Apple updated its Raw engine to include more cameras. The new update applies to Aperture 3 and iPhoto ’11. Cameras now supported include the Canon EOS-1D C, Canon EOS Rebel SL1 / 100D / Kiss X7, Canon EOS Rebel T5i / 700D / Kiss X7i, Hasselblad Lunar, Nikon COOLPIX A, Nikon D7100, Nikon 1 J3, Nikon 1 S1, and Sony Alpha NEX-3N.
Adam Broomberg and Oliver Chanarin have won the 2013 Deutsche Börse Photography Prize for their War Primer 2 publication — a collection of screen grabs and smartphone images paying homage to Bertold Brecht’s original War Primer project from 1955. Learn more on connect.dpreview.com.
A new app asks users to step back into the darkroom as it offers digital equivalents of the developing process. Koloid (available for $ 0.99 in the iOS App Store) is inspired by 19th century’s wet-plate collodion photography. The app creates a unique texture and exposure on a black and white image. Koloid takes a little longer than most camera apps but it also gives the satisfaction of using something other than a one-touch filter. We give it a go on connect.dpreview.com.
This weekend I went out with some new gear to test, namely the Hasselblad H5D medium format DSLR and Hasselblad 300mm f/4.5 lens via BorrowLenses.com. The location of choice was Asilomar State Beach. The H5D has roughly twice the resolution as my Canon 5D Mark II with a whopping 40 megapixels per image. I had been curious to find out if Hasselblad’s reputation was hype or not. To cut to the chase I’ll tell you that the reputation is justified. Focusing just on resolution for the sake of this post I’ll tell you that working with a 40 megapixel image is breathtaking especially when Hasselblad optics reveal so much sharp detail.
Fury – Asilomar State Beach, California
Above is the original image I took (7304 x 4578 pixels) before cropping it down to a ~2:1 ration (7304 x 3539 pixels). This particular composition I knew ahead of time I’d crop down into a panoramic format as much of the extreme background and foreground were uninteresting and unnecessary to include.
Fury – Asilomar State Beach, California – Detail
Above is a tighter crop into the image to highlight the sharpness Hasselblad lenses provide. This particular image was cropped down to 2604 x 1953 pixels and below is a 1 to 1 crop of the original image.
Fury – Asilomar State Beach, California – Hasselblad H5D 1-to-1 crop
In case you were curious this was the setup for the previous test shots. Expect a few more photos and thoughts on my experience with Hasselblad in the near future.
Hasselblad H5D and 300mm f/4.5 Auto Focus HC Lens
Photo Details:
ISO 100, f/13, 1/350 sec, 300mm on a H5D-40
Copyright Jim M. Goldstein, All Rights Reserved
Fury, Asilomar State Beach – Diving Into Digital Medium Format
The post Fury, Asilomar State Beach – Diving Into Digital Medium Format appeared first on JMG-Galleries – Landscape, Nature & Travel Photography.
Fury – Point Lobos State Natural Reserve, California
This weekend I went out with some new gear to test, namely the Hasselblad H5D medium format DSLR and Hasselblad 300mm f/4.5 lens via BorrowLenses.com. The location of choice was Point Lobos State Natural Reserve. The H5D has roughly twice the resolution as my Canon 5D Mark II with a whopping 40 megapixels per image. I had been curious to find out if Hasselblad’s reputation was hype or not. To cut to the chase I’ll tell you that the reputation is justified. Focusing just on resolution for the sake of this post I’ll tell you that working with a 40 megapixel image is breathtaking especially when Hasselblad optics reveal so much sharp detail.
Fury – Point Lobos State Natural Reserve, California
Above is the original image I took (7304 x 4578 pixels) before cropping it down to a ~2:1 ration (7304 x 3539 pixels). This particular composition I knew ahead of time I’d crop down into a panoramic format as much of the extreme background and foreground were uninteresting and unnecessary to include.
Fury – Point Lobos State Natural Reserve, California – Detail
Above is a tighter crop into the image to highlight the sharpness Hasselblad lenses provide. This particular image was cropped down to 2604 x 1953 pixels and below is a 1 to 1 crop of the original image.
Fury – Point Lobos State Natural Reserve, California – Hasselblad H5D 1-to-1 crop
In case you were curious this was the setup for the previous test shots. Expect a few more photos and thoughts on my experience with Hasselblad in the near future.
Hasselblad H5D and 300mm f/4.5 Auto Focus HC Lens
Photo Details:
ISO 100, f/13, 1/350 sec, 300mm on a H5D-40
Copyright Jim M. Goldstein, All Rights Reserved
Fury, Point Lobos State Natural Reserve – Diving Into Digital Medium Format
The post Fury, Point Lobos State Natural Reserve – Diving Into Digital Medium Format appeared first on JMG-Galleries – Landscape, Nature & Travel Photography.
Stephan Schulz, the Head of Professional Photo at Leica Camera AG has given an interview to Forbes.com in which he explains the opportunities – and challenges – of moving into the professional digital medium-format marketplace. Traditionally identified with 35mm (film and latterly ‘full frame’ digital), Leica announced the creation of the S2 back in 2009, and followed it with the 37MP late last year. Click through for some extracts, and a link to the full interview at Forbes.com.
Last week I wrote a post exploring 3 stupidly simple reasons why most people’s photography doesn’t improve – the first reason being that they don’t take their camera with them.
A lot of people agreed – so I thought it might be interesting to run a poll to see how many of us DO take a camera with us all the time.
We ran this poll over four years ago so it’ll be interesting to see if anything has changed since then.
Note: There is a poll embedded within this post, please visit the site to participate in this post’s poll.
Feel free to share more about your answer in comments below!
Post originally from: Digital Photography Tips.
Check out our more Photography Tips at Photography Tips for Beginners, Portrait Photography Tips and Wedding Photography Tips.
Do You Take a Digital Camera With You Everywhere? [POLL]
You’ve been reading their articles for months or years, have you ever wondered “Who are the photographers who write for dPS”?
Today we meet Jim Goldstein.
1. How long have you been shooting?
I have been behind a camera perfecting the art of photography since the mid-1990′s. I honed my skills in the days of film and have been growing every day since as a photographer, digital and otherwise.
2. Do you have a full time job or are you a full time photographer?
I was a full-time professional outdoor photographer for sometime, but given my knack for social media & marketing I was recently recruited by BorrowLenses.com to help head up their marketing department.
3. If you had to limit yourself to one genre of photography, what would it be and why?
That is much easier said than done, but I would say Outdoor Photography.
4. When did you start writing for dPS and why?
I began writing for Darren the first day he opened his site to authors other than himself in early 2008. I pursued writing for DPS because I’m deeply passionate about sharing with the photography community at large. I strive to share my expertise, ideas and inspire others.
5. What do you shoot with and what’s your favorite lens?
These days I shoot with a Canon EOS 5D Mark III when ever I have the opportunity, but always have my trusty Canon 5D Mark II with me as well. My favorite lens at the moment is a Canon EF 50mm f/1.0L lens as it is the newest lens to my collection, but the bulk of my work is shot with a Canon EF 16-35mm f/2.8L lens.
6. What would be your number one tip to any new photographer?
Be persistent. I can’t begin to tell you how many times I was frustrated along my journey as a photographer. Very early on, when I was 15, I stopped because of it. Only after college did I return back to try again and to push my way through the learning process. Ever since I’ve embraced each challenge to push my limits and test my creativity.
7. What’s your next big project?
My next big project is a follow up to my ebook Photographing the 4th Dimension – Time.
8. Where can people go to find out more about you and your work?
People can see my photography and writing on my blog: JMG-Galleries blog, my social media pages Google+, Twitter & Facebook and my ebooks/webinars at InspiredExposure.com.
Post originally from: Digital Photography Tips.
Check out our more Photography Tips at Photography Tips for Beginners, Portrait Photography Tips and Wedding Photography Tips.
Meet The Photographers Who Write For Digital Photography School ~ Jim Goldstein
Being able to store old videos in digital formats has helped preserve some of the world’s most important footage. It has also helped us keep all of our old family memories intact without worrying about ever losing that video of Dad at the beach or the family at Disneyland. The problem with digital, though, is that it takes away a certain kind of connection to the video.
The Bioscope is an interesting project from Jon Stam and Simon de Bakker that reappropriates digital, previously-analog footage into a once-again analog format. The Bioscope is a kind of hand-held one-person cinema experience. Its shape was based on a child’s video viewer toy, a small plastic device through which one could look while turning a hand crank. A video would magically play through the viewfinder, much to the amazement of the child lucky enough to play with this amazing toy.
The same kind of wonder and amazement are recreated with the Bioscope. Digital video is fed into the device via a USB stick. From there, the functionality is up to the user. Turning the crank on the side quickly will make the video play fast; turning it slowly will play the video back in nostalgia-filled slow motion. The movement of the pictures is entirely up to you; if you stop cranking, the pictures stop moving.
While it is an unusual step backward in technology, the creators insist that this is necessary for us to again become connected to our data, to our memories, to our lives. Interacting with our memories in this more tactile, physical way allows us to form new bonds with them and attach new emotions to those images captured long ago.
iPhones, and internets, and ion implanters! Oh my!
In this tech-savvy world we can return to 100%-analog-photog-goodness and transform them to digital with some simple scanner-wizardry.
This handy guide will show you how to scan your film, merging all of the sweetest parts of analog with the ease and shareability of digital.
The best part? You don’t have to know a thing about rocket science to follow along.
Learn How to Scan Film!
p.s. Our buddies at Printstagram make some of the bestest Instagram prints we’ve seen! You can make it happen right from your phone.
Why it’s Cool:
We all know the benefits of analog photography: slower pace, limited number of frames, and those old cameras are just plain fun to use.
The only downside? Your inner tech maven is crying out for all of those lost shares on Facegram, instabook, and PinTube! Or something like that.
This guide will equip you with the tools to get started on making film grains best friends with digital pixels.
Ingredients:
Film Scanner (We used a flatbed Epson V600.)
A computer
Developed 35mm film
Dust Blower, Microfiber Cloth, or Anti-Static Brush
Flatbed Scanners vs. Dedicated Film Scanners
There are a few brands of scanners, but they mostly fit into two categories for consumers: flatbed scanners and dedicated film scanners.
This article will be dealing specifically with an Epson V600 flatbed scanner, but many of the techniques will still apply, especially to other flatbeds!
Here’s a quick rundown of the pros and cons of a flatbed scanner.
Cost: For the most part, a flatbed is a very reasonable option in terms of price and quality.
Uses: In addition to being affordable, many flatbeds are able to do both 120 and 35mm, something usually reserved for very expensive dedicated scanners.
Ability: Flatbed scanners are certainly capable of great results, but a dedicated scanner is always better. After all, that’s what it’s built for!
Step 1: Prepping The Film
Here’s what we need to do to the film in order to ensure the best scan.
Dust bunnies sound cute, but for scanning, they are not your friend! Use a dust blower, a clean microfiber cloth (Extra emphasis on clean! There’s nothing worse than scratched film), or an anti-static brush to get rid of any dust that may have settled on the negative.
Tips for preventing dust:
Break Out The White Glove: make sure your working environment is as clean as possible. If there’s no dust in the are to begin with, there won’t be any to go on your film.
Pre and Post-Scan Storage: Store your negatives in sleeves or binders to keep exposure to open air as infrequent as possible.
Dust During Drying: If you develop your own film, try to limit either the air flow around your film as it dries or the dust in the environment. Wet film and dust stick better than glue!
Step 2:Insert Film Into The Negative Holder
One of the greatest challenges with scanning is film flatness.
The scanner works a bit like your camera; it focuses on the film to take a “picture” of it. If your film isn’t flat, it’s harder for everything to be in focus. A little curl is manageable.
Place film under a book to flatten unruly negatives, but make sure they’re in a sleeve so they don’t get dusty or scratched.
Each negative holder is a bit different, but here’s how it’s inserted into ours.
Step 3: Place Negative Carrier Onto Scanner
This one’s as easy as it sounds! Each scanner has a specific orientation for the negative carrier depending on the film type.
On the Epson V600, there’s an “A” on the negative carrier that should line up with the “A” on the side scanner bed.
If your scanner doesn’t have markings, make sure to place the negative carrier under the slot of glass in the top of the scanner.
Step 4: Scanning Software
This step will also be specific to your scanner. We’re using the included Epson Scan software in Professional Mode.
Here are the main points:
Make sure to choose the “Film” setting and then the appropriate type: black and white, color negative, or positive
Choose the resolution: for files that are easy to work with and great for web use, we set ours to 1200 DPI. If you have plenty of space on your harddrive or want to print above an 8×10, scan at a higher resolution to get a larger image
Don’t forget to switch on Dust Removal to get any spots you missed earlier
First, hit the preview button and let the scanner generate a preview. At this point you can rotate the photo and mirror the image if the film isn’t oriented correctly.
Lastly, choose the file format for the scan and you’re good to go! We usually scan ours as jpeg. A TIFF can provide more information, but at the cost of much larger files. If you need to make corrections to a scan it’s a better option, but for many sharing purposes a jpeg is sufficient!
There are a few third party software options for scanning as well, and our favorites are VueScan and Silverfast.
The advantage to these programs is that they offer more customizability and control over the scanning process. Plus, they have some neat tricks such as setting the film stock to try to get the most faithful result. They’re both friends with PC’s and Macs!
Step 5: Final Touches
Once the scan is completed, you have a few choices of where to go next. You can take the scan “as is” and go from there, or import into Photoshop, Lightroom, and other editing programs to make some slight changes.
Sometimes a few tweaks are needed after the fact so that the imagined picture lines up with the actual picture!
Some post-scan adjustments
Contrast: This is a big one for black and white. Adjust the contrast so that it’s more faithful to the look of the negative
Color: Sometimes a scan will have a shift in colors or have an overall color cast that’s undesirable. The curves adjustment will be your BFF. Utilize the separate color channels to get the look right.
Sharpness: Sharpness can be detrimentally affected by the scan. Apply a little unsharp mask or boost the sharpening slider in Lightroom to taste.
Dust and Scratch Removal: Despite our best efforts, dust can still remain on the negative and sometimes they get scratched as well. An easy way to fix this is to use the healing brush or clone brush in Photoshop.
This isn’t to change the look of the film, but sometimes this information gets skewed in the scan and needs to be returned to the appropriate value.
Taking it Further
Try it with medium format!
Try using your DSLR and a macro lens to scan!
Ditch the film. Use your scanner as a Camera!
Related posts:
Meet Mr. Digital Clover, A Keychain Camera with Film Camera Appeal Extra photos for bloggers: 1, 2, 3 Bus rides can…
How-To: Turn Digital Photos into Artistic Sunprints! Extra photos for bloggers: 1, 2, 3 Boy, do we…
Keep Your Film Safe on Plane Trips Extra photos for bloggers: 1, 2, 3 The airport x-ray…


 I was a full-time professional outdoor photographer for sometime, but given my knack for social media & marketing I was recently recruited by BorrowLenses.com to help head up their marketing department.
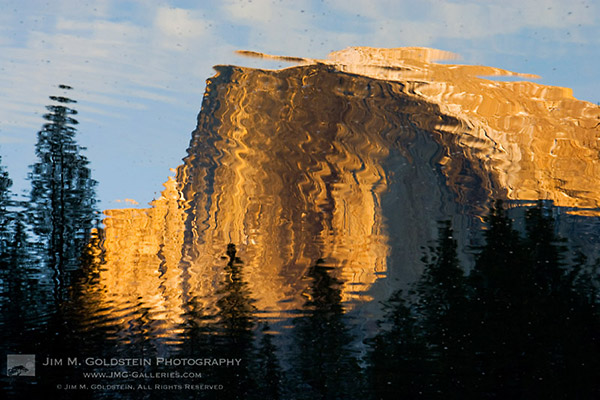


 We all know the benefits of analog photography: slower pace, limited number of frames, and those old cameras are just plain fun to use.
 There are a few brands of scanners, but they mostly fit into two categories for consumers: flatbed scanners and dedicated film scanners.
 Here’s what we need to do to the film in order to ensure the best scan.
 One of the greatest challenges with scanning is film flatness.
 This one’s as easy as it sounds! Each scanner has a specific orientation for the negative carrier depending on the film type.
 This step will also be specific to your scanner. We’re using the included Epson Scan software in Professional Mode.
 Once the scan is completed, you have a few choices of where to go next. You can take the scan “as is” and go from there, or import into Photoshop, Lightroom, and other editing programs to make some slight changes.
You must be logged in to post a comment.