RSS
 

Posts Tagged ‘Creative’

Creative Ways to use Keywords in Lightroom 5

05 Dec

Andrew S. Gibson is the author of Mastering Lightroom Book One: The Library Module, on offer now at Snapndeals for a limited time.

Keywords in Lightroom 5

One of the things about any software, such as Lightroom 5 that does a lot of things, is that many photographers tend to use only a small number of the available features. For example, I’ve never bothered to use the keywords feature much in Lightroom. I’ve always seen it as a waste of time. It takes time to add keywords to images and I don’t really need keywords to search for images – I know where to find them already.

But since I started writing about Lightroom, and reading what other photographers have written about it, I’ve realised that there are a lot of good reasons to use keywords, and that used wisely they can actually save time.

Like many things, it’s a matter of balance. The more keywords you use the harder it is to keep track of them all and the reasons that you added them, and to maintain a consistent approach (exception: if you shoot stock you will want to use lots of keywords as they are an essential part of your work).

If you use just a few keywords, it’s easy to remember which ones you use and why.

Let’s look at a couple of examples of creative ways to use keywords in Lightroom 5. Of course, if you have any suggestions, please leave them in the comments. I’m curious to see how you use keywords.

Keep track of the kids

I really like this one (thanks to Robert Taylor for the suggestion, he left in the comments on Using Lightroom Collections to Improve your Workflow). If you have children, add their name as a keyword when you import the images that you take of them. Then you can create a series of Smart Collections that searches for images with that keyword and organises them by year.

Create a yearbook

Keywords in Lightroom 5

Back before digital photography became the norm, a photographer’s best work ended up as prints or as slides. Today, the finished article is often a digital image stored on a hard drive or uploaded to a website. One of my current projects is organising my best images from every year since I’ve owned a digital camera, and picking the best to create a yearbook. The ultimate aim is to use Blurb to create a book creating my favourite photos taken each year, over the last eight years, and to carry this forward throughout my life. Not just for me, but for posterity. These books will hopefully make great gifts for younger family members.

Method: add the keyword “yearbook” to suitable images, then create Collections to house those images.

Taking it further: This could be applied to all sorts of ideas. For example, I could use it to create a book (or simply a collection) of my favourite images taken here in New Zealand. All I need to do is add the keywords “New Zealand” and “book” to candidate images, then perform a search.

Using keywords

Excited? I hope so, because the more you delve into Lightroom’s Library module ,the more you’ll find ways to simplify how you organise your images. Keywords are no exception. Now let’s look at the different ways you can actually apply keywords to your images in Lightroom. There are several options:

Keywords in Lightroom 5

Adding keywords when you import images

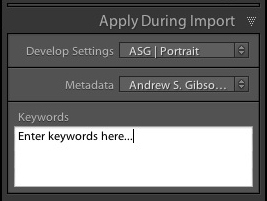
This method works well if you tend to import images in groups, according to subject matter. For example, if you take some portraits one day, some landscapes the next, and import them all in one go you can’t really add subject specific keywords. But if you import the images from both shoots separately you can add keywords at the import stage (for example, the name of the model to the portraits, and the name of the location to the landscapes). You can do this in the Apply During Import panel on the right-hand side of the Import window.

Use the painter tool

Keywords in Lightroom 5

The Painter tool is an easy way to add keywords to images while you are in Grid View. Click on the Painter icon in the Toolbar (it looks like a spray paint can – press the ‘T’ key to reveal the Toolbar if you don’t see it) and select ‘Keywords’ from the drop-down menu. Type in the keywords you want to add (in the box just to the right). Now all you have to do is click on a photo thumbnail to add those keywords to that image. It’s a very fast way of working in Grid View.

Use the Keywording panel

Keywords in Lightroom 5

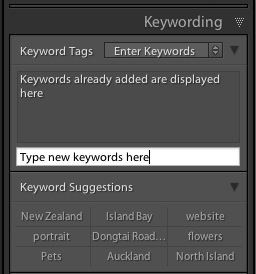
The Keywording panel is located in the right-hand panel in the Library module. To add keywords, select the image (or a group of images) and type the new keywords into where it says ‘Click here to add keywords’. Any keywords already given to the image are displayed above. You can also add keywords by clicking on any that appear under Keyword Suggestions (populated by keywords you have used in the past).

Use Keyword Sets

Keyword Sets are found at the bottom of the Keywording panel. They are there to help you organise your keywords, and overcome the problem caused by the fact that it becomes more difficult to maintain consistency the more you use keywords.

Keywords in Lightroom 5

For example, I live in a suburb of Wellington called Island Bay. If I take photos here then I should keyword them with “Island Bay”. But what if one day I use the keyword “Wellington” instead? Or even forget to keyword them completely? Then the power of keywording is diminished, because those photos won’t be picked up in any search based on the keywords “Island Bay”.

The solution is to use a Keyword Set. For instance, I could create a Keyword Set called Island Bay, and add Keywords such as Island Bay, Wellington, New Zealand, landscape, portrait. Then, when it comes to adding keywords, I can select the Island Bay keyword set first, then click on the appropriate additional keywords. This ensures consistency by ensuring that I select my keywords from a pre-determined pool.

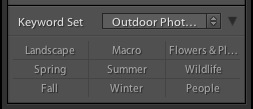
There are several Keyword Sets included with Lightroom, with titles such as Outdoor Photography, Portrait Photography and Wedding Photography. You can access them via the drop-down menu at the top of the Keyword Set section of the Keywording panel. This menu also gives you the options to create your own Keyword Sets.
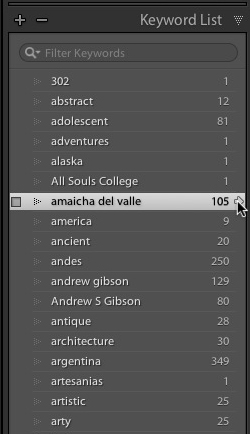
Keywords in Lightroom 5

Keyword List

The Keyword List panel lists all the keywords that you have applied to images in your Lightroom Catalog. If you want to see all the photos tagged with a specific keyword together, hover over the keyword and click on the white arrow that appears on the right-hand side. Lightroom brings them together in Grid View. This is one way of searching images by keyword.

Finding keyworded images

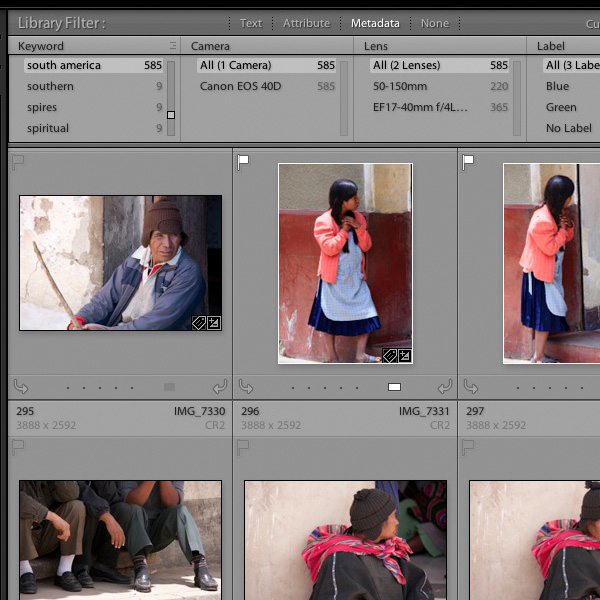
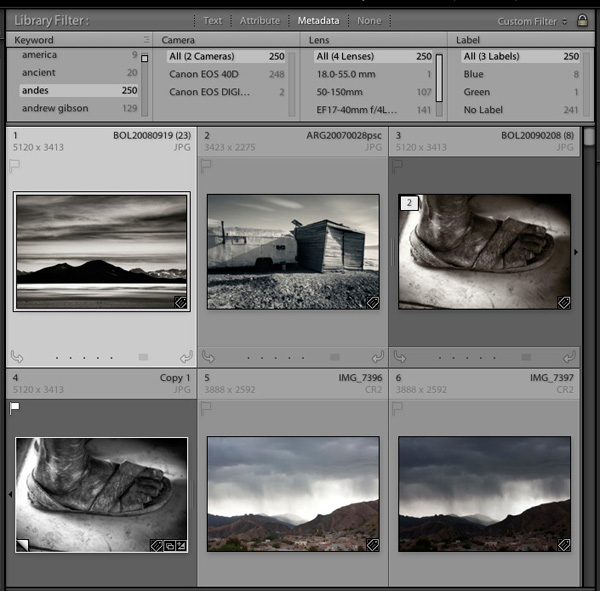
The easiest way to find keyworded images is to go the Filter Bar (press the ‘\’ key if you don’t see it) in Grid View and click on the Metadata label. Select “Keyword” from the drop-down menu in the first column. Lightroom displays a list of keywords underneath. Click on a keyword – Lightroom gathers all images tagged with that keyword together. You can limit the search to specific Folders or Collections by selecting them in the left-hand panels (or select “All Photographs” to search your entire catalog).

Keywords in Lightroom 5

Using Smart Collections

Keywords in Lightroom 5

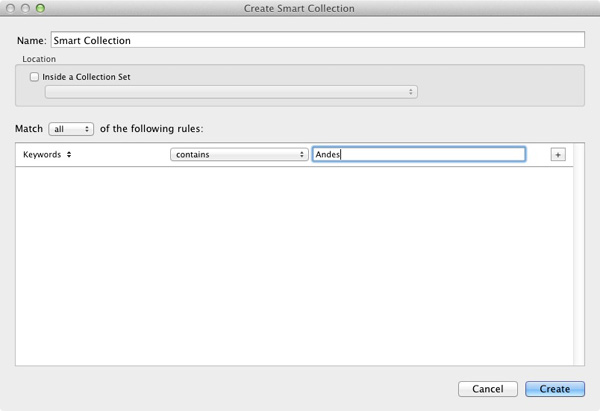
Finally, you can use Smart Collections to gather together images tagged with specific keywords automatically. Go to the Collections panel, click on the ‘+’ icon in the top-right corner and select the Create Smart Collection option. Set Match to All, select ‘Other Metadata > Keywords’ from the drop-down menu in the first column and then type the required keyword in the blank space provided. The example shows a very simple Smart Collection, you can make it as complex as you like by adding extra rules (remember to give your Smart Collection a name, in the example above “Andes” would be applicable).

Additional learning – Mastering Lightroom eBook

Keywords in Lightroom 5

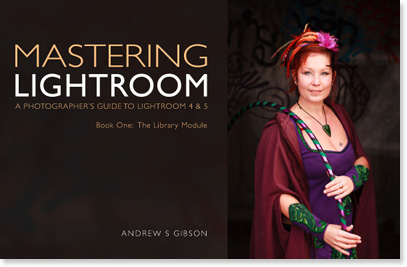
My latest ebook Mastering Lightroom Book One: The Library Module is a complete guide to using Lightroom’s Library module to import, organise and search your photo files. You’ll learn how to tame your growing photo collection using Collections and Collection Sets, and how to save time so you can spend more time in the Develop module processing your photos. It’s available now for a special price at Snapndeals for a limited period.

Post originally from: Digital Photography Tips.

Check out our more Photography Tips at Photography Tips for Beginners, Portrait Photography Tips and Wedding Photography Tips.

Creative Ways to use Keywords in Lightroom 5

The post Creative Ways to use Keywords in Lightroom 5 by Andrew Gibson appeared first on Digital Photography School.


Digital Photography School

 
Comments Off on Creative Ways to use Keywords in Lightroom 5

Posted in Photography


Breaking Down the Creative Process

03 Nov

I’ve been thinking quite a bit lately about the creative process. When we talk about “creativity,” people generally end up putting themselves into one of two categories– creative or not creative. I’m always amused– and a bit leery– when people who consider themselves creative say that they have no creative process. That ideas “just come” to them. I’m not buying it. I can’t help but ask if ideas really do just come to them, or have they refined and streamlined their process to the point that they don’t even recognize it as a process? And if there really is a process, can someone who thinks they aren’t creative follow a series of steps that can help them become creative? The truth is, everyone has creative potential.

Graham Wallas (1858-1932) was an English social psychologist and co-founder of the London School of Economics. In Art of Thought – The Model of Creativity, written in 1926, Wallas broke down what we now refer to as the “creative process” into four distinct stages– Preparation, Incubation, Illumination, and Implementation. I’ve seen his approach described in several sources recently and over the years, but few ever seem to give any proper credit to the source material, espousing these thoughts and concepts as if they were original ideas. And so, Graham Wallas– this one’s for you, with my thanks.

guyer-photography-graham-wallas

Preparation

It sounds simple, and maybe a bit obvious, but this first step really does lay the foundation for the entire process. Writers write, read, research, and revise. Musicians practice and rehearse. They listen to music– sometimes their own, sometimes that of their influences. Painters experiment with color and visit museums. They sketch. As a photographer, what are you doing to prepare? Do you have influences and inspiration? Do you look to other art forms? How will you nurture an idea once it’s formed? We all draw from different emotional resources, but one thing that every creative has in common at this stage in the process is that the steps can actually be pretty boring. We may enjoy walking through museums or scouting locations, and they may get the creative juices flowing,  but they are not the exciting part of the process. Preparation is, quite simply, evaluating your creative options and beginning to come up with a plan.

Incubation

For me, this is where the fun begins– partially because half the time I don’t even realize it’s happening.  This is the stage where those first hints of a hopefully great idea are bouncing around in my head.  This is when I’m sitting in the car at a red light and happen to notice how the sun is hitting an object.  This is the stage when I’m flipping through a magazine  and an off-handed remark in an article brings the whole project into focus (no pun intended).  During the incubation step your conscious AND subconscious minds are working on the idea.  Wallas talked about the incubation stage being one where no real direct thought was given to the project or idea. Have you ever tried forcing an idea? It doesn’t usually work, right? Just like you sometimes have to take a break and clear your head, diverting your thoughts to other problems or projects– or to nothing at all– during the incubation stage may be just what you need for you to find yourself at…

Illumination

This is the “A-hah!” moment.  When this moment hits, your creative urge is so strong that you just have to get the idea out of your head and into its medium (camera, canvas, paper, etc.)– usually to the point that you have no problem ignoring or losing track of everything else going on around you.  The biggest problem with my illumination moments is that they usually happen at the most inconvenient times (in the shower, driving, middle of the night, etc.). It’s going to happen when it happens. You’ve had all these preparatory elements bouncing around– incubating– inside your head that when they do finally snap into a coherent form, it’s almost like the wheels on a Vegas slot machine coming to rest in perfect alignment.

Implementation

This is where your idea sees the light of day.  You’re taking conscious, positive steps towards executing your idea. Remember, though, that implementation in and of itself does not mean that your idea is going to be a success. This is also the point where a good creative begins to evaluate the idea and determine whether it was a good or bad idea.  Until you have something tangible to show for your idea, it’s almost impossible to decide whether this theoretical notion you’ve been nurturing through the process can be a success.  How many times has the idea or image in your head not matched the photo in your camera?  For every great idea, there are several I wish I’d never had.

Bringing it All Together

Obviously, we’re not talking about flow charts or checklists. Each of these “steps” is really more like part of a gradient– soft edges overlapping as you move from dark to light. As you know from your own experience, sometimes this process runs start-to-finish in the blink of an eye, but it can also take weeks. You just never know. While they may not always be clearly defined as you process each idea or project, it can be extremely helpful knowing what they are and how to identify them. Being able to recognize where you are on a creative journey can often be the confidence boost you need to see something through from preparation to implementation.

Post originally from: Digital Photography Tips.

Check out our more Photography Tips at Photography Tips for Beginners, Portrait Photography Tips and Wedding Photography Tips.

Breaking Down the Creative Process

The post Breaking Down the Creative Process by Jeff Guyer appeared first on Digital Photography School.


Digital Photography School

 
Comments Off on Breaking Down the Creative Process

Posted in Photography


5 Creative Ways to Find New Locations to Photograph

05 Oct

There’s truly nothing like visiting a location for the first time – I absolutely love it and I strive to always photograph at least one new location a month.

When I started on my photography journey this wasn’t a hard challenge to meet as even my own backyard was new to me and my camera, but as time went on things got a bit more difficult. New locations became ‘go-to’ spots and there came a point where I was only photographing at places that I had previously visited.

While I’d love to travel the world on a whim I just don’t have the means or time to do so which severely limits the range of my ‘new locations’ to places within driving distance from my house. As a result I’ve developed this list of useful techniques for getting the most out of my local area and I hope that it will help you do the same!

Creative Ways to Find New Photography Locations

#1 – Stuck on Earth

While Google Maps, Google Earth and Google’s Street View tools are great for getting location data, one of the best tools that I’ve used to find locations to photograph is the amazing app created by the people at Stuck in Customs called Stuck on Earth.

It works by fusing Flickr location data with a beautiful map to give you an amazing resource of not only useful locations, but the photographs other photographers have taken at those locations.

On top of searching random locations for photographs that have been tagged in various locations around the world, they have top location lists that have been curated by actual photographers to showcase the best photographs in cities around the world. There’s a bunch of other cool features as well and I highly recommend it as a resource (after all it is free).

You can find out more about it here.

#2 – Join a Photo Club

I’d have to say that one of the best ways to get out and find new locations is by meeting new people local to your area. Even if you’ve lived there your entire life odds are someone else has found interesting locations you haven’t – or better yet – has been able to find a new perspective on a location you thought you’ve picked clean.

Photography clubs often will also hold photo walks which will help you get out to different locations many of which might become your new ‘go-to’ spot when you’re in a pinch to get on location before sunset. It’s a great experience and I highly recommend trying it if you haven’t done so yet.

Have you ever gone on a photowalk? Tell us about the experience in the comments!

#3 – Make an Old Place New By Going At Night

One trick that I’ve done is not necessarily to find a new location, but instead to photograph the same location in the middle of the night.

A-lot-of-Stars

Night changes the way we perceive the world and will more than likely change the way you see a familiar location. It opens up a whole new set of challenges and pushes your camera to its limits of low light image capture, but in my opinion it’s one of the most fun types of photography there is.

Read more about photographing at night here.

#4 – Buy a Guide Book to Your Local State

Guide books might seem dated these days with instant access to so many great tools online, but there’s something to be said about a good guide book that has a friendly voice guiding you to the spots, telling you what to expect, where to park and when the best time to visit is.

Trap Falls 2013

I never would have found out about Trap Falls (pictured above) if I hadn’t gotten a guide book detailing the hundreds of waterfalls and cascades that New England has to offer. It’s amazing the detail that the book goes into about not only where the waterfalls are, but how difficult the hikes are, and how picturesque the fall is.

There are tons of great guide books on Amazon and other bookstores and many of them can be downloaded as eBooks right to your phone or eReader so you can take it with you on your trip!

#5 – Fill up your tank and just drive

Finally, if all else fails, just fill up you tank and drive. One of my favorite things to do is pick a highway and a direction and tell myself, “I’m driving for 50 miles and taking the first exit I see after that”. What I end up doing is putting myself into an unknown town with all sorts of new things to see. I like to bring a friend along for the ride to keep me company as well as a second pair of eyes so that I can be sure to see potential photography opportunities.

Double Yellow

Of course it’s not a fool proof plan and driving around aimlessly can be a bit tricky. While it’s certainly possible that you’ll find a location you might otherwise have overlooked – it’s nearly just as likely that you’ll spend your day driving around with nothing to show for the effort, time and gas you burned.

How Do You Find New Locations to Photograph?

Okay now it’s your turn to help build upon this list – I’d love to hear what techniques you use to continue to discover new locations – leave a comment below and let us know!

Post originally from: Digital Photography Tips.

Check out our more Photography Tips at Photography Tips for Beginners, Portrait Photography Tips and Wedding Photography Tips.

5 Creative Ways to Find New Locations to Photograph

The post 5 Creative Ways to Find New Locations to Photograph appeared first on Digital Photography School.


Digital Photography School

 
Comments Off on 5 Creative Ways to Find New Locations to Photograph

Posted in Photography


Getting Creative with Aperture and Colour

19 Sep

Creative use of aperture and colour


Andrew S. Gibson is the author of Mastering Photography: A Beginner’s Guide to Using Digital Cameras, on offer now at Snapndeals for a limited time.

You are probably already familiar with the effect of aperture on your images. If not, here’s a quick recap: for any given focal length and camera-to-subject distance, use a wider aperture to get less of the image in focus. There’s a fair amount of science behind that statement (some of it subjective, such as the definitions of depth-of-field and sharpness) but the end result is that you can use wide apertures to limit depth-of-field and add a real creative edge to your images. Note that you’ll get the best results with a prime lens as they have wider maximum apertures.

I’m writing about using wide apertures in this article because they are exciting. You can use them to do wonderful things with composition, focus and colour. Today I’m going to concentrate on the relationship between aperture and colour, something that I hadn’t really thought about before until someone pointed it out in a comment on a previous article. It made me realise that a wide aperture alone isn’t enough to make a good image. Light (as always in photography) is important, and (unless you’re working in black and white) so is colour.

Creative use of aperture and colour

Here’s an example. I used an 85mm lens and an aperture of f2.0 to create a portrait with very little depth-of-field. Now, look at the model. She has fair skin and dark hair. She’s wearing a black top over another green top. There is very little colour. I emphasised that by placing her against a grey coloured background. I darkened the background in Lightroom and reduced the saturation. The end result is a portrait with a lot of neutral light and dark tones and very little colour. The colour has become a subtle and understated part of the composition.

Creative use of aperture and colour

Here are two more portraits. They were taken during the same shoot, just with different backgrounds. In both cases I moved the model away from the background so that it would go out of focus. The idea here was to have fun and play around with the colours. Unlike the previous example the colours are strong, rather than subtle.

The background in both portraits was a painted door. Perhaps it’s also another example of seeing – where many photographers would see a door I saw colour, because I understood that I could throw the doors out-of-focus by choosing the right lens and aperture.

Creative use of aperture and colour

This portrait has a different approach. We took the photos in a children’s playground, and I noticed that the model’s jumper was nearly exactly a match with the colour of one of the plastic climbing frames. I was able to position her so that the colour of the background (out of focus again) matched her jumper.

The key in all these photos is first in observing the colours (seeing what is actually happening in the scene) and then finding interesting ways to work with the colour palettes presented by the combination of clothes worn by the models and the environment we were in. None of these were pre-conceived concepts. I was simply reacting to the circumstances given to me.

It’s also part of learning about how lenses and aperture work. Once you understand that you can make the background go out of focus by moving your model away from it and using a short telephoto lens with a wide aperture, you can start seeing what the camera sees, rather than what you see when you use your own eyes.

Mastering Photography

Creative use of aperture and colour

Would you like to learn more about aperture and the other important settings on your digital camera? My latest ebook, Mastering Photography: A Beginner’s Guide to Using Digital Cameras introduces you to digital photography and helps you get the most out of your camera. It covers concepts such as lighting and composition as well as the camera settings you need to master to take photos like the ones in this article. It’s available now at Snapndeals for a special price for a limited period.

Post originally from: Digital Photography Tips.

Check out our more Photography Tips at Photography Tips for Beginners, Portrait Photography Tips and Wedding Photography Tips.

Getting Creative with Aperture and Colour


Digital Photography School

 
Comments Off on Getting Creative with Aperture and Colour

Posted in Photography


Cokin revamps square filter lineup as ‘Creative Filter System’

06 Sep

CFS-logo.jpg

Cokin has announced a complete overhaul of the branding and packaging of its square filters. The existing different-sized ranges ( ‘A’, ‘P’, ‘Z-Pro’ and ‘X-Pro’) have been rebranded into a single ‘Creative Filter System’, with the four sizes relabelled ‘S’, ‘M’, ‘L’ and ‘XL’. Gone are the old bulky plastic storage boxes too, replaced by a slimmer ‘SlidePack’ design which takes up half the space, and uses a microfibre-lined sleeve to help keep your filters clean. Photographers nostalgic for the good old days can breathe a sigh of relief though – old classics such as Tobacco Grads and Sunset filters are still in the catalogue.

News: Digital Photography Review (dpreview.com)

 
Comments Off on Cokin revamps square filter lineup as ‘Creative Filter System’

Posted in Uncategorized


Adobe introduces cheaper Creative Cloud with Photoshop + Lightroom

05 Sep

shared:AdobeLogo.png

Adobe has added a new pricing tier to the Creative Cloud product, possibly in response to the negative response from the photography community when it announced that all Creative Suite products would require a monthly subscription. The Photoshop Photography Program gives users Photoshop CC, Lightroom 5, Bridge CC, Behance, and 20GB of storage for $ 9.99 per month. That’s not a promotional price, either, as long as you sign up by the end of this year. You must already own Photoshop CS3 or newer to be eligible for this offer.

News: Digital Photography Review (dpreview.com)

 
Comments Off on Adobe introduces cheaper Creative Cloud with Photoshop + Lightroom

Posted in Uncategorized


3 Questions to Answer Before You Fly into Adobe’s New Creative Cloud

09 Aug

Adobe’s announcement of their decision to switch to a subscription-only model has sparked off hot debates on whether they are justified in making this move. The Internet is flooded with concerns expressed by users of Adobe software – especially Photoshop – on whether they can now afford to continue using the software. Doing so will mean they would have already Continue Reading

The post 3 Questions to Answer Before You Fly into Adobe’s New Creative Cloud appeared first on Photodoto.


Photodoto

 
Comments Off on 3 Questions to Answer Before You Fly into Adobe’s New Creative Cloud

Posted in Photography


Discover These Stunning Creative Lighting Techniques That Will Electrify Your Photos

03 Jul

Light is photography.. Without it, photographs would make for some of the dullest looking objects; as pointless an activity, as that of watching a documentary on the beauty of rainbows on a black and white television set! Many first time photographers struggle with the fundamentals of lighting, I certainly did, as there are so many options and choices available to Continue Reading

The post Discover These Stunning Creative Lighting Techniques That Will Electrify Your Photos appeared first on Photodoto.


Photodoto

 
Comments Off on Discover These Stunning Creative Lighting Techniques That Will Electrify Your Photos

Posted in Photography


DxO releases FilmPack 4, with 65 new creative effects

05 Jun

DxO_FilmPack_4_-_Expert_Edition.png

DxO has announced availability of FilmPack 4, the fourth version of its film-simulation software. FilmPack 4 adds 65 ‘even more aesthetically-pleasing renderings’. Available in two editions, Essential and Expert, a single DxO FilmPack 4 license can be used as a plugin for Adobe Photoshop, Adobe Photoshop Elements, Adobe Photoshop Lightroom, Apple Aperture, and DxO Optics Pro, and as a standalone application for Mac and Windows. Click through for the press release.

News: Digital Photography Review (dpreview.com)

 
Comments Off on DxO releases FilmPack 4, with 65 new creative effects

Posted in Uncategorized


10 May, 2013 – The Adobe Creative Cloud Storm

10 May

Adobe is moving its Creative Suite apps, including Photoshop, to the Cloud. What does this mean for photographers, both Pros and amateurs?

Find out what I think in Clouding The Issue.


 "Every time I go back to a module I had already seen, I learn additional things.  I have never seen tutorials that have the excellent mix of what the features are, 
how to use them, enough of the under-the-hood information 
and concepts so that I can utilize the features creatively and efficiently, 
and just enough humor to keep the motivation level high.  Wow!"


The Luminous Landscape – What’s New

 
Comments Off on 10 May, 2013 – The Adobe Creative Cloud Storm

Posted in News