RSS
 

Posts Tagged ‘Creative’

Creative Reasons to use Intentional Camera Movement

14 Jun

One of the earliest lessons you likely learned as a photographer was the importance of keeping your camera steady and stable. You wanted tack-sharp focus, so you learned to tuck in your elbows and support your camera properly. But why limit yourself when there are so many creative reasons to move your camera?

intentional camera movement, ICM, blur, motion blur, how to, sunrise

Try Intentional Camera Movement or ICM

ICM is the abbreviation for Intentional Camera Movement, a term that covers a wide range of photography situations. What brings these different situations together is the fact that rather than remaining still, the camera itself is moving while the photograph is being taken. This creates a wide-range of creative effects and abstract images, like the sunrise image above.

In order to capture recognizable blur, you need to shoot at a slow enough shutter speed to capture significant motion. A quarter to a half-second or longer is a good place to start. Shooting in Shutter Priority mode allows you to set a longer shutter speed, and your camera will choose an appropriate aperture. If the picture is too light or too dark, you may want to consider dialing in all of the settings in Manual mode. You can also achieve ICM style shots with a point-and-shoot camera in darker situations, where your camera will select for a longer shutter speed. (Both of the panning shots, below, were taken with a point-and-shoot camera in Program mode.)

Try Panning

Panning is one specific type of intentional camera movement. Rather than being random movement when panning, the movement of the camera mimics the relative movement of the subject. This results in an unusual composition where a moving subject appears frozen and the background of the image becomes blurred and conveys the sense of motion.

intentional camera movement, ICM, panning, people, motion, blur, blackandwhite

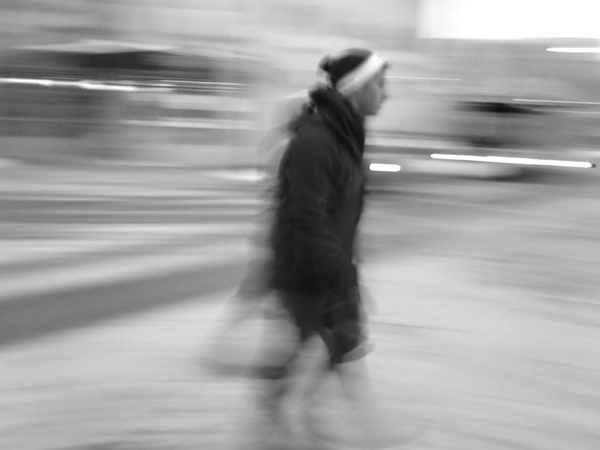
Panned at 1/4 of a second – if you want less blur use a slightly faster shutter speed like 1/30th

The tricks behind panning are in the focus and the follow-through. A moving subject and a moving camera can confuse your camera’s autofocus, so you will get better results if you use back-button focus or pre-focus the camera to the right distance and then switch it into manual focus mode. Either technique will keep the camera focused at the right distance, and you will not waste time waiting for your autofocus to lock on to your subject.

The second trick for panning is in the follow-through: both before and after you take the shot. Just like in golf or baseball, the smoothness of the swing comes from continuing the motion before and after the point of contact (hitting the ball or hitting the shutter). If you want smooth motion blur in your panning image, you need to be moving and following your subject both before and after hitting the shutter.

intentional camera movement, ICM, panning, motion, blur, car, vehicle

Panned at 1/8th of a second

The best way to get a feel for the mechanics of panning is to practice the movement without actually hitting the shutter and taking a photograph. Practice keeping your subject in approximately the same place within your viewfinder as it moves past you. For example, if you are trying to capture a panning shot of a car, begin by locating the car in your viewfinder when it is a short distance away from you. Swing the camera to follow the motion of the car as it approaches, passes, and zooms away from you. Once you have been able to successfully track a few cars and keep them in the frame, try repeating the same process but press the shutter button midway through the motion. Continue to follow the car with the camera as the shutter closes, and you will find you have a much smoother feel and flow to the final image.

Shooting a few successive frames using High Speed or Burst mode can help get a successful panning image also.

Try a Zoom Burst

A zoom burst is another specific type of intentional camera movement. Rather than moving the entire camera, during a zoom burst shot you move the lens and zoom it in or out while the photograph is being taken. The more focal lengths covered by your camera lens, the greater the zoom effect will appear to be.

intentional camera movement, ICM, zoomburst, zoom, motion, blur, christmas lights, abstract

18-270mm lens, 4 seconds at f/13, ISO 100 on a tripod

The bright points of light on a Christmas tree provide an excellent subject for a zoom burst shot, as each individual light renders as a bright streak across the image, making for a feeling of achieving warp speed and rocketing forward into the photograph. This shot had a shutter speed of four seconds and was taken hand-held, with one hand holding the camera and the other rotating the zoom lens during the shot. The slight bumps and jumps in the lights are a result of the movement of the camera body due to camera shake and the added motion from zooming the lens.

intentional camera movement, ICM, zoomburst, zoom, autumn, leaves, abstract, motion, blur

10-24mm zoom lens, ISO 100, 1/25th at f/22

Zoom burst shots can be of any subject, not just bright points of light. Here, the variations in color of the fallen leaves provide a colorful backdrop for the motion and lines of the zoom burst effect. This shot also demonstrates that you can achieve a zoom burst effect with a smaller range, as this image was shot hand-held using a 10-24mm lens.

Conclusion: try Intentional Camera Movement

There are many, many ways to use Intentional Camera Movement to capture creative and unusual shots, and these different techniques are just the tip of the iceberg. Don’t let yourself be locked in to only stable, tack-sharp photographs.

intentional camera movement, ICM, blur, motion, abstract, sunrise

ISO 100, 0.6 seconds at f/11 done hand-held by rotating the whole camera when shooting (took several tries to get that smooth)

Experiment with intentional camera movement, and you might surprise yourself! Share your results in the comments below.

The post Creative Reasons to use Intentional Camera Movement by Katie McEnaney appeared first on Digital Photography School.


Digital Photography School

 
Comments Off on Creative Reasons to use Intentional Camera Movement

Posted in Photography


Adobe Creative Cloud update brings ability to download previous versions

29 May

shared:AdobeLogo.png

Adobe has rolled out version 1.6.0.393 of Adobe Creative Cloud, bringing some new features and improved file transfer support. The biggest addition that this update brings to Creative Cloud is the ability to install previous versions of Adobe’s design tools directly from the Creative Cloud installer. Graphics professionals and creatives will be able to maintain legacy versions of CC apps without having to juggle multiple serial numbers. Read more

News: Digital Photography Review (dpreview.com)

 
Comments Off on Adobe Creative Cloud update brings ability to download previous versions

Posted in Uncategorized


Guide to Creative White Balance for Landscape Photography

16 Apr

If you’ve been using a digital camera for any length of time, you’ve probably heard about White Balance. You may still be wondering exactly what it is, and how to use it; or you may be using it right now and be wondering how it can possibly be something “creative”.

Creative white balance landscape photography

Different white balance settings create different looks

I’m going to show you some of my techniques for using White Balance to creatively enhance your landscape photography and with a few simple steps you can unlock the remarkable power of creative White Balance. Don’t worry, this is not a technical discussion, there are lots of references about that aspect of White Balance online. This article explains a simple shooting technique you can start using right now.

The Color of Light

Creative white balance landscape photography daylight

Daylight setting

Have you ever taken photos in an office, and been dismayed to see that your results had a sickly green cast to them? Or taken photos under cloudy, lifeless, skies only to see your images appear cold, flat and a little blue?

This happens because light comes in a variety of colors. The reasons for these colors is a result of wavelengths of light and the light spectrum. But we’re not going to get into this too deeply here. Just know that all light has different colors, and even the sun has different colors at different times of the day. Every landscape photographer knows about the “sweet light” or the “magic hour” – the times around sunrise and sunset when the color of the light is perfect for photography.

The crazy thing is that your eyes usually adjust to compensate for these color shifts, especially the subtle ones, so you won’t necessarily perceive these color differences, and in some cases your eyes are not as sensitive to color shifts as are the sensors in your camera. So you snap that office photo and the result isn’t as great as you had expected. Because of the color, those fluorescent bulbs cast a green pall over everything but you didn’t see it because your eyes “adjusted” the color for you.

This is where your White Balance settings play an important role in correcting potential problems by adjusting the color of the light in the camera. It is really important when you’re taking images of people, because the skin tones will be unattractive and far from natural looking.

But, if you are a landscape photographer, armed with the knowledge that light has color and your camera has a tool that can change the color of light, you can use this knowledge to do more creative landscape photography.

White Balance for Landscape Photography

Creative white balance landscape photography hicolour fluorescent daylight

Fluorescent setting

I shoot a lot of landscapes, in fact I pretty much ONLY shoot outdoors. Thankfully I almost never have to deal with those ugly green fluorescent lights. But what I do deal with are sunsets, sunrises, autumn colors, mountains, flowers, etc. – all those good things we find in nature.

I noticed that sometimes my sunset images just didn’t pack the punch the way I SAW it at the location. Sure, I could go back to my computer and make adjustments. Or, without degrading any pixels, I could punch up my images in camera by purposely fooling it into using a different White Balance. In other words I don’t use White Balance to correct color casts, I use it to ADD color casts! I deliberately use the “wrong” White Balance setting.

Landscapes created at sunset or sunrise, snow and winter scenes, and those with night sky dominating lend themselves well to creative White Balance techniques.

Sunsets can become more warm, or more soothing, with violet overtones if you use the Cloudy White Balance setting. Autumn foliage pops with yellow and orange when you use Shade as your White Balance! The Aurora Borealis (Northern Lights) becomes a rich alien green, rolling through a deep royal blue sky, by changing your White Balance setting to Incandescent or Tungsten. Please note, that you use these settings regardless of actual light colour.

Creative white balance landscape photography hicolour fluorescent daylight

Fluorescent daylight camera setting

Creative white balance landscape photography customA3 M3

Custom white balance setting A3 M3

Creative white balance landscape photography auto

Auto white balance setting

Creative white balance landscape photography direct sun

Daylight white balance setting

Creative white balance landscape photography shade

Shade white balance setting

How to use Creative White Balance

To use creative White Balance, there are just a few things to understand about using White Balance in general.

Since White Balance is designed to correct color casts, the setting on your camera will compensate, or change the light, to be the opposite of the shooting situation. In other words, incandescent lights are too warm (orange), so changing your White Balance setting to Incandescent or Tungsten will add a blueish tinge. The light in the shade is blueish, so changing the White Balance setting on your camera to Shade adds warmth, orange and red.

To get creative with White Balance you’ll need to find the dial or menu for changing your White Balance settings. Most cameras have presets for Flash, Shade, Cloudy, Incandescent (Tungsten), Fluorescent, Sunny (or Daylight), and Auto.

Look for the ICONS – a cloud (cloudy), a house (shade), a sun (full sunlight), a fluorescent bulb – long and skinny (fluorescent), an old school light bulb (incandescent or tungsten), a lightning bolt (flash), and AUTO or A for automatic.

Next you’ll need to know how to set your White Balance for a specific type of shot. The best way is to experiment by trying all of your White Balance settings for the same scene. So if you want to ramp up your warm colors, say in an autumn scene or sunset, change your White Balance to Shade, Flash, and Cloudy! Compare your results.

Shooting the night sky or the Aurora Borealis, change to Tungsten or Incandescent to make the colors cooler, make that Aurora really pop! The added blue tones give the night sky a rich royal blue tone, while the green light of the Aurora turns an eerie alien glowing green.

Here’s a handy chart I made for you – so you can literally “dial it in”. All you need to do is change your settings according to the type of landscape scene, using the chart. This will give you a great place to start.

Chart

Supercharge your Creative White Balance

Depending on your camera, you may also be able to fine tune and supercharge your custom White Balance once you find one that provides the boost you like.

In Nikon DSLRs you may see this graph that enables you to make your own custom White Balance presets. It’s typically in your shooting menu under the White Balance tab. Consult your camera manual to see if your camera has this option, and how to apply it.

2customWB1

1customWB

Custom white balance in camera

By selecting a specific color balance presets, you can ramp up the warmth and impact for sunrise and sunset, as well as boost the coolness for winter snow landscapes.

Easy Experimentation

If you shoot RAW, and can’t switch White Balance in the field, you can also easily adjust your White Balance in post-production. Lightroom, Photoshop, Nikon Capture and most other image editing programs have a RAW White Balance setting. Nikon shooters note that you’ll get the best results adjusting RAW [NEF] White Balance if you use Nikon Capture, as Nikon encrypts its White Balance “formula”. Other software can only read parts of the White Balance data so your results may not be as high impact as they could be.

If you have some landscape sunset or sunrise shots on your computer, give creative White Balance a try right now. Here are few of my Lightroom White Balance edits so you can see how much control you have over the drama and mood of your lighting.

Creative white balance landscape photography auto

Auto white balance in Lightroom

Creative white balance landscape photography cloudy custom

Cloudy custom white balance in Lightroom

Creative white balance landscape photography auto adjustments 2

Auto white balance adjustment in Lightroom

Creative white balance landscape photography auto adjustments3

Auto white balance adjustment in Lightroom

Do you have some other tips you can share on using White Balance creatively? Please tell us about them in the comments below and share your images as well.

For some other landscape photography tips try some of these articles:

  • 5 Steps to Help you Take Better Landscape Photos
  • 10 Most Common Mistakes in Landscape Photography – and How to Overcome Them
  • So you Want to Shoot Landscapes? [Top 12 dPS Landscape articles from 2013]
  • Living Landscapes – A Guide To Stunning Landscape Photography – a dPS ebook
  • Loving Landscapes A guide to landscape photography workflow and post-production – a brand new dPS ebook by the authors of Living Landscapes

The post Guide to Creative White Balance for Landscape Photography by Alex Morrison appeared first on Digital Photography School.


Digital Photography School

 
Comments Off on Guide to Creative White Balance for Landscape Photography

Posted in Photography


Developing a Creative Eye – be Careful Before Deleting Your Photos

06 Apr
PhotoA Good Eye

Photo A: ‘Reflections On Land’ by Patrick Elliott

DEVELOP A CREATIVE EYE

The more you get out and use your camera, the more proficient you become as a photographer. In the process of learning and using your camera, you will develop a better eye from a creative perspective. It is important that you put this “creative eye” to use on a regular basis, not only to maintain it, but also to improve it.

Taking pictures isn’t the only time you have to use your creative eye. You can use it by looking at other people’s pictures to see what you could have done differently, or what factors you will take from their pictures to add to your photography. As you go through your daily routine, you can imagine that you are constantly looking through a viewfinder or LCD screen, and as your eye develops, you will have more and more ideas for creative shots everywhere you go.

You can especially put your eye to use by looking at your pictures before the editing process. Developing this creative eye will benefit you as you are sorting through the pictures after a photo shoot. Put your eye to use by carefully looking at all of your images before deleting any of them. Let me tell you why.

DELETE IT OR KEEP IT?

It is very common to come back to your computer after a photo shoot, dump the images into your computer, and start deleting all the “bad” shots. Or, you may be the type who deletes the “bad” shots in the camera before importing them into your computer. Either way, be careful as you do this because you could overlook a good thing in those shots. The photo above (Photo A) isn’t a planned shot that I took during a photo shoot. It is the result of using my eye before deleting a bad shot. If you look at the photo below (Photo B), it is a bad shot that was not the model’s fault. We were outdoors and the lighting kept changing constantly because the sky was rapidly going through changes. She was in the process of getting prepared for a shot, and I was taking test shots while adjusting my settings to get the correct exposure.

As I got the images from that photo shoot to my computer, the photo that you see below (Photo B) was a “bad” shot that would normally go to the trash bin. But, before deleting it, I put my creative eye to use by carefully looking over it and something caught my eye. I saw a photo within the photo, and decided to open it up in my photo editor to bring this vision to life. I put my crop tool to use, and the result was the photo that you see above (Photo A).

PhotoB Bad Shot

Photo B: Carefully look over a bad shot like this before deleting

HOW SHARP IS YOUR EYE?

Do all that you can to develop a creative eye. I have mentioned a few techniques for you to practice so that your eye can become sharper. It is more than likely that photography may have you spending more time sitting down at the computer rather than the actual photo shoot. Use that time to really put your eye to use. What ways do you develop your creative eye? Have you ever seen something special in a picture before deleting it?

PhotoC Bad Shot

A test shot that would normally be deleted

PhotoD Good Eye

‘Living Outside’ by Patrick Elliott. Using the creative eye to make good use of a ‘bad shot’ you see in the image just above.

The post Developing a Creative Eye – be Careful Before Deleting Your Photos by Patrick Elliott appeared first on Digital Photography School.


Digital Photography School

 
Comments Off on Developing a Creative Eye – be Careful Before Deleting Your Photos

Posted in Photography


Reading Room (Dividers): 13 Creative Bookshelf Designs

20 Mar

[ By Steph in Design & Furniture & Decor. ]

Bookshelf Room Dividers Main

Books make everything better, especially when you’re looking to divide a large loft or studio apartment into smaller, more functional spaces. Bookshelf room dividers go far beyond the standard IKEA Expedit setup, as these 13 examples illustrate, with some offering built-in reading nooks or modular systems that can be expanded as your personal library grows.

Bookshelf Tower and Divider by Marica Vizzuso

Bookshelf Room Divider Vizzuso 2
Bookshelf Room Divider Vizzuso 1

This folding metal screen has slots for books of various sizes, and it can either close up into a columnar tower or be opened for use as a room divider. B-OK by Marica Vizzuso is not only multi-functional, it also turns books into art. Says the designer, “Why do you place books in a conventional way when you can have both an amusing and aesthetically interesting alternative?”

Charmingly Off-Kilter

Bookshelf Room Dividers Off Kilter

Open cubes and rectangles are packed together in a random and off-kilter fashion, resulting in a visually dynamic room divider with a built-in desk.

Hidden Chair and Footstool

Bookshelf Room Divider Viable Hidden Chair

The ‘Shelflife’ series by Charles Trevelyan for Viable London is a space-saving bookcase and room divider with a chair and footstool hidden within the structure of the shelves.

Modern Leaning Bookcase and Room Divider

Bookshelf Room Dividers Modern Leaning

Forget about bookends – you don’t need them with this modular bookcase and room divider system by Nitzan Cohen. The leaning shelves ensure that books stay put, and modules can be added as your collection grows.

Alphabet Room Divider Bookshelf

Bookshelf Room Divider Alphabet

So maybe it’s a little difficult to fit books into rounded letters like C and O, but but this room divider and storage system by modern Finnish designer Lincoln Kayiwa is still a fun way to organize small objects. It’s made of medium-density fiberboard and available in a range of colors.

Next Page – Click Below to Read More:
Reading Room Dividers 13 Creative Bookshelf Designs

Share on Facebook


[ By Steph in Design & Furniture & Decor. ]

[ WebUrbanist | Archives | Galleries | Privacy | TOS ]


WebUrbanist

 
Comments Off on Reading Room (Dividers): 13 Creative Bookshelf Designs

Posted in Creativity


Hack Your City: 12 Creative DIY Urbanism Interventions

13 Mar

[ By Steph in Art & Installation & Sound. ]

DIY Urbanism Main

If city officials won’t do their part to make public spaces more fun, efficient, useful, comfortable and creative, citizens will take matters into their own hands. DIY urbanism, or ‘hacktivism,’ is the practice of altering urban environments in ways that aren’t officially sanctioned, whether by turning vacant lots into temporary playgrounds, adding swings to bridges, seed-bombing neglected city spaces or knitting giant hats for bus stop shelters.

City Swings

DIY Urbanism City Swings 2

DIY Urbanism City Swings

The spaces under piers, beside bridges and beneath industrial remains are transformed into instant playgrounds with surreptitiously installed swings funded by The Awesome Foundation for the Arts and Sciences. The Los Angeles chapter of the group awarded its $ 1,000 2011 grant to artist Jeff Waldman, who chose underutilized spots around the city to install temporary swings. A similar project hung spill swings from the handrails on San Francisco’s BART public transit system, while the more complex 21 Swings project in Montreal coordinated the urban swings with music for an interactive experiment.

DIY Urban Furniture

DIY Urbanism Furniture Stair Square

DIY Urbanism Furniture Sign Chair

DIY Urbanism Furniture City Living Room

If there aren’t comfortable places to sit and hang out in urban locales, perhaps the people should just create them, whether they turn scaffolding into instant hangouts with bracket-equipped furniture or bring specially made tables that fit perfectly onto public steps. Some temporary installations have gone so far as to create entire urban living rooms complete with couches, bookshelves and coffee tables that invite passersby to take a seat, relax, get to know each other better and enjoy impromptu musical performances. One particularly creative guerrilla seat design is simply a piece of plywood printed with an icon of a chair that attaches quickly and easily to street signs and can be folded up when not in use.

Vacant Lot Playgrounds & Hangouts

DIY Urbanism Vacant Lot Mini Golf

It’s incredibly frustrating when your neighborhood lacks a decent playground or public recreation space, yet multiple vacant lots surrounded by razor wire-topped fences waste away for years on end. Why should such spaces be closed off to the public when they’re not in use? Many DIY urbanism projects focus on reclaiming these spaces with non-permanent setups for community gardens, swing sets and even mini golf. Repurposing vacant lots maintains a sense of vitality and egalitarianism in the community, especially during times of economic sluggishness when planned construction projects are indefinitely delayed.

Yarn Bombing

DIY Urbanism Yarnbombing

Who wouldn’t smile at custom-crocheted sweaters for trees, phone booths and bicycles? Yarn bombing is the practice of adding knitted and crocheted additions to all sorts of public objects, just for the fun of it. Bus stops are given giant winter hats, bus seats get a lot cozier and stop signs suddenly become red flowers with the addition of green leaves and a ‘stem.’

Next Page – Click Below to Read More:
City Hacktivism 12 Fun Diy Urbanism Interventions

Share on Facebook


[ By Steph in Art & Installation & Sound. ]

[ WebUrbanist | Archives | Galleries | Privacy | TOS ]


WebUrbanist

 
Comments Off on Hack Your City: 12 Creative DIY Urbanism Interventions

Posted in Creativity


50K Creative Profesisonals Creating Their Websites Code-Free in a Flash with Webydo, See Why

24 Feb

Some of you may have already heard about Webydo, and some of you may have not, but that’s alright. You’ll probably be hearing plenty more about it in the future. Webydo’s a web-design platform that lets people create pretty rad-looking HTML websites that have a built-in CMS, too. And they’re able to do all of this without even knowing the Continue Reading

The post 50K Creative Profesisonals Creating Their Websites Code-Free in a Flash with Webydo, See Why appeared first on Photodoto.


Photodoto

 
Comments Off on 50K Creative Profesisonals Creating Their Websites Code-Free in a Flash with Webydo, See Why

Posted in Photography


30 Creative Cinemagraphs to Drive You Wild With Inspiration

20 Jan

Cinemagraphs are still images that contain within themselves moving elements allowing a glimpse of time to be preserved and experienced. Just like the magical newspaper from the Harry Potter movies, these animated GIF images leave the impression that you’re watching a short video. According to Wikipedia, the cinemagraph technique was created by photographers Jamie Beck and Kevin Burg, who used Continue Reading

The post 30 Creative Cinemagraphs to Drive You Wild With Inspiration appeared first on Photodoto.


Photodoto

 
Comments Off on 30 Creative Cinemagraphs to Drive You Wild With Inspiration

Posted in Photography


Get Your Creative Juices Flowing with Different Focal Lengths

22 Dec

Get Your Creative Juices Flowing with Different Focal Lengths

Eckert Creative Juices Focal Length 01

14mm lens

I’ve gone through periods of low creativity in my photographic journey. Times when I don’t have compelling ideas or nothing seems new. When the excuses why not to go takes pictures (“It’s too cold, it’s too hot, the light isn’t right, it’s too cloudy, it’s not cloud enough”) manage to outweigh my need to photograph, and I go into an unproductive slump. It can be hard to break out of these slumps, but there are lots of ways to get the spark back including everything from: getting on dPS to read articles; to looking at galleries of other photographers’ images online for inspiration; to choosing a slightly different route or time to work, in order to see the world in a different way.

In this article I’m going to touch on just one of those “creativity sparks”, specifically, getting creative with focal length, even the point of breaking the “rules.”

Before I get to the meat of the article, please note I’m not saying you have to go spend thousands of dollars on new lenses. If you can afford to, want to, and need to, then by all means do so – new gear is one more method of lighting the creativity fire in your soul again. Instead, however, I’m suggesting you work on finding new ways to shoot with the gear – the lenses – you already have.

Eckert Creative Juices Focal Length 02

100mm lens

The “Rules”

When it comes to lenses, most new photographers learn the typical applications of different focal lengths pretty quickly. Here are a few examples of what I learned, when I was first teaching myself this complicated art, about how different focal lengths *should* be used (Note: all focal lengths list here refer to 35mm full-frame format):

  • 10-14mm: distorted fisheye, not really for ‘serious’ photography
  • 14-24mm: landscapes, seascapes, waterfalls, starlight and astrophotography
  • 24-35mm: street and architecture photography
  • 35mm-58mm: “normal” and most closely approximates our natural view of the world, useful for portraits and still life photography, etc.
  • 85mm: the classic, flattering portrait length lens
  • 90-105mm: the province of macro lenses (close ups)
  • 135mm: the other classic portrait length
  • 200mm: the other, other classic portrait length also getting useful for nature and sports telephoto shots
  • 200-500mm: sports, wildlife and birds
  • 500-800mm: for wealthy and/or partially crazy Antarctic nature photographers who want close-ups of polar bears

Are there problems with the above gross simplifications? Sure, tons! Even novice photographers will understand the above list is just a shorthand, a way of reducing a radically complicated subject into more easily digestible chunks. More experienced photographers will be able to name a dozen exceptions to the list above. But, that’s also where the fun – the creativity spark – can begin: in the exceptions, in shattering of rules.

Eckert Creative Juices Focal Length 03

14mm lens

Breaking the “Rules”

I’m going to re-write the list from above, presenting just a few alternative ideas. This is also hardly a comprehensive list; instead, I’m trying to get your creative juices flowing with regard to what you can do with those different focal lengths, how you can go about breaking the rules and producing something new, unusual and outside the expectations.

  • 10-14mm: still life, product shots, cityscapes, purposefully distorted architecture, sports, hiking
  • 14-24mm: pet portraits, street shots, extreme close-ups (thanks to the design of many ultra-wide angle lenses you can actually get really close to the subject, and, thanks to the wide angle, still show a lot of the surroundings), flowing architecture, cloudscapes
  • 24-35mm: babies, landscapes, cityscapes, portraits
  • 35-58mm: anything anti-“normal” with these “normal” lenses – get close, get far, turn the camera, close down to f/16 even with your expensive 50mm f/1.4 because it’s different, because it makes you think
  • 85mm: landscapes (start to pick out specific areas to focus the viewer’s attention), cityscapes (ditto), architecture (same again), still life, street scenes
  • 90-105mm: more of what I offered for the 85mm; just because you have a macro doesn’t mean it won’t happen to make a great landscape lens (e.g. the Zeiss 100mm f/2 Makro Planar) or a great portrait lens (e.g. Nikon 105mm f/2.8 VR)
  • 135mm: street scenes where you really separate a subject or object from the crowd; detail shots of antique or expensive cars; clouds (picking out the special parts to focus on), light trails, long-exposure shots of the sea (at 135mm? Crazy talk! But that’s the idea!)
  • 200mm: waterfalls, mountains, sunsets and sunrises, fog in the trees, autumn leaves on the long roadway, the shadows cast by that old oak tree on the fence in the neighbour’s yard
  • 200-500mm: rolling plains and wide open vistas; sections of the Grand Canyon at sunset; night life in the city, your pets
  • 500-800mm: polar bears

Just kidding on that last one. I think you get the general idea, though: take the stereotypical, “classic” uses of any given focal length, and turn those ideas on their head. Have a go at something you’d never thought would work for that lens. You might be shocked by what you come up with, and if nothing else it will get your conscious and subconscious mind churning and that creative flame burning.

Eckert Creative Juices Focal Length 04

35mm lens

The “You Should Never” Rules

These are one step beyond the regular rules. You’ll find these on Flickr sometimes, as well as other online photo communities, where someone will passionately argue that a given photo (or set of photos) is utter garbage because the photographers in question “misused” their lenses and “you should never do” whatever it is that they did.

For example: “You should never take a portrait with a fisheye lens.”

This might even seem reasonable at first glance – after all, fisheye lenses are defined by their hefty distortion that is not generally considered a good look by most models. But here’s the thing: as long as you are using your lens on your camera to take a photo, you aren’t “misusing” it. Especially if you are experimenting and learning new ways of seeing the world, and stoking that creative fire a bit.

You can take a portrait with a fisheye lens. I guarantee it. And a good portrait, no less. It might be harder, more challenging than firing away with that 85mm, but that’s the point: it’s new, it’s different, it’s outside the norm and it’s outside of the rut in which you can sometimes find yourself.

lenses-wide-angle-portrait

17mm lens – Image by Darlene Hildebrandt

So, if you are in that creative rut, search out the “You should never rules” online, and then do whatever it is “they” say you should never do. Within the bounds of the law, of course!

One Last Idea

I’ll end here with one last idea to make creative sparks out of focal length – check out some popular or famous photographs, consider what focal length the photographer used and why, and then think about – and experiment with – how that photograph would have turned out differently with another focal length.

I’m sure there are many other ideas to spark creativity, please post your thoughts in the comments below, and help us all spark our creative fires.

Eckert Creative Juices Focal Length 05

105mm lens

500px can be a great site for inspiration. Check out the “Popular” or “Editor’s Choice” streams for the latest and greatest to find some photographs you love, and then investigate. Often the focal length is included in the photo’s information so you don’t even have to guess what they used. Think: why did the photographer pick that focal length? Ask yourself; “What if I used the extreme opposite in that exact situation?”.

Then, of course, go out and take some pictures!

Remember, it’s the experimentation and thought process behind it that is worth the effort, even if none of your photos that break the focal-length “rules” end up working out. It will get the creative juices flowing and that’s the goal.

Eckert Creative Juices Focal Length 06

14mm lens

The post Get Your Creative Juices Flowing with Different Focal Lengths by Joseph Eckert appeared first on Digital Photography School.


Digital Photography School

 
Comments Off on Get Your Creative Juices Flowing with Different Focal Lengths

Posted in Photography