RSS
 

Posts Tagged ‘Creative’

5 Creative Ideas to Improve and Inspire Your Photography

08 Feb

If you are a photographer who takes pictures day in and day out, perhaps because it is your livelihood or you are a keen hobbyist, there are times when you may want to digress from the day to day, and do something new on your day off. You can do this purely for the fun of it, or to set yourself some new learning challenges. This is a good practice to implement regularly because it pushes you to think outside the box, hone your skills, enlarge your vision, and challenge your creativity.

Here are some creative ideas on what you can do to take a break or depart from the usual, even just for a day.

layering-creative-photography-tip-01

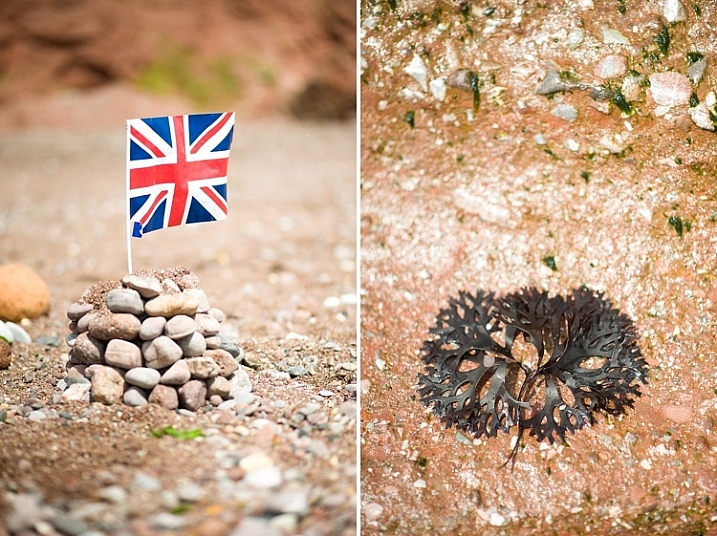
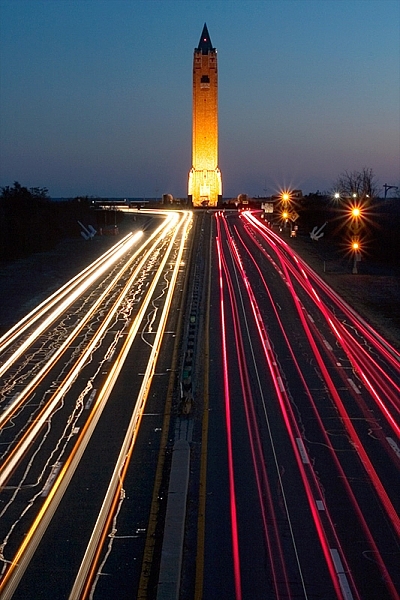
1 – Vertical only please

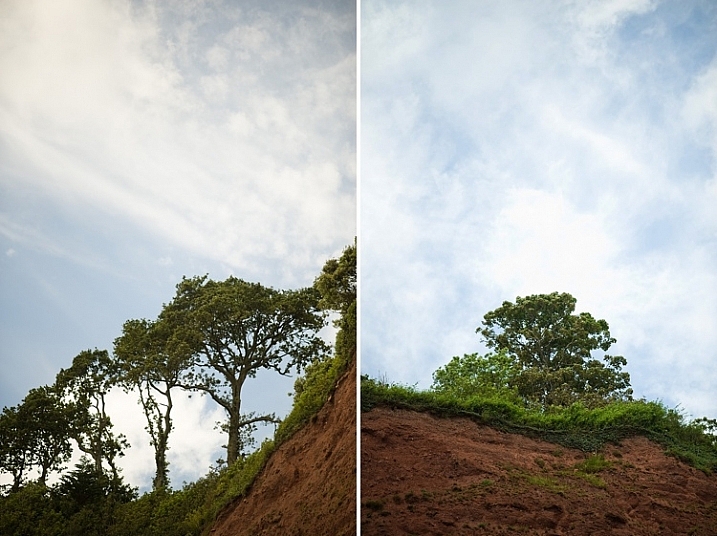
These vertical images below were taken from a beach summer holiday when I decided to do this particular photography challenge, purely as a fun visual exercise in composition. All I had was a D700, a 35mm f/1.4 lens, and a few meters of beach.

vertical-photography-tip-01

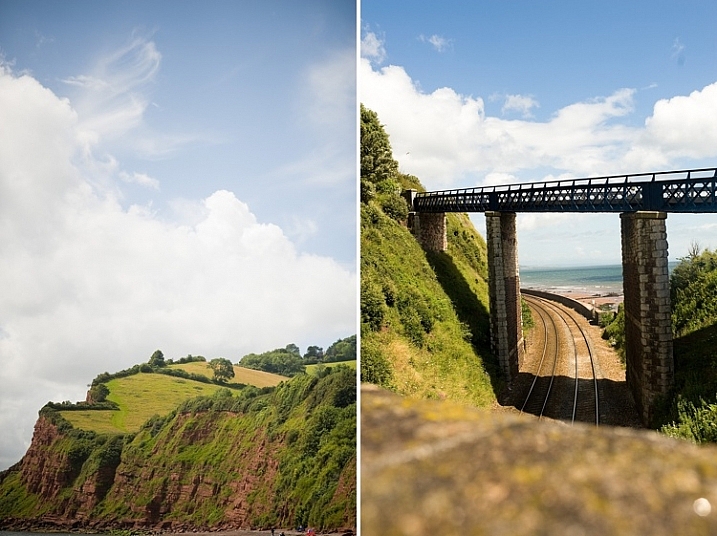
Photographing solely in the vertical orientation can be quite tricky. Your view and vision are more constrained. If you are photographing a landscape scene for instance, with the vertical orientation you are limited to pretty much the sky or the earth.

vertical-photography-tip-02

vertical-photography-tip-03

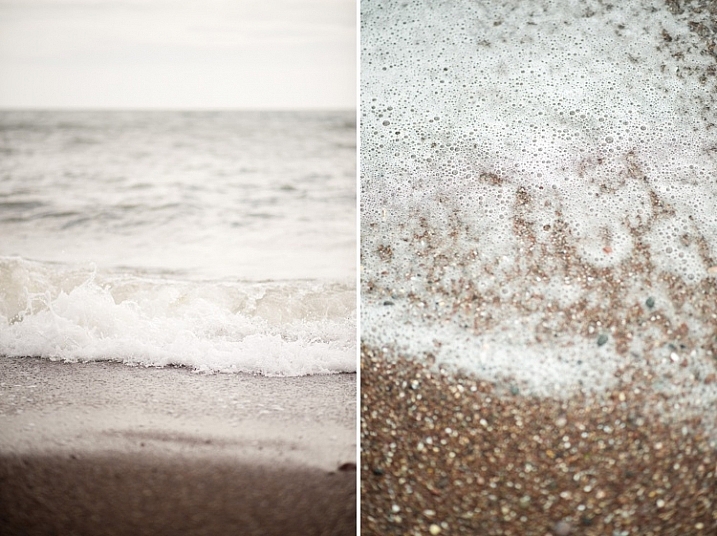
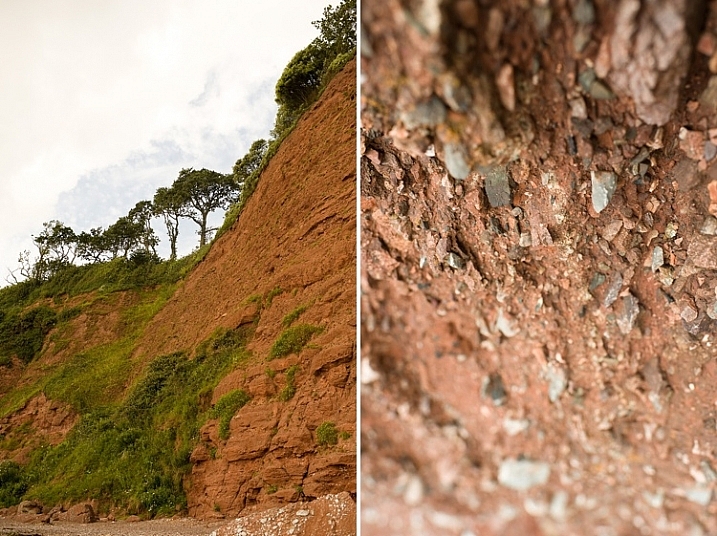
Things that you are always used to seeing in a landscape (horizontal) format will look different, and therefore you will begin to see with a fresh eye. This forces you to look for more intriguing views and items to photograph, as well as to compose in such a way that the photograph is still interesting, despite the limited width.  You could be confronted with some quite unnerving compositions which make the picture more striking, or at the very least elicit an unusual or unexpected reaction.
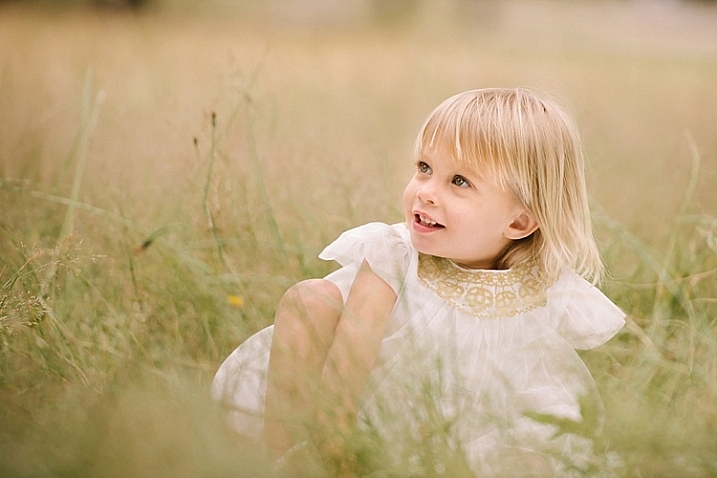
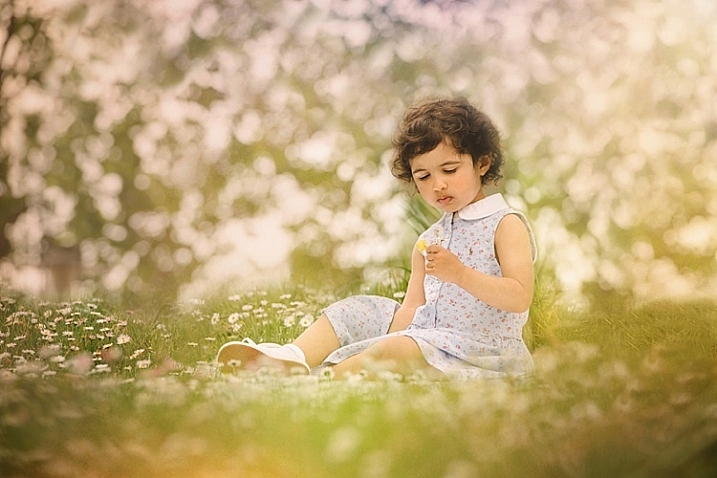
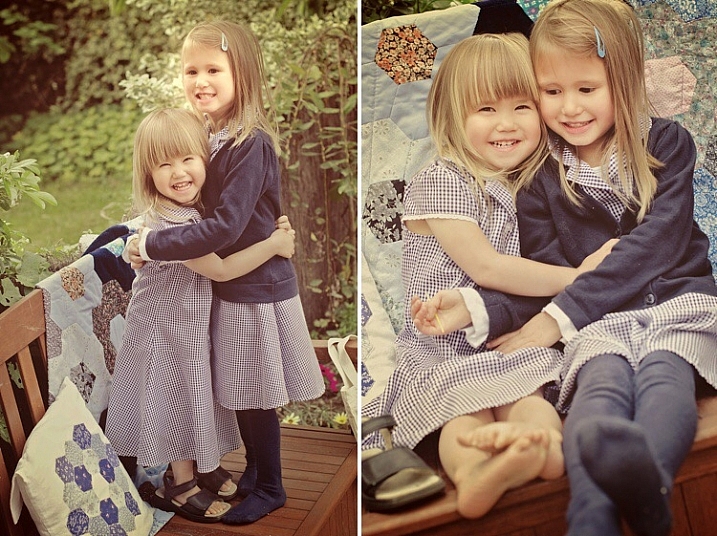
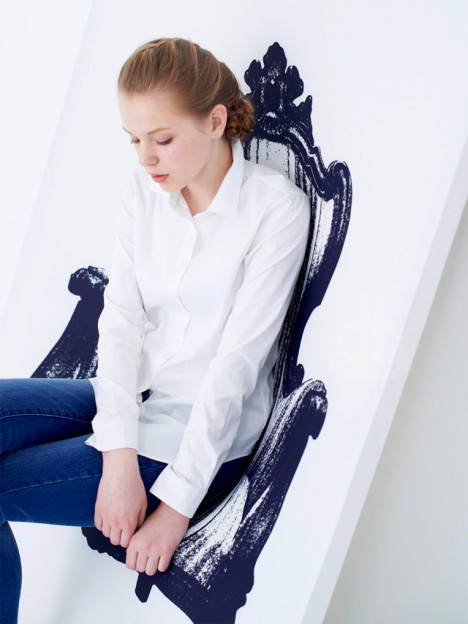
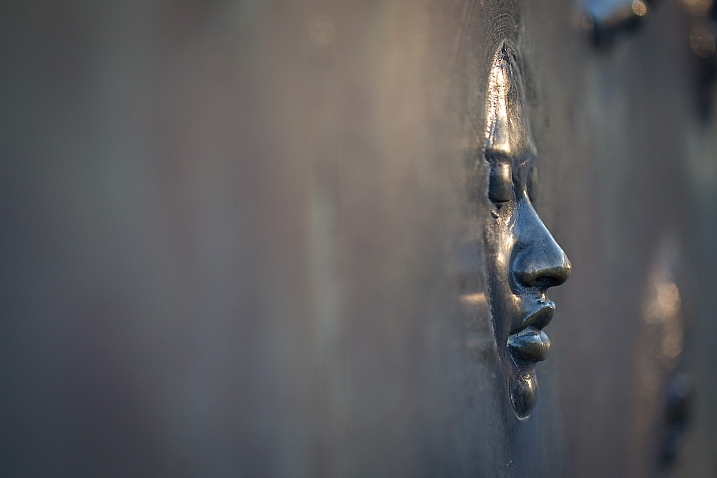
vertical-photography-tip-04

vertical-photography-tip-05

2 – No eyes allowed

It is said that the eyes are the window to the soul. This challenge is to try and capture a someone’s personality, without photographing their entire face. There are many more things to a person than just a face. For this challenge focus on anything but the eyes, and see how much of the person’s personality you can capture.  You can focus on physical aspects, clothes, or objects that the person loves.

personality-photography-tip-01

personality-photography-tip-03

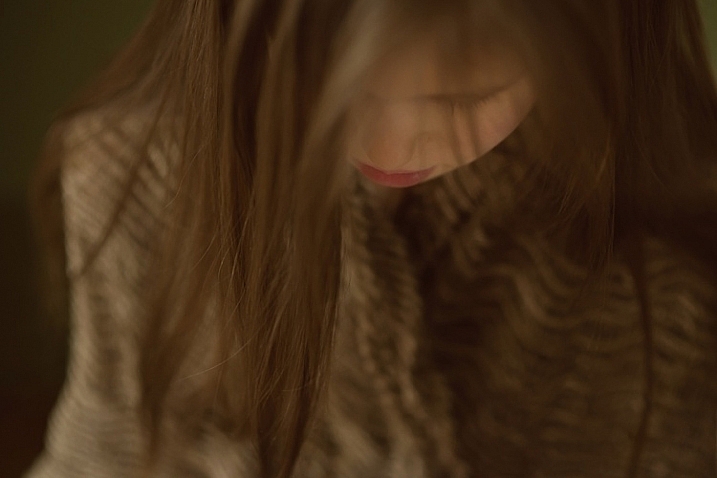
Some people have developed icons of themselves: things they are known and recognized for. For example, someone who always wears sunglasses on their head, or a person who only wears striped socks, or someone’s tattoo or jewellery style. Find something distinctive about the person. You can also focus on actions. Perhaps the person is adventurous or has a fun-loving, bigger-than-life personality.

persosnality-photography-tip-08

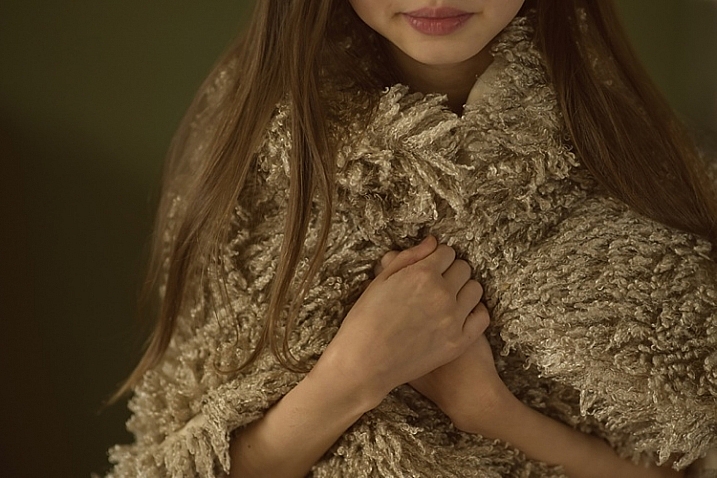
You may want to ask them to do something they love, or hold something that reflects their persona, and find a way of capturing that without photographing the face. Focus on the running motion of their feet, or waving hands, or a big smile cropped in an interesting composition. Color could be another thing. Ask the person to wear their favorite color and find a location that has the same tones.

persosnality-photography-tip-09

You can also set something up that reflects the quirkiness of the person, or choose a location that does the same. A country-loving person might be walking in muddy boots, on a long road that seemingly leads to nowhere. Give it some thought with a person in mind, and you may be surprised how many ideas you can come up with that will potentially truly capture their personality.

personality-photography-tip-07

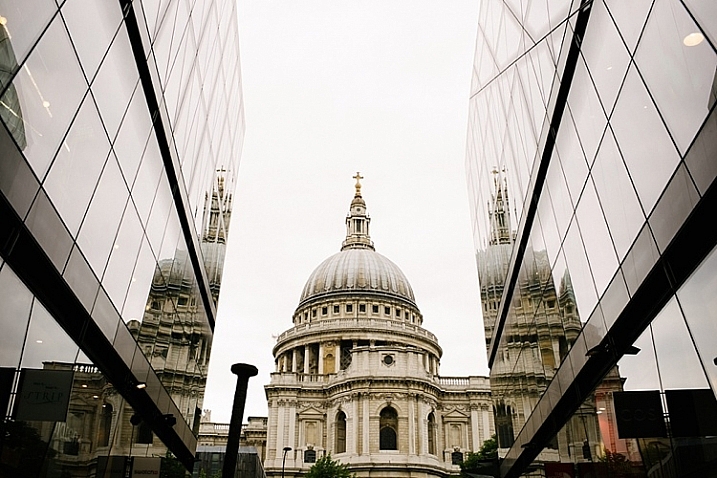
3 – Through a glass, darkly…

Consider utilizing reflection to make your images more enthralling and thought-provoking. You can impose a rule that you can only photograph a reflection and never the person or the object, or you can use both subject and reflection for a refreshing take on an image, making them more captivating.

reflection-photography-tip-01

reflection-photography-tip-01

reflection-photography-tip-02

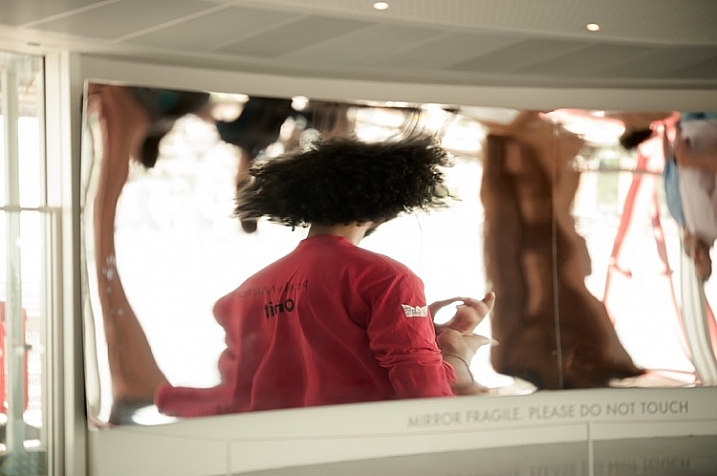
Some reflector ideas include: mirrors and shiny reflective objects, water, reflective glass or plastics, windows – even clear windows can have reflections. Raindrops can be great reflectors although you may have to pull out your macro lens to capture the reflection. Photographing reflections can open up a whole new world, such as seeing and capturing surreal or abstract images with the blending of forms and colors, as well as igniting your imagination, and filling you with a new sense of wonder.

relfection-photography-tip-04

relfection-photography-tip-04

relfection-photography-tip-06

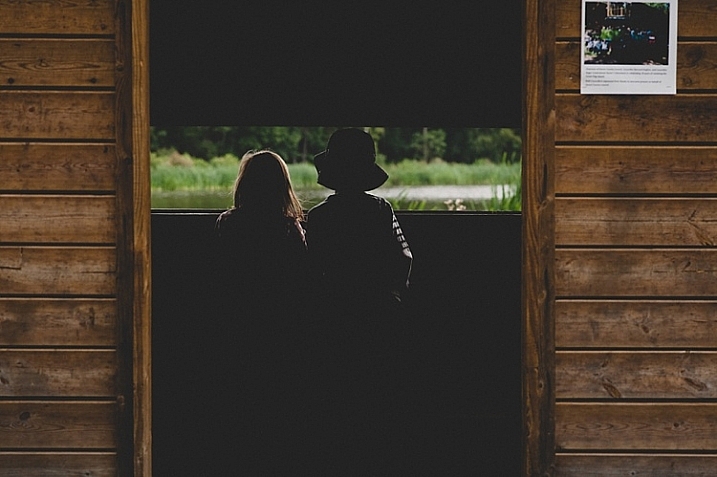
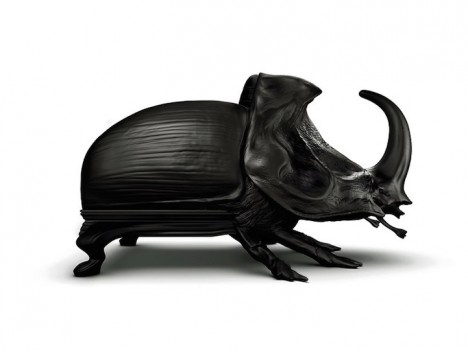
4 – Black is the new hue

Silhouettes are fun to photograph, and not that difficult to execute. But the bigger challenge is to find a striking silhouette concept. The main thing to remember is to find good contrast – a very bright background, preferably bigger than the subject, and put the subject in front of the light area. Expose for the bright background so that your subject is so severely underexposed that they look very dark or black.  Here is a really good article with a simple step-by-step guide on how to take stunning silhouettes.
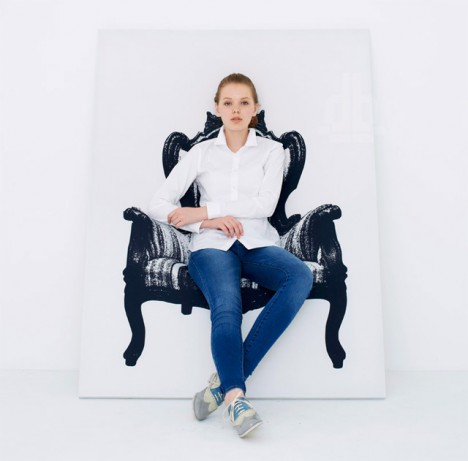
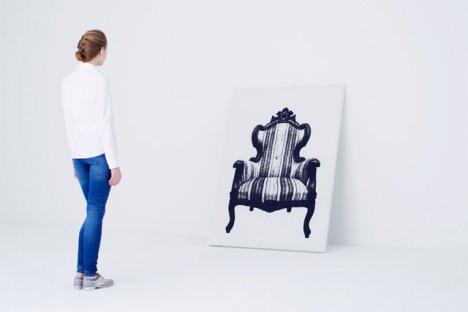
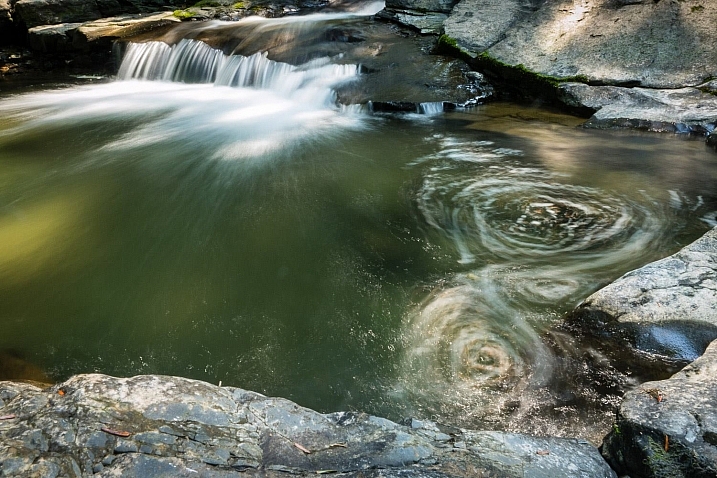
silhouette-photography-tip-01

silhouette-photography-tip-02

silhouette-photography-tip-03

5 – Layering

Layering is a really subtle, but extremely effective, photographer’s trick to convey depth, mystery, and mood in a photograph.  It is especially useful if you are a photojournalistic or documentary photographer, as it makes the viewer feel that they are looking through someone else’s lens, and are present in the moment but inconspicuous, much like a fly on the wall.

layering-photography-tip-01

layering-photography-tip-02

There are three basic things to remember when composing a photograph with layering in mind: foreground, middle ground and background.  Most of the photographs we see often have two layers – the subject and the background.  Incorporating a foreground in your composition not only adds three-dimensionality to your photograph but also makes it more visually compelling.

layering-photography-tip-03

Choosing the right foregrounds can be used to frame your subject – as a leading line to direct attention to your subject, therefore making your image more dynamic, or as a tool for emphasis and composition amongst many others. There are times when finding an obvious foreground is next to impossible. One solution is to physically hold an object, such as a leaf or paper, in front of your lens just enough to be in the frame, but not to obscure the subject.

layering-photography-tip-04

layering-photography-tip-04

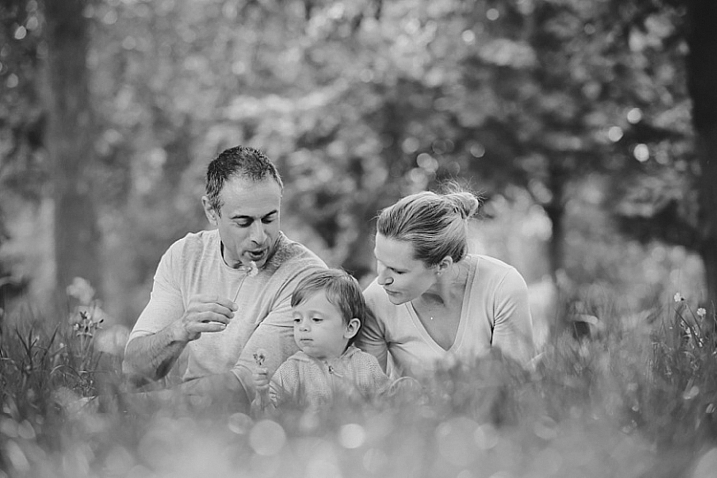
You can also layer by simply using your lens and the effect of a very wide aperture such as f/1.4. By employing your lens’s ability to blur the foreground, while keeping the middle ground in sharp focus, and then blur the background again, can make an otherwise dull image enchanting. Even something as simple as a patch of stones or sand can look layered using this technique.

layering-photography-tip-06

I hope you will enjoy doing these creative challenges. Do you have other creative photography ideas to share? Please do so in the comments below.

googletag.cmd.push(function() {
tablet_slots.push( googletag.defineSlot( “/1005424/_dPSv4_tab-all-article-bottom_(300×250)”, [300, 250], “pb-ad-78623” ).addService( googletag.pubads() ) ); } );

googletag.cmd.push(function() {
mobile_slots.push( googletag.defineSlot( “/1005424/_dPSv4_mob-all-article-bottom_(300×250)”, [300, 250], “pb-ad-78158” ).addService( googletag.pubads() ) ); } );

The post 5 Creative Ideas to Improve and Inspire Your Photography by Lily Sawyer appeared first on Digital Photography School.


Digital Photography School

 
Comments Off on 5 Creative Ideas to Improve and Inspire Your Photography

Posted in Photography


Adobe Portfolio brings customizable personal websites to Creative Cloud

27 Jan

Adobe has introduced Adobe Portfolio, a website creation platform similar to Squarespace. Part of Creative Cloud, Adobe Portfolio is offered under three subscription tiers and aims to provide creatives and professionals with a simple way to showcase their work online.

The Adobe Portfolio service offers pre-made layouts, as well as customization options for website elements like the header, logo, navigation, background and footer. The designs are responsive, able to scale for various screen sizes and there’s an option for a personalized website URL. Features include galleries for showcasing content, password-protected pages and website analytics. Subscribers can also integrate a Behance account with Portfolio for seamless content syncing.

Adobe Portfolio is available to individuals under three Creative Cloud pricing tiers: $ 9.99 USD/month with included access to Photoshop CC and Lightroom CC, $ 19.99 USD/month with access to 20GB of cloud storage and one desktop app and $ 49.99 USD/month with access to all Adobe creative apps.

Via: Adobe Blog

Articles: Digital Photography Review (dpreview.com)

 
Comments Off on Adobe Portfolio brings customizable personal websites to Creative Cloud

Posted in Uncategorized


5 Steps to Creative Storytelling in Pictures with Your Kids

19 Jan

image

Creative storytelling in pictures need not be daunting nor time-consuming. You can easily set up something really simple at home to take pictures of and at the same time make new memories with your kids.

The actual shoot must be kept really short, so as not to exasperate your kids too much, especially if they are very young, and therefore have relatively short attention spans. The real work is in the planning and thinking ahead.

image

The first rule to telling a good short story in pictures, is to keep it simple. Think of a singular plot: beginning, middle, and end. You can then fill in the gaps with interesting takes and angles. The biggest, and best, tip I give to anyone before taking on any creative project, is to imagine the emotion and feeling you want to evoke at the end of the project. Then work your way backward.

Start planning and decide on a theme. Take for example a simple back to school theme.

image

Step 1. Plan ahead

Think through the story you want to tell; decide on the details, picture the sequences in your head, and feel the story. Think through the items and characters that play a major role in the shoot. Half the battle is won by good meticulous planning, even if it’s just in your head.

What is the overarching emotion, look, feel, and colour of the shoot that you want to achieve? Pare everything back that doesn’t fit in with that look and feel. This shoot below had three requirements: golden, sentimental, and rich in bokeh (background blur). So I planned everything to achieve those three specific requirements.

image

To get rich bokeh, you need to shoot with a wide aperture, between f/1.2 to f/3.2, if you have normal shorter focal length lenses. For longer lenses like 85mm upwards, you can stop down a bit more, as the longer the lens, the more compression there is in the background. Using a 200mm lens, for example, would still give you nice background bokeh even at f/5.6.

To get golden images, use a gold reflector, and wait for the golden hour when you can get soft diffused yellow light. Golden hour usually happens about 1-2 hours after sunrise and before sunset depending on where you are in the world.

image

Step 2. Coordinate colours and props

Reign in the colour palette, go for a family of colours like blues and greens, or reds and purples, or warm yellows and oranges. You can add a splash of contrasting colour for focus. But it is always good to reign in the colour palette keeping it to 3 or 4 colours maximum.

Props need not be bought, or expensive. Use what you have at home; fruit, books, toys, cushions, quilts, etc. Just make sure they are colours that complement your chosen theme.

image

Step 3. Don’t be over ambitious

Keep goals simple when it comes to photographing kids, especially if they are your own. It’s one of the most difficult things to do. Keep it short and sweet by focusing on one or two actions or scenarios, and make them super easy like reading a book, hugging, or laughing at a silly joke.

A plot is not always necessary, you can even just aim for capturing some interactions between your kids. The props are to create some new context for them, hold their attention for a few short minutes, and keep them engaged during that time.

image

Step 4: Plan a beginning and end shot

The beginning and the end are crucial to a story because they bring the theme together. Make sure you have an establishing first shot, and a feel good last shot. Details are always a good idea for a contextual or establishing shot. They not only enrich emotion, and reinforce a story, but also strengthen memories. Interesting close-ups, and expressions or unusual crops are also good for closing shots, and stay in the viewer’s memory for a second longer.

image

image

Step 5: Edit your images with a plan

If you edit your photos, edit them according to your vision. there is no one else to please but yourself. The photoshoot you planned is for you and your family, so be true to your original vision and be brave, then sit back and enjoy your creative story in pictures.

image

Have you taken images that tell a creative story of your kids at home or more tips to add? Share them in the comments below.

googletag.cmd.push(function() {
tablet_slots.push( googletag.defineSlot( “/1005424/_dPSv4_tab-all-article-bottom_(300×250)”, [300, 250], “pb-ad-78623” ).addService( googletag.pubads() ) ); } );

googletag.cmd.push(function() {
mobile_slots.push( googletag.defineSlot( “/1005424/_dPSv4_mob-all-article-bottom_(300×250)”, [300, 250], “pb-ad-78158” ).addService( googletag.pubads() ) ); } );

The post 5 Steps to Creative Storytelling in Pictures with Your Kids by Lily Sawyer appeared first on Digital Photography School.


Digital Photography School

 
Comments Off on 5 Steps to Creative Storytelling in Pictures with Your Kids

Posted in Photography


Neat Seats: 14 Crazy Creative Modern Chair Designs

29 Dec

[ By Steph in Design & Furniture & Decor. ]

chair painting 2

More than just a surface to sit on, these modern chair designs are (sometimes literally) works of art, sculptural yet functional, from a flat-looking canvas you can actually sit on to a series of chairs that slide inside each other, inception-style. Customize a chair’s look with removable graphic panels, hook two high-backed seats together to make a room-within-a-room, or scare your guests with hanging chairs that mimic beasts of the deep sea.

Monster Chairs Might Eat You
monster chair 2

monster chair 1

monster chair 3

Rest inside the mouth of a sea beast, real or mythical, in this series of fun and frightening handmade chairs by Cape Town artist Porky Hefer.

A Painting You Can Sit In
chair painting 1

chair painting 2

chair painting 4

Hung flat on a wall, these canvases look like nothing more than two-dimensional paintings. But pull them down, lean them against the wall and take a seat, and you’ll find that they are surprisingly up to the task. These lightweight furniture pieces by YOY design studio are made of wood, aluminum and stretched elastic canvas.

Home Office in a Chair
chairs office

If you’re the type who works from home but isn’t into sitting at a conventional desk, the Four Works Armchair can meet all of your needs. A seat is embedded within a bookcase-like base that also offers a light, cupholder, power outlets, storage and a laptop platform.

Inception Chair

chairs inception 1 chairs inception 2 chairs inception 3

Ten interlocking chairs ranging from adult to child size fit within a single frame in this chair by Vivian Chiu, inspired by the dream-within-a-dream concept of the movie Inception.

Rhinoceros Beetle Chair
Adobe Photoshop PDF

Adobe Photoshop PDF

Adding to a collection of realistic animal-shaped chairs rendered in matte black, Maximo Riera presents The Beetle Chair, which is only recognizable as furniture when viewed from the back.

Next Page – Click Below to Read More:
Neat Seats 14 Crazy Creative Modern Chair Designs

Share on Facebook


[ By Steph in Design & Furniture & Decor. ]

[ WebUrbanist | Archives | Galleries | Privacy | TOS ]


WebUrbanist

 
Comments Off on Neat Seats: 14 Crazy Creative Modern Chair Designs

Posted in Creativity


75% OFF: Get Out of Auto Mode & Gain Creative Control Of Your Camera

23 Dec

It’s day 10 of our 12 deals of Christmas and todays deal is one we’ve been getting requests for – it’s deals on our brand new Photography Courses by Neil Creek.

These two courses were both released in 2015 and both have helped many of our readers to get out of Auto mode and gain creative control over their cameras.

Today you can pick up either course for $ 20 (they are each normally $ 59) or you can bundle them together for just $ 30.

Course 1: Photo Nuts and Bolts

NewImage.png
This course is all about getting out of Auto mode and getting to know your camera and how to get control over it to take fantastic images.

In 10 practical video lessons, you’ll discover the key photography concepts that will put you in creative control of your camera and increase your technical confidence, to take more amazing photos than you ever thought possible!

  • Shutter speed
  • Aperture
  • F-stops
  • ISO
  • Metering
  • Depth of field
  • Lenses
  • Focus
  • Magnification

Photo Nuts and Bolts is perfect for new camera owners or those who are yet to venture out of Auto Mode.

Take the course today for just $ 20

Course 2: Photo Nuts and Shots

NewImage.png
This second course is for those who understand the basics (it builds perfectly upon the first course above) and helps you to discover tools, techniques and thought processes for creative photography.

In 10 video lessons you’ll:

  • Learn to harness light to convey emotion
  • Understand the impact of great composition and how to achieve it
  • Tips for the sharpest possible photos
  • How to adapt your camera’s exposure for the shot you want
  • Master the concepts of shot perception, planning and execution – in any setting
  • When to break the rules for creative effect

Today only you can grab it for just $ 20 (66% off).

Take Both Courses for $ 30 (75% Off)

These courses are designed to be taken stand alone but are beautiful companion courses when you bundle them.

You can start though courses immediately and go through them all at once or pace it over time. You’ve got lifetime access so it’s completely up to you!

If you’re sick of looking at the dials and settings on your camera and knowing it can do so much more than what you do with it they’re the perfect gift to yourself to help you take beautiful images in 2016 and beyond.

This is one deal you don’t want to miss.

googletag.cmd.push(function() {
tablet_slots.push( googletag.defineSlot( “/1005424/_dPSv4_tab-all-article-bottom_(300×250)”, [300, 250], “pb-ad-78623” ).addService( googletag.pubads() ) ); } );

googletag.cmd.push(function() {
mobile_slots.push( googletag.defineSlot( “/1005424/_dPSv4_mob-all-article-bottom_(300×250)”, [300, 250], “pb-ad-78158” ).addService( googletag.pubads() ) ); } );

The post 75% OFF: Get Out of Auto Mode & Gain Creative Control Of Your Camera by Darren Rowse appeared first on Digital Photography School.


Digital Photography School

 
Comments Off on 75% OFF: Get Out of Auto Mode & Gain Creative Control Of Your Camera

Posted in Photography


8 Creative Ways to Make Money with Your Photography

30 Nov

Photography doesn’t just have to be a hobby, in fact, it can be a brilliant way to gain some extra money – and quite a lot at that! I’ve put together a list of my favourite ways of making money through photography, and with the ideas ranging from a couple of hours a week to a part-time project, you may find something that catches your eye.

1. Shoot Microstock

Picture 0

Stock image – © Olly Stabler

There are many different microstock sites out there, including Shutterstock and iStock Photo, and by uploading your images you may well be able to earn some extra money. If you excel at taking commercial images, this will be a great idea for you as these are the types of photographs that sell the most. If you are considering this option, make sure you don’t let your passion for photography die out, through a focus on sales statistics and selling stock shots.

2. Network to be a Second Shooter

Through networking using social media, events, and photography clubs, you can build relationships with other photographers. Opportunities will often arise through the relationships you have built, such as requests to work as a second shooter on a project. It may be that a fellow photographer is working an event, and needs you to join them to take photos to build a complete portfolio of photographs from the day. Weddings are probably the most common occasions that require second shooters, so keep an eye out for these jobs.

Picture 1

Me as a second shooter – © Scott Choucino

Alternatively, those you have networked with may have to turn down work that is too low-budget for them, and will ask you to work on them instead. Never underestimate the job opportunities that will become available to you through networking. This article tells you everything you need to know about the importance of being a second shooter.

3. Sell Prints

Picture 2

The first of my photos to make it to print – © Olly Stabler

There are many different ways you can sell prints; choose framed copies for larger amounts of money, print on canvases to create a professional look, or prints on their own for those who want to spend less. This will also open up the opportunity to place your work in stores and exhibitions. Having hard copies of your photographs will prove helpful whether you have already received sales, or are searching for prospects.

If you shoot in a studio, I would advise hanging your prints on display, and the larger the prints, the better. Your clients will always take note of them hanging in your studio and these prints will showcase the work you can create, encouraging sales. Upselling to your clients can create big money, with bigger prints bringing in big profit margins. To ensure that your photos print perfectly, check out Image Size and Resolution Explained for Print and Onscreen.

4. Become a Photo Booth Service

Photo booths are a similar price to a full frame DSLR body plus lens, and are extremely easy to operate. There are an unlimited amount of events and options available if you choose this route including parties, weddings, corporate affairs and events. Offering a photo booth service might not be the best option for a budding photographer as artistic photo opportunities are extremely limited, but nevertheless, it is a surefire way to earn money through photography.

Chris Guillebeau

By Chris Guillebeau – Yes that is your very own Managing Editor Darlene Hildebrandt in a Photo Booth at an event in Portland in 2012

IMG 0653

Same group, same event – 2015!

5. Sell an eBook

If you want to share your passion with others by talking about your experiences and discussing hints and tips, creating an eBook may be the way forward for you. This idea will involve little costly investment, but will require a lot of time. There are many benefits of writing an eBook including the fact that it will help you to make a name for yourself within the industry. The best way to encourage the success of your publication would be to outreach to bloggers and ask for reviews; the power of word of mouth is invaluable.

6. Hold a Portrait Party

Picture 3

A headshot taken in my studio – © Olly Stabler

The idea is simple. Invite friends, bloggers, colleagues, and clients to your studio and tell them to bring a couple of friends. This concept will also work in your lounge, your friend’s front room, or pretty much any location you fancy. Shoot portraits of them all throughout the night, you can even put on a show with entertainment and food.

You can then give them the option to buy their photographs, or book a session. Giving out a few free prints will also work in your favour, as you are thanking them for their time; this will also give them examples of your work to show people they know, and could end up resulting in a lot of business.

7. Photograph in Nightclubs

Picture 4

A photograph taken from my nightclub days – © Olly Stabler

Photographing in clubs will help you to learn a lot of skills that you will need for higher paid and more complex jobs. If you are reasonably new to photography, and want to earn extra money as well as build your skill set, this is the one for you. Although the pay isn’t brilliant, you can end up earning a decent amount if you photograph a few student nights a week in university towns and cities. This will also help you to build confidence as a photographer as you will be forced to interact with a lot of people at the same time – an essential quality for a photographer.

Becoming a nightclub photographer is extremely easy to get into, you just need to make sure you have a flash – you can find my recommended products on Amazon.com. The cheaper versions of these flashes do not work with ETTL, which means you will learn how to control flash manually, giving you a full understanding of how flash lighting works – something that is essential if you want to move into higher paying work.

8. Enter Competitions

There are plenty of photography competitions floating around, all with various prizes dependent on those running the feature. Try looking for those that offer a cash prize and enter as many as you can. If you are regularly photographing, you should have a portfolio of images you can enter into competitions. You only need to spend an hour each day searching and applying for these, which may make this option a favourite if you only have a small amount of time to spare. A good place to start is by utilizing databases such as this photo competition website. Remember though, this idea does not guarantee a payout and can be an unpredictable way of making money.

Editor’s note: be sure and read How To Evaluate Photo Contests Before Submitting Your Images And Cash before you enter any contests.

So those are just a few ways you could use your photography to make a little extra money, or start to make the move towards full-time professional. Do you have any other ideas or things you’ve tried? Please share in the comments below.

googletag.cmd.push(function() {
tablet_slots.push( googletag.defineSlot( “/1005424/_dPSv4_tab-all-article-bottom_(300×250)”, [300, 250], “pb-ad-78623” ).addService( googletag.pubads() ) ); } );

googletag.cmd.push(function() {
mobile_slots.push( googletag.defineSlot( “/1005424/_dPSv4_mob-all-article-bottom_(300×250)”, [300, 250], “pb-ad-78158” ).addService( googletag.pubads() ) ); } );

The post 8 Creative Ways to Make Money with Your Photography by Olly Stabler appeared first on Digital Photography School.


Digital Photography School

 
Comments Off on 8 Creative Ways to Make Money with Your Photography

Posted in Photography


5 Effective Methods of Creative Composition

13 Oct

It seems everyone has a camera these days, so you may be wondering, “How can I separate myself from the pack?” The answer does not involve a better camera, or a more expensive lens. In fact, the most important part of your equipment actually can’t be purchased in a store. It’s your own unique vision, and perspective on the world, that makes all the difference. The following five elements of creative composition are starting points to help you better express your point of view.

1) Leading Lines

While using leading lines in composition sounds simple, it’s actually one of the harder styles to pre-visualize. The idea is to find a line that will lead the viewer’s eye through the frame, and direct them to the subject. Train tracks are an obvious example, but it’s dangerous to shoot there, and therefore not recommended. There’s no shortage of safe alternatives however. The key is learning to see these opportunities, and apply them accordingly. How do you do this? Slowing down is certainly a good place to start. If you’re chasing the light at sunset, chances are your composition will be rushed and sloppy. If you take the time to really scout a location, it’s possible to craft an image that far exceeds a routine snapshot.

2) Shutter Speed

2_waterfall_slow-shutter

Yes, even your camera settings can be used as a compositional element. In this instance, a fast shutter speed would have frozen the water, leaving it rather listless. By slowing the exposure down to several seconds, the circular motion of the stream becomes evident, and works to anchor the scene. This is a different way of thinking about composition. It’s not only about where you put your focus point, but how you apply your settings to create the scene.

3) Depth of Field and Selective Focus

The aperture you choose can also play a major role in your composition. At f/1.8 for example, you have such a shallow depth of field that only a small portion of the picture is in focus. From a strategic angle, this can be quite an effective way to bring attention to your subject. While the face of the monument is sharp, both the foreground and background are completely out of focus. Seeing like this in advance, takes practice and imagination. When you look at an object, try to visualize how the camera can render it at various settings.

4) Going the Extra Mile

Lazy Composition

When traveling, it’s easy to get swept up in the excitement of a location. Often, you have to balance shooting time with making time to eat, sleep, and well, be human. Still, you want to get the shot that will be good enough for your portfolio. This doesn’t necessarily mean you need to sleep in the field, with the camera as your pillow. Sometimes, the difference between an average shot and a great one is a little extra effort. I’ve seen this time and again in my own work, and therefore wanted to stress it here.

In the first shot (above), I got off the ship, turned around and made a quick mindless record shot. The light was pretty but the overall image is uninspiring at best. Taking my own advice, I asked the waiting cab to let it idle for a minute, and walked down the pier a few hundred feet. From this new perspective, an entire different view presented itself with the sun kissing the ship’s bow. To emphasize the shape and color I purposely underexposed the scene (to make a silhouette). The small aperture of f/16 turned the sun into a starburst. These two shots are vastly different but were taken merely 100 feet apart, separated by five minutes.

Second ship shot

5) Framing

There are of course times when you scout and plan well, but the light is just not flattering when you arrive. You can go home empty handed, or work with what’s been presented, to make something special. Framing is one of the most effective ways to eliminate bad light. By essentially hiding it behind foliage you can emphasize your subject in a clever way. For the viewer, this provides a sense of three dimensionality, almost like they’re peering through a window. A small aperture works best for this technique, as it will keep everything sharp from near to far.

So try to incorporate some of these creative composition techniques into your images as you shoot. Work intentionally and think about your image before you press the button. Share any additional tips you have in the comments below.

googletag.cmd.push(function() {
tablet_slots.push( googletag.defineSlot( “/1005424/_dPSv4_tab-all-article-bottom_(300×250)”, [300, 250], “pb-ad-78623” ).addService( googletag.pubads() ) ); } );

googletag.cmd.push(function() {
mobile_slots.push( googletag.defineSlot( “/1005424/_dPSv4_mob-all-article-bottom_(300×250)”, [300, 250], “pb-ad-78158” ).addService( googletag.pubads() ) ); } );

The post 5 Effective Methods of Creative Composition by Chris Corradino appeared first on Digital Photography School.


Digital Photography School

 
Comments Off on 5 Effective Methods of Creative Composition

Posted in Photography


Countdown to PIX 2015: Rick Sammon and creative visualization

03 Oct

With less than a week until PIX 2015, we think you should meet some of our talented re:FRAME speakers. Rick Sammon is a veteran wildlife and travel shooter who has made it a focus of his career to help educate and inspire new photographers. Read more

Articles: Digital Photography Review (dpreview.com)

 
Comments Off on Countdown to PIX 2015: Rick Sammon and creative visualization

Posted in Uncategorized


Insanely Creative Tips ForShooting Gorgeous Interiors

03 Sep

Looking for roommates? Putting your place on the market?

Maybe you just wanna show your IG followers your sweet new setup?

Good thing we’ve got a few simple tricks to help you present the best features of your home! You’ll receive compliments from potential roommates, buyers, and followers in no time.

Read on and your house will be the star of the real estate listings!

(…)
Read the rest of Insanely Creative Tips For
Shooting Gorgeous Interiors (532 words)


© Taylor for Photojojo, 2015. |
Permalink |
No comment |
Add to
Shooting Gorgeous Interiors”>del.icio.us

Post tags:


Photojojo

 
Comments Off on Insanely Creative Tips ForShooting Gorgeous Interiors

Posted in Equipment


How to Take Creative Landscape Shots using Intentional Camera Movement

19 Aug

Many photographic situations rely on keeping your camera as still as possible during exposure for pin-sharp images. You may have practiced hard to develop a steady hand and you’ve probably used tripods, remote shutter releases or image stabilisation to reduce the risk of camera shake. But, is keeping your camera still always a good thing? Every now and again, why not throw caution to the wind, move your camera while the shutter is open, and explore the range of creative opportunities this offers you as a photographer.

Bluebellwoodsblur750

What is Intentional Camera Movement and why use it?

Intentional Camera Movement (or ICM for short) is a photographic technique where the camera is moved as the image is being taken. One example is panning. The camera movement mimics that of a moving subject to keep the subject sharp and the background blurred. However, moving your camera during exposure can open up a lot more creative options for you to try out. In particular, ICM can be used to take some truly unique landscape shots. The technique can be exceptionally liberating and, by reducing the amount of sharp details in a landscape, it allows you to concentrate on lines, form and colour in your images. A scene that you may ordinarily consider too cluttered, might just come to life through ICM by letting you blend colours and shapes for an interesting abstract shot.

One of the reasons that I have grown to love ICM is that it enables you to capture a landscape in a unique and personal way that cannot easily be reproduced. It can even breathe new life into overly familiar landscapes, letting you see and capture something new about a location you may have photographed many times before. If you are struggling to find inspiration for your next photographic project, or you want to get your creative juices flowing, this is a technique that you should try at least once. It is relatively easy to take some striking shots, you are sure to end up with a unique set of landscapes and it can also be a lot of fun.

ICMburtonbshorejul15750

Slow Shutter Speeds

A key factor to get right when using ICM is the shutter speed. It needs to be long enough to capture significant motion blur; anything from 1/3 or 1/2 second exposure times, up to multi-second exposures. Because of these slow shutter speeds, shooting in low-light conditions is ideal for ICM. During the daytime, it may be harder to achieve the required shutter speeds even at the lowest ISO setting and the smallest aperture (highest f-stop number). You may need to use a polarizing filter, a neutral density (ND) filter, or a combination of both. Personally, I prefer to use a polarizing filter as a starting point as this helps to boost colours and cut down on reflections and glare. I will then add a 2-stop or a 4-stop ND filter if the shutter speed needs to be slowed down any further.

When starting out with ICM, it may help to shoot in Shutter Priority mode. Set the shutter speed to around half a second to start, and turn the ISO to the lowest available setting on your camera. Once you have practiced at this shutter speed, you can then get longer exposure times by using a combination of low-light and/or filters. Focus manually and turn off the autofocus to prevent the camera searching for focus during exposure. Also, if you are using a lens that has image stabilization, remember to turn it off.

RockpoolsportlandICM750

Moving the Camera

Once you have taken control of the shutter speed, how you move the camera is totally up to you. Get creative, there are no rules. You could move the camera vertically, horizontally, or diagonally – fast or slow. Alternatively, you could rotate the camera 360 degrees during exposure to create a spiral effect, or change the focal distance on a zoom lens during exposure to create a zoom effect. With practice, you can combine two or more of these movements to create something truly unique. The look and feel of your final images will be determined by the speed, direction, and smoothness of your chosen movements. If you wish, you can use a tripod to control the camera movement. This will help you to capture a smoother movement, which can be useful if you wish to retain a straight horizon line. I prefer to work hand-held when moving the camera, as it offers greater flexibility and provides more opportunities to experiment with different movements.

Bold movements can sometimes be more effective as there is a risk that too subtle a movement may end up looking like camera shake in the final image. Waving your camera around may not come that naturally, and it may result in you getting some funny looks from amused onlookers, but the end results definitely can make it worthwhile.

ICMwarehamtreesunset750

What to Shoot

A good place to begin using ICM in your landscape shots is to look for locations that offer striking colours, lines, or patterns. Woodland is a favourite ICM subject of mine, particularly during the spring and autumn seasons. Clean, parallel lines provided by the trees and vibrant colours of nature (provided by bluebells in the spring and fallen leaves in the autumn) lend themselves to a vertical camera movement. This can be from the top-down, or from the bottom-up and can be a quick or slow movement. It really just depends on the effect you wish to capture, and how experimental you want to be. Seascapes can be a good starting point for side-to-side camera movement, panning the camera in line with the horizon.

Alternatively, in rougher waters, you could try to match the movement of your camera to the movement of the waves for an altogether different effect. Shooting at sunrise or sunset could provide you with a greater variety of colours to work with, and shooting city lights after dark can also offer a wide range of creative options.

Once you have found a suitable location, you will probably find yourself taking multiple shots with various different movements. (I should warn you that this technique can sometimes be quite addictive, and you may find your memory cards filling up quite quickly!) You may find it useful to set your camera to shoot in Continuous Shooting Mode so that you can take a series of shots in quick succession, while moving the camera in a particular direction.

Bluebellaction750

Final Tips

As with any type of photography, images created using this technique are not going to be to everybody’s taste. It is highly subjective and what works for you will not work for others. Just keep in mind basic principles of photography such as composition and exposure – these are still just as important. Also, while this technique will render much of the landscape abstract, you may find it helps to have at least one element of the landscape sharp, or recognizable in the final image.

There is an element of trial-and-error when starting out with Intentional Camera Movement. You should soon find out what works for you and what doesn’t; this will help you to develop your own style. Don’t be too concerned if you do not get an effect you like right away – the technique can be quite hit-and-miss sometimes. Take a lot of shots, and don’t be too quick to delete shots that you feel haven’t quite worked out as you had hoped. There is a chance that, after a few days, you may take another look and see something that you like in there after all.

One of the great things about this technique is that it is all about how you express yourself through photography – think of your camera as your paintbrush. Get creative, have fun, and start seeing landscapes in an exciting new way.

RiverweedsICMblandford750

I have included several of my attempts at ICM landscape shots. Please feel free to share your own in the comments section.

googletag.cmd.push(function() {
tablet_slots.push( googletag.defineSlot( “/1005424/_dPSv4_tab-all-article-bottom_(300×250)”, [300, 250], “pb-ad-78623” ).addService( googletag.pubads() ) ); } );

googletag.cmd.push(function() {
mobile_slots.push( googletag.defineSlot( “/1005424/_dPSv4_mob-all-article-bottom_(300×250)”, [300, 250], “pb-ad-78158” ).addService( googletag.pubads() ) ); } );

The post How to Take Creative Landscape Shots using Intentional Camera Movement by Richard Beech appeared first on Digital Photography School.


Digital Photography School

 
Comments Off on How to Take Creative Landscape Shots using Intentional Camera Movement

Posted in Photography