RSS
 

Posts Tagged ‘Creative’

3 Creative Exercises for Using a Slow Shutter Speed

18 Jul

The reason I’m a big fan of experimenting with different shutter speeds is that the opportunities seem endless. By only using a fast shutter speed you’ll limit your photography and miss out on so many great images. In my opinion, shutter speed is the setting which allows you to be the most creative and to capture unique and visually interesting images.

By changing the shutter speed only slightly (let’s say from 1/120th of a second to 1/60th) the image can look completely different and tell a whole different story.

3 Creative Exercises for Using a Slow Shutter Speed

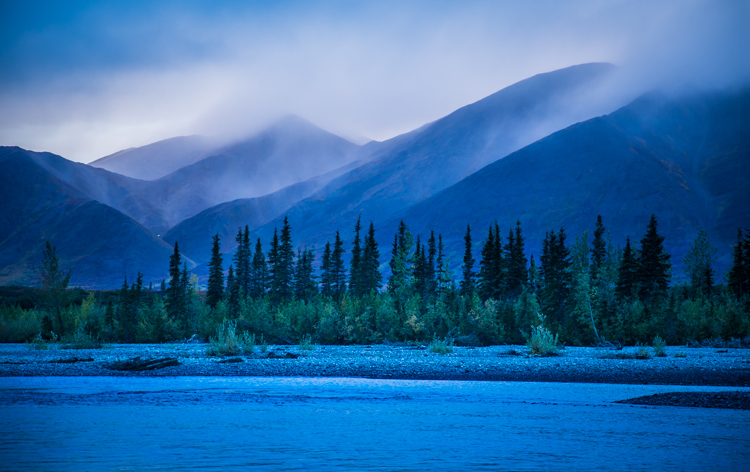
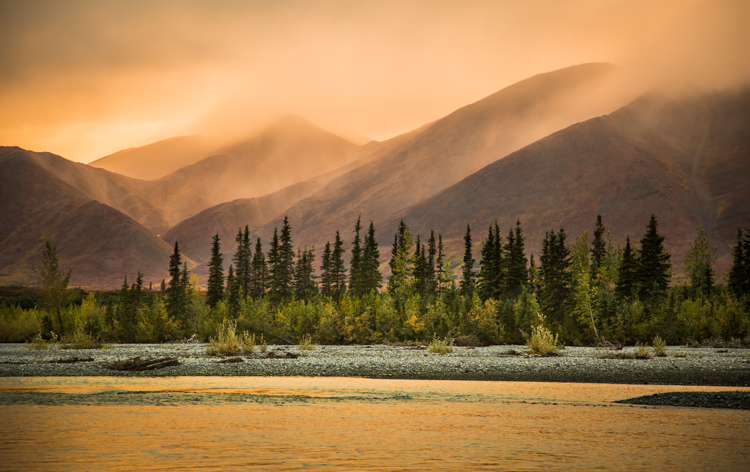
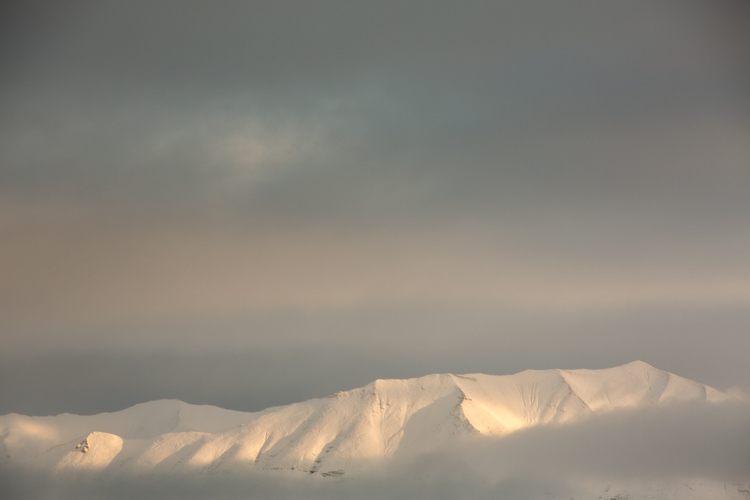
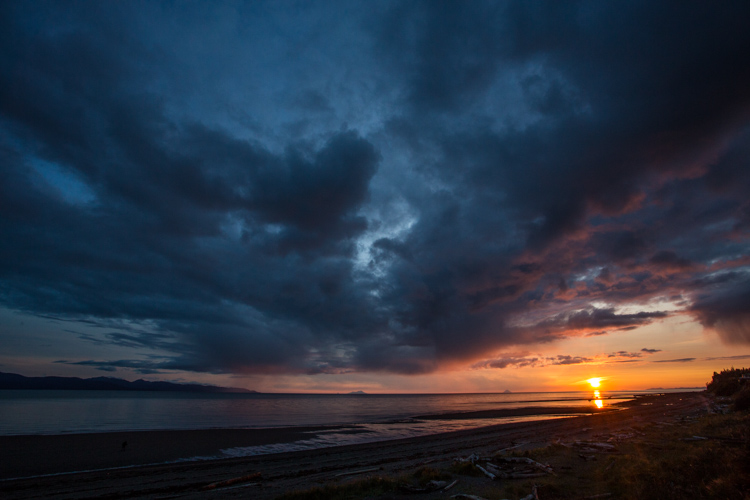
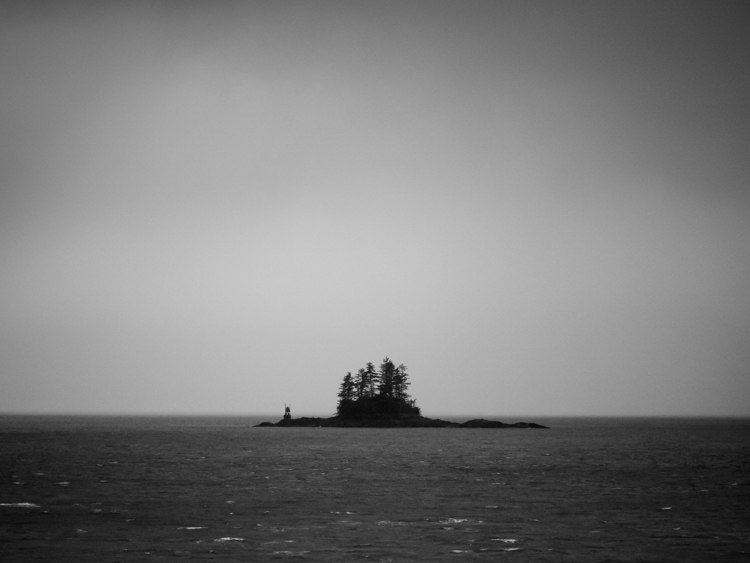
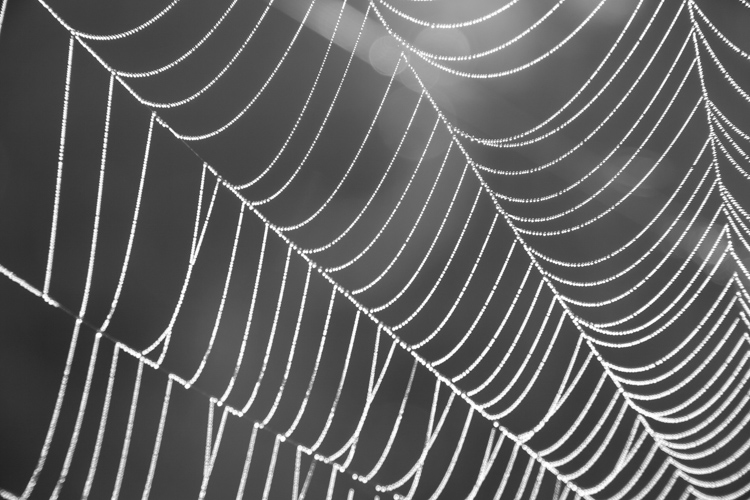
A typical use of a slow shutter speed.

If you are already somewhat familiar with using a slow shutter speed, you’ll know that it’s highly recommended to use a tripod for this technique. Doing so will lead to sharper images and you’ll most likely avoid camera shake (at least if you use a delayed shutter or remote trigger as well). I’ll be the first to say that I use a tripod for 99% of my images, but every now and then, I choose to break this rule as I know that leaving it behind will, in that case, be the best choice.

In this article, we’ll look at three creative exercises you can do using a slow shutter speed. They may not be typical or the most logical but the results can be stunning.

Creative Exercise #1 – Tilt and Pan

As I said, one of the main reasons for using a tripod when photographing with a slow shutter speed is to remove any vibration and movement from the camera, leading to crisp and sharp images. This creative exercise goes against those guidelines and instead of leaving the camera on a steady tripod, you’re going to tilt or pan it while taking the image.

The use of a tripod is not necessary for this technique and it’s easy to do without one. If you’re using a shutter speed slower than one second, I do recommend using a tripod though as you’ll most likely get a better result.

You’ll get the best results when your subject contains different colors and also has texture and patterns. When you’ve found the subject you wish to photograph, let’s say a treeline or a patch of grass, slow your shutter speed down to between 1/15th and 1/4th of a second. You can use an even slower shutter speed, but I’ve found that the best results are in this range, as you’ll still get some good texture and detail in the image.

Now, when you press the shutter button, quickly tilt or pan the camera in one direction – make sure that you’re quick enough though! As you can see, the result is an abstract image with lots of lines. This technique doesn’t work for all scenes though and I recommend zooming in on your subject to avoid including the sky.

shutter speed exercises

Photographed with a Nikon D800, Nikkor 70-200mm f/2.8 lens at f/11, ISO125, 1/15th.

Continue repeating this technique and try moving the camera both slower and quicker, as well as making small changes to the shutter speed. You’ll soon see that even small adjustments will have a huge impact on the final image. It may take quite a few attempts before you get an image you’re truly satisfied with, so keep playing.

Creative Exercise #2 – Zooming

Exercise number two is similar to the first in that it will create an abstract image with a lot of movement. Also this time you will forget about the guideline of keeping your camera still when photographing and will deliberately create motion, this time by zooming your lens.

This is a technique you can experiment a lot with, as the results can vary greatly. You may also want to use a longer shutter speed than you did above. For a more detailed description of this method, you can also read: How to Create a Dynamic Zoom Burst Photograph

Let’s try this first. Set your shutter speed to five seconds and place the camera on a tripod. Press the shutter button and wait two seconds before you slowly start zooming your lens, continue until the exposure is completed. As you can see, it appears as if two images are put together into one. The background is sharp but the ghost-like lines going away from it creates a sense of motion and can add a lot of extra depth.

shutter speed exercises

Image courtesy of dPS Managing Editor, Darlene Hildebrandt.

Again, as with all of these creative exercises, trial and error is your friend. Don’t just do it once and leave. Try this multiple times with different settings, vary the exposure, try a different tempo of the zoom (go fast, then try slow), zoom in then try zooming out, zoom and stop at varying intervals, etc. After a while, you’ll hopefully capture something that has potential!

This method can result in fascinating images taken at night. By capturing two images (one where this technique is used and one that’s normal) and blending them together you can get a quite interesting result. The landscape will be normal while the stars look like their shooting out of the image. It’s all about trying the unknown and take a moment to disobey the “rules”. For more on this technique read: How to Create a Dynamic Zoom Burst Photograph or Intentional Blur- How to Create it and Why It’s Awesome

shutter speed exercises

Image courtesy of dPS Managing Editor, Darlene Hildebrandt.

Note: if you want to try this on a bright daytime scene you may need to use a Neutral Density filter to cut down on the amount of light. Otherwise, your image will just be overexposed. 

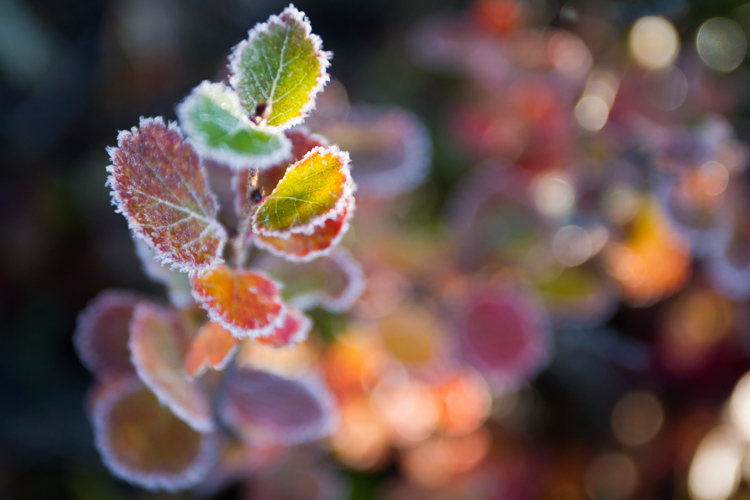
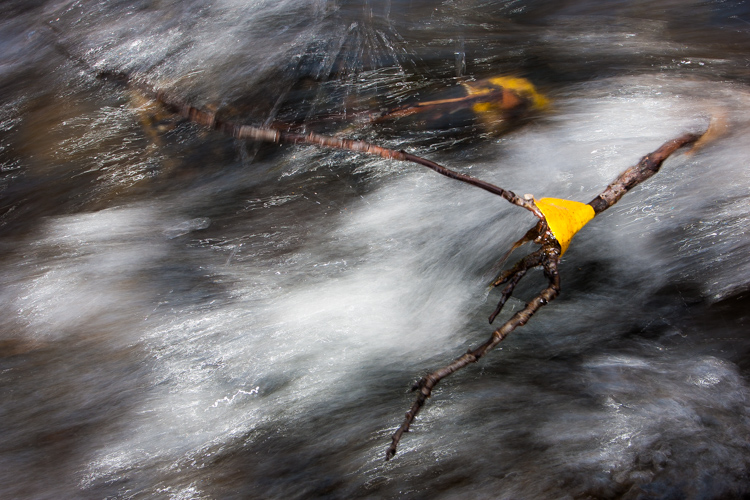
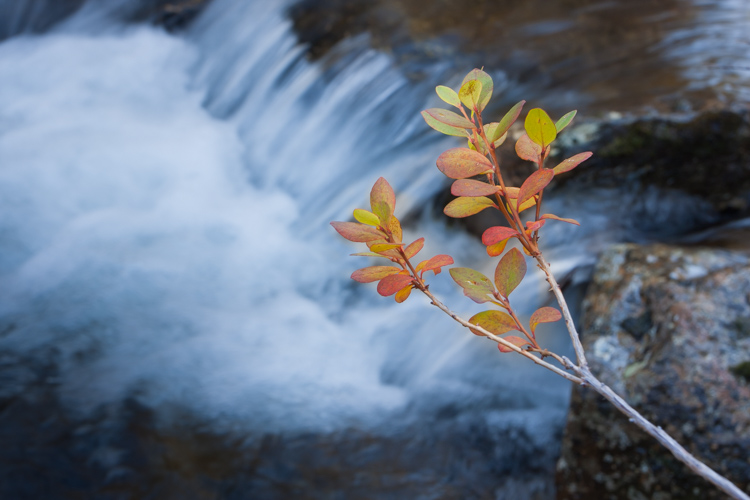
Creative Exercise #3 – Close-up

This last exercise for practicing using a slow shutter speed is quite different than the other two. For this one, you will use a tripod and delayed shutter or remote trigger to capture a sharp image. Then, you will be zooming in on some details in the landscape and using a slow shutter speed to capture it.

shutter speed exercises

For many years I rarely used anything other than an ultra-wide-angle lens, as I wanted to capture everything in the same image. As I became more experienced and my art began evolving, I realized that I found a much greater pleasure in viewing abstract and intimate shots. In many ways, these simple scenes result in more powerful images that better tell a story.

So, for this exercise, you’ll need to go outside and search for something that includes a moving element, such as a waterfall, river, or perhaps waves. The composition isn’t crucial yet as you’re mostly going to be experimenting with different shutter speeds but if you’re able to find a good one that’s a benefit.

Once you’ve found the subject you wish to photograph, set your shutter speed to 0.5 seconds. Capture an image and start lengthening the shutter speed until you reach somewhere between 5-10 seconds (you might need to use an ND filter and compensate with ISO/Aperture for this to work). By scrolling through the series of images you’ve taken you will see just how much it changes by making only small adjustments. I bet that the 0.5-second exposure looks nothing like the 5-second exposure, right?

slow shutter speed

What fascinates me with this exercise is that every now and then you’re going to find patterns or shapes in the image that you couldn’t see with the naked eye. The motion creates these shapes and in some cases, it can even be scary. Can you see all the screaming faces in this image?

Summary

So now it’s up to you to go out and try these shutter speed exercises. Share your results in the comments section below as well as any questions you may have.

Note: If you want more info, my eBook The Ultimate Guide to Long Exposure Photography, covers the basics of using a slow shutter speed and shares multiple case studies on how changing the shutter speed can affect your image.

The post 3 Creative Exercises for Using a Slow Shutter Speed by Christian Hoiberg appeared first on Digital Photography School.


Digital Photography School

 
Comments Off on 3 Creative Exercises for Using a Slow Shutter Speed

Posted in Photography


Photographer duo captures incredibly creative architecture portraits

17 Jul

$ (document).ready(function() { SampleGalleryV2({“containerId”:”embeddedSampleGallery_7260825413″,”galleryId”:”7260825413″,”isEmbeddedWidget”:true,”standalone”:false,”selectedImageIndex”:0,”startInCommentsView”:false,”isMobile”:false}) });

Artist duo Daniel Rueda and Anna Devis have one of the most creative, fun, not to mention OCD-friendly Instagram partnerships you’ll ever stumble across. They travel the world finding creative, strange and colorful architecture, and then come up with creative, strange and colorful ways to interact with it.

Surprisingly (or maybe not) Devis and Rueda are not photographers who love architecture, but architects who love photography. The architectural education gives them a better understanding and appreciation of the spaces they’re working with, while the photographer’s need to tell a story is what inspires them to insert themselves into each pictures as ‘characters.’

As Rueda explained in an interview with design website More with Less, in addition to lending a sense of scale, “the role of these characters in my pictures is to tell a story that goes beyond aesthetics. That is, it is not enough to just have an image that looks more or less beautiful; it has to tell something without the need of putting it into words.”

Devis and Rueda’s work is, plain and simple, a treat for the eyes. You can find many more creative shots like the ones above on Instagram at @drcuerda and @anniset.

Articles: Digital Photography Review (dpreview.com)

 
Comments Off on Photographer duo captures incredibly creative architecture portraits

Posted in Uncategorized


6 Ideas for More Creative Landscape Photography

26 Jun

In the following article, you will learn how to do creative landscape photography using a variety of different techniques.

The level of technical skill in photography these days is amazing. A quick Google search for any given location will show well-composed photos, taken during the correct lighting conditions, and edited to perfection. The number of people capable of taking these perfectly crafted photos is also increasing, and therein lies the problem. The number of people with similar photos diminishes all the others when placed together. What’s the solution to this? If you still want to take a photo of a particular landscape consider other creative approaches to photographing it.

So what’s the solution to this? If you still want to take a photo of a particular landscape consider using some other creative approaches to photographing it. Read on for six ideas to help you do better and more creative landscape photography.

6 Ideas for More Creative Landscape Photography - long exposure

This photo has used a long exposure to flatten the water. It’s also the same image used for the 360-degree panoramic image below.

#1 – Infrared Photography

Infrared photography is great fun to experiment with and has been around along time. This particular form of photography uses, as the name suggests, infrared light to capture images. Now you can’t see the infrared spectrum with your eyes, but your camera sensor or special infrared film can.

When using a digital camera you will either need to adjust the White Balance in camera or use post-processing to bring out the signature infrared look (note you can also get an old camera body converted especially for capturing infrared images). What is the infrared look? These photos have dark black skies, bright white foliage and often they have still water caused by a long exposure. In order to take this type of photo with a digital camera you will need a filter or a reconditioned camera.

6 Ideas for More Creative Landscape Photography - infrared

Infrared is a lot of fun if you’re prepared to put the time into learning this technique.

#2 – Aerial Photography

One of the best angles in photography is a high angle looking down, this can lead to some great creative landscapes. The advances in drone technology have seen many people take amazing photos from the sky, though the consumer-level drones still don’t produce the highest quality still images. There are a few options if you want to try out aerial photography yourself.

  • Airplanes – Yes get the window seat of your plane, and take photos from the sky. Ensure you have a high shutter speed, remember you’re plane is moving fast so you need a fast shutter speed to get a sharper image.
  • Drones – The consumer drone will get you great angles, and images with good enough quality for online sharing, but not for printing. The professionals use larger drones that allow their dSLR to be attached to them.
  • Hot air balloons – It’s a great experience to take a hot air balloon ride, and the photos can be incredible. Even more extreme is attaching a camera to a weather balloon, and sending it up almost into space!
6 Ideas for More Creative Landscape Photography - aerial photo

A great angle if you can get it is overhead for a creative landscape. This photo was taken from a hot air balloon, but a drone would also get an angle like this.

#3 – Refraction

The concept of refraction to use light bent through a glass object is essentially how your lens puts an image onto your camera sensor. You can create this effect with spherical glass objects, or even ones filled with water. The image inside the refracting object will be upside down, and a vast amount of the scene behind the ball will be captured.

This is an interesting way to capture a creative landscape because the image inside the ball the image has the characteristics of a fisheye lens. Using a lens with a long focal length will compress the scene.

6 Ideas for More Creative Landscape Photography - refraction

This scene of St Paul’s Cathedral was captured inside a crystal ball, using the refraction technique.

#4 – Shoot a 360-Degree Panorama

This creative landscape idea utilizes post-processing to create a tiny planet effect. The effect is similar to the refraction idea, in that you are creating a globe, however, the look is very different.

To create this photo you will need a panoramic landscape image. If you’re a purest, then the panoramic landscape will be created by rotating the camera through 360 degrees. Once you have your panorama it needs to be reformatted into a square image, flipped upside down, and then the polar coordinates filter should be applied in Photoshop. To find this filter go to filter > distort > polar coordinates.

6 Ideas for More Creative Landscape Photography - 360-degree pano

This photo was turned into a tiny planet. It has the feel of a 360-degree panoramic photo.

#5 – Long Exposure

The different types of images that are possible with long exposures will lead to a burst of creative landscape photography. All you need is a tripod, and a camera capable of taking long exposure photos. The effect of long exposure is to make things move. The main subjects are car light trails, water, and cloud movement. Now, of course, astrophotography is also long exposure, but you’ll learn about that next.

  • Car light trails – These are produced by taking photos that are generally five seconds or longer. An overhead angle from a bridge or tall building is often best for shooting car trails, but photos from street level also look nice.
  • Water – Anywhere there is moving water, a long exposure can look nice. When photographing waterfalls the white water becomes like silk, with exposures over two seconds. The sea and its waves can be flattened by using long exposures over 10 seconds.
  • Cloud movement – Clouds moving across the sky make for a dreamy look in your photo, to achieve this you’ll need lots of clouds, with some clear sky. The faster the clouds move the easier it is to capture this movement. A sturdy tripod is important here, clouds move faster on windy days, so you need the camera to be still.
6 Ideas for More Creative Landscape Photography - long exposures

It’s a lot of fun to play creatively with traffic light trails in a photo. The photo of Big Ben in London is a popular one.

#6 – Astrophotography

One of the most popular forms of photography for those interested in landscapes is astrophotography. The latest cameras help you capture starry skies, with better noise performance at high ISO levels. Recent excursions to the deserts of Dubai and the coastline of southern England revealed a phalanx of photographers interested in this kind of photography. The most popular types of astrophotography are capturing the Milky Way, or showing the rotation of stars around the pole.

  • The Milky Way – Positioning the Milky Way in your frame can create a dramatic and creative landscape photo. This is the subject of a whole different article. The basics are to shoot at the constellation of Sagittarius between March and October in the northern hemisphere. Use the largest aperture you have, with exposures generally being 25 seconds long, and an ISO of 6400 or greater.
  • Star trails – The aim here is to point your camera at the north or south pole, and capture the earth’s rotation during a long exposure. The photo can be an ultra long 15-minute exposure or a series of shorter ones. The best method is to take multipl30-secondnd exposures, and then stack them together. StarStax is a good piece of software that will help you create this type of photo.
6 Ideas for More Creative Landscape Photography - Milky Way

Shooting the Milky Way is hard to photograph, so the chance of your photo being more unique is higher if you can do it.

Which creative landscape will you make?

There are many creative landscape photography ideas, which one will you choose to try out? There are other ideas we’d love to hear about as well, how did you make a creative scene your own?

In this article, I stuck strictly to still photos, but experiments with video allow for time-lapse or cinemagraphs as well. Please share your examples of the above styles that you’ve done, and tell us why and how you create your shot.

The post 6 Ideas for More Creative Landscape Photography by Simon Bond appeared first on Digital Photography School.


Digital Photography School

 
Comments Off on 6 Ideas for More Creative Landscape Photography

Posted in Photography


How to Use a Prism to Make Creative Photo Effects

14 Jun

In this article, I’ll give you some ideas and tips on how to use a prism to make some really cool and creative photo effects.

How to Use a Prism to Make Creative Photo Effects

Prisms

Have you ever seen the beautiful rainbows dispersed by hanging suncatchers and wondered, how would that look in a photograph? Unfortunately, the small prisms used on most suncatchers don’t fill enough of the camera frame to render a detailed image. But where there’s a will, there’s a way!

Triangular prisms, usually found in college science labs have become an increasingly popular tool for adding beautiful reflections and light to a photograph. Plus, because prisms are small, they are easy to pop in a camera bag, ready for your next shoot.

How to Use a Prism to Make Creative Photo Effects

How to Use a Prism to Make Creative Photo Effects

How to Use a Prism to Make Creative Photo Effects

The physics

You may be familiar with triangular prisms from high-school demonstrations on the characteristics of light. The physics goes something like this – when a beam of light (made up of different electromagnetic waves with varying wavelengths) hits a piece of glass straight-on, the light passes right through it.

However, if the beam of light comes into contact with a glass surface at an angle, the wavelengths bend, which is a phenomenon called refraction. Then, when the beam exits through the other side of the prism, the wavelengths bend again. The amount the light bend depends on the wavelength itself. Red bends at one angle, and violet bends another and so each color is dispersed into the rainbow we see when we look through a prism.

As photographers, we exploit the inherent properties of light whenever we take a photo. The assembly of glass elements in camera lenses directs light from a scene, translating it to the digital sensor. But by adding a prism into the mix (in front of the lens) you can introduce some interesting creative effects to your photographs. Light that would usually meet the outer lens element first, hits the prism, dispersing the light before it’s directed into the camera.

What you will need

  • A camera
  • One triangular prism
  • A lens cloth
triangular prism - How to Use a Prism to Make Creative Photo Effects

A triangular prism like this one is available on Amazon for only a few dollars.

This project only has two ingredients – a prism and a DSLR camera. For this project, I used a triangular prism I purchased on eBay for a few dollars. A prism that can be manipulated with one hand is ideal. My preference is one that is approximately 3″ x 1″ (8cm x 2.5 cm). Keeping a lens cloth close by is useful for fingerprints on the glass that can show up in the image.

How to Use a Prism to Make Creative Photo Effects

How to Use a Prism to Make Creative Photo Effects

How to Use a Prism to Make Creative Photo Effects

Method

Using a prism to create interesting effects in-camera requires a little trial and error and a bit of co-ordination. Holding the prism over the front lens element is the easy part. It’s getting the effect right that’s a little fiddly. I’d recommend using a tripod as it can be a bit vexing having to juggle the camera in one hand and the prism in the other. I would also recommend using Live View to give you an accurate indication of what impact the prism is making, without being blinded by wayward reflections from the sun streaking through your viewfinder.

If you’ve ever shot through glass materials before, you’ll know that your autofocus can really start to struggle. First, focus the camera on your subject using autofocus, then switch to manual focus mode. That way, the subject in the background will already be sharp, without having the camera flail around trying to focus on the prism itself.

Slowly rotate the prism, monitoring the effect on the LCD screen. Angling the prism away from the lens, or changing your position in relation to the sun can also add different effects. Experiment with the distance between the prism and the camera lens too. When you find a reflection in the image you like, take a snap!

Now that you have the basics down, try changing up the prism! I am constantly switching between my triangular prism and a glass wine stopper I chanced upon in an op-shop. The hexagonal prism adds a greater kaleidoscopic effect but tends to distort the image more, so it’s fun to experiment and see what works best.

How to Use a Prism to Make Creative Photo Effects

How to Use a Prism to Make Creative Photo Effects

A wine-stopper I found at an op-shop makes for a great tool in prism photography.

How to Use a Prism to Make Creative Photo Effects

You don’t always need sunny weather for prism photography, this abstract image of a crane was taken on a cold, rainy afternoon.

Your turn

So pick up a glass prism and give this a try. Please share your prism photographs in the comments below.

The post How to Use a Prism to Make Creative Photo Effects by Megan Kennedy appeared first on Digital Photography School.


Digital Photography School

 
Comments Off on How to Use a Prism to Make Creative Photo Effects

Posted in Photography


How to Use White Balance as a Creative Tool

02 Jun

White Balance is almost always used to match what colors our cameras detect to the colors we see with our eyes. Our brains are very good at managing how we see color. A sunny day looks warm and bright, but the actual color of the light is skewed heavily blue. Indoors, incandescent lights are notoriously warm (yellow/orange) and though our eyes may detect little of this warmth, you can bet our cameras will. White Balance is how we correct for that difference in light color, and how we can make images appear “natural” which is to say, how our brains detect it.

White Balance as a Creative Tool

Auto White Balance

It’s useful, certainly, but most of us leave it up to the camera to make the decision about White Balance. I know I do. My cameras are almost always set to Auto White Balance. Since I shoot in RAW, any errors that the camera makes can quickly be corrected in post-processing. At this point, I rarely even think about White Balance. But, perhaps I should…

White Balance can be more than a mindless setting of camera functions or a digital slider in Lightroom. Instead, it can be used as a creative tool. Slight changes in White Balance can change the tone and impact of your images. From dramatic color shifts to subtle changes in tonality, it’s time to elevate White Balance into the realm of creative options in photography.

The methods I’ll discuss here can be done either in camera or in post-processing, but it’s easier using the latter since you can see the impact of your choices real time. Although I use Adobe Lightroom, any program that allows you to adjust White Balance will work.

Dramatic Shifts in White Balance

Big shifts in White Balance can completely change the nature of your image. Shifts from cool to warm tones can take the image from looking as though it was made during the blue hour to post-dawn, or even make the weather appear to change.

A few years ago I was leading a wilderness/photo tour in the Noatak National Preserve in northwestern Alaska. One evening, an afternoon storm was clearing off the mountains and I went down to the river to make a few images. The light was pink, the rolling clouds and falling rain lit by the low sun.

Below are three versions of the same image with only the White Balance changed. You can see the huge difference made by the shift from warm to cool tones. The bluest image is set 3600K, the warmest to 14750K, and the one somewhere in between is 7000K. In the end, you’ll probably choose an image that is neither overly cool, nor overly warm, but how the White Balance setting changes the feel of the image is worth noting.

White Balance as a Creative Tool

White Balance set to 3600K.

White Balance as a Creative Tool

7000K

White Balance as a Creative Tool

14,750K

Here is another example using autumn foliage, in this case, a Dwarf Birch in Alaska. The top image is 5050K, very close to what the Auto function on my camera selected, in the second I’ve warmed the image to 9000K. Although I prefer the cooler tones, I could see the second version appealing to editors looking for an autumn spread in a magazine or catalog.

White Balance as a Creative Tool

White Balance set to 5050K.

White Balance as a Creative Tool

White Balance set to 9000K.

Subtle Shifts in White Balance

White Balance as a Creative Tool

White Balance set to 4350K.

White Balance as a Creative Tool

White Balance set to 8700K.

Subtle shifts in White Balance can also be effective, even though differences between images may be less obvious. A change of a few hundred to a couple thousand Kelvin (the K measurement used in White Balance) can make a surprising difference to the impact of an image. In the top photo, I chose a cool setting (4350K) which brings out the cool winter tones. The second is much warmer, set to 8700k, which to me, (aside from being a bit too warm) feels like an evening storm is approaching. Neither is exactly “accurate” to the scene as I saw it, but neither are they necessarily unnatural. I’ll return to this image shortly.

Water

Water strikes most people as a cool substance, and often it looks better when a White Balance with more blue-tone is selected. I made this image on a day with broken clouds, in autumn, in a small mountain range north of my home in Alaska. Tiny patches of the sun were penetrating the yellow, shrubby willows which surrounded this small creek. The yellow leaves and the partially overcast sky gave the scene a notably warm tone which you can see in the top image, set to 4600K (as selected by my camera’s Auto White Balance setting). I think it’s too warm, so just a subtle push to the blue range (4100K) was enough to retain the warm tone in the single yellow leaf but sufficient enough to cool the water.

White Balance as a Creative Tool

White Balance 4600K as chosen by the camera using AWB.

White Balance as a Creative Tool

White Balance adjusted to 4600K in post-processing makes the water feel much cooler.

Sunsets

Sunsets too can benefit from a little creative tweaking of the White Balance. From the bluff above a beach in Homer, Alaska, I made the image below. The cooler-toned toned image was shot using Auto White Balance (4600K), while the second I warmed up to 6000K in processing. I like both versions. So you can see that selecting a White Balance is very much a matter of taste, and how you want your image to come across to your audience. Which version do you prefer?

White Balance 4600K as shot using AWB.

White Balance adjusted to 6000K in post-processing.

Selective Changes to White Balance

The great part about digital post-processing is that you don’t have to choose one White Balance or another, you can mix and match. My choice of software, Adobe Lightroom, allows you to use the Adjustment Brush to grab certain parts of your frame, and independently adjust them from the rest of the image.

The photo below was made around the same time as the leaf in the stream I discussed earlier. In this case, a global (over the entire image) adjustment made the sprig of autumn colors look too cool and weird, even though the water was about right. So I cooled the whole image off to 3700K, then selected the sprig and bumped the Temperature setting to +35 using the Adjustment Brush.

As I was playing with the snowy mountain image I discussed early, I realized I liked neither the blue nor the overly warm version. I thought some combination might work well. So I set the overall tone slightly blue to 5100K and selected just the mountain, where the hint of sunlight was shedding some warmer light and gave that a boost to +23. The result works.

White Balance set to 5100K overall with warmth added to the top of the mountains using the Adjustment Brush.

Compare this version which is at 5000K with no extra adjustments on the mountains. See how subtle the difference is? But the version above feels little warmer in the sunlit areas.

White Balance in Black and White

We think of White Balance as strictly related to color, but in fact, it can play an important role in black and white as well. The White Balance used in your final image can impact cont st, and the way different shades of gray are presented in the final image.

To get the full impact, you need to use that White Balance slider in a big way. That means doing big pushes from warm to cool, not little subtle shifts of a few hundred or thousand Kelvin.

Examples

I was on the Alaska Ferry making images on a very gray and rainy winter day when we passed this small speck of an island with a few wind-blown spruce trees growing on it. I knew it was a black and white kind of scene, so I quickly removed the color using Lightroom. When I moved the White Balance to one side or the other it created a big change in the contrast and overall brightness of the photo. The top image is set well to the blue range (3700K) while the second is way over in the warm range (32,700K). You can see how the warm setting removed some contrast and brightened the photo.

3700K

32,700K

A snowy landscape image on a beach near Haines, Alaska provided another chance to explore how White Balance impacts a black and white scene. The left image is set to 3700K, the right to 35,000K.

3700K

35,000K

Lastly, is this simple composition of a dew-covered spider web. The top image has high contrast, is dark overall, with clean white dew drops and is set 2000K, (as cool as Lightroom will allow). The second is much grayer, with substantially less contrast, and is as high as Lightroom will allow at 50,000K. There is no question, I prefer the first version. But many images, such as the two examples above depend more on personal taste.

2000K

50,000K

Conclusion

It is time to stop thinking of White Balance as strictly a way to accurately present color, and instead, embrace it as a creative tool. Whether it is for dramatic impact, subtle changes, selective adjustments, or even (counter-intuitively) using it in black and white photography – White Balance can play an important part in the outcome of your images. Consider it, use it. Embrace White Balance as more than just a setting.

The post How to Use White Balance as a Creative Tool by David Shaw appeared first on Digital Photography School.


Digital Photography School

 
Comments Off on How to Use White Balance as a Creative Tool

Posted in Photography


How to Photograph Your Museum Visits – Turn Limitations Into Creative Challenges

20 May

Do you feel frustrated that you are not allowed to make selfies in museums? Did a light reflection ruin the photo of your favorite artwork? Are the other visitors always in the way of your perfect shot? Then this article is for you, to help you photograph your next museum visit!

Museums are a great place to get inspiration, however, the great teams behind every exhibition have to be more concerned with the preservation of the artworks than about your photo. Therefore, photographing in a museum poses two big challenges.

First, the multiple rules that you have to follow, remember to always be respectful of them because they exist for a reason. Second, the fact that you can’t alter the conditions in which you have to shoot. But this doesn’t mean that you can’t make great photos, actually, you can turn it around and use these limitations to take your photography to the next level.

Every museum has different rules so I’ll cover some of the most common:

NO SELFIE-STICK

Many museums of the world like the Palace Museum in Beijing, the Van Gogh Museum in Amsterdam, the Metropolitan Museum of Art in New York, and many others have banned the selfie-stick. Not to worry, this shouldn’t stop you from making a memory of yourself with your favorite artwork.

Whether it’s in a frame or a display case, most objects in museums are protected by glass. So, you can use your reflection on the glass to make a selfie. You can also use mirrors and other reflective surfaces you can find.

How to Photograph Your Museum Visits - Turn Limitations Into Creative Challenges

Crystals, Teylers Museum, Haarlem, The Netherlands.

How to Photograph Your Museum Visits - Turn Limitations Into Creative Challenges

Albergo Diurno Venezia, during the exhibition Senso 80 by Flavio Favelli, Art Week Milan 2017, Milan, Italy.

In order to work with reflections, you need to understand how light works. Without going into a complicated physics lesson, what you need to know is that light travels in straight lines.

Light Diagram How to Photograph Your Museum Visits - Turn Limitations Into Creative Challenges

Which is also why you can get those annoying light flares that can ruin your photos. So you need to be very aware of all the other objects in the room to avoid unwanted reflections.

Reflection Mistakes - museum

Me As Mapplethorpe, 2009. Gillian Wearing RA, (based upon the Robert Mapplethorpe work: Self Portrait, 1988) exhibited at Gemeente Museum, The Hague, the Netherlands.

Now that you know how it works, you know how to move around the space in order to control your reflection. A few tips to consider though:

  • The darker the background, the better you will see the reflection. For example, if you are doing the selfie in front of a black and white photo, position yourself in a way that you will be reflected in the darkest part of the photo, so you will stand out more. If you are wearing white or a light color shirt that’s even better.
  • Try different positions so that you are not blocking an important part of the artwork. You can even try interacting with it.
  • If there is a metallic surface or a mirror in the piece, use it to your advantage, and acknowledge your presence (smile, wave, etc.) so that it doesn’t look like a mistake.
  • Locate the light source and then position yourself in a way that the bouncing trajectory doesn’t hit the lens of your camera, but it does hit any objects you want to reflect.

NO FLASH

This is one of the most universal rules in museums. This is because the hundreds of thousands of visitors that some artworks attract would sum to a great amount of light that some materials cannot take without damage. So you’ll have to make the best with the lighting of the museum that is designed to either preserve the delicate artworks, or to set a mood that complements a whole concept of the exhibition.

In other words, more often than not it will be very dark. This is where the settings of your camera (and even some smartphones) come in.

Since this article is not about exposure I won’t go into a lot of detail, but I will give you a quick guide to adjust it to better photograph in low light. The correct exposure depends on three things:

ISO

In photography this stands for International Standard Organization just like every other ISO that you’ve heard about. What it standardizes in this case is a scale for measuring sensitivity to light. The higher the ISO number you choose, the higher sensitivity your device will have. A lot of people are afraid to go very high because there is the risk of getting noise in your image, which is like the grain that used to be in film photography.

Nowadays most cameras can keep the quality even at higher numbers, so try all the settings out to determine which one is the highest you can go with your own equipment. However, in my experience, you get less noise from a high ISO than going lower and then trying to correct the underexposure in Photoshop later. Here is an example:

ISO 320 museums

This image was taken at ISO 320.

Versus . . .

ISO 3200 museums low light

This image was taken with an ISO of 3200.

Aperture (f-number)

The simplest explanation I can offer is that the aperture is the hole in your lens that lets in light. Therefore the bigger the hole, the more light will enter.

But here is the tricky part, the aperture reference scale is inversely proportional. So, contrary to what you might think, a smaller number means a bigger hole and therefore more light. For example, a photograph taken with f/8 will be lighter than the photo taken with f/11.

This setting also controls the depth of field of your image (the area that will be in focus). So be careful moving this one because you might loose some sharpness in areas that are farther away from your point of focus if you use smaller f-numbers. Notice in the image below how the objects are loosing focus towards the back.

Depth of field museums

Crystals, Teylers Museum, Haarlem, The Netherlands.

Shutter Speed

This setting controls how much time you expose the sensor to light. Since the sensor (or film) is accumulative, the more time you expose it, the lighter your image will be. Shutter speed is very straightforward and it could be your best choice, except that anything moving will look like a blur if you go too slow.

Even if everything is still, if you are not using a tripod, YOU are the one moving. So don’t let it stay opened too long. In some museums you’re allowed to use a tripod if you pay an extra fee, so feel free to ask.

It is also useful to know that telephoto lenses need a faster shutter speed to avoid blur than the wide angle lenses. So you can also consider re-framing your image like the next example.

Shutter speed 1/8th, f/5.6, ISO 800, focal length 55mm.

Shutter speed 1/8th, f/5.6, ISO 800, focal length 22mm.

You can also use this setting in a creative way. For this photo I wanted the tram passing in between the two pieces of the sculpture to leave a blurry line to have a more dynamic result and also show more context on how the sculpture was meant to interact with the space.

Shutter speed 1/2 second, f/11, ISO 400; focal length 18mm.

Shutter speed 1.3 seconds, f/11, ISO 400; focal length 18mm.

Now that you know what each setting does, you can adjust them to your needs. Keep in mind that they are interrelated, so if you move one you need to correct the others accordingly. For example, if you close your aperture because you want more depth of field, remember to compensate it by leaving the shutter open for a longer time, or by making your ISO more sensitive (higher number). Always keep an eye on your exposure meter!

NO TOUCH

Given that you can’t change your surroundings or rearrange the artworks, you will have to be extra creative and flexible.

Take care of composition.

When photographing an artwork in a museum, don’t try to just reproduce it. To do that it’s always better to buy the postcard or the catalog. What you do want is to capture what it’s transmitting to you. Use the architecture of the gallery, make it interact with the other pieces of the exhibition, try to capture the ambiance. In other words, make it your own. Notice how in this example I didn’t photograph any specific artwork, just the space and the atmosphere.

Composition museums

Rijksmuseum van Oudheden, Leiden, the Netherlands.

Change your position.

Retaking the topic from the No Selfie-stick, if you need to avoid reflections and you can’t move the artwork or the lighting, then reposition yourself. Do this also to play with perspective, to include or exclude objects from your frame, and just try as many angles as you can.

For this next image, I was playing with perspective and the position of the circular lamps in order to make them look like the aura of the statue.

Position museums

Rijksmuseum, Amsterdam, the Netherlands.

Be aware of other visitors.

It will be very difficult for you to have the museum to yourself, so try to be respectful of others and don’t get in the way. Don’t be afraid to include people in your photo as well, just be sure to wait until the right moment so that they complement your image.

Mirrors museums

Het Dolhys, Haarlem, the Netherlands.

Silhouette museums

Museo de la luz, Mexico City, Mexico.

COPYRIGHT

Last but not least, there is one rule that you won’t see on the museum signs, but it exists and it’s very important – the issue of copyright.

While getting inspiration from other artists it’s great, remember that you are photographing the work of a fellow artist so it is covered by copyright. This can apply from the artwork being exhibited to the architecture of the museum so it can be a very complicated issue to understand.

I advise you inform yourself about it in more depth. A general rule of thumb that you can always follow is that you can’t use the image for commercial purposes without permission and/or retribution from the creator. And in any other context for educational purposes (e.g. this tutorial or giving a conference) you should always give the credits. Let’s be respectful of one another.

Next time you go to a museum you can both get inspired and creative. Enjoy and share your photos!

The post How to Photograph Your Museum Visits – Turn Limitations Into Creative Challenges by Ana Mireles appeared first on Digital Photography School.


Digital Photography School

 
Comments Off on How to Photograph Your Museum Visits – Turn Limitations Into Creative Challenges

Posted in Photography


How to do Creative Water Splash Photography with Off-Camera Flash

19 May

Photography gives us the unique opportunity to freeze time. Moments that normally can’t be seen because they occur in the blink of an eye can suddenly be captured by a camera with incredible precision. This gives us the opportunity to discover fascinating and unique opportunities for photography that showcase and celebrate the wonder of the world around us. It can also be an extremely fun and creative style of photography, and a way to practice your skills with off-camera flash.

A toy car dropped into water, photographed with off-camera flash

Chances are you’ve come across a photo of a water droplet or water splash before. The intricate and mesmerizing patterns of water droplets in flight make for excellent abstract art.

But how can you take a picture fast enough? How does it work to freeze each individual droplet in midair?

A water droplet frozen in midair with off-camera flash photography

Lightning Fast Photography

Most modern cameras can take a picture as fast as 1/8000th of a second. You’ve probably noticed, however, that lightning fast shutter speeds typically require a lot of light.

If you are walking around outdoors on a bright and sunny, you will be able to get your camera up to 1/8000th, and you can capture a water fight or the splash of a water fountain. However, there often isn’t enough light to take a good image indoors or under cloudy lighting conditions.

Water droplets splashing into a jar, photographed with off-camera flash

Furthermore, taking a picture under sunny lighting conditions won’t hide the background. The intricacies of the water will be lost against the background.

That’s why the trick to creating a truly amazing water image is to use off-camera flash.

How it works

Cameras only record what they see. This means that a picture taken in a dark room will result in a pitch black picture.

When you use flash in a dark room, your subject will be illuminated for the duration of the flash of light – which means that your new “shutter speed” will be the speed at which your flash fires (flash duration).

Depending on the model and power, a flash can fire as quickly as 1/10,000th of a second. This new shutter speed of 1/10,000th of a second is easily fast enough to freeze a water droplet in midair.

A water droplet, frozen in midair with off-camera flash

This shot was taken using the settings 1/250, f/5,6, ISO 250. Even with the “slow” shutter speed, the flash stops the water droplet in mid-flight.

The neat thing here is that as long as the room is dark, the shutter speed on your camera doesn’t actually even matter anymore. With the right setting, your camera can take an image that lasts for a full second long, but the final shot will only be recorded in the blazing fast burst of light from the flash.

Setting up your shot

To try this out for yourself, you will need to set up in a fairly dark room – dark enough so that you can use your in-camera settings to take a completely black picture. You’ll need to get off Auto mode in order to do this.

Remember that the aperture and ISO that you select will affect your flash power. Selecting either a wider aperture or a higher ISO will make your camera more sensitive to light, including the light from your flash. This makes your flash more powerful, in a way.

For this purpose, I used the following setup:

A behind the scenes shot of the setup for water splash photography

Note the towel. A towel just might be the most important piece of equipment to remember when you try water splash photography!

Even though there is still some light in the room, I was able to create a dark background by setting my camera to 1/250, f/5, ISO 250.

Get the flash off-camera

The key is to use the flashes off-camera. Having the light come in at an angle is more in line with how we experience light in the real world, so it produces a more naturally lit image.

But you don’t need to have multiple flashes to try this out – experiment with one flash and see what happens!

More importantly, by bringing the light in from an angle and preventing it from shining on the walls or objects behind your subject, you can create a dark background. This really makes each droplet shimmer and shine in contrast.

Two tomatoes splashing into water, shot with off-camera flash

A toy car splashing into water, photography with off-camera flash

Two common ways of triggering a flash off-camera are to use either a radio transmitter or a sync cord that connects your camera’s hotshoe to the flash itself. Your camera may also be able to fire your off-camera flash optically using the built-in pop-up flash. You may need to check your camera’s manual to see if your system has that functionality.

The exact power settings you will need to use on your flash will vary depending on the type of flash, the setup, and the distance between your flash and the splash you are photographing.

Remember: Digital is cheap! Experiment and watch your camera’s LCD screen after every shot. If it is too dark, simply turn up the flash power or consider moving your lights a bit closer to the subject.

Getting the timing right

Once you have everything set up, it’s simply a matter of trial and error! Even with a fancy setup, perfecting your timing in order to capture a splash at the right moment is tough.

Unless you have a high end strobe unit, you won’t be able to take pictures quickly – the batteries will need a moment to recharge every time they fire. This means you’ve only got one shot for every splash!

A man photographed with off-camera flash as he is hit by water in the face

If you get tired of using toy cars as a model, why not ask a friend to step in?

Every camera has a very slight delay after you press the shutter button (before it actually takes the picture). You’ll want to work on your timing so that you can make the most of every shot – especially if you ask a friend to stand in as a target for a water splash picture!

Shooting digital allows you to experiment until you have a good sense of the timing. After a bit of practice, you will have some incredible and creative water splashes to show for your effort!

A man being photographed splashing water while on a black background

The post How to do Creative Water Splash Photography with Off-Camera Flash by Frank Myrland appeared first on Digital Photography School.


Digital Photography School

 
Comments Off on How to do Creative Water Splash Photography with Off-Camera Flash

Posted in Photography


How to Improve Your Art – The Creative Process in Photography

19 May

As photographers, we all want to be constantly improving our work. However, often this can seem like an uphill struggle, especially when you are just starting out. As an art form, photography is all about the creative process and exploring ideas through images, but in order to really create great images you need to put a plan in place for your own development; especially focused on skills, inspiration, purpose and output. By tackling these elements you can focus your mind and develop your work, to help you produce better and more refined art every time you go out on location.

Creating prints as a final output

Skills – The Basics

In order to get on to the creative elements, having a solid understanding of the base knowledge first is integral to improving your art as a photographer. I’m not going to go into detail here about understanding exposure, depth of field, composition, etc., but these are key things to spend time on.

It may seem like a huge task, but with solid work you can come to grips with being able to shoot in full manual mode easily within a month. After that point, you need to understand the basics as well as the layout of your camera’s functions, helping to make it an extension of yourself and not a distraction from your intended subject. There are a large number of fantastic tutorials here on dPS that can help you to get up to speed and really understand the basics.

Knowing your settings

Focus Days

Taking your learning further is all about practice and persistence, so think about spending a few days focused on certain image types. Set yourself the task of going out the door to just shoot panning images, wide angles, bokeh, etc. This will help you to formulate the skills in your photographer’s arsenal and produce more creative images for the future.

No matter how many years you have been shooting, testing yourself and constantly putting in the time will always help you improve. If you can’t find a whole day, why not a lunch break at work? Small efforts done consistently lead to great results.

Working on a local project

Restrict Yourself

Creativity is something people often believe thrives with options, but in honesty, having too many things to choose from can often dilute your vision and reduce the creativity within your images. Restrict yourself by focusing on a single subject for an extended period of time. Build a long term project in your garden or local nature reserve and keep returning to build upon your images.

Working with primes

Another option is to work with a single focal length or prime lens to explore how you can make the most of what you’ve got. If you don’t have a prime lens use a piece of gaffer tape to hold your zoom lens in position to stop the temptation of zooming in or out. These practices will enhance your skills when it comes to general shooting, as you will be able to quickly select and formulate the ways and ideas you want to shoot.

Create a prime using gaffers tape

Record

In order to get the best out of the images you are taking and the skills you are learning, remember to record them. Working with a simple notebook or online workbook, evaluate the images you have taken for successes and failures, in order to cement the lessons in your mind and learn from your work.

Sketchbook for taking notes

Inspiration

Inspiration is very important for your development as a photographer. Without constant inspiration it can be hard to formulate ideas and develop on past work. Staying inspired doesn’t just mean looking at other photographer’s work, as often over-saturaturation of a single medium can result in less creativity. So it’s better to take input from as wide a range of sources as possible.

Galleries

A traditional showcase of artwork, galleries are still a fantastic option for gaining some inspiration. The variety of work on show, from ancient works such as stone carvings and cave paintings, through to impressionism and modernism, really do offer a superb variety of visual stimuli. Often, to get the best out of them, attending a tour or showcase day can help, giving you the backstories of the work as well as explaining the techniques and mediums used. This knowledge will inform, and allow you to formulate your own processes when creating images in the field.

Nature

As a wildlife photographer, nature is a huge inspiration to me. Heading out on walks, be it with or without a camera, is a great way to soak up some atmosphere. Look at light and shape of the landscape, and pull in ideas for future images.

Architecture

Looking for line and shape

Buildings offer fantastic inspiration for photography. Lines, form and shape are used to make striking structures and can be a excellent source of inspiration. Focus on looking for the way the shapes are used to form elegant structures or draw your eye to a pivotal point. Additionally, take note of the way shadows form, as this will help you imagine and anticipate lighting for future images.

Online

In the modern world the internet has a huge amount to offer, and with so many fantastic resources it is full of inspiration. Taking a look at photographers’ portfolios, or the feeds of 500px, Flickr, etc. offer superb images that can be the perfect inspiration for your own work. One thing to avoid is that of visual trends, copying styles just because they are popular. It is always worth noting that just because an image doesn’t have many Likes or Favourites” does not deny its worth as inspiration, as images will always mean different things to different people.

In person

A great way to find inspiration is to become part of a community. Heading to events in the photography world such as exhibitions or trade shows can provide a great way to meet like-minded people as well as see some excellent work. Also, think about looking for a local photography group or club. Many areas have these and they offer a great chance to meet up and discuss work and camera techniques with your peers, all the while helping you improve and develop your skills.

Record (again)

Just as above, it’s very important to also record your inspirations. Write down the names of artists and photographers you want to look up, and make notes on what you like and dislike about certain images and media. All of these thoughts and feelings are great to revisit when creating to help formulate and focus your own work. Remember to keep that notebook handy!

Purpose

Back Garden wildlife

Creativity often needs purpose and so do your images.The most powerful images almost always have a purpose behind them, be it to tell stories, stir emotion, tempt us, or give us a glimpse into something we’ve never seen before. Images with purpose have greater strength.

When wanting to improve your own images look for purpose within your shots. Tell stories through single images or start to work on documenting a larger idea through multiple images. Have the story in your head and shoot frames to help tell it pictorially. Stories don’t need to be huge photojournalist essays, instead start off by just showcasing the mundane, everyday occurrences.

Training yourself to make powerful images of these situations will equip you with the necessary skills for more exciting opportunities in the future. Working on a local project, be it in your back garden or local community, means you can spend a great deal of time focused on your images as well as developing your story and vision.

Always ask yourself the following;

  • Why am I creating this image?
  • What am I trying to show?
  • What are the key elements in this story?
  • How can I find a unique angle?

These thoughts will help you work toward creating stronger images with purpose and meaning, leading to far more creative photography.

Taking inspiration from architecture

Output

Art deserves to be shown and deciding how you are going to output your final work is a great way to focus your creativity. In the modern world, most images just end up on a hard drive, away from the light of day where no one can see them. With all the work and effort you are putting into them, they deserve more.

In terms of being creative with your work, think about how it should best be shown. Often people lean toward online media, showcasing work through the likes of Flickr or Facebook, Although these are a great way of getting work out there, they can numb the creative and learning process somewhat.

Printing your work

Think about outputting to hard media, printing out your work as well as online platforms. There are loads of great ways to produce photo books, magazines and gallery style prints that will look far better and suit certain bodies of work far more. The creative process of learning to design a photo book, bring together a 12-part print collection, or design a magazine spread, will also be an excellent learning curve to help you when working on future projects.

In addition, there is something to be said for holding a final piece of work in your hands. A finished print really is the ultimate moment for an image. Having passed through all of the creative stages from conception and execution, through to editing and final completion in your hands is a great feeling, and one every photographer deserves after finishing an image.

Conclusion

In order to produce more and more creative work it’s all about focusing on the process. The skills behind creating, the inspiration and purpose behind projects, the final results and how they are output. By taking time to think through these stages you can really focus your mind and produce refined work to be proud of, as well as constant develope your skills and grow as a photographer in the future.

The post How to Improve Your Art – The Creative Process in Photography by Tom Mason appeared first on Digital Photography School.


Digital Photography School

 
Comments Off on How to Improve Your Art – The Creative Process in Photography

Posted in Photography


Acer unveils 31.5″ 4K display for image editors and other creative types

29 Apr

At its Acer Next event in New York City the Taiwanese electronics manufacturer has unveiled its new 31.5″ ProDesigner PE320QK display. The new monitor features super-thin bezels and, looking at the impressive specifications, is clearly targeted at image editors and other creatives. It offers 550 nits of brightness at 4K (3840 x 2160 pixels) resolution and has an enhanced color gamut, supporting 130 percent of the sRGB and 95 percent of the DCI-P3 color spaces. Response time of the display is 4 milliseconds, with a 100 million to 1 contrast ratio.

In terms of connectivity there are two HDMI 2.0 ports, audio out, a DisplayPort 1.2, a USB 3.1 type C input, and four USB 3.1 Type C outputs which are suitable for peripherals and support power delivery of up to 85W. The display also comes with a pair of 2W speakers and a removable anti-glare hood. Unfortunately Acer has not provided any information on pricing and availability yet. 

Articles: Digital Photography Review (dpreview.com)

 
Comments Off on Acer unveils 31.5″ 4K display for image editors and other creative types

Posted in Uncategorized


Working With A Creative Team

22 Apr

What exactly is a creative team? It’s a group of people there to aid in the production of a


Fashion Photography Blog

 
Comments Off on Working With A Creative Team

Posted in Uncategorized