RSS
 

Posts Tagged ‘Creating’

Beginners Guide to Creating and Applying Texture Overlays Using Photoshop

03 Aug

Creating and applying textures is surprisingly simple and fun to do.

Adding texture to photographs was happening long before the invention of Photoshop and other editing programs. In the days of the darkroom, we would scratch negatives with pins, sand paper them, stain the photographic paper with fixer before exposing, layer two negatives on top of each other in the enlarger, or push our film ISO to increase grain. These days, with editing programs being our digital darkroom, we simply have yet another way of adding texture to photographs.

What is a texture?

In digital photography terms it’s simply another layer added to your photograph in an editing program, usually an image of some sort of textural surface, such as paper, wood, concrete, etc., but anything at all can be a texture. They can be photographed, scanned or even made in Photoshop.

Almost anything can be used as a texture.

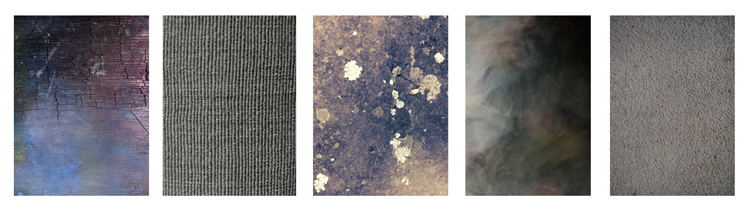
Some examples of textures. A friend’s work bench, a close-up of my lamp shade, a mossy rock, fog from a smoke machine, and some very ugly carpet.

Why use textures?

With the right texture overlay, and application of it,  you can add an extra level of depth and feeling to your photograph. You can use them for anything – from adding a vintage or grunge look to your photographs, to creating fine art pieces.

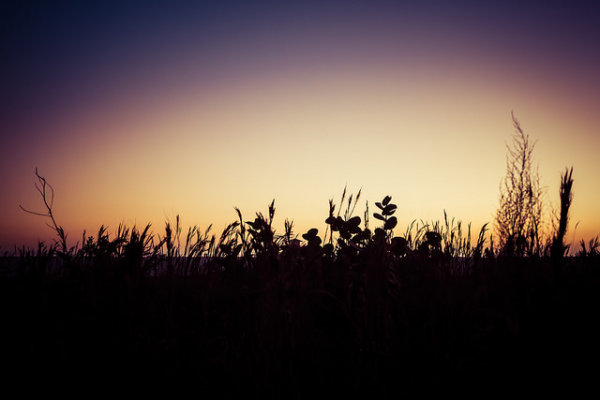
One of the best uses is to rescue a photograph that just isn’t quite working. I’ve been told no texture overlay will save a terrible photograph. While this is true for the most part, sometimes it can transform an otherwise unusable image to something more promising.

A texture can transform an otherwise unusable image into something more promising

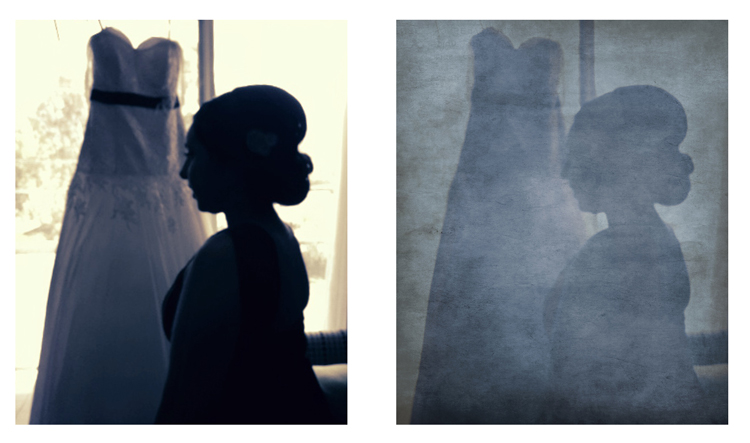
A texture can transform an otherwise unusable image into something more promising.

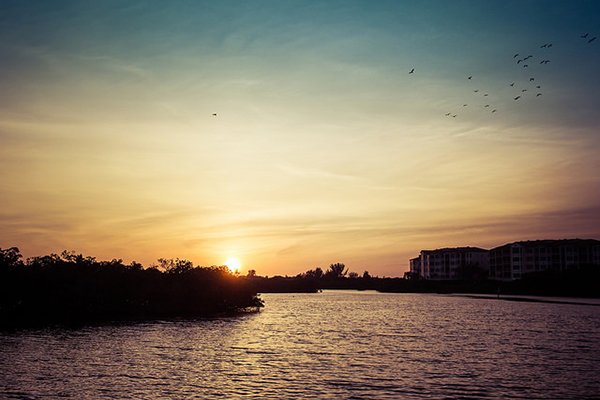
Textures can be added to almost any kind of image. If you’ve ever downloaded a photography app for your Smartphone, you have most likely had them add a texture with the app’s built-in filters.

Some mobile phone apps add texture for you

If you’ve ever used a filter on a mobile phone app, you have probably already had textures added for you.

Getting started

You don’t need to create your own texture to get started. There are many pre-made, free textures available on the internet. A quick Google search will bring up a bunch of free texture sites. But not all textures are created equally, or usable legally. You need to look for textures that are a decent size and resolution, a 200px/72dpi texture over a 3200 px/300dpi image probably isn’t going to work so well.

You’ll also want to make sure the texture has the right copyright permissions. Sites like deviantart.com have many stock textures offered free by their artists for personal use. These artists ask that you simply return the favor by sending them a link to the image you created using their work. Other sites like freetstocktextures.com offer their images copyright free for personal and commercial use, as long as you aren’t reselling the texture images themselves.

Creating your own textures

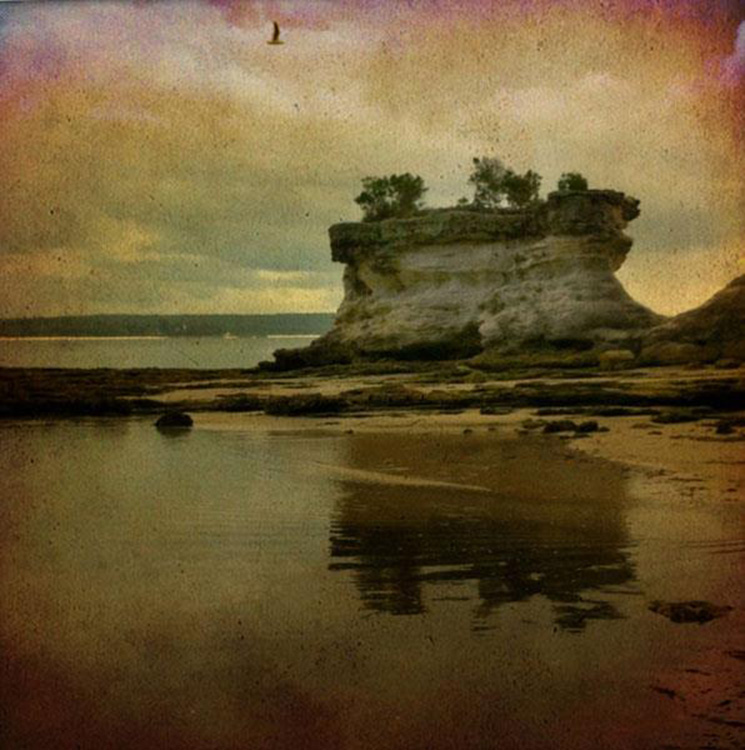
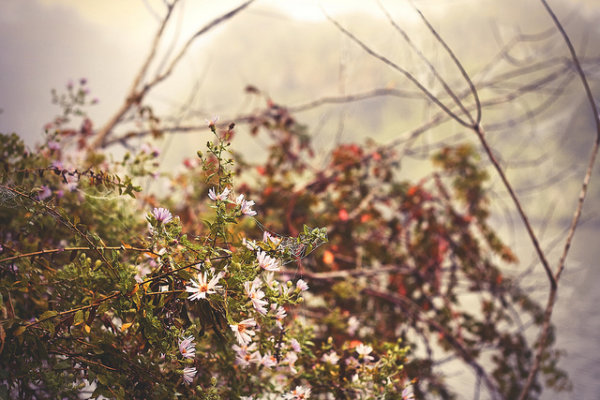
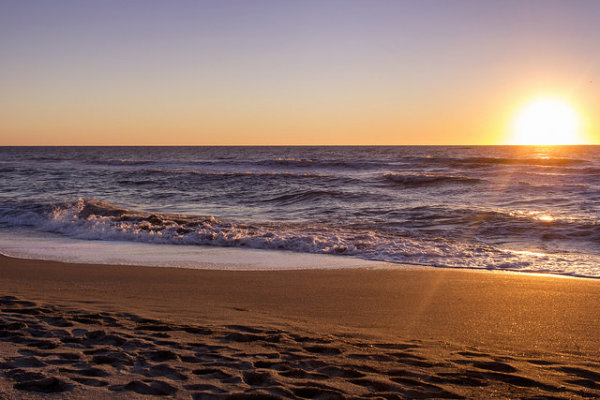
Creating your own textures is as simple as taking a photograph. Why do that, when you can download free ones? Because it’s fun, your work is then completely all yours, and you can tailor your textures to suit your images. For example; if you’re photographing skateboarders at a skate park, you could also gather some shots of the concrete they skate on, or graffiti around the place to create original textures that work with, and possibly add to, the story of your subject matter.

create your own textures to add more story to your image

Textures can add a bit more of a story to your images.

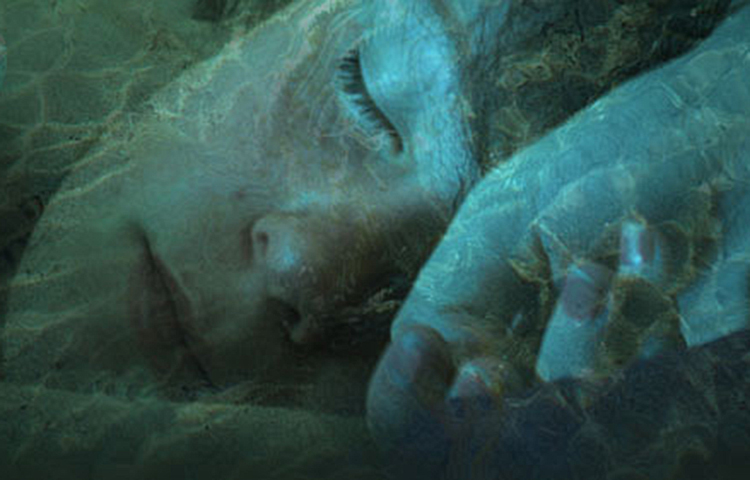
The image above is of my daughter asleep after a day at the beach (many years ago) combined with texture of the water I took that day, to add to the story and memory of the day, and give the photo an extra dream like feel.

Create a texture with your scanner

Below is the first texture I created, one that I still use years later. It was created by scanning the bottom of an old baking tray. Scanning works well for textures of papers and other small flat surfaces.

You can also use a scanner to create textures. Thiis is a scan of the bottom of an old baking tray

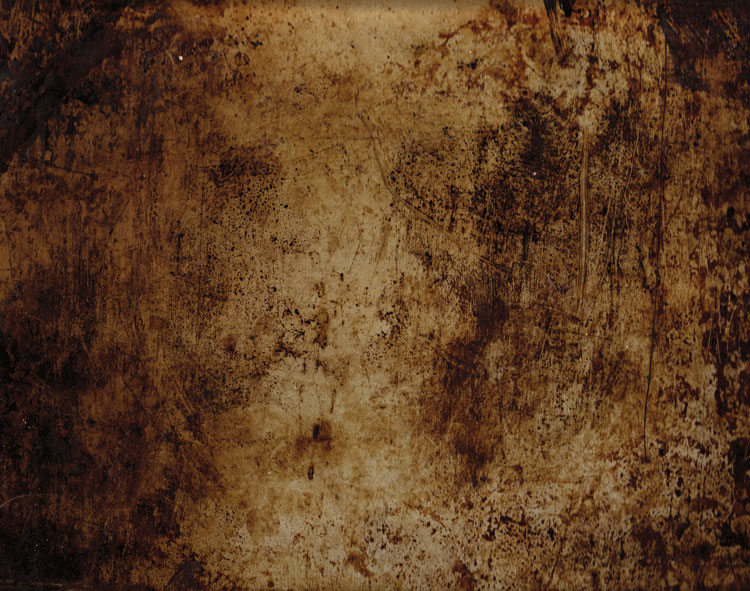
Scanned texture from an old baking tray.

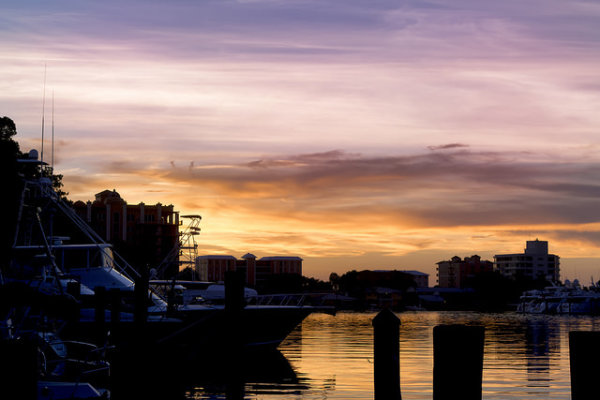
The baking tray texture was used in the image of the cello player at the beginning of this article, in combination with a manuscript image of the music she played on the day. I also used it in the image below; one of a series of images created in collaboration on album artwork with Canadian singer songwriter Sora. The texture was used to tie all the photographs in the album together even though some were taken by other photographers. Yet another use for textures!

Baking tray texture in combination with a few other textures.

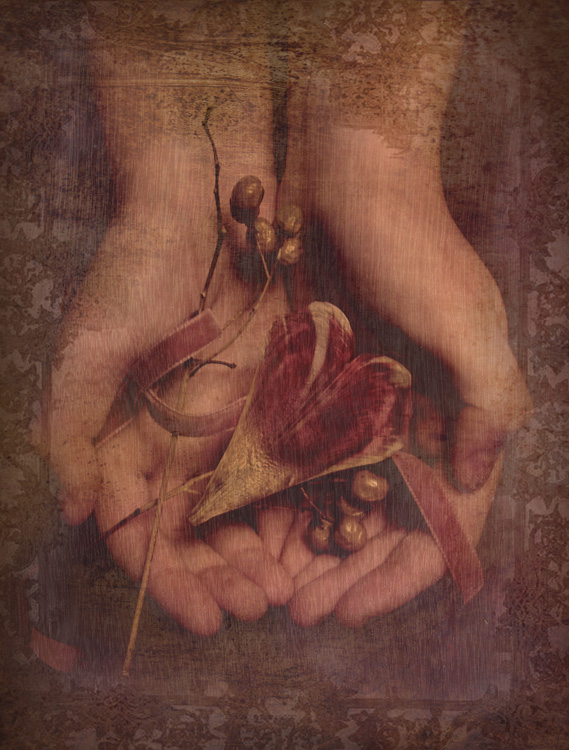
Textures can be used to tie a series of images together.

Create a texture in Photoshop

You don’t need to understand complex Photoshop processes to create a texture quickly and easily. Here are a few simple steps to create a basic texture in a few minutes:

  1. Open a new file the size and resolution you require
  2. Brush around a couple of colors
  3. Add a Render Clouds filter
  4. Adjust levels for a bit of contrast
  5. Add a vignette and a color filter
Creating a texture in photoshop takes only minutes.

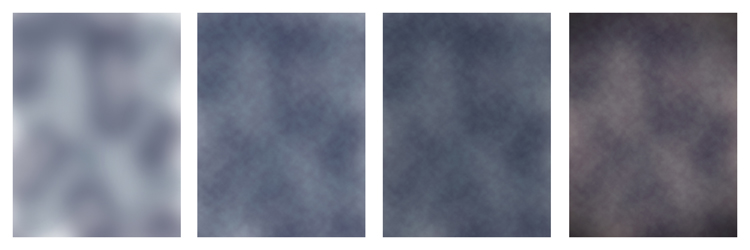
Paint in some colors, add Render Clouds Filter, some contrast, then some colour and vignette. Easy!

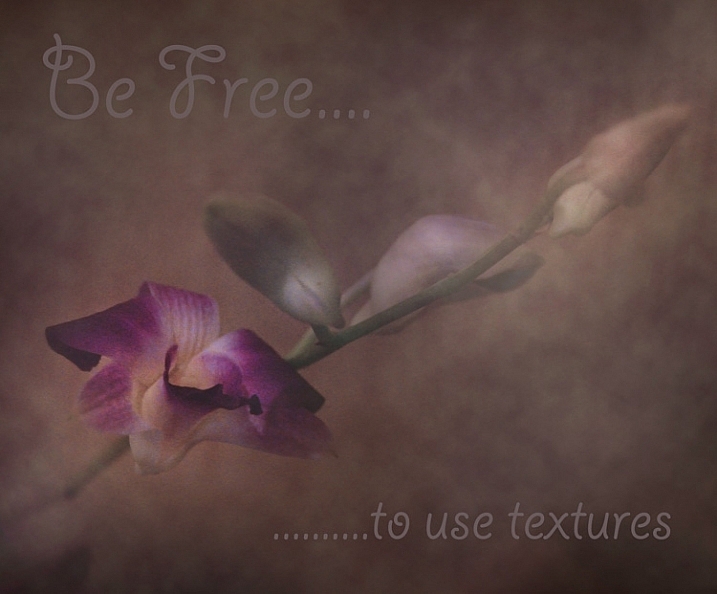
Instead of a Render Clouds you could use the Blur Tool to swirl your colors around, or try some of the other filters in Photoshop to get different effects. I tested it out on what was originally a rather terrible photograph of this orchid.

creating-and-applying-textures13

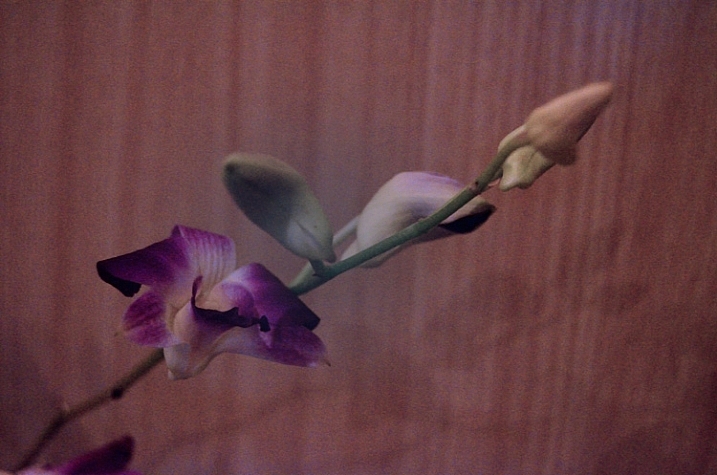
The texture, plus a few color adjustments and a warming photo filter, and it’s a whole different image.

create-and-add-textures09

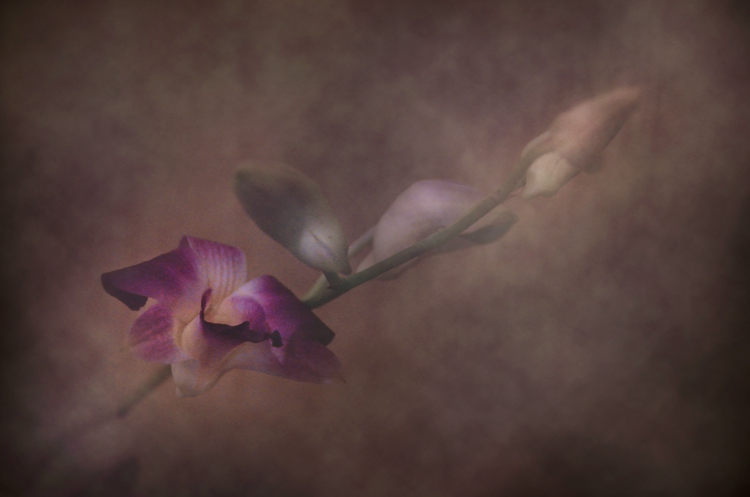
While it does look a little like something you might see on your Facebook stream with a positive affirmation written across it in an awful font, it took me less than five minutes to do for this demonstration to show you how simple it can be to create a texture from scratch.

create-and-add-textures10

Applying your texture

It is really very easy to apply your texture. There are some more technical articles on adding textures here on dPS, but here is a quick guide to get you started.

Click and drag your texture thumbnail in the Layers palette over onto your original image. Your texture becomes layer 1 in your original image’s Layer palette. Choose your level of transparency with the Opacity Slider and use Free Transform Tool to move the texture about. Turn it around, enlarge or stretch. See where it sits best.

create-and-add-textures11

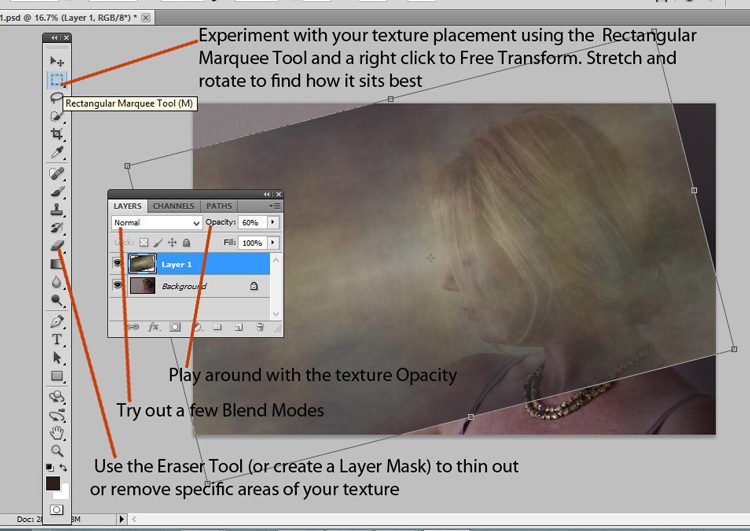
Then it’s simply fine tuning the Opacity, maybe putting Eraser Tool on a low opacity and painting out unneeded parts of the texture. Alternatively use a layer mask to paint out some areas, as well as back in, if you accidentally paint out too much.

create-and-add-textures12

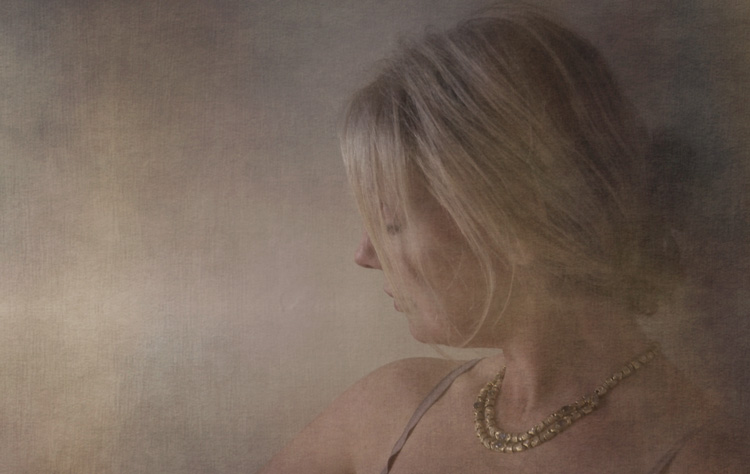
Have fun with it and experiment. Try a few different layer blend modes, add multiple textures, or add the same texture image a few times, perhaps with each layer having a slightly different hue. There are no rules.

Have you created a texture that you love? Share it and its use (your images) in the comments below.

googletag.cmd.push(function() {
tablet_slots.push( googletag.defineSlot( “/1005424/_dPSv4_tab-all-article-bottom_(300×250)”, [300, 250], “pb-ad-78623” ).addService( googletag.pubads() ) ); } );

googletag.cmd.push(function() {
mobile_slots.push( googletag.defineSlot( “/1005424/_dPSv4_mob-all-article-bottom_(300×250)”, [300, 250], “pb-ad-78158” ).addService( googletag.pubads() ) ); } );

The post Beginners Guide to Creating and Applying Texture Overlays Using Photoshop by Lea Hawkins appeared first on Digital Photography School.


Digital Photography School

 
Comments Off on Beginners Guide to Creating and Applying Texture Overlays Using Photoshop

Posted in Photography


3 Secrets for Creating Beautiful Nature Photos

19 Jun

Secret #1 Start with you

What elements of nature do you particularly like? You may already be clear on this; but even if you are, write it down, as something magical happens when you get things out of your head and living in front of you on paper.

00 Copyright Beth Jennings Photography Digital Photography School Nature 2423

Are you a flowers person? Do you like trees? How about specific elements of nature, for example, mushrooms on forest floors? No answer is a silly answer – just write them all down, no-one is screening what you say.

You have your own take on the world and you need to work out what it is. Then you’ll make nature photos that have a little piece of you in them.

Secret #2 How close is too close?

You can go as far away, or as close as you like when photographing nature. Just so long as the element of nature is clear within the photograph.

Let’s break it down a bit:

You can get a fair distance from your nature subject and allow it to dominate your frame. These trees were captured in late afternoon light with a polarizing filter to make the blue sky really intense. The light is pouring through – totally natural. Would you believe this was shot on transparency film – no post-production, ha! However, that means I can’t give you the camera settings. (slaps forehead).

Have a guess, what do you think the settings may have been?

Either ISO 100 or 400 because that’s what was available at the time! Handheld – 1/125th of a second or faster. F/? something large to keep the depth of field, maybe, f/11.

01 Copyright Beth Jennings Photography Digital Photography School Nature transparency

Take a few steps in toward your trees and your composition changes. The trees run right to the edges and now we are so close that some are cropped off. See how the meaning of this picture changes, just by moving in closer? (Yes, it’s a different scene, but work with me here!)

Where the previous picture was about the vast form of the trees, and the setting sun, this one is about the delicate nature of the branches and pine needles. It was taken about 11am on a bright, overcast day. The deep green needles contrast against the light, bright background.

See the careful placement of all the trees in the composition? Look all the way to the edges, then through all the grassy areas. Notice the care in the spatial placement of the trees and the green grass? Take your time, and really see where the elements are falling in the composition.

03 Copyright Beth Jennings Photography Digital Photography School Nature Photography 4348

ISO 400, f/10, 1/160th

Take a few more steps in on one tree, right up close on the detail. You have a choice now about rendering most of the capture out of focus, or creating lots of depth with the f-stop. This one has a shallow depth of field, to keep the focus on the tiny caterpillars. You can see parts of the texture of the tree to give a little hint as to the environment they live in.

It was late afternoon with dappled, soft light coming through trees. The little creatures were spotted in their web in a soft, spot-lit area.

04 Copyright Beth Jennings Photography Digital Photography School nature 2229

ISO 320, f/1.2, 1/1600th

Secret #3 Move your feet

When you come to photographing nature, it pays not to be too fixated on how you want to photograph your subject in terms of distance to subject, camera angle, and technical settings. Do have ideas in mind, but be open to the possibility that you may see something else (possibly better) on the day.

05 Copyright Beth Jennings Photography Digital Photography School Nature 0332

Walking and looking does wonders. Relax and enjoy your surroundings first. The beautiful things will come to you as long as you don’t force it.

When something catches your eye, go up closer to it, study it, and figure out what element in particular it is that interests you. There is spontaneity in capturing nature in its living, untouched state. The key is being open to the most beautiful, particular and unique elements, and finding your composition, lighting and camera settings to suit.

06 Copyright Beth Jennings Photography Digital Photography School Nature Photography 2 5

It does sound a little new-age, but give this method a try, and hey, it costs nothing but your time to walk around and breathe it in.

So there you have it – three secrets revealed as to how you can create pretty nature images, without it costing you a cent!

What’s your secret to getting better nature photographs? Drop it in the comments area below.

googletag.cmd.push(function() {
tablet_slots.push( googletag.defineSlot( “/1005424/_dPSv4_tab-all-article-bottom_(300×250)”, [300, 250], “pb-ad-78623” ).addService( googletag.pubads() ) ); } );

googletag.cmd.push(function() {
mobile_slots.push( googletag.defineSlot( “/1005424/_dPSv4_mob-all-article-bottom_(300×250)”, [300, 250], “pb-ad-78158” ).addService( googletag.pubads() ) ); } );

The post 3 Secrets for Creating Beautiful Nature Photos by Beth Jennings appeared first on Digital Photography School.


Digital Photography School

 
Comments Off on 3 Secrets for Creating Beautiful Nature Photos

Posted in Photography


Creating Effective DIY Studio Lighting With Household Items

12 May

When I first started to experiment with controlling the light, I couldn’t afford to splash out on studio gear just to experiment, so I improvised with what I could find around the house, or acquire for only a few dollars. Some improvisations were, let’s just say, less successful than others. But some did produce good results. Some DIY studio lighting I still use, even though I now have a studio setup.

Let’s start with an easy and free lighting method, because free is my favourite price!

Use a table lamp

HawkinsDPS1

This shot was taken with a table lamp. Most of us have some sort of lamp around the place. Any kind will do. They come with their own diffuser, the lamp shade, and are easy to move around. You can adjust height with boxes, books, or anything stable you can find. You can experiment with alternative lamp shades as well as different strength, variety, or colour of light bulbs, or the number of lamps you use.

Lamp lighting usually isn’t very bright so you might need a tripod or somewhere solid to put your camera. For the image above I had the model hold the lamp and move it around slowly as I fired away, getting her to go even slower or stop when things were looking good.

For the shot below I put the green glass dish directly on top of a lampshade, in front of an abstract painting. It’s all about experimenting.

HawkinsDPS2

Make-shift softbox

While lamps were great, I really wanted to try soft box style lighting, so I had to get a bit more creative. The portrait below of friends and their dog was lit using a large open cardboard box lined with aluminium foil and placed on its side. I then shone a bright halogen work-light into the box, and softened the resulting light with a white sheet held up in front of the setup. Off to the side was a similar setup using a lamp with the shade removed, a smaller foil lined box, and a white pillow case.

HawkinsDPS3

It’s not a perfectly lit portrait. I was just starting out with portraiture and it was my first attempt with my DIY softboxes, but the results were encouraging enough for me to keep experimenting.

Try different things – experimentation is key

I went on to using regular white umbrellas, of the rain repelling variety, to diffuse the bright bulbs used for household outdoor lighting. I’ve bounced the light from an array of heavy duty flashlights, into a foil lined rain umbrella, all attached to a tripod with about a million miles worth of gaffer tape. I’ve used metallic cardboard sheets from the newsagent, or foil covered boards as reflectors. There were many experiments, some good, some not so much, and some were surprising.

Basically you just need a light, or two, and something to diffuse or reflect/bounce the light, or both. Preferably without setting fire to anything. Work-lights and other really bright bulbs can get surprisingly hot. It’s best not to have flammable things like sheets or cardboard too close and have something protective underneath if the light is placed on surfaces.

If you are not so keen on lining boxes and hanging sheets, you might like to try light painting.

Light painting

HawkinsDPS4

Apart from the emanating beams of light which were added later in Photoshop, the rest of this image, shot in my kitchen, was lit with only a two dollar LED light from the junk store. This was a complicated shoot, which had to be lit and shot several times, then blended in Photoshop. But you don’t have to go to that extreme. With a bit of experimenting and practice you can light a subject this way in one single shot.

There are many interesting and informative articles about light painting here on dPS. I highly recommend having a browse through them if you’ve never tried it before, but I’ll just run you through the basic idea here.

You’ll need a tripod (or somewhere solid to put your camera), a completely or almost completely dark room and a cheap little flashlight, or LED light. This is what I used for the shot above, a two dollar press button, night light.

HawkinsDPS5

A slow shutter speed is necessary to give you time to paint. I usually start off with a shutter speed of about 20 seconds, ISO 400, aperture at roughly f/11. Then adjust from there, depending on the subject and light brightness. Once you are all set up, turn out the lights, shine your flashlight on your subject while looking through viewfinder to get your focus, then click the shutter and start painting your subject with light.

You’ll have to move in close and run your light around only a few inches from the areas you want to light. That means being in front of the lens when the shutter is open, but the camera will only pick up what you shed light on, so as long as you don’t accidentally light yourself up, you won’t show up in the shot.

Try a bit of side lighting, play around with different lengths of exposure time, different light sources. If the light shines directly into the lens, you will get what I call ghost lines, which can be used deliberately as I did in this shot below.

HawkinsDPS6

While these methods are obviously not a replacement for studio lighting gear, they are an effective alternative that can produce some surprisingly good results and allow you to take a bit of control over your lighting without forking out more than a few dollars. It’s also very fun and even though I now have a properly equipped studio, I still sometimes love to play around with a simple table lamp or two dollar torch (flashlight).

Feel free to share any photographs you created with DIY lighting setups in the comments, I’d love to see them!

googletag.cmd.push(function() {
tablet_slots.push( googletag.defineSlot( “/1005424/_dPSv4_tab-all-article-bottom_(300×250)”, [300, 250], “pb-ad-78623” ).addService( googletag.pubads() ) ); } );

googletag.cmd.push(function() {
mobile_slots.push( googletag.defineSlot( “/1005424/_dPSv4_mob-all-article-bottom_(300×250)”, [300, 250], “pb-ad-78158” ).addService( googletag.pubads() ) ); } );

The post Creating Effective DIY Studio Lighting With Household Items by Lea Hawkins appeared first on Digital Photography School.


Digital Photography School

 
Comments Off on Creating Effective DIY Studio Lighting With Household Items

Posted in Photography


How Your Camera Gets in the Way of Creating Great Photos

21 Apr

I am the kind of person who loves nothing more than to read a new camera manual back to front. When the Canon 5d MK3 came out the manual was over 200 pages, YUM! It was the thickest Canon manual yet, heaven!

Anthonyepesphotography dps2 1

I love my kit and I love finding out how it works, what cool tricks I can do with it and what every single button does plus custom settings, autofocus modes, etc. I still use film (and digital of course), print my own work (which I keep detailed records of) so you can see that I am a solid tech nerd.

Yet, I see all the time how distracting the camera can be when we are taking photos. This statement probably seems like a massive contradiction so let me explain. We expect this piece of kit to take great photos for us – even though the camera is an inert and emotionless device with no brain or heart. Thinking, seeing and feeling are what create great photographs.

Sound technical knowledge is just the springboard – don’t get stuck there. Use it to launch your work to the next level by spending the majority of your time improving your ability to see, and I don’t mean just taking photos.

Anthonyepesphotography dps2 4

Good technique will only improve the quality of your shots – it will not help you create awesome images, it will not help you tell a story, communicate the feelings of a subject, or show the viewer how a place feels to be standing right there. Only you, the photographer can do that. This is where I think many photographers get a bit lost.
Diane Arbus, one of my favourite photographers, and one of the most revered portrait photographers we’ve ever had, had a brilliant relationship with her camera:

“I think the camera is something of a nuisance in a way. It’s recalcitrant….I mean I can work it fine, although I’m not so great actually. Sometimes when I’m winding it it’ll get stuck or something will go wrong and I’ll just start clicking everything then suddenly, very often, it’s alright again.”

For her the camera was just a tool that helped her execute her vision. To create her famous portraits, she spent the most amount of time on finding subjects she was fascinated by, creating a relationship and connecting with them. It’s that connection, and the ease at which her subjects felt with her that created the power of her work. The expressions that she obtained from her subjects are often very moving and they tell the story about what it was like to be them.

Once you’ve learned the fundamentals of how to use your camera, then you are obligated, in my opinion, to focus on seeing, truly looking and truly feeling what’s going on in this world. That is how you will create truly unique and original images.

Anthonyepesphotography dps2 2

Seeing is a state of mind

Learning to really see, is learning to be in a state of mind where you notice everything around you. Not just visually, but with every sense, because all of your senses feed into each other. You’re wandering around one morning and you smell fresh bread baking; it leads you to the back door of a bakery where the door is propped open and the bakers are laughing as they bake trays of bagels. It’s intriguing. It is making you smile.

You are not taking photos. But you are practicing seeing by noticing, by having the intention to notice. All of this is fuel for your photography. It stokes the flames of your creativity, it creates a discipline that you are becoming more and more aware in this world. At first it is a very active practice. It’s like becoming a child again. You have to keep paying attention rather than get lost in your thoughts, your to-do list, your future. But the more you do it the more it comes naturally and you start to see the impact that it has on your photography.

Anthonyepesphotography dps2 3

Chase the light

A great way to develop your eye is to always be chasing the light. Light diffracts, reflects, is filtered, and bounces off of things in a myriad of ways. If you see a shadow, think about where is that light coming from. I’ve spent a lot of my life looking for the sources of reflected light; off building windows, puddles. It’s like a light puzzle and when I’ve found the incident angle, I’ve solved it, and sometimes get a good shot as a prize.

Return to the same places

We miss most of the things that are happening around us because our brain blocks out what it considers to be unnecessary stimuli. So we are essentially fighting our brain and retraining ourselves to notice. I find going back to a place is a good way to see new things. Ask yourself, “What can I see in this place today that I didn’t see yesterday? How can I show something new that I haven’t photographed before? How has this new light changed the scene?”.

Anthonyepesphotography dps2 5

Create seeing projects for yourself

One fantastic way to start training your eye is to create a seeing project for yourself. Pick a subject, then look for that subject wherever you go. I’ve done snail-trails; my friend did red-jack playing cards. It could be tabby cats, purple cars, the colour yellow. Lots of people like shooting doors. You get the idea.

Choose something that is not that rare, but rare enough that you’ll be challenged, and it will help you to develop your eye. It’s like when your mate gets a new car and suddenly you see that car everywhere. The reality is that there aren’t more of those cars but your attention has been focused, honed to it. I’m always taking photos of things embedded in the street, purely for my own satisfaction (looking down is as important as looking up!)

Feel

Our senses all work together, and heightening one sense will heighten the others. Having an emotional reaction to your subject will help your photos because you will imbue those feelings in your photos. I loved what travel photographer Steve McCurry said in an interview:

“A picture of a guy in the street in New Guinea, with a bone through his nose is interesting to look at. But for it to be a really good photograph; it has to communicate something about what it is like to live with a bone through your nose. It is a question of the moment to reveal something interesting and profound about the human condition.” Steve McCurry

Anthonyepesphotography dps2 6

Shoot the third thing

A few years back Victoria Coren wrote about some advice her father, the late writer Alan Coren, had given. I thought this was a brilliant idea that could be applied to taking photos:

“Don’t write the first thought that comes into your head, because that is what everyone will write. And don’t write the second thought that comes into your head, because that is what the clever people will write. When you hit on a third thought, pick up the pen. That one is just yours.”

That first thought is the photo everyone sees and takes (the tourist shot). The second photo is one you thought over and shot. But the third photo is one where you stopped and really examined everything around you. When you start taking that third shot you will see your style come through. This third way of shooting will come quicker as you practice.

Don’t underestimate the power of looking in a different direction

I’ve found that photographers are often drawn to the same places. I have had so many situations like this one – where I’ve stood with banks of photographers on Westminster Bridge and they are all shooting in one direction:

Anthonyepesphotography dps2 7

But then, if you turned around, there was a very different style of photo behind us, which everyone was ignoring:

Anthonyepesphotography dps2 8

Seeing is a lifelong journey that will open up tremendous opportunities for your photography. Commit to improving your ability to see, and it will transform your photos. Push yourself always to see more, experience more and feel more.

googletag.cmd.push(function() {
tablet_slots.push( googletag.defineSlot( “/1005424/_dPSv4_tab-all-article-bottom_(300×250)”, [300, 250], “pb-ad-78623” ).addService( googletag.pubads() ) ); } );

googletag.cmd.push(function() {
mobile_slots.push( googletag.defineSlot( “/1005424/_dPSv4_mob-all-article-bottom_(300×250)”, [300, 250], “pb-ad-78158” ).addService( googletag.pubads() ) ); } );

The post How Your Camera Gets in the Way of Creating Great Photos by Anthony Epes appeared first on Digital Photography School.


Digital Photography School

 
Comments Off on How Your Camera Gets in the Way of Creating Great Photos

Posted in Photography


Trick Photography: Creating Appealing Illusions with Your Camera

16 Apr

Trick photography – creating appealing illusions with your camera Trick photography helps in creating an illusion of the scene through the ideas of the photographer. While there’re many, some of the popular trick photography ideas include tilt-shift, infrared, high speed, light painting, zoom & panoramic photography. Trick photography is a way to make a scene look more appealing and attractive Continue Reading

The post Trick Photography: Creating Appealing Illusions with Your Camera appeared first on Photodoto.


Photodoto

 
Comments Off on Trick Photography: Creating Appealing Illusions with Your Camera

Posted in Photography


Tips for Creating Landscape Photos during the Golden Hour

26 Mar

The golden hour. Even if you haven’t been involved in photography for very long, you undoubtedly have heard the term thrown around. As photographers we are in the business of capturing light, and there is no better light to have cast on our subjects, than sun light that is low on the horizon.

The golden hour is defined as periods of time; specifically, the hour after sunrise, and the hour before sunset. The length and time of these occurrences depends on your location on our planet, and time of the year.

siesta_silhouette

Regardless of the type of photography you do, natural light generally falls into two categories; harsh (hard) and soft. Harsh light is what you see when the sun is high in the sky, during the middle of the day (cloudless day).

Because the light is at its most intense during that time, and shining directly down from above, shadows are sharp and well defined. They can also appear in places you don’t want them, such as on a human subject’s face. You can sometimes counter this by using fill flash and reflectors. When you’re shooting landscapes, you see the more unwelcome effects on the sky, with less warmth and higher contrast.

Your subjects are well lit, but generally only from one direction. Images shot during at midday can be rather dull and uninspiring, and it becomes more difficult to capture something spectacular.

goldenhour_article_new4

After the sun lowers in the horizon and sunset approaches however, everything changes. Simply put, taking photos during the golden hour give the images atmosphere. These times give the best light for all kinds of photography, but what advantages do you gain by shooting your landscapes during the golden hour?

Reduced Contrast

Light from the golden hour effectively reduces the contrast in your images. A black and white street shot could benefit from harsher light in the middle of the day, because the higher contrast and sharp shadows better define the subject and the environment. For landscape photos however, the world comes alive when the sun is low, and the light is soft and diffused. Shadows become longer and less defined, and the tonal range changes significantly. Clouds are illuminated differently, and their visual transitions against the sky soften.

Colors

The position of the sun during the day creattes varying temperatures of light, as you can see by the different colors as it crosses the sky. When we discuss temperature in photography, we’re discussing tthat of color, instead of heat. Neutral temperatures are what you see during the middle of the day. The main point to take away from this is that neutral temperatures are fairly uninteresting in regards to their aesthetic effect on your photography.

sunsetcolors

Color ranges become more vibrant and pronounced when the sun is closer to the horizon.

During the golden hour periods, colors tend to bend to the extremes, and give you much more pronounced effects on your images. During the morning golden hour, just after sunrise, the color temperatures are cooler, and give a moody, bluish hue to the shot. In the evening before sunset occurs, the spectrum shifts to warmer colors, providing you with warm oranges and reds.

A photo captured during the golden hour has a wonderful warmth and feel that’s impossible to capture at midday.

Softer Light Through Diffusion

Diffusion can be visualized with the words, scattering and softening. Light that is diffused is soft with less defined edges, and scattered across a greater area than non-diffused light. A good example of that is a diffuser attachment for your DSLR flash unit. The translucency of the diffuser attachment emulates the soft light you get from the sun being in a low position in the sky, and takes away hard shadows.

diffusion

Diffused light is more evenly and softly applied throughout a scene, and a low-hanging sun or sunlight projecting through clouds becomes a great natural diffuser.

Your landscape photos benefit from this by less pronounced shadows from objects in your shot, and in general the light that falls on your subjects within the landscape scatters in a more even, favorable manner. What does this all give you? Again, the one thing you’re ultimately striving for in landscape shots; atmosphere.

Sun Flare Effects

Another advantage of shooting during the golden hours is the opportunity to introduce sun flare effects and backlighting into your images. Because of the sun’s position in the sky (low and near the horizon), you have the ability to better introduce it as a subject, or as a compliment to the subject in your shot.

flare

Sun flares are easier to capture during the golden hours, and produces a much more dramatic effect on the final image.

Flaring occurs when the sun is either at or near the edge of the frame of your photo, and while in some situations it is unwanted (photographers typically use lens hood attachments to minimize these effects), flares can add mood and drama to a landscape shot.

So now that you’re aware of the wonderful effects of photographing during the golden hour, how do you go about shooting our landscape images during these times?

Settings

Your camera settings for shooting during the early mornings or late evenings are going to depend on your exact subject, but in general, since less light is getting to your sensor, a larger aperture is usually required.

You may also need to bump up your ISO setting to compensate for the lower amount of light. This will increase noise, but usually not to a noticeable point, and even then, there are steps in post-processing that can easily remove it.

Again, this all depends on what type of shot you are doing. If you’re looking at a long exposure capture, you would set your camera for a smaller aperture and lower ISO.

goldenhour_article_new3

Use a Tripod

As a landscape photographer you are always encouraged to use a tripod. Since generally you will be shooting in one static location for each set of shots, the tripod will allow you a wider range of apertures to work with. You always want your landscapes crisp!

Prepare

By definition, you have two hours each day to shoot for the best light, so your preparation for those times are even more critical than usual (you’re always prepared for any shoot, right?). If you’re planning on just taking your gear and spending time to set everything up on location, you run the risk of missing the shots you’re looking to get in the first place.

Either prepare before you leave, or allow extra time well before the golden hour to get everything settled. Scout the location ahead of time. Have your settings ready for the appropriate shots, and pack anything extra that you might need, including food, drinks or something warm to cover up with.

Keep Shooting!

While the scope of this article has been the golden hour, don’t forget that the magic doesn’t stop after the sun dips below the horizon. After this point, the blue hour begins, when colors and tones change even more rapidly and dramatically. Keep adjusting your settings, and shoot until there’s no light left to capture. You’ll be surprised at what you have when you finally get those images unloaded on your computer.

White Balance

While white balance is a setting on your camera, because of its overall effect on the atmosphere of your images, it warrants a little extra attention when shooting landscapes during golden hour. My recommendation is to take your camera off of AWB (automatic white balance) because the camera will attempt to neutralize the warmth of the image on this setting. Most DSLR’s have a cloudy or shade setting that will retain that color tone.

If you’re shooting RAW images, this is a step that can be adjusted in post-production.

goldenhour_article_new2Helpful Apps

Thankfully, there are several Smartphone apps that can also help your planning process. A search on the Apple app store and Google Play shop will provide no shortage of this kind of apps, although there a few that I’ve used that seem a bit more robust, and worth the price you’ll pay. These apps provide calculators that will let you see when the golden and blue hours occur in any location in the world, and also include calculations for exposure, depth of field, time lapse, and more.

  • PhotoPills – iPhone/iPad, $ 9.99
  • Golden Hour – iPhone/iPad, £1.49
  • The Photographer’s Ephemeris – iPhone/iPad, $ 8.99, Android, $ 4.99

Enjoy the Light!

Shooting at optimal times of the day is one of the easiest things you can do to improve your photography. Nothing else adds character, atmosphere, and dimension to your work so dramatically.

What other golden hour tips do you have to share? How do you apply these guidelines to your own photography? Be sure to join in the conversation below, and keep churning out those golden shots!

googletag.cmd.push(function() {
tablet_slots.push( googletag.defineSlot( “/1005424/_dPSv4_tab-all-article-bottom_(300×250)”, [300, 250], “pb-ad-78623” ).addService( googletag.pubads() ) ); } );

googletag.cmd.push(function() {
mobile_slots.push( googletag.defineSlot( “/1005424/_dPSv4_mob-all-article-bottom_(300×250)”, [300, 250], “pb-ad-78158” ).addService( googletag.pubads() ) ); } );

The post Tips for Creating Landscape Photos during the Golden Hour by Tim Gilbreath appeared first on Digital Photography School.


Digital Photography School

 
Comments Off on Tips for Creating Landscape Photos during the Golden Hour

Posted in Photography


4 Tips for Creating Portraits with Impact

25 Mar

Faceplant

Since the birth of the camera, an overwhelming number of photographers have concentrated on portraiture. Capturing the personality, mood, or expression of a fellow human is sublimely beautiful. Because of this, many of us have thousands of portraits saved on hard drives, and eagerly await the next portrait contest. Honestly, how many of these portraits actually have visual impact? How many of our portraits are powerful enough to hold a viewer’s attention longer than a couple of seconds?

We can continue to produce countless portraits that are stale and void of visual power, or we can step back, evaluate our work, and begin to strategically create portraits that do have impact. Whether you are shooting on location or in a studio, begin adding some punch to your portraiture to captivate your audience. Here are a few ways to start creating portraits with impact immediately.

#1 INCLUDE ENVIRONMENT

When we pick up our cameras to snap a portrait, we almost instinctively move close to our subject. Yet, constantly shooting tight portraits can put us in a close-up rut. Simply moving your camera body closer to someone’s face, or using the telephoto aspect of your lens, doesn’t always lend itself to powerful photographs (the selfie is a perfect example of how easy it is to botch a close-up portrait).

Jun Temple

By physically taking several steps back, or by retracting your zoom, you allow context to enter the frame. Suddenly, what was just a photograph of a person’s face, can become an image rich with balance and environmental information. Additionally, a portrait with contextual information can easily appeal to a much wider audience by relating a story.

Steve wide

Shooting tip: When shooting wide portraits, make smart lens choices. Many wide-angle lenses (such as Canon’s 17-40mm L-Series) come with a great deal of distortion and will exaggerate a subject’s features. So that your subjects are not distorted, use a standard portrait lens (i.e. 85mm) and move your body in relation to your subject.

#2 USE NEGATIVE SPACE

Negative Monks

Stepping back and including environmental information can add impact to many portraits. However, the surrounding environment can also distract from your intended subject. At times, photographs are more powerful if the environment is minimal or void.

To draw the viewer’s eye directly to your subject, strategically add abundant negative space (area around or between a subject) in your frame. The use of negative space can be a key element in artistic composition in that it emphasizes and defines the main subject of a photograph (positive space) and adds impact.

#3 FORGET THE FACE

When we think of portraits, the first thing that usually comes to mind is a frame filled with a face. We can agree that there are many positives to this approach to portraiture. In a headshot we can see facial features, skin tones (unless we wipe them away in Photoshop or Elements) and the catchlights that draw us into the windows of the soul.

Alessa s Leg Grandmother s Hands

Luckily though, all of our photographs do not have to follow a headshot-only, antiquated view of portraiture. It is important to remind ourselves that a portrait is simply a representation of a person. Photographers are given the artistic license to determine how their subjects are portrayed. Instead of snapping a run-of-the-mill headshot, try shooting hands, feet, necks or even the cast shadow of a person. At times, moving away from a person’s face can lead to a frame that carries a tremendous amount of visual impact.

#4 CROP YOUR FRAMES

IMG 5902

Another way to add impact to your portraits is to experiment with cropping. This is one of the simplest ways to add impact to a portrait and to showcase your aesthetic as a photographer. If you are finding it difficult to see fresh or unique frames while you are actually shooting, experiment with the crop tools in post-production.

Focusing on smaller portions of your subject can have much more impact than if you neglect to adjust the original frame. Moreover, a cropped picture can completely alter the photograph’s intention or interpretation. The more you experiment with cropping, the more apt you will be in spotting unique and powerful frames in the field.

Singh

Shooting tip: If you are photographing with particular frame in mind, it is better to take photographs that are a bit wider than your intended crop. You can always crop tighter, but you cannot widen the original frame.

Whether you are an amateur or a seasoned professional, rethinking the way you shoot portraits will inevitable invigorate your craft. The next time your camera is pointed toward another human, try something new. Experiment with a variety of strategies that will add impact to your portraits.

googletag.cmd.push(function() {
tablet_slots.push( googletag.defineSlot( “/1005424/_dPSv4_tab-all-article-bottom_(300×250)”, [300, 250], “pb-ad-78623” ).addService( googletag.pubads() ) ); } );

googletag.cmd.push(function() {
mobile_slots.push( googletag.defineSlot( “/1005424/_dPSv4_mob-all-article-bottom_(300×250)”, [300, 250], “pb-ad-78158” ).addService( googletag.pubads() ) ); } );

The post 4 Tips for Creating Portraits with Impact by Andrew Faulk appeared first on Digital Photography School.


Digital Photography School

 
Comments Off on 4 Tips for Creating Portraits with Impact

Posted in Photography


11 Tips for Creating Stunning Photographs of Cities at Dawn

30 Jan

We’ve all seen hundreds of gorgeous photos of sunrises over beaches and beautiful landscapes. Of course they have the capacity to wow and inspire, but I would argue that it’s far more interesting to photographs cities at dawn. You have so much more to work with – buildings, graffiti, debris, rivers, glass, the odd person, roads, and greenery in the midst of all of this urban-ness. The possibilities to create unique photos are endless. So, if you combine all this intense city landscape with the wonderful and quickly-changing light of dawn, you have an amazing combination.

Anthonyepesphotography DPS 1

I’ve been shooting cities at dawn for over a decade now. For me cities are at their most inspiring when they are empty of people, traffic, and chaos and bathed in the beautiful light of dawn.

Here are 11 tips on how to create stunning photographs of cities at dawn:

1. Sunrise

Sunrise, especially when it’s an epic one, is obviously the focus for any early morning shoot. But it shouldn’t be just about capturing the sunrise.

  • Clouds: To me what is special about any given morning is what kind of clouds are in the sky. Clouds are what make mornings different from day to day and are one of the reasons to keep going back to the same place again and again.
  • Other elements: Think about other elements you can use to enhance the photo. Try framing the sunrise, and the sky, to create an interesting contrast (see photo above).
  • Foreground: Find an interesting subject for your foreground, using the sunrise like a tapestry.

Anthonyepesphotography DPS 2

2. Emptiness

Being in a city (which is usually densely packed with people) suddenly deserted, creates a feeling that you are in a different world. You see the city as it really is, and it changes what you see but also what you photograph.

This sense of emptiness is made especially impactful when you photograph:

  • Tourist attractions
  • Roads
  • Monuments
  • Public squares

Anthonyepesphotography DPS 3

3. Varying types of light

The sunrise may be the shining moment of the morning, but don’t forget other unique qualities to early morning photography.

  • Blue hour: Is a very short time between night and sunrise, when the sky changes quickly from dark to light. It happens again before sunset, but at dawn the beauty of the blue hour is enhanced by the emptiness and stillness of the city. When you are shooting during the blue hour, be prepared as the light changes very quickly. Get your camera set up on a tripod and have your scene already composed, so that when it arrives and the light is changing, you won’t miss it. If you have a shot you really like, be patient, and shoot slowly as the light changes. Slowing down like this also creates the opportunity to relax enjoy the view and look around for the next shot.

Anthonyepesphotography DPS 4

  • Artificial and natural light: Contrasting artificial and natural light. There is a very short time at dawn when you have both, and the effect is beautiful.
  • Low sun, long shadows: At dawn the sun rises from below the horizon and moves up into the sky at a height dependent on the time of year (and what part of the world you are in). The effect of a low sun is that it creates long shadows, which are stunningly effective with the low light of dawn. Stick around for a few hours after sunrise to capture the light falling over the streets and buildings like this:

Anthonyepesphotography DPS 5

4. Look for light sources

A bundle of different elements like buildings, roads, glass, and windows with the light falling onto them creates a myriad of opportunities for light to bounce, reflect, bend and distort. If you see light falling onto a wall, or reflecting onto a piece of glass, look for its source. It could be that the source is more interesting than the effect the light is creating.

  • Reflections: Are a gem to photograph and dawn is such a brilliant time because there aren’t people crowding around disturbing them. Search out water as it’s usually still – puddles, canals, ponds and my favourite – glass buildings.

Anthonyepesphotography DPS 6

  • Light effects: The low sun creates a myriad of effects as it filters through trees, buildings and other city architecture. Look at this man, locking up, and how the shadows enhance the mood and meaning of the photo.

Anthonyepesphotography DPS 7

  • Use the light for contrast: Search out the unusual. I love the contrast of some of the rougher, decaying edges of a city with the vibrant light of dawn.

Anthonyepesphotography DPS 8

5. Seek out people – they are usually doing interesting things at dawn

Most people out at dawn are either working or they’ve been out all night enjoying themselves. They make interesting, and often very willing subjects!

Anthonyepesphotography DPS 9

Anthonyepesphotography DPS 10

6. Return to your favourite spots

No two sunrises are the same. So, if you have a favourite spot, go back and photograph it on a different day, during different seasons. The quality of the light will be different, perhaps there will be changes in the cityscape (London is never the same year to year), you will notice contrasts. Give yourself a challenge, ask yourself: How can I make this same scene a distinctive photograph? What else can I do? Push yourself to create more unique photographs every day.

Anthonyepesphotography DPS 11

Anthonyepesphotography DPS 12

7. Explore

Go off the beaten track. Photographing the iconic sites is amazing in any city (it’s iconic for a reason, right?) and having St. Mark’s Square in Venice to yourself at dawn is a heady experience. But there are always so many areas of any city that are not so frequently photographed. It could be the docklands in London’s East End, the rough and run down area east of Paris’s Sacre Coeur or the eastern edge of Venice, where I found abandoned buildings and ancient fortresses. Everything seems other-worldly at dawn and worth exploring.

8. Look behind you (and above, below, around and everywhere)

When you are going out to shoot, it’s important to really look around you. Doesn’t this sound like a simple task that we spend all of our lives doing? Actually no! You will be surprised by how much we all miss as we rush around in the little bubble of our minds, distracted by our thoughts and our tasks for the day.

Don McCullin says it brilliantly: “You can feast your eyes on a daily basis, although I suspect the average man on the street goes through life with narrowed vision, not seeing the whole scope of what’s going on around him.”

If you want to create images with a WOW factor you have to pay attention to what’s around you. What the photo world calls, “The art of seeing”.

I find being out at dawn helps me see, because there isn’t the usual distractions, our senses are more heightened, it’s an unusual time of day to be awake (for most of us) and we are seeing our familiar streets and places in a new light.

9. Get started early

I like to have found my location before I go out. From there I wander, but it’s good to have a initial place so you don’t waste time. I like to be in this first location at least an hour, sometimes an hour and half, before sunrise. There are some incredible opportunities to photograph the blue hour.

10. Be prepared with your kit

The light changes very quickly at dawn, and you definitely don’t want to miss that spectacular sunrise. My essential kit list for dawn shooting includes:

  • A small torch (flashlight) for setting up your camera in the dark
  • A plastic bag for my camera in case it rains (cheap but it works!)
  • A visor or hat as walking into the sunlight is hard on the eyes
  • Gloves (it’s often cold at dawn, even in summer)
  • A light, but sturdy tripod, (you’ll need this for the first couple of hours, but then you’ll be carrying it, hence it should be light)

11. Get yourself acquainted with your camera

This may seem a bit obvious but it is something most people don’t do; know your camera. Lack of camera knowledge can turn a simple shoot into a difficult one (especially in the dark)! Know what all those buttons do, some may make your life easier.

Does that give you some ideas for photographing your city at dawn? Or perhaps getting up early on the next trip? Share your comments below please.

BIO
Photographer Anthony Epes is currently publishing a series of photo books on Cities at Dawn, with instalments on London, Paris, Venice, New York and Istanbul. Inspired by his books Anthony runs photo workshops at dawn in some of the world’s most interesting and beautiful cities. His work has been featured on BBC World, French Photo Magazine, The Economist, Hyperallergic and CNN. He blogs about photography on his website.

SOCIAL MEDIA
• https://plus.google.com/u/0/+AnthonyEpes/posts

Twitter
• https://www.facebook.com/londonatdawn
• https://www.flickr.com/people/anthonyepes/
• https://www.linkedin.com/in/anthonyepes

googletag.cmd.push(function() {
tablet_slots.push( googletag.defineSlot( “/1005424/_dPSv4_tab-all-article-bottom_(300×250)”, [300, 250], “pb-ad-78623” ).addService( googletag.pubads() ) ); } );

googletag.cmd.push(function() {
mobile_slots.push( googletag.defineSlot( “/1005424/_dPSv4_mob-all-article-bottom_(300×250)”, [300, 250], “pb-ad-78158” ).addService( googletag.pubads() ) ); } );

The post 11 Tips for Creating Stunning Photographs of Cities at Dawn by Anthony Epes appeared first on Digital Photography School.


Digital Photography School

 
Comments Off on 11 Tips for Creating Stunning Photographs of Cities at Dawn

Posted in Photography


6 Tips for Creating Leading Lines to Make Your Photos Stand Out More

04 Dec

There is perhaps no more important tool in composition than lines. The eye will virtually always follow an actual or implied line across the picture. Because of this tendency, many lines are referred to as leading lines They are actual, or implied lines that control the eye of the viewer through the frame.

PointReyesTrees

Some leading lines guide the viewer entirely through the frame. Some lines are the subject of the photo themselves. But others, and my favorite sort of leading lines, are the ones that draw the viewer into the picture. They add depth to your image. So today I want to focus on that particular kind of leading line, giving you some examples and ideas for how to create them.

1.  Plan for opportunities

Lines that you can use to lead into your viewer into the frame are everywhere, but you’ve got to look for them. In fact, it is a good idea to plan a few shots ahead of time so that you can consider what to use as a leading line. Leaving it to chance when you are out shooting will often result in the idea of leading lines being overlooked while you are focused on other things.

When you are thinking about possible lines leading into the frame, think about roads and paths, which work great. Plus they are everywhere so you almost never have to search for them. The edges of the road will converge in the distance, thereby pointing the viewer to the center of the frame. Although certainly not as prevalent as roads, railroad tracks also work great. Finally, don’t overlook the use of shadow to create a line toward the center of the picture.

QueensWalk

2.  Finding and using urban opportunities

In an urban environment, besides roads, you can use buildings and other structures. Obviously rows of buildings can work. Perspective will make the buildings appear smaller as they become more distant, resulting in lines pointing to the center of the picture. Fences are another good choice.

Keep your eye open for rows of streetlights, which we often overlook, but which can work great. In addition, don’t forget to look up, as the natural convergence of buildings toward the center of your frame (due to the distortion of your lens) can actually work for you in this context, and create lines that point to the center of the frame.

TubeEscalator

3.  Opportunities in nature

When you are out in the wild, nature often provides you with the leading lines you seek. Patterns on the ground, whether it be paved, sand, or grass, can often provide markings that lead to the center of the frame. In addition, similar to the convergence of buildings mentioned above, looking up into tall trees will create the same effect.

Sand

Leading lines on the ground can be difficult if not impossible to see with the naked eye though. There are times you have to walk around with the viewfinder held to your eye (or looking through your LCD with the camera in Live View) in order to see the lines on the ground. Moving water can also provide lines toward the center of the frame. Again, however, these might not be visible to you. Frequently looking at a a long exposure after the fact is the only way you can actually see these lines. Take test shots when you can.

4.  Manufacture your own lines

Sometimes there are no leading lines tha to use and you have to make your own. There are many ways to do this. One of my favorites is by adding streaking lights that go into the frame. Taking a long exposure of moving water will also result in lines.

GreyWhaleRock

5.  Stay cognizant of lines when shooting

Once you identify leading lines to draw your viewer into the frame, you need to take your picture in such a way that it will show them. We already mentioned shutter speed, which is particularly important when you are allowing lights or water to flow through your frame to show a leading line. But you will also want to keep an eye on your aperture setting. Most of the time you will want the entire leading line sharp, along with the subject that you are leading the viewer’s eye toward. You’ll want to use a small aperture in that case, which will create a large depth of field for your shot. On occasion, however, you want to blur out the background by using a large aperture. In any case, the important thing is to have a plan for showing the leading line in the final picture.

WiseCoRoad

6.  Accentuate the lines in post-production

Finding and using leading lines to draw your viewer into the picture does not end when the shutter closes. Usually you can accentuate them in post-processing. The main way is through selective brightening and darkening. Oftentimes you will want to brighten your leading line to draw the viewer’s eye to it. Sometimes you might want to darken other parts of the frame for the same reason. You also might want to increase the contrast in, and around, your leading lines since the eye is attracted to contrast.

The best way the accomplish this selective lightening and darkening is through curves adjustment layers. Just create a curves adjustment layer (Layer – New Adjustment Layer – Curves). Then brighten the picture by pulling the middle of the curve upward bit. Use whatever selection tools you are most comfortable with to mask away the brightening everywhere you don’t want it (which will be pretty much everywhere except for your leading lines). To darken portions of the picture, just do the same thing on a new adjustment layer, but instead of pulling the curve up, pull it down. Again, mask away the effect where you don’t want it (which, this time will be areas away from your leading lines).

NYC

Effort and reward

The use of leading lines to draw the viewer into the frame is a great way to add depth to your pictures. Rather than looking at the picture the viewer is looking into the picture. But it isn’t always easy. It requires thought before, during, and after the shot. But with the right pre-planning, a little attention while shooting, and some accentuation during the post-processing, you can add an element to your photos that sets them apart.

googletag.cmd.push(function() {
mobile_slots.push( googletag.defineSlot( “/1005424/_dPSv4_mob-all-article-bottom_(300×250)”, [300, 250], “pb-ad-78158” ).addService( googletag.pubads() ) );
} );

The post 6 Tips for Creating Leading Lines to Make Your Photos Stand Out More by Jim Hamel appeared first on Digital Photography School.


Digital Photography School

 
Comments Off on 6 Tips for Creating Leading Lines to Make Your Photos Stand Out More

Posted in Photography


6 Tips for Creating Leading Lines to Make Your Photos Stand Out More

03 Dec

There is perhaps no more important tool in composition than lines. The eye will virtually always follow an actual or implied line across the picture. Because of this tendency, many lines are referred to as leading lines They are actual, or implied lines that control the eye of the viewer through the frame.

PointReyesTrees

Some leading lines guide the viewer entirely through the frame. Some lines are the subject of the photo themselves. But others, and my favorite sort of leading lines, are the ones that draw the viewer into the picture. They add depth to your image. So today I want to focus on that particular kind of leading line, giving you some examples and ideas for how to create them.

1.  Plan for opportunities

Lines that you can use to lead into your viewer into the frame are everywhere, but you’ve got to look for them. In fact, it is a good idea to plan a few shots ahead of time so that you can consider what to use as a leading line. Leaving it to chance when you are out shooting will often result in the idea of leading lines being overlooked while you are focused on other things.

When you are thinking about possible lines leading into the frame, think about roads and paths, which work great. Plus they are everywhere so you almost never have to search for them. The edges of the road will converge in the distance, thereby pointing the viewer to the center of the frame. Although certainly not as prevalent as roads, railroad tracks also work great. Finally, don’t overlook the use of shadow to create a line toward the center of the picture.

QueensWalk

2.  Finding and using urban opportunities

In an urban environment, besides roads, you can use buildings and other structures. Obviously rows of buildings can work. Perspective will make the buildings appear smaller as they become more distant, resulting in lines pointing to the center of the picture. Fences are another good choice.

Keep your eye open for rows of streetlights, which we often overlook, but which can work great. In addition, don’t forget to look up, as the natural convergence of buildings toward the center of your frame (due to the distortion of your lens) can actually work for you in this context, and create lines that point to the center of the frame.

TubeEscalator

3.  Opportunities in nature

When you are out in the wild, nature often provides you with the leading lines you seek. Patterns on the ground, whether it be paved, sand, or grass, can often provide markings that lead to the center of the frame. In addition, similar to the convergence of buildings mentioned above, looking up into tall trees will create the same effect.

Sand

Leading lines on the ground can be difficult if not impossible to see with the naked eye though. There are times you have to walk around with the viewfinder held to your eye (or looking through your LCD with the camera in Live View) in order to see the lines on the ground. Moving water can also provide lines toward the center of the frame. Again, however, these might not be visible to you. Frequently looking at a a long exposure after the fact is the only way you can actually see these lines. Take test shots when you can.

4.  Manufacture your own lines

Sometimes there are no leading lines tha to use and you have to make your own. There are many ways to do this. One of my favorites is by adding streaking lights that go into the frame. Taking a long exposure of moving water will also result in lines.

GreyWhaleRock

5.  Stay cognizant of lines when shooting

Once you identify leading lines to draw your viewer into the frame, you need to take your picture in such a way that it will show them. We already mentioned shutter speed, which is particularly important when you are allowing lights or water to flow through your frame to show a leading line. But you will also want to keep an eye on your aperture setting. Most of the time you will want the entire leading line sharp, along with the subject that you are leading the viewer’s eye toward. You’ll want to use a small aperture in that case, which will create a large depth of field for your shot. On occasion, however, you want to blur out the background by using a large aperture. In any case, the important thing is to have a plan for showing the leading line in the final picture.

WiseCoRoad

6.  Accentuate the lines in post-production

Finding and using leading lines to draw your viewer into the picture does not end when the shutter closes. Usually you can accentuate them in post-processing. The main way is through selective brightening and darkening. Oftentimes you will want to brighten your leading line to draw the viewer’s eye to it. Sometimes you might want to darken other parts of the frame for the same reason. You also might want to increase the contrast in, and around, your leading lines since the eye is attracted to contrast.

The best way the accomplish this selective lightening and darkening is through curves adjustment layers. Just create a curves adjustment layer (Layer – New Adjustment Layer – Curves). Then brighten the picture by pulling the middle of the curve upward bit. Use whatever selection tools you are most comfortable with to mask away the brightening everywhere you don’t want it (which will be pretty much everywhere except for your leading lines). To darken portions of the picture, just do the same thing on a new adjustment layer, but instead of pulling the curve up, pull it down. Again, mask away the effect where you don’t want it (which, this time will be areas away from your leading lines).

NYC

Effort and reward

The use of leading lines to draw the viewer into the frame is a great way to add depth to your pictures. Rather than looking at the picture the viewer is looking into the picture. But it isn’t always easy. It requires thought before, during, and after the shot. But with the right pre-planning, a little attention while shooting, and some accentuation during the post-processing, you can add an element to your photos that sets them apart.

The post 6 Tips for Creating Leading Lines to Make Your Photos Stand Out More by Jim Hamel appeared first on Digital Photography School.


Digital Photography School

 
Comments Off on 6 Tips for Creating Leading Lines to Make Your Photos Stand Out More

Posted in Photography