RSS
 

Posts Tagged ‘Create’

Tips for Shooting Through Objects to Create a Special Effect

19 Mar

Photography is as much a study of the creative, as it is a study of the technical. Often, knowing all the technical ins and outs of your camera, still does not guarantee a stellar image – an image that evokes emotion, one that makes you stop in your tracks and take a second look. Such images are created by thinking outside the box, by experimenting with new techniques and ideas that may seem crazy, ridiculous, or even somewhat unbelievable! Lucky for us, we photographers are known to be a little bit crazy, so trying new and innovative techniques should not surprise us too much.

One such really cool and innovative technique, to add a little bit of creativity and flare in our imagery, is shooting through objects. This technique is, quite literally, to have a small object between the front of the lens and your subject. This is often used to frame the subject, in order to draw attention to it/them, soften the edges of the image, or add a cool color special effect, to an otherwise ordinary image.

Memorable Jaunts DPS Article Shooting through objects for special effects 01

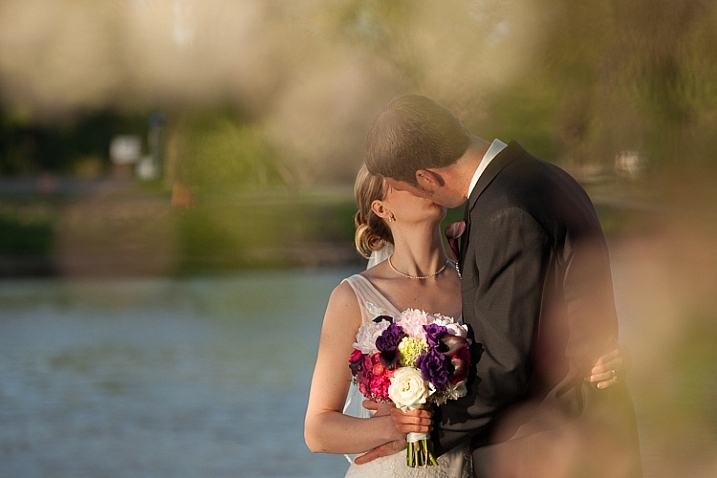
The whole idea of shooting through objects, is to have an out of focus foreground and be able to shoot through it, but at the same time keep the subject sharp. This effect is best achieved by placing the object close to the lens, either by hand holding it, or by resting it against the lens. Placing the foreground object further away from the actual subject and closer to the front of your lens, makes it easier to blur.

Although any lens will work, the shorter your lens focal length the closer the foreground object will need to be to the front of the lens, making it much easier to hand hold. If the object you are shooting through is large, it is easy to miss the focus on the actual subject. In these situations, it is best to focus on the subject, lock focus by switching to manual focus (MF/AF toggle buttons are located on the lens body in most cases or using back button focus) and then bringing the foreground object close to the lens for the blur effect. Sometimes it is possible to use the out of focus foreground to hide distracting things in the background.

Memorable Jaunts DPS Article Shooting through objects for special effects 06

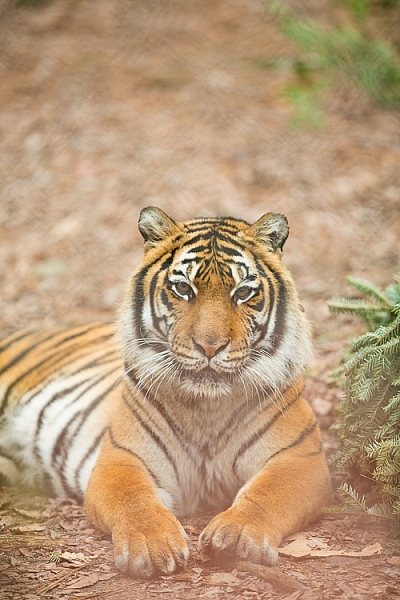
In the above image, this tiger in North Carolina’s Tiger Rescue facility, was holding a perfect pose and staring dead straight at me. Thankfully, I had a fence between me and the tiger (I am sure he was viewing me as a tasty snack!) and I loved the blur shapes seen in the top of the frame. I also handheld a piece of candy wrapper towards the bottom of the lens to give a little pink tint to the bottom of the image. The only post-processing done here, was to bring up the blacks and add a little contrast to the image.

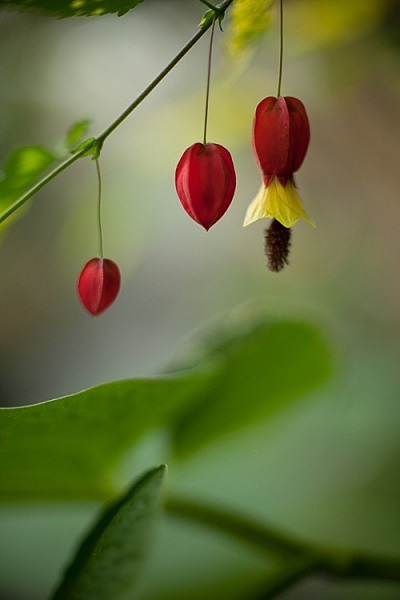
The shoot-through technique works especially well with leaves, flowers, and even small pieces of glass. The possibilities are quite endless when it comes to finding things to shoot through. If you are feeling uninspired, sometimes bringing something as simple as a small strip of fabric, or a piece of clear plastic, can completely change the outcome of your final photograph. Look around your photography location and you are bound to find something to shoot through. Even if you often shoot in the same location, you may find something new each time. Flowers bloom at different times of year, leaves change color, and sometimes even dry twigs add an element of interest.

Memorable Jaunts DPS Article Shooting through objects for special effects-SidebySide01

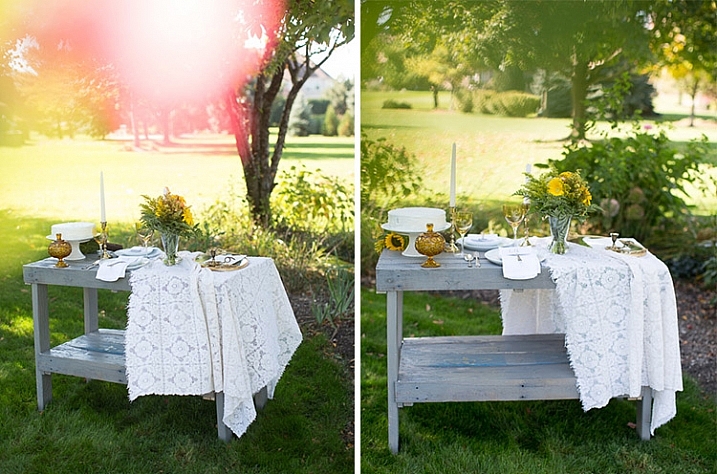
Always use these effects to taste. In the side-by-side above, I initially used a pink flower to see if I could get a cool, light leak effect in the frame. But somehow that did not appeal to me. So in the next frame, I took a leaf and held it up to the top of the lens. I loved this effect, as if I was shooting through the bushes but still retaining the details in the bottom half of the image.

Memorable Jaunts DPS Article Shooting through objects for special effects-SidebySide02

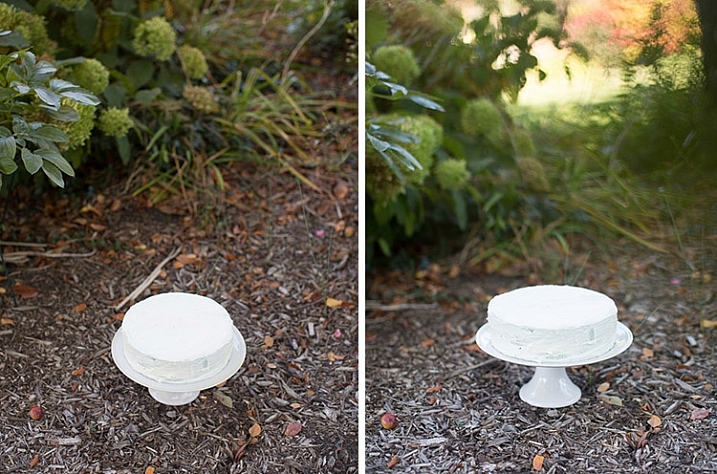
In the images of cakes above, the first is a standard, run-of-the-mill, top shot of the cake. But when I changed my angle and used a leaf to shoot through, I loved the blur effect it produced at the top of the frame.

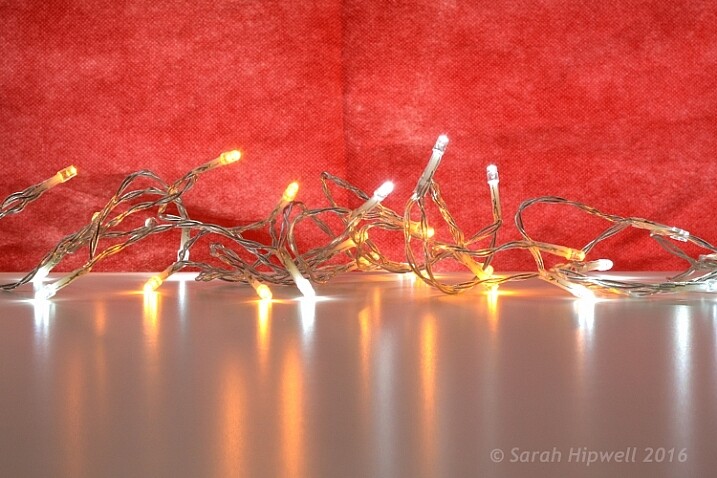
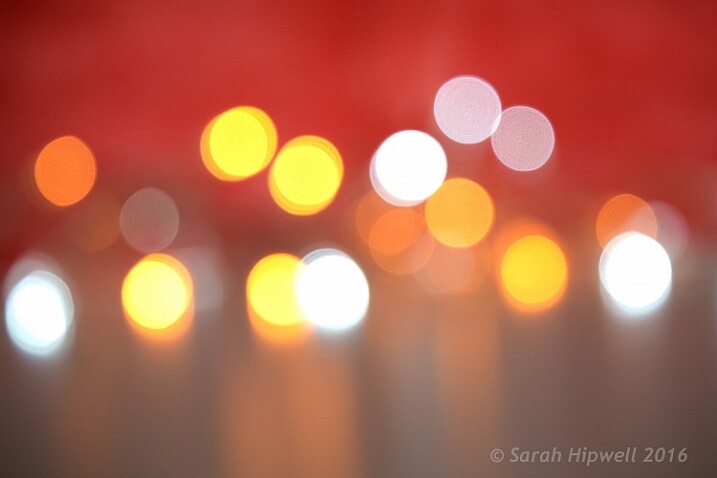
Shooting through objects adds an element of interest to photographs. When you use colored pieces of glass or flowers, you get an effect similar to a light leak (from film days). Some photographs also appear to have been processed with unique filters, except all these effects are straight out of the camera (SOOC), not added during post-processing. When you use clear glass, plastic bags, or even sheer fabric, photographs appear to have additional texture and depth.

Memorable Jaunts DPS Article Shooting through objects for special effects-SidebySide03

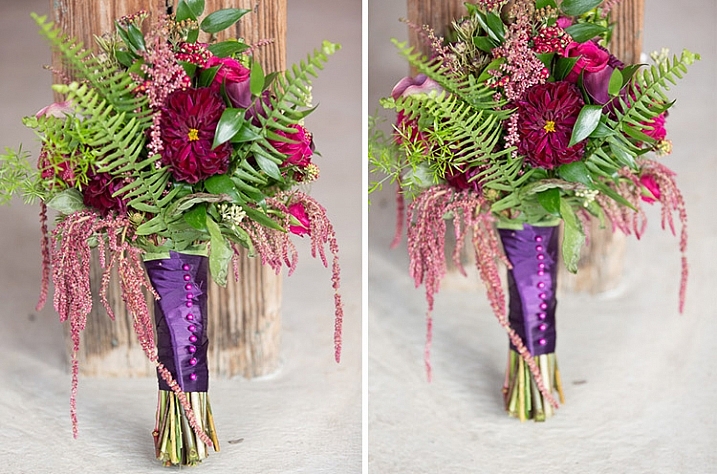
The bridal bouquet on the left is a straight shot. The one on the right has a clear piece of plastic (it was used to cover the cake topper) – I held it to the bottom on the lens to add a little texture and interest.

Memorable Jaunts DPS Article Shooting through objects for special effects 05

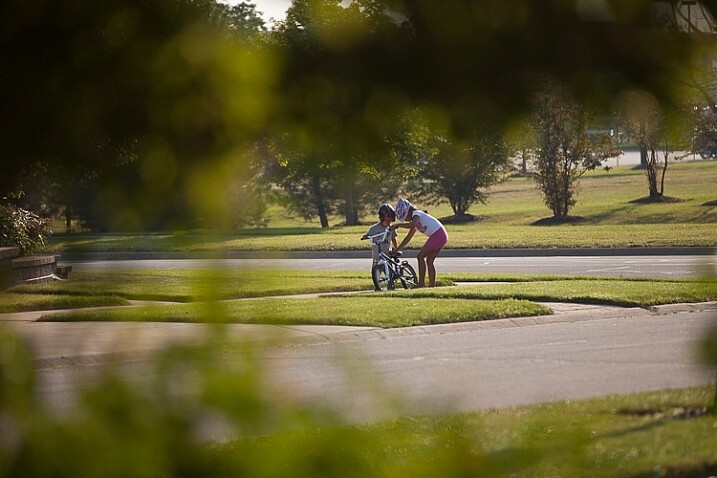
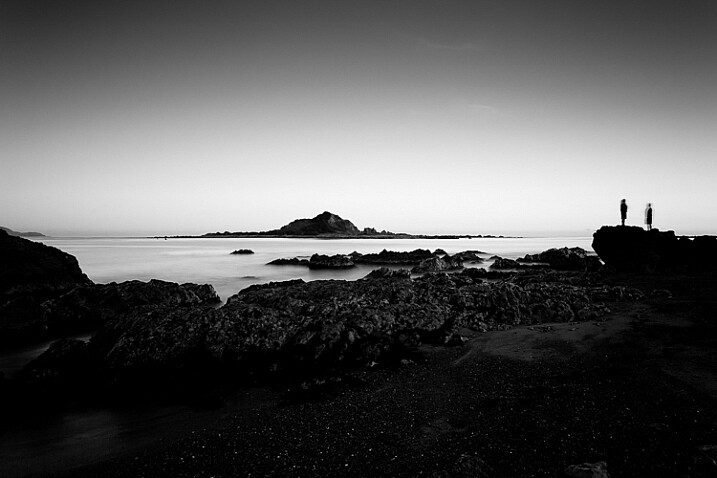
I love this image of my kids – my daughter is teaching my son to ride his bike. By shooting through the bushes, I caught them unawares, as well as used the bushes to frame the subject (in this case my kids!).

Memorable Jaunts DPS Article Shooting through objects for special effects 03

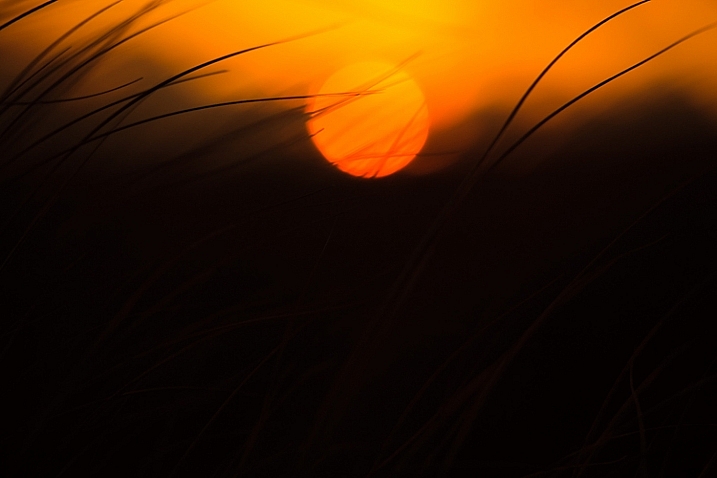
The sun was setting in my backyard, and to exaggerate its warmth, I added an orange piece of plastic (my flash gel cover). No post-processing needed!

While this is not a technique that should be used on every photograph, there are so many options for framing, introducing texture, and adding interest when you add an unexpected element into your photographs. Use this tool when you want to break free from the mundane and the ordinary, you might be pleasantly surprised with the results!

This week on dPS we are featuring articles on special effects. Check out the others that have already been published here:

  • How to Photograph the Full Band of the Milky Way
  • Fire Spinning with Steel Wool – A Special Effects Tutorial
  • Special Effect – How to Create Multiple Flash Exposures in a Single Frame
  • Stacking Light Trails for Night Photography Special Effects
  • 26 Unique Special Effects Photos to Spark Your Creativity
  • Weekly Photography Challenge – Special Effects

googletag.cmd.push(function() {
tablet_slots.push( googletag.defineSlot( “/1005424/_dPSv4_tab-all-article-bottom_(300×250)”, [300, 250], “pb-ad-78623” ).addService( googletag.pubads() ) ); } );

googletag.cmd.push(function() {
mobile_slots.push( googletag.defineSlot( “/1005424/_dPSv4_mob-all-article-bottom_(300×250)”, [300, 250], “pb-ad-78158” ).addService( googletag.pubads() ) ); } );

The post Tips for Shooting Through Objects to Create a Special Effect by Karthika Gupta appeared first on Digital Photography School.


Digital Photography School

 
Comments Off on Tips for Shooting Through Objects to Create a Special Effect

Posted in Photography


Special Effect – How to Create Multiple Flash Exposures in a Single Frame

18 Mar

Many photographic techniques, rightfully, tend to focus on polished images. They vary anywhere on the spectrum from getting sharper images to capturing accurate skin tones. These techniques are important. However, sometimes they’re not very much fun. Sometimes, that’s precisely what you need to have, and exactly what photography should be – fun.

This article will guide you through a fun special effect technique that will allow you to capture multiple exposures in a single frame, using the test button on your strobes or flashguns. Using this method, you will gain a new tool to add movement, and a sense of action in your studio photography.

how-to-multiple-flash-exposures-2793

What you need

  • A dSLR on manual settings (set from 2-10″ or bulb exposure)
  • A very dark room (or nighttime outdoors)
  • A tripod
  • A human subject
  • A strobe or flashgun (speedlight) with a test button (to manually fire the flash)
  • Someone to serve as an extra pair of hands (not required but it helps a lot)

Setting it up

how-to-multiple-flash-exposures-2795

Aperture

Because you’re using flash, the aperture setting is the most important in this technique. As long as your shutter speed is slower than your camera’s flash sync-speed, aperture is what controls how the flash exposure is recorded, and it also dictates what power output to set on your flash. I suggest using an aperture somewhere between f/8 and f/16, to get the best results. A smaller aperture will also help to minimize the effect of any ambient light in your images.

Camera settings

With your camera on a tripod, set the dial to manual mode, the ISO to 100, and your shutter speed to between two and six seconds. To test if your shutter speed is suitable, take a test shot without any flash. As long as the image is completely black at the end of the exposure, it will work for this technique.

This time can be changed and extended later, depending on how many movements you want to capture.

Lighting

To start with, try to keep your lighting simple. A single light source will give you unlimited potential. This technique will work with multiple lights, but it is best to build up to that over time, as you get used to how the technique works.

As for lighting placement, the choice is yours. The lighting will, and should, depend on the final intent of the image you are trying to create. However, if you’re unsure, try starting with your light high above, and in front of, your subject. That will provide a good starting point to make adjustments from there.

Use a light meter, or manually calculate the exposure, to set your flash output, so it matches your chosen aperture.

how-to-multiple-flash-exposures-diagram

Simple lighting set-ups, like this one used in these images, can be the most effective.

Direction

With everything set up, you need to explain to your subject how to move. The easiest way to explain this is, “Pose, wait for the flash, pose, wait for the flash, and pose again”.

In more detail – you want to wait for your subject to adopt the first pose, set the focal point, and start the exposure. Press the test button on your strobe to fire the flash. After this first flash, your subject should move to their second position as quickly as possible, where you will press the test button again. Repeat as many times as required.

Keep trying

The hardest part of this technique is that it is incredibly hit and miss. Getting your subject to move into positions that create pleasing compositions, without be able to evaluate while it’s happening, is tricky. It takes time and patience. You will need to shoot a lot of frames, and most of them will be unsuitable. Just keeping making as many attempts as you can, until you think you have something, then take some more.

how-to-multiple-flash-exposures-2781

Tips

Here are a few things to keep in mind that will make your attempts easier.

Start small

Sometimes it’s hard judge how movements will appear in the final image. By trying to squeeze too much in, you might end up with a cluttered mess in your images. Start with two or three movements to gauge where things are and build it up from there.

how-to-multiple-flash-exposures-2787

Trying to include too many movements may result in a cluttered mess like this image.

Remote triggers

If you have a remote trigger for your strobes with a manual button on it, you can hold it in your hand and fire the flash. This is much more preferable than having to move between the camera and your light source during each frame.

Recycle rate

If you want to squeeze more than two or three movements into a six second exposure, try to ensure that your flash isn’t set to full power. By reducing the power output, you’re also decreasing the amount of time it takes your flash to refresh. This will allow you to fire the strobe more times in the short timeframe.

Clarity

There is no one way to process images from this technique, and all of that is up to you. However, if you want crisper, more pronounced outlines of your subject, the clarity slider in Lightroom or Adobe Camera RAW will help a lot.

Neutral backdrops

how-to-multiple-flash-exposures-2793-2

Colored backdrops will overpower images using this technique.

For color images, try and stick to a black or grey background. Because your subject is moving to different positions, the background continues to expose once your subject has moved. If you use a colored background, as I did with these images, that color will dominate your exposures. Of course, this can be used judiciously as a feature of the image should you choose.

Two second timer

If you can’t rope someone into being your assistant for the day, set your camera to use the two second timer, to give you time to move between the camera and the strobe.

Keep going

Once you’ve had a go at this technique with people, feel free to try and think of ways to use it with other subjects. For example you could use it to capture a hammer at different points in its swing, or perhaps a basketball at different parts of its arc. The choices are endless. Be creative with it, have fun, and if you give it a go please share your images below, as well as any questions you may have.

This is the third of a series of articles we will be featuring this week on dPS all about special effects. Check out the others here:

  • How to Photograph the Full Band of the Milky Way
  • Fire Spinning with Steel Wool – A Special Effects Tutorial

googletag.cmd.push(function() {
tablet_slots.push( googletag.defineSlot( “/1005424/_dPSv4_tab-all-article-bottom_(300×250)”, [300, 250], “pb-ad-78623” ).addService( googletag.pubads() ) ); } );

googletag.cmd.push(function() {
mobile_slots.push( googletag.defineSlot( “/1005424/_dPSv4_mob-all-article-bottom_(300×250)”, [300, 250], “pb-ad-78158” ).addService( googletag.pubads() ) ); } );

The post Special Effect – How to Create Multiple Flash Exposures in a Single Frame by John McIntire appeared first on Digital Photography School.


Digital Photography School

 
Comments Off on Special Effect – How to Create Multiple Flash Exposures in a Single Frame

Posted in Photography


Intentional Blur- How to Create it and Why it’s Awesome

18 Feb

An abstract blur of cotton grass, Fairbanks, Alaska, in autumn.

Open up any photography magazine or website, and I promise there will be at least one article, and a half dozen ads, discussing image sharpness and how to get it through technique or gear. Don’t get me wrong, sharpness is great. When I’m shooting a classic landscape or portrait, if the image is a hair out of focus, it goes in the trash. But, at times, blur is exactly what you want, and occasionally, it’s exactly what your sharpness-obsessed brain needs. All you need, is a camera that allows you to manually control shutter speed.

Abstract Panning Blur

Creating abstract blurs is a chance to explore color, and pattern, and forget about the nit-picky details of composition. Frankly, it’s a fun way to screw around with your camera, and the results can be very cool.

An abstract blur of Fireweed, Fairbanks, Alaska, in autumn.

I made the above image in the small wetland below my home in Alaska. In the autumn, the fireweed fades from green, to orange and red, and these plants erupted from the background. Photographically, I didn’t care about the fireweed itself, I wanted to create an image with the feeling of an explosion. After a moment of pondering, I decided a blur might do the trick. I set the camera shutter to 1/10th second, and panned the camera parallel to the direction of the stems (up and down).

The process is simple, but can feel strange. The camera must be in motion for the entire length of the exposure (usually longer than 1/15th of a second). If you pause, start too soon, or end too early, then elements of the image will retain detail, and the clean washes of color will become confused.

Below are a couple of examples using a patch of autumn foliage. In the first (below left), I moved the camera slowly, while the second (below right) is a quicker motion:

AK-FAI-autumn-blur-abstract-11 An abstract blur of Fireweed, Fairbanks, Alaska, in autumn.

Linear patterns, like the fireweed stems I noted above, or trunks of trees, make great subjects for this kind of image. Below are two interpretations of a forest. The first of these images was made during the blue hour of a snowy winter morning, the second is a very fast vertical pan of cottonwoods, on a bright spring day.

AK-FAI-winter-abstract-6
AK-FAI-CreamersField-abstract-104284-25

You can also experiment with jiggling the camera as I did in the image below. The results can be very painting-like, and are quite unlike any other type of image I know how to create.

AK-FAI-CreamersField-abstract-104284-33
Zoom Blurs

A zoom blur, as is obvious from the name, requires a zoom lens to execute. The result is an image that appears to blur outward, from a comparatively sharp center point. Often, it gives the impression of forward motion, or viewing the subject down a long tunnel of color and pattern. Bright subjects, like flowers, often work well. When done properly, this technique yields an image that is a celebration of color.

AK-Girdwood-fireweed-abstract-3

Just as you need the camera in constant motion to create an effective panning blur, you’ll need to make sure the zoom is activated throughout the exposure. Try 1/10th second as a starting point. I’ve experimented with this technique in a variety of situations, even on a colony of King Penguins (below), where I think the technique emphasizes the chaos and noise of the tightly packed birds. It can also be effective for portraying motion, as I did in the image of the mountain biker (second image below). For this image I used a small zooming motion, instead of a dramatic pull back, as the cyclist approached me.

SGeorgia-9Jan10-SalisburyPlains-53
AK-FAI-GoldstreamSports-Sep13-121

Subject Blur

In the techniques I described above, either the camera, the lens, or both must be in motion, but blurs can also be effective when it’s the subject that’s moving. Most landscape photographers will already be familiar with the technique of blurring moving water through the use of a slow shutter speed. This technique requires a tripod to be effective, and composition, unlike in abstract blurs, now plays an important role.

Your shutter speed will dictate how the blur appears in your final image. Slowly moving subjects like rippling waves, may require several seconds to blur, while a fast tumbling creek or waterfall may only need 1/15th second. Experiment, and see what you get. In the two images below, the bear and waterfall required only 1/15 second to blur, while the slower moving creek required nearly a half second.

A Brown Bear fishes for salmon at Brooks Falls in Katmai National Park, AK, USA.

AK-Denpark-Savageriver-01

1/8th second at f16

1/8th second at f16

Water is the obvious subject for this kind of photography, but don’t limit yourself. Several years ago, I was hiking atop a ridge in the Alaska Range. It was mid-summer, a few minutes before midnight, and the sun was just setting behind the mountains. It was windy, and tufts of golden tundra grass were waving rapidly back and forth in the breeze. I knew that when the last light of day departed, those tufts of grass would be lit up, and all the rest of the world would be shadowed. Quickly, I set up: tripod placed low, long shutter speed (1/4 second), and waited. Sure enough, for just a moment, the only thing lit by the sun was the blowing grass stems:

Blowing tundra grass lit by evening sun, Alaska.

Action Blurs

This last technique is frequently used to give the impression of movement and speed, and is often used in sports and wildlife photography. There are two flavors of action blurs. The first is when the camera is panned to track a moving subject. This results in an image with a sharp, or semi-sharp subject, and blurred background like the image below.

AK-FAI-Equinox-marathon-109203-3

The second is when the camera is still, and the subject is in motion. The outcome is a blurred subject, with a sharp background. Both result in an image that clearly tells the story of motion.

AK-FAI-GoldstreamSports-Sep13-128

Results using this technique are hard to predict. The combination of long shutter speeds, and moving cameras and subjects, can result in many failed images. But when it works, the results can be awesome.

CO-Golden-Cyclocross-26Sep2012-87

Rapidly moving subjects may require only 1/60th of second (or faster) to provide blurred motion, but slow subjects may need substantially longer shutter speeds. It’s a game of trial and error. Running and cycling races, or other sporting events, are great places to practice the technique, as you can shoot again and again while experimenting with different shutter speeds. Once you’ve mastered the method, you can break it out on higher stakes subjects like fast moving wildlife, where you may only get one opportunity to get the shot.

AK-FAI-CreamersField-Migration-Aug2009-54

Go out and experiment. Blurs, be they abstract, impressionist, or realistic, can be great fun to play with. For me, it’s a fallback technique when I need to jumpstart my creativity.

Have you tried making blurs? I’d love to see what you get. Feel free to post them in the comments below.

googletag.cmd.push(function() {
tablet_slots.push( googletag.defineSlot( “/1005424/_dPSv4_tab-all-article-bottom_(300×250)”, [300, 250], “pb-ad-78623” ).addService( googletag.pubads() ) ); } );

googletag.cmd.push(function() {
mobile_slots.push( googletag.defineSlot( “/1005424/_dPSv4_mob-all-article-bottom_(300×250)”, [300, 250], “pb-ad-78158” ).addService( googletag.pubads() ) ); } );

The post Intentional Blur- How to Create it and Why it’s Awesome by David Shaw appeared first on Digital Photography School.


Digital Photography School

 
Comments Off on Intentional Blur- How to Create it and Why it’s Awesome

Posted in Photography


How to Create Awesome Portrait Lighting with a Paper Bag an Elastic Band and a Chocolate Donut

12 Feb
Paperbag main 717

I photographed Luke Deslandes with a homemade modifier and a lighting kit that can be created for less than $ 200

One of my favourite TV series from the 90s was MacGyver, an action-adventure series about a US government secret agent with a fabulous mullet, who improvised and built complicated devices from household objects such as rubber bands, paper clips, pens and a Swiss Army knife.

The show was so incredibly popular that the term MacGyver made its way into the dictionary:

MacGyver (v): To make or repair (an object) in an improvised or inventive way, making use of whatever items are at hand:

  • He MacGyvered a makeshift jack with a log.
  • He has a shock of short red hair and a pair of rectangular-framed glasses, MacGyvered with duct tape.

The other week I was caught short on a night shoot because I’d misplaced my small softbox modifier, and needed to come up with a way to soften and control the from my speedlight to create portrait lighting.

I searched my entire kit and car, found nothing useful, then I asked myself, “What would Macgyver do?”. I rummaged through my bag and found a chocolate donut (Nutella filled, so good!) in a white paper bag, and a hair elastic which would be perfect substitutes for the softbox I’d forgotten to bring to the shoot.

The really cool thing about lighting is that the basic principles will work with any kind of light, regardless of budget, or the type of modifier used. So whether you’re working with a $ 150 lighting kit (similar to the one I used for these images) a $ 1,500 hit, or $ 15,000 one, the light will still react in the same way.

light-modifers

One of the best lessons I learned from working with film and television crews is that ordinary household objects can be used to shape and train light. I’ve seen soft light created using sheets of Perspex, calico, and even shower curtains. A light modifier is basically designed to do two things:

  1. It controls the shape of the flash
  2. It controls the quality of light coming from the flash

Light Shapers SQ copy

Some modifiers, like umbrellas, will spread the light over a large area and soften the quality of the light. Other modifiers like grid spots contain the light to a very small area and create a hard quality of light (click image above to read more).

The main differences between the high-end options, and MacGyvered lighting are: light quality, consistency, and build. A light modifier that has been cobbled together using found objects is not going to look pretty, and you may attract some odd looks from passers by. On a positive note, I believe a MacGyvered light modifier is a perfect way to get your head around how lighting works, and to vary your lighting styles without having to empty your bank account.

This is how I created my mini softbox using a paper bag, an elastic band, and a chocolate donut.

The Gear

Boom 750
Booms are an awesome way to add light above your model, as they allow the freedom to work without stands getting in the way of your shot. Using a boom is also the best way to position the light exactly where you want it.

I’ve created this lightweight location boom by using a mini-boom arm on an umbrella bracket, attached to a light stand. Always remember to use a weight on the light stand, to avoid it tipping over in high winds. You can buy a sandbag, or MacGyver your own using two-litre drink bottles filled with water in a canvas bag.

A cheaper alternative to the boom is to use a light pole, and to ask a friend to hold it for you. If you are new to working with off-camera flash, I suggest you read one of my previous blog posts: A Beginner’s Guide to Working With Flash Off-Camera.It will walk you through the step-by-step technique of shooting with off-camera flash .

  • A Yongnuo YN-560II speedlight – under $ 80
  • Yongnuo RF-603N flash triggers $ 30
  • CowboyStudio umbrella mount bracket with swivel tilt bracket $ 16
  • LumoPro LP605 compact 7 foot stand with ground spikes $ 45
  • Sandbag $ 7
  • LumoPro mini-boom/reflector arm $ 40
  • Tripod
  • Nutella donut in a white paper bag – you can use plain donut but they are not as good! <$ 1
  • One Hair elastic <$ 1
  • Canon 5DMK111 (use your own camera)
  • Canon 24-105mm L series (use the lenses you have already)

The Way

Paperbag 2 717

Carefully remove the donut from the bag, being careful not to get any Nutella smeared on the bag. Divide the donut into two equal portions. Offer one half to your model and eat the other half. If you can’t find Nutella donuts in your neck of the woods, you can substitute with any other pastry served in a white paper bag.

If you prefer a cleaner style of shooting, just ask for an extra bag when you buy your donut. You can also skip this part altogether, but it’s not as much fun, and just find a white paper bag similar to the one I’m using (see below). They vary in size and thickness so look for bags that are free of any advertising.

Paperbag 3 717

Place the bag over the flash and secure using the hair elastic. Electrical tape will also work, but it tends to leave a sticky residue on the flash.

Paperbag 4 717

Position the light directly above, and slightly to one side, your model’s head. This lighting style is called loop lighting. I think it’s a flattering style because it leaves the face in partial shadow, and creates the illusion that the face is slimmer.

It’s called loop lighting because of the loop-shaped shadow the nose casts on the side of the model’s face. How prominent the shadow is, depends on how much fill light is used. I use this style of lighting for 80% of my studio and location shoots, as I believe it is one of the most natural-looking lighting techniques.

Paperbag 5

Adding Fill Light

Using one light from overhead looks great, and adds definition to the model’s bone structure. As I prefer a softer lighting style, I’ve also added a white reflector to my shot.

I placed the reflector on Luke’s (my model) lap because I was shooting very tight headshots. If I were shooting a ¾ or full-length portrait, I would position the reflector on the ground, just out of the shot. The reflector fills in the shadows caused by the flash overhead. You can modify the amount of fill light by how close you place the reflector in relation to your light source. The closer the reflector is to the light, the more evenly lit your portrait will look. If you prefer more contrast or mood to your lighting, move the reflector further away from the light or don’t use one at all.

Paperbag_6-717

Changing the shutter speed controls how much ambient light there is in the image. To create a brighter background, I selected a shutter speed of 1/6th second. Shooting at 1/200th of a second removes most of the ambient light and creates a moodier image. I wanted to create the goldilocks effect, not too heavy, and not too light, but just right.

The Final Image

Paperbag final 717

Here are a few more awesome Macgyver lighting hacks that my podcast listeners have shared with me.

Ping pong balls and empty toilet rolls

Brett Ferguson 01

This gorgeous image by Brett Ferguson was created with a light modifier Macgyvered together with a ping pong ball and empty toilet rolls.

Brett Ferguson 02

Hey Gina Milicia, here is a Macgyver light modifier for you. I needed a spot light source to light the model in a convincing way. It was really important to have a soft glow, and realistic shadows, to emulate what the moon would look like. I used a ping pong ball at the end of two empty toilet rolls and then rigged some cardboard to hold the flash. The flash head fits in nicely, and the centre of the toilet rolls are white, allowing it light up to the ball. This image (edited) was shot at 47mm on a 24-70mm f2.8L II lens on a Canon 5D3 at 1/80th, f/3.5 and ISO 500.

You can see a larger version of the finished image at www.brettferguson.com.au.

The Pringles gridspot

GlennDube 717

Photographer Glen Dube has Macgyvered this brilliant grid spot using a Pringles container and straws.

This is basically just a Pringles can, with the bottom cut out and replaced by straws, hot glued in place. But I found coloured straws tainted the light, luckily my wife found some paper straws that have a nice bright white inside. The end of the can you get the chips out slides right over all the flashes I have, except this really old Vivitar that has the zoom function on the outside. Pringles has been helpful in providing a variety of lengths of cans for us.

The length (and diameter) of the straws determines the size of the spot and there are even online calculators. I found the flashes zoom function has little effect but the calculators are accurate for determining the spot sizes. The paper straws let you have a sharper fall off (as the plastic straws are translucent and spill light outside the circle). I used 60mm straws, which at 1 meter (3′) gives me a 180MM (7.1″) diameter spot that gets wider the farther away the light is from the subject.

Pop-up flash modifier

Andrej Valko 717

Photographer Andrej Valko created this really simple portable pop-up flash modifier using cardboard.

I saw this idea a couple of years ago – a bounce card for the on-camera flash. I thought: how hard can it be to make one. So I did – I printed black on one side of heavy photo-paper so it didn’t look conspicuous from the front. It was white on the other side to bounce light. I taped it with clear tape so it reflected light more efficiently (it also made it a bit more durable), and I cut it to suit my camera.

Andrej Valko 2

Andrej-Valko-3

It was easy to mount (it just slid in), easy to carry (in a back pocket just like a business card) and it bounced light off the walls and ceiling, as well as off my face! And I, the crazy photographer, shot a wedding reception with just the bounce card! (I didn’t have a single flash unit at the time.) I still cannot believe I actually used this to shoot a wedding.

The drawer liner modifier

MikeHickman 2 717

Photographer Mike Hickman created this modifier using a translucent drawer liner.

My “ugly” modifier created from translucent drawer liner which I have used almost exclusively during events, including weddings. The idea came from here.

Cost is about $ 10 for a full liner made by Contact, and attached with Velcro strips for about an additional $ 6. Makes three or four, depending on size. Also, folds up to stick in your pocket when changing locations and I have two in my camera bag at all times. Can’t do that with too many other modifiers!

There are so many awesome ways to MacGyver light modifiers. Do you have one you are particularly proud of? I’d love to see it. Please share your ideas in the comments below.


fastflash_bookIf you want to learn more about using flash for creating portraits, pick up Gina’s brand new dPS ebook: Fast Flash for Portrait Perfection. Now on sale for an introductory price for a limited time only.

googletag.cmd.push(function() {
tablet_slots.push( googletag.defineSlot( “/1005424/_dPSv4_tab-all-article-bottom_(300×250)”, [300, 250], “pb-ad-78623” ).addService( googletag.pubads() ) ); } );

googletag.cmd.push(function() {
mobile_slots.push( googletag.defineSlot( “/1005424/_dPSv4_mob-all-article-bottom_(300×250)”, [300, 250], “pb-ad-78158” ).addService( googletag.pubads() ) ); } );

The post How to Create Awesome Portrait Lighting with a Paper Bag an Elastic Band and a Chocolate Donut by Gina Milicia appeared first on Digital Photography School.


Digital Photography School

 
Comments Off on How to Create Awesome Portrait Lighting with a Paper Bag an Elastic Band and a Chocolate Donut

Posted in Photography


How to Create Strong Compositions Using Color Contrast

05 Feb

Color contrast and composition

When I wrote about making dramatic images using shadow and contrast, a reader rightly pointed out that a couple of my photos were also good examples of color contrast.

This is interesting because it shows how two photographers can look at the same scene, and see different things. In those examples I saw textures, shadows, and tonal contrast, and instinctively converted them to black and white. But another photographer might place more importance on the strong colors, and make them the centre point of the composition.

Here’s the first of those images. The color contrast here is between the orange car and the blue sky.

Color contrast and composition

If you look at a color wheel, used by artists and graphic designers to show the relationships between colors, you will see that orange and blue are on nearly opposite sides. They are said to be complementary colors (as opposed to analogous colors, which are close to, or next to each other on the wheel).

Color wheel

Diagram by Wikipedia contributor Jacobolus

Using contrasting colors in a composition nearly always results in a strong image. The key is to keep the composition simple, and not to overwhelm it with too many hues.

Here are a couple more examples. The first shows dramatic red stripes on a lighthouse against a dark blue sky (I used a polarizing filter to intensify the colors). Red and blue are also nearly opposite on the color wheel.

Color contrast and composition

The second shows red flowers, against a green background.

Color contrast and composition

These three color combinations – orange/blue, red/blue, red/green – occur a lot in both natural and man-made environments.

Below is the second photo from the earlier article, mentioned above. It uses a different type of color contrast. The green apples are displayed against a grey background. The lack of color in the background makes the green of the apples seem more intense than it is in reality.

Color contrast and composition

This technique of placing a colored object against a dark or neutral background is another that you can use over and over. It’s very effective. Here are two more examples.

The first shows a work created by artist Chris Meek. The grey background emphasises the yellow paintwork, the only strong color in the image.

Color contrast and composition

Image used with the permission of the artist

The second shows a display of pumpkins. The dark grey background emphasizes the intensity of the orange hues.

Color contrast and composition

The key here again is to keep the composition simple. Imagine each of the previous examples with a splash of red in the image somewhere. The red would pull your attention away from the dominant colors, and diminish the impact of the composition.

Another approach to using color contrast is to look for scenes with a limited color palette. Here’s an example – the image below is a portrait of a friend of mine, sitting in front of a gypsy caravan, that she made herself. The image is full of color, but they are mostly shades of two different hues – red and green, which we know are near opposites on the color wheel.

Color contrast and composition

Here’s another example. It’s a colorful image, but again there are two dominant hues – blue and red. The incongruity of the plastic sleeves the chef is using to protect his arms, combines with the color contrast to make a strong composition. The colours are more muted than the earlier examples with this color combination, but it still works.

Color contrast and composition

The images in this article have several things in common: strong use of color (in different ways), simple composition (simplicity often equals strength in design), and good observational skills.

It is is one thing to analyze these things in photos, it is another to train yourself to see them. To do so, you really have to think about the scene in front of you. What colors do you see? Does the light suit the subject? How can you simplify the composition to make those colors stronger? If you can figure out the answers to these questions, your images will be stronger.

Do you have any questions about color contrast, or any photos to show us? Please let us know in the comments below.


Mastering Composition

Mastering Composition ebook by Andrew S. GibsonMy ebook Mastering Composition will help you learn to see and compose photos better. It takes you on a journey beyond the rule of thirds, exploring the principles of composition you need to understand in order to make beautiful images. You’ll also learn how to use colour to create photos like the ones in this article. Click the link to learn more or buy.

googletag.cmd.push(function() {
tablet_slots.push( googletag.defineSlot( “/1005424/_dPSv4_tab-all-article-bottom_(300×250)”, [300, 250], “pb-ad-78623” ).addService( googletag.pubads() ) ); } );

googletag.cmd.push(function() {
mobile_slots.push( googletag.defineSlot( “/1005424/_dPSv4_mob-all-article-bottom_(300×250)”, [300, 250], “pb-ad-78158” ).addService( googletag.pubads() ) ); } );

The post How to Create Strong Compositions Using Color Contrast by Andrew S. Gibson appeared first on Digital Photography School.


Digital Photography School

 
Comments Off on How to Create Strong Compositions Using Color Contrast

Posted in Photography


How to Create Dynamic Images with an LED as Your Only Light Source

02 Feb

With a limited budget it’s easy to feel limited by your gear (or lack of gear I should say) but with time, and experimentation, you can discover ways to use the gear you have now, to make compelling images. In this tutorial you will be given a few pointers on how you can use just one LED light to make beautiful and dynamic images.

Equipment

For this tutorial you will need:

Intro image 1

  • An LED light. The light used here is a Neewer CN-126 LED Video Light which was bought on Amazon for under $ 35.
  • A DLSR – Canon, Sony, or any other brand is suitable. I used a Canon 5D Mark II.
  • A tripod or stable surface.

Direct light

Let’s start with the easiest setup: Placing your LED light directly on top of your camera, or on a light stand directly in front of your subject, may seem fairly basic. On its own, it can create a standard, flatly, lit image, which may not seem very exciting to your viewer. However, placing an item that has an interesting pattern or shape directly between your light and your subject can give a unique and creative result.

You can, for example, place a lace tablecloth between your LED light and your model/subject. Playing around with the fabric’s distance from the light, causes the pattern’s shadow to change size, and sometimes even shape. Adjust the distance and placement of your fabric (or other item) until you find a combination that works for you.

DL image 1

DL image 2

DL image 3

For the image above, I used my 50mm lens with an ISO of 2000, and my exposure set manually with shutter speed at 1/50th and aperture at f/1.4. My LED light was adjusted to medium brightness.

You can also use movement to add interest to your image as shown below. A slow shutter speed along with quick movements can make your images a real conversation piece. Try experimenting with moving your body, or an object like a colourful scarf or umbrella in your image.

DL image 4

Side light

Taking your LED off-camera, and placing it at an angle to your subject is another easy way to create a beautiful image with this simple setup. Keep your LED light setting between low and medium, and angle it at roughly 45 degrees from your subject, can give a nice soft light cascade across your image.

SL image 1

If you try placing your LED light directly to the right, or left, of your subject, you will get a pretty cool effect as well. This placement creates an interesting shape in the natural shadow your subject makes. In the image below, the LED is propped up at eye level, on a bookshelf to my left. The angle of the light, coupled with a delicate pose, created an image that was both compelling, and visually interesting. Camera settings for this image were ISO 1600, f/3.2 and 1/160th of a second with a 50mm lens.

SL image 2

Playing around with overlays and textures in Photoshop can further enhance your photo.

SL image 3

Backlight and overhead light

For small objects you can do a simple backlight setup, using your LED light. If you place a sheet of white letter sized printing paper directly over your LED light, and place your subject directly on top of it, the result is pretty interesting. When using this method try to choose a subject that you think would have an interesting silhouette. You can also try items that are slightly translucent and may possibly glow when back lit. Try capturing your final image by shooting from an overhead angle, but don’t be afraid to experiment with other camera positions as well.

BL image 1

BL image 2

Interesting images can also be created by putting your LED light directly above your subject. In the first image below, the light was angled slightly above the rose. This created a nice, softly angled, light effect that gave the rose a different dimension.

OL image 1

Coupling the overhead LED placement with interesting poses gives really striking results. Posing your subject with their face turned upward, in the direction of the light, for example, creates some really nice shadows along the contours of the face. Some creative editing in Photoshop resulted in these final images.

OL image 2

OL image 3

With this simple tool and a little imagination, you can create dynamic, visually appealing images for your portfolio. The key here is to experiment, play and have fun.

Let me know other creative ways you have used an LED light to add interest to your photography in the comments below.

googletag.cmd.push(function() {
tablet_slots.push( googletag.defineSlot( “/1005424/_dPSv4_tab-all-article-bottom_(300×250)”, [300, 250], “pb-ad-78623” ).addService( googletag.pubads() ) ); } );

googletag.cmd.push(function() {
mobile_slots.push( googletag.defineSlot( “/1005424/_dPSv4_mob-all-article-bottom_(300×250)”, [300, 250], “pb-ad-78158” ).addService( googletag.pubads() ) ); } );

The post How to Create Dynamic Images with an LED as Your Only Light Source by Tricia Bent appeared first on Digital Photography School.


Digital Photography School

 
Comments Off on How to Create Dynamic Images with an LED as Your Only Light Source

Posted in Photography


How to Create Bokeh In-camera and Using Photoshop

26 Jan
Title-Emmet-with-Bokeh

Emmet with background bokeh from small LED lights.

As the holidays are over, I couldn’t resist taking a classic bokeh shot before putting away the lights and decorations for another year.

In this article I’ll show you how you can create this effect in-camera in your own living room. Plus I’ll show you how easy it is to create a bokeh effect using Photoshop as well.

What is Bokeh?

Bokeh comes from the Japanese word boke, which means blur or haze, or the phrase boke-aji which is the blur quality. It isn’t just that any blur will do. It’s more to do with an aesthetic quality of the blur.

What does Bokeh look like?

The easiest way to see the shape of the bokeh is by taking a photo with small lights in the background, thrown way out of focus (see second image below).

Small-LED-lights-with-window-in-background

Small LED Lights placed in front of a big window with red see through fabric.

Bokeh-effect-using-aperture-f4

Bokeh effect created in-camera using an aperture of f/4, with a 120mm focal length lens.

Is shallow Depth of Field (DOF) the same as bokeh?

No, but it is important to understand DOF and how it can play an important aspect in creating a bokeh effect. Depth of field (DOF) is the area of your image that is in focus.

Shallow depth of field refers to the object or subject being in focus, but the areas in front, and especially in the background, are blurred. Whereas bokeh is the term that refers to the aspect of light sources that are blurred in the background or foreground.

When discussing DOF, we need to take into consideration three other factors:

  • Aperture size
  • Distance from the lens
  • Focal length of the lens

In practice, photographers who shoot portraits, will in general, use long focal lengths and a wide aperture setting (f/2.8-f/5.6). For example, when you are shooting outdoors with your model, and you don’t want the background in focus. Street lights, or interior building lights, can be used effectively for creating bokeh in the background of your subject.

Aperture

Bokeh is affected by the shape of the diaphragm blades (the aperture) of the lens. A lens with more circular shaped blades will have rounder, softer circles, of out-of-focus highlights. Whereas a lens with an aperture that is more hexagonal in shape, will reflect that shape in the highlights. Generally speaking, the faster the lens, the better the bokeh.

In the following animated gif, you can see that the wider the aperture (the lower the f-number), the shallower your depth of field. The lowest aperture setting on my lens is f/4 but I zoomed out to its maximum focal length of 120mm.

Aperture-animation

Animated gif illustrating the different apertures and how they deal with the lights in the background being thrown out-of-focus.

Create your own bokeh

This setup is really easy to try at home. Use whatever lens you have. Set your DSLR camera to Aperture priority or Manual mode ,and use a tripod. I used small LED christmas lights that were battery operated.

Small-LED-lights

Small battery operated LED lights.

Place your object a good distance away from the camera, and in front of the lights. The distance will vary depending on the lens (focal length) that you are using, so it will be trial and error exercise. Your object must be as near as possible to the camera lens.

Begin with the widest aperture on your lens. The objective is to get the circles of light as round, and as smooth as you can. You may need to experiment by moving the object further away from the lights.
The lighting I used for this setup was a big window light and a small small LED light on Emmet.

Lighting-setup-to-create-Bokeh-in-your-own-home

Lighting diagram to show the setup for doing bokeh shots in your own home.

Creating bokeh in Photoshop

Once I got my shot in-camera, I then decided to see if I could create a great bokeh effect in Photoshop.

In the Filter Gallery, under Blur is a fantastic option called Field Blur, which has a dedicated Bokeh feature. I took a few random close-up shots of my christmas tree. I focused only on the lights.

Christmas-tree-with-lights

Random shot of a christmas tree with lights.

Next, I brought it into Photoshop (CS6). I used the image straight out of camera (SOOC), I didn’t do any other post-processing. Go to Filter > Blur > Field Blur.

Filter-Blur-Field-Blur

The Field Blur in the Filter Gallery in Photoshop has its own bokeh feature.

Two panels appear on the right: Blur Tools and Blur Effects. Under Blur Tools, enter 200 px in the Field Blur option. Under Blur Effects, move the Light Bokeh slider to 57%, and the Bokeh Color slider to 78%. Then press the OK button. It takes a few seconds for the blur to take place. Et voilà!

Field-Blur-dialog-options

You can experiment with the input figures for the Blur and Blur Effects to get the desired bokeh. I chose these.

Bokeh-from-christmas-tree-lights

Bokeh effect created in Photoshop using the Field Blur.

Okay, so now what do you do with the image? Use it as a background. I shot a series of playing cards images against a black background.

Playing-cards

One of a series of images I shot against a plain black background.

This is where the power of Blending Modes and Layer Masks comes into their own.

By placing the bokeh image on its own layer. I duplicated it to make another copy. Then I reduced the size of the original and moved this over to the left side of the image. I changed the Blend Mode to Screen and reduced the Opacity. I wanted the lights to appear further away from the playing cards, to give it a better depth of field. The screen blend option eliminates the dark areas and makes the light areas show through, making the bokeh appear.

For the copy layer, I left the size as it was and moved it over to the right. I increased the brightness by using a Levels Adjustment layer to match the light source. I also changed the Blend Mode of this layer to Screen. Lastly, I masked out any hard lines using Layer Masks.

Playing-cards-with-bokeh-background

Bokeh effect created in Photoshop and then applied to a background in this image.

I was well pleased with the result.

Now it’s your turn. Let’s see your images with “Bokeh-licious” images posted below.

googletag.cmd.push(function() {
tablet_slots.push( googletag.defineSlot( “/1005424/_dPSv4_tab-all-article-bottom_(300×250)”, [300, 250], “pb-ad-78623” ).addService( googletag.pubads() ) ); } );

googletag.cmd.push(function() {
mobile_slots.push( googletag.defineSlot( “/1005424/_dPSv4_mob-all-article-bottom_(300×250)”, [300, 250], “pb-ad-78158” ).addService( googletag.pubads() ) ); } );

The post How to Create Bokeh In-camera and Using Photoshop by Sarah Hipwell appeared first on Digital Photography School.


Digital Photography School

 
Comments Off on How to Create Bokeh In-camera and Using Photoshop

Posted in Photography


How to Create a Lightsaber in Photoshop Video Tutorial

10 Jan

With all the recent hype and talk about the newest installation in the Star Wars movie empire (The Force Awakens), I thought this might be a fun project to do.

If you’ve followed along with the saga you know about lightsabers, the weapon of choice for the Jedi knights. Even if you aren’t a fan, you’ve likely heard of it, or had your kids or grandchildren request a toy version for themselves. So how fun would it be to add one to your photos.

Here are two videos that take slightly different approaches to creating a lightsaber in Photoshop. You can learn some new techniques and see which method you prefer.

This one by Adam from Photoshop Tutorials:

And another with Andrew from Creative Edge Studios:

If you give this a try, please share your images in the comments below. See how creative you can be, and how realistic you can make your lightsaber look. Have fun!

googletag.cmd.push(function() {
tablet_slots.push( googletag.defineSlot( “/1005424/_dPSv4_tab-all-article-bottom_(300×250)”, [300, 250], “pb-ad-78623” ).addService( googletag.pubads() ) ); } );

googletag.cmd.push(function() {
mobile_slots.push( googletag.defineSlot( “/1005424/_dPSv4_mob-all-article-bottom_(300×250)”, [300, 250], “pb-ad-78158” ).addService( googletag.pubads() ) ); } );

The post How to Create a Lightsaber in Photoshop Video Tutorial by Darlene Hildebrandt appeared first on Digital Photography School.


Digital Photography School

 
Comments Off on How to Create a Lightsaber in Photoshop Video Tutorial

Posted in Photography


How to Create Your Own Desktop Calendar

07 Jan

Creating-calendar-1

Ansel Adams once said “12 significant photographs in any one year is a good crop”. Creating a desktop calendar is a fun way to share your photography with family and friends, and they make great gifts. These calendars can feature any and all subjects; family members and gatherings, vacations, wildlife, landscapes, or whatever you enjoy shooting. Small enough to set on a desk or mantel, this type of calendar displays your best images all year long.

What do you need?

  • Software – Creating these calendars requires some type of design software such as Adobe Illustrator, Adobe InDesign, Microsoft Publisher, CorelDraw, Mac Pages, or Microsoft Word. If you have no other design software, Adobe Photoshop may be used, though it presents more challenges than the others. You can also do a Google search for “2016 desktop photo calendar templates” and you will find several like these, or these for MS Word.
  • Inkjet photo printer and 4×6″ photo paper – Depending on the number of calendars you want, you may choose to send out the calendar pages to be printed by an online printing service, such as Mpix.
  • Paper cutter – To easily and accurately trim your calendar to its finished size, a paper trimmer works better than scissors!
  • Jewel case – The jewel case (CD case) is used to package and display your final calendar.

Instructions

  1. Select 12 photos: Sometimes selecting your images can be the toughest part of creating a calendar! Finding 12 images of which you are really proud, or having too many favorites to whittle them down to just 12, may present something of a dilemma! Not only do you need 12 photos, you need to select which photo to feature in any given month of your calendar. Try to choose photos that depict a season or month in which you plan to place it, such as choosing a snowy landscape for winter months, or budding flowers for spring.

    Creating-calendar-7

    Collect your 12 final images into a folder for use in your calendar.

  2. Set up your page size: In your design software, set up for a 4×6″ page. (If you’re using Photoshop, set the dpi to 300 which will allow for sharp resolution for printing.) Be aware that the size of the jewel case is actually only 5.5″ tall, which means the 4×6″ prints will need to have half an inch trimmed off the bottom for finishing.
  3. Design the layout: The layout can be as simple as placing your photo at the top of the calendar and placing the calendar dates below. Be creative and add interesting elements to your page by adding rules or borders around your photos. Keep in mind the font you use is a factor in the calendar design. (Setting the text for the calendar is much easier in software like Adobe Illustrator.) You will need to keep your calendar high enough on the page that they will show above the bottom of the jewel case.

    Creating-calendar-6

    The red line on the bottom (0.5″ from bottom) indicates where page will be trimmed after printing. The blue line (1″ from bottom) indicates the area of the page that will be below the edge of the jewel case.

  4. Add some color to your calendar: Choose colors from your image to use as background colors, or for any text or rules, to add zip to your calendar page (most design software features an eye dropper tool that is handy to accomplish this). Using complementary colors such as red and green, or blue and orange works well. You may need to lighten the background colors as you don’t want them to overpower your image; rather, let them accent the hues within the photo. If you are using dark colored backgrounds, your text will need to be white, and  vice versa, with light colored backgrounds your text will need to be black, or a very dark color to make it easily readable.
    Creating-calendar-3

    Notice how the green borders highlight the green color of the water in the image.

    Creating-calendar-5

    Holidays can be printed in another color to mark their importance and add color (note the red dates above).

  5. Template: Once you have completed your first page you can use it as a template for creating the other 11 pages of your calendar. You may also want to create a cover page, which will give you the opportunity to add a 13th image to your calendar if desired.
  6. Check your work: Once you have all your calendar pages created, double check all of your dates for accuracy. It may also be useful to have someone else check them for you, as another person can often catch the errors that you missed.
  7. Print out a test copy: A print of all your pages, trimmed to size and placed in a jewel case, will ensure that all pages are properly displayed.
  8. Save file or print: If you are sending your calendars to a service like Mpix for printing you will need to save each page as a high resolution jpg image, and be sure to give each file a unique file name. Of course, you may print the calendar pages on your personal printer using 4×6″ inkjet photo paper.
  9. Trimming your pages: Cut each calendar page down to 5.5″ high so they will fit nicely into your jewel case.
  10. Load your pages: Place all calendar pages, January through December, into the jewel case.

    creating-calendar-2

    Including a cover page is a great option for calendars that depict a special event or location.

Your calendar is now ready to use, or give to a friend or family. You may want to ask your recipients to save the jewel case, so you can create a refill calendar with a new batch of images next year.

There are many unique items you can design featuring your photography. What ideas do you have for creative photo projects? Leave your ideas or suggestions in the comments below.

googletag.cmd.push(function() {
tablet_slots.push( googletag.defineSlot( “/1005424/_dPSv4_tab-all-article-bottom_(300×250)”, [300, 250], “pb-ad-78623” ).addService( googletag.pubads() ) ); } );

googletag.cmd.push(function() {
mobile_slots.push( googletag.defineSlot( “/1005424/_dPSv4_mob-all-article-bottom_(300×250)”, [300, 250], “pb-ad-78158” ).addService( googletag.pubads() ) ); } );

The post How to Create Your Own Desktop Calendar by Bruce Wunderlich appeared first on Digital Photography School.


Digital Photography School

 
Comments Off on How to Create Your Own Desktop Calendar

Posted in Photography


How to Use Shadow and Contrast to Create Dramatic Images

24 Dec

shadow and contrast

You can use shadow and contrast to create dramatic images. The key is to forget about shadow detail. You don’t need it. Shadows are meant to be dark and mysterious. This is good – it leaves something to the viewer’s imagination.

Utilize the dynamic range of your sensor. Expose for the highlights, and let the shadows fall where they will. If the light is strong enough, the shadows will contain very little detail.

Harsh light can make dramatic images

I took the following photo in Bolivia. The sun was sinking behind me, casting a strong shadow that had started to touch the underneath of the old car. The shadow fills the bottom third of the image. We don’t need detail in the shadow, although a little doesn’t hurt. Shoot in Raw format, and in most cases you’ll be able to pull some shadow detail out in post-processing, giving you a choice.

shadow and contrast

When I see a dramatic image like this, with strong shadows, my immediate instinct is to convert it to black and white. High contrast scenes look great in monochrome. There’s something about removing colour that emphasizes the depth of the shadows, and the drama of the composition. You can add impact by increasing contrast in Lightroom and emphasizing texture using the Clarity slider. Here’s my black and white conversion of the photo above.

shadow and contrast

Look for naturally contrasty scenes

I took the next photo indoors, in an old manor house that had been converted to a museum. The apples were lit by light coming through a window. The windows were small, so the interior of the room was naturally dark, which is why there is so little detail in the background. It’s a high contrast scene – the area lit by window light ,is much brighter than the rest of the scene.

shadow and contrast

Here’s the same image converted to black and white. Without colour, the emphasis is on the textures and shadows.

shadow and contrast

Silhouettes

The following photo of an approaching storm uses also uses shadow and contrast. The mountains are backlit and silhouetted. The approaching storm clouds are dark and ominous. A brightly lit strip of sky fills the gap between the two dark areas. A silhouetted telegraph pole forms a natural focal point. The drama of the light has created a dramatic image.

shadow and contrast

The image is naturally monochromatic, and converts well to black and white.

shadow and contrast

There are lots of shadows in this seascape. But the ones that caught my eye were the silhouetted figures on the right. After I had set up the shot, two children walked across the beach, and climbed up on the rock. I used a long shutter speed (30 seconds) to blur the water, which also blurred the silhouetted children. I was fortunate because the figures add human interest and scale to the scene. They are a natural focal point that pulls the eye across the photo.

shadow and contrast

shadow and contrast

It also converted well to black and white.

The final image is also one that uses shadow to create mystery and drama. I focused on the grass on the foreground, set a wide aperture, and let the sun go out of focus. I adjusted the white balance in Lightroom to emphasize the warmth of the setting sun. This image is different from the others in that the colour is an important part of the composition and it doesn’t work as well in black and white.

shadow and contrast

Conclusion

One of my aims with this article is to dispel the idea that it is essential to capture lots of shadow detail, and that if you fail to do so, it is some kind of technical shortcoming. Not so – let’s celebrate the fact that camera sensors don’t capture the full range of brightness that our eyes are capable of seeing. Let’s use the interplay of light and shadow to create interesting and dynamic compositions. Let’s create some mystery and leave gaps for the viewer’s imagination to fill in.

Do you use shadows in your images? Please share your images with lots of shadow and contrast in the comments below.


Mastering Composition ebookMastering Composition

My new ebook Mastering Composition will help you learn to see and compose photos better. It takes you on a journey beyond the rule of thirds, exploring the principles of composition you need to understand in order to make beautiful images.


googletag.cmd.push(function() {
tablet_slots.push( googletag.defineSlot( “/1005424/_dPSv4_tab-all-article-bottom_(300×250)”, [300, 250], “pb-ad-78623” ).addService( googletag.pubads() ) ); } );

googletag.cmd.push(function() {
mobile_slots.push( googletag.defineSlot( “/1005424/_dPSv4_mob-all-article-bottom_(300×250)”, [300, 250], “pb-ad-78158” ).addService( googletag.pubads() ) ); } );

The post How to Use Shadow and Contrast to Create Dramatic Images by Andrew S. Gibson appeared first on Digital Photography School.


Digital Photography School

 
Comments Off on How to Use Shadow and Contrast to Create Dramatic Images

Posted in Photography