RSS
 

Posts Tagged ‘Create’

How to Create a Strong Composition by Centring the Subject

24 Jun

Central composition

I’m a strong believer that there are no rules when it comes to composition in photography, only guidelines. The rule of thirds is misnamed (but guideline of thirds is not nearly so catchy), and while it is helpful for newcomers to photography realize that you can often improve composition by placing the subject off-centre, it is not a rule.

The rule of thirds, and other similar guidelines that you may read about (golden section, golden triangle, Fibonacci sequence, etc.) are really about placement. The question you are looking to get answered is, where in the frame should the main subject be placed? Secondary questions are how large should the subject be in the frame, and how does it relate to other elements that may be included?

In simplistic terms: sometimes the best place for the subject is in the centre of the frame, and sometimes it is not. In this article we’re going to look at some examples where the subject is centred, and talk about how that central placement actually makes the image stronger, not weaker.

Central composition

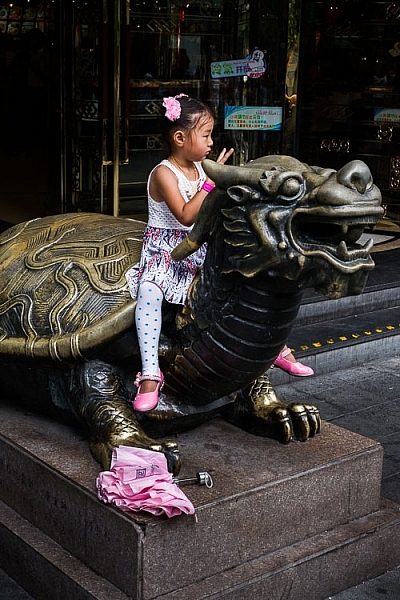
In the photo above I placed the girl in the centre of the frame (horizontally) because that was the best way to include the metal statue she was sitting on. If I moved the camera to the left (to place her on a third) then the statue’s head would be cut off. If I moved the camera right then there would be an empty space to the right of the statue’s head.

Here, the question of whether or not to place the subject (the girl) on a third, is the wrong question to ask. A better question is – What’s the best way to include everything that needs to be in the frame, and nothing more? Different question, and a different thought process.

The image also shows a strong use of tonal and color contrast. The girl’s white clothing contrasts against the surrounding dark tones, pulling the viewer’s eye to her. The eye also moves between the girl and the pink umbrella lying on the ground. The pink tones (umbrella, shoes, wristband, hair ribbon) stand out because the rest of the scene is fairly monochromatic.

Central composition

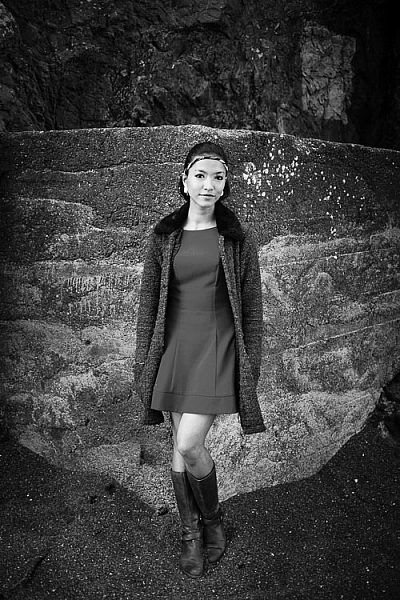
The photo above is interesting because it utilizes symmetry. I asked the model to stand at the corner of concrete structure, built into the base of the cliff. The sides of the walls, the textured pattern on them, even the way the pebbles lie against the base of the walls all mirror each other. She is placed in the centre of the frame (horizontally) so she doesn’t break the symmetry of the background. The model, however, is not symmetrical. I asked her to put her weight on one foot, creating an S-curve with her body, to break the symmetry created by the background.

Consider also the size of the subject within the frame. If I had placed her on a third by moving the camera to the right or the left, I would have both broken the symmetry and been left with a large area of empty space. This can work when there is something interesting in that space, but it doesn’t always, and should be considered when deciding where to place the subject.

Central composition

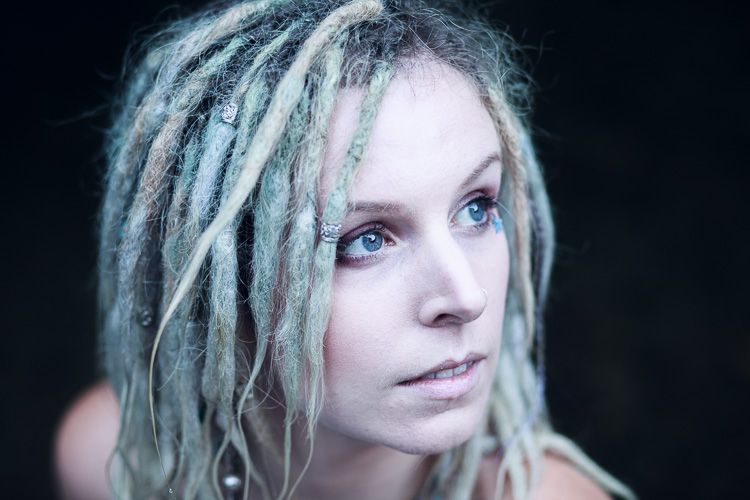
In this portrait you can see that the model’s sharp eye, is right in the centre of the frame. There’s a good reason for that – I took the photo with an EOS 5D Mark II, which has just one cross-type autofocus (AF) point in the centre of the frame. When you are using wide apertures, as I was in this case (f/2.5), it’s essential to use a cross-type autofocus point, as it’s the most accurate. One of the weaknesses of this camera is that it forced me to base my composition of portraits around its central AF point.

That’s the practical reason for using a central composition, but the portrait works. I moved in close so there wasn’t much empty space in the photo, The central composition takes the viewer’s eye to her face, eyes and hair, which are the important parts of the image. If I had moved back a little and placed her face on a third, then there would be a lot more empty space around her, and less emphasis on her features.

Central composition

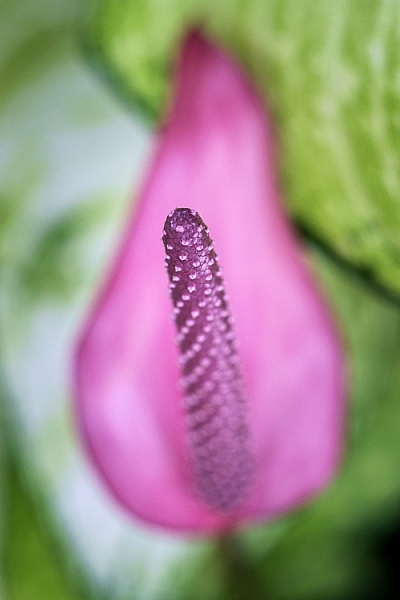
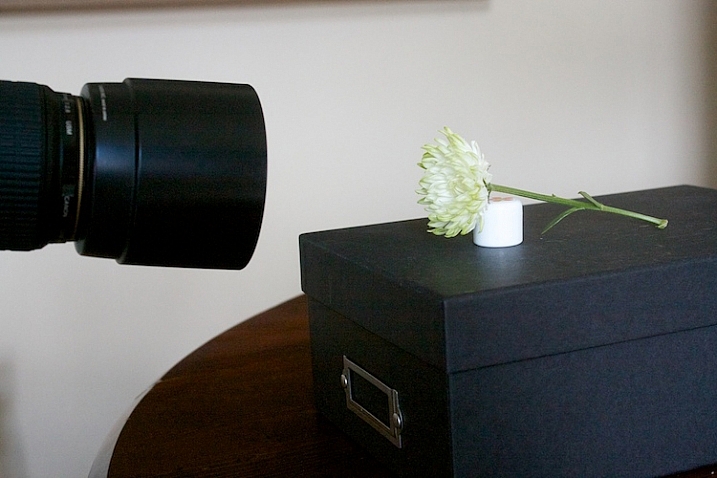
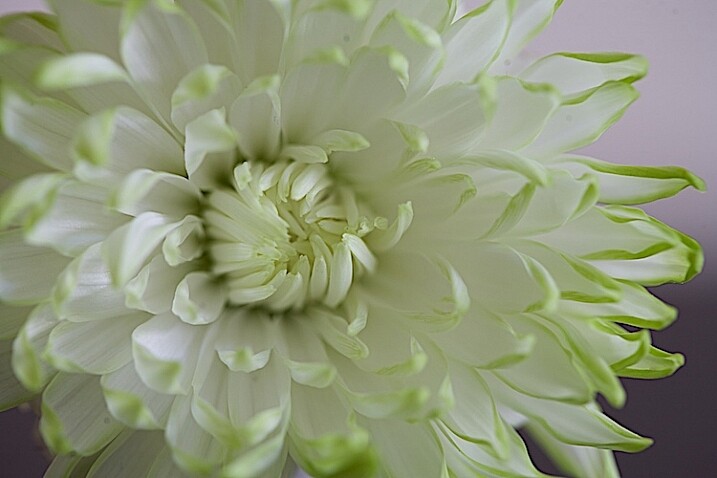
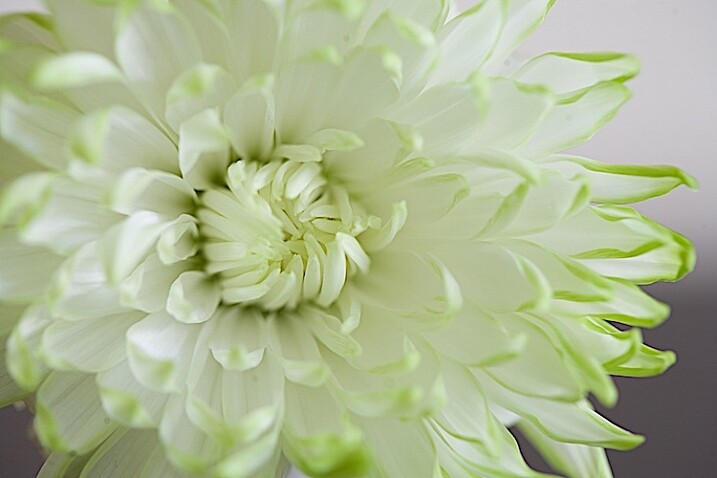
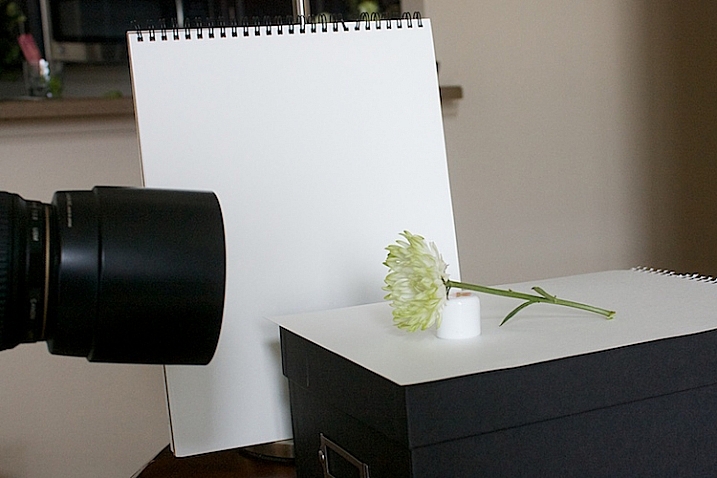
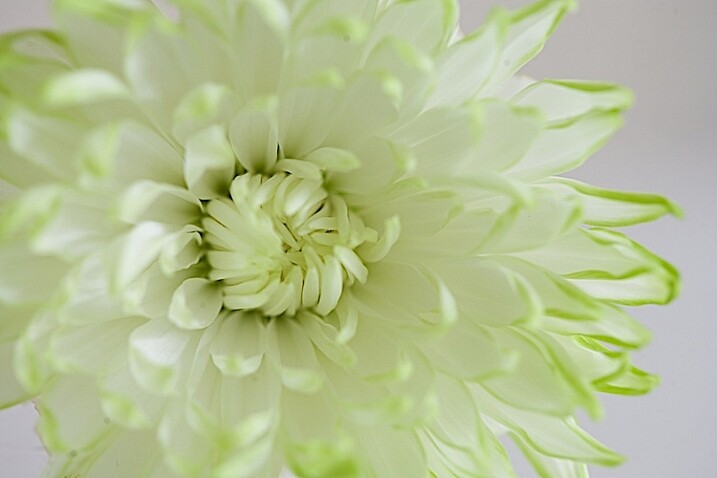
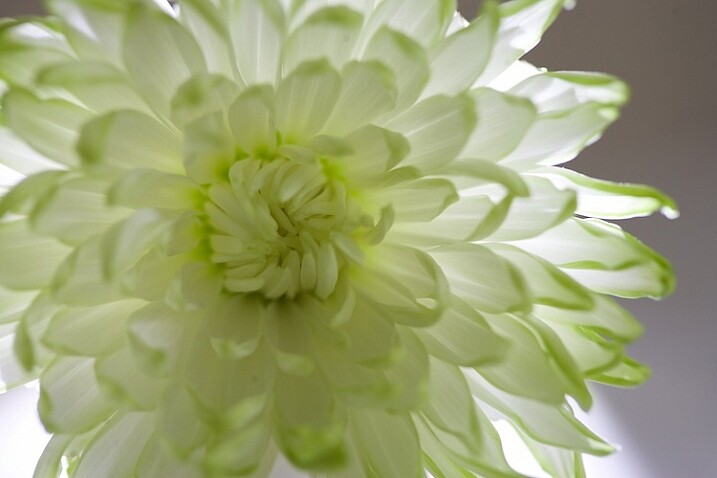
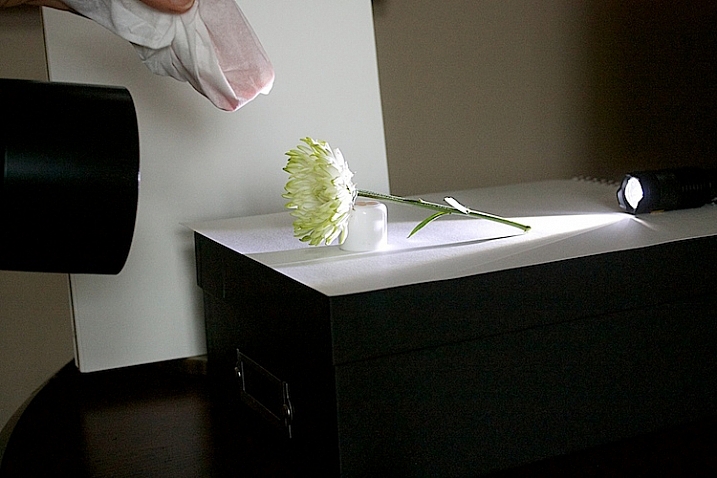
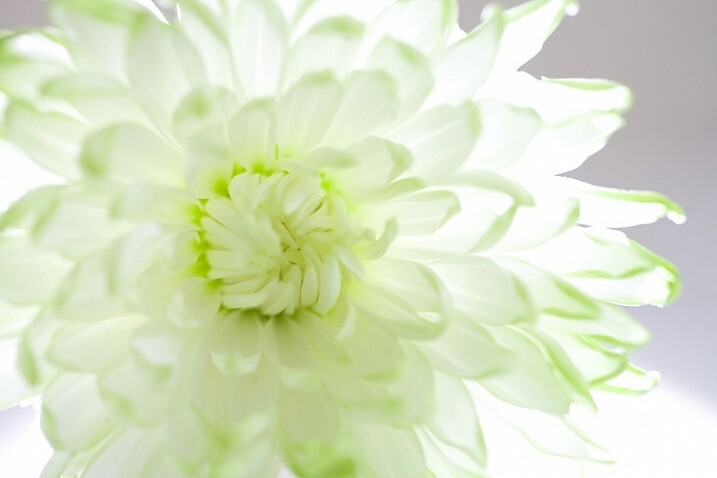
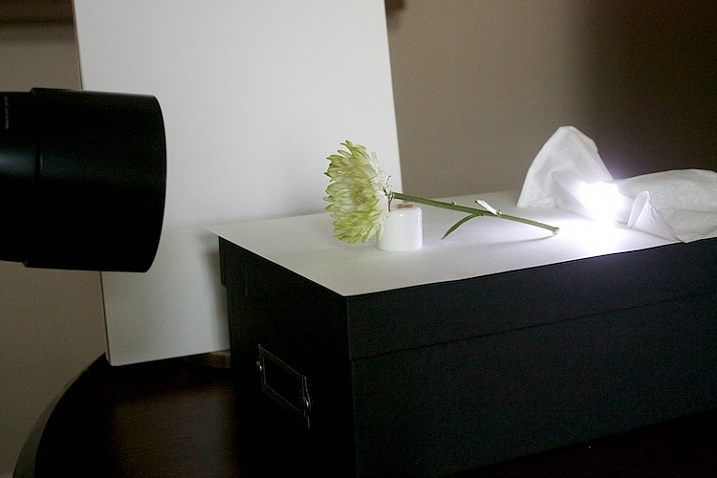
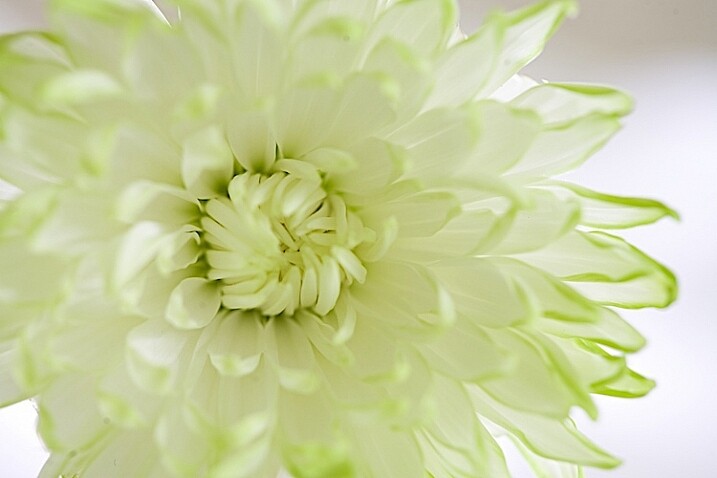
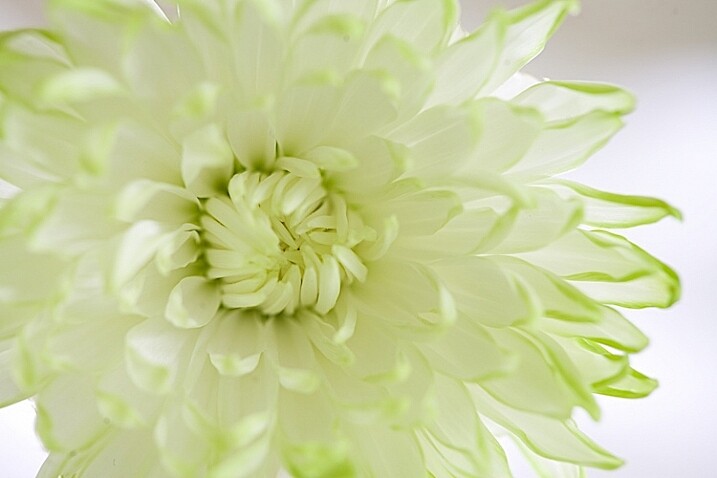
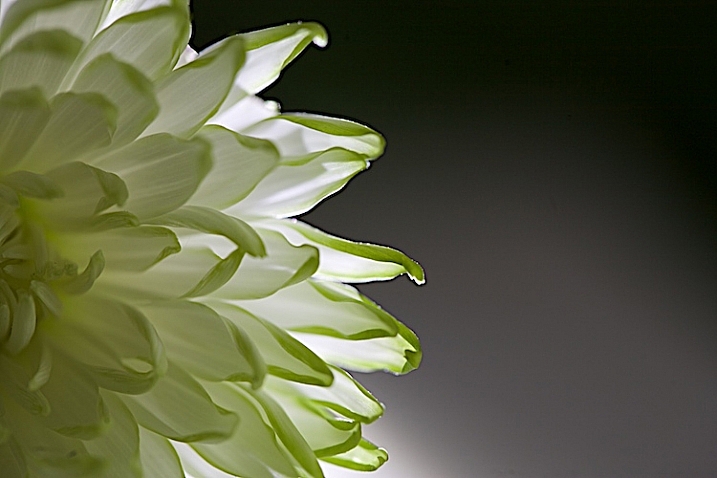
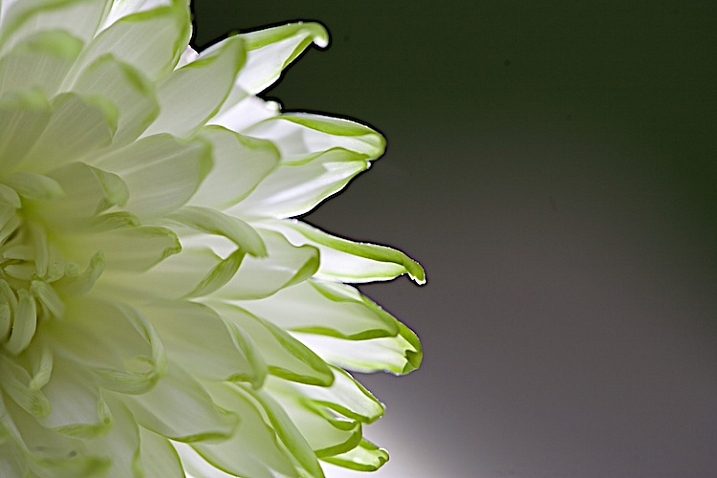
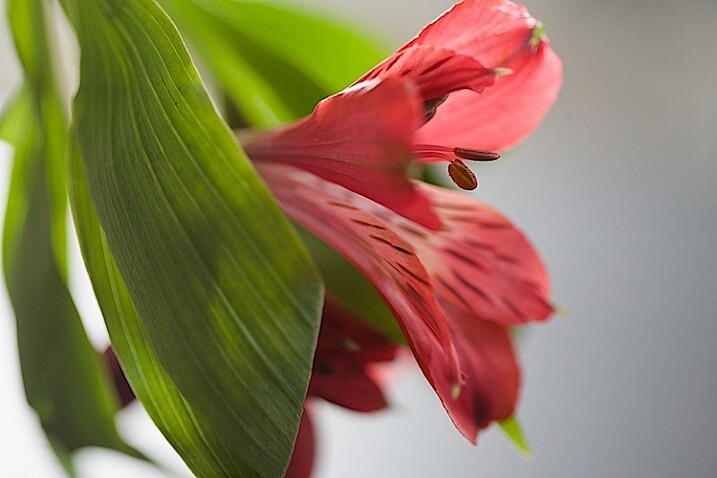
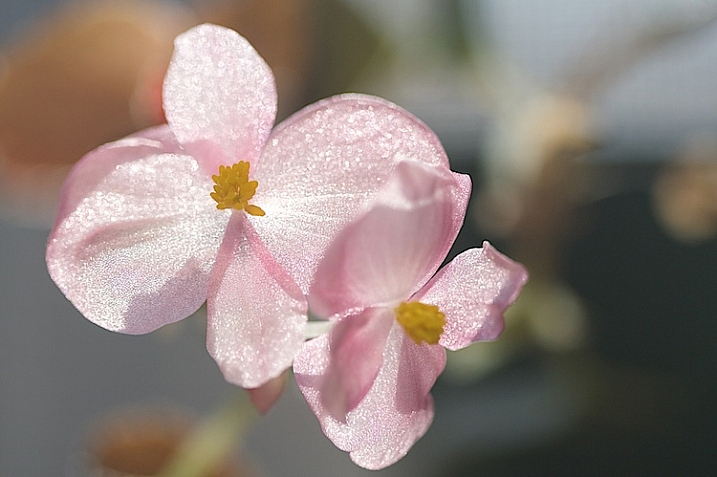
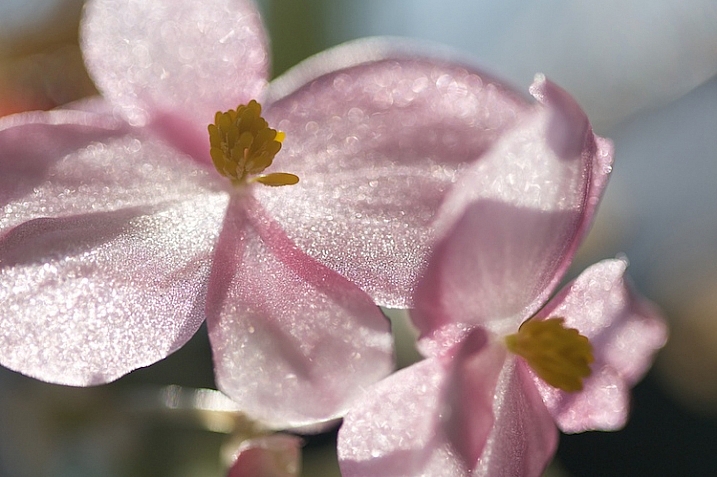
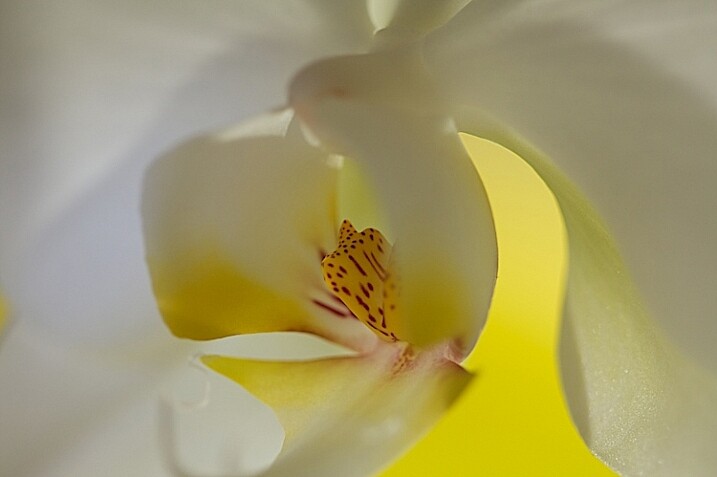
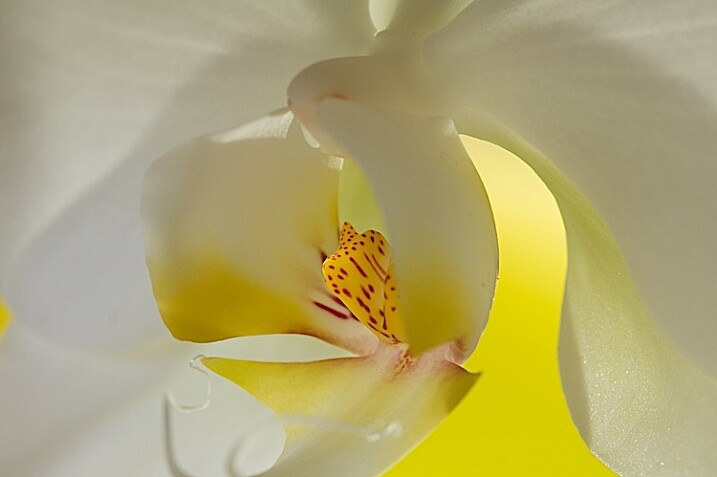
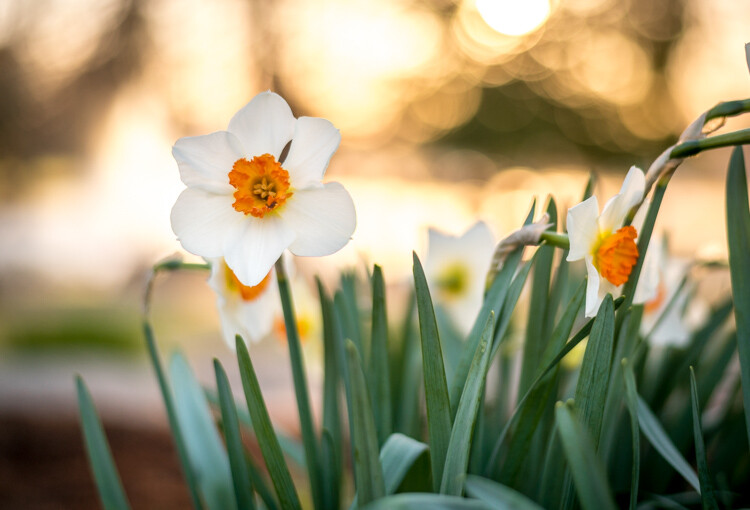
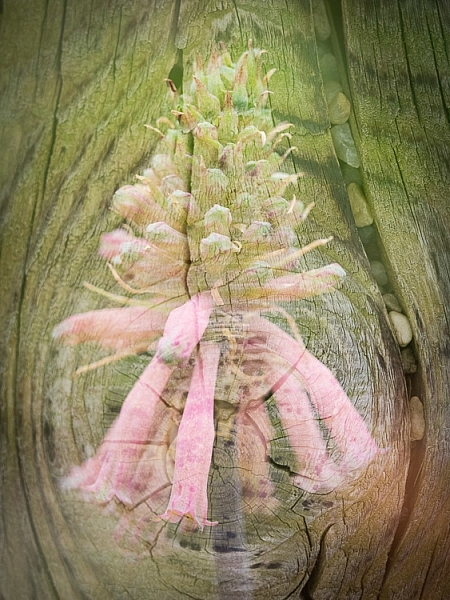
This close-up photo of a flower (above) is another example of using a central composition for impact. I focused on the flower’s stamen and let the petals go out of focus. Visually, you can divide the photo into three. At the centre there’s the stamen, which is the sharp part of the image. Around that is the petal of the flower, and around that the green leaves. If I moved the camera further away and placed the flower on a third, rather than the centre, then it would lose impact and be a completely different photo.

Central composition

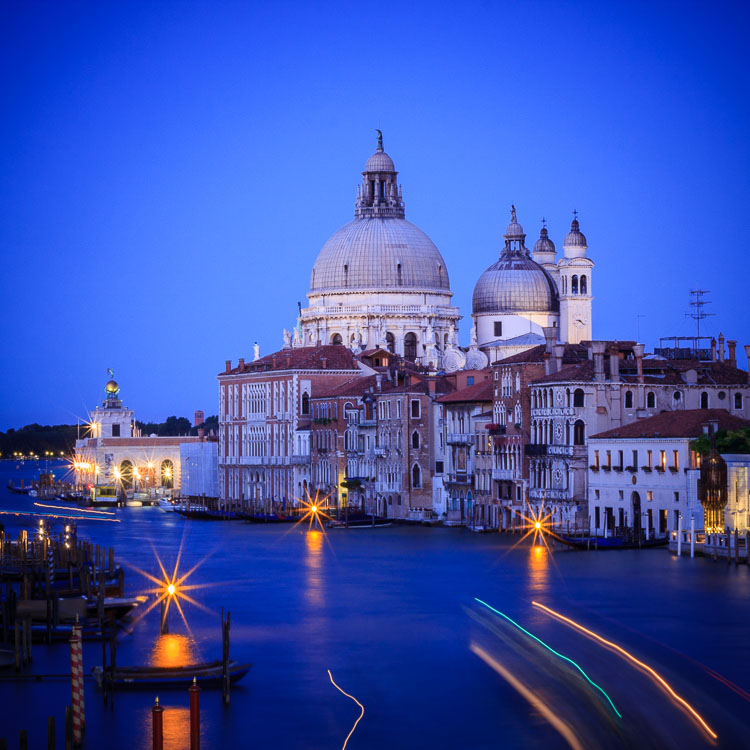
The final example uses the square format. You’ll see central compositions in the square format, far more than you will with a rectangular aspect ratio, because the square format lends itself to strong, graphic compositions that utilize shape.

In this example the domes of the Venetian church (centered horizontally) are the strongest shapes, and the focal point of the image. It helps that the lines formed by moving boats from the bottom right of the frame pull the eye towards the church in the distance.

What do you think? Are there times when you use central composition or do you prefer to place the subject off-centre? Let us know in the comments below.


Mastering Composition

If you’d like to learn more about composition then please check out my ebook Mastering Composition: A Photographer’s Guide to Seeing.

googletag.cmd.push(function() {
tablet_slots.push( googletag.defineSlot( “/1005424/_dPSv4_tab-all-article-bottom_(300×250)”, [300, 250], “pb-ad-78623” ).addService( googletag.pubads() ) ); } );

googletag.cmd.push(function() {
mobile_slots.push( googletag.defineSlot( “/1005424/_dPSv4_mob-all-article-bottom_(300×250)”, [300, 250], “pb-ad-78158” ).addService( googletag.pubads() ) ); } );

The post How to Create a Strong Composition by Centring the Subject by Andrew S. Gibson appeared first on Digital Photography School.


Digital Photography School

 
Comments Off on How to Create a Strong Composition by Centring the Subject

Posted in Photography


How to Create Gorgeous Flower Images using a Flashlight and a Reflector

31 May

1-Light-painting-flowers-orchid

In this tutorial, I’m going to share with you some simple and inexpensive ways to create beautiful flower images. You will learn to add light by using a flashlight and a reflector. If you add in some imagination and patience, you will soon be creating gorgeous flower images of your own.

In addition, you will gain insight about seeing light, and how and recreate it on your own.

The techniques I am going to share are reminiscent of light painting and burning (from film days printing negatives), but in this tutorial we are going to take advantage of the ambient light, combined with light from flashlights to create some great effects.

Setting up

You will need to put your camera on a tripod, and find a nice surface near some window light to photograph your flower. Set up to shoot using a shutter speed slower than 1/15th of a second, and it’s much easier if you use a cable release or use your camera’s self-timer feature.

1s-Light-Painting-Flowers-2016-05-19at13-10-21-behind-scene

Here’s my set up, above. I chose an easy location, perpendicular to a window, providing some nice light. I used a prop to hold the flower up.

2s-Light-Painting-Flowers-2016-05-19at13-30-24

Window light only. Exposure was f/4 at 1/4.

I did a test shot, above, to determine my exposure using just ambient light. I slowed the shutter speed down just a little bit to see what results I would get.

2.s-Light-Painting-Flowers-2016-05-19at13-29-53

Window light only. Exposure f/4 at 0.40 seconds.

Add a reflector

It’s a little brighter at this exposure, but notice that the shadows are still quite strong.

3s-Light-Painting-Flowers-2016-05-19at13-15-39-behind-scene

To soften the light, I added a white fill card below, and to the side of the flower. It’s also called a reflector. Almost anything white can be used as a reflector. The idea is to fill in the shadows, and to make the light feel softer.

4s-Light-Painting-Flowers-2016-05-19at13-36-59

Window light with fill card. Exposure f/4 at 1/4.

This exposure above was taken with the fill cards in place. Compare it with the two above, and notice that the lightness/darkness is similar to the longer exposure. It’s pretty amazing how much light can be added to a photo just by using reflectors.

More importantly, note the quality of light. By that I mean, notice how the shadows are still present to the left of the center of the flower but are not as prominent. Also be aware of how  nicely the shadows are filled in from the bottom.

Create a feeling that matches your subject

Flowers are soft. They are feminine. When we tell stories about our subject, we want to convey that feeling. One of the ways we convey feelings in photographs is in how we use light. Notice how the feel is different in the photos with the fill card and without. The second exposure feels softer and more feminine, and thus, supports the story of a feminine flower.

Add light from a flashlight for more drama

Now, to add a backlight with a flashlight. Make sure to position the flashlight in such a way that it doesn’t cause lens flare (the light isn’t hitting the lens directly). Make sure the light is pointing entirely at the flower, and not reaching your camera lens.

5s-Light-Painting-Flowers-2016-05-19at13-18-08-behind-scene

5bs-Light-Painting-Flowers-2016-05-19at13-51-46

Flashlight with backlight, no fill cards or reflectors. Exposure f/4 at 1/4.

This is with a strong backlight. Notice how dark the center of the flower seems.

6s-Light-Painting-Flowers-2016-05-19at13-41-23-behind-scene

We can use a second light to fill in the center of the flower. I recommend using a slower shutter speed, 1/15th or less, and moving the flashlight while the exposure is made. If you don’t move the light, it will appear too strong and create harsh shadows.

7s-Light-Painting-Flowers-2016-05-19at13-41-03-behind-scene

If the light appears too strong and too direct, use a diffuser over your flashlight. I used a kleenex to soften the light.

8s-Light-Painting-Flowers-2016-05-19at13-38-27

Flashlight as a backlight, with a second flashlight as a fill light in the front. Exposure f/4 at 1/4.

How does this feel to you now? Notice how I brought the exposure of center of the flower up, just by doing a little light painting. If you ever worked in a darkroom, you will notice this is similar to manipulating an image in an enlarger called, burning, but we are doing it live at the capture stage.

9s-Light-Painting-Flowers-2016-05-19at13-20-12-behind-scene

Let’s see what our flower looks like with a backlight that isn’t as strong. I used a kleenex diffuser on the flashlight in the back.

10s-Light-Painting-Flowers-2016-05-19at13-41-36

Using a softer backlight by diffusing with tissue.

Can you see how much softer the backlight is?

11sLight-Painting-Flowers-2016-05-19at13-42-54

In this image, I added a little bit of fill with a flashlight and kleenex diffuser.

This is very, very subtle. But move your eye back and forth between the two. Can you see the one directly above is a little bit softer? The difference isn’t huge on a computer screen, but makes a big difference in a large print.

Get creative with light and composition

11s-Light-Painting-Flowers-2016-05-19at14-07-29

At this point, it’s time to get creative with your framing and play with light.

In composition, you want to decide what your center of interest is in the photograph, and draw the eye to that point. Notice how dark the center of the flower is in the top image, so let’s add some fill.

12s-Light-Painting-Flowers-2016-05-19at14-06-32

The center of the flower is lighter now (above). Which image do you like better?

20.s-Light-Painting-Flowers-2016-05-19at16-10-27

Notice the stamen of the flower above. Can you see it’s just a black blob? What happens when we add just a little bit of fill with a flashlight?

21.s-Light-Painting-Flowers-2016-05-19at16-11-21

The center of interest becomes more pronounced.

Let’s try another one.

22.s-Light-Painting-Flowers-2016-05-19at16-30-03

Dark stamen.

23.s-Light-Painting-Flowers-2016-05-19at16-29-04

A little bit of fill.

25.s-Light-Painting-Flowers-2016-05-19at16-33-56

A new angle with no fill.

26.s-Light-Painting-Flowers-2016-05-19at16-36-40

A little bit of fill light, highlighting the center of interest.

A few more examples

Let’s go back to this simple lighting setup.

2-Light-painting-flowers-gardenia-1

I used this setup on several different kinds of flower and I likde this white rose the best.

3-Light-painting-flowers-White-Rose-no-fill

Can you see the beautiful light and how translucent the rose looks?

I like the overall feel to the image, however, there is a lot of contrast between the center of the flower and the outer petals. You want your viewer’s eye to go toward the center of interest, which is the middle of the flower, so I placed a reflector right in front of the flower.

4-Light-painting-flowers-White-Rose-fill

You can see how the light reflects back in, and brightens up center of the flower. I also like this frame better because it feels softer.

This technique can work outdoors, too. Just use your reflector and your flashlight, and see what works.

7-Light-painting-flowers-no-fill-pink-3

There is no right or wrong when deciding where to put your light, but it’s usually best not to shine your main light from the camera angle. In this photo, the light is to the right and it feels to harsh to me. There are strong shadows on the flower that don’t add to the feel of the photograph. I moved myself in order to move the position of the light source, the sun.

8-Light-painting-flowers-fill-pink-3

I added a fill card, and see how the stamen starts to stand out. This is much better, but I decided to play with camera angles to see what that would look like.

11-Light-painting-flowers-no-fill-pink-2

I liked this better, especially how the light created patterns on the petals of the flower, but I wanted my interest in the center of the flower. It still just seemed to dark.

10-Light-painting-flowers-fill-pink-2

In the photo above, I used a reflector to fill in the shadows and used my flashlight to add a little bit of light.

5-Light-painting-flowers-no-fill-pink

Then, I changed the angle just a little bit. This is with no fill (above).

6-Light-painting-flowers-fill-pink

Here is the same flower with a reflector and flashlight filling in the dark areas.

There is no science to this. It’s all about playing to see what works. Here are a few more example that I shot, these images have no corrections. They are straight from the camera to help you see my process better.

16Light-painting-flowers-no-fill-orchid

Without a fill.

17-Light-painting-flowers-fill-orchid

With a fill.

1-Light-painting-flowers-orchid

This final photo used several reflectors, as well as using a flashlight in the center of the flower.

Now you have some great tips, and inspiration to create a gorgeous floral photo of your own. You’ve seen how you can use simple fill cards to add light and soften an image. You’ve learned how light impacts the story you are telling, and you’ve learned how a simple flashlight or two, plus a kleenex, can take your photos to a new level.

Let’s see your floral photos, please share in the comments below.

googletag.cmd.push(function() {
tablet_slots.push( googletag.defineSlot( “/1005424/_dPSv4_tab-all-article-bottom_(300×250)”, [300, 250], “pb-ad-78623” ).addService( googletag.pubads() ) ); } );

googletag.cmd.push(function() {
mobile_slots.push( googletag.defineSlot( “/1005424/_dPSv4_mob-all-article-bottom_(300×250)”, [300, 250], “pb-ad-78158” ).addService( googletag.pubads() ) ); } );

The post How to Create Gorgeous Flower Images using a Flashlight and a Reflector by Vickie Lewis appeared first on Digital Photography School.


Digital Photography School

 
Comments Off on How to Create Gorgeous Flower Images using a Flashlight and a Reflector

Posted in Photography


6 Tips on How to Create Abstract Photos

29 May

It’s time to have some fun with your camera, and pop you out of the realistic rut you may not even know you’re in. It’s time to create some images based on color, light, emotion, and a lack of concern for sharpness or details.

It’s time to play around with abstract photography!

PWC-Travel2015-1229-0212

Abstract | ab-stract | adjective | of art : Expressing ideas and emotions by using elements such as colors and lines without attempting to create a realistic picture.

You already have all the tools you need (a camera or even a smartphone),  so let’s take a look at some methods of creating emotive and abstracted images.

Techniques

1 – Move Your Camera

The simplest method for creating images filled with color and lines, is to blur the snot out of everything. This is a liberating concept for most of us. “I get to move my camera and not worry about staying super steady? Heaven!” I can hear you shout.

All of these techniques are paths of self discovery, but I can give some tips on where to start.

PWC-Travel2016-0323-3539

First, slow your shutter speed down to 1/10th of a second or slower. As with panning blur, this is where things get interesting. You can do this in Shutter Priority mode, or if you know how to adjust your camera in Aperture or Program modes, you can use those to get the same shutter speed. You’ll also be helped with a low ISO, such as 100 or lower.

Second, look for things in the shade. That slow shutter speed needs a lack of light to work well, otherwise your shots will be blown out (overexposed).

Third, take some sample shots moving your camera in one direction, then another. I know, this sounds like lame advice, and is simplistic, but it starts out that way. You have to start seeing what the scene in front of you does when you move one way or the other. Then start moving in circles or random wiggles.

PWC-Abstract2016-0420-4743

Sometimes straight lined objects look best when you go with their grain and direction. Sometimes circular items (flowers being an easy target) look best with some random wiggle. This is your official “Get out of photography-jail free card” to experiment and make some ugly images. But you may also make some that pique your interest.

PWC-Abstract2016-0419-4286

2 – Move the Subject

I used to hate see tags on train cars, until I realized the magic of all those random colors screaming by at 40 miles per hour (65 km/h).

Now I often look for all kinds of colorful items, just for their color alone. The shape, subject, or intent may not be what I want, but if I can use that color and get it to move just the way I want…I can capture the colorful essence.

PWC-Oregon2012-0630-8954

This can be a lot like light painting, but without the subject emitting the light. Think of other things that can be moved around, and go for bold colors.

WARNING: Watch out for white, yellow and other super bright colors. Their properties mean they will fill your sensor with too much data too fast, and they will washout/cover over any other colors you may have in your shot.

3 – Remove Reference

A zoom lens will be your best friend here. Wide angle shots, even with ample blur, often allow us to ground ourselves in the scene, not the colors or emotion. It’s breaking out of what we can recognize, and can relate to, that helps the abstract images.

Let me show you an example. What do you see here (below)?

PWC-Abstract2016-0419-4328

Now let me show you the larger context.

PWC-Abstract2016-0419-4309

The more you zoom in and pick apart details, the more you can play with abstraction.

4 – Shoot Through Things

I have yet to experiment heavily with shooting through objects, but there is much fun to be had here too. Having a way to hold the object helps, and a clamp on a light stand would be handy. Otherwise, start with everyday objects and work your way through colored glass, a glass block, or even smear various gels and liquids (Vaseline, olive oil, etc.) on a clear sheet of glass or plexiglass.

PWC-Abstract2016-0428-4858

5 – Multiple Exposure

Using in-camera multiple exposure techniques can sometimes leave too much of the original, recognizable subject, for some photographers’ tastes. I have found the Average setting on my Canon to work well in combining shots. If you want to get funky, go for the Dark setting, and prepare to shoot a lot of tests.

My method is to take one shot, mostly in focus. Then I shoot two more in varying degrees of out of focus. This sometimes ends up with more of a soft focus look, and that’s where the argument can be made that these images are not abstract enough. That’s why I’ll choose to zoom way in, to hopefully make the subject a little more out of context.

PWC-Travel2016-0323-3621

6 – Post-Processing as a Playground

You know how people tend to complain about too much post-processing of some artists’ work? Now’s the time to cast off those bonds and have some fun. You can soften scenes to make them even more ethereal.

PWC-Abstract2016-0419-4585

Or you can try on different versions of the same image, but with vastly different color renditions (in this case, I simple moved the White Balance Temperature and Tint sliders in Lightroom).

PWC-Travel2016-0323-3463-3

PWC-Travel2016-0323-3463

PWC-Travel2016-0323-3463-2

Once your images are in the computer, let your impulses go wild!

Conclusion

PWC-Abstract2016-0419-4467

The thing I like most about abstract photography is that it plays on the “This is something I really like, but I’m not sure why” nerve inside all of us. I can possibly breakdown each of these images and tell you why I picked them, but in the end, it doesn’t really matter. It’s about creating art for art’s sake. It’s about getting back to the basics of attraction to art. It’s about being surprised by what you see on your LCD while breaking a few of the rules you used to hold so dear.

Now go experiment and show me what you can create!

googletag.cmd.push(function() {
tablet_slots.push( googletag.defineSlot( “/1005424/_dPSv4_tab-all-article-bottom_(300×250)”, [300, 250], “pb-ad-78623” ).addService( googletag.pubads() ) ); } );

googletag.cmd.push(function() {
mobile_slots.push( googletag.defineSlot( “/1005424/_dPSv4_mob-all-article-bottom_(300×250)”, [300, 250], “pb-ad-78158” ).addService( googletag.pubads() ) ); } );

The post 6 Tips on How to Create Abstract Photos by Peter West Carey appeared first on Digital Photography School.


Digital Photography School

 
Comments Off on 6 Tips on How to Create Abstract Photos

Posted in Photography


Google teams with IMAX to create next-gen VR rigs for the film industry

21 May

At its I/O developer conference this week, Google announced a new partnership with IMAX to develop next-gen VR camera rigs for use in the film industry. These camera rigs will be different than Google’s previously unveiled GoPro VR rig, but will likewise utilize the company’s Jump virtual reality platform for post-processing. The cameras are being created in part with tech from Chinese company Yi Technology. Likewise, IMAX has announced plans to open VR experience spaces in six locations across the US.

The companies haven’t revealed any details about the planned cameras at this time, except that they will feature Jump integration. The announcement comes at a time when competing high-end VR cameras have made public debuts, including the 4K-capable $ 2500 Sphericam 2 and Nokia’s $ 60,000 OZO camera.

Via: Yahoo

Articles: Digital Photography Review (dpreview.com)

 
Comments Off on Google teams with IMAX to create next-gen VR rigs for the film industry

Posted in Uncategorized


How to Create Catch Lights in Your Natural Light Portraits

19 May

What is a catch light, and why you should have it in your portraits?

A very popular technique in portraiture – a catch light is a spark of light in your subject’s eyes. This spark will help you to draw your viewer’s attention to your subject’s eyes, making them full of life and, well, sparkling.

04
For this portrait, I made recently in Cienfuegos, Cuba, I used the light from the setting sun to create a catch light, even without having the subject looking up.

How to create a catch light in portraits?

To create a catch light, all you need is a source of bright light to reflect in your subject’s eyes. This source can be artificial, like a flash, or natural, like sunlight. In this article, I will focus on creating catch light in portraits using natural light.

Creating a catch light – indoor

To create a catch light in an indoor location, all you need to do is to make sure there is a visible source of light, which will be reflected in your subject’s eyes.

Position your subject near an open window or door, during daylight, and make sure there is a direct line between the source of light and the subject, without blocking objects like furniture. Your subject does not have to look directly into the source, as it might be too dazzling or uncomfortable. The important thing is that the light source must be visible as a reflection in the subject’s eyes.

01

I met the lovely Nagina at her home in a small village of Roma people, outside Bukhara, Uzbekistan. Although she was only 10; she was very busy caring for her small brothers, along with few other neighbors’ children. She asked me to take her photo, and I was drawn to her gaze right away, choosing to go for a close-up portrait. The house was completely dark, except a large window, which was position at a 45-degree angle to her face, which created that catch light in her eyes.

Good to know: The closer your subject is to the light source (open window or door) the larger and more dominant the spark of catch light will seem.

Taking it to the next level: Think carefully about the location of your subject to the light source, as that will not only affect the size and visibility of the catchlight in the subject’s eyes, it will also control the entire Illumination of the subject’s face. To read more about how the direction of light will affect your portrait, check out: Understanding Natural Light Part 3: Direction of Light.

Creating a catch light – outdoors

For achieving the best results in an outdoor shooting, all you need to do is aim your subject to look at the largest light source – the sky. DO NOT instruct the subject to gaze at the sun, even for a brief moment, as it can lead to pain and damage to his or her eyes.

If you do not want to stage your subject, or if there is a language barrier, a great technique of aiming your subject’s gaze up, is by simply positioning yourself a bit above your subject. While they gaze it your lens, the sky (behind you) will reflect in their eyes. This is why I photograph many of my outdoor portraits at an angle, which is a bit higher than my subject.

Mordecai is Jewish Orthodox, from the old city of Jerusalem. I was very surprised that he agreed to be photographed, even with joy. To give a spark to those amazing eyes I told him to look into my lens, while I positioned myself slightly higher than him, and the lovely skies of holy Jerusalem were reflected in his eyes.

02

Good to know: On a sunny day, I recommend positioning your subject in the shade, as gazing at sunny skies might be uncomfortable.

Taking it to the next level: If you want it or not, it is almost sure that apart from that spark of light, your own image (the photographer) will also be visible in the subject’s eyes. You can turn this fact into a creative portrait (of your subject) and a self-portrait (of yourself) in the same frame. Just do not forget to move the camera a bit, to let your face be visible. You can also use this technique for less narcissistic reasons, as with really tight close-up, as almost anything in front of your subject’s face will be reflected in his eyes. It is a wonderful technique for making a landscape shot, or an image of an iconic place, with a twist.

Creating a catch light – while using a reflector

Using reflectors in portrait photography is a wonderful technique (a more in-depth explanation about using reflectors in portrait photography, in this article: Reflectors: Your Secret Weapon for Amazing Portrait Photography), that can help you to create catch lights in almost any situation, indoor or outdoor, sunny or cloudy.

Not only do reflectors allow you to create that spark of catch light almost anywhere; but they will allow you much more control, over the intensity, color, and direction of that spark.

A pocket size silver reflector was the best tool for the job for this portrait, photographed in a very hot afternoon in Armenia.

03

Good to know: Reflectors come in many sizes and colors. For the best results, use a small pocket-sized silver reflector. Why? Because you do not need anything larger or heavier. Those small reflectors are the perfect weapon of choice, for creating a catch light in close-up portraits. Position the reflector just under the chin of your subject. You can hold the reflector with your left hand, or ask the subject to hold it.

Taking it to the next level: Although using a silver reflector will give you the most notable catch light, you can add warmth to the portrait by using a golden one, which will result in a golden catch light.

A mix of shade, slightly higher camera angle, and gaze upward toward the sky, helped create the catch light in these portraits photographed in India and Israel.

05

See how the eyes are alive in their portraits? The catch lights help add the sparkle you see there, and without them the portraits wouldn’t feel as alive, vibrant.

Now it’s your turn, show me your portraits with great catchlights. Please share in the comments below.

googletag.cmd.push(function() {
tablet_slots.push( googletag.defineSlot( “/1005424/_dPSv4_tab-all-article-bottom_(300×250)”, [300, 250], “pb-ad-78623” ).addService( googletag.pubads() ) ); } );

googletag.cmd.push(function() {
mobile_slots.push( googletag.defineSlot( “/1005424/_dPSv4_mob-all-article-bottom_(300×250)”, [300, 250], “pb-ad-78158” ).addService( googletag.pubads() ) ); } );

The post How to Create Catch Lights in Your Natural Light Portraits by Oded Wagenstein appeared first on Digital Photography School.


Digital Photography School

 
Comments Off on How to Create Catch Lights in Your Natural Light Portraits

Posted in Photography


How to Create Compelling Wide-Angle Portraits Using One Off-Camera Flash

11 May

What are your most memorable moments as a photographer? As a travel photographer, my short list of stand-out moments include wandering alone in Namibia’s dead tree forest, photographing sunbeams from the top of a cliff in China, and capturing the Aurora Borealis on the coast of Iceland.

1 Colombian Girl

However, a year ago all of those amazing locations and moments were trumped by spending 30 minutes photographing a little girl outside her home near Villa de Leyva, Colombia (pictured above). This was the first time the girl had her portrait taken, let alone by a foreigner. With all the confidence of an experienced model, she literally stole the show that day. I believe the session is an important memory for her and instantly became my top moment photographing to date.

Ironically, two years ago I would not have even bothered taking this picture. I was focused on landscape and outdoor travel scenes. Also, if I’m honest with myself, I was somewhat intimidated by using artificial lighting and working with people as subjects. In April of 2014, I gave environmental portraiture a shot and have never looked back. It is now an important focus of my work.

This article will provide some guidance on how you can create images like the ones you see here, using a wide-angle lens and just one off-camera flash. But first, let me let you in on a little secret – it’s not that difficult.

Getting things right in camera is the important first step, which is the focus of this article. Processing your images is equally important, but I’ll cover that in a future article. So, let me start by providing you with the core techniques, then get into equipment and settings.

2 Smoking Guy

Use a (Relatively) Wide-Angle Lens

Lens choice is critically important in portraiture. Most portrait photographers reach for their 85mm or 105mm lens when heading out on a shoot. These focal lengths give a nice, realistic look to the subjects. However, I find myself drawn to portraits that have a surreal look to them, and include extra context that helps tell a story. Also, wide-angle lenses require you to shoot close to your subject, which also brings your viewer into the scene.

So, the first step is to leave your 85mm or 105mm in the bag, and grab a wide-angle lens. Most of the portraits you see here were created at 24mm using a full frame camera (use a 16mm for the same view if your camera has a cropped sensor). For me, this focal length is the perfect blend of reality and distortion. If you shoot much wider, elements closer to the lens, such as arms and hands, look too big or elongated. Also, wider focal lengths mean a much bigger background, which is usually not desirable.

3 Dockworker Ships

Choose a Compelling Subject

Your subject is paramount. The Indonesian dockworker above is amazing. I spent 20 minutes photographing this guy and really had a difficult time choosing the best image. On the other hand, you could spend all day photographing me on the same dock, in front of the same ships, and have nothing but tossers at the end of the day.

I look for people that have experienced life. The ideal subject has a particular interesting quality about him or her, that makes them stand out from the rest. However, my subjects also have an everyday person quality about them. Finding subjects can be challenging, especially if you live in the suburbs of Chicago, like I do. I am a travel photographer and usually find my subjects in rural areas overseas. However, there are great subjects everywhere.

Clothing is critically important. If your 90-year old rural villager is wearing a hat that says, “I Love New York”, then you will want to politely ask him to take it off, or at least turn it around for the picture. The point is, don’t let out-of-context clothing ruin or weaken your shot.
4 Smiley Guy

Choose a Complementary Background

Your image is only as strong as the weakest part of it, which is often the background. This is because, as photographer Jim Zuckerman puts it, “The world is a compositional mess”. There are two important qualities you want out of your background:

First, at the very least, your background must be non-distracting. Although you can easily isolate your subject with a longer focal length, the background becomes a major consideration with wide-angle portraits. Beginner, and even intermediate photographers, can overlook even some obvious distractions in the background. You have probably seen them before: trees that look like they are growing out of the subject’s head, patchy spots of bright light in the scene, colorful objects, straight lines and geometric shapes. You essentially don’t want anything that competes with your subject for attention.

The image of the Indonesian dockworker below is non-distracting, but not much more. He is essentially standing in front of a shipping container, so this image won’t win any awards for its background. Nevertheless, it is still a good picture because of the strength of the subject.

5 Dockworker Container

Second, whenever possible, include a background that complements your subject by providing a context. I’ve shot many images with simple non-distracting backgrounds. But, my favorite pictures are those with a background that tells a story about the subject. This is why I love shooting in places like rural China and Indonesia. These countries have many ancient villages that provide opportunities for amazing backgrounds, such as in the image below.

6 Chinese Guy Hat

I like to keep all evidence of modernity out of the background. I don’t like plastic stuff in my pictures. I don’t include modern looking buildings or cars. Instead, I prefer rural areas with weather-beaten buildings. Of course, this all depends on what you are after. The important thing is that the background complements the subject and does not distract from it.

Shoot in the Right Lighting Conditions

Because the majority of the background is not lit by the flash, many of the same outdoor photography lighting principles hold true, even if a flash is being used. Try shooting either early or late in the day (when the sun is low in the sky) or in overcast conditions. I actually prefer overcast conditions, but still shoot relatively early or late in the day.

Put Your Subjects at Ease

I don’t hire models, so some subjects work well and others not as well. What you want to avoid is a picture of your subject standing flat-footed, straight up and down, and holding a fake smile.

To help avoid this, it is a good idea to start your session by gaining their interest and confidence. If you have some images you’ve shot and processed, show them to give him or her an idea of what you are looking for, and hopefully peak their interest. This should communicate immediately that you are not looking for them to just stand there and smile. It should also show that the posing expectations will be basic.

7 Colombian Lady Cat

Posing and Composition

Because I am shooting wide, I get quite close to my subjects and warn them ahead of time about this. For me, the eyes are a critically important part of the picture and must be very sharp. I focus on the closest eye, and re-focus frequently as I move around the subject slightly.

I generally ask him or her to look directly at the camera and not to smile, although not always. I then start moving slightly left or right, asking them to keep their head still and just follow the camera with their eyes. I usually shoot from slightly below eye level. I have them stand or sit at an angle to the camera. If the subject is standing, I have them put their weight on the back foot.

I like to include the subject’s hands in the composition. With a wide-angle lens, their hands in the foreground will look large, so try to strike a balance with the hands being prominent, but not too large. You can do this by simply positioning the hands closer to or farther away from the lens relative to their body.

8 Chinese Girl Laughing

Equipment and Settings

The Camera

Your camera should be equipped with an internal or external flash trigger to control your off-camera flash. Here is how I set things up:

  • Start by leaving your flash or trigger initially turned off.
  • Set your camera to manual mode.
  • If the session is outdoors, I try for settings of ISO 100, f/7.1 and a shutter speed of around 1/160. You can adjust your f-stop and shutter speed to your preference, but keep in mind that you cannot go faster than your camera’s maximum flash sync speed.
  • Make the necessary adjustments to slightly underexpose the background by 1/3 to 2/3 stop. I usually start by adjusting shutter speed, but go no slower than 1/60 and no faster than 1/160. If necessary, I will then adjust my f-stop to f/5.6 at the widest. Then, and only then, will I start bumping up the ISO.
  • If you are indoors, you need to start with a higher ISO as a first step, and then make your adjustments to shutter speed and f-stop in the same manner.

9 Chinese Woman

Lighting

For 90% of my portraits, I use a single off-camera flash, diffused with an umbrella or softbox. The most important rule with flash is “don’t ruin your shot,” which is usually done by putting too much flash on your subject. Instead, you want to get a decent balance of natural and artificial light, so that the flash is undetectable to the untrained eye, but lights your subject brighter than the underexposed background.

Now, turn your flash and trigger on:

  • Set your off-camera flash to manual mode.
  • I typically position the flash at a 45-degree angle to the subject, about 2-3 feet (slightly less than a meter) away, higher than their head, angled downward.
  • I usually start with 1/16 flash power when outdoors, and adjust from there until the subject stands out from the background, but does not look like they have been blasted with flash.

Post-Processing

You need to get things right in camera first. But, you will need to use a variety of post-processing techniques to get the effect you see in these images. I’ll coverthe techniques I use to process environmental portraits in a future article.

Thank you for reading, please share your wide-angle portraits and questions in the comments below.

googletag.cmd.push(function() {
tablet_slots.push( googletag.defineSlot( “/1005424/_dPSv4_tab-all-article-bottom_(300×250)”, [300, 250], “pb-ad-78623” ).addService( googletag.pubads() ) ); } );

googletag.cmd.push(function() {
mobile_slots.push( googletag.defineSlot( “/1005424/_dPSv4_mob-all-article-bottom_(300×250)”, [300, 250], “pb-ad-78158” ).addService( googletag.pubads() ) ); } );

The post How to Create Compelling Wide-Angle Portraits Using One Off-Camera Flash by Ken Koskela appeared first on Digital Photography School.


Digital Photography School

 
Comments Off on How to Create Compelling Wide-Angle Portraits Using One Off-Camera Flash

Posted in Photography


How to Create a Delicious Blurry Bokeh Background in 4 Easy Steps

02 May

Blurry backgrounds are nothing new when it comes to photography. The technique of blurring the background to emphasize a subject in the foreground has been used by photographers for decades, and by painters and other visual artists for hundreds of years. Now thanks to the proliferation of digital cameras this phenomenon has exploded in recent times.

Many people like photos with a tack-sharp subject and a smooth blurry background, and even though some might say it’s more of an over-used trend, the truth is that bokeh is here to stay. The trick to using it effectively, is to learn how to use the physical properties of lenses and light to create the look you are going for. While some people turn to creative editing tricks like adding blurry filters or doing Photoshop gymnastics there really is no substitute for the genuine article. If this is something you have always wondered about or wanted to try for yourself, here are four easy steps to get you started.

50mm, f/4, 1/350 second, ISO 400

50mm, f/4, 1/350th of a second, ISO 400

The term bokeh is a Japanese word that doesn’t have a precise English translation, but refers to the type and quality of the out-of-focus areas of an image. In other words, when the blurry parts of a picture look nice, you might say the image has good bokeh. While a thorough discussion of what bokeh is, what causes it, and what affect your lenses and lens elements have on the type and quality of bokeh could go on for several pages, this article is going to be a bit more basic look at how to create visually pleasing blurry elements in your photos. If you don’t want things to get too complicated, and aren’t quite ready for a thorough breakdown of aspherical elements or the circle of confusion, then get out your camera and follow along with these few simple tips to help you get the look you have always wanted.

understanding-bokeh-golden-glow

50mm, f/1.8, 1/6000th, ISO 100

1 – Shoot with a wide aperture

Take a look at the front of your lens, you will probably see a few numbers that look like 1:3.5-5.6, or 1:2.8, or f/4 (read: What the Numbers on your Lens Mean for more on how to find this). These numbers refer to the size of the aperture in the lens itself, and how big the opening can get. Ironically smaller numbers are bigger, and a lens that says 1:2.8 will be able to let in much more light than a lens that says 1:4 or f/4. (Some manufacturers use different schemes to show the aperture size but it’s always the number after the colon, or on the second side of the / that you want to look for when determining the maximum size of the lens opening.)

The smaller the number, the wider your aperture will be, and the less light you will need to take a properly exposed photo. Wide apertures also mean your photos will have a shallower depth of field, and anything out of focus behind your subject will begin to take on a smoother, more visually pleasing blur. In other words, wide apertures help give you more bokeh.

understanding-bokeh-leaves

50mm, f/1.8, 1/4000 second, ISO 100

If you’re itching to get some pictures with the same kind of buttery-smooth background blur you have seen in nature magazines or fashion spreads, put your camera in Aperture Priority mode (on Nikon) or Av (Canon, Pentax, etc.) and turn the control dial until the aperture value number is as close to zero as it can go. It helps if you have a prime lens that doesn’t zoom in and out, since they usually have wider maximum apertures, but even a kit lens can give you decent results if you have enough light. Now go out and find something to photograph, even if it’s just a coffee mug on your office desk.

To put my money where my mouth is, I took my camera to work and literally snapped a picture of a coffee cup on my desk. No photoshopping or magic tricks here, just a wide f/1.8 aperture. 50mm, 1/100 second, ISO 160

To put my money where my mouth is, I took my camera to work and literally snapped a picture of a coffee cup on my desk. No photoshopping or magic tricks here, just a wide f/1.8 aperture. 50mm lens, 1/100 second, ISO 160

2 – Put your subject far away from the background

If you have been trying to get the kind of silky, blurry bokeh you seem to notice in everyone else’s photos you might try this one simple trick and you won’t believe what happens! Simply putting a great deal of distance between your subject and whatever is behind it, can go a long way towards creating the bokeh you have always dreamed about.

understanding-bokeh-flowers-sunrise

50mm, f/1.8, 1/1000 second, ISO 100

If you are shooting portraits, try moving your subjects to a location where there is a great deal of space behind them, or even just repositioning yourself so you are looking at your subjects from a different angle that puts more distance between them and the background. In the photo below, I specifically shot the scene so that there was about 50 meters between the couple and the fountain, which caused it to have a nice blurry out-of-focus appearance that complements the woman and her fiancée quite well. I could have used a bench that was much closer to the fountain, but it would have had a very different affect on the picture, and it would not have given me nearly the same amount of bokeh as you can see in the final image below.

understanding-bokeh-fountain

85mm, f/2.4, 1/2000 second, ISO 200

3 – Get close to your subject

As I mentioned in the opening paragraph there are many different optical elements that come into play when dealing with bokeh and background blur, and certainly shooting with wide apertures while putting a great deal of distance between your subject and the background are critical elements of the equation. Another thing you can do, is position your camera and lens physically close to the subject you are shooting. Combine this technique with the first two, and you’re virtually guaranteed to get good results.

understanding-bokeh-fence

This shot has all the techniques rolled into one: a wide f/1.8 aperture, a far-away street light in the top left corner, and a very short distance between my camera and the fence bar on the right side.

4 – Zoom in, waaay in

If you are trying to get bokeh-licious shots and not having much luck, there’s another technique that could mean the difference between frustration and celebration. Due to how lenses collect, and focus incoming light rays, it’s easier to get blurry backgrounds with longer focal lengths. This is why these types of shots are difficult to get on mobile phones, which generally have lenses with a much wider angle of view. Grab your nearest camera, whether it’s a DSLR or a humble little point-and-shoot, and zoom the lens as far in as it will go. Now use the other tips I have already mentioned: set the aperture to the widest setting, find a subject that’s relatively close to you, and make sure there is plenty of room between the subject and the background.

A golden eagle, taken with my 400mm f/4 lens on a Nikon D7200. A very expensive combination, but it produces outstanding results with silky-smooth bokeh.

A golden eagle, taken with my 300mm f/4 lens on a Nikon D7200. A very expensive combination, but it produces outstanding results with silky-smooth bokeh.

You might not get the photo of your dreams, but with a little bit of practice you should start to see some improvements, as you begin to understand how to use your camera to create sharp subjects with pleasing out-of-focus areas.

Just kidding! I took the first shot with a $  150 Panasonic ZS7 pocket camera. All I did was zoom in as far as it would go. This is the same scene with the same camera a few seconds later, shot at the camera zoomed all the way out.

Just kidding! I made that first image above with a cheap Panasonic ZS7 pocket camera, and all I did was zoom in as far as it would go. This is the same scene, with the same camera, a few seconds later – but zoomed all the way out.

Now with all this being said, I have a challenge for all of you dPS readers: What is your favorite picture you have taken that has nice pleasing bokeh? Is it a portrait, a wild animal, or more along the lines of abstract art? Share your picture in the comments section below along with a few tips of your own to help others take similarly beautiful bokeh photos.

googletag.cmd.push(function() {
tablet_slots.push( googletag.defineSlot( “/1005424/_dPSv4_tab-all-article-bottom_(300×250)”, [300, 250], “pb-ad-78623” ).addService( googletag.pubads() ) ); } );

googletag.cmd.push(function() {
mobile_slots.push( googletag.defineSlot( “/1005424/_dPSv4_mob-all-article-bottom_(300×250)”, [300, 250], “pb-ad-78158” ).addService( googletag.pubads() ) ); } );

The post How to Create a Delicious Blurry Bokeh Background in 4 Easy Steps by Simon Ringsmuth appeared first on Digital Photography School.


Digital Photography School

 
Comments Off on How to Create a Delicious Blurry Bokeh Background in 4 Easy Steps

Posted in Photography


Create a Photography Business Marketing Plan in 3 Days (+ Save $30 Instantly)

25 Apr

Starting a photography business these days is quite a challenge. It takes courage. You need to push yourself constantly to go out of your comfort zone and learn a whole pack of new things. While there are no shortcuts to success, there are accelerated ways. Read on to learn about one of them and build a photography business marketing plan Continue Reading

The post Create a Photography Business Marketing Plan in 3 Days (+ Save $ 30 Instantly) appeared first on Photodoto.


Photodoto

 
Comments Off on Create a Photography Business Marketing Plan in 3 Days (+ Save $30 Instantly)

Posted in Photography


How to Create a Silky Water Effect in Post-Processing without Using Filters or a Tripod

17 Apr
Affiniy-photo-mean-stack-mode

Smooth water effect edited in Affinity Photo using the Live Stacks feature.

Even if you don’t shoot landscape photography, photos of waterfalls with the smooth water and glassy appearance are awesome. The gist to achieving this, and I do stand corrected if I have this wrong, is as follows:

  • Slow shutter speeds – the need for a tripod
  • A remote shutter release or your camera’s timer
  • Wide angle lens and the camera settings using a small aperture of f/22, ISO 100
  • Neutral Density and/or polarizer filters, as you’ll be shooting long exposures during the day
  • Of course the scene and by all accounts patience too

However, I personally don’t own ND or polarizer filters. These type of filters are required for long exposures during the day, so that your shutter speeds are slow enough, possibly one minute or more to get that misty look. On top of which, you have to get the exposure right, which requires a bit of math and experimentation. ND filters block out the light in terms of stops.

So taking long exposures during the day is an involved process, especially if you want to create that smooth, silky water effect in-camera. But, is there a way to simulate this effect in Photoshop or other post-processing software? Yes there is! It does require that you take multiple shots. I’m not advocating that this technique in post editing is a replacement to going out and achieving long exposures out in the field, far from it. But, I hope this technique may serve as a stepping stone or inspiration to go out and capture silky waters, clouds etc., in-camera.

This article will demonstrate how you can achieve a similar result by taking a bunch of photos in continuous mode without using any filters or a tripod. Although, I would recommend you use a tripod.

First, I’ll demonstrate this effect using a manual method in Photoshop CS6 (standard version). There is an automated way to do this with the Stack Mode feature, which I believe is in Photoshop CC. If you have previous versions of Photoshop, the Stack Mode feature is only available in extended versions, not standard, unfortunately. However, Gimp has this Stack Mode feature and it’s free. Then, I will compare the manual method in Photoshop with Affinity Photo, using Live Stacks. I was really impressed with this feature.

Photoshop manual method

Let’s begin. On the day I took these images, I was pressed for time. So I took a series of shots in continuous mode, and handheld the camera while I focused on this part of a small river. I would recommend that you use a tripod and give yourself some time. It will be easier to align the images later.

small-river-handheld

I took a bunch of images in continuous mode of this small river, close-up deliberately for this article.

You will need to load your images as layers into one document in Photoshop, as follows:

file-scripts-load-files-into-stack

Loading multiple images into one document in Photoshop. File>Scripts>Load Files into Stack

Go up to the Menu Bar > File > Scripts > Load Files into Stack. As I didn’t use a tripod, I selected all the layers to align them. Go to Auto-Align under Edit. As you can see, Photoshop had its work cut out trying to align the images.

images-after-auto-align-photoshop

I handheld my camera when I took a bunch of shots in continuous mode. As you can see from this screenshot, I needed to use Auto-Align Layers in Photoshop. If you use a tripod the alignment will be much easier.

Now that the layers are stacked on top of each other. Start at the bottom and leave this layer at 100%, go to second layer above and reduce the opacity by 50%(100÷2=50). Continue with the next layer and reduce the opacity by 33%(100÷3=33).

percentages-opacity-reduced

Reducing the opacity of each layer by dividing the number of the layer into 100%. The bottom layer remains at 100%. The second layer is 50% and so on.

Therefore, depending on the amount of layers you have, and where they come in the stack, divide this number into 100. So if you had 30 images, the opacity for the top layer in the stack will be 3% (100÷30=3). Remember the bottom layer is always 1=100%. What this is doing is averaging out the layers. This may sound complicated, but in practice, it’s more straightforward. Although it is a bit more tedious than the automated way.

This is the effect of averaging out the layers in Photoshop - reducing the stacked layer's opacity by X amount. I also had to crop this image, whereas the same image when edited in Affinity Photo kept more of the image. See below.

This is the effect of averaging out the layers in Photoshop – reducing the stacked layer’s opacity by X amount. I also had to crop this image, whereas the same image when edited in Affinity Photo kept more of the image. See below.

I have been keeping a close eye on Serif’s Affinity Photo. So I took the plunge and purchased it for (€39) $ 44 USD. That was a discounted offer. At such an affordable price, I was curious to see how this software performs and what it can do.

In Affinity Photo, there is a Live Stacks feature which is similar to Stack Mode in Photoshop. It was easy and simple to use, and the process was fast.

Affiniy-photo-mean-stack-mode

Affinity-photo-new-stack

The equivalent Stack Mode feature in Photoshop is called Live Stacks in Affinity Photo.

Go to File > New Stack. The pop up dialog box appears where you select your images. Make sure Automatically Align Images box is ticked. Click Ok. This takes a couple of seconds. It defaults to Median in the Live Stack Group, but scroll up to the next one and this is Mean. That’s the one you want.

Affinity-photo-auto-align-images

images-selected-after-new-stack

When you create a New Stack, the pop up dialog box appears. Select your images on your computer and click Open.

Affinity-photo-live-stacks-mean

The stacked images are grouped into a folder called Live Stack Group. The different stack options are located by clicking on the small icon, circled in blue. It defaults to Median but I changed it to Mean.

The cool thing about this feature is when you scroll through each of the different stack modes, it shows the different results live.

Affinity-photo-live-stacks-maximum

Different stack options can be scrolled through one by one, and the results can be seen live, which is impressive.

When I compared the two results from Photoshop and Affinity Photo, I could see no obvious difference, with the exception that I had to crop the image of the river more in Photoshop, whereas the auto alignment in Affinity Photo meant I didn’t lose much of the image at all.

second-river-original

Here is another example of moving water.

The same image as above edited in Affinity Photo using Mean in Live Stacks. I got the same result using the manual method in Photoshop.

The same image as above edited in Affinity Photo using Mean in Live Stacks. I got the same result using the manual method in Photoshop.

Take away tip:

In my examples, I didn’t use a tripod. I would recommend using one. I also took only a series of 8-10 shots. I would recommend taking at least 15 or more.

I found this technique interesting and fun, and I am now inspired to go out and take images of waterfalls. The good thing about this technique is if you don’t have ND or polarizing filters, it doesn’t prevent you from going out and taking shots of waterfalls. Then when you get back to your computer, you can create your own silky, smooth effect.

Let’s see some of your examples below.

googletag.cmd.push(function() {
tablet_slots.push( googletag.defineSlot( “/1005424/_dPSv4_tab-all-article-bottom_(300×250)”, [300, 250], “pb-ad-78623” ).addService( googletag.pubads() ) ); } );

googletag.cmd.push(function() {
mobile_slots.push( googletag.defineSlot( “/1005424/_dPSv4_mob-all-article-bottom_(300×250)”, [300, 250], “pb-ad-78158” ).addService( googletag.pubads() ) ); } );

The post How to Create a Silky Water Effect in Post-Processing without Using Filters or a Tripod by Sarah Hipwell appeared first on Digital Photography School.


Digital Photography School

 
Comments Off on How to Create a Silky Water Effect in Post-Processing without Using Filters or a Tripod

Posted in Photography


How to Create In-Camera Double Exposures

22 Mar

It was yet another snowy day in New York, so I headed to the Arboretum to work on macro photography. Tripod slung over one shoulder, with my Olympus mirrorless gear in tow, I approached the door only to be stopped in my tracks. “No tripods” she said, pointing to the sign.

I’ve been here plenty of times with a tripod, but on holidays and weekends the rules change. Since it was President’s Day, the ban was in place. I put the tripod back in the car and decided to use the limitation as opportunity. Instead of close up studies, my plan changed to in-camera double exposures.

This is a feature that I loved with my old film camera (Canon Elan 7). While my switch to digital was a revelation, the lack of double exposure capability was a huge let down. It was only recently that camera manufacturers started including it again. Not only has it been added to most current bodies, but the functionality has been further enhanced. Some may consider it cheating, but I look at the updates as an opportunity to be even more creative.

When you take your first shot, you can see an imprint of it in the viewfinder, while looking for shot number two. This makes it possible to line things up carefully, instead of leaving it to chance. It takes a little time to get used to it, sort of the way the depth of field preview button is a bit odd at first. After some practice however, you start to realize the incredible potential of this feature. Scenes that were once ordinary, become a treasure trove of artistic possibility.

In addition to the standard double exposure mode, the Olympus E-M1 has an overlay feature that lets you choose a RAW file from your SD card as shot number one. You then shoot as many frames as you like, to find the perfect image for shot number two. I found this to provide even greater control over the final image. I’m not sure what other manufacturers offer this feature, so be sure to check your manual. With this setting turned on, I set out to create some interesting images.

Ultimately I was looking for texture in shot one, as it would be complementary to the subject in shot number two. The possible outcomes are limitless, with every shot being completely unique. Rather than simply shooting a static flower, it’s possible to create a special piece of art. Today, as more people have cameras than ever before, the ability to make a shot has become even more important. This is not something you can do with a phone camera.

You may be wondering why I wouldn’t just do this in post-production by layering two shots in the computer. First, it wouldn’t be nearly as fun – I enjoy working with my camera more than pushing pixels around in Photoshop.

Next, there is something serendipitous about doing it in the field. You work harder, and really tune in to all the possibilities around you. A textured brick becomes more than a wall, but a perfect layer of texture. A crack in the pavement is not merely an imperfection in the floor, but a possible part of an exciting composition. By working deliberately like this, you have no choice but to slow down, and really exercise your vision. You pay attention to the smallest details, focusing on things that most people would walk right past. Isn’t that what creating art is all about?

Will there be shots that don’t work? Absolutely! To create these six images I took 200 photos, over two hours. I don’t regret a single moment of this experience however. Each one is a unique work of art that can never be reproduced. Still, you must be patient, and set aside a good amount of time to do this. If you are rushing through, you’ll miss potentially great opportunities.

With winter upon us (spring coming soon in some areas of the Northern Hemisphere), and outdoor expeditions limited, now is the perfect time to explore this form of photography. You just may create something spectacular. The only way to find out is to give it a try.

Have you tried in-camera double exposures before? Please share your results and questions in the comments below. If your camera has a cool double exposure feature – please tell us about it.

This week on dPS we are featuring articles on special effects. Check out the others that have already been published here:

  • How to Photograph the Full Band of the Milky Way
  • Fire Spinning with Steel Wool – A Special Effects Tutorial
  • Special Effect – How to Create Multiple Flash Exposures in a Single Frame
  • Stacking Light Trails for Night Photography Special Effects
  • 26 Unique Special Effects Photos to Spark Your Creativity
  • Weekly Photography Challenge – Special Effects
  • Tips for Shooting Through Objects to Create a Special Effect
  • How to Add Vintage Frame Overlays Using Alien Skin Exposure X
  • 8 Steps to Great Long Exposure Landscape Photography

googletag.cmd.push(function() {
tablet_slots.push( googletag.defineSlot( “/1005424/_dPSv4_tab-all-article-bottom_(300×250)”, [300, 250], “pb-ad-78623” ).addService( googletag.pubads() ) ); } );

googletag.cmd.push(function() {
mobile_slots.push( googletag.defineSlot( “/1005424/_dPSv4_mob-all-article-bottom_(300×250)”, [300, 250], “pb-ad-78158” ).addService( googletag.pubads() ) ); } );

The post How to Create In-Camera Double Exposures by Chris Corradino appeared first on Digital Photography School.


Digital Photography School

 
Comments Off on How to Create In-Camera Double Exposures

Posted in Photography