RSS
 

Posts Tagged ‘Create’

How to Create a Dark and Moody Rembrandt-Style Portrait In Lightroom

03 Jan

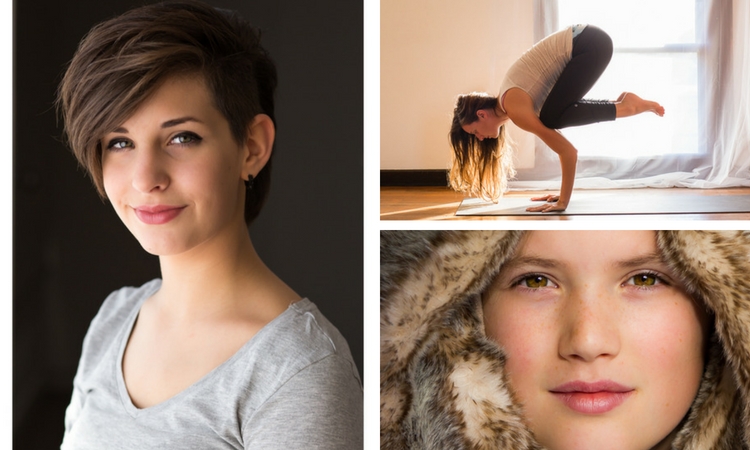
Dutch artist Rembrandt Harmenszoon van Rijn is known for his dark and moody portraits, characterized by a single lighting source falling across a subject placed in front of a dark background. It’s an interesting, evocative style that is easy enough to replicate in modern photography.

There are two steps to creating a Rembrandt-style portrait. The first is to get the lighting and composition right. The second is to use Lightroom to emphasize the dark and moody feel created by the lighting.

Rembrandt inspired lighting is easily achieved using natural light. The important thing is that the light is directional. Take a look at these portraits to see how it works.
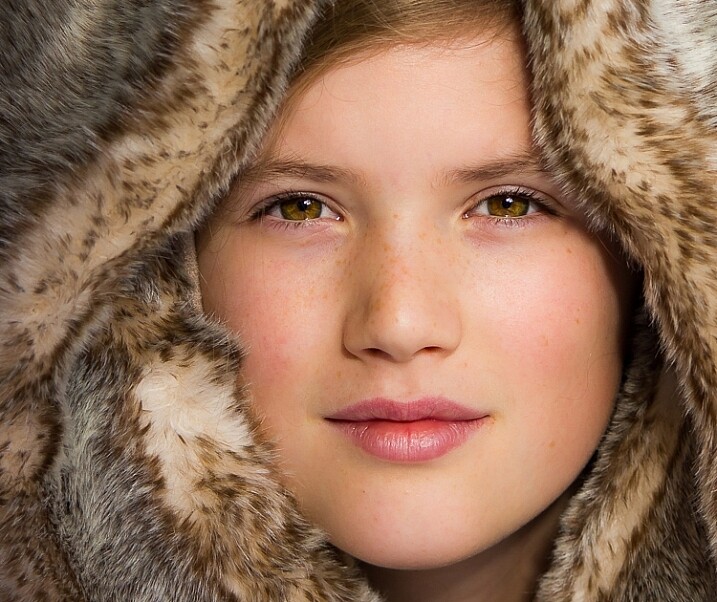
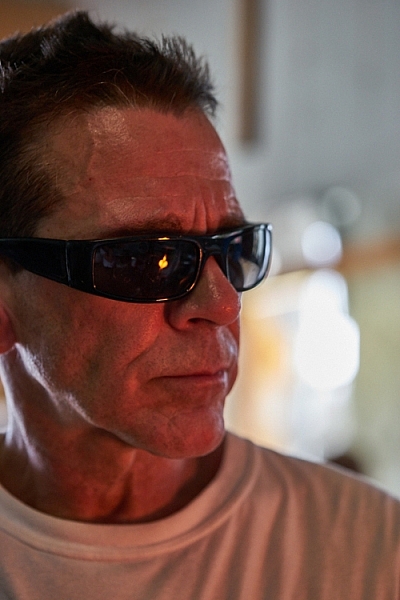
Portrait #1Rembrandt style dark and moody portrait

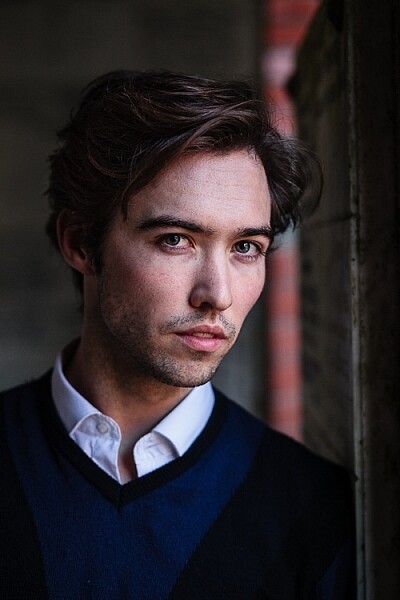
This portrait was taken with the model standing under an archway that was part of a local building. We took the photo on a cloudy day, so the light was quite soft and even, perfect for portraiture.

The light comes from the model’s left, through the archway, casting a shadow across his face. The right side of his face is dark because no light is coming from that side. The background is also dark because less light is falling on it.

The photo looks like it could have been taken in a studio – but the light was shaped by the archway rather than a softbox.
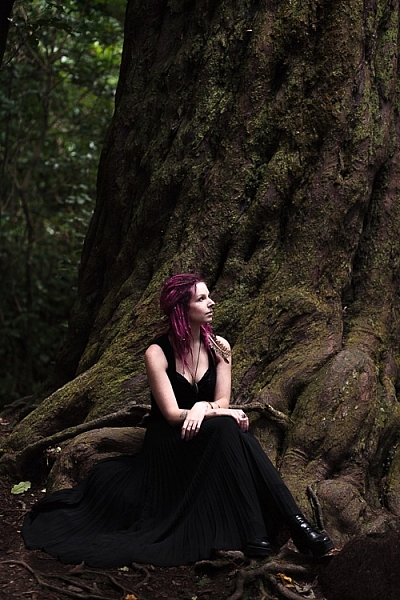
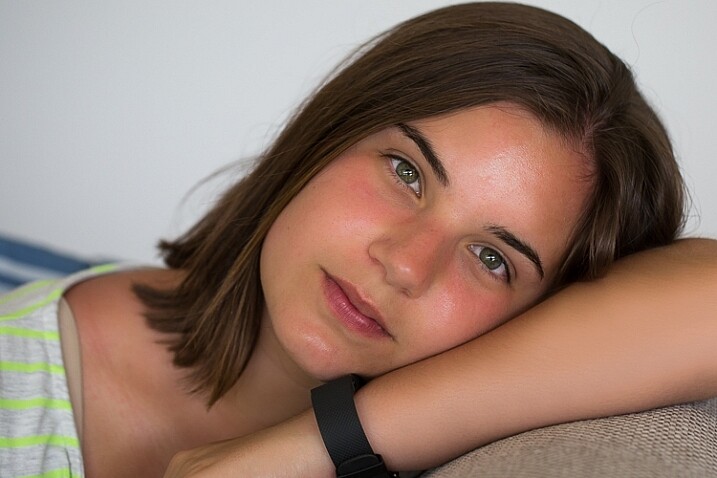
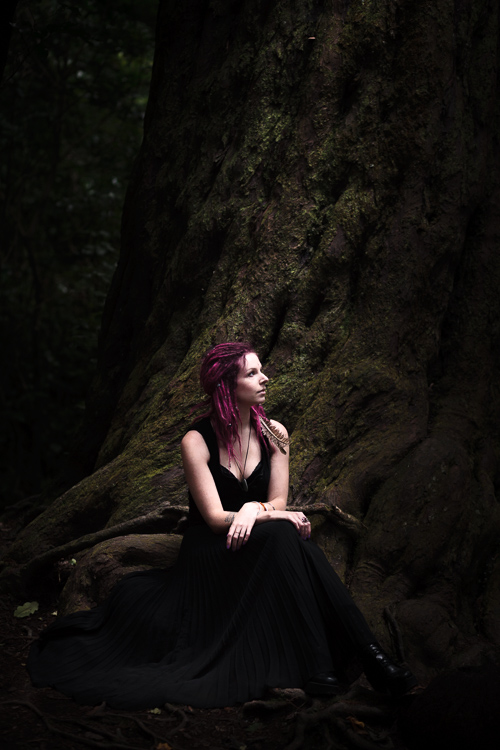
Rembrandt style dark and moody portraitPortrait #2

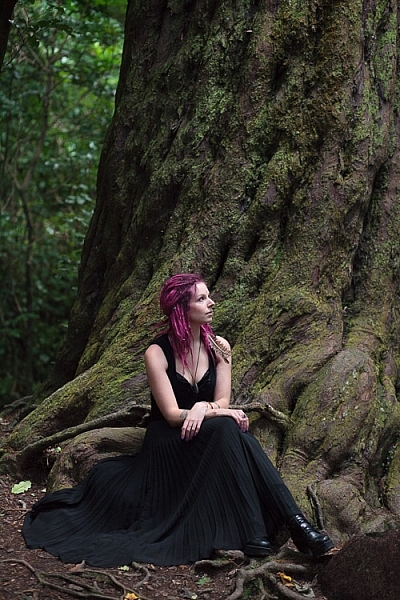
I made this portrait in a forest. The light was coming through the trees from above. It was a cloudy day, but the narrow gaps between trees meant the light was very directional. I asked my model to lift her face up towards the light so that it didn’t cast shadows under her eyes.

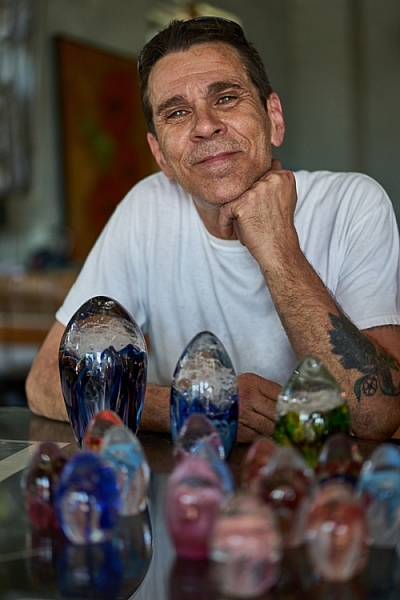
I selected these portraits because they are interesting from a post-processing point of view. One of them was very easy to process, and the other took a lot more work. Can you guess which one was which?

Processing Portrait #1

The first portrait was the easiest to process. Here’s the Raw file as it came out of the camera.

Rembrandt style dark and moody portrait

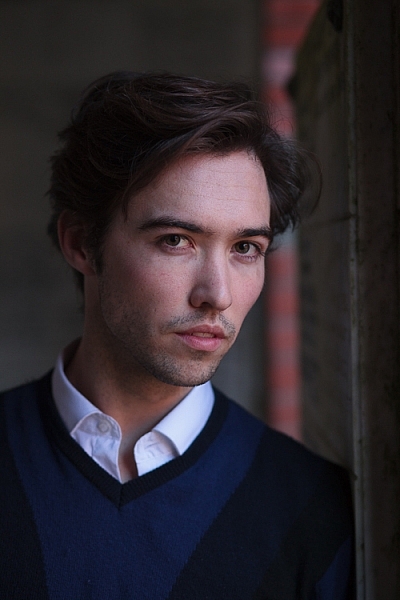
Virtually all the work for this portrait was done in the Basic panel in Lightroom. These are the main adjustments.

Rembrandt style dark and moody portrait

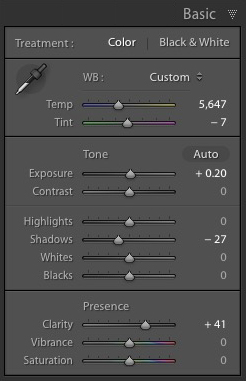
  • Exposure +0.20. A slight tweak to brighten the photo.
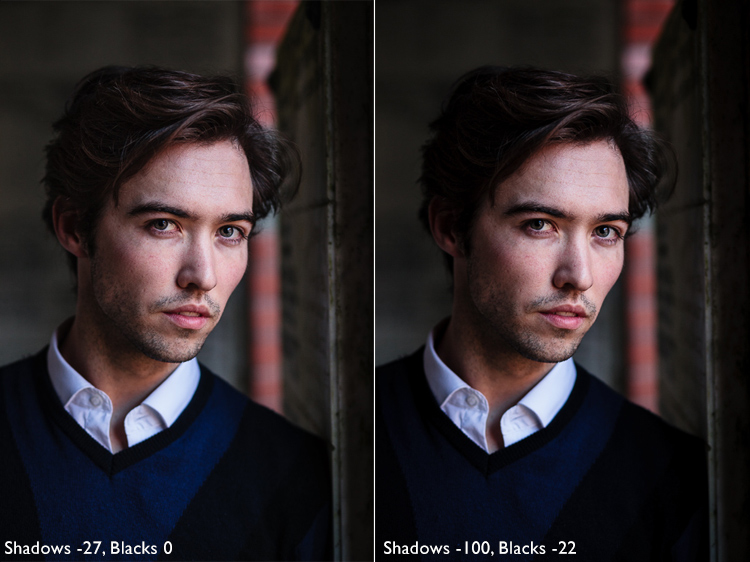
  • Shadows -27. This makes the darkest tones in the photo darker without affecting the lightest tones.
  • Clarity + 41. A global adjustment to enhance texture and details and add a gritty feel to the male portrait (a much lighter touch is required with portraits of women).

You’ll note that I didn’t use the Contrast slider to make the background darker. The reason is that the Contrast slider affects both dark tones and light tones equally. It is better to use the Highlights and Shadows sliders to control highlights and shadows separately.

Taking control of dark tones with the Shadows slider gives you a lot of choice when it comes to setting the tonal values of the image. You can also move the Blacks slider left, although you may block up some shadow areas when you do so.

Remember, your aim is to create a dark and moody Rembrandt style portrait, so it’s up to you how dark you want to make the shadows. Here’s a comparison that shows what happens with this portrait when I push Shadows to -100 and Blacks to -22.

Rembrandt style dark and moody portrait

Local adjustments

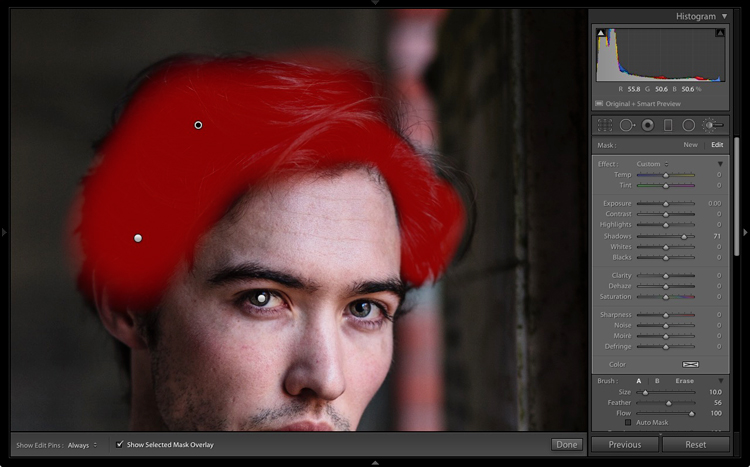
Pushing Shadows and Highlights sliders left may also darken parts of the photo that you would prefer to remain as they are. In this portrait, the model’s hair became too dark, so I used the Adjustment Brush to lighten it. This screenshot shows the mask created by the Adjustment Brush in red. I set Shadows to +71 to make his hair lighter.

Rembrandt style dark and moody portrait

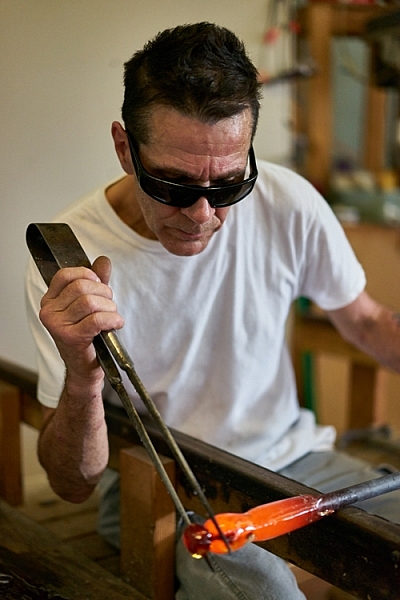
Processing Portrait #2

The next portrait required more work in Lightroom. You can see why when you look at the original image as it came out of the camera, below.

Rembrandt style dark and moody portrait

While the light is coming from above, it wasn’t as directional as the processed image suggests. An image like this needs a little more work in Lightroom in order to obtain the dark background that a Rembrandt style portrait requires.

Rembrandt style dark and moody portrait
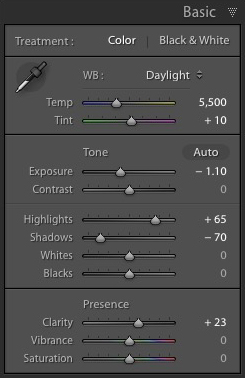
I made some subtle changes by setting the following:

  • Exposure to -1.10
  • Shadows to -70
  • Highlights to +65
  • Clarity to +23

Moving the Shadows and Exposure sliders left made the entire image darker, making the background look more how I wanted. Moving Highlights to +65 then made the highlights (in other words, the model’s skin) brighter. Once again this has increased contrast, but in a way that is much more controlled than using the Contrast slider.

Here’s the result so far.

Rembrandt style dark and moody portrait

Local adjustments

Once you have achieved all you can with global adjustments, it is time to work with local adjustments. Lightroom has three local adjustment tools – the Graduated filter, Radial filter and the Adjustment Brush. It is up to you to select the tool (or combination of tools) best suited to the task in hand.

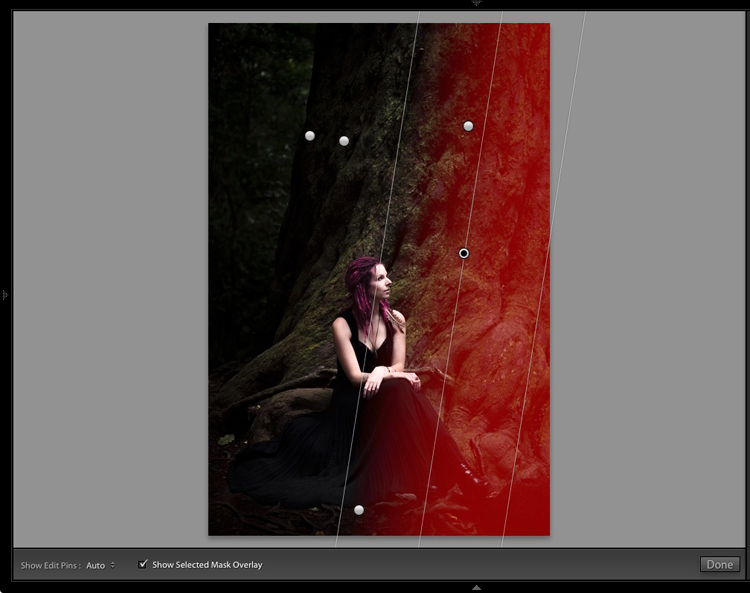
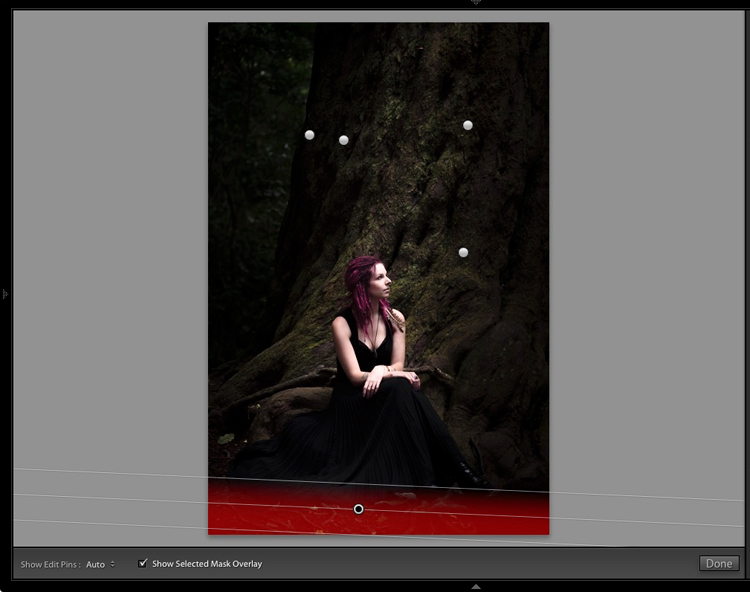
For this portrait, I applied five Graduated filters, and moved the Exposure slider left (to darken) for each one. These screenshots show where the Graduated filters I applied to the image fall.

Rembrandt style dark and moody portrait

Rembrandt style dark and moody portrait

Rembrandt style dark and moody portrait

Rembrandt style dark and moody portrait

Rembrandt style dark and moody portrait

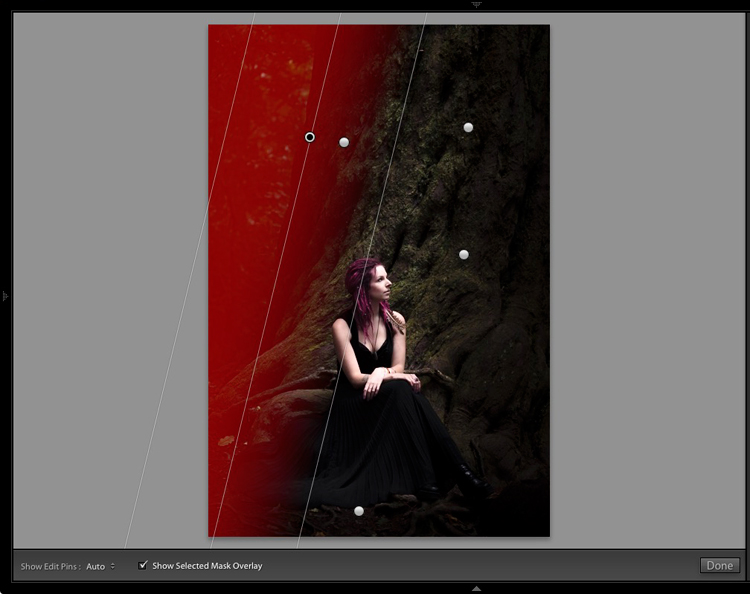
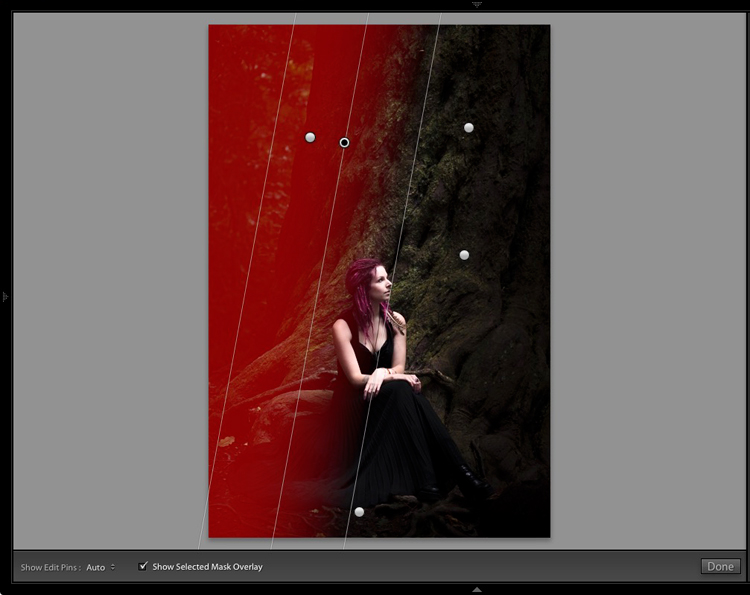
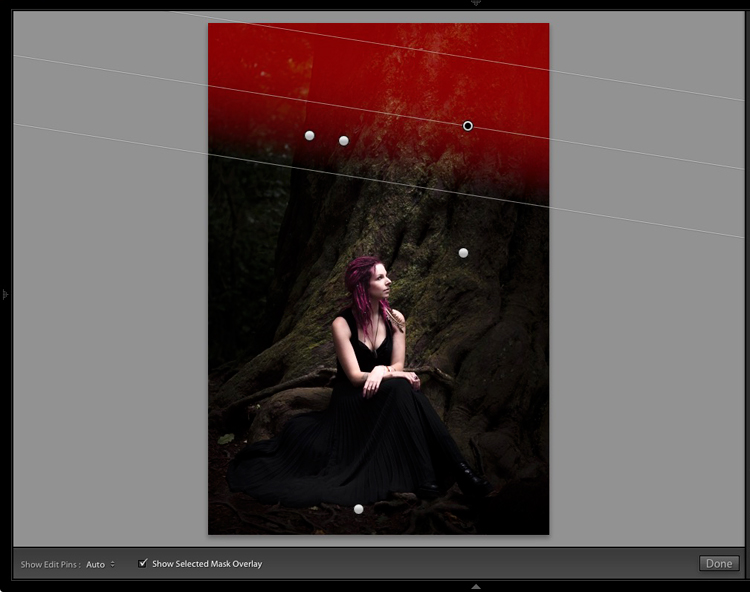
The best way when making local adjustments is to play it by eye. Don’t be afraid to jump around between your local adjustments and tweak the settings until you get the photo looking as you wish.

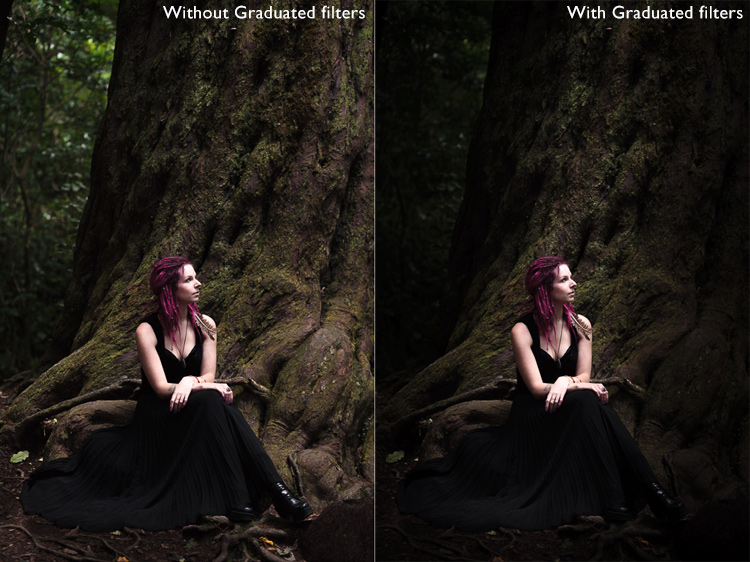
These comparisons show the difference that the Graduated filters made to the image.
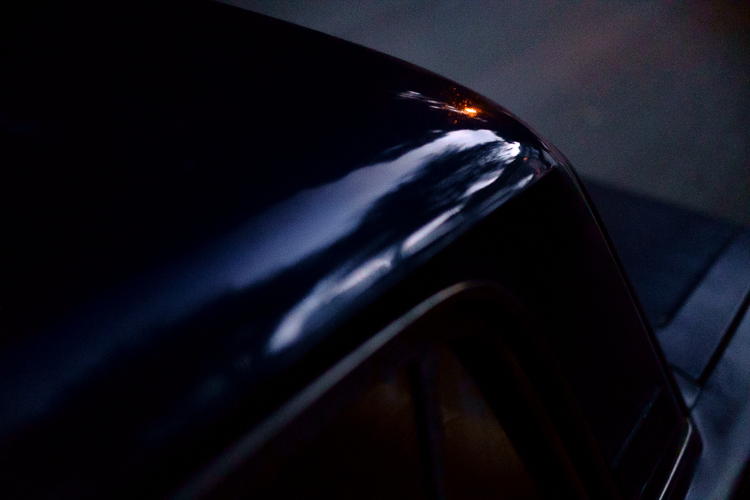
Rembrandt style dark and moody portrait

Finally

The key to re-creating the style of a painter like Rembrandt in Lightroom is to analyze the type of lighting used in his portraits and think about how you can replicate that using the tools inside Lightroom. Bear in mind that the lighting is just as important as Lightroom technique. Get the lighting right and the rest should follow easily.

Do you have any questions about the Lightroom techniques used in this article? Let me know in the comments!


If you’d like to learn more about processing your photos in Lightroom then please check out my ebook Mastering Lightroom: Book Two – The Develop Module.

googletag.cmd.push(function() {
tablet_slots.push( googletag.defineSlot( “/1005424/_dPSv4_tab-all-article-bottom_(300×250)”, [300, 250], “pb-ad-78623” ).addService( googletag.pubads() ) ); } );

googletag.cmd.push(function() {
mobile_slots.push( googletag.defineSlot( “/1005424/_dPSv4_mob-all-article-bottom_(300×250)”, [300, 250], “pb-ad-78158” ).addService( googletag.pubads() ) ); } );

The post How to Create a Dark and Moody Rembrandt-Style Portrait In Lightroom by Andrew S. Gibson appeared first on Digital Photography School.


Digital Photography School

 
Comments Off on How to Create a Dark and Moody Rembrandt-Style Portrait In Lightroom

Posted in Photography


How to Create Glass Ball Landscapes – 6 Techniques

29 Dec

In photography, creative inspiration can often come from trying something new and photographing a scene with that technique. Creating glass ball landscapes is one example of this, as it allows you to capture a fish-eye like scene, using a telephoto lens. The glass ball creates a mystique, as many people associate looking into a crystal ball with seeing into the future. However, visions inside a glass ball are easy to achieve with a few simple steps!

How to take landscape photos with a glass ball

img_8070-copy

In order to get good landscape photos with the glass ball, you’ll need to apply some basic rules, an understanding of the science at work also helps. If you read my previous article on crystal ball photography you will already be familiar with the 7 steps you can follow to take this type of image. Here’s a quick recap:

  1. Choose a scene that you’d normally shoot with a wide angle lens.
  2. Photograph this scene with the sun behind you, lighting up the scene you wish to shoot.
  3. Place the ball somewhere it won’t fall.
  4. Compose your scene with the glass ball in it.
  5. Ensure the horizon lines inside the ball and in the background match.
  6. Focus the camera on the scene inside the ball, which is best achieved using live-view and manual focus.
  7. Use an aperture of around f/4 as this will keep the ball sharp and the background blurred.
  8. Take the photograph, and repeat if you’re not happy with the sharpness inside the ball.
  9. Rotate your image in post-processing so the scene in the ball isn’t upside down. In some cases, you can skip this step.

Alternative glass ball landscapes, and how to compose them

It’s easy to get it in your mind that every scene or situation needs a crystal ball photo. This is not the case and careful consideration needs to be taken when selecting the photograph you’ll take. The most important thing to do is find a compelling subject that shows prominently inside the glass ball. Once you have this basic parameter established below are some differing ways you can compose your glass ball landscape photograph.

1 – The classic composition

Glass ball landscapes use the rule of thirds. This classic composition shows the entire ball and was shot at 100mm.

Glass ball landscape using the rule of thirds. This classic composition shows the entire ball and was shot at 100mm.

In this type of composition the ball fills the majority of the frame, with the entire edge of the ball visible. This will lead to glass ball landscapes that have an immediate impact and areas to the side of the ball that are blurred out and minimalist in nature. This type of image is most easily taken with a macro or telephoto lens with an aperture of f/4 to create the nice bokeh around the ball.

2- Get in close

Getting closer to the glass ball will emphasize the scene within the ball, this also entails framing that cuts some of the edges of the ball away. A centered composition with both the top and bottom part of the ball can work here, this has the advantage that top and bottom parts of the scene cannot be easily deduced. The other composition follows the rule of thirds, with the edge of the ball showing in the left or right third of the image.

glass ball landscape photography

A closer crop focuses the eye more on the image in the ball.

3 – Give the ball a bit of space

There are many ways to photograph the glass ball, and using a wide-angle lens with this technique can be very effective. In this case, you want the background scene to be minimalist, with the ball becoming an accent in the scene. The scene will not likely be rotated during post-processing, so compose to the scene in the background. In this type of the photo, the ball and the landscape scene should form a balanced composition.

A wider angle of 20mm is used here. The ball is an accent within this frame.

A wider angle of 20mm is used here. The ball is an accent within this frame.

4 – Take it to the high life

Glass ball landscape photographs

Gaining access to the rooftop provided a great vantage point.

As with all landscape photos, a high vantage point for glass ball images works well. Gaining access to a high building overlooking a city, or climbing a hill are both good options. Once at your high vantage point find a good position to place the ball, so you can see the landscape inside it. You need to ensure the ball will not fall, be very careful with its positioning.

5 – Don’t forget the view from the floor

Apartment buildings in Busan, South Korea. This photo shows a glass ball being held by hand.

The view looking up can be just as good as the view looking down.

Deserts and canyons make for great locations to photograph with the ball. In this photo the ball is place on the ground, the stones in the foreground add a nice element to this photo.

In this photo the ball was placed on the ground, the stones in the foreground add a nice element to this photo.

Placing the ball at street level doesn’t always work, as half the scene will be taken up by the ground. That said there are several situations that really work well with the ball on the ground.

  • The ball is ever so slightly higher than the rest of the scene, so it might be at the top of an undulation.
  • There is a reflection in the scene from a marble surface or a puddle.
  • The ground is an appealing element of the photo because it’s a leaf bed for example.

6 – The human element

A friend holding the ball in position is an alternative to putting the ball on the ground.

A friend holding the ball in position is an alternative to putting the ball on the ground.

The glass ball landscapes are not always best suited to having people in them. The blurred background may look less appealing with a human shape included in it. There are a couple of ways to humanize your image, though, while still maintaining a minimal feel.

  • You eclipse the people inside the ball. Use a long telephoto lens, compression will cause people to appear inside the ball. The background will be clean without the shapes of people in it (as below).
  • You take the photo, and someone else is holding the ball. The hand is the human element of this photo, with the landscape still inside the ball (as above).
glass ball landscape photography

Photographing people inside the ball is tricky, but not impossible.

Where to try this technique

The places you’d visit for regular landscapes will also work for glass ball landscapes. The rooftops of tall buildings in cities work very well or a worm’s eye view from street level can be just as good. The beach or the desert are excellent options due to the minimalist nature of those locations.

Sunset photos at the beach with the glass ball are one of the classics in this genre of photography. Mountains and forests make for good locations as well. A lone tree can be a nice subject, as can lines of tree trunks inside the glass ball. Up in the mountains, you can easily fill the scene inside the ball with a large peak jutting up into the landscape.

The snow globe is a well known souvenir gift, which the glass ball can replicate.

The snow globe is a well-known souvenir gift, which the glass ball can replicate.

Getting out with the glass ball

In my last article on refraction I linked to a site selling an 80mm glass ball, this is a great option though it can be heavy to carry. You can also use a smaller ball for many situations, and when you are carrying a heavy bag of camera gear this is a good idea.

Once you have a glass ball it’s best to dive in and see what works best for you. I’d love to see more examples of your work, it was great to see so many pictures last time. One final tip, be careful in the sunlight with the ball. The glass ball acts as a magnifying glass with the sun’s rays and can burn you, or your property.

googletag.cmd.push(function() {
tablet_slots.push( googletag.defineSlot( “/1005424/_dPSv4_tab-all-article-bottom_(300×250)”, [300, 250], “pb-ad-78623” ).addService( googletag.pubads() ) ); } );

googletag.cmd.push(function() {
mobile_slots.push( googletag.defineSlot( “/1005424/_dPSv4_mob-all-article-bottom_(300×250)”, [300, 250], “pb-ad-78158” ).addService( googletag.pubads() ) ); } );

The post How to Create Glass Ball Landscapes – 6 Techniques by Simon Bond appeared first on Digital Photography School.


Digital Photography School

 
Comments Off on How to Create Glass Ball Landscapes – 6 Techniques

Posted in Photography


DEAL: How to Create Captivating Photo Collages in Seconds

20 Dec

Welcome to Day 7 of the dPS 12 Days of Christmas Sale.

Today’s exclusive offer will help you make beautifully designed collages within Lightroom, in seconds.

Cole from Cole’s Classroom has an exclusive offering for dPS subscribers.

LR collage header

Normally $ 158, today it’s only $ 29. That’s 85% Off.

Creating photo collages has never been so simple, and without ever having to leave Lightroom, you save massive amount of time! These Drag & Drop Collage Templates are Perfect for…

Your Blog, Instagram, Facebook, Prints for Your House & More!

Cole has set up templates for all the popular formats, so you can create collages using:

  • 16 Instagram Unique Design Templates
  • 18 Blog or Website Collage Templates
  • 19 Facebook Cover Design Templates
  • 7 Facebook Ad Templates
  • 16 Print Design Layout Templates

That’s a total of 76 unique design layouts & collages!

Cole has also thrown in a bonus if you buy today so you can export your collages to your blog or Facebook in one click!

So don’t miss out, save $ 129 today.

Note: There’s a 100% no-questions asked money back guarantee on these templates so no risk to you. Buy it, try it and if isn’t what you expect Cole will be more than happy to provide you with a refund.

googletag.cmd.push(function() {
tablet_slots.push( googletag.defineSlot( “/1005424/_dPSv4_tab-all-article-bottom_(300×250)”, [300, 250], “pb-ad-78623” ).addService( googletag.pubads() ) ); } );

googletag.cmd.push(function() {
mobile_slots.push( googletag.defineSlot( “/1005424/_dPSv4_mob-all-article-bottom_(300×250)”, [300, 250], “pb-ad-78158” ).addService( googletag.pubads() ) ); } );

The post DEAL: How to Create Captivating Photo Collages in Seconds by Darren Rowse appeared first on Digital Photography School.


Digital Photography School

 
Comments Off on DEAL: How to Create Captivating Photo Collages in Seconds

Posted in Photography


No dual-cam? No problem: Patch app for iOS uses neural networks to create fake bokeh images

11 Nov

Most dual-cam equipped smartphones offer a ‘fake bokeh’ feature. Thanks to the slightly offset position of their two lenses, cameras in devices like the Apple iPhone 7 Plus, Huawei P9 or LG G5, can distinguish between objects in the foreground and background of an image. By applying digital blur to the latter they can simulate effects of shallow depth-of-field you would typically achieve with a DSLR and fast lens.

If your phone just has one camera, there are still a few pure software solutions out there to achieve the same effect. The Patch app for iOS is the latest and uses neural networking to identify the foreground subject in an image and isolate it from the background. If the scene is too complex for the algorithms to work automatically, there is also a manual selection tool that can be used to optimize the results. You can paint in areas that should be sharp, and remove areas that should be blurred. A zooming function allows for greater precision in this task. 

Once the selection is finalized users can choose from 5 different blur strengths to generate the desired effect. Patch does not have any particular camera hardware requirements and therefore works with most iOS devices. If you want to try the app you can download a free version that will leave a watermark on your images from the Apple App Store. A $ 1 in-app purchase will get you an upgrade to the watermark-free version.

Articles: Digital Photography Review (dpreview.com)

 
Comments Off on No dual-cam? No problem: Patch app for iOS uses neural networks to create fake bokeh images

Posted in Uncategorized


How to Create Stronger Photos by Working the Subject

07 Nov

One way to create better compositions, and thus stronger images, is to do something called working the subject. Generally speaking, there are two ways to approach taking photos. Let’s take a look at both, and how you can learn to work the subject to improve your photography.

The first is to take as many photos as you can, in the hope that some of them turn out well. This is called machine-gunning, or spray and pray. It’s easier to do with digital cameras than it ever was with film cameras, as you are no longer limited by the number of frames on a roll of film.

Working the subject

Incidentally, this is one of the reasons often cited as a benefit of using film cameras. Knowing that every time you press the shutter button it adds to the cost of the shoot (processing plus film) is a good incentive to be more intentional and think carefully before you take a photo.

The second way is to take plenty of photos, but in a way that is more purposeful. The idea is to think about what you are doing and spend your time exploring the possibilities and potential of the subject. This is called working the subject.

Try new photography techniques

The dividing line between the two methods is sometimes a thin one. An example of this may be when you are trying a new technique, such as panning. Panning is a bit of a hit and miss technique. If you’ve chosen a good subject you should create some interesting photos, but you’re also going to get a lot of misses along the way.

The difference in this situation is that the photographer who is working the subject looks at the photos they have taken already, evaluates what works and what doesn’t, and adjusts their techniques and camera settings accordingly.

Another way of looking at it is that they are using the earlier photos as stepping stones to get to the more interesting images. A photographer who is machine-gunning, on the other hand, doesn’t think a lot about what they are doing and relies on serendipity rather than their own skill.

This is where the instant feedback of digital cameras is a useful tool for learning and improving.

Panning in Spain

Let me illustrate the point with some photos I made in Spain. I stood in the sea at sunset and panned with my camera as the waves came by. I took a lot of photos, and these are some of my favorites.

working-subject-1

Working the subject

Working the subject

These images were created by working the subject. Doing so helped me figure out where to stand, what angle to use, how slowly to pan the camera, and the best shutter speed to use.

Photographing an old car

Working the subject doesn’t necessarily mean that you take lots of photos. Let me give you an example.

I bought a Fuji X-Pro 1 camera a couple of years ago and took it out one evening at dusk with the intention of shooting at high ISO in low light to see how it performed (the answer – very well). As I was walking around my local neighborhood I noticed an interesting car parked on the street. Intrigued (and wondering how a Lada ended up in New Zealand) I took this photo.

Working the subject

It’s nothing special, but I knew there was a better picture there. I kept looking and realized that what had really caught my eye was the way the light from the street lamp reflected off the roof of the car. So, I moved in closer and created the following images. They all contain the reflection of the street lamp and just part of the car rather than all of it.

Working the subject

Working the subject

Working the subject

Then I took another photo of the rear of the car.

Working the subject

Analysis of the shoot

I only made five photos, but I was still working the subject. When I break it down and think about what happened the process went something like this.

  1. I saw something interesting and took a photo. That was just my first impression. My gut feeling told me that there was a better photo to be had.
  2. I looked closely until I realized that the real subject, the thing that really interested me, was the way the street light was reflected in the car’s paintwork. So, I moved in close and made several photos that showed that.
  3. Lastly, I moved away from the car and took another photo, which was okay but not as good as the others. I understood that I had gotten what I wanted and decided to move on to look for another subject.

The last point is crucial because one of the differences between working the subject and machine-gunning is that the photographer who is working the subject knows when to stop.

Working the subject in China

Here’s another set of images taken in Beijing. We were visiting a historic site called Prince Gong’s Mansion, made up of a series of interconnected buildings, courtyards, and gardens.

One of the courtyards contained some Tibetan style prayer wheels. I noticed that as people walked into the courtyard most of them passed by the prayer wheels, turning them as they went. I stood nearby and took some candid portraits of people doing so.

Working the subject

Of course, some of the photos are better than others, and I’m going to show you some of my favorites below. But there were also many times that I looked at the scene through the viewfinder and it wasn’t quite right, so I didn’t press the shutter.

One benefit of this method is that you don’t have as many photos to sort through and edit afterward. But it also shows discipline and an awareness of the subject. A machine-gunning photographer would take photos of everyone, without thinking about it much.

The photographer who is working the subject, and being more purposeful, is thinking about how to make each photo better than the one before. They may also be thinking about how the images are going to work together, or whether they should use a different technique, a different lens, or find a different point of view to add variety to the sequence of photos.

Working the subject

Conclusion

One of the key steps involved in learning to be a better and more creative photographer is knowing when to work the subject rather than machine-gun, and become more purposeful and intentional in your approach to making photos.

Can you think of any other examples of when working the subject can help you to create better images? Please let us know in the comments below.


Mastering Composition

If you’d like to learn more about composition then please check out my ebook Mastering Composition: A Photographer’s Guide to Seeing.

googletag.cmd.push(function() {
tablet_slots.push( googletag.defineSlot( “/1005424/_dPSv4_tab-all-article-bottom_(300×250)”, [300, 250], “pb-ad-78623” ).addService( googletag.pubads() ) ); } );

googletag.cmd.push(function() {
mobile_slots.push( googletag.defineSlot( “/1005424/_dPSv4_mob-all-article-bottom_(300×250)”, [300, 250], “pb-ad-78158” ).addService( googletag.pubads() ) ); } );

The post How to Create Stronger Photos by Working the Subject by Andrew S. Gibson appeared first on Digital Photography School.


Digital Photography School

 
Comments Off on How to Create Stronger Photos by Working the Subject

Posted in Photography


Leica and Huawei to create joint R&D center

24 Sep

Leica’s Dr. Andreas Kaufmann with Ren Zhengfei, founder of HUAWEI

Camera manufacturer Leica and telecom brand Huawei have announced they are to create a research and development center so they can jointly work on optical and software systems. The Max Berek Innovation Lab will be established at Leica’s headquarters in Wetzlar, Germany, and will build on the relationship the two companies formed while producing the Huawei P9 and P9 Plus smartphones. There was some doubt about the level of Leica’s involvement in the P9 project, but Huawei clarified the extent of the German brand’s contribution in a statement in April.

This next step of the partnership intends to push forward lens and software technology, according to Leica, with the aim of improving the image quality it’s possible to obtain from the tiny cameras that phones and other mobile devices use. The pair also state that they will work together on solutions for virtual reality, augmented reality and computer-based imaging, and that they will involve universities and other research establishments in their projects.

The new research lab is named after optical engineer Max Berek, the man who developed the first lens for the Leica 35mm camera system. He joined Leitz the year after Oskar Barnack came to the company from Zeiss, and designed the 50mm F3.5 lens that was coupled with the Leica 1. The lens was named Elmax – E rnst L eitz Max and the 50mm focal length became the standard for the 135 format. The Elmax developed into the Elmar, a lens that Leica still uses today.

For more information see the Leica and Huawei websites.

Press release

Leica Camera and HUAWEI Establish New R&D Centre

‘Max Berek Innovation Lab’ will conduct R&D in the fields of new optical systems, computational imaging, virtual reality and augmented reality

HUAWEI and Leica Camera AG today announced that they have expanded their strategic collaboration with the establishment of a jointly operated research and innovation centre, the Max Berek Innovation Lab. The launch comes seven months after the public announcement of their long-term technology partnership in the field of optical engineering, and five months after the launch of the globally successful, multi-award winning HUAWEI P9 and P9 Plus smartphones.

The new lab, located at Leica’s global HQ in Wetzlar, Germany, will drive further development of optical systems and software-based technologies to improve imaging quality in a wide range of photographic and mobile device applications. Additional outcomes will include the creation of computational imaging, augmented reality (AR) and virtual reality (VR) solutions. In addition to R&D resources from both companies, HUAWEI and Leica plan to collaborate with German and international universities and research institutions.

The Lab’s establishment is the result of the vision and support of Dr. Andreas Kaufmann, majority shareholder and chairman of the advisory board of Leica Camera AG, and Ren Zhengfei, founder of HUAWEI.

“With the founding of the Max Berek Innovation Lab, HUAWEI and Leica Camera AG are expanding the scope of their successful strategic relationship and are laying the foundation for close collaboration in research and development of ground-breaking technologies in the imaging segment,” emphasised Dr. Andreas Kaufmann.

“In the future, over 90 per cent of the data traffic will be images and videos,” said Ren Zhengfei, founder of HUAWEI. “The Max Berek Innovation Lab provides the capacity to establish an even closer partnership with Leica, leading to continuous improvements in image and video quality. As a result, we will deliver the most advanced innovations in the smartphone camera market and bring greater value to consumers.”

“HUAWEI and Leica share not only enormous innovation power and years of research experience, but also their dedication to providing the highest quality standards. The Max Berek Innovation Lab offers us a historic opportunity to unite the resources and extensive expertise of both companies to pioneer game-changing technologies,” confirmed Markus Limberger, Chief Operating Officer (COO) of Leica Camera AG and director of the Max Berek Innovation Lab.

The R&D centre is named in memory of Max Berek (1886 – 1949), the German pioneer of microscopy and creator of the first Leica lenses. Berek was also responsible for the optical design of more than 20 lenses for the legendary 35mm camera, invented and built by Oskar Barnack. Thanks to the exceptional imaging performance and perfect harmonisation of the lenses, coupled with Barnack’s ingenious construction, Leica achieved worldwide success in 35mm photography.

Articles: Digital Photography Review (dpreview.com)

 
Comments Off on Leica and Huawei to create joint R&D center

Posted in Uncategorized


How to Use 1 Natural Light Setup to Create 3 Different Portrait Looks

22 Sep

As a portrait photographer, the majority of my work is shot on location. This can be outdoors or in my clients’ homes or places of business. I mostly shoot using natural light and have become adept at finding the best light source in any location as well as creating backgrounds that won’t interfere with the subjects. In this tutorial, I want to show you an easy, natural light portrait setup you can recreate in your own home. Simply by repositioning yourself and your model, you can create three distinctly different portraits from this one setup.

one natural light setup - 3 looks

No special lighting or fancy equipment is needed, and the techniques are straightforward and easy to master. Experiment to create different looks using various backdrops such as plain walls or sheets, or different outfits for your subject. You can also get different effects by changing your lens, distance to the subject, and experimenting with different apertures.

Equipment

Below is a list of the items I have used for this setup and suggested substitutes:

  • SHEER CURTAIN or FABRIC: You can buy a sheer curtain or length of fabric from any fabric or haberdashery store. I picked this one up from the clearance table at my local Spotlight store (Australia) for under $ 20.
Image showing basic natural light portrait setup using a white cloth

A white sheer curtain or large sheet of sheer fabric will filter the window light.

  • REFLECTOR: I have a circular, five-way reflector that follows me everywhere. Each side has a different colour; white, silver, gold, and black, plus a diffuser. It folds into a neat little disc, is lightweight, and can be thrown into the back of my car. You will get endless use out of a portable reflector, and at around $ 30 from Amazon, it’s a worthwhile investment. However, if you don’t want to rush out and buy a reflector (or wait for your order to arrive before you start shooting) a large piece of white card, polystyrene, or foam board, will work equally well.
Image showing basic natural light portrait set-up with a reflector

This reflector was a great investment at around $ 30. It is lightweight and folds up compact to the size of a dinner plate.

  • BACKDROP CLAMPS: another Ebay or Amazon purchase, my backdrop clamps come in packs of 12 for under $ 20. These are infinitely useful for creating makeshift studios. In this instance, I used them to attach the sheer curtain to the rolled-up window blind. You can also use masking tape to stick the curtain directly onto the window, or use heavy-duty stationery clips.
clamps can be helpful for a natural light portrait setup

Backdrop clamps can be purchased inexpensively from Ebay or Amazon and similar.

Lens

My favourite portraiture lens is the Canon EF 85mm f/1.8, but you can use a 50mm, a 100mm – whatever works in the space you have. A tighter space will require a shorter focal length.

Basic portrait setup

Look for a window or glass door with a good strong light source coming through, so that you can shoot at the lowest possible ISO. If the window has a sheer curtain, pull it across to filter the light. If there is no curtain, you can attach a piece of sheer fabric to the window using the backdrop clamps or masking tape.

As you can see, the setup couldn’t be simpler. This is the corner of my living room, with sliding glass doors to the left of the shot. The strong afternoon light is filtered with a sheer curtain clipped to the bottom of the roller blinds. I have closed the curtains in the adjoining room to create a dark background for my subject. If your room layout doesn’t allow this, you can hang a sheet or large piece of coloured fabric behind your subject, or just use a plain wall.

natural light portrait setup background

The setup couldn’t be simpler.

As you can see in the setup below, I brought my model forward (away from the open door behind her). This is to ensure she has good light on her face, and that there is sufficient distance between her and the room behind her to make sure it is completely out of focus. In this pull-back shot, you can see some detail in the room behind her. However, in the first pair of portraits, further along, you can see no background detail. The room behind looks like a studio backdrop.

Add a reflector

If you are going to use a reflector, you’ll need someone to hold it for you. If there is no-one to help, try propping it on a chair. Let your creative photographer’s brain get to work and figure out a creative solution.

natural light portrait setup reflector and assistant

You’ll need an extra person to hold the reflector – in this case, my husband!

Portrait #1: side lighting and a reflector

This is my most-used natural light setup. Side lighting contours and shapes the face, and is flattering for most subjects. If your subject is male, or if you want to create a moodier portrait, you can try moving the reflector further away from your model or removing it altogether. This creates more contrast by increasing shadow on one side of the face.

Your model can sit, stand, or even lie on the floor if the window is low enough. How you position your model’s face and body is up to you. To recreate the look below, your model’s face needs to be at a 90° angle to the main light source (the window). Her body turns 45º away from you. The door behind my model is opened and I darkened the background room to minimize distracting elements. Position the reflector on the shadowed side of her face, to bounce the light back and fill in the shadows

In the photos below, the image on the left is shot without a reflector. The one on the right is shot with a reflector. The effect in this example is subtle because the light in this room is already balanced somewhat by small, high windows on the opposite wall to the main window. In the photo on the right, you can see how the reflector brightens the face and fills in the shadows, particularly the under-eye shadow of her left eye. It also brings out more detail and highlights in her hair and improves separation from the background.

natural light portrait setup with and without reflector

Left (no reflector): ISO 320, f/4, 1/200th. Right (with reflector): ISO 320, f/4, 1/320th.

Portrait #2: shooting into the backlight

I love this technique for photographing women and girls. It creates soft, non-directional  lighting on the face, so is flattering to every age group. And the backlighting creates a gorgeous halo around the hair. This works especially well if the model wears her hair out, or wears a dress with some sheer elements – think darling little girls in fairy costumes and tutus!

Technique for backlighting

Using the same window setup as before, your model sits or stands with her back to the window. Position the reflector in front of her, bouncing the light back into her face. Your light meter will try to read the light coming from the window, and will underexpose your model’s face. You can obtain the correct exposure by getting in close to her face to set your exposure. You might also bracket your exposures and check the back of the camera until you’re happy with the result (review the histogram but note that the background area may show clipping – that’s okay). To get the exposure right on the face, you will lose detail in the background, which is the idea!

natural light portrait setup backlighting

ISO 320, f/4, 1/160th

The photo below is a yoga instructor posing in front of a window on the floor of her studio. The backlighting is beautiful through her hair, and the warm tones of the timber floor reflect back on her skin to give her a golden hue. The lighting technique is identical to the previous photo. But in this photo, I have allowed the curtain and window to be visible as I think it adds something to the scene.

natural light portrait setup backlighting

ISO 500, f/5, 1/80th.

Portrait #3: shooting with front-on light

For this set-up, the sheer curtain remains in place. Your model faces the window, and you position yourself between your model and the window. If you are taking a wider shot than the example below, you may be able to bounce light into the back of her hair with a reflector.

Frontal lighting removes virtually every shadow on the face. It brings out detail and colour in the eyes, and can be quite striking with the right subject. However, this technique is not for everyone. It can give the face a flat, two-dimensional appearance, and if the light source is too strong, your subject will squint. This lighting tends to highlight every imperfection, which is fine if your subject happens to be young and gorgeous. But, it can be too harsh for a mature model, or someone with a lot of blemishes.

Examples of front lighting

The photo below of a young girl snuggled into a faux-fur hood has been enduringly popular on my social media sites. It was shot using this lighting technique in warm, late-afternoon light.

natural light portrait setup front lighting

ISO 400, f/4.5, 1/200th.

The photo below of my daughter, sun-kissed after a day at the beach, was photographed with front-on lighting. As we were  on vacation and I didn’t have my usual bag of tricks at hand, I didn’t use a sheer curtain to filter the light. As you can see, the highlights are more pronounced than those in the first photo, but the effect is similar.

natural light portrait setup front lighting

ISO 250, f/3.5, 1/125th.

Now it’s your turn

I’d love to hear how you get on trying this setup at home. Please post any questions, comments or examples of your portraits in the comments section below.

Don’t forget, there is also our dPS Facebook Group, which you can join to share your photos and get a critique from other dPS readers.

googletag.cmd.push(function() {
tablet_slots.push( googletag.defineSlot( “/1005424/_dPSv4_tab-all-article-bottom_(300×250)”, [300, 250], “pb-ad-78623” ).addService( googletag.pubads() ) ); } );

googletag.cmd.push(function() {
mobile_slots.push( googletag.defineSlot( “/1005424/_dPSv4_mob-all-article-bottom_(300×250)”, [300, 250], “pb-ad-78158” ).addService( googletag.pubads() ) ); } );

The post How to Use 1 Natural Light Setup to Create 3 Different Portrait Looks by Karen Quist appeared first on Digital Photography School.


Digital Photography School

 
Comments Off on How to Use 1 Natural Light Setup to Create 3 Different Portrait Looks

Posted in Photography


10 Tips to Help You Create Unique Storytelling People Photos

16 Sep

storytelling with photos leadFor most of us, the joy of photography goes beyond taking a great image, to being able to share our pictures and experiences with our friends and family. To do storytelling with images.

How many times have you been traveling and come across someone interesting that you wanted to share with your family? Did asking for permission hold you back? Did you get a photo or series of photos that really tell the story? Were your photographs different and did each add a new perspective?

The following tips will walk you through a real-life example of how I shot a glassblower in his shop and created a series of unique photos to tell his story.

#1 – Get clear on your goals for the shoot

Something attracted you to this person or situation. What peaked your interest? Do you like the subject’s purple hair? Do you love photographing people having fun? Do you want to try to capture the beautiful light on someone’s face? Or perhaps you love dance and would like to capture a dancer in a beautiful portrait?

Here are my thoughts on the glassblower. What I wanted to photograph, what I wanted to do and why I wanted to do it.

Why I wanted to photograph the glassblower:

I have been a Canon user for a long time and Sony lent me one of their new cameras and two lenses (50mm and a 90mm) for a trial run. I had already spent some time playing with the camera by photographing squirrels and I was ready to try something with a little bit more potential.

storytelling with photographs

While on vacation in a small beach town, I noticed a small shop run by a local glass blower. He made beautiful glass as well as offered lessons to tourists. I liked the idea of photographing the glass blower for several reasons:

  • He makes beautiful art.
  • The workshop is interesting with a lot of picture possibilities.
  • I could shoot available light in his workshop.
  • He was there all day doing interesting things which means I had a lot of time to shoot.
  • He seemed very proud of his work.
  • He seemed to have an extroverted personality and a sense of showmanship.

What I wanted to do:

I wanted to be able to photograph him as he worked and interacted with others.

My most important goal was to have the opportunity to shoot something pretty simple as I learned to drive this new camera. I liked this situation because I could shoot available light and there was enough action and movement that I could test out the different autofocus settings as well as the creative features of the camera.

I also wanted to be able to shoot, leave to download my images, and come back to the same situation later to tweak my approach. I had found my subject, I just needed to get permission.

storytelling with photos

#2 – Be honest about what you want and don’t be afraid, just ask!

A lot of photographers are shy about asking friends, relatives, and strangers if they can take their photo. Asking is easy if you are honest, sincere, and you know why you want to photograph the person.

The truth is, some people hate to have their photo taken and so be prepared for a no. If someone shies away from the idea, perhaps they require more convincing. Some people actually enjoy being persuaded, so push gently after the first no. There could be a yes hiding behind a little bit of shyness.

And, if you get a no, remember that it’s never personal. Some people are just going to say no. Sometimes the person being asked has no idea why anyone would want to photograph them. They are afraid you are going to make them look dumb and they can’t imagine why anyone would want to take their photograph. That is why step #1 is important.

storytellings with photographs

Before you ask permission, get clear on what you want so you can explain it and overcome any objections. Yes, it’s partly sales, but if you are sincere and enthused and truly want to photograph them, most of the time they will feel flattered and say yes.

How I approached the glassblower

When I approached John to ask him if I could photograph him, I had my camera over my shoulder. I told him his work was beautiful and I’d love to take some photographs. He beamed. He loved the attention.

Note: I didn’t run into the shop taking pictures without permission. I intentionally had my camera, though, so he knew from the start that I was interested in taking photographs. Having your camera on your shoulder, hanging loosely is non-threatening. If he had an aversion to having his picture taken, he would have felt much more relaxed than if I had put a camera in his face. This isn’t paparazzi. It’s about connecting with someone you want to spend some time with.

I told him the truth. That I was in town visiting and I wanted to learn how to use this new camera. I smiled and told him I had already photographed every squirrel in town and was ready to shoot some people. He laughed.

telling stories with photographs

Being able to put people at ease is a great step toward getting a yes. I find it easier to connect with people as a student than a professional. When I approach people as a professional they put up more of a front. When I’m just trying to learn my camera, the pressure is off the subject to do or be anything.

If you are looking for great vacation photos and stories to share with your friends and family, say so. Imagine if a traveler approached you, said you looked amazing and would love to show people back home what people here looked like? You’d be flattered! Of course!

I also explained that I was testing the camera and I might shoot for awhile, go look at pictures, then come back again to shoot some more. Would that be okay? He got excited over the attention and immediately started to share photos another photographer had taken. He loved the idea of being photographed and I had a subject.

#3 – Be considerate

You are shooting in someone else’s home, yard, or business, so be courteous. If a customer comes in, the customer comes first. Always take the back seat. It’s a privilege when someone allows you to take their photo. Remember that and you will always be welcome.

telling stories with photos

#4 – Tell your subject to pretend you aren’t even there

First of all, you will get better pictures and expressions if your subject keeps busy doing what they love. You can watch how they do it and begin to anticipate their next move. Secondly, especially if you are working in a place of business, you don’t want to distract them from their livelihood. If you do, they will grow impatient and suggest the session is over.

I often get close to shoot and then back away for awhile. It relaxes the subject and keeps them off guard. It truly allows them to forget about me and get into their zone.

how to tell stories with photographs

#5 – Really work the situation

Create a variety of shots, with the goal that each shot adds a different element or idea to the story. Walk around, shoot high and low, and use a variety of lenses. Work on cleaning up the background and capturing great expressions. Look for opportunities and unique ways of showing it. Experiment. Have fun. Get creative.

telling stories with photographs

#6 – Shoot portraits

Look for different expressions, light, and angles. Shoot tight and shoot loose. Include the environment in some shots. Work on taking candids as well as photos with the subject looking at the camera. I loved the light on John’s face when he was looking at the fire and how it reflected in his glasses.

telling stories with photographs

Remember, variety is the key. Notice how many different expressions John has in the different photos in this article. Each expression helps to add an element to the story.

telling stories with photographs

#7 – Shoot action shots

Tell the story of what the person does. Try shooting the same activity in different ways.

telling stories with photos telling stories with photographs

#8 – Shoot close-ups and details

telling stories with photos telling stories with photographs

#9 – Shoot hands

telling stories with photographs

#10 – Photograph relationships

Try to capture the relationship your subject has with other people. In these photos, a tourist stopped by to blow his own piece of glass.

telling stories with photographs telling stories with photos

You now have the tools to approach strangers to ask them if you can spend time with them taking pictures. These rules apply to every situation, whether it’s a musician in the street, your child’s ballet class, or a homeless person. Remember to know your intention and be honest with the subject. Sincerity has opened many, many doors for me.

Once you are inside the door, really work your subject to tell the story. Try different angles and remember to shoot close as well as far away. Shoot portraits, close-up shots, focus on recording what the subject is doing, as well as their relationships.

What story would you love to shoot? Do you know a musician in your neighborhood or a craftsperson? Share your thoughts below, go out and shoot and then share your images in the comments below.

googletag.cmd.push(function() {
tablet_slots.push( googletag.defineSlot( “/1005424/_dPSv4_tab-all-article-bottom_(300×250)”, [300, 250], “pb-ad-78623” ).addService( googletag.pubads() ) ); } );

googletag.cmd.push(function() {
mobile_slots.push( googletag.defineSlot( “/1005424/_dPSv4_mob-all-article-bottom_(300×250)”, [300, 250], “pb-ad-78158” ).addService( googletag.pubads() ) ); } );

The post 10 Tips to Help You Create Unique Storytelling People Photos by Vickie Lewis appeared first on Digital Photography School.


Digital Photography School

 
Comments Off on 10 Tips to Help You Create Unique Storytelling People Photos

Posted in Photography


How to Create Stunning Architecture Photography by Painting with Light

15 Sep

My name is Mike Kelley. I’ve been lucky enough to travel the world and see incredible architecture while working for hotels, architects, designers, and developers.

Architecture tips 04

Architecture tips 07

In this article, I’d like to share with you one of my favorite techniques for photographing architecture. If you’ve ever tried to photograph a building at twilight, you know how tough it can be to properly expose all parts of the scene. You know how some areas tend to fall into darkness.

When this happens, many photographers will just try to recover the shadows with a brighter exposure or some dodging and burning. Unfortunately, that can lead to muddy results which often display a lack of texture and color.

Although this article touches on my basic processes, a full tutorial on my workflow is $ 100 off right now over at Snapndeals – Mike Kelley’s Where Art Meets Architecture Course

Light painting for architecture photography

One technique that I’ve adapted to use with modern photographic tools is light painting. Back in the old days, depending on how old you are, there were many photographers who painted with light. They would literally stop down the aperture, wear an all-black outfit, and wave a light around for a 30-60 second exposure to fill in shadows and give the image some nice snap.

Luckily, things are a bit easier these days (to me, at least). You can use a single Speedlight and see the results instantly. All without burning through expensive sheets of 4×5 film, or having to dress like Steve Jobs to keep yourself from showing up in the exposure.

I personally use either a Lowel GL1, Yonguo Speedlight or Profoto B1 light to pull it off, depending on how much power I’ll need. The aim here is to add light in spots that appear to have natural light falling on them – either from landscape lighting or interior lighting. Adding flash or hot light will dramatically clean up the quality of light, by giving it direction and fall off. Whereas the ambient light may create a muddier appearance due to having no directionality, incoherent color casts, or being mixed with the falling light of the day.

Architecture tips 01

So you’re all set up for your twilight. You’re waiting for that perfect balance between falling ambient exterior light and interior glow. Before, during, and after twilight, you should have the camera set in one place on a tripod and every couple of minutes, shoot a bracketed set of images at 0 EV, -2, and +2, or something similar, whatever your preference may be.

Shooting at twilight

When the time for the perfect twilight has arrived, and the falling ambient exterior light and interior glow from the practical lights are perfectly balanced, it’s time to add your hot light or flash. Moving quickly (it helps to have a plan ahead of time for what you’ll flash) add light to areas that you think have fallen into too much shadow or places that could use a little texture and color.

I also recommend adding a CTO gel to your lights to warm them up so that they match the interior glow of the house or any exterior lighting that may be present. This process should take no more than five minutes and should be shot tethered, whether to a computer or a wireless solution like a CamRanger, so you can see what you’re doing immediately and adjust accordingly.

Architecture tips 12

Architecture tips 17
Architecture tips 27

After you’ve gone around and added light, continue to bracket exposures to cover your bases. Sometimes I’ll use an exposure from when it’s completely dark outside and the only light in my scene is from the interior glow to remove any distracting reflections or color casts that popped up.

Processing the images

When in post-production, try to keep it simple. I used to think it was a source of pride to edit these photos and have to use 50, 70, or even more layers. But the fewer layers there are in Photoshop, the less of a chance there is for something to go awry. Depending on the subject, 10-15 flash pops should be more than enough to get this amazing effect on your images. You may want to add or remove some color using curves, and it would also be wise to make sure that everything blends together seamlessly by setting the blend mode of your flash pop layers to Lighten.

Replace the sky if necessary

Lastly, in many of my images I end up replacing the sky. Don’t underestimate what an amazing impact a new sky can have on your image – but only when it’s done perfectly! If there’s anything that takes people out of an image and ruins the moment, it’s a poorly composited sky that doesn’t match the color and brightness of the rest of the image So choose your sky carefully. I personally like to vary the opacity of my sky layer to taste so that things all blend seamlessly.

No architectural photo would be complete without nice, straight verticals lines, so use CMD/CNTL + alt + shift + E to stamp all to a new layer. Then drag out some ruler lines and make sure there’s no distortion – we don’t need people thinking our clients can’t build straight homes.

Architecture tips 08

Here is the final image

You can watch a video of this entire process below and see me in action:

Summary

I hope you enjoyed this quick tour through one of my favorite techniques. The more you use it, the more flexible you will become with adding light and mood to make your photos really stand out.


If you would like to go more in depth with this technique and learn how to build your own business in real estate and architectural photography, Kelly’s full-length tutorial is currently 33% off over at Snapndeals – grab it before the sale ends September 27th, 2016.

googletag.cmd.push(function() {
tablet_slots.push( googletag.defineSlot( “/1005424/_dPSv4_tab-all-article-bottom_(300×250)”, [300, 250], “pb-ad-78623” ).addService( googletag.pubads() ) ); } );

googletag.cmd.push(function() {
mobile_slots.push( googletag.defineSlot( “/1005424/_dPSv4_mob-all-article-bottom_(300×250)”, [300, 250], “pb-ad-78158” ).addService( googletag.pubads() ) ); } );

The post How to Create Stunning Architecture Photography by Painting with Light by Mike Kelley appeared first on Digital Photography School.


Digital Photography School

 
Comments Off on How to Create Stunning Architecture Photography by Painting with Light

Posted in Photography


How to Create an Infrared Effect in Photoshop

10 Sep

Note: For this tutorial I am using Photoshop CS6, however every version from CS2 up will work for this technique.

What is Infrared Photography?

Infrared (IR) light lies just beyond the visible spectrum, so we can’t actually see it with the naked eye. However, IR photography allows us to view this spectrum with a camera, to capture a whole new world of invisible light.

13Done

In basic terms, anything that reflects a lot of infrared light, will appear red in IR photography. As healthy vegetation absorbs blue and red-light energy to fuel photosynthesis and create chlorophyll, organic matter is the most popular subject for IR photography. The surrealistic effects that are created when IR comes into contact with plants and grass makes the method very popular for with landscape photographers, and is a great way to diversify your portfolio.

There are a few ways to capture IR photos in-camera

As most digital cameras are somewhat sensitive to IR waves already, screw-in filters are a reasonably straightforward way to make IR photographs. They are, however, fairly expensive and significantly reduce the amount of light that reaches the sensor of your camera, thus also increasing exposure times. Infrared light also focuses at a slightly different point than visible light. Once the filter is on, you won’t be able to see much at all, a combination that makes for a difficult time focusing. Autofocus is also rendered useless.

You can also use a film camera with special infrared film. This type of film is quite expensive and requires special handling, but shooting IR photos with it requires no modification to your camera.

Your third option is to pay for your digital camera to be altered to capture infrared light exclusively. But the procedure is expensive, and involves altering the internal layout of the camera, meaning it will never photograph light in the visible spectrum again.

This simple tutorial will show you how to mimic the distinct, surrealistic effect of in-camera IR photography, without the hassle or expense of buying an IR filter, IR film, or doing a camera-overhaul.

1Originalimage

Step 1 – Open our image in Photoshop

Open up your image with Adobe Photoshop. The image I’ve chosen for this tutorial has plenty of organic material in it, so the finished result will be pretty intense. However, if a subtler effect is what you are after, simply pick an image with less dense greenery. As demonstrated in the conclusion, sometimes less can be more with this effect.

Now, duplicate the image layer via Image > Duplicate Layer or by using the shortcut CMD/CTRL + J. Rename this layer “Infrared” via the command box or by double-clicking on the layer name.

2Rename

Next, invert the colors of the layer you just named “Infrared” by using the Invert option in the Adjustments Layer Panel. We will be using a few tools in the Adjustment Layer Panel. This method adds layers over the original image rather than directly editing it, which reduces the overall image quality and its ability to be altered again later if you change your mind. This is called non-destructive editing.

3Adjustmentlayers

Once the layer is inverted it will look like a color negative.

4Inverted

Step 2 – Blending Modes

With the Invert Adjustment Layer selected, change the Blending Mode to Color, from the dropdown menu in the layers panel.

5Blendingmodesdropdown

The image should now have a nice orange and blue tone.

6Color

Step 3 – Channel Mixer

Select Layer > New Adjustment Layer > Channel Mixer, or select the Channel Mixer icon in the adjustment layers panel.
Now, in the Channel Mixer, first set the output channel to red, and move the red slider to 0. Move the blue slider to +100.

7colorbalance1panel

Then set the output channel to blue. Increase the red to +100 and move the blue slider to 0.

8colorbalance2

Leave the green output channel as it is, making sure that the green slider it is set to +100.

9colorbalance3

The image will now look a lot more saturated, color wise.

10Channelmixer

Step 4 – Hue and Saturation

This step is going to vary depending on what photo you have selected, but the overall goal is the same: isolating the pink/red colors and converting them to whitish/yellow color.

Make a Hue and Saturation adjustment layer via the Adjustment Layer Panel. Select the red channel. Reduce the saturation down so the result is almost grey.

Following this, adjust the hue slider until you get a hint of yellow. Feel free to play around with the other channels slightly to get the best results.

11HueSaturation

My image now looks more faded and subtle:
12Afterhuesaturation

Step 5 – Finishing Touches

To finish up, I adjusted the contrast of the image using the Curves Adjustment Layer on the Adjustment Layer Panel.

13Done

Other Examples

Here are some examples of other landscapes I’ve used this technique on:

The image below started with little or no blue tones. The final image takes on the appearance of a black and white, hand painted with a slight yellow tone.

14Example1

Inorganic material isn’t really affected by the IR treatment, so only the grass and plants in this image take on a surreal hue.

15Example2

I hope this tutorial was useful as a quick trick to diversify your landscape work.

Enjoy playing around with this technique, because the results are often unpredictable and can lend a completely different perspective to an image. Please share your questions and IR image results in the comments section below.

googletag.cmd.push(function() {
tablet_slots.push( googletag.defineSlot( “/1005424/_dPSv4_tab-all-article-bottom_(300×250)”, [300, 250], “pb-ad-78623” ).addService( googletag.pubads() ) ); } );

googletag.cmd.push(function() {
mobile_slots.push( googletag.defineSlot( “/1005424/_dPSv4_mob-all-article-bottom_(300×250)”, [300, 250], “pb-ad-78158” ).addService( googletag.pubads() ) ); } );

The post How to Create an Infrared Effect in Photoshop by Megan Kennedy appeared first on Digital Photography School.


Digital Photography School

 
Comments Off on How to Create an Infrared Effect in Photoshop

Posted in Photography