RSS
 

Posts Tagged ‘Control’

Pulse aims to bring advanced wireless control to your DSLR

04 Dec

Pulse, a project currently seeking funding on Kickstarter, aims to bring wireless control to many Nikon and Canon DSLRs. The device consists of a wireless controller that attaches to a camera’s hot shoe and plugs into its USB port, connecting to Android and iOS smartphones over Bluetooth. Read more

Articles: Digital Photography Review (dpreview.com)

 
Comments Off on Pulse aims to bring advanced wireless control to your DSLR

Posted in Uncategorized


How to Take Control of Aperture and Create Stronger Photos

14 Nov

aperture and composition

The focal length of the lens you use, combined with the aperture setting, determines how the camera sees whatever you point it at. This has profound implications for composition. Let’s look at them one by one.

Selective focus and bokeh

Selective focus occurs when you focus on your subject, and use a wide aperture to make the background go out of focus. Bokeh is the blurred parts of your photo. It originates from the Japanese word boke, and has come into use because we don’t have a word in English for it.

aperture and composition

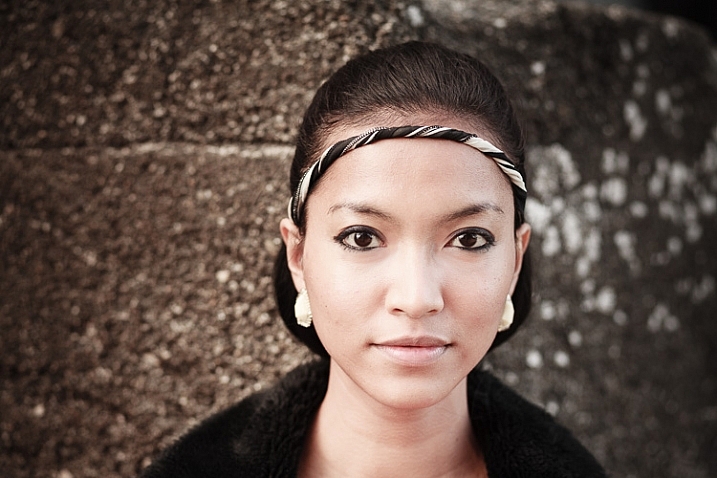
This photo shows both selective focus and bokeh. I focused on the model’s eyes, and selected an aperture of f/1.4, to blur the background as much as possible.

There are several factors that affect bokeh.

1. Aperture

The wider the aperture, the less depth-of-field there is, and the more bokeh you get. Photographers that like to use selective focus buy prime lenses, as they have often wider maximum aperture settings than zooms.

But, you can still obtain nice bokeh with zooms, if you pay attention to the following points.

2. Camera to subject distance

The closer you are to the subject the less depth-of-field there is. This is a useful tip if you have a zoom lens with a limited maximum aperture (such as an 18-55mm f/3.5-5.6 kit lens). Just set the focal length to longest available setting, the aperture to its widest setting, and move in as close as you can. You’ll be surprised by what you can achieve.

aperture and composition

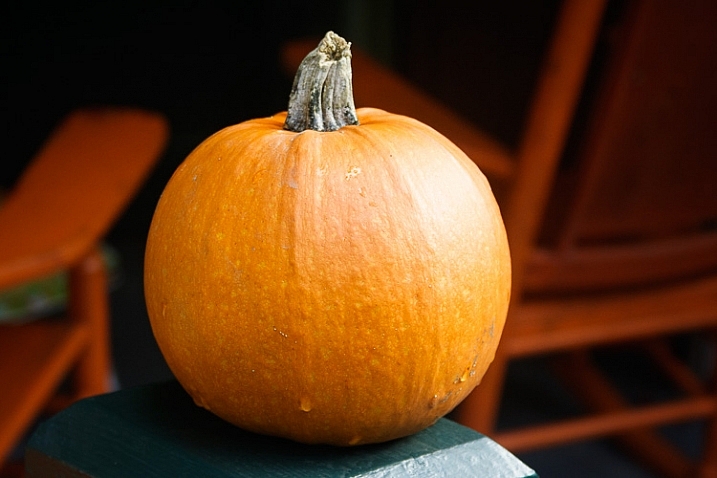
This photo was taken with an 18-55mm kit lens set to 55mm and f/5.6, the widest available aperture at that focal length. It’s not nearly as close to how little depth-of-field there would be if I had used an 50mm prime lens at f/1.4 – but it’s still enough to blur the background.

3. Subject to background distance

The more distance there is between subject and background, the more out of focus the background will get, at any given aperture setting.

4. Quality of light

Light affects bokeh. Soft light (like that on an overcast day) produces smooth, even bokeh. Sunlight or reflections, create a different type of bokeh with more texture.

aperture and composition

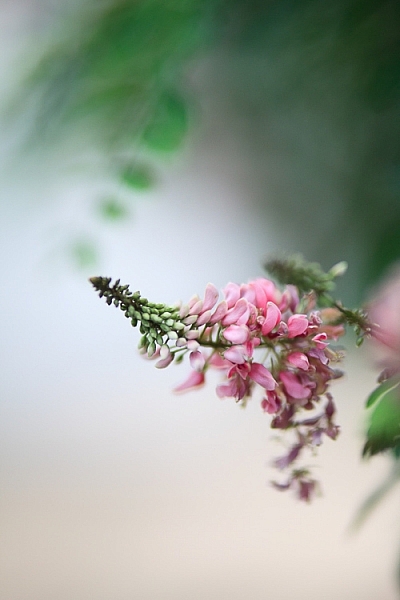
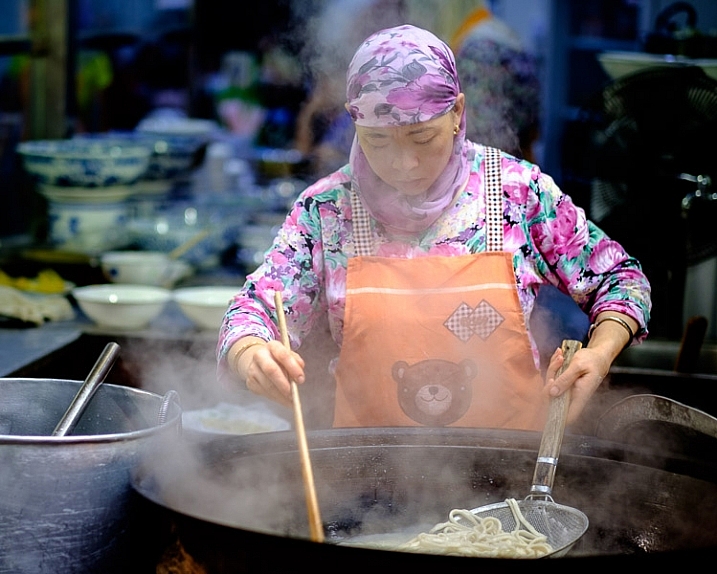
I took this photo on an overcast day. The bokeh is very smooth.

aperture and composition

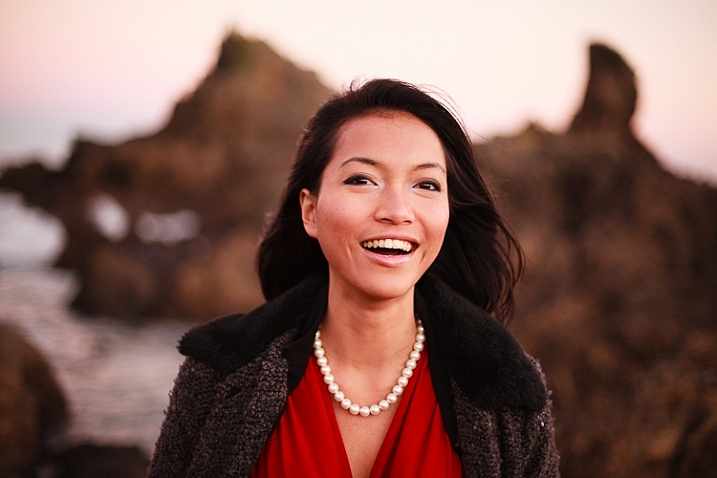
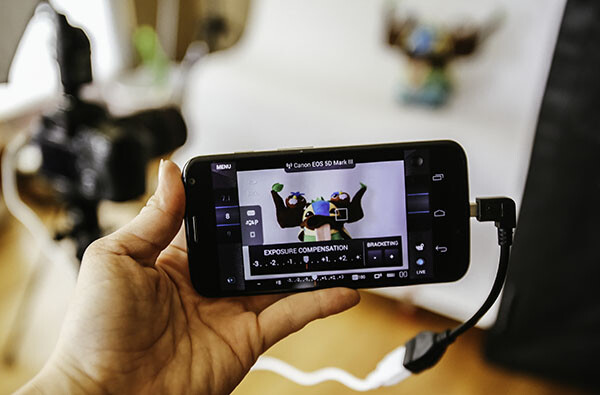
I took this photo in the early evening. The artificial lights reflecting from the shiny objects in the background have created a different type of bokeh.

5. The aperture blades of the lens

The more blades the lens has, the rounder the shape of the aperture, and the smoother the quality of the bokeh. Less expensive lenses tend to have fewer aperture blades, and may not produce the same quality of bokeh as better ones.

6. Other optical characteristics of the lens

Some lenses, such as the Helios 58mm f/2 lens, used to take the photo below, have optical characteristics (or more likely, flaws) that produce a certain type of bokeh. Lensbaby is a company that makes lenses that produce a specific type of bokeh.

Aperture and composition

f/2.8 on a prime lens

I’ve singled this aperture setting out because it hits a sweet spot when it comes to composition, especially for portraits.

If you have a normal or short telephoto prime lens, and use the widest aperture setting (generally f/1.2, f/1.4 or f/1.8) then the depth-of-field is very narrow indeed. Sometimes that works really well, but other times you need a little more depth-of-field to create a stronger image. It’s like any technique – overuse it and it becomes a gimmick.

The solution is to mix it up a little by using aperture settings like f/2, f/2.8, and f/4. You’ll still get a narrow depth-of-field and create some beautiful bokeh, but a little more of your subject will be in focus.

Using f/2.8 (or thereabouts) shows subtlety, restraint, and maturity.

aperture and composition

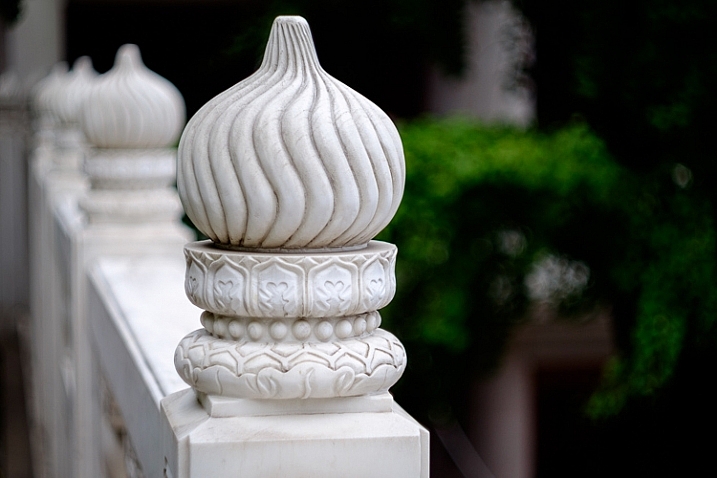
I took this photo with an 85mm lens (full-frame) at f/2.8. The depth-of-field is still shallow enough to blur the background nicely.

The middle apertures

Now we get into the middling apertures, those from around f/4 or f/5.6, to f/8, depending on your lens.

The effect of these apertures depends on the focal length of your lens and how close you are to your subject. For example, you could use a super telephoto lens (300mm plus) and shoot from farther away from your subject to create images with shallow depth-of-field at f/5.6, or get the entire scene in focus at the same aperture with a wide-angle lens (35mm and less) if you focus on the right spot and are much closer to your subject.

These middle apertures represent the transition between photos where some of the image is out of focus, to those where everything is in focus.

You can still use selective focus at these apertures (although perhaps not with wide-angles), although the effect is much gentler than with the widest aperture settings of your lens. Use these apertures when you want good depth-of-field but don’t mind if the background is out of focus a little.

aperture and composition

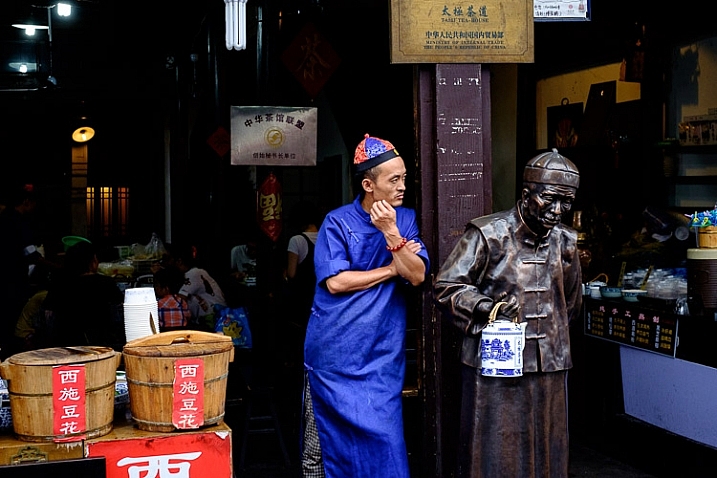
I used an aperture of f/4.5 for this photo. The depth-of-field is sufficient to get the man, the statue, and the wooden baskets in focus. The background is unimportant and doesn’t need to be in focus.

The smaller apertures

These are the ones you use when you need everything within the frame to be sharp, like with landscape photography. This can be anything from f/8 on a wide-angle lens, to f/11 or f/16 on longer focal lengths. With telephotos and macro lenses you can stop down to f/16 and still not get everything in focus.

The thing you need to be aware of here is diffraction. When the aperture gets too small, the light passing through it spreads out, and softens the image. Thanks to diffraction, images taken at f/22 are usually visibly softer overall, than those taken at f/8 or f/11. Noticeable diffraction may start at f/16 or f/22 on a full-frame camera, and around f/11 on an APS-C camera.

aperture and composition

An aperture of f/11 ensured everything in this photo, taken with a 14mm lens (APS-C), was in focus.

Take control

Every time you take a photo you should be thinking about what the optimum aperture is for the composition you want to make. Do you want to open the aperture and throw the background out of focus? Do you want to stop down and get as much as possible in focus? Or somewhere in between?

What aperture settings do you like to use with your photos? Do you use a Lensbaby or other lens that gives a certain bokeh effect? Please let us know in the comments – I’d love to hear your thoughts and see your images.

This week on dPS we’re featuring a series of articles about composition. Many different elements and ways to compose images for more impact. Check out the ones we’ve done so far:

  • Using Framing for More Effective Compositions
  • 7 Tips to Improve Your Skyline Photos
  • 33 Images that Exemplify Compositional Elements
  • Weekly Photography Challenge – Composition Craziness

Mastering Composition ebookMastering Composition

My new ebook Mastering Composition will help you learn to see and compose photos better. It takes you on a journey beyond the rule of thirds, exploring the principles of composition you need to understand in order to make beautiful imag

googletag.cmd.push(function() {
tablet_slots.push( googletag.defineSlot( “/1005424/_dPSv4_tab-all-article-bottom_(300×250)”, [300, 250], “pb-ad-78623” ).addService( googletag.pubads() ) ); } );

googletag.cmd.push(function() {
mobile_slots.push( googletag.defineSlot( “/1005424/_dPSv4_mob-all-article-bottom_(300×250)”, [300, 250], “pb-ad-78158” ).addService( googletag.pubads() ) ); } );

The post How to Take Control of Aperture and Create Stronger Photos by Andrew S. Gibson appeared first on Digital Photography School.


Digital Photography School

 
Comments Off on How to Take Control of Aperture and Create Stronger Photos

Posted in Photography


How to use Color Grading for Effect and Tone Control in Photoshop

07 Nov

Photoshop is a massive tool that can be used to do just about anything on your images. But, knowing how and when to use which tool can be daunting.

In these two videos you can see how to use color grading with adjustments layers to make special effects and add or control color and tone in your images.

This one from Clay Cook shows you how to “Color Grade like a Pro” as he walks you through two portraits as he processes them in Photoshop:

In this second one from SLR lounge photographer, Lauri Laukkanen, goes through how it takes one image from camera to a fashion look using color grading:

Lastly if you really want to put this information to use here’s an in-depth tutorial on using color grading to make a cinematic poster look to an image:

Have you tried color grading before? Please show us your results below in the comments if you follow along and give it a go.

googletag.cmd.push(function() {
tablet_slots.push( googletag.defineSlot( “/1005424/_dPSv4_tab-all-article-bottom_(300×250)”, [300, 250], “pb-ad-78623” ).addService( googletag.pubads() ) ); } );

googletag.cmd.push(function() {
mobile_slots.push( googletag.defineSlot( “/1005424/_dPSv4_mob-all-article-bottom_(300×250)”, [300, 250], “pb-ad-78158” ).addService( googletag.pubads() ) ); } );

The post How to use Color Grading for Effect and Tone Control in Photoshop by Darlene Hildebrandt appeared first on Digital Photography School.


Digital Photography School

 
Comments Off on How to use Color Grading for Effect and Tone Control in Photoshop

Posted in Photography


Tips for Depth of Field Control in Macro Photography

01 Sep

Depth of field is the amount of distance between the nearest and farthest objects that appear in acceptably sharp focus in a photograph, it varies depending on camera type, aperture and focusing distance. If you are into photography you probably already know this and how critical it is when you photograph in macro distances.

01

This image was done with a 100mm macro lens with a life-size converter attached, at a distance of 4 inches to the object to achieve this type of magnification. The Depth of Field you see here is impossible to achieve, as there is no way to have the whole ring in focus with this focal length and this distance to the object.

Here are a couple of test shots to show a comparison between an f/8 and an f/32 exposure of this image:

02

In this particular image f/8 would give you a very shallow Depth of Field, so if you would like to have more then f/32 would seem to be a better choice, right? But if you take a closer look, you will realize it is just not that easy.

03

The magnified image shows you that f/8 has shallow Depth of Field but, because it represents the sweet spot of this lens, it gives you great detail in the focused areas. On the other hand f/32 gives you more Depth of Field, but it lacks detail overall.

This lack of detail is due to diffraction, that is the slight bending of light as it passes around the edge of an object giving the photographed image a soft focus effect. So, sharp focus and deep Depth of Field are impossible to achieve in this image due to optical limitations.

A great work-around for these limitations is Focus Stacking (also known as Focal Plane Merging, Z-Stacking or Focus Blending), which combines images photographed with different focus distances into one final image with a greater Depth of Field.

This technique is only possible if the camera, and all the elements on the image are perfectly still, so the use of a steady tripod is really important.

Another important factor is to shoot, and focus without touching the camera. In this particular image the camera was tethered with a computer and a remote shooting app was used to focus the image.

04

The best way to capture these images is to start by focusing on the closest area first, then keep shooting, making sure you cover all the focusing length (move focus farther away from the camera with each successive shot). Just use the controls of your remote trigger and app to fine-tune the focus for each shot.

The final number of shots depends on how detailed you want your image to be, but keep in mind that the more images you have, the harder it will be to process later on. This particular image was made with a merge of 21 images.

05

After the images are captured it’s time to process them. There are a lot of software options on the market for focus stacking; this image was edited with Adobe Photoshop CC. Here are the steps:

  1. Open Photoshop, go on File > Scripts > Load files into a stack
  2. Select all the pictures and turn on “attempt to automatically align layers”
  3. Select all your files in the layer panel on the right side
  4. Go to edit > Auto-Blend Layers and select “stack Images”

You will end up with a stack of layers with associated masks that look something like this:

06

Each layer mask reveals the best of each focused part of the image, and they can also be manually adjusted for more controlled results. The final images are usually very impressive and allow you to achieve effects that would be impossible to reach any other way.

googletag.cmd.push(function() {
tablet_slots.push( googletag.defineSlot( “/1005424/_dPSv4_tab-all-article-bottom_(300×250)”, [300, 250], “pb-ad-78623” ).addService( googletag.pubads() ) ); } );

googletag.cmd.push(function() {
mobile_slots.push( googletag.defineSlot( “/1005424/_dPSv4_mob-all-article-bottom_(300×250)”, [300, 250], “pb-ad-78158” ).addService( googletag.pubads() ) ); } );

The post Tips for Depth of Field Control in Macro Photography by Ivo Guimaraes appeared first on Digital Photography School.


Digital Photography School

 
Comments Off on Tips for Depth of Field Control in Macro Photography

Posted in Photography


Canon EF 35mm F1.4L II USM boasts new Blue Spectrum Refractive Optics for improved chromatic aberration control

27 Aug

Canon has announced the EF 35mm F1.4L II USM, the second generation of its popular wide-angle prime. It uses newly designed Blue Spectrum Refractive Optics, which claim to reduce chromatic aberration better than any other existing technology. Read more

Articles: Digital Photography Review (dpreview.com)

 
Comments Off on Canon EF 35mm F1.4L II USM boasts new Blue Spectrum Refractive Optics for improved chromatic aberration control

Posted in Uncategorized


Cascable iOS app offers remote control of WiFi-enabled cameras

23 Jun

Cascable is a new iOS app that aims to create a better experience for photographers using Wi-Fi connected cameras. Currently supporting Canon EOS cameras, Cascable provides access to exposure settings and allows for shutter release control from the Apple Watch. Read more

Articles: Digital Photography Review (dpreview.com)

 
Comments Off on Cascable iOS app offers remote control of WiFi-enabled cameras

Posted in Uncategorized


Petzval 58 Bokeh Control Art Lens launched on Kickstarter

29 May

Lomography has launched its new Petzval 58 Bokeh Control Art Lens, the second lens it has introduced based on the Petzval optic invented by Joseph Petzval in 1840. This newest Petzval lens features Russian glass optics, is constructed by hand, and is offered in a brass finish. The lens results in photographs with a ‘swirly bokeh,’ and the strength of the effect can be controlled via a Bokeh Control Ring, a feature not available in Lomography’s existing 85mm Petzval. Read more

Articles: Digital Photography Review (dpreview.com)

 
Comments Off on Petzval 58 Bokeh Control Art Lens launched on Kickstarter

Posted in Uncategorized


Get Complete Control Of Your Camera with Our Brand New Course

25 Feb

Pnbvideo boxToday I’m very excited to announce the launch of our first Digital Photography School Course – Photo Nuts and Bolts.

The Photo Nuts Journey

Early in 2010 dPS launched a brand new eBook – Photo Nuts and Bolts. Written by Neil Creek it was all about understanding your camera so you can get creative control over it.

It went on to become one of our most popular eBooks ever and each year since we’ve added new eBooks to the series including Photo Nuts and Shots (Tools and Techniques for Creative Photography), Photo Nuts and Post (a Guide to Post-Processing) and Photo Nuts and Gear (Know your gear and take better shots).

These eBooks have helped tens of thousands of dPS readers!

Announcing our Brand New Photo Nuts Course

Today sees the continuation of the Photo Nuts journey with this fantastic course by Neil Creek. Here’s the course intro:

This course brings alive the concepts in the original Photo Nuts and Bolts eBook and is all about putting down your user manual, saying goodbye to ‘Auto’ mode and learning firsthand how to use your camera to its full potential.

The course is delivered through 10 high quality video lessons delivered at your own pace through our brand new courses area here on dPS. It comes with downloadable course notes, exercises and resources.

NewImage

Is Photo Nuts and Bolts for You?

There’s plenty of great information on what this course covers over on the Photo Nuts and Bolts Course page but in short it is for you if:

  • You’re new to photography and/or using a DSLR camera
  • You want to move past the point and shoot approach and get out of ‘Auto’ mode
  • You’d like to understand the fundamentals of how your camera works and start using it to its full potential
  • You’re looking to get more technical and increase the creative control you have over your camera
  • You learn best by visually observing and doing, not reading a manual

Pick Up Photo Nuts and Bolts with a 33% Discount Today

This course is available today for just $ 39 USD. This is a limited time introductory 33% discount (the normal price will be $ 59 USD).

As with all our products Photo Nuts and Bolts the Course is backed by a 60 day money back guarantee. If you pick it up and find it doesn’t suit your needs simply let us know within 60 days and we’ll refund your money.

Sign up today and get immediate access to Photo Nuts and Bolts the Course.

googletag.cmd.push(function() {
tablet_slots.push( googletag.defineSlot( “/1005424/_dPSv4_tab-all-article-bottom_(300×250)”, [300, 250], “pb-ad-78623” ).addService( googletag.pubads() ) ); } );

googletag.cmd.push(function() {
mobile_slots.push( googletag.defineSlot( “/1005424/_dPSv4_mob-all-article-bottom_(300×250)”, [300, 250], “pb-ad-78158” ).addService( googletag.pubads() ) ); } );

The post Get Complete Control Of Your Camera with Our Brand New Course by Darren Rowse appeared first on Digital Photography School.


Digital Photography School

 
Comments Off on Get Complete Control Of Your Camera with Our Brand New Course

Posted in Photography


Review: slingShot DSLR Remote Control App

18 Feb

One of the great advantages of smartphone technology is the way that it makes photography more convenient. I’m not just talking about using the camera that came with your phone. There are now smartphone apps coming out that allow you to connect with, and even control, your DSLR camera. One of these apps is the brand new slingShot DSLR Remote Control, which just came to the Google Play Android market on January 25, 2015. Using this app makes it possible to adjust the settings on your camera, see what the camera sees in live view, and view the resulting image after it’s snapped. All of this, and you don’t even have to be standing right next to your camera.

How it Works

The slingShot app connects with your camera in one of two ways: via Wi-Fi if your camera has it, or via a physical USB On-The-Go (OTG) cable. If you have a Wi-Fi enabled camera, you’re already likely to be familiar with how the function works in that your camera will create its own Wi-Fi network that your phone will then sync with. For photographers with non-Wi-Fi cameras, the connection to your phone is made with the aforementioned OTG cable. While these cables definitely aren’t as common as others, they are cheap, easy to find online, and really convenient for connecting other devices to your phone or tablet besides your DSLR, such as a wireless USB mouse or keyboard.

slingShot Remote DSLR Controller

Compatibility

At this moment, the app claims on its website to only support the following models:

  • Camera Via Wi-Fi Connection: Canon EOS 6D, Canon EOS 70D and Nikon 5300.
  • Camera Via USB Connection: Canon EOS 6D, EOS 70D and Nikon D5300 and D7000.
  • Phone: Android 4.0 or higher; phone must also have Wi-Fi or full USB host support capabilities.

Despite the app’s relatively short list of supported devices, you may want to try it out for yourself. For example, the app doesn’t specify compatibility with the Canon EOS 5D Mark III, but it worked just fine with mine.

How to Control Your Camera with the App

1. Assuming you have a supported camera model and Android phone (no iOS support at the moment), the first step is to download the slingShot app from the Google Play store. This app does cost $ 8.99, but its features may make it worth the cost, depending on how useful you find them.

2. After you install the slingShot app, proceed to connect your camera to the phone. If your camera has Wi-Fi, walk through the procedures to enable the wireless connection, or simply connect the camera by using a OTG USB cable. When your camera and phone are successfully connected, you’ll see the screen below pop up, asking which app you want to activate. Choose the slingShot app.

slingShot Remote DSLR Controller

3. A screen will then flash up on your phone indicating that your camera has been detected. Press the “Connect” button to continue.

slingShot Remote DSLR Controller

4. You will then see the menu controls on your phone (see below), as well as an indicator in the upper middle of the frame confirming that your camera is connected; in this case, I have my Canon 6D connected via Wi-Fi. You will also have the ability to use your phone to control aspects of your DSLR such as shutter speed, aperture, exposure, ISO, white balance, and image quality; you can even tap on the button in the upper right corner to take a photo.

However, you won’t be able to see what the camera is seeing until you enable live view mode on your camera and then press the “LIVE” button on the lower right corner of the app. Once the live view is on, the rest of the app controls are very smooth and easy to use, requiring just a tap or swipe of the finger to enable. There are also some extra features that appear when you tap on the menu button in the upper left corner, one of the most notable being the ability to do time lapse shots.

slingShot Remote DSLR Controller

Time lapse feature

I’ve played around with quite a few DSLR remote control apps, but none have come with the time lapse functionality. slingShot’s time lapse feature is in the Menu and it offers a range of customizable settings. You can set it to start immediately or after a set period of time, you can also set the interval between frames, and give it a time to stop or have it stop after a certain number of frames are snapped. I tried the time lapse function out on both my Canon 6D and 5D Mark III and it worked perfectly the first time around.

There are a couple things that didn’t work so well. First, if your camera falls asleep, the time lapse function is turned off, even if you have a timer set. Second, the ability to reset the time lapse with different conditions is difficult to do; each time I had to simply reconnect my camera and phone to get rid of the initial settings I input. However, the fact that this app can do basic time lapses is still impressive and will likely be improved upon in future updates.

slingShot Remote DSLR Controller

Previewing images

Another simple use of the slingShot app is to use it to preview DSLR content on your phone. Simply connect via Wi-Fi or OTG cable and press the play button in the app’s lower left corner. You’ll then see the screen show (see image below) a neat gallery of photos from your CF or SD card. Even if you have older content that wasn’t shot with the app,  you’ll be able to see it and download it to your phone, or share via email or social media. This app will even read and convert RAW files at pretty decent speeds.

slingShot Remote DSLR Controller

Potential Deal Breakers

While there are many positive aspects to the slingShot app, there are a few possible deal breakers. First, there are a few bugs in the app that don’t necessarily affect its overall functionality, but make its cool trick features such as time lapse not work as well as one might hope. On the other hand, the team behind the app is still actively making updates, so there’s a good chance these errors will be fixed. Another possible point of contention is the app’s $ 9.99 price tag. While you can download slingShot’s Beta version for free, you can only use it for 11 days before you’re made to purchase the actual app in order to keep using it. While the price isn’t super extravagant, it is on the steeper side compared to some other apps available. Also, there are a few other DSLR controller apps that offer the same functionality at lower prices. In fact, if you have a Wi-Fi DSLR, such as the Canon 6D in my case, there’s a (free) app from Canon that comes with it that enables DSLR control.

If the idea of being able to control your DSLR with your phone sounds like a winning deal, be sure to download slingShot app! Has anyone else given it a try? Thoughts?

googletag.cmd.push(function() {
tablet_slots.push( googletag.defineSlot( “/1005424/_dPSv4_tab-all-article-bottom_(300×250)”, [300, 250], “pb-ad-78623” ).addService( googletag.pubads() ) ); } );

googletag.cmd.push(function() {
mobile_slots.push( googletag.defineSlot( “/1005424/_dPSv4_mob-all-article-bottom_(300×250)”, [300, 250], “pb-ad-78158” ).addService( googletag.pubads() ) ); } );

The post Review: slingShot DSLR Remote Control App by Suzi Pratt appeared first on Digital Photography School.


Digital Photography School

 
Comments Off on Review: slingShot DSLR Remote Control App

Posted in Photography


How to Control Aperture and Create Images You Love

09 Feb

This article is sponsored by the New York Institute of Photography. NYIP offers high-quality online photography courses that are affordable, convenient, and accredited.

1 aperture

Controlling the aperture is one of the most powerful ways to improve your images. It’s also the topic that continues to perplex photography students everywhere. Rather than unnecessarily complicating matters, I prefer to demystify the subject. In this tutorial, I’ll reveal how both a wide and small aperture can be used to create consistent and beautiful results.

Consider the Background

2 butterfly

When I’m about to take a photo, the first question I ask myself is, “What kind of background would be best?” With wildlife, sports, portraits, and still-life objects, I often want the subject sharp, and the background to be a soft blur. As you’ll see in the example above, the blurred background allows the viewer to focus on the beautiful details of the butterfly, not on the leaves behind it. To do this, I chose a wide aperture by adjusting to a smaller f-number. At f/5.6 the opening in your lens is physically wide open, creating what’s known as shallow depth of field.

3 puffin

In the example above, I photographed an Atlantic Puffin at f/5.6. The bird is tack sharp while the foliage in the distance is very soft. The theme of the photo is clearly about its colorful beak, and there is little else in the photo to detract from it. For this reason, wildlife photographers typically use wide apertures for the majority of their work. To further emphasize the effect, try positioning yourself so there is distance between the subject and the background.

Freezing action

4 soccer

If you flip through the pages of Sports Illustrated, you’ll notice how most of the players are sharp while the fans are out of focus. The wide aperture chosen by the photographer not only creates that shallow depth of field, but it also lets a great deal of light into the camera. As such, it’s possible to use a fast shutter speed to freeze the action. If you are serious about sports photography, a lens that opens all the way to f/2.8 is worth the investment. You may even hear people refer to them as “fast lenses” which describes the speed in which the wide aperture lets light into the camera.

Focus on what’s important

Before going any further, allow me to spend a moment on focus. When using a wide aperture, be sure to place your active focus points on the subject you want sharpest. These two vineyard photographs were both taken with the same wide aperture of f/1.8, but they look very different. This is due to my placement of the focus point indicated here by the arrows. For the image on top, I focused on the vines closest to me. As a result, everything behind it is soft. For the image on the bottom, I focused on the distant vines. The shallow depth of field then works to blur everything in front of the focus point.

5 focus example

We can see how all of this comes together in the image of the male buck. I saw the large deer in October just after sunrise. With my active focus point on his face, I knew the deer would be sharp. A wide aperture of f/5.6 created a shallow depth of field. Not only was the background blurred, but the tall reeds in the foreground as well. The perspective makes it seem as if we’re spying on the creature through the tall grasses.

6 buck

As you can see, a wide aperture can help you create images that surpass routine snapshots. With this new knowledge, you’ll start to recognize the techniques other photographers have used in their photographs. Begin practicing with wide apertures and you’ll soon be changing settings like a pro. Now, let’s turn our attention to small apertures.

Small apertures

7 castle

There’s a common misconception amongst photography students who believe sharp photos are solely result of fast shutter speeds. While that is part of the equation, the other equally important consideration is the aperture. By achieving greater depth of field, it’s possible to keep the entire subject in focus. In this second portion of our aperture tutorial, I’m going to share the specific f-stops and techniques used to create tack sharp images.

8 aperture opening

Don’t let the terminology trick you. The term “small aperture” refers to the physical size of the lens opening. This may seem counterintuitive since the actual f-number is larger. Yet, f/22 is a smaller aperture than f/16 because the aperture blades inside the lens don’t open as wide. See the example above.

9 empire state

When you hear photographers say they are “stopping down”, it means they are using a narrower aperture opening, for example going from f/8 to f/11, or from f/11 to f/16. This renders everything sharp from near-to-far, hence the phrase “great depth of field”. I’ve created a phrase to help you remember this. “The greater the f-stop number, the greater the depth of field.”

10 brooklyn bridge

Great depth of field is also useful when you’re photographing flowers or close-up objects. If the aperture is too wide like f/2.8, only a handful of the petals will be sharp. The solution doesn’t necessarily have to be f/22 which is more suitable for a vast landscape; a better compromise would be f/8 which provides enough depth of field for most macro opportunities. Then, by simply focusing on the center of the flower, the entire subject remains reasonably sharp.

11 dahlia

In a big sweeping landscape, it can be tricky to determine where to focus. For me, apps that calculate precisely where to focus are just not practical (or fun). To further emphasize the effect of the small aperture, I have found a simple solution that really works. Place your focus point on an object that’s 1/3rd of the way up from the bottom of the frame and use a small aperture like f/22. Not only will the object in the bottom third be sharp, but so will everything in front of, and behind it. As an example, I focused on the large boulder towards the bottom of the frame in this photo from Yosemite National Park.

12 yosemite

Where the tripod comes in

While f/22 may be an ideal setting for a landscape, it does present photographers with a challenge especially in low light situations. Since a small aperture doesn’t let much light into the narrow opening of the lens, a slower shutter speed and/or higher ISO become necessary to achieve a good exposure. These longer exposure times are the primary reason most landscape photographers use tripods.

13 central park

Bonus tip

If carrying a tripod is not possible, you can create a makeshift camera support by placing the camera on a bag, a wall, even the ground. Then, to avoid jostling the camera during the exposure, set the two second timer to automatically trip the shutter.

14 jefferson

This article is sponsored by the New York Institute of Photography. NYIP offers high-quality online photography courses that are affordable, convenient, and accredited.

googletag.cmd.push(function() {
tablet_slots.push( googletag.defineSlot( “/1005424/_dPSv4_tab-all-article-bottom_(300×250)”, [300, 250], “pb-ad-78623” ).addService( googletag.pubads() ) ); } );

googletag.cmd.push(function() {
mobile_slots.push( googletag.defineSlot( “/1005424/_dPSv4_mob-all-article-bottom_(300×250)”, [300, 250], “pb-ad-78158” ).addService( googletag.pubads() ) ); } );

The post How to Control Aperture and Create Images You Love by Chris Corradino appeared first on Digital Photography School.


Digital Photography School

 
Comments Off on How to Control Aperture and Create Images You Love

Posted in Photography