RSS
 

Posts Tagged ‘Control’

How to Control and Modify Your Lighting With Flags

02 Aug

Lighting can be a complicated subject. From light sources, to modifiers, and color temperature, there are so many things to take into consideration. You probably know of many ways to alter your light with reflectors and diffusers.

However, what do you do when you have too much light, or the light isn’t behaving the way you need to produce your final image? You could start from scratch and choose a different light source and modifier, or you could opt for a different setup altogether. There is another way – flags.

how-to-modify-light-with-flags-5218final

Like diffusers and reflectors, flags are a tool that are used to control light. While diffusers control the shape and softness of light, and reflectors control the shape, intensity and direction (often acting as an additional light source), flags give you the ability to remove, or block light from your scene.

Another use of flags is to alter the size and shape of your modifier. For example you can block off a portion of a softbox to turn it into a striplight. They are also useful when working with reflective surfaces to control or block unwanted reflections.

This article will break down the basic use of flags to control where light falls in a scene. To do this, we’ll go through the step by step process of creating an image which employs the careful manipulation of a single light source.

The purpose of using a small, tabletop subject is so you can repeat the exact steps at home, in your own time.

What are flags?

At the most basic, flags are anything that can used to block or cut light from anywhere it isn’t wanted. Have you ever closed a blind or a curtain to block glare from a television screen? That blind is acting as a flag. Another example would be the sun visor in your car. What other examples can you think of? These instances from day to day life can help you figure out the use of flags much quicker.

Although you can use almost anything dark as a flag, the most common items are black paper and foamcore. Also, most 5-in-1 reflectors come with a black side that’s intended as a flag (see links above for some options).

Foamcore is one of the more useful things you can use, as it comes in a variety of thicknesses making it rigid, and it’s easy to cut to any shape and size you might need. It is also easily obtainable (visit any art supply store) and quite cheap.

Helpful things to have

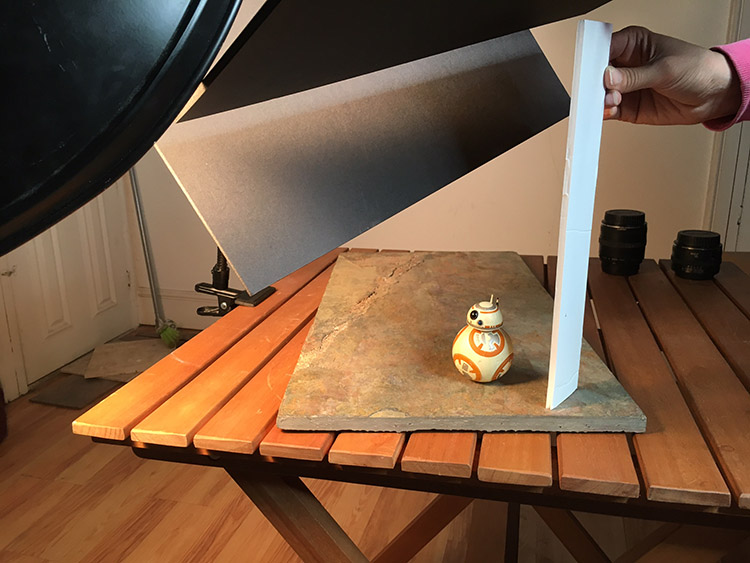
As you will see in this demonstration, it can be very precarious to get your bits of foamcore to stay in place. An easy solution is to get a bunch of clamps to hold your flags. I cannot recommend this enough.

Other things that will help you position your flags include Blue-Tac, toothpicks, Popsicle sticks and tape.

Building an image

When you are working on an image that has many steps as part of the setup process, it’s important to take your time and build up your image one step at a time. Start with putting your subject in place and choosing your composition. From there, you can pick how you want to light it. Once those three things are in place, you can add or take away from the scene one step at a time, ensuring things are perfect before you move on to the next step.

Fun with flags

Step 1 – Set-up

As mentioned, this process will start with a wide crop to better illustrate how the light changes. The first task is to arrange the subject and light in the desired position, and calculate the exposure. For this shot, I intend to push the highlights of the subject to just below their limit, so the flags can be used to darken the background and achieve a very high contrast look in the final image.

how-to-modify-light-with-flags-setup

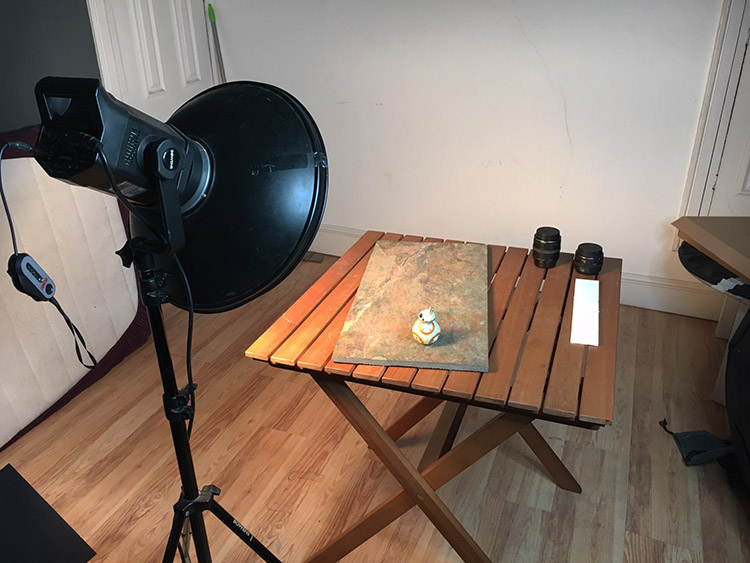
Original setup, no flags used.

how-to-modify-light-with-flags-5212

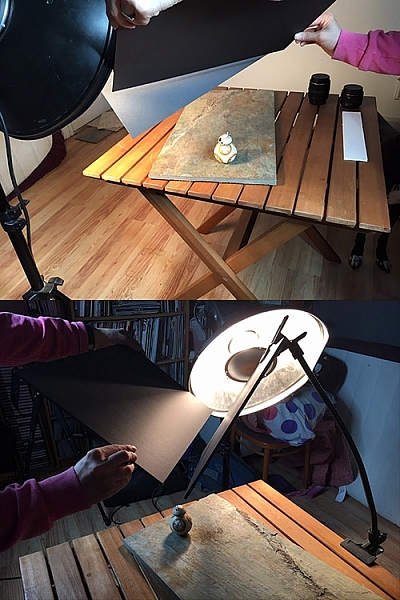
Step 2 – first flag for background control

Even though that is a good start, there are some things that can be done to improve this image. The first thing that needs to be tackled is the large negative space in the left hand side of the image. The background matches the subject in tone and color, so bringing down the exposure on the background will help to separate the two.

This is achieved by bringing in a large piece of black foamcore and holding it in front of the light. By watching where the shadows fall, you can figure out exactly where your flag needs to be to reduce the exposure on the background, without affecting your subject. Once that place is found, the flag can be mounted in place and another test shot taken.

how-to-modify-light-with-flags-first-flag

First flag placed to strategically block light from falling on the background.

how-to-modify-light-with-flags-5213

Notice how much darker the left side of the image is, but the exposure on the subject has not changed.

Step 3 – place second flag for further light control

With the left side darkened, the next bit of concern is the area of background to the right of and behind, the subject. Again, it’s a matter of bringing in a piece of foam core and moving it around while watching the shadows and making sure the subject is still lit. Once that’s achieved, clamp or hold the flag in place and take another test shot.

how-to-modify-light-with-flags-second-flag

how-to-modify-light-with-flags-5214

Step 4

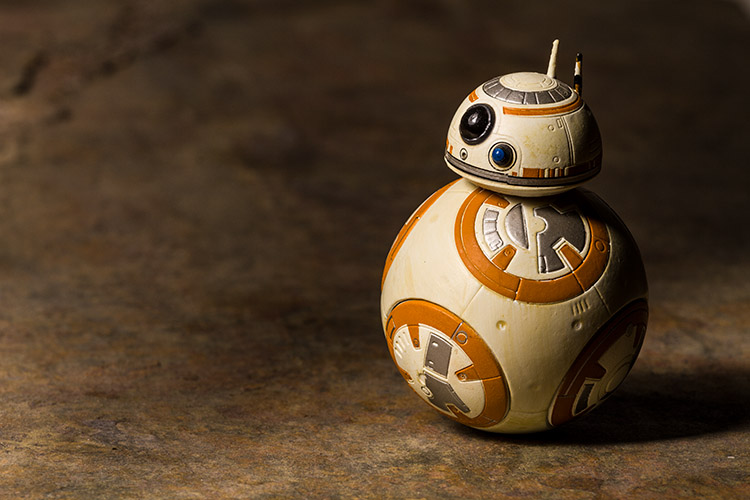
With all the flags in place, this image isn’t quite finished. Because the background has been darkened so much, the shadow side of the subject now doesn’t stand out as much as it did in the initial setup. You can fix this with a reflector. In this case, I used a strip of white foamcore, just out of the frame to camera right. This fills in the shadows, creating an extra amount of separation between the subject and the background.
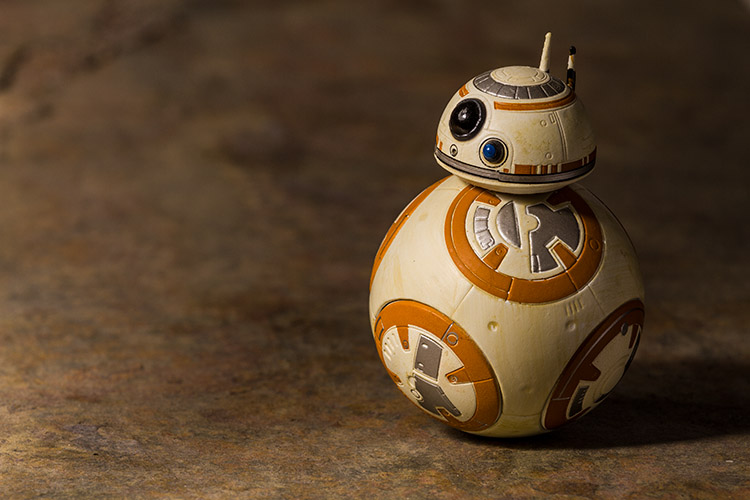
how-to-modify-light-with-flags-reflector

how-to-modify-light-with-flags-5218

Final image

With these techniques, you are taking your time to build up a scene, and controlling every bit of light that your camera records. This control, when done right, should result in well crafted images that need very little attention in post-production. In this example, this image needed a small crop, a couple small local contrast adjustments, and a high pass filter. That took all of a minute to achieve, thanks to the amount of time spent working in camera.

Before

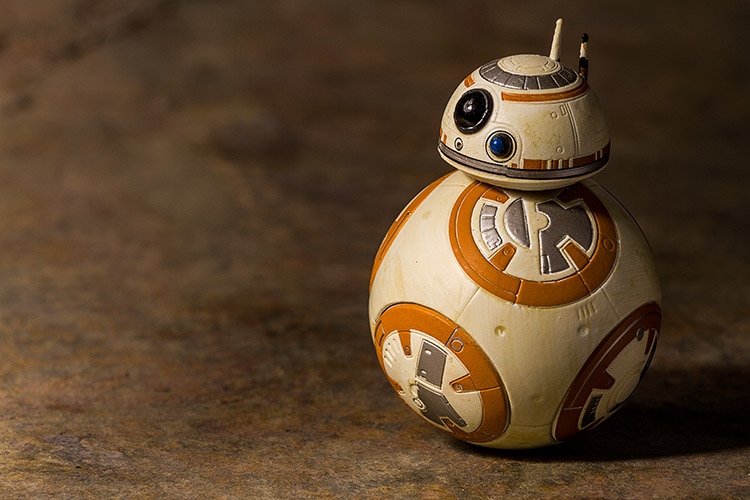
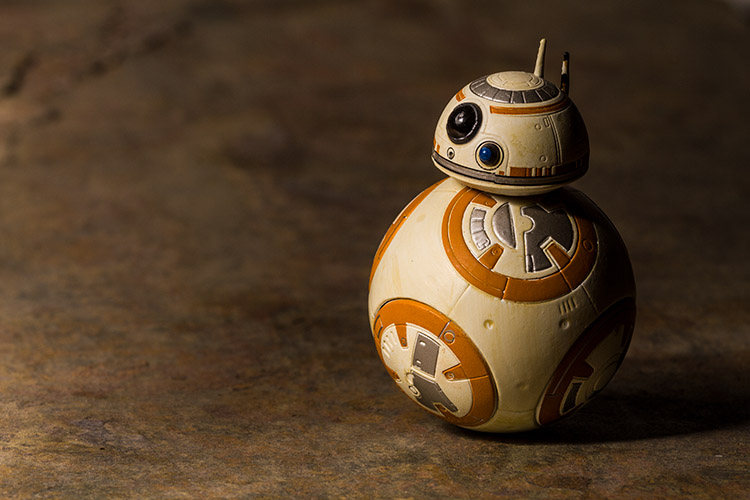
Before flags and lighting control

how-to-modify-light-with-flags-5218final

Final image with the use of flags and a reflector to control the light, and minimal post-processing.

Moving on

Once you try this for yourself, you should quickly see how flags can be a huge help when trying to control lighting in your photography. Although this tutorial focuses on a small subject, flags can be used to great effect in all manner of genres where you have the opportunity to control light. This is especially true with portraiture. So, when you have the hang of it with a small subject, don’t be afraid to think bigger.

Please feel free to have a go at this technique yourself and share your questions and your results below.

googletag.cmd.push(function() {
tablet_slots.push( googletag.defineSlot( “/1005424/_dPSv4_tab-all-article-bottom_(300×250)”, [300, 250], “pb-ad-78623” ).addService( googletag.pubads() ) ); } );

googletag.cmd.push(function() {
mobile_slots.push( googletag.defineSlot( “/1005424/_dPSv4_mob-all-article-bottom_(300×250)”, [300, 250], “pb-ad-78158” ).addService( googletag.pubads() ) ); } );

The post How to Control and Modify Your Lighting With Flags by John McIntire appeared first on Digital Photography School.


Digital Photography School

 
Comments Off on How to Control and Modify Your Lighting With Flags

Posted in Photography


All about control: Huawei P9 camera review

24 Jul

DPReview smartphone reviews are written with the needs of photographers in mind. We focus on camera features, performance, and image quality.

$ (document).ready(function() { SampleGalleryV2({“containerId”:”embeddedSampleGallery_8524135201″,”galleryId”:”8524135201″,”isEmbeddedWidget”:true,”standalone”:false,”selectedImageIndex”:0,”startInCommentsView”:false,”isMobile”:false}) });

Right behind the LG G5, the Huawei P9 is the second device to launch in 2016 with dual cameras. However, while on the LG the secondary module essentially acts as a wide-angle extension, Huawei’s approach is different. In the Huawei system, which has been co-engineered with German camera manufacturer Leica, a 12MP RGB main sensor is accompanied by a 12MP monochrome chip. Huawei says combining image information from both sensors makes the P9 camera 100% more light-sensitive than conventional smartphone cameras which should, at least in theory, result in superior low light image quality.

The P9 is also capable of some other dual-camera tricks that we’ve seen before, such as simulating shallow depth-of-field. While the camera is no doubt one of the most interesting we have seen this year, with an octa-core chipset and fingerprint reader the non-camera specifications are flagship-worthy as well. Read our full review to find out how the Huawei P9 performs in the hands of a mobile photographer.

Key Photographic / Video Specifications

  • Dual Sony IMX 286 12MP sensors with 1.25µm pixel size
  • 27mm equivalent focal length
  • F2.2 aperture
  • Laser-assisted AF
  • DNG Raw capture
  • Manual control
  • 1080p Full-HD video
  • 720p, 120fps slow-motion video
  • 8MP front camera with F2.4 aperture

Other Specifications

  • 5.2-inch 1080p IPS screen
  • HiSilicon Kirin 955 chipset
  • 3GB RAM/32GB storage or 4GB RAM/64GB storage
  • microSD slot
  • 3,000mAh battery
  • Fingerprint reader

Articles: Digital Photography Review (dpreview.com)

 
Comments Off on All about control: Huawei P9 camera review

Posted in Uncategorized


Wireless tethering on a budget: control your camera from your phone or tablet for $40

13 Jul

Wireless tethering is nothing new, but it’s not exactly a cheap proposition. Well, that’s changed, as Seattle-based photographer Alan Lawrence shows on his blog. For around $ 40, you can wirelessly control and transfer images from your camera to your phone or tablet.

In short, this DIY wireless tethering requires a TP-Link MR3040 Battery Powered 3G Wireless Router, some software, a USB cable, and some time. Lawrence says the router is similar-looking to the CamRanger, a device that offers tethering functionality out-of-the-box, but the router retails for under $ 30 compared to the CamRanger’s $ 299 MSRP.

Once you’ve got your hands on the router (and he does say you need a specific version, which is the one linked above), you’ll need a $ 9 app called DSLR Dashboard for Android, or QDSLR Dashboard for iOS. The last thing you’ll need is a compatible USB cable, and you’re almost in business.

The DSLR Dashboard website has a link to download new firmware for the router, and once you’ve updated that, all you have to do is connect to the wireless network you’ve set up and launch the app. You can control your camera from your device and download files instantly after you’ve taken them.

You can read all the nitty gritty details over on Alan Lawrence’s blog.

Articles: Digital Photography Review (dpreview.com)

 
Comments Off on Wireless tethering on a budget: control your camera from your phone or tablet for $40

Posted in Uncategorized


Nikon issues D810 and D810A firmware updates with remote control bug fix

06 Apr

Firmware updates for the Nikon D810 and D810A cameras are now available. Both updates fix a bug that may cause the cameras to stop responding if attached to a WR-R10 wireless remote control running firmware 3.00. The updates bring the Nikon D810 to firmware version 1.11, and the Nikon D810A to firmware version 1.01.

Via: Nikon

Articles: Digital Photography Review (dpreview.com)

 
Comments Off on Nikon issues D810 and D810A firmware updates with remote control bug fix

Posted in Uncategorized


Sony announces development of wireless flash control system

08 Mar

To kick off WPPI in Las Vegas, Sony has announced that it’s developing a wireless radio flash control system for its range of flashguns. Consisting of the FA-WRC1M radio commander and FA-WRR1 receiver, the system will provide control over 15 flashes in 5 groups up to 30m away. It will offer sync speeds up to 1/250th sec as well as a high sync speed. No pricing has been given, but Sony estimates the system will be available this summer in the US and Canada.

Press release:

Sony Announces Development of New Wireless Lighting Control System at WPPI 2016

LAS VEGAS, Mar. 7, 2016 – Sony Electronics, a worldwide leader in digital imaging and the world’s largest image sensor manufacturer, has today announced plans to release a new wireless lighting control system to meet the growing demands of professional Sony photographers.  

Designed for compatibility with their ? interchangeable cameras and external flash units, the new lighting system will include the FA-WRC1M wireless radio commander as well as the FA-WRR1 wireless radio receiver.  A prototype of the new system will be on display in Sony’s booth at WPPI 2016.  

With a maximum range of 30m (approx. 98 feet), the new radio controlled system will allow for an extremely flexible wireless flash shooting experience with exceptional performance in all types of shooting conditions. In total, the system can control a maximum of 15 separate flash units in up to 5 groups of flashes.   While using the system, photographers have the ability to control the exposure of connected flash units either manually or automatically depending on preference.   Additionally, the new lighting control system will be capable of flash sync speeds of up to 1/250th of a second with high speed sync (HSS) available as well.  

The new Wireless Lighting Control system will be available this summer at authorized retailers throughout the US and Canadian markets.  Pricing and detailed specifications will be released at a later date.

Articles: Digital Photography Review (dpreview.com)

 
Comments Off on Sony announces development of wireless flash control system

Posted in Uncategorized


How to Use Exposure Compensation to Take Control of Your Exposure

15 Feb

Chicago-River-2016-01-02
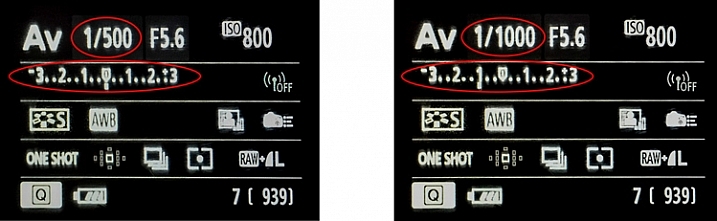
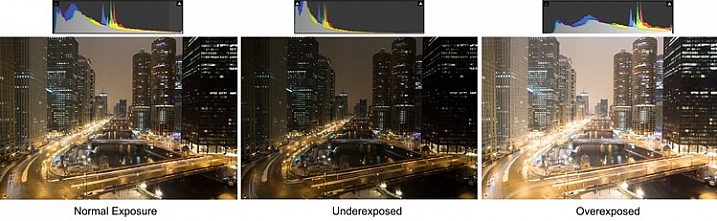
You don’t have to shoot in Manual mode to take complete control over the exposure process.

When you use shooting modes other than Manual, the camera will set at least one of the three exposure controls (shutter speed, aperture, and/or ISO) for you. However, your camera provides you with an override called exposure compensation. It gives you the ability to change the camera’s exposure values from something other than what the camera automatically sets for you. In this article, I will show you how to use it to get the exposure you want every time.

When should you use Exposure Compensation?

First, let’s back up and talk about when you might want to use exposure compensation. You may wonder why you’d want to change anything, if your camera is already determining the proper exposure level.

The first reason is that your camera’s meter can be fooled by some of the conditions you face. The meter operates by looking at the tones in its view, then averaging them out. Basically, the manufacturers have determined that most scenes will average out to a middle grey tone, often referred to as 18% grey. Therefore, if the tones in your frame are darker than this middle grey tone, the meter will show that there is not enough light for a proper exposure, and therefore the meter thinks your picture will be underexposed. Conversely, if the tones in your frame are lighter than middle grey, the meter will show that there is too much light for a proper exposure and it thinks your photo will be overexposed. A lot of the time the camera meter is right, but sometimes it is not.

Some situations are supposed to be brighter than middle grey. A classic example is a photograph taken of a snowy scene. Your camera’s meter will assume that all that white snowy scene should be grey, and will therefore choose exposure settings that underexpose the image. Obviously you don’t want that. Here is an example, the picture to the left was taken strictly by the camera’s meter, and the picture to the right overexposed by one stop according to the camera’s meter:

A snowy scene frequently confuses your camera's meter. To the left is a shot taken at normal exposure. To the right is one taken after adding in a stop of exposure compensation (overexposure).

A snowy scene frequently confuses your camera’s meter. To the left, is a shot taken at normal exposure. To the right, is one taken after adding in a stop of exposure compensation (overexposure).

Another example is night photography, where the darkness of the scene should result in dark tones in your picture. The camera’s meter won’t recognize this though, and will tell you to brighten up the picture. Using exposure compensation will allow you to take control, and set a proper exposure.

As an example, check out the pictures below. In the picture on the left, taken at normal exposure as per the camera’s meter, it brightened the night scene and it looks a little washed out. To the right is an underexposed (according to the meter) image that more closely resembles the actual conditions of the scene.

Night-Comp

The camera’s meter (and even the histogram) tells you that the normal exposure is correct (see below). But the reason the camera thinks the normal exposure is correct, is that it that the average of the tones closely approximates middle grey. However, the underexposed image actually more closely captures the reality of the situation.

Histogram-Comp

Another reason you may want to use exposure compensation is that you simply don’t like the “correct” exposure. You may want to darken the scene to add some mood or drama, or you may want to brighten things up. Photography is ultimately an artistic endeavor, and is highly subjective, so exposure compensation gives you a tool to put that to work.

Finally, if you subscribe to the theory that you should expose to the right, exposure compensation will allow you to do so in camera modes other than Manual. If you are unfamiliar with this concept, expose to the right means that you slightly overexpose your images so that most of the tones appear on the right side of the histogram (without clipping anything). You later reduce the tones in post-processing and this can sometimes result in slightly better image quality. The overexposure happens by using exposure compensation.

How Exposure Compensation Works

Now that you know what exposure compensation is, how do you use it? In most cases, your camera will have a little button with a +/- on it. That is the button you press to change the exposure compensation. While pressing that button, turn the main dial of your camera right or left (by main dial, I am referring to the dial on the top right of your camera, usually next to the shutter release button). That will change the exposure compensation. Turning the dial one way will reduce the exposure, and the other way increases it. Each click of the dial will usually change exposure settings by 1/3 of a stop.

PlusMinusButton

If you have a higher-end DSLR, then your camera will have a second dial or wheel on the back of the camera. Those cameras will usually not have the +/- button, but that second dial will be used to change the exposure compensation settings. The advantage is that you can just turn that dial with your right thumb without needing to press any buttons.

Wheel

Exposure Compensation in Different Camera Modes

So what does exposure compensation actually do? You know that it changes the exposure, but how does it do so? By changing the aperture? Or the shutter speed? Or both?

The answer is that it depends on what mode you have your camera in. I will explain what is going on for each of the camera modes:

  • Aperture Priority Mode – In Aperture Priority mode, exposure compensation changes the shutter speed. Remember that in this mode, you set the aperture and the camera sets a corresponding shutter speed. If you change the Aperture, your camera just sets another corresponding shutter speed, and there is no change in the exposure level. Exposure compensation gives you the ability to change the shutter speed (and the overall exposure value) while staying at the same aperture you originally set.
  • Shutter Priority – In Shutter Priority mode, exposure compensation changes the size of your aperture. It is basically the reverse of Aperture Priority mode. You set a shutter speed, and the camera sets a corresponding aperture. Exposure compensation therefore changes the exposure by allowing you to change that aperture size.
  • Program – In Program mode (P on your mode dial), exposure compensation changes the shutter speed. At least that’s what happened on the cameras I tested. It is possible that yours works differently, or that you can change it in the menu. As with so many things, this is a good excuse to pull out your camera’s user manual and go through it.

What about Manual and Automatic modes? These don’t have exposure compensation. In Manual mode, the camera does not set an exposure value for you in the first place, you set everything yourself. Whenever you change the aperture or the shutter speed, you are changing the exposure value. In Automatic mode, there is no exposure compensation because you have no control over exposure – the camera does everything for you. That is one of the reasons why you should never use this mode.

Exposure-Compensation

Here we see the back of the camera before and after applying one stop of exposure compensation. In the example to the left, the camera shows a normal exposure with a shutter speed of 1/500 of a second. In the example to the right, the shutter speed is reduced by 1 stop to 1/1000 of a second, and the meter reading reflects that.

Exposure Bracketing

While talking about exposure compensation, there is a related topic that you might find useful as well. It is Auto Exposure Bracketing (AEB, or just bracketing). It is where you set your camera to take multiple pictures in a row with the first at normal exposure, the next one(s) underexposed, and the final one(s) overexposed (if you have Canon it may look more like this:  underexposed>normal>overexposed, you can also change the order on a Nikon if you go to your menu settings).

When you enable the feature in your camera’s menu, you set the amount of under and overexposure. The camera will take three to five pictures in rapid succession (depending on your camera, if you shoot Canon you have to also set your drive mode to high speed burst). In a way, this accomplishes the same thing as exposure compensation, because you are dialling in a certain amount of underexposure or overexposure.

Bracket

Why would you want to do this? Several reasons. Usually it comes into play when there is a wide divergence of tones in the image. Using a little blending later, you can use the brightest tones from the underexposed image and the darkest tones from the overexposed image. In addition, if you are ever going to use any high dynamic range processing on your images, you should have multiple images to work with. Finally, you might just think of it as “exposure insurance” for important shots to make sure that you have nailed the exposure.

Conclusion

We all want to be able to take complete control over the exposure process, but not all of us want to work in Manual mode. When you work in a mode like Aperture Priority mode, the camera offers you a lot of benefits – speed being the main one. By adding exposure compensation to your process, you can get the speed of other modes, along with the control of manual.

If you haven’t used exposure compensation before, give it a try. If you are familiar with it, chime in below with your own tips and experiences.

googletag.cmd.push(function() {
tablet_slots.push( googletag.defineSlot( “/1005424/_dPSv4_tab-all-article-bottom_(300×250)”, [300, 250], “pb-ad-78623” ).addService( googletag.pubads() ) ); } );

googletag.cmd.push(function() {
mobile_slots.push( googletag.defineSlot( “/1005424/_dPSv4_mob-all-article-bottom_(300×250)”, [300, 250], “pb-ad-78158” ).addService( googletag.pubads() ) ); } );

The post How to Use Exposure Compensation to Take Control of Your Exposure by Jim Hamel appeared first on Digital Photography School.


Digital Photography School

 
Comments Off on How to Use Exposure Compensation to Take Control of Your Exposure

Posted in Photography


Cambo introduces Canon EOS lens plate with aperture control for Actus view camera system

12 Feb

$ (document).ready(function() { SampleGalleryV2({“containerId”:”embeddedSampleGallery_4644059846″,”galleryId”:”4644059846″,”isEmbeddedWidget”:true,”standalone”:false,”selectedImageIndex”:0,”startInCommentsView”:false,”isMobile”:false}) });

Cambo has devised a new Canon EF/EF-S lens plate for its Actus view camera system that allows users to control aperture settings on Canon EOS lenses. The Cambo Actus system is designed to deliver a view camera style of shooting to some mirrorless camera bodies, consisting of a lens plate and a body plate with bellows and a monorail in between.

As EOS lenses have no manual aperture control, a plain mounting plate will only allow the lenses to be used at their widest aperture setting. The new ACB-CA plate however has electronic contacts that allow it to communicate with the lens, and a finger wheel so the photographer can dial in required aperture settings. An OLED display shows aperture values as well as the focal length in use, even when a zoom is mounted. 

The ACB-CA adapter will provide tilt, shift, swing, rise and fall movements between the front and rear standards with an EOS lens and a mirrorless camera mounted, though other lens systems allow movements with Nikon and Canon DSLR bodies. The Actus-DB system allows digital backs to be used.

The new ACB-CA plate for Canon EOS lenses costs £950 / $ 1299, while the Actus body costs £1400 / $ 1900. For more information visit the Cambo website.


Press release: 

NEW Cambo Actus Canon Auto Lens Mount

Cambo has released the NEW ACB-CA adapter for Canon EF lenses for use on the ACTUS mini view camera. The adapter has built-in electronic controls for setting and operating the aperture of Canon EF lenses.

Normally when a Canon auto iris lens is removed from the camera body the lens aperture is wide open. The ACB-CA communicates with the lens and enables the user to adjust the aperture, giving you full control.

This adapter has an internal battery for continuous use and features an OLED display which shows the preset or set aperture together with the focal length of the lens. The communication is accurate, such that the display will also show the focal length of zoom lenses.

The adapter accepts lenses fitted with Canon EOS bayonet, in combination with the ACTUS view camera. The ACB-CA adapter is finished in black to match the ACTUS-B camera version.

This ACB-CA lens adapter is designed to work with mirrorless* camera bodies, such as the Sony A7 series, Fujifilm X series and Canon M series. When mounted on the Actus the adapter will tilt and swing within the lens image circle that is being used. The rear rise/fall and left/right shift will operate as normal, again within the lens’s image circle.

*Mirrorless camera bodies have the imaging sensor further forward enabling the lens to focus at infinity or closer.

Check via the Cambo Configurator the compatibility between cameras, lenses and adapter when using the Cambo Actus.

The ACB-CA adapter is available now from stock £790.00 excluding VAT and shipment. For further information contact CamboUK on 07863 116150 or cambouk@gmail.com .

Articles: Digital Photography Review (dpreview.com)

 
Comments Off on Cambo introduces Canon EOS lens plate with aperture control for Actus view camera system

Posted in Uncategorized


Sekonic expands LiteMaster Pro meter series for wireless control of Elinchrom and Phottix flashes

10 Feb

Japanese light and color meter manufacturer Sekonic has introduced a pair of new ambient and flash light meters to the L-478 series that are dedicated to use with Elinchrom and Phottix flash units. The Sekonic LiteMaster Pro L-478DR-U-EL is designed to be used with Skyport-equipped Elinchrom heads, while the LiteMaster Pro L-478DR-U-PX is aimed at users of Phottix Indra studio heads, Mitros+ hotshoe flash guns, the Strato and Strato II receivers and the Atlas II transceiver.

From the new meters Elinchrom users will be able to adjust flash output in 1/10th stops across four lighting groups, and the meter is capable of triggering and measuring individual groups as well as all the flashes as a whole. Photographers using the Phottix system will be able to make adjustments in 1/3rd stop steps, and can trigger individual or collections of groups at one time. Although the meters are primarily intended for wireless radio triggering they also support standard flash cables. 

The LiteMaster Pro L-478 meters use a color touch-screen interface, and are designed to be used for still and motion picture work. These new models include an ISO 850 setting to suit users of the Canon cinema cameras, and have had their filter compensation factor increased from 5EV to 12EV for people using high-value neutral density filters. These features will be added to the current L-478D-U and L-478DR-U (PocketWizard) models via a firmware update in the near future. 

An interesting feature of the series is the ability to store the dynamic range profile of ten camera/lens combinations so that you can ensure that your lighting set-ups don’t create burnt-out highlights or blocked shadows. 

The new LiteMaster Pro L-478 meters will cost $ 400/£400. For more information visit the Sekonic website.

Articles: Digital Photography Review (dpreview.com)

 
Comments Off on Sekonic expands LiteMaster Pro meter series for wireless control of Elinchrom and Phottix flashes

Posted in Uncategorized


75% OFF: Get Out of Auto Mode & Gain Creative Control Of Your Camera

23 Dec

It’s day 10 of our 12 deals of Christmas and todays deal is one we’ve been getting requests for – it’s deals on our brand new Photography Courses by Neil Creek.

These two courses were both released in 2015 and both have helped many of our readers to get out of Auto mode and gain creative control over their cameras.

Today you can pick up either course for $ 20 (they are each normally $ 59) or you can bundle them together for just $ 30.

Course 1: Photo Nuts and Bolts

NewImage.png
This course is all about getting out of Auto mode and getting to know your camera and how to get control over it to take fantastic images.

In 10 practical video lessons, you’ll discover the key photography concepts that will put you in creative control of your camera and increase your technical confidence, to take more amazing photos than you ever thought possible!

  • Shutter speed
  • Aperture
  • F-stops
  • ISO
  • Metering
  • Depth of field
  • Lenses
  • Focus
  • Magnification

Photo Nuts and Bolts is perfect for new camera owners or those who are yet to venture out of Auto Mode.

Take the course today for just $ 20

Course 2: Photo Nuts and Shots

NewImage.png
This second course is for those who understand the basics (it builds perfectly upon the first course above) and helps you to discover tools, techniques and thought processes for creative photography.

In 10 video lessons you’ll:

  • Learn to harness light to convey emotion
  • Understand the impact of great composition and how to achieve it
  • Tips for the sharpest possible photos
  • How to adapt your camera’s exposure for the shot you want
  • Master the concepts of shot perception, planning and execution – in any setting
  • When to break the rules for creative effect

Today only you can grab it for just $ 20 (66% off).

Take Both Courses for $ 30 (75% Off)

These courses are designed to be taken stand alone but are beautiful companion courses when you bundle them.

You can start though courses immediately and go through them all at once or pace it over time. You’ve got lifetime access so it’s completely up to you!

If you’re sick of looking at the dials and settings on your camera and knowing it can do so much more than what you do with it they’re the perfect gift to yourself to help you take beautiful images in 2016 and beyond.

This is one deal you don’t want to miss.

googletag.cmd.push(function() {
tablet_slots.push( googletag.defineSlot( “/1005424/_dPSv4_tab-all-article-bottom_(300×250)”, [300, 250], “pb-ad-78623” ).addService( googletag.pubads() ) ); } );

googletag.cmd.push(function() {
mobile_slots.push( googletag.defineSlot( “/1005424/_dPSv4_mob-all-article-bottom_(300×250)”, [300, 250], “pb-ad-78158” ).addService( googletag.pubads() ) ); } );

The post 75% OFF: Get Out of Auto Mode & Gain Creative Control Of Your Camera by Darren Rowse appeared first on Digital Photography School.


Digital Photography School

 
Comments Off on 75% OFF: Get Out of Auto Mode & Gain Creative Control Of Your Camera

Posted in Photography


Manfrotto updates Digital Director app to add remote control of its LED light panels

15 Dec

Italian accessory manufacturer Manfrotto has released a new app for its Digital Director iPad cradle that allows users to wirelessly control Manfrotto Lykos and Litepanels Astra LED lights. The 2.0 app is capable of handling up to 13 panels via a Bluetooth connection, so brightness levels can be controlled from the camera position. The app can switch the lights on and off as well, and when the BiColor models are in use color temperature can be adjusted between daylight and tungsten settings. Lights can be controlled individually, or in groups, though some models will need a Bluetooth dongle to make them compatible with the system. 

The update also brings zebra patterning to the live view display, showing when areas of the image to be captured will be over- or under-exposed, and focus peaking can now be customized with different colors and strengths. In review mode the app can now crop images, either freely or with set proportions, and pictures can be rated in the gallery with stars that are compatible with other desktop software programs. 

For more information visit the Manfrotto website, and you can read our review of the Manfrotto Digital Director here. 


Press release:

Manfrotto Announces New Digital Director App 2.0

Upper Saddle River, N.J. (December 10, 2015) – Manfrotto, a leading global innovator and manufacturer of premium photo, video and lighting support products and accessories, has launched the Digital Director App 2.0, the updated App for Manfrotto’s Digital Director, which brings new enhancements to professional and enthusiast photographers and videographers who wish to make shooting much smarter. 

The Digital Director App 2.0, now available in the App Store on Apple iPads, includes new and improved features, in particular:

REMOTE CONTROL OF LIGHTS

The new Digital Director App 2.0 not only controls all Nikon and Canon DSLR key camera functions, but turns the iPad into an innovative interface, enabling total remote control of Manfrotto LYKOS and Litepanels ASTRA LED lights (up to 13 lights!) via Bluetooth®. Lights can be controlled remotely: you can turn lights on/off, adjust dimming level and color temperature, set up groups and configure multiple scenes directly from the iPad.

FOCUS PEAKING & ZEBRA FILTER 

From the Digital Director App 2.0’s general settings, in the Digital Director Options, it’s possible to set up new features. The implemented Focus Peaking Filter presents new options: the possibility to adjust the intensity of the filter and to select the desired color for the peaking (red, blue, green, yellow). In addition, the new Zebra Filter helps to adjust exposure through striped patterns that indicate the overexposed and/or underexposed areas of the image.

INTUITIVE POST PRODUCTION IMAGE ADJUSTMENT

The new App 2.0 offers new tools for post production: cropping free or with proportion, blur and saturation. Together with the existing functions (rotate, contrast, light, checking histogram and EXIF information), it may also allow you to make final adjustments on the image in just a single touch of your finger on the iPad screen.

The App 2.0 integrates new and improved features such as control of new Manfrotto LYKOS LED lights and Litepanels ASTRA, new Focus Peaking settings, Zebra filter, new post-processing tools, gallery photo sorting and image rating that is included in the .jpeg file shared from Digital Director via FTP and email. With these upgrades, Digital Director can better help professional and enthusiast image makers make their shooting workflow more effective and intuitive.

DIGITAL DIRECTOR

Manfrotto Digital Director is the only Apple certified (MFi – Made for iPad Certification) electronic device that connects your camera and iPad, via USB cable, to help manage the photo and video workflow from the setting of your camera (Canon and Nikon DSLR) to sharing your pictures. It features a built-in Apple microchip that works with the 600MHz 256MB DRAM ARM® Cortex®-A8 microprocessor, simultaneously, in order to ensure the perfect communication between the iPad and the camera. The result is perfect control of all shooting parameters of different DSLR cameras, a smooth and consistent video streaming between devices with extremely low latency time, and an ultra-fast, high-quality image download onto the iPad.

Articles: Digital Photography Review (dpreview.com)

 
Comments Off on Manfrotto updates Digital Director app to add remote control of its LED light panels

Posted in Uncategorized