RSS
 

Posts Tagged ‘Composition’

25 Images Using Framing in Composition – Weekly Inspiration

30 Nov


By lagusa

Framing in composition

This week I want to showcase some images that use framing in composition to create a successful image. It is one of the most difficult elements to master, but one of the most important in terms of create depth in your images. In a nutshell this is what frame is all about:

  • adding a foreground object into your scene that frames, or helps highlight your subject
  • sometimes involve stepping back from your original composition and looking for elements to use as a frame
  • usually using a shallow depth of field to put the foreground, framing element out of focus
  • the frame is there to set the scene, and draw the viewer into the image

Enjoy!

By Eva Ekeblad

By Mayr

By B Gilmour

By Paul

By Brian Smithson

By Judy van der Velden

By Les Bessant

By myheimu

By Katerina Zaitsava

By Moreno Berti

By gwynydd michael

By Danushka Senadheera

By Tarik Browne

By Sid Das

By Sue Hasker

By Freaktography Urban Exploration and Photography

By Edward Simpson

By Chris Beckett

By Hersson Piratoba

By Tom Parnell

By Roberto Saltori

By Kevin Labianco


By Jan Maklak

By Nina Matthews


Post originally from: Digital Photography Tips.

Check out our more Photography Tips at Photography Tips for Beginners, Portrait Photography Tips and Wedding Photography Tips.

25 Images Using Framing in Composition – Weekly Inspiration

The post 25 Images Using Framing in Composition – Weekly Inspiration by Darlene Hildebrandt appeared first on Digital Photography School.


Digital Photography School

 
Comments Off on 25 Images Using Framing in Composition – Weekly Inspiration

Posted in Photography


Using Framing in Composition – Weekly Photography Challenge

30 Nov

Framing is exactly as it implies:  seeing your image through something that frames it such as:  a doorway, a window, through leaves of a tree, etc.

Shot at Cafe du Monde in New Orleans. To me the people in the foreground help tell the story.

Shot at Cafe du Monde in New Orleans. To me the people in the foreground help tell the story.

Framing your subject within a another is a strong, graphical composition. It adds a three dimensional quality to your images, and creates depth. Using framing adds a foreground element that can help set the scene, tell the story, and lead the viewer’s eye into the image.

Start looking for ways to shoot through natural frames to highlight your subject.

HINT: back up and look through the doorway behind you.  Show the viewer exactly where to look.

To frame this Japanese temple in Hawaii I walked away from it until I had this overhanging tree to frame the image. It adds depth and dimension to your images when you use this technique.

To frame this Japanese temple in Hawaii I walked away from it until I had this overhanging tree to frame the image. It adds depth and dimension to your images when you use this technique.

For some inspiration check out 25 Images using Framing in Composition posted earlier today.

Further reading on the topic of composition:

  • Composition: Frame within a Frame
  • Composition and Negative Space
  • Composition and the Power of Line
  • 3 Ways to Improve your Images with Composition

If you tag your photos on Flickr, Instagram, Twitter or other sites with Tagging tag them as #DPSFRAMING to help others find them. Linking back to this page might also help others know what you’re doing so that they can share in the fun.

Also – don’t forget to check out some of the great shots posted in last weeks Weather challenge – there were some fantastic shots submitted.

Post originally from: Digital Photography Tips.

Check out our more Photography Tips at Photography Tips for Beginners, Portrait Photography Tips and Wedding Photography Tips.

Using Framing in Composition – Weekly Photography Challenge

The post Using Framing in Composition – Weekly Photography Challenge by Darlene Hildebrandt appeared first on Digital Photography School.


Digital Photography School

 
Comments Off on Using Framing in Composition – Weekly Photography Challenge

Posted in Photography


Composition Exercise: Frame Within a Frame

05 Oct

I teach a kids photography class (ages 11-15), and this week we started talking about composition. I don’t require a specific type or level of camera, so I have students shooting with DSLRs, as well as students with simple point-&-shoot models. Because of the wide range of cameras, I make this class a little less about the technical and a little more about how they see the world around them. I strive to make sure they understand the elements of exposure, the principles of lighting, and all of the other aspects of the craft that come into play when they push the button and capture a moment in time. Regardless of make and model, though, the one thing they all share is a viewfinder– a frame in which to compose and arrange those moments in time. The way that each of these young photographers grasps the concepts and applies them to their own world view is incredibly enlightening and fun to watch.

So, in class this week I explained that composition guides the viewer through the frame and answers the question, “What are you trying to say?” Put another way– “This is why I stopped and took this photo.”  Now that they are armed with another set of photographic fundamentals, I’m giving them a week or two to get comfortable with photographing the same subject different ways before giving them one of my favorite assignments of the semester– “A Frame Within a Frame.”

If the frame is your window on the world, composition is where you point it. The FWAF exercise basically pushes them to find boundaries within boundaries. On the one hand, that sounds pretty restrictive, and I suppose it can be. The flip-side, however, is that pushing them to compose within certain confines now will help unleash vast waves of creativity later. I tell them every chance I get that the rules of photography were made to be broken, but first they have to know what they are. Speaking of rules, the FWAF challenge has only one– no actual frames. That’s right– no posing your subject in the middle of a wheat field, along the railroad tracks, or any other overly cliche setting, while holding a big empty frame in front of them. I try, whenever possible, to shoot the assignments I give my students, and just about all of the images in this article were part of Frame Within a Frame exercises.

One of my favorite FWAF shots was one of those happy accidents where you don’t even realize what you’ve got until it’s off the camera and up on a bigger screen. I knew that mama lion had been pretty close, keeping a watchful eye over one of her growing cubs, but it wasn’t until I’d downloaded the images that I realized that I’d caught her attentive gaze perfectly framed between Junior’s two front legs.

frame-within-frame-01

See where I’m going with this? No literal frames were harmed in the creation of these photos. Anything that creates additional boundaries within the images effectively creates an additional frame, which then directs the viewer’s attention much more precisely where you want it to go.

This next image is a great example, not only of a frame within a frame, but of repetition as an interesting compositional element. A tighter crop of the artist at work would have been okay, I guess. We’d be able to make certain assumptions about what’s not in the photo– namely, the subject of her piece. By including it in my background, however, I not only created the additional frame, but also lead the viewer through the image from right to left, taking in the artist, her canvas, and her inspiration.

frame-within-frame-04

Once you get in the habit of looking for these extra frames you’ll start noticing them in all sorts of places. These boxers, for instance, are framed perfectly within the ropes of the ring. As a compositional tool, the added frame not only directs the viewer’s attention, but it also helps to minimize any distracting or non-essential elements from the photo.

frame-within-frame-03

Obviously, the frame within a frame is much more interpretive than literal. Doorways, windows, and mirrors– elements with clearly defined lines– can create great effects, but I enjoy seeing what my students do with the assignment when they are comfortable enough to ignore the obvious and go for something much more organic.

frame-within-frame-02

One of my favorite photography quotes comes from National Geographic photographer Jim Richardson, who says that “If you want to be a better photographer, stand in front of more interesting stuff.” One of the things that fascinates me about composition and exercises like this is how we push ourselves to not only stand in front of more interesting stuff, but to also photograph more interesting stuff in a more interesting way.

Try the Frame Within a Frame challenge and share your links in the comments section.


Post originally from: Digital Photography Tips.

Check out our more Photography Tips at Photography Tips for Beginners, Portrait Photography Tips and Wedding Photography Tips.

Composition Exercise: Frame Within a Frame

The post Composition Exercise: Frame Within a Frame appeared first on Digital Photography School.


Digital Photography School

 
Comments Off on Composition Exercise: Frame Within a Frame

Posted in Photography


How to go Beyond the Regular Composition Advice for Getting the Best Shots of your Kids

01 Oct

A Guest post by Rachel Devine – author of Click! How to Take Beautiful Photos of Your Kids.

dps_rd_post_image3c.jpg

If you search for advice on how to take better pictures of children there are certain gems that are sure to appear on any list of tips. “Get on their level” and “Get Closer”, are the two that come to mind right away and they are both solid ways to improve your kid shots. Let’s look first at why these work and then how to expand those ideas to create infinitely more interesting images.

The top tip on any list you find is often going to be “Get on their level”. There is a reason that it should be as it is great advice and will make a big difference immediately. If you get down on the same level as a child to take their portrait, you give them power by allowing them to look into the camera straight on. Kneel down so that you become the same height as the child. Chat with your subject and engage them before just going right into taking their photograph. When the time is right, lift your camera and ask the kids if they can see themselves (or a fairy or a pony or any other magical subject) in your lens to get direct eye contact.

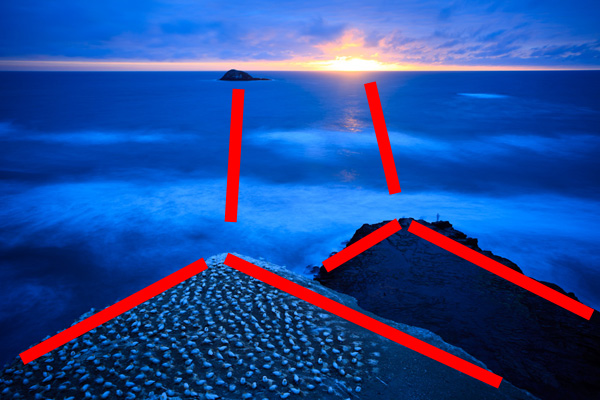
Photography is a visual language and the angle with which you shoot the photograph is an integral part of the structure of your story you are telling. Think of composition as part of the “grammar” of this language and that the choices that you make should serve a purpose. Photography is a common language that even kids can understand and when you make the effort to physically go down to their level you are showing them a certain respect.

Tech tip: Use a long lens so that you can put some distance between the camera and the child’s face. That is just another layer of respect.

Once you have begun to incorporate the “Get on their level” angle into your regular routine, here are four other ideas to break the cycle of the adult eye level shots:

dps_rd_post_image1.jpg

Over Their Shoulder: You are down on their level, you have taken a straight on portrait, now move around the child and have a look at what they are doing. Immerse yourself in their world and let your camera see what they see.

Tech tip: If you have a fast 50mm lens, use it now and include some of the child in the frame. If they are busy, you will need to use a faster shutter speed to freeze the motion. Using a fast 50mm lens means you will be able to open up the aperture to allow you to use that faster shutter speed indoors and avoid triggering your flash.

dps_rd_post_image2.jpg

dps_rd_post_image2b.jpg

Go Low: Kids are short and you may have gotten on your knees to get their eye level, but now, go further. Come on, you can do it, lie down. You may be amazed at what the world looks like from the ground. Babies tend to hate tummy time, but if you get down with them, they may even enjoy it more and you can end up with some wonderfully funny faces. Or, how about that mountain of toys on the playroom floor? You think it looks bad from where you are standing? It is massive from down here!

Tech tip: Keep your aperture as wide as your lens will let you go so you can blur some of the floor in the foreground of these shots. That will help you isolate your subject even more.

dps_rd_post_image3.jpg

dps_rd_post_image3b.jpg

Bird’s Eye: Breaking the adult’s eye level angle is not always just about sitting “criss-cross applesauce” or laying on the floor. It is about carefully observing the world that your child inhabits. It may be the same one as you, but it sure can appear different when you make an effort to look from unexpected points of view. Climb (carefully!) up above the kids and shoot directly down on mealtime, playtime, naptime, story time or bath time…anytime really. I have balanced (carefully! yet precariously) on the edges of various bathtubs, crib railings and dinner tables to get some of my favorite shots. It may be easier to grab a step stool though.

Tech tip: Use the widest focal length that you have and really get a sweeping scope of the children in their environment. Just watch out for your own feet getting into the frame.

dps_rd_post_image4.jpg

dps_rd_post_image4b.jpg

Reflections: Use reflections to not only capture yourself with kids, but to catch their expression when they don’t realize the camera is trained on them. You don’t need a house full of mirrors to do this either. When you start looking, you will find shiny surfaces all around you.

Tech Tip: Show yourself in the shot. Set the camera to closest subject auto focus mode and take the camera away from your face before you press the shutter button.

dps_rd_post_image5.jpg

dps_rd_post_image5b.jpg

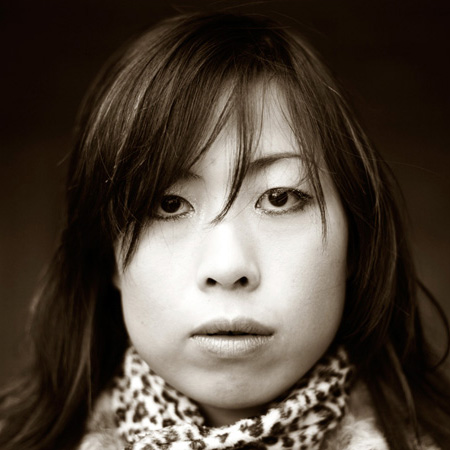
Almost as often, when searching for ways to improve your photos of children, you will be told to “Get closer.” Children’s faces are so perfect and beautiful that it is great advice for you to fill the frame with them. Isolate the tiniest of details by photographing in close on things like newborn lashes, pursed toddler lips going in for a kiss or the drips of a juicy orange picked right from the tree. These shots make for beautiful additions to your collection of images.

Tech tip: Use a macro lens, close-up adapter (or the little flower icon for point and shooters) to get the closest focus possible.

dps_rd_post_image6.jpg

dps_rd_post_image6b.jpg

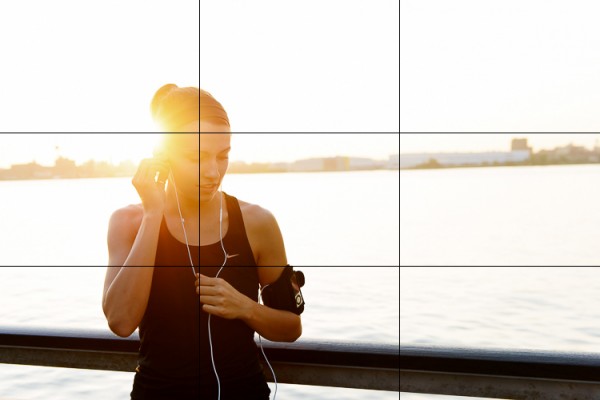
Far Away: Now that you have that powerful and fantastic full frame eye contact shot of your child, step back and let the kids in your photos breathe. You will need to really step back and feature the children in their big world. This angle will emphasize their smallness, but their confidence at being alone in the frame will be their strength.

Tech tip: Use color and negative space well. A messy shot will not be as powerful.

Image by Peta Mazey

Enjoy this post? Check out Rachel’s new eBook – CLICK! How to Take Beautiful Photos of Your Kids

Rachel Devine is an international commercial kid photographer and daily life photo blogger from the states. She currently lives in Melbourne, Australia. Rachel and Peta Mazey are the photography duo behind “Beyond Snapshots”. They teach and mentor (in person and online) photographers of all levels on how to take better photographs of life. Their book will be published next year on Amphoto/Random House.

Post originally from: Digital Photography Tips.

Check out our more Photography Tips at Photography Tips for Beginners, Portrait Photography Tips and Wedding Photography Tips.

How to go Beyond the Regular Composition Advice for Getting the Best Shots of your Kids


Digital Photography School

 
Comments Off on How to go Beyond the Regular Composition Advice for Getting the Best Shots of your Kids

Posted in Photography


Composition and the Power of Line

21 Aug

Composition and line

Lines are all around us in photography. Conscious use of line can add depth or dynamism to your composition. Let me show you what I mean. Take a look at the following image:

Composition and line

It’s an okay landscape. l like it, but it’s nothing special. Maybe what it lacks is a sense of depth. Now compare it to this landscape:

Composition and line

See how three-dimensional it looks by comparison? The lines in the composition create the illusion of depth. They converge as they disappear into the distance creating a sense of distance and space. I’ve marked the lines so you can see them clearly:

Composition and line

Not every landscape has lines that are so easy to find. Most of the time they are more subtle. In this landscape, the triangular shapes of the rocks in the foreground are like arrows that point to the island in the distance and the setting sun:

Composition and line

It is almost a case of implied line, rather than actual line. The shape of the rocks is a visual clue that directs the eye along invisible lines to the horizon:

Composition and line

Let’s look at this image again in a different way. There is a strong horizontal line in the distance created by the horizon. What happens if we crop the image to a panorama? The ‘feel’ of the photo is completely different. Horizontal lines direct the eye from side to side and create a sense of stability and peace. The panoramic crop emphasises that:

Composition and line

Composition and line

Whereas in the original image the implied lines create a sense of motion. The composition is more dynamic. The principles here are:

  • If you want to create a landscape with a peaceful, tranquil feel, then use horizontal lines.
  • If you want to create a more exciting, dynamic landscape then use diagonal lines.
  • In landscape photography, wide-angle lenses emphasise lines that lead from the foreground to the horizon.

Line outside the landscape

Line comes into play in subjects other than landscapes. You need to train your eye to look for lines, and then figure out ways to use them in your composition. Remember lines are not just straight. They can be curved, they can even be implied. Here’s a photo I took with a very powerful diagonal line that creates a dynamic, exciting composition:

Composition and line

Composition and line

Next, here’s a photo that uses a strong vertical line. The line created by the shape of the red sign is echoed by the lines in the wooden wall. The red string creates another line that intersects the others. See how the vertical line isn’t nearly as dynamic as the diagonal line in the previous image?

Composition and line

Composition and line

Lines in portraiture

The most obvious use of line is in landscape photography, but is it useful in portraiture? I think so, although again it’s a case of subtle use of line. In this example, the woman’s arms create lines that lead the eye up through the image to her face:

Composition and line

The lines are created by tonal contrast – her arms are a light tone and contrast strongly against her black dress and the dark background:

Composition and line

Final thoughts

Lines are all around us and are a very useful tool that can help you create strongly composed images. One way of making the most out of line is to keep the composition of your images as simple as possible. A busy image has lots going on that may distract the eye from elements such as line. Simplifying the composition makes elements like line stronger and more effective.

Mastering Photography

Composition and line

My latest ebook, Mastering Photography: A Beginner’s Guide to Using Digital Cameras introduces you to digital photography and helps you make the most out of your digital cameras. It covers concepts such as lighting and composition as well as the camera settings you need to master to take photos like the ones in this article.

Post originally from: Digital Photography Tips.

Check out our more Photography Tips at Photography Tips for Beginners, Portrait Photography Tips and Wedding Photography Tips.

Composition and the Power of Line


Digital Photography School

 
Comments Off on Composition and the Power of Line

Posted in Photography


Composition and Negative Space

19 Aug

Composition and negative space

In portraiture, negative space is the area around the main subject of your photograph. The portrait above has negative space – it is the dark area around the model. I’ve highlighted it below in green so you can see exactly what I mean:

Composition and negative space

There’s a quote in photography attributed to photojournalist Robert Capa:

“If your photographs aren’t good enough, you’re not close enough.”

A lot of the time, that’s good advice – many portraits can be improved by getting in closer to the subject, either physically or with a longer lens, so the model dominates the frame. When it comes to photographing people, it also helps to get closer emotionally to your models, by establishing a rapport or connection that enables you to take deeper, more insightful portraits.

But there are also times when the environment around your model can contribute to the composition. Sometimes the subject needs room to breathe. This is when you can create an interesting image by backing off and including more negative space.

There is nothing to stop you getting in close to your model and making a portrait, and then stepping away and including more of the environment to make use of the negative space. This is called working the subject, and is the process of exploring the photographic possibilities by varying focal length, shooting distance and other factors.

In addition to making the portrait above, I also got in close during our shoot. Here’s a close-up portrait, side-by-side with the first so you can see the difference. See how the close-up also uses negative space, just in a different way:

Composition and negative space

Please note there is no right or wrong here, no simple rule to tell you what to do. You have to take each situation on its merits and find the best way to make a good portrait of your model. But, it always helps if you keep the composition as simple as possible. In the examples here, the negative space is ‘empty’. There is detail if you look closely, but nothing to distract attention away from the model.

Other subjects

This technique also works with subjects other than portraits. Here is an example with a photo of a dandelion. Note the principle of simplicity has come into play again. I used a wide aperture (f2.8) to ensure the background is blurred:

Composition and negative space

Here’s an example of a landscape photo that uses negative space in the composition. It works because the blue and orange colours in sky add atmosphere and mood:

Composition and negative space

Finally, here is a black and white photo I took in Argentina a few years ago. I was attracted by the textures in the door and the wall, which I knew would come out well in black and white. Note the use of rectangles in the composition. The door is a rectangle, so is the door frame, and so are the paintings hanging on the wall. They are all contained in another rectangle – that of the 35mm frame. The negative space provided by the wall (which I darkened in post-processing to emphasise the effect) accentuates the rectangular shapes in the image.

Composition and negative space

Mastering Photography

My latest ebook, Mastering Photography: A Beginner’s Guide to Using Digital Cameras introduces you to digital photography and helps you make the most out of your digital cameras. It covers concepts such as lighting and composition as well as the camera settings you need to master to take photos like the ones in this article.

Composition and negative space


Post originally from: Digital Photography Tips.

Check out our more Photography Tips at Photography Tips for Beginners, Portrait Photography Tips and Wedding Photography Tips.

Composition and Negative Space


Digital Photography School

 
Comments Off on Composition and Negative Space

Posted in Photography


3 Ways to Improve Your Images With Composition

16 Aug

Along with lighting, subject, perspective, composition is one of the fundamental tools to creating better images. It’s one of the easier ones to begin applying to your own photography as well. Here are a few tips on improving your composition, with examples from a recent fitness photo shoot.

Rule of Thirds

You’ve probably heard this one beat to death, but the rule of thirds is one of the fundamental keys in creating stronger compositions. It involves dividing an image into nine equal grids at the thirds. By placing your subject on the line of a third, or at the intersection of two thirds you’re following your eyes’ natural focus. We find photographs with the subject on one of these thirds simply more pleasing.

Take the below image for example, where this woman is placed on the left third line with the focus of her head near the top left third as well. It creates a more pleasing composition and gives the eye plenty of space to wander in the frame.

RuleofThirds

The rule of thirds isn’t a hard and fast rule and it’s often broken to great success, but that’s a topic you can find in many other posts. It’s a great starting point though to create stronger compositions.

1. Second Point of Interest

Applying the rule of thirds, you can now try adding a second point of interest into your images. Adding a secondary point, whether it’s out of focus in the background or in focus with a deep aperture landscape, gives your image a natural viewing progression. Your eye starts at the first focal subject and then moves along to the second.  Not only does this create more interest in your image, it can help reinforce a theme or perspective.

In this fitness image, the woman tying her shoe and preparing for a run is the clear focus of the image. Introducing a second runner in the background now creates another place for the eye to follow through the image. At the same time the “running” theme has been reinforced. Additional factors in leading the eye are; her gaze into the open space of the image, and the leading lines of the banister and concrete blocks.

MDP_5148-Edit

2. Room for Copy Space

If you ever have aspirations to shoot for advertising agencies and many editorials, learning to leave room for copy space is a must. Copy space is the negative area in an image where a brand will place their tag line, logo or product/information. Generally you want this negative space to not be too busy, so that the copy pops out. The effect can be achieved often by using a shallow focus in your images, or by simple ensuring there is a space without too much “busy-ness” in it. A nice open sky often works great in this regard.

In this shot there’s some clear head space in front of the two runners that works great for copy. An important thing to keep in mind though if you do end up applying these principles for a client, is how the images will be placed in publication. Will they be on a poster or against a store wall? Or across the pages of a magazine? This particular image might not work well across a double page spread, as it places the subjects’ heads right where the crease would be. Against a store wall it would work just fine. These are important placement ideas to keep in mind with copy space.

MDP_5190-Edit

3. Bringing It All Together

When you bring all three of these compositional elements into mind you can create a great image that not only holds interest, but appeals to the creative people who hire photographers (always a big plus). The image below is an example when all three work together. The subject is at one of the third grid lines, there’s a secondary point of interest in the background and room has been left below for copy space. When you keep all three elements in mind you’ll be on your way to creating stronger compositions.

EveryDayRun2

Post originally from: Digital Photography Tips.

Check out our more Photography Tips at Photography Tips for Beginners, Portrait Photography Tips and Wedding Photography Tips.

3 Ways to Improve Your Images With Composition


Digital Photography School

 
Comments Off on 3 Ways to Improve Your Images With Composition

Posted in Photography


Composition, Balance and Visual Mass

31 Jul

Black and white photo

In previous articles I wrote about the concept of balance in relation to the colours orange and blue, and in relation to composition in the square format. Today I think it will be interesting to explore the concept of balance in relation to photographic composition in more depth.

Central composition

Black and white photo

This is a portrait that I created with a central composition. There are a couple of interesting things going on here. One is that the composition is virtually symmetrical. One half of the image is a mirror image of the other, with a few variations. In this case, that reinforces the sense of balance created by the central composition.

What happens if we crop the image to move the girl’s face off-centre, closer to a third? Let’s take a look. Here I’ve cropped it to the 4:3 aspect ratio:

Black and white photo

Do you see the difference? In this example the eye is encouraged to move around the frame more by the off-centre composition. Placing the girl’s face off-centre has created a more dynamic composition.

The first version is about balance, the second is about being off balance and adding a kind of tension to the image. The subject is the same, but one simple variation in composition creates two different effects.

Tonal contrast

The portrait is also an interesting study in tonal contrast. The light tones of the face and scarf contrast with each other. Roughly one-third of the image is made up of light tones, and the rest dark tones. What we’re looking at here is an example of what some photographers refer to as visual mass. Light tones pull the eye more than dark tones. Therefore, to create a balanced image, there needs to be more dark tones than light tones. If the ratio was around equal, the image wouldn’t feel so balanced.

This is what happens if we crop the portrait to a square. The ratio of light to dark tones is about even. But the sense of balance between dark and light tones in the original has been lost:

Black and white photo

Here’s another example of balancing the visual mass between light and dark tones:

Black and white photo

Now, here’s another example to illustrate the same concept:

Black and white photo

The photo is split into three bands. The strips of dark tones at the top and the bottom are balanced by the band of light tone in the middle.

There are other ways this image is balanced too. The mountains occupy the bottom part of the frame, and are balanced by a large expanse of stormy sky. The mountains have more visual mass than the sky, therefore the photo benefits from having more sky in it.

The telegraph pole in the bottom right third is the focal point of the image. It has a lot of visual mass, assisted by its placement on the thirds. The visual mass of the telegraph pole is so strong that even at this small size it is balanced by the rest of the image.

Finally, an image with a composition that at first glance seems to be at odds with what I said earlier about tonal balance:

Black and white photo

In this image, the light tones of the salt flats are balanced by the brooding dark tones of the mountains and sky in the distance.

The thing about visual mass and balance is that they are difficult concepts to condense down into rules like the rule-of-thirds. Every scene is different and the best composition may depend as much upon your intent (ie. would you like a balanced image, or a less balanced one with more dynamic tension?) as it does upon the subject.

One of the best ways to improve the composition of your images is to read as much about these concepts as you can, absorb them, and then compose according to ‘feel’. Does the image feel right when you look through the viewfinder? As your understanding of composition improves, so will your photos.

Mastering Photography

Black and white photo

My latest ebook, Mastering Photography: A Beginner’s Guide to Using Digital Cameras introduces you to digital photography and helps you make the most out of your digital cameras. It covers concepts such as lighting and composition as well as the camera settings you need to master to take photos like the ones in this article.

Post originally from: Digital Photography Tips.

Check out our more Photography Tips at Photography Tips for Beginners, Portrait Photography Tips and Wedding Photography Tips.

Composition, Balance and Visual Mass


Digital Photography School

 
Comments Off on Composition, Balance and Visual Mass

Posted in Photography


6 Lessons the Square Format Can Teach You About Composition

29 Jul

Square format composition

In another article I wrote that one of the main attractions of the square format for me is composition. Today I’m going to elaborate on that idea.

Composition in the square format is a different process than within a rectangular frame. The benefit of understanding of why that is so is that you will be able to apply the lessons learnt to improving the composition of your images in any aspect ratio. Even if you never intend to use it in earnest, it’s worthwhile playing around with the square format for this reason alone.

Let’s take a look at some of these factors:

1. Balance

A square is a perfectly balanced shape. Each side is equal in length. Using the square format encourages the eye to move around the frame in a circle. This is different to the rectangular frame, where the eye is encouraged to move from side to side (in the landscape format) or up and down (in the portrait format). There are many factors that influence the way the eye moves around a photo, including the use of line, texture, colour, selective focus and negative space. But the shape of the frame is a major factor.

In this landscape, composed within the 3:2 aspect ratio of my 35mm camera, the eye is encouraged to move from side to side by the shape of the frame and the horizontal lines:

Square format composition

In this square format photo, the eye is encouraged to move around the frame in a circle:

Square format composition

2. Space

Negative space is the term used to describe the empty space in an image around the subject. Composition is often improved by getting closer to the subject. But sometimes you can create atmosphere or emphasise the shape of the subject by including negative space around it. In the rectangular frame, this can be difficult to do as it results in a lot of empty space. But it can be very effective in the square format.

Here is a photo that I took of a lizard in the 3:2 aspect ratio:

Square format composition

And here is the same photo cropped to a square:

Square format composition

Which do you prefer? There is no right answer – it’s entirely subjective. But it’s interesting how the dynamic of the image is changed by a single crop.

3. Simplicity

The square format lends itself to a simple approach. There is less room within the square frame than the rectangular one, therefore simplifying the composition becomes a necessity.

Creating a simple composition is often much harder than it seems. But it’s a very useful exercise. For your photos to have impact, you want to eliminate as many distractions as possible. The focus should be on your subject. If there are other elements within the frame that pull the viewer’s eye away from the subject that can lessen the strength of the image.

The composition of this image is about as simple as it is possible to get:

Square format composition

4. Shape

How many shapes can you see in the images below? There are circles, squares, diamonds, rectangles and triangles within these photos. The square format lends itself to this style of composition. I think that’s because the square is such a powerful shape in itself, that it emphasises other shapes within it. Linked with this are the ideas of balance and simplicity. Simplifying the composition emphasises shape, and so does placing shapes within a square frame. Converting to black and white emphasises them further.

Square format composition

5. Central composition

In the square format you can often place the subject in the centre of the frame for an effective composition. Generally speaking, many photographers tend to avoid place the subject off-centre for a more interesting composition.The rule-of-thirds is a reminder of this. But in the square format that doesn’t apply.

It’s even more true when the image is simple. The less distractions there are in the frame, the more effective a central composition becomes. If the subject has a strong shape, the empty space around it emphasises the shape. And the square format provides the perfect, balanced frame:

Square format composition

6. Black and white

Take away colour and what do you have? An image that relies on tonal contrast for impact and that emphases visual elements such as line, texture and shape. The square format and black and white seem made for each other, which perhaps explains its popularity with fine art photographers.

Take another look at the photos in this article. Do you prefer the colour images or the monochrome ones? The answer may give you an idea for future photo projects.

Final thought: Have fun

Whether you shoot with the intention of utilising the square format, or go back over old images to see whether they can be improved by cropping to a square, the most important thing is to have fun with the process. Enjoy the challenge of getting to grips with the square format and its implications for composition. Don’t take it too seriously. You’ll create some beautiful images and the lessons you learn about composition along the way will help you create better images in the future.


Post originally from: Digital Photography Tips.

Check out our more Photography Tips at Photography Tips for Beginners, Portrait Photography Tips and Wedding Photography Tips.

6 Lessons the Square Format Can Teach You About Composition


Digital Photography School

 
Comments Off on 6 Lessons the Square Format Can Teach You About Composition

Posted in Photography


Colour Composition: Using Subtle Colour

11 Jul

A photo with subtle colour

In my last article I wrote about using colour boldly. Today I’m going to look at ways you can use colour in a much subtler, gentler fashion.

Bold colours are most often found in man-made objects. If someone paints a wall bright red, for example, and you take a photo of it against a deep blue sky, then you are using colours that are just about as strong and deep as it is possible to get.

In nature though, colours are often much more subtle. And there are ways that you can use the subtlety of colour found in nature to create photos that capture the mood of the scene.

Let’s look at some examples to explain what I mean:

A photo with subtle colour

For this portrait I photographed my model against a cliff and use the cloudy white balance setting to warm it up. The background and the model’s skin and hair are all shades of brown. Apart from white, I don’t think there’s another colour in the image.

A photo with subtle colour

Here’s another portrait taken the same afternoon. The background in this photo is the sea, although it’s difficult to recognise as it’s out of focus. It was overcast, so the sea has come out grey rather than blue. But it suits the image. Just like the previous portrait, the colour palette is limited.

A photo with subtle colour

I created this photo by focusing on the grass in the foreground and using a wide aperture to defocus the setting the sun. I applied a low colour temperature in post-processing to give the scene a cool feel. Even though it is sunset, the colours are subtle.

A photo with subtle colour

Here is a close-up photo I took in a local museum. The colour palette is very subtle. The box is cream, and the background is green. There is some nice tonal contrast going on in this image.

So far, the examples I’ve given have all used soft or pastel colours. But you can still use bright colours such as red in a subtle way. Here’s an example:

A photo with subtle colour

My model was wearing a bright red jumper and headband, so I positioned her against a white coloured building to provide a neutral background. The neutrality of the background colours emphasise the strength of the red.

I hope the photos in this article and the last have given you some ideas about using colour in your photos. It’s a little more difficult to use colour with subtlety that it is to fill the frame with bright colours. But it does give you an extra tool for expressing yourself with. And don’t forget, you don’t have to settle for the colour palette that nature provides. Feel free to make the colours in your images more subtle by desaturating them in post-processing.

Mastering Photography

A photo with subtle colour

My latest ebook, Mastering Photography: A Beginner’s Guide to Using Digital Cameras introduces you to digital photography and helps you make the most out of your digital camera. It covers concepts such as lighting and composition as well as the camera settings you need to master to take creative photos like the ones in this article.

Post originally from: Digital Photography Tips.

Check out our more Photography Tips at Photography Tips for Beginners, Portrait Photography Tips and Wedding Photography Tips.

Colour Composition: Using Subtle Colour


Digital Photography School

 
Comments Off on Colour Composition: Using Subtle Colour

Posted in Photography