RSS
 

Posts Tagged ‘Composition’

Tips for Better Composition of Seascape Photographs

23 Jan

I do not believe that in photography there are absolute rules of composition, but it is undeniable that certain compositions work better than others.

Why? Probably because our brain is the result of millions of years of evolution, and as in two dots and a line we recognize a face (you don’t believe me? Have a look here.), in the same way we recognize some images as more pleasant to look at than others.

So let’s look at a few tricks to keep in mind during your next visit to the seaside.

Start following rules

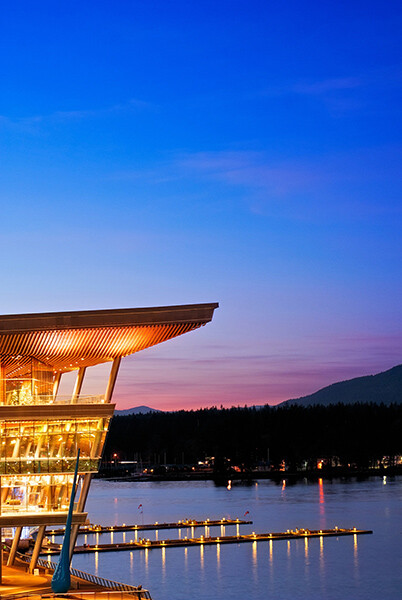
Before trying to break rules, try to follow them. Start with the Rule of Thirds: divide your image into nine equal parts by two equally spaced horizontal lines and two equally spaced vertical lines. Then place important compositional elements along these lines or their intersections. The result will be that your photo becomes more balanced. In a seascape shot, for example try to put a Lighthouse on one of the vertical lines and the horizon on one of the horizontal ones.

1 post

Important elements (the lighthouse and the horizon) are positioned along the lines and at the intersections

1 ante

Choose the leading actor

If you follow the Rule of Thirds, you’ll never again put the horizon in the middle of your image, and that’s a great thing unless you have a perfect symmetrical reflection.

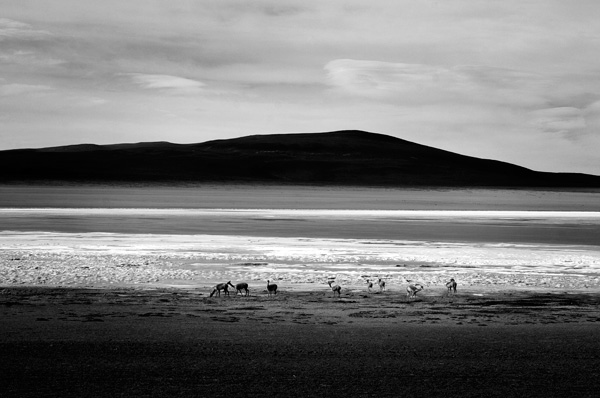
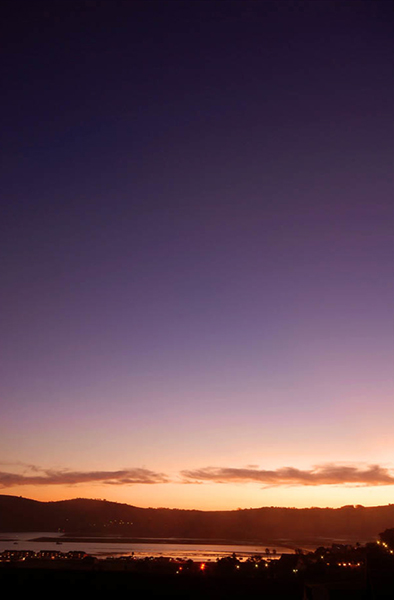
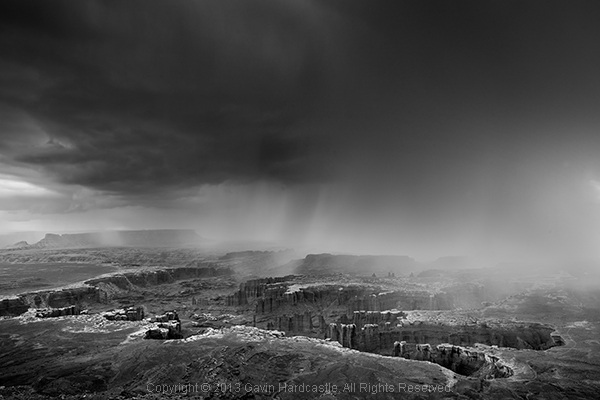
Decide next if the leading actor of your seascape is the sky or the sea, and place the horizon line accordingly. For example if the leading actor is the sea, the image portion under the horizon line will be 2/3 of the whole image.

2 post

The rock formation in the foreground is really interesting with this tide. I wanted to emphasize it and so I give ? o the image to the sea in this the image.

2 ante

Check the horizon

There is nothing more annoying than seeing a crooked horizon. Use the built-in level of your camera, or for few cents buy an external hot shoe level (the yellow one with an air bubble inside). Why? Because every time you fix the horizon in post-production you will lose a portion of the image. Finally, remember that if you publish an image with a crooked horizon, the horizon will be the leading actor of your image.

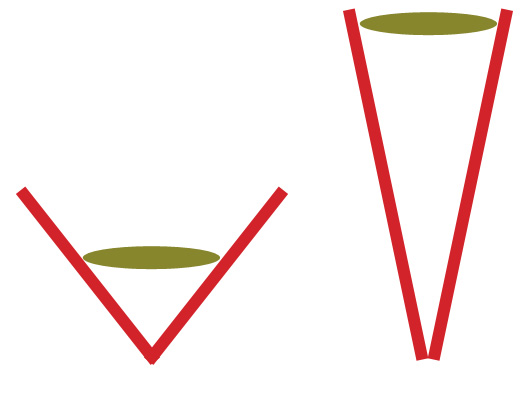
Choose your focal length wisely

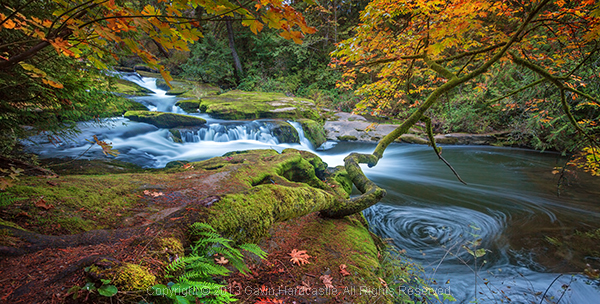
Sometimes you might believe that a certain focal length is perfect for the scene you have in front of your eyes. Think wider! If you’re using a 24mm lens, try with an 18mm or a 21mm lens – don’t be lazy. Remember that in post-production you can always crop your 21mm image to a 24mm image, but you’ll never be able to do the opposite.

3 post

A 21mm lens was perfect here as it let me put inside the frame the spring flowered plant on the bottom right.
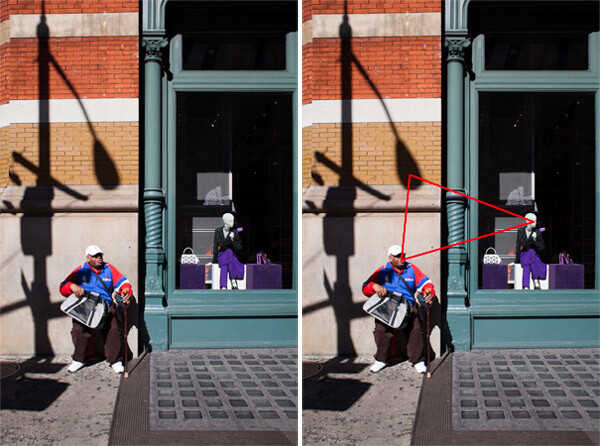
3 ante

Use leading lines

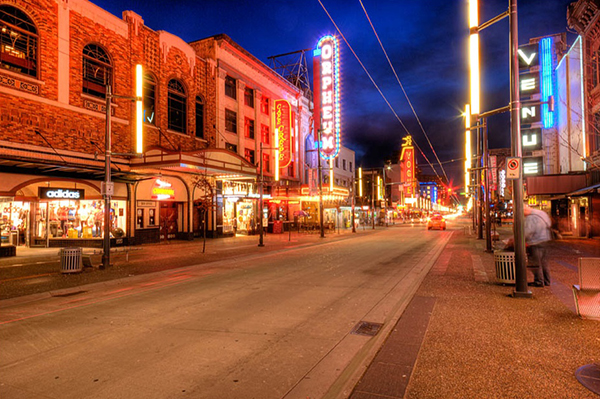
An image is like a book, and to really enjoy it you should be able to read it from the begin to the end. To do that, try to use lines and curves to guide the eyes through a path. You can use a road or the natural line of the coast for example. Keep in mind that you should avoid interrupting that path because it’s like skipping a line in a book; you lose the sense of the story that you’re telling. Also try to avoid lines that guide the eyes of the reader outside the image. You want attention given to what is inside the image, not to what is outside.

4 post

I used the road to drive the eye of the viewer from the margin of the image to the main character.

4 ante

Avoid straight objects in the margin

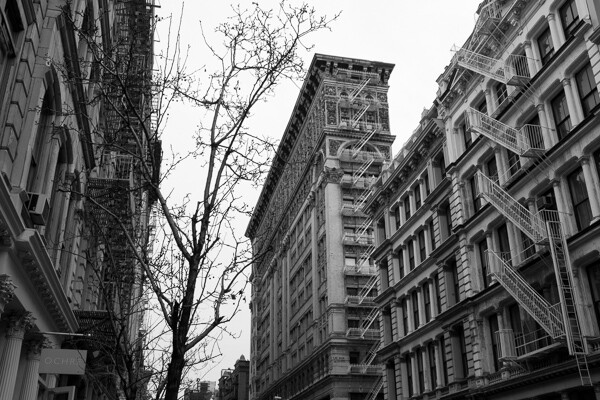
One common problem of wide angle lenses is the perspective distortion when the camera is not aligned perpendicularly to the subject. In other words buildings like lighthouses appear to be falling if you (correctly) place one according to the rule of thirds. Well, the bad news is that there is no an universal solution. The best one is obviously to buy a lens with excellent optical quality, but they are very expensive and in any case the perfect lens does not exist. So we need to correct the distortion in post-production. There are a thousand ways to do that, but most of them require an image crop. For that reason, if you have a straight object in your frame, don’t put it exactly on a vertical line of the Rule of Thirds, but slightly closer to the image center. In that way, after correcting the distortion, your lighthouse will be nearer the vertical line of the third.

5 post

If I had put the small village too close to the frame edge, it would be affected by perspective distortion and to correct it in post production probably I would have lost the nice leading line with a crop.

5 ante

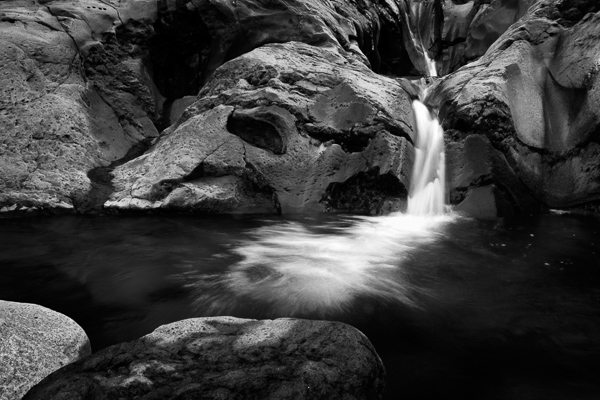
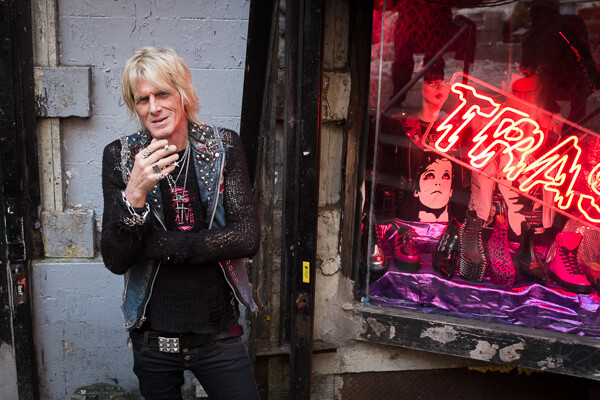
Add dimension and scale

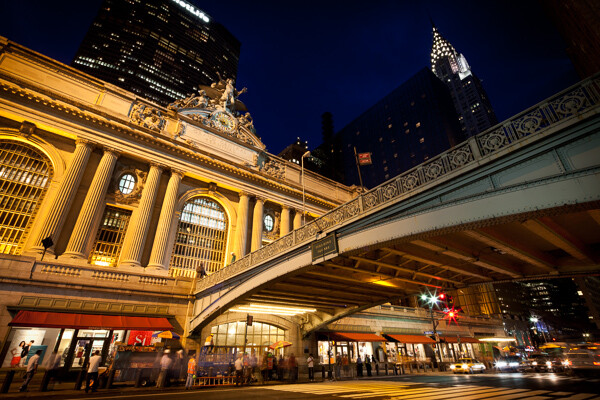
When I started taking seascape pictures, I was a purist: no humans or human artifacts were allowed inside my frame. If humans are still not allowed to join, sometimes I think it’s a good idea to put some artifacts in my composition. The main reason is that even if you exactly the dimensions of the rock formations in front of you, viewers of your image may have no idea if they have never visited that place. When you look at a image, your brain tries immediately to define the dimensions comparing the unknown to something known – help it and use something like a lighthouse, bridge, church to give an idea of scale. A reef is even more beautiful if it is perceived as high and massive.

6 New
The lighthouse give a dimension to the other rocks in the image (try to cover the lighthouse with your finger.)
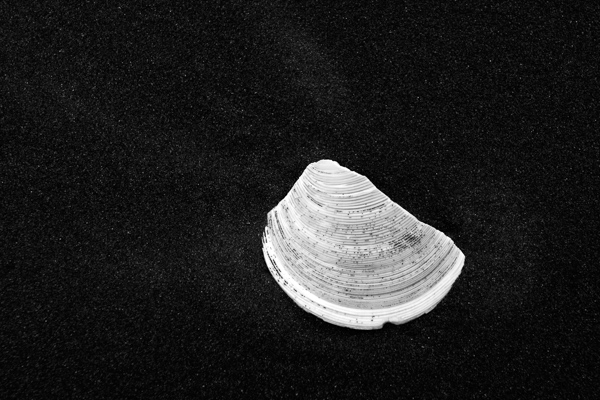
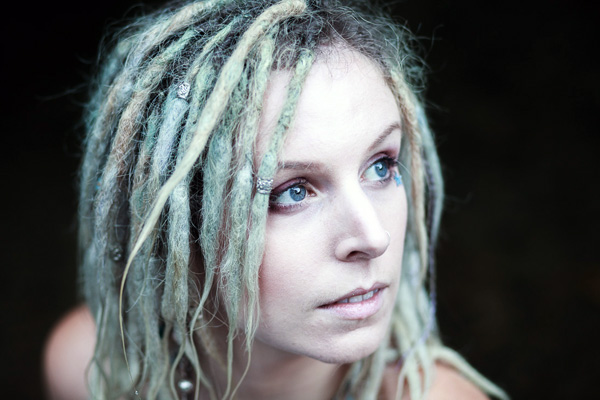
6 ante

Use negative space

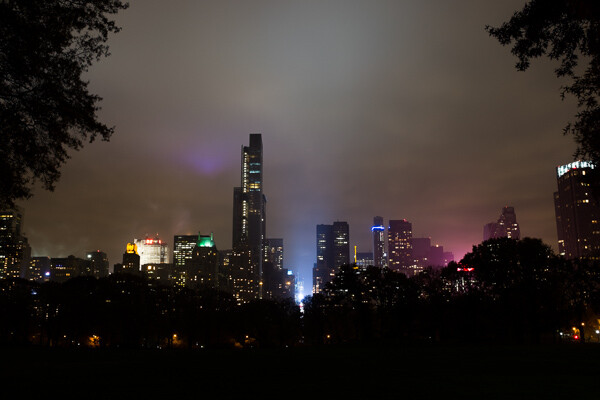
I’m a big fan of using negative space. But what exactly is that? Easy – it is nothing but the space around, and between, the subject of an image. Yes, basically they are “the” nothing. So, how can that be useful? Negative space is perfect to emphasize the subject. A lonely church on the top of a cliff is even more brave if it seems that it challenges the vastness of the sea.

7 post

This old church reminded me a solitary sentinel who scrutinizes the sea.

7 ante

Have fun

Finally, remember that every rule is made to be broken. If the horizon is not perfectly in one third because the sky lacks of clouds, put it above the upper horizontal line of rule of thirds. If you need to put a lighthouse near the margin of the frame to use leading lines, just do it.

The real goal of a picture is not to follow the rules, but to arouse emotions in the viewer. Keep this in mind and there is no composition that can overcome you.

8 post

The lighthouse is on the right vertical line of rule of thirds. Unfortunately I didn’t have a wider lens with me and I had to put it there in order to use leading lines in the foreground and not to cut the nice wave trails in the upper left side of the image.

8 ante

googletag.cmd.push(function() {
tablet_slots.push( googletag.defineSlot( “/1005424/_dPSv4_tab-all-article-bottom_(300×250)”, [300, 250], “pb-ad-78623” ).addService( googletag.pubads() ) ); } );

googletag.cmd.push(function() {
mobile_slots.push( googletag.defineSlot( “/1005424/_dPSv4_mob-all-article-bottom_(300×250)”, [300, 250], “pb-ad-78158” ).addService( googletag.pubads() ) ); } );

The post Tips for Better Composition of Seascape Photographs by Francesco Gola appeared first on Digital Photography School.


Digital Photography School

 
Comments Off on Tips for Better Composition of Seascape Photographs

Posted in Photography


Deal 8: 70% off Photoshop Artistry: Fine Art Grunge Composition Course

21 Dec

Today’s deal is perfect for those of you wanting to awaken your creative genius and create some art with your images.

It is 70% off the Photoshop Artistry: Fine Art Grunge Composition course.

Photoshop artistry

We offered this course on our sister site – SnapnDeals – earlier this year and it ended up being our most popular deal of the year, so we convinced it’s creator – Sebastian Michaels – to bring it back for dPS readers today.

The best thing you can do to learn what this course is about is to head over to the sales page where Sebastian has created a great video run down of what the course covers and why you might consider signing up.

You get a whole lot with this course including:

  • 68 videos, each averaging over 20 minutes in length
  • Each lesson is accompanied by PDF downloadable cheat sheets
  • Sebastian’s huge texture library (over 5 gigabytes in total is available to you)
  • Sebastian’s custom brush (and edge effect) library
  • Sebastian’s high res vector graphic library

Photoshop artistry grunge

Normally this course retails for $ 297 and in January it is set to increase in price but for the next 24 hours it is yours for $ 89.

Best of all – there’s a 60 day satisfaction guarantee on this course. If you buy it and if you don’t find it meets your needs you’re able to simply ask for a refund and Sebastian will get you your money back.

Head over to check out full details of what is included here (there are also a heap of previous students testimonials).

googletag.cmd.push(function() {
tablet_slots.push( googletag.defineSlot( “/1005424/_dPSv4_tab-all-article-bottom_(300×250)”, [300, 250], “pb-ad-78623” ).addService( googletag.pubads() ) ); } );

googletag.cmd.push(function() {
mobile_slots.push( googletag.defineSlot( “/1005424/_dPSv4_mob-all-article-bottom_(300×250)”, [300, 250], “pb-ad-78158” ).addService( googletag.pubads() ) ); } );

The post Deal 8: 70% off Photoshop Artistry: Fine Art Grunge Composition Course by Darren Rowse appeared first on Digital Photography School.


Digital Photography School

 
Comments Off on Deal 8: 70% off Photoshop Artistry: Fine Art Grunge Composition Course

Posted in Photography


How to Improve Your Composition Using Juxtaposition and Contrast

09 Oct

Juxtaposition and contrast in composition

Today I’d like to explore two complementary elements juxtaposition and contrast, to help you improve your composition.

Juxtaposition occurs when you place two contrasting subjects side by side. The difference (i.e. the contrast) between the two subjects creates an interesting photo.

A classic example

A great example of this is the Annie Leibovitz portrait (bottom of page linked) of jockey Willie Shoemaker (4’ 11” tall) and basketball player Wilt Chamberlain (7’ 1”). Placing the two men side by side (juxtaposition) emphasizes the difference in their height (contrast). As we’re not used to seeing an extremely short person standing next to a very tall one, the difference in height appeals to our sense of curiosity.

Juxtaposition and contrast in action

Here are some more examples, this time using my own photos, showing how you can use juxtaposition and contrast to improve the composition of your images.

Juxtaposition and contrast in composition

I took this photo in the remote village of Iruya in north-west Argentina. It was late afternoon and I wandered beyond the boundary of the village towards a pass through the mountains. I saw two people walking down a path cut between the rock, one of them leading a donkey.

The juxtaposition here is between the human figures and the mountainside. The contrast is one of scale – the difference in size between the people and the landscape they are passing through.

Juxtaposition and contrast in composition

This photo was also taken in South America, this time in south-west Bolivia. The juxtaposition is between the guanacos in the middle distance and the mountain in the background. The contrast in size gives a sense of distance and scale to the landscape.

This photo is interesting because there is also strong tonal contrast, formed by the light and dark horizontal bands crossing the photo. The effect is emphasized because I used a short telephoto lens (the 55mm end of an 18-55mm kit lens on an APS-C camera), which compressed the landscape and flattened the perspective.

Juxtaposition and contrast in composition

This photo is a simple close-up of a seashell on a beach. The juxtaposition of the white shell against the black sand emphasizes the difference between them. It’s not a coincidence that I chose to convert this photo to black and white. Sometimes, good black and white photography is created simply by juxtaposing a black subject with a white one.

Juxtaposition and contrast in composition

I took this photo at sunset in the Argentinian city of La Plata. The cathedral is one of the largest in the Americas and was only completed in the 1990’s. The juxtaposition here is between the statue in the foreground and the spires of the cathedral. You can’t tell from this photo but the statue is located in a square in front of the cathedral. The two are some distance apart, separated by a road. By finding a position from which I could include both the statue and cathedral together, I created a composition that is more interesting than one containing either the cathedral or the statue alone. There is also a contrast between the gothic architecture of the cathedral and the weathered stonework of the statue that encourages the eye to move between the two.

Juxtaposition and contrast in composition

I photographed this waterfall on the side of Mount Taranaki, a conical volcano on New Zealand’s North Island. I used a tripod to support the camera and a shutter speed of 1/3 second to blur the water.

The juxtaposition here is between the rock and the water. The rocks are still, hard, and have a beautifully textured surface. The water is moving, soft and blurred. This type of contrast is the basis of many long exposure photographs.

Juxtaposition and contrast in composition

Finally, this photo taken in a temple in Shanghai, China, shows a different type of juxtaposition – the power of line. It’s a photo comprised of intersecting lines. The lines created by the incense sticks are perpendicular to the one created by the edge of the burner.

There is another type of contrast too. The line formed by the edge of the burner is much bigger than the sticks of incense. It’s another type of contrast of scale, as seen in some of the earlier photos.

Your turn

Can you think of any other examples of juxtaposition and contrast? Please let us know in the comments, and feel free to add your photos so we can all see what you have done.


Mastering Photography

Composition and line

My latest ebook, Mastering Photography: A Beginner’s Guide to Using Digital Cameras introduces you to digital photography and helps you make the most out of your digital cameras. It covers concepts such as lighting and composition as well as the camera settings you need to master to take photos like the ones in this article.

The post How to Improve Your Composition Using Juxtaposition and Contrast by Andrew S. Gibson appeared first on Digital Photography School.


Digital Photography School

 
Comments Off on How to Improve Your Composition Using Juxtaposition and Contrast

Posted in Photography


Camera51 for Android guides your photo composition

03 Oct

Since the launch of iOS 8, manual camera apps for iPhone photographers have been in the news. Now it seems the makers of Camera51, a new camera app for Google’s Android OS, are going the opposite way. The new app not only sets exposure and white balance automatically, but also aims to optimize how your shot is framed. Read more

Articles: Digital Photography Review (dpreview.com)

 
Comments Off on Camera51 for Android guides your photo composition

Posted in Uncategorized


8 Quick Composition Tips to Help Improve Your Images

10 Sep
Using different composition techniques can result in more dynamic images

Using different composition techniques can result in more dynamic images

You have likely heard of the Rule of Thirds, in fact it seems as if this is the only rule of composition. To be fair though, the Rule of Thirds is a good go to tool when you are unsure of how to put a scene together compositionally. There are many other techniques that can be used to improve your composition. Techniques like balance, leading lines, symmetry, depth of field, and so on, can all make a big difference to your image.

In many ways a photograph is very similar to a painting. Photographers learned early on that composition is a key component to engage people in an image. Composition literally means to put together, so when you think about composing an image, you need to think about the visual elements that you will put together in your image.

As a photographer, you need to decide when to use certain techniques, and when not to use them. Most compositional techniques are simply guidelines, or frameworks, there are very few hard and fast rules.  What they do offer is a starting point for putting an image together. Perhaps you may look at a scene and not know how to capture it. That is a good time to put some of the techniques into action and work the scene from there. They have been tried and tested by visual artists (painters, photographers and moviemakers) around the world for decades. The only constraint is don’t be dogmatic about applying them. Once you understand how to use the rules, you will then know how to break, and break out of them. By doing this, you will take your photographic creativity to a new level and your images will become that much better.

As always, with anything photographic, you need to experiment and practice. Know your equipment, experiment by shooting different scenes under different lighting conditions. Find what works for you and hone that skill. The art of composition is not a particularly technical art, but it can make an amazing difference to your images.

Good composition can make any subject interesting

Good composition can make any subject interesting

The great thing about composition is that you don’t need specialist equipment. The most important pieces of equipment are your camera and your tripod. I know, I know, we all sigh when we hear about the tripod. Once you see how much easier your photographic life becomes with a tripod, you will not be so reluctant to carry it around. There are also  better options for tripods nowadays (think Gorillapod and other travel-style ones). Remember though, a tripod is a key piece of equipment for successful composition. A tripod will help you to compose your image and keep that composition. Whenever possible, use a tripod to set up your shots, that way you can be sure that there is no movement when you photograph.

A lot of the time, you will be shooting images handheld. That is perfectly fine, and you can apply the compositional techniques to handheld shots. Sometimes you may need to take more than one image and adjust your composition to correct or change it.

Here are eight additional composition tips to help improve your images.

The yellow funicular and the blue house add an element of balance to this scene

The yellow funicular and the blue house add an element of balance to this scene

1. Balance

Often when you place an image on one of the thirds, the rest of the frame may be left without much in the way of anything of interest. This is often referred to as negative space, not because it is bad, it is simply to point out that it is not the centre of interest. In some images, negative space can work well, but in other images there may need to be another object in the frame, or even a colour to balance the centre of interest. Photographers use this compositional tool to do exactly that, balance the centre of interest with another object.

2. Leading Lines

We look at an image in the same way that we read a page of words. In the western world that means we look at an image from left to right. Our eyes are naturally drawn into the image by lines. If you have a road or a river winding through your image, the viewers eye will automatically run along those lines. If your centre of interest is at the end of that river or road, that is a good way to compose the image. Sometimes it is enough to have the river or road meandering through the image as it makes the image interesting to look at.

The lines pull us into, and through the scene. The lines can be straight, diagonal, curving, zigzag, S – Shape and many other types. The important thing is to create as dynamic an entry point to an image if possible.

The numerous lines in this scene direct your eyes down the street

The numerous lines in this scene direct your eyes down the street

3. Symmetry and Patterns

We live in a world that is defined by symmetry and patterns. They are all around us in so many ways. There are natural patterns that are captivating to photograph and there are man-made objects that accentuate balance. It is very gratifying to photograph a perfectly uniform scene. The symmetry brings order to the scene and gives a sense of peace and harmony to your image. Sometimes it is good to break the symmetry, show it in a different way, and by doing so create a sense of tension.

A symmetrical doorway

A symmetrical doorway

4. Viewpoint

Kneel down or lie down to get the eye level of your subject

Kneel or lie down to get to the eye level of your subject

Changing your viewpoint when shooting a subject makes a huge difference to the visual impact. It is natural to shoot everything from your eye level. By doing that you tend to create images that have been seen before. By changing your viewpoint, you immediately give a different perspective on very familiar subjects. If you are taking photos of small children or pets and animals, try and get down to their eye level. This is a view that most adults won’t see very often and will make a big difference in the impact of your image. To change your viewpoint, try a few of these tips:

  • Stand on a chair or ladder to get up higher than your subject
  • Kneel or lie down to get underneath a subject, i.e. for shooting a field of flowers
  • Photograph the subject directly from the top
  • Shoot from a diagonal angle to emphasize shape or texture

The important thing here is to make sure that you change YOUR viewpoint and by doing that, you will breathe new life into a well known subject.

5. Background

A distracting background can completely ruin an image. The human eye will naturally settle on the area of an image that is: the brightest, most colorful, sharpest and has the most contrast. Be aware of what is behind your centre of interest. If there is a pole, a distracting pattern, an awkward colour or some other object, you may need to reconsider your shooting angle. This is not always possible, but sometimes, taking two or three steps to the left or right can make all the difference. Look around for an unobtrusive background, or change your aperture settings to achieve a shallow depth of field and by doing so, soften the background.

Move around your subject until the background is nit distracting to the rest of the image

Move around your subject until the background is not distracting viewers from the subject

6. Depth

Photography is a two-dimensional art form. As a result, you use certain techniques to imply three-dimensionality. One way to do this is to have subject matter in the foreground, middle and background. This creates depth, and the eye will naturally walk through the image. This implies a deep depth of field from a technical point of view, so ensure that you use a smaller aperture (i.e. f/8, f/11 or f/16) making everything in the scene in focus. This technique is particularly important when photographing landscape images.

Sometimes, it is great to have a whole scene in focus

Sometimes, it is great to have a whole scene in focus

7. Framing

The world is full of natural objects that can be used to frame a subject (e.g., archways, tree lined streets, holes, and so on create natural frames). By placing your subject in the middle of these natural frames you will create a strong visual pull towards your centre of interest.

Use natural elements to frame your scene

Use natural elements to frame your scene

8. Get in Tight

Sometimes, closer is better and less distracting.

Sometimes, closer is better and less distracting.

It is often tempting to put more detail into a frame to show more about what was happening, but this can lead to confusion. The important maxim to remember is this: less is more. The art of simplifying an image is not easy, but if done correctly can make an image far more dramatic. When you find that your composition has more than one centre of interest, or seems confusing, try these steps:

  • Get in as close as you can to your subject
  • Simplify the composition
  • Be sure to avoid any distracting colours or objects in the background
  • Use a shallow depth of field

Finally

Composition and the rules around it are flexible. There really is no right or wrong way to compose an image, but there are better ways to do so. Some composition techniques can make a huge difference to an image and take it from being a snapshot to becoming a truly great photo. The important thing is to experiment with these techniques. Combine them wherever possible. Try them out as often as you can on different subject matter, and know when NOT to use them. The important part is to make sure that you master them. Use them when you need to. Find out what works for you and go from there. By doing this, not only will your images improve, so will your ability to see an image in a scene.

This is the most important part of photography and very often what separates an average photographer from a great photographer. The ability to see an image in a scene makes all the difference and these compositional techniques help you to do that.

Don't forget to experiment and break the rules where necessary

Don’t forget to experiment and break the rules where necessary

The post 8 Quick Composition Tips to Help Improve Your Images by Barry J Brady appeared first on Digital Photography School.


Digital Photography School

 
Comments Off on 8 Quick Composition Tips to Help Improve Your Images

Posted in Photography


Using Composition to Create More Powerful Portraits

18 Jul

As part of my series on portrait photography, in this article, I will discuss composition, one of the most important aspects of creating a good portrait image.

F11A6332 1

  • Are there any laws regarding framing a portrait?
  • Can I leave hands, fingers, or part of the head out of the frame?
  • Does a portrait have to include a face?

I will answer these questions that my students often ask. It is important to keep in mind that as in all aspects of art, there are no “rules” or “must dos” here, because you can do anything as long as it works for you. So, I will describe techniques that work for me and I hope that they will work for you, resulting in much stronger portrait photography portfolio.

What is a good portrait?

A good portrait is an image of a person that manages to tell a story. A good portrait evokes emotion. A good portrait tells us something about the person in the image, and composition is a key element that helps us create a storytelling portrait.

How can I create a storytelling portrait with the help of composition?

I think good composition is a combination of the scene on the ground and the scene within your head. It combines the available with the desirable.

Here are a few examples of portraits I made recently (using natural light only) with explanations of the thinking process and goals in terms of composition. As Ansel Adams said, don’t forget that every image has two people behind it. the photographer and the viewer. So you might not feel the same emotions as I do with the images I created. But that’s okay, because photography is both an art and a science.

Choosing how much background to include

F11A3496 Exposure 1

Focal length 24mm

I met this boy cutting Paprika in rural Cambodia. It was summer vacation and he was there with his family and other villagers. What’s my visual narrative in one line? “Small boy, big work.”

I immediately knew two things: one, the background is a significant element and two; I wanted to capture the boy working alone. So, I started with the background and decided on a high angle in order to capture this “mountain” of Paprika. It was important for me to show the boy’s entire body with some space above his head so that the viewer could compare (remember my one line story?) the size of the boy to the size of the work.

I even included that basket in the composition to add balance to the entire frame. After I set up my composition, I waited about 20 minutes to capture the boy looking up. I knew that if he was working with his head and eyes down, the whole story would fall apart. I think the wait was worth it.

For me, this is one of the most complex decisions in photography: to identify visual storytelling potential and decide how much time you’re willing to wait until the story materializes.

Story 56 the kid 1

Focal length: 17mm

I used the same technique here in Kyrgyzstan, for this shot of six year old Aytinger, which I made for National Geographic Traveler magazine. Visual narrative in one line, “Small boy, big world”.

Here, I made the background much more dominant compared to the previous image. Here the boy is very small compared to the land. Imagine if I framed this image with only his face? I would lose the entire story, because his face alone doesn’t tell the story I want to portray. It was important for me to “include” the path and the big cloud in the horizon, to add sense of an “epic” feel to the image.

Web11 1

Focal length: 70mm

Here, you can see a different kind of portrait framing. Visual narrative in one line – “Quiet, peaceful, youth”.

I wanted to evoke peace and harmony. So I focused only on the face of this young monk, and included almost no background, in order to avoid interference from the environment. Also, note how the central composition (the subject is in the center of the frame) is balanced with the two orange frames on the sides.

I used soft natural light (coming from the right side of the frame) in order to create a sense of something religious and pure.

Cropping in tight

42 1

Focal length: 70mm

This is the type of framing that I’m asked many questions about by my students: whether it is allowed to cut off part of the head like this. Sure, as long as it helps the visual story you want to tell. Visual narrative in one line, “A sad reflection”.

Apollo’s wife died not long before I met him in the hills of northern Laos. In the image, Apollo’s face and the feeling of something tilting or shifting in his world is the only important thing. By framing his face on the right, while he was looking down and to the right, I wanted to create a feeling of an “unbalanced world”. Compare the very low key, dim lighting (with negative exposure compensation) in this image to the previous one of the monk. I was using the dark part of his house to evoke this story.

TheAccess 4photography people

Focal length: 85mm

This framing is even more radical than the previous one. Please note that this is the composition I did on the ground (no cropping) for a story I did for National Geographic Traveler magazine on Western China. Visual narrative in one line, “Strong and wise”.

Leaving space

When I saw the eyes of this man, the oldest man sitting in the back of a teahouse in remote western China, I knew I didn’t need anything else but his blue eyes. So I made it the dominant factor of my composition.

Story 35 alone 1

Focal length: 24mm

Now you might ask, is this a portrait too? Well, yes, for two reasons: one, do you see a person, and two, do you feel a sense of story?

What’s my visual narrative? It was a particularly hot afternoon. Dozens of worshipers left the mosque. I paused for a moment, trying to change lenses, as I noticed this guy. It seems that he was not affected by the hustle passing him by. He remained alone, continuing to read the prayer book. At first, my initial thought was “wow, what loneliness”. But then I thought, ”wow, what strength”.

I used the empty spaces of the place to enhance the sense of loneliness, but the balanced; “by the rules” composition (rule of thirds) should give the sense of power I was aiming for. The reason I chose to use negative exposure compensation and thus create a silhouette was to not compete with red color in the background and give it a sense of harmony.

Put it all together

You may be asking – “Okay, I understand the thought process. But honestly, do you really think about it before the creation of the frame or only afterwards?”.

Well, I do believe that good portrait photography is an outcome of a thinking process. Should I add the background or not? Should I crop the head or leave it full? Sometimes by over-thinking, the subject might lose patience. It has happened to me more than once. But for me, having the time to think, to plan, and to achieve the story I wanted is part of the fun.

Feel free to leave questions and comments below.

Note: the author would like to thank Nicholas Orloff for his help of writing this article.

The post Using Composition to Create More Powerful Portraits by Oded Wagenstein appeared first on Digital Photography School.


Digital Photography School

 
Comments Off on Using Composition to Create More Powerful Portraits

Posted in Photography


Using Depth of Field and Perspective for Better Composition

01 Jul

We all know this problem. You take a picture of a beautiful scene but it just doesn’t turn out the way you want. Something is missing. It usually isn’t a matter of your camera or the settings you are applying. But what is it then? The question at hand is how do you get from a snapshot to an interesting, unique, and well composed photograph.

To answer this, we have to move away from the technical aspects and go more into the creative and artistic aspects of photography. You might say that this is a very subjective matter and that beauty is in the eye of the beholder, but there are a few building blocks that will help to improve your photography and also develop your own unique visual language.

Depth of field for a more three-dimensional Look

An important aspect of photography is that we want to capture a three-dimensional reality by taking a two-dimensional image. When we are out in the field, our eyes in collaboration with our brain create very complex images within split seconds. The most important factor in this context is that our eyes are constantly moving while focusing on different subjects. The focal plane is shifting with a subject in focus and everything in front or behind appearing to be blurred. This “Depth of Field” is one the most important techniques we can utilize to simulate depth and three-dimensionality.

Begginner photography tips 06

Utilizing depth of field to create a more three-dimensional look

In order to play with depth of field, we need a scene with a defined foreground and a background. Whereas the background is usually a given, a lot of images lack foreground which makes an image appear flat and boring. Choosing a defined foreground will enable us to actively compose an image and become creative.

Once you have chosen a background and a foreground you like (ideally both complementing each other), you have to find the right position for you and your camera in order to combine both for an appealing overall image. To find the right position, you should try different angles, move around, get low to the ground and don’t solely rely on your zoom. By using a large aperture (small f-stop number) and a selective focusing, we can isolate the foreground from the background by making the foreground objects sharp and the background blurry (or vice versa). This will convey a sense of depth and three-dimensionality.

Begginner photography tips 10

No foreground. Lack of depth and composition.

This image (above) of one of the ancient tombs around Hue, Vietnam looks flat. There is no depth, no three-dimensionality and it lacks a clear composition. Because a foreground is missing, the image is too busy and distracting.

Begginner photography tips 04

Foreground and background nicely isolated to create a sense of depth.

Above an image of the same subject but with a much better composition. The focus is on the eye of one of the dragons, making it our foreground. The rest of the tomb is our background, slightly blurred and nicely separated. It generates a sense of depth and also appears much calmer and structured than the first image. The viewer is being led into the picture. You can use this technique when photographing very popular places like for example the Eiffel Tower, Angkor Wat or other monuments. Instead of taking the same shot as every other tourist, experiment with different backgrounds and foregrounds, get creative, move, and I am sure you will end up with an original and authentic image.

Begginner photography tips 03

Cambodian Fighter. Focus on the subject, still including the environment.

You can also apply this technique to your people and portrait photography. It not only helps to really put emphasis on your subject, but also to incorporate some of the environment, which will help to tell a story. In the picture above, the focus is on the weary fighter, catching his breath during a fierce Khmer Boxing fight in Cambodia. We are at eye level with the fighter and again, the foreground is nicely separated from the rather blurry background. Yet, we can still see parts of the surrounding environment which is the ring and the crowd in the back. The focus however always remains on the main subject.

Leading lines for a sense of perspective

Of course depth of field is not the only means to create a sense of depth and three-dimensionality. The concept of leading lines is another one of those building blocks that you can apply. The viewer of a photograph usually associates diagonal lines which are leading into an image, to a vanishing point perspective. This means that objects which are farther away also appear smaller. This context automatically and unconsciously gives the viewer an impression of three-dimensionality.

Begginner photography tips 02

Two images with a clear vanishing point perspective.

As you can see in the images above, a shallow depth of field is not necessarily needed to convey that sense of depth we are looking to achieve. Here it’s all done by using a jetty as lines, which connect different layers of the picture – the image becomes much more plastic and complex.

Begginner photography tips 01

Night Scene: The bridge leading into the picture.

Similarly the image above becomes three-dimensional because the pedestrian bridge is leading into the image. It also appears to become smaller and smaller as it leads into the background. This way the image has that sense of depth even without applying a low depth of field. The bridge as a leading line is connecting our different layers, the foreground and the background.

Begginner photography tips 07

The bridge and the train convey a sense of depth.

Providing a relationship in size

When regarding a picture, the viewer often needs a reference point in order to correctly interpret the information our two-dimensional images provide. We can do this by establishing proportions and providing a relationship in size. Often this isn’t needed as we know a lot of the subjects we are capturing. In the image above we were dealing with familiar objects like a pedestrian bridge, a street and a commercial building. It was easy to put everything into context. But a lot of times, when we are confronted with unfamiliar things, this isn’t as easy.

Begginner photography tips 09

Mingun Pahtodawgyi in Mingun, Myanmar. Can you tell how big it actually is?

In the picture above is Mingun Pahtodawgyi, a temple in Mingun, Myanmar. Left unfinished, this huge construction was planned to become the world’s biggest stupa with a height of 150 meters. It is huge and impressive but the picture above somehow doesn’t manage to convey this. Just by looking at this image it is impossible to gauge the sheer size of the temple. A reference is missing.

Begginner photography tips 08

Mingun Pahtodawgyi. Are you getting a better sense of dimension?

Here I have added myself to the picture and despite my rather stupid pose, it instantly provides a point of reference. This relationship in size helps to categorize the stupa and establishes a sense of dimension. To achieve this effect and to provide a relationship in size, you can also use other elements which help the viewer to better comprehend an image.

Begginner photography tips 05

The hike up Mt. Minatubo, Philippines. Another example of relationship in size.

Try to practice, and utilize, these three building blocks to improve your photography. You can also try combining two of these techniques to generate an even greater sense of depth. Of course these concepts are by far not the only factors that make for a good and well composed image. There are many more things to take into account but for now, it should give you a good starting point.

Begginner photography tips 11

Temple dogs – a shallow depth of field and leading lines combined.

I hope you liked this article. Feel free to comment below and let us know what other techniques or concepts you found helpful on your quest of becoming a better photographer.

The post Using Depth of Field and Perspective for Better Composition by Philipp Dukatz appeared first on Digital Photography School.


Digital Photography School

 
Comments Off on Using Depth of Field and Perspective for Better Composition

Posted in Photography


Using Balance in Your Landscape Photography Composition

19 May

How to use Balance in your landscape photography

If you want to take your landscape photography to the next level, it’s time to start thinking about how you balance your subjects. The most powerful compositional tools that you have at your disposal are your knees, and your feet.

Simply stepping to the side a couple of feet can change your landscape compositions drastically. Take things one step further (weak pun intended) and bend those old knees to get a lower point of view. Now things might start to look more interesting.

The reason why I say this is because horizontal and vertical movement will allow you to achieve the ideal balance of subjects in your landscape images. If you’ve got a camera with one of those flippable LCD screens, you’ll be able to get right down on the ground or way up high on your tripod. Nice.

So what do I mean by ‘balance’?

Composition basics - using balance in your landscape photography

Something Wicked

I’m referring to how you balance subjects in your image on the horizontal and vertical planes. Simply plonking your interesting subject slap bang in the centre of your image might work, but there are times when you might get a better composition by placing it to one side of your image, and counter balancing that with something on the opposing side.

With my image above ‘ Something Wicked’, I wanted the moody storm clouds to be the main subject but it was essential to capture it bearing down on the mesa. By devoting the lower third of the frame to the mesa and the upper two thirds to the menacing clouds above, I balanced the subjects to my liking.

Subjects can’t move but you can

There may be times when you actually use interesting space to counterbalance your main subject, don’t assume that your spaces have to be filled with obvious subjects. I like to invite my viewers to think about what’s in that space, drawing their eye to what at first appears to be nothing, but upon closer inspection reveals something interesting.

Balancing subjects in images that feature reflections is really important. Perhaps you want to give more emphasis to the reflected elements? Movement from left to right, or up and down, can really place those elements exactly where they need to be. Moving one foot to the left might eliminate a pleasing mountain ridge in the distance. Dropping down a few inches might bring it back.

How to balance reflections in landscape photography - Gavin Hardcastle

With my image of Mono Lake above, I found that if I got too low to the ground, I lost some of the mass in the reflected clouds. The ideal vertical position was at an agonizing semi crouch that had my quads screaming. If I’d moved a little more to my right I would have lost the foreground tufa mound that you see in the lower left corner, which adds depth to the image.

I’ve done this so many times that I no longer think about doing it, something just clicks and I know the shot is in the bag. When you’re starting out however, this might require a bit of conscious thought, so here are two tips I always teach to my workshop students.

Do the Squat

After you’ve taken a shot with your camera at normal height on the tripod, squat down for a few seconds and survey the scene from a lower perspective. Make it a habit and I can virtually guarantee* that you’ll see a better shot around 50% of the time.

Do the Cobra

Rather than shuffling left to right, I often like to crack out my Cobra impersonation and move my head from side to side while trying to maintain the same height. By doing this I can see how my foreground subjects move around the subjects in the distance. If you see some bloke with a tripod on a cliff edge who looks like he’s doing some type of shamanic dance, that’s me setting up a shot.

This sounds really obvious, but I notice a lot of photographers don’t bother with these two basic moves. There’s more to composition than your standard tripod setup.

Composition tips for landscape photography

My shot of Los Arcos Park in Cabo San Lucas (Mexico) is a prime example of how ‘doing the Cobra’ helped me to visualize the ideal composition for having El Capitan (the central sea stack) positioned so that it fits just right in that gap. If I’d moved just 12 inches left or right I would have lost that pleasing ‘equidistant’ position. If I’d moved lower (the Squat), that foreground rock would have obscured the footsteps in the sand that lead your eye towards El Capitan.

Go Handheld

Yes, yes, I realize I’m a one man tripod enforcement unit but I’ll often start a shoot without the tripod so that I’ve got the freedom of movement to find the best compositions. Once I’ve discovered that ideal balance of subjects along the vertical and horizontal planes, I’ll grab the tripod and take the shot. This will save you a lot of fiddling around with the tripod, especially if you’re rocking one of those flimsy box store tripods that belong in the recycling bin.

Try it out

Go out and try the ‘Squat and Cobra’, then post your comments here to let me know your results. Being conscious of how you balance your subjects will give you better landscape images, and with practice, will become automatic.

** Guarantee is virtual and only worth the paper on which it is written.

For more articles on composition try these:

  • Composition, Balance and Visual Mass
  • A New Photographer’s Guide to Composition
  • Perspective in Photography – Don’t just stand there move your feet!

The post Using Balance in Your Landscape Photography Composition by Gavin Hardcastle appeared first on Digital Photography School.


Digital Photography School

 
Comments Off on Using Balance in Your Landscape Photography Composition

Posted in Photography


A New Photographer’s Guide to Composition

16 Apr

Recently I wrote a New Photographer’s Guide to Camera Settings. Once you become comfortable with your camera settings, the next step is to learn the rules of good composition and design for your photography.

So here are the 10 most important tips to take into account when framing your scene. Your guide to composition.

Grand Central and Chrysler Building, NYC.

Grand Central Terminal and Chrysler Building, NYC

#1 How will the viewer’s eyes flow through the scene?

I prefer to think about composition as if it is a game to please the eyes, and if you want to please the eyes, they need something to do and somewhere to go. When creating an image you want to think about the path that the viewers eyes will take through the scene, and whether this will be a fluid path or a jarring path.

  • Fluid Path – an image with leading lines, such as a road or stream, or an image with a foreground, middle ground, and background, which leads your eyes gradually from one level to the other.
  • Jarring path – an image with multiple, well spaced subjects for the eyes to bounce around between. Since there would be no lines leading between the objects in this type of image, they must be well spaced within the scene.

If you look at the photo above, the eyes are led directly to the Grand Central statue in the top left one third line in the scene, particularly because most people read from top to bottom and left to right.   The eyes are then led over to the Chrysler Building Spire and down to the detailed bridge.  These three elements make a triangle shape to lead the eyes through, however, the bridge acts as a very important element of the composition, keeping the eyes from leaving the scene and leading them back into the image, where they can either head up towards the statue or down to the people and cars on the street.

#2 Watch the Edge of your Images

Continuing from tip #1 above , for an image to feel balanced the edges of the image should be balanced. The eyes have a natural tendency to want to fall off an image through its edges. By putting elements in the corners you stop and catch the attention of the eyes, pushing them back into the scene. This is why landscape images often have small branches of trees or foliage in the top corners of the sky, and why vignetting is commonly used.

Central Park South, NYC.

Central Park South, NYC

Notice the branches in the top corners that function to keep the eyes in the frame. The corner elements often work even more effectively when only part of them is showing.

#3 Rule of Thirds Versus Centered Images

The rule of thirds is more of a suggestion than a rule. I’ve seen people take it to the extreme, but there are so many instances where a centered or different composition is preferable.

The rule of thirds refers to placing your main subject, or subjects, at one of the four one-third intersections in your photo, which you will notice in the second image below. This feels more pleasing to the eyes and it also allows you to simultaneously focus on a foreground subject on one side, while having a significant amount of space for an interesting background to balance out the scene.

Silk Exchange Building, NYC.

Silk Exchange Building, NYC

Rule of Thirds.

Rule of thirds

In the above photo, while not exactly on the one third line (it’s not a rigid rule), you can see the building is balanced out by the tree on the corresponding one third line. The buildings on the each edge act as leading lines and have the added purpose of acting as edge frames to keep the eyes within the scene.

However, don’t be afraid of placing your main subject in the center. A centered subject can block everything else out of the scene and make you focus only on the most important element. This works especially well with a strong facial expression or look in the eyes. In addition, this works for symmetrical scenes, which can feel extremely balanced.

Rucker Park, NYC.

Rucker Park, NYC

#4 Horizontal – Vertical or Skewed

Whether to capture an image horizontally, vertically, or slightly skewed is always a tough decision. There are many reasons to photograph both horizontally and vertically, however I often find that photographers have a tendency to rely more on one format.

Horizontal images often feel more natural to look at because they mimic the way that our eyes see the world. They also allow you to to fit more elements into your image and they provide an easier format for the eyes to flow through the image.

A vertical format can be beneficial when you want to get in closer and focus on a single subject or a tight area. It is a way to simplify your photo and get rid of any elements that might take attention away from your main subject.

When you are creating a horizontal or vertical image you want to make sure that your lines are straight.  If they are slightly off, the image will not feel balanced. However, sometimes you will want to skew your subjects at an angle. Skewing your subjects so the scene is neither horizontal nor vertical adds interest and energy to the photo. It promotes a spontaneous feeling and the lack of balance can actually be a pleasing to the viewer.

4-vertical_vs_skewed2

Tight, classic, vertical shot vs. energetic, skewed, detail shot

#5 Triangles and the Number Three

The triangular shape can be very important to good composition in photography. This does not refer to having the actual shape in an image but a relationship between three objects that create a triangle within the scene.

As long as the three objects are able to balance each other out, this is pleasing to the eyes because it creates a constant path through the scene.

5-Prada_Store2

Prada store, SoHo, NYC

#6 Perspective

The height from which you shoot can be a significant factor in how your images appear. If you want to emphasize height and power in a scene, get low to the ground and tilt the camera slightly up. People will look more important and prominent, and objects like trees or mountains will look even larger.

Shooting from a high camera angle on the other hand makes everything feel smaller and diminished in power. If the shooting height becomes extreme enough the image can even tend to take on an abstract and graphic feeling.

When photographing people, always pay attention to the camera angle.  Sometimes raising or lowering the camera slightly can make a big difference.

#7 Minimalist Versus Maximalist

Minimalist refers to keeping a photograph very simple, such as an image with a single subject and a pleasing and calm background. This can create a very powerful and graphic design.  There is power in the simplicity.  Valerie Jardin, recently wrote a good article on minimalist photography.

Maximalist on the other hand refers to a chaotic image, with a lot of elements competing with, and playing off of each other. However, within the chaos there is balance. This type of image is very hard to create in a balanced way, but when it works it can be a delight for the eyes that allows a viewer to explore through the scene.

Canal Street, NYC.

Canal Street, NYC. Balance in the chaos

The image above would not work if the subjects were not all spread out evenly throughout the scene.

#8 Color

Color is a vital aspect of design. A strong color on your main subject can add extra emphasis, while a strong color in an insignificant element can ruin the balance of a photo.

There is a large trend these days towards strong and unrealistic colors in photography, similar to the movies or on instagram. Strong colors do a better job of catching our attention at first, but muted colors can be just as interesting and create just as much of a mood as strong colors, if not moreso.  Explore desaturating your images slightly.

Each color has its own properties and ability to create mood within an image. A red tint can add a warm and energetic feeling to a photo, while a blue tint can make a scene seem either calm or cold and sterile. As portrait photographer Dan Winter’s states, “Green is an inherently calming and inviting color, and is tied to our natural surroundings.” Winters uses green for many of his portraits.

Here are some ways that colors can play off each other to add balance:

  • Complementary colors (colors on the opposite side of the color wheel)
  • Analogous colors (colors next to each other on the color wheel)
  • Different colors in similar shades
  • The same color in different shades
Spring and Bowery, NYC.

Spring and Bowery, NYC

#9 Getting Close and Filling the Frame

This is a very important concept. Figure out what is significant in the frame, get close, and only capture that. Cut everything else out and envelope the main subject. If the most interesting part of a person is their eyes, then capture the eyes up close.

Shop Owner, Trash and Vaudeville, NYC.

Shop Owner, Trash and Vaudeville, NYC

#10 Uniqueness and Breaking the Rules

Learn these rules and practice them, but keep in mind that sometimes you must break the rules. Be unique whenever possible. There is nothing more pleasing to the eye than something that is different.

Do you have any additional tips you’d like to add to this list? Please share in the comments, with example images if you have some.

The post A New Photographer’s Guide to Composition by James Maher appeared first on Digital Photography School.


Digital Photography School

 
Comments Off on A New Photographer’s Guide to Composition

Posted in Photography


How to Simplify and Improve Composition with Normal or Long Lenses

28 Feb

Telephoto lenses and composition

Andrew S. Gibson is the author of Understanding Lenses Part II: A Guide to Canon Normal & Telephoto Lenses, special deal on now 40% off at Snapndeals for a limited time only.

Wide-Angle Lenses

A potential issue with wide-angle lenses is that you try to include too much information in the frame. It takes real skill to create a strong composition with lenses that have a wide field-of-view. It is easier with normal and telephoto lenses, because you can utilise their narrow field-of-view to compose strong yet simple images with little in the background to distract the viewer.

Let’s take a look at how that works:

Field-of-view diagram

Angle of view from a wide-angle lens (left) and long lens (right)

This diagram shows the difference in field-of-view between a wide-angle lens (left) and a telephoto lens (right). You can think of a wide-angle lens as a lens of inclusion: it enables you to fit a lot of the scene in a photo. You can get close to the subject and still fit in a lot of the background.

The telephoto lens is a lens of exclusion. You don’t get so close to your subject and there is less in the background.

Here are a couple of examples:

Portrait taken with wide angle lens

I took this portrait using a wide-angle lens (24mm on a full-frame camera). I was able to get fairly close to the model and still include a lot of the background.

Portrait taken with telephoto lens

This portrait was taken using a short telephoto lens (85mm on a full-frame camera). I was able to get in close and exclude most of the background. The effect is emphasized by placing the model against a dark background.

This effect seems to kick in at around 50mm on a full-frame camera (the equivalents are 35mm on an APS-C camera, and 25mm with the micro-four thirds format). Here’s a photo taken with a 50mm lens on a full-frame camera to illustrate:

Photo taken with a normal lens

This means that you can use this technique to simplify composition even if the only lens you have is a kit lens. Just set it to the longest focal length and move in closer to your subject.

There are other ways to simplify composition – you can’t rely just on focal length:

  1. Pay attention to the background. Does it contain bright highlights or anything else that pulls attention away from the subject?
  2. Are the colours in your photo harmonious? If the colours don’t work well together this can also weaken the composition.
  3. Experiment with depth-of-field. Using a wide aperture helps simplify composition by throwing the background out of focus. This works best with prime lenses as they have wider apertures than most zooms.
  4. Move in as close as you can to the subject. One of my favourite techniques is to use a close-up lens (it’s called a lens but looks like a filter and screws to the front of your lenses the same way) to reduce the minimum focusing distance of my 85mm lens and get in really close. Another benefit is that depth-of-field becomes narrower in close up photography, helping create images with beautiful bokeh.

Here’s an example taken with an 85mm lens fitted with a Canon 500D close-up lens:

Photo taken with 85mm lens plus close-up lens

What are your thoughts? Do you use normal or telephoto lenses to simplify composition the same way? What are your favourite focal lengths? Let us know in the comments.


Understanding Lenses Part II: A Guide to Canon Normal & Telephoto Lenses

Understanding Lenses ebookMy ebook Understanding Lenses Part II will teach you how to get the most out of Canon’s normal and telephoto lenses. It contains a buying guide, takes a deep look at aperture and bokeh, and shows you how to focus accurately with telephoto lenses. It’s now 40% off at Snapndeals for a limited time only.

The post How to Simplify and Improve Composition with Normal or Long Lenses by Andrew S. Gibson appeared first on Digital Photography School.


Digital Photography School

 
Comments Off on How to Simplify and Improve Composition with Normal or Long Lenses

Posted in Photography