RSS
 

Posts Tagged ‘Classic’

Six Reasons to Upgrade From Lightroom 6 to Lightroom Classic CC

25 Mar

If you’re a Lightroom 6 user you may be wondering whether it’s time to upgrade to Lightroom Classic CC. Yes, it will cost you more to move over to the Lightroom Classic subscription, but you will receive a lot of extras in compensation. Let’s take a look at what they are, so you can decide whether the upgrade is worth it for you or not.

1. The Lightroom Classic CC subscription includes Photoshop CC

Lightroom Classic CC upgrade

It’s true that many photographers do all their photo processing in Lightroom without ever moving across to Photoshop. If that’s you, then don’t feel you need to use Photoshop just for the sake of it.

But there are things you can do in Photoshop that you can’t in Lightroom. If you’d like to try any of these, then you’ll need to subscribe to Lightroom Classic CC to access to the latest version, as you can’t buy a standalone version of Photoshop CC.

These are just some of the things you can do in Photoshop that you can’t in Lightroom.

  • Use layers and masking.
  • Advanced portrait retouching.
  • Blend or composite multiple images together.
  • Swap skies or heads (in a group portrait).
  • Use Content-aware fill to remove unwanted items.
  • Make complex selections.
  • Add texture overlays.
  • Add fancy borders.
Lightroom Classic CC upgrade

I used Photoshop to add a texture layer and an interesting border to this still life photo.

2. Lightroom Classic CC lets you synchronize photos to use with the Lightroom CC mobile apps

With Lightroom Classic CC you can synchronize selected Collections and view the photos in those Collections in the Lightroom CC app (formerly known as Lightroom mobile) on a tablet or smartphone. One benefit of this is that you can download the photos to your device so that you can show them to people even when your device is offline.

This makes Lightroom CC a great way to show your portfolio to people while on the go. You can also develop photos in the Lightroom CC app, which may come in handy when you are away from home.

Lightroom Classic CC upgrade

A Collection of photos in Lightroom Classic CC.

Lightroom Classic CC upgrade

The same Collection in the Lightroom CC iPad app.

3. Lightroom Classic CC lets you display photos online

There are two ways to display your photos online using Lightroom Classic CC. The first is to make a Collection public – something you can do with any synchronized Collection. When you do this Lightroom generates a URL that you can give to other people so that they can see the photos in the Collection in a browser (also known as Lightroom Web).

This is a good way to share photos with family, friends, and even clients. If the viewer logs in with an Adobe ID they can even favorite photos and add comments.

Lightroom Classic CC upgrade

This is how the same Collection shown above looks when displayed in a browser.

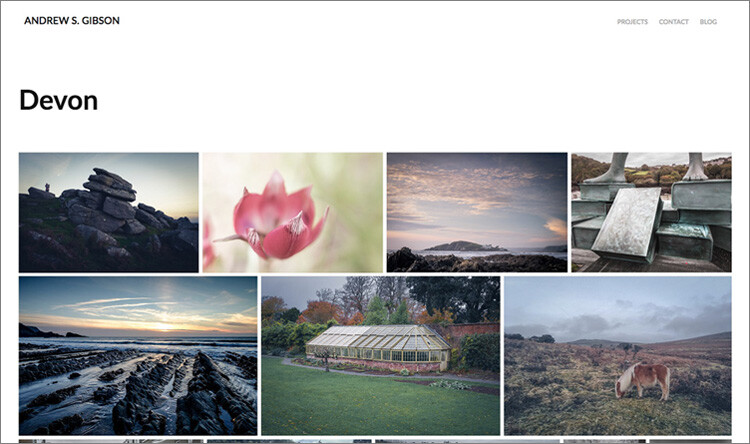
The other way is to use Adobe Portfolio to build your own portfolio website. I explored this option in more detail in my article How to Create a Beautiful Online Gallery with Lightroom Classic CC and Adobe Portfolio in 15 Minutes.

Adobe Portfolio is the easiest way I know of to turn a synchronized Collection into a website portfolio.

Lightroom Classic CC upgrade

One of the pages from my Adobe Portfolio-generated website.

4. Lightroom Classic CC is faster than Lightroom 6

The latest upgrades to Lightroom Classic CC means that it runs much faster than Lightroom 6. The exact speed gains depend on your computer setup (for example, you need to have at least 12GB of RAM to take advantage of some of the speed gains in the latest Lightroom Classic CC release).

But there’s no doubt that the process of importing photos and generating previews is much faster in Lightroom Classic CC. If speed is an issue with Lightroom 6, it may be time to upgrade.

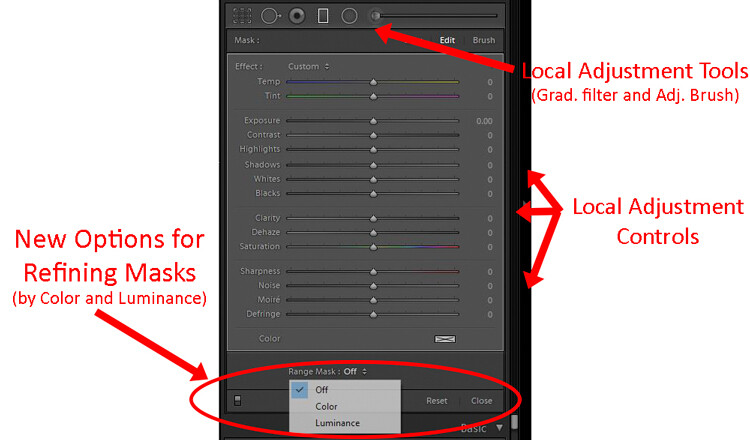
5. Lightroom Classic CC has Color Range Masking and Luminance Range Masking

These new tools give you more options when it comes to making selections and applying Radial Filters, Graduated Filters and the Adjustment Brush. They are extremely useful when it comes to making local adjustments. You will need to upgrade to Lightroom Classic CC if you’d like to use them.

Lightroom Classic CC upgrade

The Color Range Masking tool in action. I used it here in conjunction with the Adjustment Brush to apply Clarity to the red tin, but no other part of the photo.

6. Lightroom 6 is no longer supported by Adobe

While I’ve tried to emphasize what you will gain by upgrading to Lightroom Classic CC in the rest of the article, there’s no getting away from the fact that Lightroom 6 is no longer supported by Adobe. As a result, new features added to Lightroom Classic CC won’t be available to Lightroom 6 users.

The question you need to ask yourself is how important are the new features, such as Color Range Masking, to you and your workflow?

There’s no need to make an immediate decision. There’s nothing wrong with continuing to use Lightroom 6 for now and upgrading to Lightroom Classic CC in a year or two when the difference between the two is much greater.

You also need to be aware of the effect it will have on your workflow if you buy a new camera whose Raw files aren’t supported by Lightroom 6. In this situation, you can use Adobe’s free DNG Converter to convert the new camera’s Raw files to the DNG format, which can then be read by Lightroom 6. If that is too much of an inconvenience then it may be time to upgrade to Lightroom Classic CC.

Conclusion

These are the six main reasons that I can think of that Lightroom 6 users might want to upgrade to Lightroom Classic CC. If you’re considering the upgrade then take the time to think through your decision and decide which of these (if any) apply to you.

It’s important to make the right choice because once you upgrade to Lightroom Classic CC it’s extremely difficult to go back to using Lightroom 6. The reason for this is that Lightroom upgrades your Catalog so it’s compatible with Lightroom Classic CC. But the new Catalog format isn’t recognized by Lightroom 6. So make your decision wisely.

Can you think of any other reason why a Lightroom 6 user might want to upgrade to Lightroom Classic CC? Have you already upgraded? Then please let us know your thoughts in the comments below.


Mastering Lightroom ebooks

Want to get a head start with Lightroom? Take a look at my popular Mastering Lightroom ebooks, written to help photographers learn how to use all of Lightroom’s powerful features. Use the code DPS20 to get 20% off your first order.

The post Six Reasons to Upgrade From Lightroom 6 to Lightroom Classic CC by Andrew S. Gibson appeared first on Digital Photography School.


Digital Photography School

 
Comments Off on Six Reasons to Upgrade From Lightroom 6 to Lightroom Classic CC

Posted in Photography


Lightroom Classic 7.2: Major performance boost, new features, and more

14 Feb

Lightroom Classic 7.2—the performance boosted version of Lightroom DPReview got to test for ourselves at the end of January—has finally arrived! And with it come numerous performance improvements, better support for Intel hardware, a fix for speed issues experienced by some users, and some new features to boot.

Additionally, Adobe has also updated the new cloud-based Lightroom CC ecosystem for both desktop and mobile operating systems. Let’s take them one at a time.

Lightroom Classic Performance Boost

The company explains that it has worked with Intel to improve performance scaling on computers that have multiple cores and at least 12GB of RAM, and as we showed in January, the result is much faster importing and preview generation, and improved speed for things like adjustments rendering in Develop, HDR/Panos rendering, and more.

“One key attribute of the enhancements is that they scale appropriately with a customer’s investment in hardware,” says Adobe. Users who invest in newer, more powerful hardware will see more performance improvements, particularly if the system has at least 12GB of memory. This time around, Adobe says it focused on batch processing improvements (how efficiently system resources are used and batch tasks are completed), but the company will also focus on Interactive (interface response speed) needs in the near future.

Some users had experienced problems with Lightroom Classic slowing down over time, an issue Adobe says it has fixed “in most cases,” though it is possible some users will still experience this issue.

Lightroom Classic Feature Enhancements

Performance improvements and fixes aside, Lightroom Classic 7.2 comes with multiple new features, including a text search for finding a specific folder (“Folder Search”), the ability to filter favorites within folders, an option for creating collection sets from folders for use with Lightroom mobile, as well as a feature for creating collections from Map Module pins.

This version of Lightroom Classic also adds a library filter for unedited and edited images and enables users to create smart collections with unedited or edited images.

$ (document).ready(function() { SampleGalleryV2({“containerId”:”embeddedSampleGallery_3173476968″,”galleryId”:”3173476968″,”isEmbeddedWidget”:true,”selectedImageIndex”:0,”isMobile”:false}) });

Finally, Adobe says it has enabled Photoshop Continuously Scalable User Interface in the Adobe Camera Raw plugin, with the scaling limited to 100% or 200%. Support for per-monitor scaling in Windows has also been added. In explaining the plugin update, Adobe said, “This is primarily a Windows change to sync up Photoshop, and Windows users will now be able to scale the ACR plugin from 100% to 500%, in increments of 100%.”

The full Lightroom Classic 7.2 update changelog is available here, new camera support can be found here, and new lens profile support can be found here.

Updates to Lightroom CC and Lightroom Mobile

In addition to the Lightroom Classic CC updates, the whole Lightroom CC ecosystem—including the Lightroom Mobile apps on iOS and Android—have been updated as well with “optimized performance, added support for new cameras and lenses, and some great new features for desktop and Android.”

Adobe says it put a lot of effort into “tuning and improving stability” with this update. Lightroom CC on Mac and Windows will see performance improve when moving between photos, grid scrolling, and exporting, while all the apps across mobile and desktop should be “a lot more stable.”

As for new features, Lightroom CC for desktop gets the ability to add copyright to imported images; meanwhile, Lightroom Mobile on Android gets a geometry tab for correcting perspective distortion, the ability to add a watermark upon export, the ability to search your Lightroom library with Google Assistant, and a new “Add to Lr” option that will allow you to add photos from third party apps directly into your Lightroom library.

$ (document).ready(function() { SampleGalleryV2({“containerId”:”embeddedSampleGallery_8528326624″,”galleryId”:”8528326624″,”isEmbeddedWidget”:true,”selectedImageIndex”:0,”isMobile”:false}) });

All of these updates are available now, so if you have a Creative Cloud subscription, update to the latest versions and give them a go. And if you want to dive deeper into all of these new features, head over to the Adobe blog.

Articles: Digital Photography Review (dpreview.com)

 
Comments Off on Lightroom Classic 7.2: Major performance boost, new features, and more

Posted in Uncategorized


*Updated* Adobe is preparing a major Lightroom Classic performance update, and we got to try it

30 Jan

This article has been updated to include results from a 2015 quad-core Apple MacBook Pro.

Adobe Lightroom Classic users have been pining for a serious performance update for ages—even Adobe admitted that Lightroom performance was lackluster, and improving it was ‘top priority.’ Well, it looks like ‘top priority’ is going to pay off very soon.

Late last week, Adobe told DPReview that it has a significant Lightroom Classic performance update in the works. The update—which is “coming soon”—is supposed to improve performance across the board for anybody using a multi-core machine with at least 12GB of RAM. Or, in Adobe’s own words:

In this upcoming Lightroom Classic 7.2 release, we were able to make significant strides with our partners at Intel on addressing key performance issues. We have optimized CPU and memory usage so that performance will scale better across multiple cores on computers with at least 12 GB of RAM.

Adobe claims the update will result in:

  • Faster import and preview generation
  • Faster walking of images in the Loupe View
  • Faster rendering of adjustments in Develop
  • Faster batch merge operations of HDR/Panos
  • Faster export

The company’s own benchmarks back up this claim in a big way. Adobe shared these results with DPReview, revealing substantially improved export times between the current v7.1 and the upcoming v7.2.

Adobe Export Test

Adobe tested the new build on three machines:

  1. A 10-core iMac Pro with 32GB of 2666MHz DDR4 RAM, a 3GHz Intel Xeon W processor, AMD Radeon Pro Vega 64 graphics card with 16GB of RAM.
  2. An 8-core Windows 10 PC with 64GB of 2400MHz DDR4 RAM, a 3.2GHz Intel Xeon E5-1660 processor, and an Nvidia GeForce GTX 1080 graphics card with 8GB of RAM.
  3. A 10-core Windows 10 PC with 64GB of 2400MHz DDR4 RAM, a 2.9GHz Intel Core i9 7960X processor, and an Nvidia Quodro P2000 graphics card

Each of the three showed significant speed improvements when exporting 100 heavily edited Raw files as either full-resolution JPEGs or full-resolution DNGs:

  • The 10-core iMac Pro exported JPEGs 29.5% faster and DNGs 43.7% faster
  • The 8-core Windows 10 PC exported JPEGs 32.5% faster and DNGs 32.4% faster
  • The 10-core Windows 10 PC exported JPEGs 48.3% faster and DNGs 64.7% faster

Additionally, while subsequent tests of the current version got slower and slower on the Windows, version 7.2 fixes this problem. In other words: Lightroom Classic will no longer slow down over the course of a long editing session on Windows machines.


Our own tests also showed a noticeable speed boost when it came to exporting files, and a massive increase in performance on import. Adobe gave us early access to the new build, and we tested it alongside the current version of Lightroom Classic CC twice. We ran an initial export test on a 2016 13-inch MacBook Pro, with 16GB Ram and a 3.3GHz dual-core i7 processor running macOS 10.12.6, and found a modest but still significant speed improvement of around 11%.

After speaking to Adobe’s technical experts, we then conducted a follow-up import and export test on a Mid-2015 15-inch MacBook Pro. Specifically, a Retina model with a 2.2GHz quad-core Intel Core i7, 16GB of RAM, and Intel Iris 5200 Pro graphics card. It’s not exactly in the same class as the 8+ core powerhouses that Adobe seems to have lying around, but it’s arguably closer to the average setup for an enthusiast or semi-professional photographer. Also, despite being an older machine, we knew that according to Adobe, more cores would give us a better chance of seeing some serious performance gains.

As such, these results replace our earlier published figures.

DPReview Import Test (2015 Quad-core MacBook Pro)

When importing 130 Raw files from the Fujifilm X-T2 (7.6GB in total), we saw a major performance boost in LR Classic CC 7.2, on our quad-core 2015 MacBook Pro. Roughly 80%, in fact.

  • LR 7.1 – 4:05 (245 seconds)
  • LR 7.2 – 50 seconds

DPReview Export Test (2015 Quad-core MacBook Pro)

When exporting the same 130 Raw files as JPEGs (quality level 80, Adobe RGB), after heavy edits (including exposure, shadow/highlight adjustment, lens corrections and luminance noise reduction) we saw a modest performance improvement in LR Classic CC 7.2 compared to 7.1. Roughly 10% when averaged out – very similar to the 11% performance increase we saw when we ran the earlier test on our dual-core 2013 Mac.

  • LR 7.1 – 11:08 (668 seconds)
  • LR 7.2 – 10:16 (616 seconds)

Adobe was adamant that this update is just the beginning. The company is “pleased with these performance improvements” and believes Lightroom Classic users will be please as well, but Adobe also told us it is “far from done.” The company promises continued performance optimizations and improvements in future releases of Lightroom Classic CC.

For now, we’re just happy to see the first fruits of that “top priority” promise Adobe made last year.

Articles: Digital Photography Review (dpreview.com)

 
Comments Off on *Updated* Adobe is preparing a major Lightroom Classic performance update, and we got to try it

Posted in Uncategorized


How to capture a classic perfume product shot with a single speedlight

27 Jan

Dustin Dolby, the photographer behind the workphlo YouTube channel, is great at breaking down product photography into the simplest possible bits. By using Photoshop to mask together multiple exposures, he’s able to capture professional looking product photos using extremely minimal gear.

In his latest episode, he shows how a single speedlight and some reflecting material can be used to capture a professional-looking photograph of perfume. What’s more, the exercise of capturing these exposures helps explain some basic lighting tenets when shooting products:

Lighting a perfume bottle in a studio setting, requires the photographer to understand the angles the light is coming from. The substance of a few key lighting techniques can be boiled down into a few tips. Backlighting is a great way to show the volume of a translucent object, which couples nicely with frontal lighting.

Here’s a look at the high-res final render, composited from a few different exposures you see him capture in the video above:

Photo by Dustin Dolby/workphlo, used with permission.

As Dustin explains in the video, you can do a lot more here—both compositionally and with different lighting techniques if you really want to have some fun—but this tutorial is more about explaining the basics and capturing a “classic” perfume shot with very little gear.

Check out the full tutorial up top, and if you want to see more of Dustin’s ‘workphlo,’ head over to his YouTube channel or follow him on Instagram and Facebook.

Articles: Digital Photography Review (dpreview.com)

 
Comments Off on How to capture a classic perfume product shot with a single speedlight

Posted in Uncategorized


The Voigtländer Nokton classic 35mm F1.4 for E-Mount ships in February, will cost $750

20 Dec
The Voigtlander Nokton Classic 35mm F1.4 FE at CP+ last February. Photo by Barney Britton

Sony shooters will have a new manual-focus lens to play with soon. After announcing the lens as ‘in-development’ way back in February, Cosina Japan has revealed pricing and availability for the E-Mount Voigtlander Nokton classic 35mm F1.4 lens. According to the translated webpage, the lens is scheduled to ship in February of 2018, at a price of ¥ 85,000, or approximately $ 750 USD.

This, just a couple of weeks after announcing pricing and availability for another E-Mount Nokton that was “in-development” in February: the Nokton 40mm F1.2.

The Nokton classic 35mm F1.4 is an E-mount version of the M-mount Nokton that Voigtländer has been selling for many years, and we actually got to see this lens in person at CP+ last February. Unfortunately, the 35mm was the only lens under glass that day, so we couldn’t get a true ‘hands-on,’ but we expect it to be built to the same high standard as the older M-mount version.

Another photo from our through-the-glass ‘hands on’ at CP+. Photo by Barney Britton

To learn more about this lens, head over to the Cosina website, read the translated Cosina Japan page, or check out our ‘hands-on’ impressions from last February.

Articles: Digital Photography Review (dpreview.com)

 
Comments Off on The Voigtländer Nokton classic 35mm F1.4 for E-Mount ships in February, will cost $750

Posted in Uncategorized


Cosina has discontinued the Zeiss SLR Classic series of lenses

15 Dec

Cosina Japan has officially discontinued the Zeiss SLR Classic lens series, specifically bringing an end to the: Zeiss Distagon T* 15mm F2.8, 18mm F3.5, 25mm F2, 28mm F2, and 35 F1.4, as well as the Zeiss APO?Sonnar T* 135mm F2.

The notice simply reads (translated):

“[Production End Guide] The ZEISS SLR classic series of products (2.8/15, 3.5/18, 2/25, 2/28, 1.4/35, 2/135) has finished production.”

The announcement comes a couple years after Cosina launched a new lens series called Milvus, which is designed for digital SLR cameras and more-or-less replaced the SLR Classic series. The Milvus series more than makes up for the lenses that are currently being discontinued, already boasting 11 lenses to its name, but there’s no doubt that some true gems will be relegated to eBay auctions from this point forward.

You can still find some Zeiss SLR Classic glass new at online retailers for now, but don’t expect that to last much longer.

Articles: Digital Photography Review (dpreview.com)

 
Comments Off on Cosina has discontinued the Zeiss SLR Classic series of lenses

Posted in Uncategorized


New Lightroom CC or Lightroom Classic: Which Version is Right for You?

10 Nov

You may have heard that Adobe recently unveiled some pretty significant changes to Lightroom. When you consider using Lightroom, you will now have two different versions to choose from; both are aimed at different audiences. In this article we will take a look at both the new Lightroom CC and Lightroom Classic, so you can choose the one that best meets your needs.

New Lightroom CC or Lightroom Classic: Which is Right for You?

How we got here

There are a lot of letters and numbers associated with Lightroom, so it might be helpful to walk through a quick timeline of how we got here.

In the beginning, way back in 2007, there was Lightroom. At first, Adobe was content to come out with periodic new releases and number them. So we had Lightroom 1.0, 2.0, 3.0, 4.0, 5.0, and 6.0, with each version they added some new features. If nothing else, the system was easy to understand.

After that, however, Adobe moved to a subscription model. They simply called it Lightroom CC, which stood for Creative Cloud. With the change to the subscription model, there wouldn’t be big periodic launches. Instead, new features would be rolled out periodically. That’s the world we lived in until recently.

Now, however, Adobe has essentially split Lightroom into two different applications. They are Lightroom CC and Lightroom Classic. Let’s take a closer look at each of them.

Lightroom Classic

Let’s start with the simple one, Lightroom Classic. If you are already familiar with Lightroom, then this is the easy one to understand. Lightroom Classic is basically the same Lightroom you have been using but it’s just updated a little bit. There are really only two changes.

The first is that it is faster. It uploads (imports) image faster, it moves through pictures faster, it edits faster – it seems to do everything faster. There have been a lot of complaints about speed in recent versions of Lightroom. As Adobe added more and more features, it gummed up the works so it was moving slower and slower. Adobe clearly made fixing this a priority.

So Lightroom Classic is faster – a lot faster – than previous versions of Lightroom. How much faster? I haven’t seen any numbers, but the increase in speed will be noticeable to you immediately. It is much faster.

Beyond the speed, is there anything actually different between Lightroom Classic and the prior version? Yes, but not that much. In fact, when it comes to making global changes to your pictures, there is nothing different. The features and controls are all exactly the same. There is one change that is small but is really handy if you make local adjustments to your pictures (i.e. changes to discrete portions of your pictures rather than the whole thing).

New Lightroom CC or Lightroom Classic: Which is Right for You?

Adobe added new masking controls to the local adjustment tools – those being the Adjustment Brush, Graduated Filter, and Radial Filter. It is called the Range Mask feature, and it allows you to limit the selection you make by either the Luminance or the Color. In other words, if you make a selection with the Adjustment Brush or one of the filters, but there are things you don’t want to be included in your selection, you can remove them using these tools. This promises to make local adjustments much more doable in Lightroom.

Lightroom CC

Now comes the new part, and the one everyone is talking about (for good or for bad), Lightroom CC. This is a whole new Lightroom. It really comes down to three principles.

  1. Lightroom CC is simpler to use
  2. It is designed for mobile devices
  3. It relies largely on cloud storage

Let’s take a look at each of these.

#1 Lightroom CC is simpler

Lightroom CC has a simpler interface. It is streamlined and more intuitive. Those new to Lightroom will find it easier to navigate and use.

New Lightroom CC or Lightroom Classic: Which is Right for You?

Simplified Lightroom CC editing controls.

This comes at a cost though. Experienced Lightroom users will find the experience a little like switching from Photoshop to Photoshop Elements. There are entire modules of Lightroom that are missing from Lightroom CC.

There are no Print, Maps, or Books modules. There are some editing functions that are missing as well (the Tone Curve and Camera Calibration). There is no Photo Merge or HDR. In fairness, however, over 90% of the editing functions in traditional Lightroom are present in Lightroom CC.

New Lightroom CC or Lightroom Classic: Which is Right for You?

Expanded Lightroom CC editing controls.

#2 Lightroom CC is for mobile

Lightroom CC is designed for mobile platforms. It will look and work exactly the same whether you use it on your phone, your tablet, or your desktop. You’ll be editing full resolution versions of your photos, and they will be synced to all your devices. What’s more, Lightroom CC makes it easy to share your photos to various social media channels. Because of this, however, you can only export to JPEG (no PSDs or TIFFs) and only in sRGB, which is the color space that is used for all online photos.

#3 Cloud storage

All your edits in Lightroom CC are backed up to cloud storage. Of course, this will cost you extra. More about the plans below, but the first TB of data will cost you $ 10 a month, and it goes up from there. There is also an additional element of organization added in; Lightroom CC uses Adobe’s Sensei to automatically add keywords to your photos.

The Plans

Here’s the deal, though, you don’t necessarily have to choose between the different versions of Lightroom. If you subscribe to the Photography Plan (in my opinion, most readers of this website should be doing that) you already get Lightroom CC. It has just been added to your subscription, along with a token 20 GB of cloud storage. If you aren’t already familiar with the Photography Plan, it is where you get Photoshop and Lightroom for $ 10 a month.

If you want additional cloud storage, it will cost you more. 1 TB of cloud storage costs another $ 10 a month, taking the Photography Plan plus the 1 TB of cloud storage up to $ 20 a month.

Finally, if you only want the new Lightroom CC, you can get it along with 1 TB of cloud storage for $ 10 a month. That might be a good option for those that are very mobile, store everything to the cloud, and/or are just getting started with Lightroom.

Here is a chart from Adobe showing the options:

Purchased outright version is going away

There is one more thing you need to know. If you want to purchase Lightroom outright and avoid the monthly charge, you can still do so, but Lightroom 6 is your last chance. Adobe will also stop updating that fairly soon (meaning if you buy a new camera and LR 6 can’t open the raw files there will be no update for that – you’d have to convert them all to DNG before importing). The days of being able to purchase Lightroom (as opposed to renting it) appear to be just about over.

Which version of Lightroom is right for you?

So, which one is right for you? If you are just starting out with Lightroom and your photography is based on mobile platforms, then Lightroom CC might be for you. But if you are already using Lightroom, I think Classic is the way to go.

If you are used to Lightroom, then switching to CC will probably seem like a step backward. Further, if you tend to use desktops and laptops for your editing, then Classic is clearly the way to go. For those instances when you need to do something on your phone, there is always Lightroom Mobile (not ideal, but it works in a pinch).

Of course, all this assumes that Adobe keeps updating Lightroom Classic (the use of the term “Classic” has a lot of people scared since that is often the kiss of death in the tech world).  For the moment at least, Adobe is promising continued updates to it.

Poll

Fill in this quick poll and tell us what you’ll be choosing in regards to Lightroom.
Note: There is a poll embedded within this post, please visit the site to participate in this post’s poll.

The post New Lightroom CC or Lightroom Classic: Which Version is Right for You? by Jim Hamel appeared first on Digital Photography School.


Digital Photography School

 
Comments Off on New Lightroom CC or Lightroom Classic: Which Version is Right for You?

Posted in Photography


How to Create a Beautiful Online Gallery with Lightroom Classic CC and Adobe Portfolio in 15 Minutes

04 Nov

One of the common questions I hear from photographers is regarding a way to link Lightroom to a photography portfolio website. It usually comes from photographers who don’t like the design options in the LR Web module. The perfect solution doesn’t exist, perhaps the closest (until recently) is Koken, a free plugin that I wrote about some time ago that uses Lightroom’s Publish Collections to update your online portfolio.

But, the good news is that Adobe has just made creating a portfolio website a whole lot easier with its latest update to Adobe Portfolio.

Adobe Portfolio Lightroom

What is Adobe Portfolio?

Adobe Portfolio is exactly what it sounds like – an online gallery of photos. The benefit of using Adobe Portfolio is that it’s very easy (no web design or coding skills required). It also integrates with your Lightroom Collections (this is the update I just referenced).

That means all you have to do is set up some Collections containing the photos you want to include in your gallery and synchronize them with Adobe Portfolio. Then it’s just a matter of choosing a layout, tweaking the design, and making the website live. You can do all of this in less than 15 minutes.

The only caveat is that you need to be an Adobe Creative Cloud Photography Plan subscriber. Just like Lightroom mobile and Lightroom web, it isn’t available to photographers who use a standalone (purchased) version of Lightroom.

Curious? You can check out a portfolio website I created for myself using Adobe Portfolio here to see what it’s capable of.

Adobe Portfolio Lightroom

Step-by-Step Guide to Adobe Portfolio

The first step – and probably the hardest – is to decide what photos you want to include in your portfolio. Once you’ve made your mind up about that, the rest is easy.

  1. Create a Collection Set in the Library module called Portfolio.
  2. Create several Collections inside this Collection Set, one for each gallery you want to include on your portfolio website.
  3. Add photos to the Collections.
  4. Arrange the photos in the order in which they are to be displayed online.
  5. Synchronize the photos in the Collections by ticking the boxes to the left of the Collection name (marked below).

My portfolio website (link above) has four galleries; Black & White, Portraits, Spain, and Devon. Each gallery corresponds to a Collection in Lightroom with the same name (seen below).

Adobe Portfolio Lightroom

Register

Go to www.myportfolio.com and sign in with your Adobe ID. If you haven’t created a portfolio yet click the button that says Get Started Free. Otherwise, click the button that says Edit Your Portfolio.

Adobe Portfolio Lightroom

Choose a design for your gallery

Now it’s time to choose a layout. Start by clicking the Switch layouts icon (marked below).

Adobe Portfolio Lightroom

Adobe Portfolio gives you eight layouts from which to choose. All the layouts are fully mobile responsive, which means they work and look professional on mobile phones and tablets as well as desktop computers. Decide which one you want to use and click the Use this layout button.

Adobe Portfolio Lightroom

It may be difficult to visualize which one works best when populated with your photos. Don’t worry about that at this stage – you can change the layout afterward if you want to.

Settings

Next, click the Edit your settings icon (marked below).

Adobe Portfolio Lightroom

Go to Site Options and click the Lightbox for Images tab. Tick the “Enable lightbox for images on my pages” box and click Done (see below). This is important as it lets people view the photos on your portfolio website. If you don’t tick it all they will be able to see are thumbnails.

Adobe Portfolio Lightroom

Add images to your gallery

Click the Manage content icon (marked below).

Adobe Portfolio Lightroom

Go to the Integrations tab and Click the Add Collections button. The website opens a window that displays all your synchronized Lightroom Collections. Pick the ones you want to include in your portfolio and click the Import Selected button (see button below lower-right).

Adobe Portfolio Lightroom

Go to Adobe Portfolio, click on the Manage content icon again and go to the Website Pages tab. Make sure the switch is set to the On position for each Collection you want to display on your portfolio website.

Adobe Portfolio Lightroom

Choose cover photos

Now it’s time to tidy up the gallery cover photos. You’ll need to do this once for each gallery. Start by clicking the pencil icon next to the gallery cover photo (see below).

Adobe Portfolio Lightroom

Pick Edit Cover Image from the menu to edit the cover photo. At the moment this feature is a little limited – the website automatically picks the photo that appears on the cover and it’s not easy to change it.

The only way currently is to click Upload a new image and upload a photo you’ve exported from Lightroom – there’s no way to select another photo from the Collection. But you can zoom the photo and adjust the crop. Click Done when you’re finished and repeat for the other gallery cover photos.

Adobe Portfolio Lightroom

Setup the domain name

Click the Edit your settings icon again and click Domain Name. You can select a URL for your portfolio in the form yourname.portfolio.com. This is the easiest option. Alternatively, if you have a domain or a subdomain you can follow the instructions to use that.

Adobe Portfolio Lightroom

Preview your portfolio gallery

Click the gray Preview button to see a preview of your portfolio website. Happy with what you see? Click Update Live Site to publish your portfolio to your chosen URL. Congratulations – your brand new portfolio website is now live!

Adobe Portfolio Lightroom

Customizing the design

So far I’ve shown you how to get your portfolio website online as quickly as possible. The hardest part, as I said, is deciding which photos to include in your gallery. That can take hours, days, or even weeks. But, once the decision is made, you can get your portfolio online in under 15 minutes. It really is that quick.

If you’re happy with the default settings of your layout you can stop there, your job is done. But it’s worth spending some time looking at both the page and global settings. You can customize things such as fonts, colors and the number of columns on your front page. There is an option to add pages (for instance an About page) and links to other websites. You have a lot of options and it’s worth exploring them to see how you can individualize your portfolio website.

You can even change the layout by clicking on the Switch layouts icon. Adobe portfolio remembers your customizations, which gives you peace of mind as it means you won’t lose your customizations when you switch from one layout to another.

When you are finished, remember to click the green Update Live Site button. None of your customizations are published until you click that button.

How to update the photos

Portfolios are fluid and as time goes by you will add and remove photos from the Collections you created. You may also add more Collections as your photo collection grows. There are two steps to updating your portfolio website.

1. Update your Lightroom Collections and make sure Lightroom has had time to synchronize the changes.

2. Go to Adobe Portfolio, click on the Manage content icon and go to the Website Pages tab. Click on the Cog icon next to the Collection that you want to update and select Reset from Lightroom to update your portfolio gallery.

Adobe Portfolio Lightroom

3. Finish by clicking the green Update Live Site button to publish the updates to your portfolio website.

Next steps

With the recent update that lets you integrate Lightroom Collections, Adobe Portfolio has become the easiest way to create a portfolio website using Lightroom Collections. The only downside, as mentioned earlier, is that you need to be a Creative Photography Plan subscriber to use this feature.

If you are not, then look at Koken as an alternative. Don’t dismiss the Web module out of hand either, it has some very useful features and doesn’t require a CC subscription to use.


You can learn more about all aspects of Lightroom with my bestselling Mastering Lightroom ebooks.

The post How to Create a Beautiful Online Gallery with Lightroom Classic CC and Adobe Portfolio in 15 Minutes by Andrew S. Gibson appeared first on Digital Photography School.


Digital Photography School

 
Comments Off on How to Create a Beautiful Online Gallery with Lightroom Classic CC and Adobe Portfolio in 15 Minutes

Posted in Photography


Interview: Adobe will ‘absolutely continue investing’ in Lightroom Classic

24 Oct

The release of Lightroom CC and Lightroom Classic CC—and the untimely death of Lightroom as a stand-alone product that is available sans subscription—has inspired some very strong reactions within the photo community. But even those of us who aren’t itching to yell profanities at the folks at Adobe are left with some questions about the future of this software.

Enter Dan Watson of Learning Cameras, who recently sat down with Adobe director of product management Tom Hogarty and Lightroom product manager Sharad Mangalick for a deep dive on this major release, how it would impact current Lightroom users who don’t want to switch to a cloud-based workflow, and, most importantly, what the future looks like for Lightroom Classic CC.

In other words: is Lightroom Classic an afterthought that is going to be phased out in a couple of years?

You can check out the full interview at the top of this post—they cover everything from the reason for the name change, to moving images between the two versions, to potential future features, video integration, custom preset, and a lot more—but since everyone has been wondering, here’s the answer to the question above.

No, Lightroom Classic CC isn’t going anywhere.

In fact, Adobe has two separate teams working to build out Lightroom CC and Lightroom Classic CC, so this isn’t some side-project that will quickly be relegated to the back burner.

Some photographers want to work on a hard disk-based desktop workflow, and Adobe has no interest in deserting those users, at least according to Hogarty. Speaking of Lightroom CC, he said:

We don’t want [the name change] to be perceived as a lack of investment, or a lack of effort with that product. It is very good at what it was designed to do, which is manage files and folders on disk. All of those desktop-local workflows that photographers told us about during our first Lightroom Public Beta back in 2006, we are absolutely going to continue investing in. It’s a different team.

To hear more about Lightroom CC and Lightroom Classic CC from the product managers who actually decide where these products go in the future, click play up top. And if you want to hear our thoughts on the product-line split, read two opposing opinions by senior editors here at DPReview below:

RIP Lightroom 6: Death by subscription model

Hello Lightroom CC: Embracing the future

Articles: Digital Photography Review (dpreview.com)

 
Comments Off on Interview: Adobe will ‘absolutely continue investing’ in Lightroom Classic

Posted in Uncategorized


Somewhere Outside of Time: 13 Classic Retro-Futuristic Architectural Visions

07 Sep

[ By SA Rogers in Architecture & Houses & Residential. ]

Retro-futuristic architecture seems to exist outside of time, perhaps in parallel universes where the versions of the future envisioned by their creators actually became reality. They combine design elements from the decades in which they were built with futuristic elements as the architects imagined them, recalling the science fiction of their respective eras, often seeming like remnants from movie sets. Many still stand in a rapidly changing world, feeling like portals to somewhere very far away.

Walden 7 by Ricardo Bofill

Built in 1975, this housing structure by Ricardo Bofill located outside Barcelona, Spain takes inspiration from the science fiction novel Walden Two by B.F. Skinner. It originally included 446 residences in 18 towers, resulting in a labyrinth organized around seven interconnecting interior courtyards. Bofill imagined that this structure would be a utopian urban residence addressing many of the problems of urban life, with space for gardens and social interaction as well as two swimming pools. The high rise still stands and functions as an apartment building, with some units combined to create larger spaces.

Palais Bulles by Antti Lovag

The strange and bulbous Palais Bulles, or Palace of Bubbles, was built in 1989 on a cliff overlooking the Mediterranean Sea. Though it’s often used as a setting for fashion shoots and film festival parties, architect Antti Lovag emphasizes that how the structure is inhabited is its most important aspect. “Whether for economic reasons or lack of technical solutions, human beings have confined themselves to cubes full of dead ends and angles that impede our movement and break our harmony.”

Monsanto House of the Future by Monsanto

Did you know that infamous agrochemical giant Monsanto (known for creating Agent Orange during the Vietnam War) built a ‘house of the future’ at Disneyland in 1957? Located at the entrance to Tomorrowland, the house was designed by Monsanto in collaboration with MIT and Disney Imagineers, showcasing their vision of what life would be like in 1987. Made of fiberglass, the house was elevated on a pedestal with the intention of allowing it to rotate. Everything was modular and made of synthetic materials. Monsanto’s House of the Future closed in 1967, and though it was scheduled to be demolished in one night, the wrecking ball bounced off its tough facade, and a 2-week demolition job was ultimately required to take it down.

Habitat 67 by Moshe Safdie

First built as a pavilion for the World’s Fair in 1967 after architect Moshe Safdie conceived it as his master’s thesis, Habitat 67 remains one of the most unusual buildings of its kind, featuring 146 residences and a network of interlocking forms and walkways. The architect wanted to maximize the amount of private space and natural environments within a small urban footprint, enhancing the quality of life with gardens, fresh air and views. It was intended to be the first phase of a much larger complex, but Safdie’s vision for futuristic affordable housing failed to proliferate due to the high per-unit cost of his design.

Next Page – Click Below to Read More:
Somewhere Outside Of Time 13 Classic Retro Futuristic Architectural Visions

Share on Facebook


[ By SA Rogers in Architecture & Houses & Residential. ]

[ WebUrbanist | Archives | Galleries | Privacy | TOS ]


WebUrbanist

 
Comments Off on Somewhere Outside of Time: 13 Classic Retro-Futuristic Architectural Visions

Posted in Creativity