RSS
 

Posts Tagged ‘Capture’

Mount a Canon 5D Mark III to a custom drone and capture the beauty of nature

04 Nov

Polish photographer Miron Bogacki mounted a Canon EOS 5D Mark III to a custom-built octocopter and flew the drone over Northern Poland in the Valley of Drw?ca. We hope that you enjoy the gorgeous video footage he captured as much as we did! To see more of Miron’s work check out his website.

Articles: Digital Photography Review (dpreview.com)

 
Comments Off on Mount a Canon 5D Mark III to a custom drone and capture the beauty of nature

Posted in Uncategorized


How to Capture a Ghost (in a Photo) in 3-ish Ways

27 Oct

As Halloween Approaches, you’re probably noticing more ghosts around.

They can be quite camera-shy and tricky to photograph, so we’re here to show you how.

Shhhh, now lean in close for this part.

*whispers* We haven’t actually managed to photograph a real ghost, but we’re pretty good at faking it using just our phone. Read along to learn just how we do it.

But only if you don’t scare too easily. *ghost sounds* OoooOooOOoOooo!
(…)
Read the rest of How to Capture a Ghost (in a Photo) in 3-ish Ways (290 words)


© laurel for Photojojo, 2016. |
Permalink |
No comment |
Add to
del.icio.us

Post tags:


Photojojo

 
Comments Off on How to Capture a Ghost (in a Photo) in 3-ish Ways

Posted in Equipment


How to Capture the Perfect Action Shot in Sports Photography

08 Oct

Sports photography is a fun challenge for any photographer. There is plenty of intensity and emotion to be found at any competitive event. These elements combine to create the potential for some truly memorable images.

At the same time, the speed and unpredictability of some games can be intimidating. Especially if you are used to dealing with slower-moving subjects, like portraits or landscapes.

Never fear! This article will arm you with helpful knowledge so that your next brush with sports photography will result in some fantastic captures.

Getting your settings right

A soccer player about to kick a soccer ball, captured with a high shutter speed

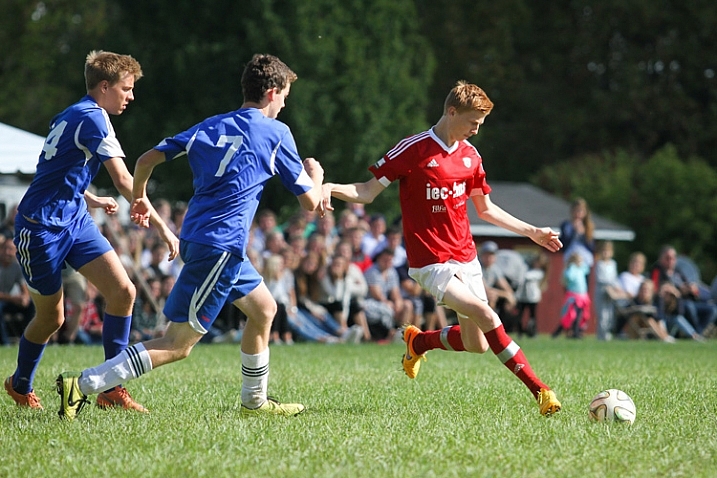
This image was taken at 1/1600th of a second, which freezes the action completely. This super fast shutter speed is possible because there is a lot of sunlight.

Chances are that you’ve probably taken your fair share of blurry sports photo. Typically, players or athletes are moving at high speeds, and your camera doesn’t necessarily know for itself how to compensate.

Freezing the action

If you want to freeze the action in a photo, you’ll need to use to choose a fast shutter speed. But, how fast does it need to be? Well, that depends on the sport. 1/250th of a second should be enough to freeze kids playing soccer, but you’ll need to go a lot faster if you want to capture a baseball in mid-flight. Experiment and find what shutter speed you need to use in order to produce sharp images.

Adding motion

On the other hand, you can also experiment with slowing down the shutter speed and panning your camera throughout the picture to create a sense of speed and movement. It takes a bit of practice to get right, but if you match the speed of your subject, you can hold them in focus while the directional blur emphasizes the sense of movement.

Whenever possible, you will want to use a wide aperture, such as f/3.5 or lower. This will create a narrow depth-of-field, and helps the players to stand out, as the background distractions will be blurred.

Two soccer players fighting for the ball with spectators watching the game behind them

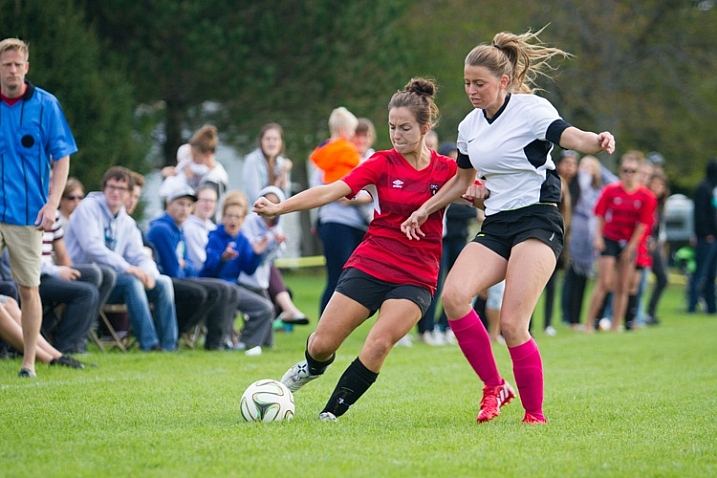
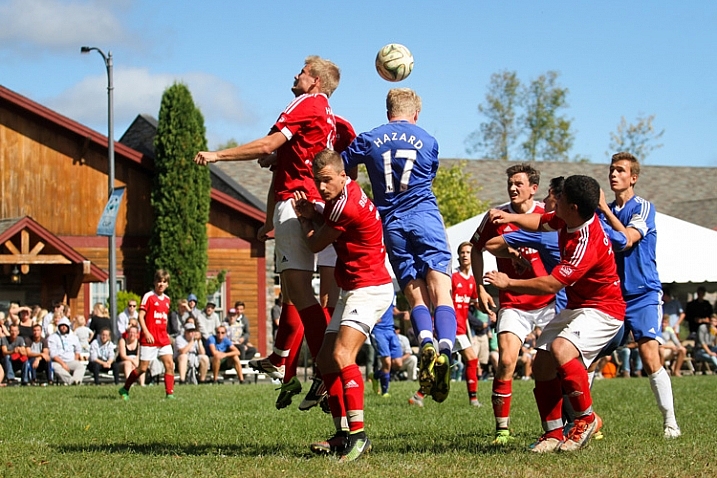
This image was shot at an aperture of f/2.8 so that the spectators in the background don’t distract from the players chasing the ball.

If the sport is being held outside during overcast conditions or indoors with consistent lighting, consider using manual exposure mode and settings. It may take a bit of time to figure out, but you’ll get much more reliable and consistent images.

Pick your spots

When you first arrive at the field, arena, gym or track, consider all of your potential angles and options. Your options will be different depending on whether you have a short or a long zoom lens.

For many sports, you won’t be able to cover every angle. Getting up close with a wide-angle lens means you won’t be able to capture plays on the other side of the field. While using a long zoom means you may struggle to capture play right in front of you.

Find the “sweet spots” – the places on the field of play which are the perfect distance away for your camera and lens combination. You’re going to get your best images when the play is in these areas. Rather than trying to get an incredible picture when play is far away on the other side of the field, be patient and prepare so that you make the most out of every opportunity when play is in your sweet spots.

A hockey player tries to deke around the goaltender

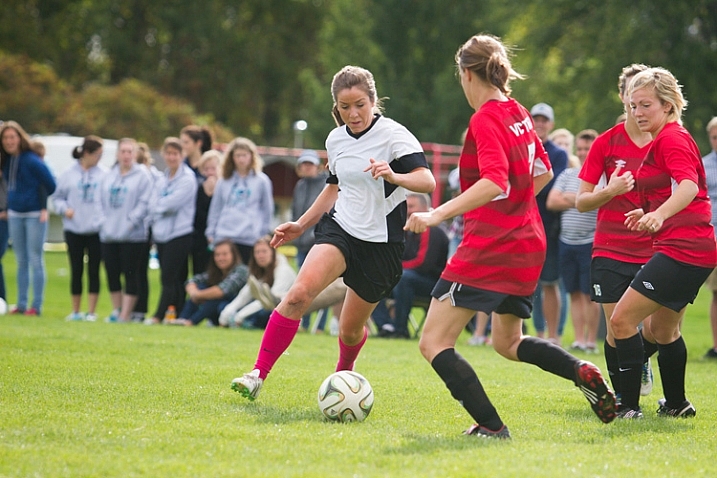
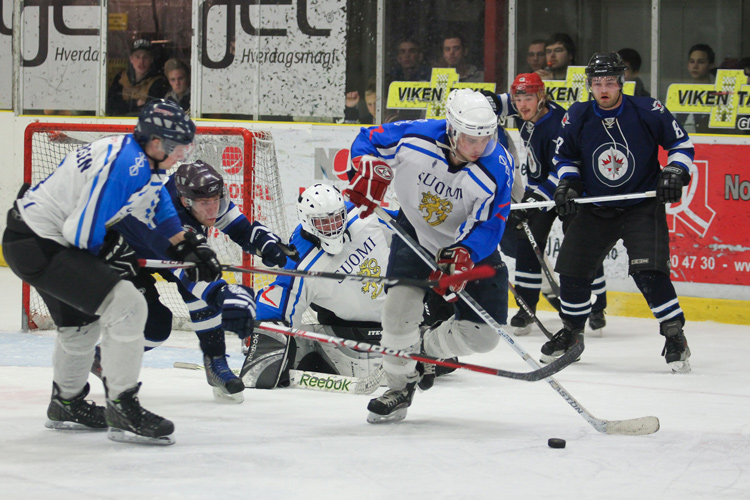
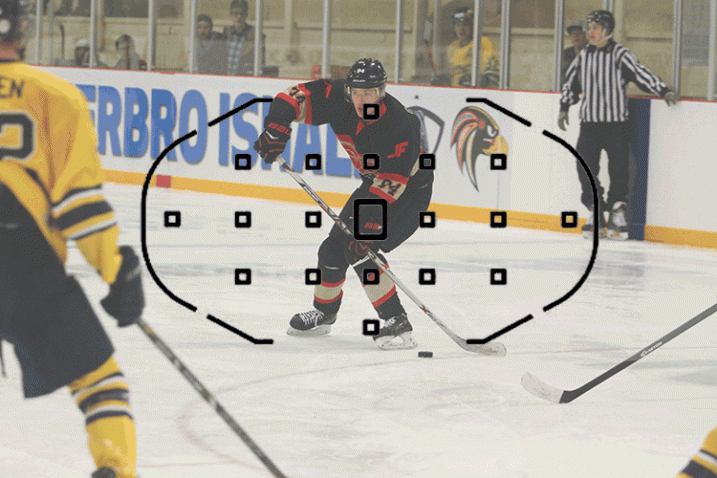
When I stand near the benches with a 70-200mm lens, this play in front of the net is right in my sweet spot, which allows for strong composition.

Where possible, it’s a good idea to put yourself in a position where the players will be coming towards you. This allows you to see faces and get a better sense of depth than if you shoot from the sidelines and get a side profile view of everyone.

A female soccer player attempts to dribble the ball through two defenders

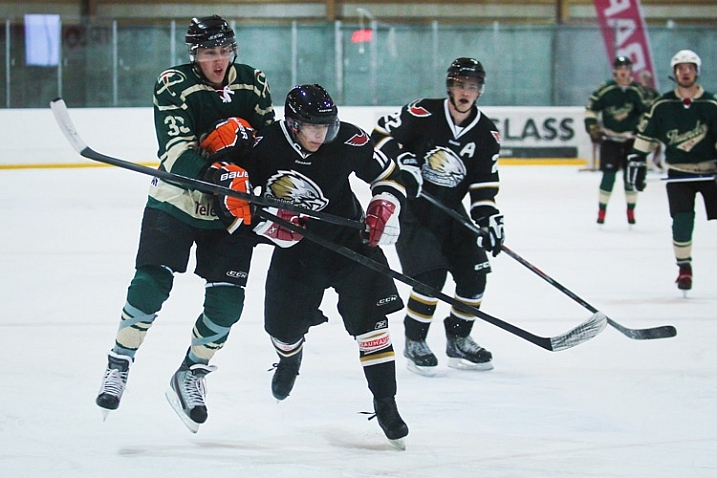
Get in the middle of the action

If you want to take a sports photo that will be memorable, you need to bring the viewer in as close as possible. Typically, this means using a zoom lens like the 70-200mm. If you don’t have a long zoom lens, simply get as close as possible to the field.

Perspective changes quite a bit as you zoom in. A wide-angle shot looks very different than a shot with full zoom (long telephoto). Consider how you can use this change in perspective to find some unique captures.

Many first-time sports photographers are nervous to zoom right into the middle of the action. Yes, it does come with some risks. You’re likely to snap plenty of frames where an unexpected zig or zag took the player partially out of the image. This is part of sports photography. Even the professionals aren’t able to nail the perfect shot every time.

A hockey picture where the focus has missed

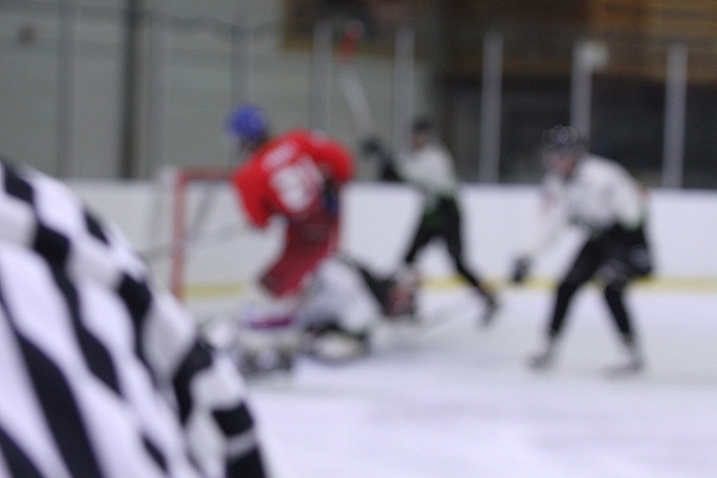
In this shot, the referee passed in front of the camera and messed up the focus. Don’t feel upset if some pictures turn out like this! These kinds of images will be very familiar to any sports photographer.

Risks sometimes pay off

If you have trouble following the play, it definitely is an option to play it safe by taking a wider shot and then cropping in closer afterward. But by taking a high risk, high reward approach to composition will result in some magnificent images!

Another reason to use zoom: To capture expressions!

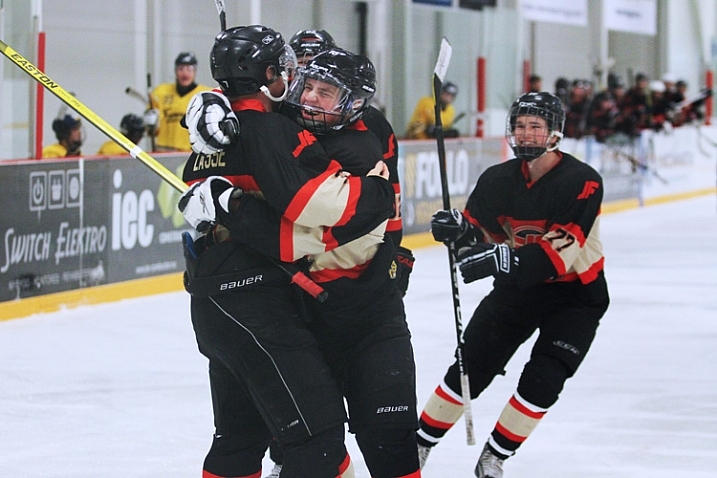
The most memorable sports shots show faces full of emotion – whether that is the joy of the game, the thrill of victory or the agony of defeat.

Image of hockey players celebrating on the ice after a goal

Image of two soccer players laughing while preparing for a corner kick

Timing is everything

There seems to be a furious competition between manufacturers to see who can make a camera that takes the most images per second.

Burst mode is an incredibly useful tool for sports photography, but all too often it can be a crutch. Just because you can take 10 pictures in one second doesn’t mean you should.

Soccer players attempting to head the ball into the net from a corner kick

Having the ability to take pictures in bursts should be secondary to anticipating the action. Understanding of the game and having a sense for what is going to happen next is more important than burst mode in every case. If you return from every event with thousands of pictures, all taken a fraction of a second apart, it’s going to be a strenuous job of sorting and finding the keepers.

With that said, burst mode can be a great tool if you don’t want to miss any opportunities and have lots of room on your card.

Lastly, don’t spend the whole game chimping! Chimping is when you get so caught up checking out all of your sweet pictures on your camera’s LCD screen that you miss an incredible play that happens right in front of you. Your pictures will still be there when the game is over. Focus on getting your shot!

Hitting your focus

Having the perfect settings, composition and timing won’t count for anything if you miss your focus.

With the possibility for spectators, colourful advertisements, and other players in the background of your images, your camera’s focus might wander and lock onto the wrong target.

For sports photography especially, you might want to consider using back button focus. With this method, your focus is controlled by a button on the back of your camera, which you can reach with your thumb. The shutter button doesn’t influence the focus at all.

By separating the actions of focusing and taking the picture, you will have greater control and independence over both roles. You may need to consult the manual for information on how to switch your camera to back button focus.

An sports action shot of hockey players fighting for the puck

Focus modes

Your camera comes with different focus modes that you can use to get more reliable results, even when dealing with fast and unpredictable subjects. The process for selecting these modes will be a bit different for every camera, so consult your manual for information on how to switch to these options.

First off, you can allow your camera to use all the focus points to determine the best target to lock onto. This can often go wrong, however, as the camera may choose the wrong point, leaving you with an out-of-focus image.

You can get a bit more specific with zone focus, which allows you to select a group of focus points that the camera uses to determine what it focuses on. This focus mode gives up greater control over what the camera locks onto, but still leaves some room for error.

If you want to be very precise, single point focus allows you focus based on just one point of your choosing. This is great if you want to focus on a specific player in a group. The drawback is that is may not be as accurate, and you may need to be very steady in order to stay locked on target.

Shows all the different focus modes

This image shows three different focus modes as seen through a Canon 7D: Full Auto Focus, Single Point Focus, and Zone Focus

You can also select how the focus will track. These settings may have different names from manufacturer to manufacturer, but they do the same thing.

Continuous or AF-C (Nikon) / AI Servo (Canon):  In this mode, your focus will constantly seek for as long as you are holding your focus button down. This is ideal for moving subjects, and should be your first choice for sports.

Single or AF-S (Nikon) / One Shot (Canon):  In this mode, your focus will find a target and lock, even if you continue to hold down your focus button. While this is often slightly more accurate than servo focus, your subject may have already moved out of focus by the time you take the shot.

AF-A (Nikon) / AI Focus (Canon):  This mode is an intelligent blending of the two previous modes – it will determine if the target is moving and will lock or track accordingly.

Making the most of the focus technology your camera has to offer will play a big role in snapping some excellent sports shots!

Bonus tips and tricks

If you are photographing a car race or a long jump event, it can be a real challenge to track your subject in action. A fast moving car or runner isn’t an easy target for a lot of cameras.

One surefire way to hit your focus even under these tricky conditions is to prefocus. When using this technique, you pick a spot somewhere ahead on the track to carefully set your focus. Then, when your subject comes through, you simply snap the picture and voila!

Two hockey players in mid air after a body check collision

If you want to add drama and action to your images, consider shooting from a lower angle. This perspective can often make athletes seem heroic or larger than life. Shooting from a lower angle also means the background will show spectators or the opponents behind the player, giving a better sense of the setting and action.

Take Lots of Pictures!

When you get home and load the images on your computer, you’re going to find that many of your shots have missed focus, have players in awkward or unflattering angles, or other annoying distractions. This is perfectly normal! It isn’t easy to capture the chaos of sports, and you’re going to need to throw out a lot of shots.

Over time, as your feel for the game from behind the camera improves and as you begin to master these techniques, you will find yourself coming home with more and more keepers!

googletag.cmd.push(function() {
tablet_slots.push( googletag.defineSlot( “/1005424/_dPSv4_tab-all-article-bottom_(300×250)”, [300, 250], “pb-ad-78623” ).addService( googletag.pubads() ) ); } );

googletag.cmd.push(function() {
mobile_slots.push( googletag.defineSlot( “/1005424/_dPSv4_mob-all-article-bottom_(300×250)”, [300, 250], “pb-ad-78158” ).addService( googletag.pubads() ) ); } );

The post How to Capture the Perfect Action Shot in Sports Photography by Frank Myrland appeared first on Digital Photography School.


Digital Photography School

 
Comments Off on How to Capture the Perfect Action Shot in Sports Photography

Posted in Photography


How to Shoot a Sequence of Photos That Capture a Story

27 Sep

As a photographer, you’ll often concentrate on perfecting your art at taking one perfect photo. However, there are many occasions where you’ll need to string together a sequence of photos with differing styles. Whether you’re shooting a magazine article or making a personal project, knowing how to produce photos that show details, people, and the whole scene is a skill worth having.

Shooting a sequence of photos

In the example you’re going to see in this article, a traditional puppet show will be used to produce this sequence of photos, but any number of other scenarios could apply. There is always plenty to photograph and although my example shows detail, portrait, and scene-setting images, there are other photos that could also have been taken from the same event.

In the image below you can see the area’s that are boxed. They contain the photos you’d be aiming to get from a scene such as this. Let’s talk about each of these shots and why they’re all important.

Overall image

The scene-setting photo

This is the big picture that shows your audience what’s going on, you’ll likely be using a wide-angle lens here to get as much story into your scene as you can.

The image from the puppet show below is the scene-setting photo. In this photo, the viewer can see the stage, audience, and the performers. In this case, a 50mm lens was sufficient to get the entire story needed from this scene. The aim here is not to go in too close, but to tell the whole story. The photo should capture the scale involved, and often it is helpful to do this shoot from an angle above or overhead

sequence tells a story - scene setter

This photo is the scene setter, you can see the stage and the audience watching the performance.

You’ll notice the image is almost identical to the image used to set out the example at the beginning. The left portion of the frame was a distracting element that wasn’t needed to show the action happening in front of the camera. It’s important to remember that although you want to capture a large canvas when telling your story, too much could detract from the specific story you intend the scene setter to display.

The portrait photos

Portrait photos are a real mainstay of any sequence that seeks to tell a narrative, it’s the people and their story you’re looking to show. There are many types of portraits, though, from ones that just show the face, to those that explore more of the scene around the person (often called environmental portraits).

When photographing a stage production you want to explore as much as you can, that means photographs of the stage, and if possible backstage as well. If the production is small, getting backstage may be as simple as asking the performers on the night of the event. But for large productions or things like music gigs, getting permission to shoot backstage ahead of time is advised. A lot of this work can and should be carried out with lenses best suited to portrait work, which means using primes lens in the range of 35mm to 135mm.

Sequence of photos

The layers created by a shallow depth of field act to give this photo impact, with the main focus on the puppet.

In the scene, you see photographs C (above) and D (below) are of the stage. In photograph C the image needed some compression to fit both the puppet and the puppeteer into the frame. To achieve that you’ll need to use a longer focal length, in this case, a 135mm lens was used. When using prime lenses like the 135mm f/2 you have a lot of control over the depth of field, making it possible to make your subject sharp while the background is blurred.

sequence of photos

In this photo, the interaction on stage between the puppeteers is captured.

In this case featuring the puppet, but contextualizing the image with the puppeteer in soft focus, gave the image more story, and hence more impact. Photograph D (above) shows more interaction between puppeteers and more of the stage in general. This time, the image was shot with a 50mm lens allowing for a wide part of the scene to be shown. Once again, focus is on the puppets, and the rest of the scene is softer because a large aperture of f/3.5 was used.

The photograph taken from location A shows musicians performing backstage (below). In this case, some tarpaulin was used to frame the image and give context to the photo. The woman was playing the gong as part of the music that goes with the puppet show. So although the live audience can hear this music, in terms of photography this aspect of the show can only be shown by going backstage to photograph musicians playing their instruments.

sequence of photos

This photo shows the backstage area of the puppet show. The tarpaulin background and the area being a little too cluttered for the stage can deduce this.

The detail photos

On their own detail photos can look nice, but don’t show your audience what’s happening. When added to a set of photos they can be a vital component that complements the scene setting and portrait shots. These photos are best taken with lenses that can get close to the subject, in other words, macro. You might only include details, or you could show detail but allow some background into the frame for context as well

sequence of photos

Here a line of puppets awaits use. Lines work well in detail photos, as do patterns.

sequence of photos - details

The puppets are full of intricate details, as this photo shows. The use of a macro lens at closer quarters would have enhanced this photo.

In the puppet show detail photos were taken on stage as shown in picture E (below), and backstage with two pictures taken from location B (above). At location B detail photos of the puppet were taken using a 135mm lens. Usually shooting with a macro would be better. However, walking around backstage wasn’t possible, so getting close to the subject was also not possible. The first shot shows a photo where the face of the puppet is prominent, taken in a similar manner to a portrait. The second image shows the puppets where they rest backstage between performances.

sequence of photos

Here is a detail photo that shows context.

Picture E (above) is a detail shot of one of the puppets, but with a bit more context as you can see how the puppet is being used. The shot has a minimalist feel to it, which makes it ideal for adding text above the puppet’s face. The strong light on the subject allowed me to expose for the puppet, and make the background much darker, which gave this shot its minimal tone.

How this set could be expanded on

Okay, so above there are a set of seven photos combining a number of different photos of differing styles into the one grouping that shows a puppet show. This is a snapshot of a show during a performance, could this be expanded on though? Yes, of course, it could. You could also get images of the puppeteers preparing before the show begins, you could ask if they’d let you photograph the puppets in a much more staged manner where you use lighting and select a background that would compliment the puppets. Then there could also be some staged portraits of the puppeteers with their puppets to add to the mixture of images taken during the show itself.

Other scenarios

The list of other scenarios that you could shoot to create a sequence of images is endless; it could be a rock concert, a wedding ,or a sports event. In the next example scenario, you’ll see another set of photos how a green tea field can be captured.

1
The scene-setting photo of the green tea fields, taken from a wide vantage point. On the left you can see some white bags, this is the area you’ll find portraits of the plantation workers. The field also has lots of lines and patterns that are ideal for detail photos

sequence of photos details

The fields are ideal for taking detail photos. In this case, a macro lens wasn’t needed to capture the lines and details, as the tea field required a wider lens.

sequence of photos

An environmental portrait shows a plantation worker at work, now you can see how those white bags are used.

sequence of photos portrait

Another portrait photo shows a plantation worker with his basket.

Your turn

If you have any scenario’s you’d like tips on capturing in the way described in this article please add those and any other comments in the comment section below.

googletag.cmd.push(function() {
tablet_slots.push( googletag.defineSlot( “/1005424/_dPSv4_tab-all-article-bottom_(300×250)”, [300, 250], “pb-ad-78623” ).addService( googletag.pubads() ) ); } );

googletag.cmd.push(function() {
mobile_slots.push( googletag.defineSlot( “/1005424/_dPSv4_mob-all-article-bottom_(300×250)”, [300, 250], “pb-ad-78158” ).addService( googletag.pubads() ) ); } );

The post How to Shoot a Sequence of Photos That Capture a Story by Simon Bond appeared first on Digital Photography School.


Digital Photography School

 
Comments Off on How to Shoot a Sequence of Photos That Capture a Story

Posted in Photography


Photokina 2016: 360 and VR Capture Roundup Video

25 Sep

In hall nine, which encompasses Photokina 2016’s ‘Futurezone,’ there are dozens of 360 and VR capture devices on display for attendees to ogle. There’s also plenty of people wearing VR headsets and appearing vaguely zombified to ogle, as well. So whether you think VR and 360 capture represent a future that’s dazzlingly bright or frighteningly dim, companies all over the world are jumping in with their own capture solutions. Heck, even Nikon’s joining the VR race. 

Thankfully, DPReview contributor Lars Rehm has been making the rounds and has selected a handful of the most interesting devices on display in the Futurezone. Check them out in our roundup video.

Articles: Digital Photography Review (dpreview.com)

 
Comments Off on Photokina 2016: 360 and VR Capture Roundup Video

Posted in Uncategorized


Adobe Lightroom Mobile for iOS 2.5 brings Raw DNG capture

14 Sep
In order to capture shadow detail, this image was metered from the shadows, resulting in blown out highlights. The DNG version on the right enabled the highlights to be recaptured without issue. Photo and caption courtesy of Adobe.

Adobe has released an update for the iOS version of its Lightroom Mobile app, taking advantage of iOS 10’s DNG support. Version 2.5 offers Raw capture and editing within the app, provided that you’re running Apple’s newest OS version on an iPhone 6s, 6s Plus, SE or iPad Pro 9.7.

Apple snuck a mention of iOS 10’s Raw capabilities into its WWDC keynote in June. Available for download today, iOS 10 brings DNG raw capture and editing to Apple devices. Today’s Lightroom Mobile update for iOS brings the app’s feature set into line with the Android version, which has been able to capture and edit Raw since February. 

Version 2.5 also brings support for the wide gamut P3 color space offered by the iPad Pro 9.7 and the forthcoming iPhone 7 and 7 Plus. 

Adobe Lightroom for iOS 2.5 is available for download now from the App Store.

Articles: Digital Photography Review (dpreview.com)

 
Comments Off on Adobe Lightroom Mobile for iOS 2.5 brings Raw DNG capture

Posted in Uncategorized


How Black and White Photography Taught Me to Capture Emotion

04 Sep

My first experience with photography was a black and white film photography class in high school. We were given one roll of film per week, and told to, “go capture something compelling.” Though learning photography on a fully manual, very low-tech camera, resulted in a bit of a learning curve when I switched over to digital (hello metering modes, back button focus, and exposure compensation!), one of the most important things that my first black and white photography class taught me was the importance of capturing emotion in photography.

capture-emotions-2

Ted Grant–an amazing Canadian photojournalist–has said, “When you photograph people in color, you photograph their clothes. But when you photograph people in black and white, you photograph their souls!” While I’ve certainly seen my fair share of color photos that beautifully capture emotion, I also relate to Grant’s words very much.

capture-emotions-4

Black and white strips the image down to the basics

In a sense, black and white photography strips away all the extras, and forces you to think about things like contrast and emotion, in a way that isn’t always be as crucial when you’re shooting in color. Whether intentional or not, it can be easy to use color and props as a sort of crutch in photography. I love a photo of a toddler licking a giant multi-colored lollipop just as much as the next person. But, the tendency with images like that can sometimes be for the color and the whimsy to carry the image, rather than the emotion.

Starting in black and white photography taught me that it’s not enough to have perfectly matched clothing, or a brightly colored chandelier hanging from a tree in the woods. It’s not enough to stand someone in front of a beautiful backdrop and tell them to smile. Compelling photographs do more than that. They give you a glimpse into what the person being photographed is feeling right at that moment.

capture-emotions-6

Black and white only challenge

If you’ve never had experience shooting exclusively in black and white, I highly suggest giving it a try. Most digital cameras have the capacity to shoot black and white right in camera (consult your manual). It’s a really great exercise to occasionally force yourself to do so. Grab a friend, and go shoot 50 or 100 frames in black and white.

I do recommend shooting black and white right in camera for this exercise, because it completely eliminates color from the equation. It’s a quick and easy way to see which images are successful in black and white, and which are not. It also helps train your brain to “think” in black and white. Once you’ve completed this quick exercise, take a look at your images. Are your black and white images compelling? If not, one of the reasons may be that the images are lacking emotion.

capture-emotions-1

Getting emotion into your images

As a photographer, there’s no exact science to capturing emotion in your photos. Some children will be naturally expressive, and some couples will be naturally affectionate. Other people may need a bit of help getting comfortable enough to express themselves in front of the camera. As always, building rapport with the people that you’re photographing, before and during the session, will go a long way in helping them relax and feel comfortable.

capture-emotions-8

Your subjects will mirror you

In my experience, the key to capturing emotion, is helping your subjects to actually feel the same emotion that you’re trying to capture during the session. One simple and effective tip is to remember that humans naturally mimic the emotions and attitudes of those around them. As the photographer, if you come into the session laughing and joking around, it’s much more likely that the people you’re photographing will start to laugh and joke around as well.

So, keep a book of silly knock knock jokes tucked into your camera bag, or come prepared to tell a funny story that happened to you recently. If you’re having a bad day, make the conscious decision to leave it behind for the duration of your session, and even fake it until you make it if you must. It really does make a difference!

Couples

capture-emotions-3

When photographing couples, asking them to tell you a story about how they met, got engaged, or the best part of their wedding, are all topics that can help cultivate real emotions during your session. Ask the question, then wait and watch carefully, with camera in hand, for interaction between the couple during the story.

Kids

For kids, try asking them about their favorite movie, TV show, or the best part of their week so far. If you don’t have children around the same age as the ones you’re photographing, it’s a good idea to ask the parents in advance about the sorts of books, songs, TV shows, movies, and/or sports their children enjoy so that you can prepare thoughtful questions that will allow them to talk about the things they love.

capture-emotion-9 capture-emotions-7

Get them laughing

As funny as it sounds, another method that’s really effective in making people laugh is to actually ask them to fake laugh. Ask them to be silly and to give you their biggest and deepest Santa Claus chuckle. It will feel weird and awkward, but the end result is usually that everyone around starts genuinely laughing, and that’s the moment you’re waiting for as the photographer.

During family sessions, getting mom or dad to play along and be over-the-top silly, almost always helps elicit laughs from the kids. It’s a good idea to tell the parents in advance that you’re going to ask them to be silly and ridiculous, but that if they just roll with it, the kids will smile and laugh in a natural way. They won’t if you just say, “look here and smile!”

capture-emotions-5

Summary

I no longer shoot exclusively in black and white, nor am I arguing that black and white photography is the only way to capture emotional images. Ones that capture real emotions will be compelling whether they are processed in color or in black and white. However, upon reflecting on my personal journey in photography, I can clearly see that beginning with black and white photography forced me to prioritize emotion in my images over color, props, and styling, in a way that has strengthened my photography overall.

Do you struggle with capturing genuine emotion in your images, or does it come easily for you? Do you have any other tips about capturing emotion to share? Please share in the comments below.

googletag.cmd.push(function() {
tablet_slots.push( googletag.defineSlot( “/1005424/_dPSv4_tab-all-article-bottom_(300×250)”, [300, 250], “pb-ad-78623” ).addService( googletag.pubads() ) ); } );

googletag.cmd.push(function() {
mobile_slots.push( googletag.defineSlot( “/1005424/_dPSv4_mob-all-article-bottom_(300×250)”, [300, 250], “pb-ad-78158” ).addService( googletag.pubads() ) ); } );

The post How Black and White Photography Taught Me to Capture Emotion by Meredith Clark appeared first on Digital Photography School.


Digital Photography School

 
Comments Off on How Black and White Photography Taught Me to Capture Emotion

Posted in Photography


One iconic moment, two viral photos: Rio photographers capture Bolt’s smile

23 Aug

The Rio Olympics have come to a close, and there’s no doubt that these summer games have been memorable. World records were smashed, heroes were made and the best sports photographers in the game captured it all. But what may go down as one of the most memorable images from the games is actually two photos, captured by two photographers a fraction of a second apart.

Photo by Kai Pfaffenbach / Reuter’s.

Embed from Getty Images

Cameron Spencer of Getty Images and Kai Pfaffenbach of Reuter’s snapped nearly identical photos of Bolt and his grin as he neared the finish line of the 100m race. It’s not easy to spot the difference until you notice that Bolt’s right hand is sharp in one image and blurred in the other.

Naturally, the nuance was entirely lost on the internet, particularly on Twitter where the photos quickly became the subject of countless memes. As is the way with memes, both photos went viral without credit to either of the photographers who took them. The dual photos even confused a well-meaning Sports Illustrated writer who gave credit to Spencer while tweeting the photo taken by Pfaffenbach. After the error was brought to his attention he issued an apology.

Most news coverage used (and credited) Spencer’s photo. Articles that document the popularity of the meme mostly reference the Getty photo as well, even though Pfaffenbach’s photo appears to have been used more widely.

Did you notice the different photos in circulation? Why do you think one photographer got more attention and credit for his photo? Let us know in the comments.

Articles: Digital Photography Review (dpreview.com)

 
Comments Off on One iconic moment, two viral photos: Rio photographers capture Bolt’s smile

Posted in Uncategorized


Microsoft Pix aims to capture better people pictures

28 Jul

Microsoft has released a new camera app that puts its focus on taking better pictures of people. The Pix app is now available for iPhone and iPad, and Microsoft says an Android version is in the works. When active the app is constantly recording and saves 10 frames before and after its shutter button is pressed. A series of algorithms then analyzes the recorded images, evaluating technical quality characteristics, such as sharpness or exposure, but also looking at facial expressions of human subjects.

Based on those characteristics among others, the app then selects three best shots and presents them to the user. The filtered shots are discarded to save space, but not before the image information contained in them is used to enhance the selected shots. For example, the app can brighten app images that have been captured in very dark conditions. 

Additionally, Pix converts a bunch of similar images into a moving Live Image, but only if it thinks the motion in the scene is interesting. The app also integrates Microsoft’s Hyperlapse feature. In addition to recording stabilized time-lapses, in its latest incarnation it also allows you to turn existing images into time-lapses or simply stabilize previously recorded video footage. 

One of the most interesting aspects of Pix is that we can expect the app to get better with time. Anonymized settings data and information on what pictures users delete or favorite is sent back to Microsoft where developers look at the data and fine-tune the app’s algorithms accordingly. Microsoft Pix for iOS can now be downloaded from the Apple App Store.

Articles: Digital Photography Review (dpreview.com)

 
Comments Off on Microsoft Pix aims to capture better people pictures

Posted in Uncategorized


Wolffepack Capture brings unique swinging access design to a photography backpack

24 Jul

$ (document).ready(function() { SampleGalleryV2({“containerId”:”embeddedSampleGallery_7919834426″,”galleryId”:”7919834426″,”isEmbeddedWidget”:true,”standalone”:false,”selectedImageIndex”:0,”startInCommentsView”:false,”isMobile”:false}) });

Taking your backpack off once to grab your camera gear isn’t a big deal. Having to do it over and over throughout the course of a day is a royal pain. That’s why David Wolffe dreamed up the Wolffepack – a backpack designed so that the user can swing the main compartment in front of themselves while keeping the straps on their shoulders. With a few models already on the market, the company is now looking to produce the Wolffepack Capture, designed specifically for photographers.

Sling and messenger-style bags are easier to swing around and grab gear out of while keeping your bag on your shoulder, but they don’t offer the even weight distribution of a backpack. Hence, the Wolffepack Capture employs a release cable that attaches to one of the straps. Pulling and releasing the cord lowers the pack while the straps stay fixed – the wearer can then swing the bag around front and grab their gear. Wolffepack calls this its ‘orbital trapeze technology.’

The Wolffepack Capture includes a removable, padded ‘pod’ designed to hold a DSLR with lens as well as two additional lenses. The bag also makes room for a 15″ laptop and can hold a tripod in either of its two side pockets. The Capture is made of water-resistant polyester and a nylon waterproof rain cover is included. The cord attaching the main pack to the rest of the bag is made of Kevlar, carbon fiber and Dyneema, a combination that Wofflepack calls ’15x stronger than steel.’

The Wolffepack Capture has launched on Kickstarter, where the company is looking for funding before putting the bag into production. They estimate the Capture will ship to customers in November. Currently, a pledge of $ 152/£115 will get you a Capture with camera pod – full MSRP is expected to be about $ 225/£170. 

What do you think – a great idea or kind of wacky? Let us know in the comments.

Press release:

Wolffepack Capture: The Ultimate Backpack for Cameras and Access launches on Kickstarter

July 20th 2016

The award-winning team from Wolffepack have just adapted their unique Wolffepack access system for photography, and are now launching the Wolffepack Capture, the ultimate backpack for cameras and access.

This follows their successful Kickstarter in November 2014 with their first concept, Wolffepack, the world’s first Orbital Backpack.

Wolffepack Capture is a revolutionary new camera bag that allows you to swing your gear round to your front whilst still strapped to your back. It offers groundbreaking gains in easier access, better workflow and greater security.

This innovation comes with a unique set of features:

  • Rapid Access: Wolffepack’s unique system swings your camera bag swiftly round to your front without unstrapping, for rapid and easy access.
  • Padded Carry: a custom-designed and removable padded pod to hold camera, lenses and accessories that sits inside the top of the backpack. Removing the pod converts the Capture into an access backpack for everyone.
  • Ergonomic Workflow: the top of the bag opens in a clean one-handed single movement, allowing the pod entrance to naturally open in an ‘aperture action’. This presents the camera in the perfect position to grab, shoot and replace.
  • Hands-free Platform: Wolffepack’s system allows you to stow the bag on your front, creating an ideal platform to work cleanly and hands-free on shooting, lens changes, or reloading storage.
  • Customisable Loading System: with a moveable internal shelf, there are spaces for both camera equipment and everyday gear in 3 different configurations

Wolffepack’s radical new concept in backpack design has won an ISPO Award 2016 for product excellence, following its December 2015 Good Design Award from the Chicago Athenaeum Museum of Design, and its Good Design Award 2015 from the Japan Institute of Design Promotion in November. It has also been nominated for a prestigious 2017 German Design Council Award.

Wolffepack Capture takes camera backpack design to a whole new level. The custom-designed padded pod includes all the pouches and compartments you need to safely carry and organise your camera, lenses and accessories. The customisable loading system stores away your belongings exactly how you need them – the camera pod docked and locked safely in one section, your day gear and belongings tucked away in the other. Alternatively, the 2 compartments can be converted into one large space. Stowing the bag to your front means you can work cleanly and safely without ever needing to put your backpack down on wet or dirty ground.

The ingenious expetoSYSTEM®, a patented orbital trapeze technology that frees the bag to rotate around the body on a super-strong cord system, is now available to the world of photography. It incorporates durable, high-performance materials such as Dyneema cords (15 times stronger than steel), Kevlar and carbon fibre componentry, as well as the latest magnetic catches.

David Wolffe, founder and inventor, said: “Since our Kickstarter success in 2014, we’ve been inundated with enquiries and requests to design a camera bag. As a photographer myself I always thought we’d produce a design for cameras. Now the Wolffepack Capture is finally here it has come out even better than I imagined.“

The Wolffepack Capture provides fast and easy access, comfort and convenience, not just for photographers but for everyone. It has been crafted with cameras in mind, but offers an innovative hands-free advantage for anyone on-the-go, from the commuter to the hiker, the parent to the traveller. With the camera pod removed, it’s the perfect backpack for access for everyone.

The Wolffepack story started with a seed in the mind of David Wolffe, a former Finance Director who quit his corporate career to develop the Wolffepack® backpack. A successful initial campaign on crowdfunding website Kickstarter to boost the first production run of the Wolffepack® reached 157% of its funding goal and generated preorders in 28 countries.

Some of the international acclaim the Wolffepack® has earned includes coverage on Channel 4 Television, in The National Geographic Traveller Magazine, The Independent, The Daily Express, The Daily Mail, The Telegraph, Der Spiegel and in many technology reviews including Neuerdings and Gizmag.

Wolffepack Capture- The Ultimate Backpack for Cameras and Access

Articles: Digital Photography Review (dpreview.com)

 
Comments Off on Wolffepack Capture brings unique swinging access design to a photography backpack

Posted in Uncategorized