RSS
 

Posts Tagged ‘Camera’

Triggertrap shows off new Redsnap modular camera triggering system

22 Oct

Redsnap_Coke_Empty.jpg

Triggertrap, maker of several camera triggering tools, is seeking support via Kickstarter for another product aimed at trigger-happy photographers. Redsnap is a modular triggering system that starts with the Redsnap base block to which you can add sensor blocks, each designed for a different kind of photography. Four sensor blocks are currently in the works, including a high-speed laser sensor, high-speed sound sensor, high-speed light sensor and a Passive Infrared Sensor. Learn more on connect.dpreview.com.

News: Digital Photography Review (dpreview.com)

 
Comments Off on Triggertrap shows off new Redsnap modular camera triggering system

Posted in Uncategorized


DISCUSS: What Would It Take to Get You To Swap to a New Camera System/Brand?

21 Oct

switch camera system brandThis last week Sony released a couple of cameras that caused a big stir around the online photography community – the Sony A7 and A7R cameras (pictured right). These full frame, interchangeable cameras come in a compact body with lots of features and the initial hands on reviews being published from around the web say that they are going to be really popular.

I’ve seen a lot of DSLR owners say that they’re pre-ordering these cameras already and it has made me wonder – what would it take for me to switch from one camera system to another?

The thing that stops most DSLR owners from switching brands is their investment in lenses and accessories that tie them into a brand. But increasingly we’re seeing adapters released that allow using lenses with one lens mount on other brands. For example these new Sony cameras can be fitted with an adapter that allows for my Canon lenses to be used.

The barriers to switching are slowly being removed.

I’m not yet ready to make a switch but I’m seeing more and more people do so. For some reason I’m particularly seeing disillusioned Canon DSLR users make the switch – maybe its just that there are more of them but quite a few feel frustrated by the lack of development by Canon of late.

So here’s my Question

What would it take for you to switch from one camera system to another?

Are you tempted to do so by some of the new cameras announced in the last year?

Or have you already made the switch and do you have any regrets?

Post originally from: Digital Photography Tips.

Check out our more Photography Tips at Photography Tips for Beginners, Portrait Photography Tips and Wedding Photography Tips.

DISCUSS: What Would It Take to Get You To Swap to a New Camera System/Brand?

The post DISCUSS: What Would It Take to Get You To Swap to a New Camera System/Brand? by Darren Rowse appeared first on Digital Photography School.


Digital Photography School

 
Comments Off on DISCUSS: What Would It Take to Get You To Swap to a New Camera System/Brand?

Posted in Photography


19 October, 2013 – Son y AX1. The First Affordable 4K Video Camera

19 Oct

The Sony FDR-AX1 is the first practical and affordable 4K video camera. It becomes available in North America in the next few days. Is this the 4K camera for those that don’t want or think they need 4K?

 WIN AN ANTARCTIC EXPEDITION 


The Luminous Landscape – What’s New

 
Comments Off on 19 October, 2013 – Son y AX1. The First Affordable 4K Video Camera

Posted in News


Intentional Camera Movement and the Landscape

17 Oct

Intentional Camera Movement

An interesting thing about digital photography is that it has led to the rise in use of techniques that are more difficult to carry out with film cameras. It’s all down to the ability to view your images on the camera’s LCD screen after you have taken them. It’s a simple feature, but one that has made a profound change to the way some photographers work.

Regardless of what you may read about ‘chimping’, the LCD screen lets you see if your technique is working, and make adjustments on the spot if necessary. It’s one of the reasons that professionals don’t use polaroids to check their lighting setups any more. It also makes techniques like long exposure photography much easier – what was once something that was just done occasionally by landscape photographers has turned into a new genre.

Another technique that has gained in popularity is that of introducing intentional camera movement (also known as ICM on photo sharing sites like Flickr) into the image. Panning, one way of doing that, has been around for decades. But recently some adventurous photographers have started pushing intentional camera movement in new and interesting directions.

ICM photographers

If you’re not familiar with the intentional camera movement technique, then I recommend that you take the time to look at the work of some photographers that are proficient with the technique. One of the best known is Chris Friel – an artist turned photographer who pushes the boundaries of what is possible with intentional camera movement (you can read my interview with him here). Doug Chinnery is another.

Intentional camera movement fascinates me because it is a method that can create some beautiful, ethereal images. When it works, it works beautifully. Yet when it doesn’t, it just looks like camera shake. Some people will say all intentional camera movement photos are just a form of camera shake. Ignore them if you want to try it out – like many areas of photography it’s a subjective call and not everybody will like it.

Like long exposure photography, the idea behind intentional camera movement is to use a slow shutter speed to introduce blur into the photo. The difference is that with long exposure photography you use a tripod so that part of the image remains sharp. With intentional camera movement, you deliberately move the camera during the exposure so that everything is rendered as a blur.

Getting started

Intentional camera movement is carried out with a hand-held camera. It works with shutter speeds from around 1/4 second to four seconds in length.

Intentional Camera Movement

Get started by finding a landscape that lends itself to intentional camera movement. You can get the idea by looking at the work of the photographers mentioned earlier. Coastal scenes tend to work well. If you are inland try looking for forests, lakes or rivers. Whatever scene you are working with, search for something that is relatively simple and has some strong graphic shapes (that’s why seascapes, like the one above, work so well). The best time to try these techniques is at dusk. The light is beautiful and the low light means that it’s easy to obtain the slow shutter speeds required.

Intentional Camera Movement

There are two basic types of movement you can use. The first is panning – moving the camera from one side to the other in a more or less straight line. It works well for photos like this one, which I took on the beach after sunset.

Intentional Camera Movement

The other type of movement is more of a random movement. Jiggle the camera around slightly during the exposure and see what happens. This is where keeping the composition simple helps, as it means the subject is still recognisable even when blurred.

If the exposure is long enough (say around four seconds) you could try holding the camera relatively still during the first three seconds, then moving it for the last part. This can produce some interesting results.

Experiment

The key is to experiment, and to keep looking at the results on your camera’s screen. This shows you how well your technique worked, and you can adjust accordingly. You may find that you need a shorter shutter speed (or a longer one). Or that a different type of movement produces different results. Keep looking and adjusting as you go along and hopefully the results will improve.

Be prepared to create plenty of images that just don’t work. That’s okay – they are just stepping stones along the way to creating something special. It’s fine if you take a hundred photos and get just one good result – the random nature of intentional camera movement means you are always going to create images that just don’t work.

How do you know whether you got a good intentional camera movement image? That’s an excellent question. These types of photo are highly subjective. If you like it, and you created a moody image that evokes the atmosphere of the location you’re in, then I think that’s a success. Your eye for what makes a good intentional camera movement image will improve the more you use the technique.

Mastering Photography

Intentional Camera Movement

My ebook Mastering Photography: A Beginner’s Guide to Using Digital Cameras introduces you to photography and helps you make the most out of your digital cameras. It covers concepts such as lighting and composition as well as the camera settings you need to master intentional camera movement photography and take photos like the ones in this article.

Post originally from: Digital Photography Tips.

Check out our more Photography Tips at Photography Tips for Beginners, Portrait Photography Tips and Wedding Photography Tips.

Intentional Camera Movement and the Landscape

The post Intentional Camera Movement and the Landscape by Andrew Gibson appeared first on Digital Photography School.


Digital Photography School

 
Comments Off on Intentional Camera Movement and the Landscape

Posted in Photography


The 7 Latest and Greatest Camera Bags of 2013

16 Oct

One of the most neglected and ignored of all photography accessories is the camera bag! It seems like most photographers—even some of the professional ones—just don’t care about keeping their cameras in great condition and preserving them for years to come. Most people just grab and carry their cameras in their hands, slung around their shoulders, you name it, but Continue Reading

The post The 7 Latest and Greatest Camera Bags of 2013 appeared first on Photodoto.


Photodoto

 
Comments Off on The 7 Latest and Greatest Camera Bags of 2013

Posted in Photography


Sony release Lightest FULL FRAME camera with interchangeable lens, ever! The A7r

16 Oct

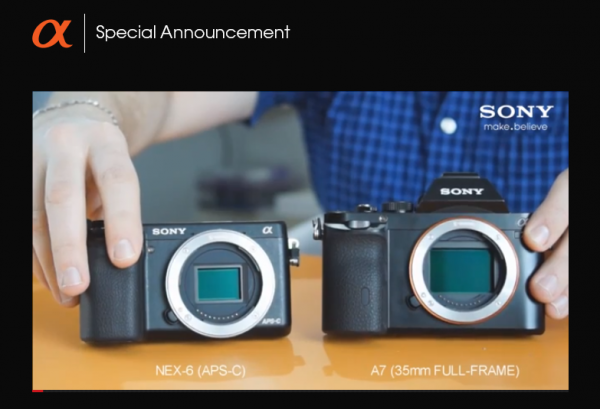
Sony are launching their new range (two models) of small, lightweight FULL FRAME cameras – right now! You can watch via this link. Updates as they happen.

I don’t say this lightly, but we see the words “game changer” used a lot in photographic circles… I’ve spent some time with the NEX range, I’ve used an RX1 to photograph a wedding and if I’m honest – the only person that could tell the difference from the other camera I was shooting with was me when I looked at the exif. The client was supremely happy and I was excited to be shooting with this solid little chunk of awesome. I said to myself “You know what… if this thing had an interchangeable lens, there wouldn’t be many reasons for me to be using all this “big stuff” ..and I’m certainly not saying rush out and pawn your dSLR gear… but well, these new cameras from Sony, they really could be “Game changers”

Time will tell!

UPDATE: The last update is a “hands on video over on SonyAlphaRumours”

UPDATE: Pricing a7 body only $ 1,699 USD, a7 w/ 28-70mm lens $ 1,999 USD and a7r body is $ 2,299

UPDATE: Grip takes two W series batteries, all control features available via grip.

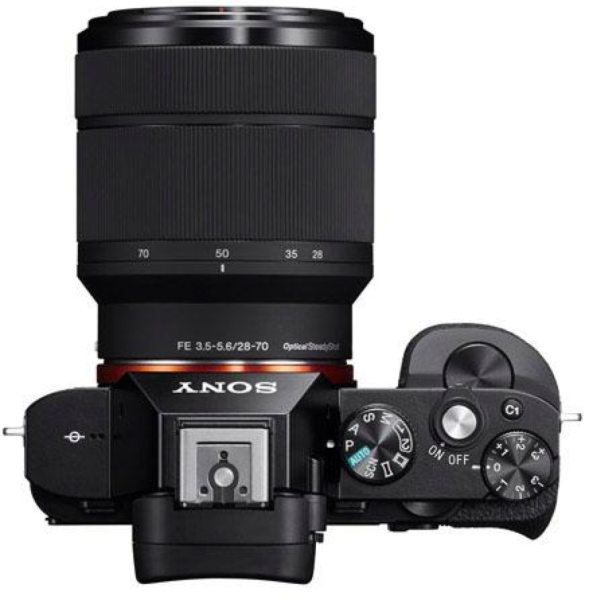
UPDATE: 35mm f2.8 lens, 55mm f/1.8 (FE denotes full frame coverage) all E Mount Sony lenses will work.

UPDATE:  Sony Australia release an image gallery of the new cameras / lenses.

UPDATE: Shipping in Aus from November (mid to late) pre-orders from Friday 18th October

UPDATE: 3 models, two bodies and one ‘kit’

UPDATE: A comparison size picture, lovely….

a&-sony-sensor-comparison

Sony-NEX-Full-Frame-A7R

Pictures via Sony Full Frame Cameras Facebook Page


What we know so far…

There are two models, here are the basic spec of these two cameras..

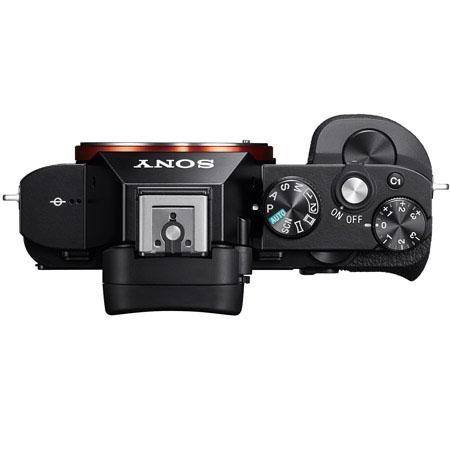
A7r: – Lightest FF camera with interchangeable lens ever

36.4 MP – gapless lens design on sensor (no AA filter).

Each on-chip lens is optimally positioned depending on its location to accommodate the sharper angle of light entering the periphery, which is caused by larger sensor dimensions being teamed with the E-mount’s short flange-back distance.

New BIONZ X image processing engine.

14-bit RAW image.

ISO 100-25600 (with 50 ISO extension).

Advanced 1200-zone evaluative metering.

4fps (Max. 1.5fps, Speed Priority Continuous shooting).

1/8000 to 30sec shutter.

TRILUMINOS™ Color technology (color space).

1080 HD uncompressed, 60p/24p and 60i frame-rates. AVCHD and MP4 codec.

2.4M dot OLED EVF.

25 points contrast AF – +/- 5EV compensation.

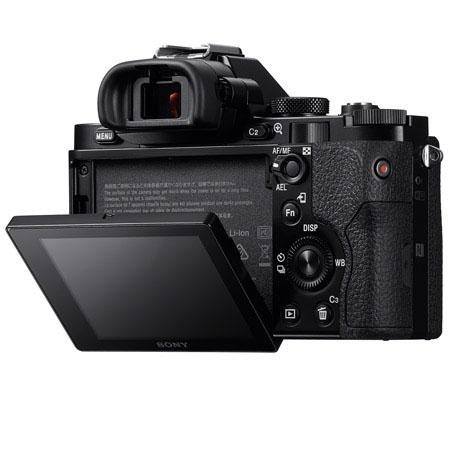
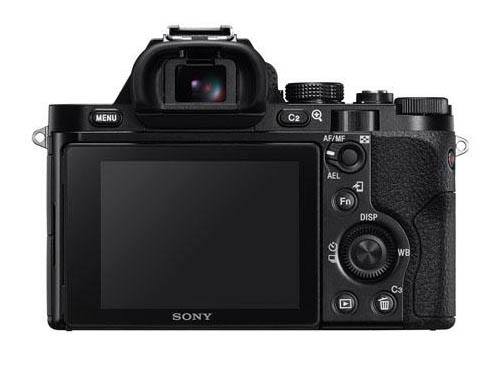
Tiltable 3.0” (1,229k dots) Xtra Fine™ LCD.

Multi-interface Shoe for flash.

PC control with remote video capture control.
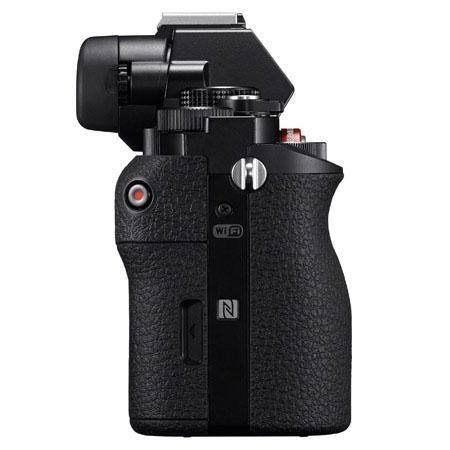
Wi-Fi®/NFC control.

Playmemories App.

Weight 465g (with battery and card)

Battery 1080 mAh for 340 shots (with LCD monitor always on!)

Weather sealed body.

And the lower spec model;

A7 (I do only list what’s different from the A7r): – 24 MP (has AA filter)

117 points (phase-detection AF), 25 points (contrast-detection AF)

5fps (Max. 2.5fps, Speed Priority Continuous shooting)


Sony-NEX-Full-Frame-A7R

Pictures via Sony Full Frame Cameras Facebook Page

Sony-NEX-Full-Frame-A7R-Side

Pictures via Sony Full Frame Cameras Facebook Page

Sony-NEX-Full-Frame-A7R-E-Mount

Pictures via Sony Full Frame Cameras Facebook Page

Sony-NEX-Full-Frame-A7R-28-70-f3-5-5-6

Pictures via Sony Full Frame Cameras Facebook Page


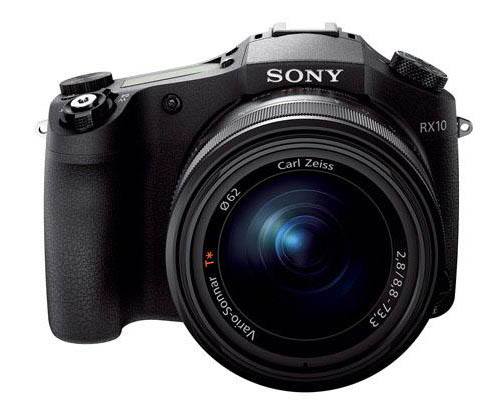
As a bit of a side-note, but still very cool, Sony are also launching their new RX10 – a SuperZoom.

sony-superzoom-rx10

Pictures via Sony Full Frame Cameras Facebook Page

The new RX10! 24-200mm F2.8 in a magnesium body.


Post originally from: Digital Photography Tips.

Check out our more Photography Tips at Photography Tips for Beginners, Portrait Photography Tips and Wedding Photography Tips.

Sony release Lightest FULL FRAME camera with interchangeable lens, ever! The A7r

The post Sony release Lightest FULL FRAME camera with interchangeable lens, ever! The A7r by Sime appeared first on Digital Photography School.


Digital Photography School

 
Comments Off on Sony release Lightest FULL FRAME camera with interchangeable lens, ever! The A7r

Posted in Photography


Nikon sues Sakar for infringement with Polaroid iM1836 Android camera

15 Oct

shared:NikonLogo.png

Nikon Inc. has announced a lawsuit against Sakar International Inc. over the design of the Polaroid iM1836, a planned Android camera that bears a resemblance to one of the Nikon 1 series of mirrorless cameras. Announced this morning in a Japanese language press release on Nikon’s Japanese website, the lawsuit was filed in the US District Court for the Southern District of New York. The lawsuit seeks an injunction against both manufacture and sale of the Polaroid iM1836 digital camera.

News: Digital Photography Review (dpreview.com)

 
Comments Off on Nikon sues Sakar for infringement with Polaroid iM1836 Android camera

Posted in Uncategorized


Adobe Camera Raw (ACR) as a Photoshop Filter

09 Oct

Photoshop camera raw filter opener

One feature that is new to Photoshop CC is the Camera Raw filter. Using this filter you can make powerful nondestructive edits inside Photoshop.

What the Camera Raw Filter offers

The Camera Raw filter is new to the Creative Cloud version of Photoshop – Photoshop CC – so it’s not available in earlier Photoshop versions. It gives you access to most (but not all) of the features of Adobe Camera Raw (ACR) from inside Photoshop.

You can use it on any image – even those file formats that ACR doesn’t support – and on any layer. So, you don’t have to be working on an image that is in one of the formats that ACR can open. You can also use the Camera Raw filter at any point in your workflow not just when you first open an image.

Combining the Camera Raw filter with Smart Objects also means that you can make an edit using the filter and come back anytime to revisit and change those edits, if desired.

How the Camera Raw Filter works

To see how the Camera Raw filter works open any image in Photoshop CC.

So that you can revisit and edit the changes made by the filter, start by converting the layer that you want the filter to act on into a smart object. To do this either right click the layer and choose Convert to Smart Object or choose Filter > Convert for Smart Filters.

Photoshop camera raw filter 1

Either way the result is the same and you will have a layer converted to a Smart Object. Using Smart Objects ensures that the adjustments that you are about to make can be edited later on.

If you have multiple layers that you want to apply the filter to, then select those layers in the Layers palette before converting them all to the one Smart Object.

To apply the Adobe Camera Raw filter choose Filter > Camera Raw Filter. This opens the current layer inside ACR.

Photoshop camera raw filter 2

Now you can make your adjustments to the image using any of the tools in ACR.

So you can, for example, adjust the white balance by clicking on the White Balance tool and click on something in the image which should be neutral gray. This is a fix that isn’t as easy to make in Photoshop itself. Other useful adjustments you can make include adjusting Highlights, Shadows, Whites and Blacks and Clarity – settings which are easy to access in ACR and less easy (or not available in the case of Clarity) in Photoshop.

The ACR filters are also available so you can use the Gradient Filter and the new Radial Filter to adjust the image. Once you have made your changes click Ok to apply the changes to the image and return to Photoshop.

Photoshop camera raw filter 3

Notice that the Smart Object layer in Photoshop has its own layer mask so you can, if desired, use the layer mask to adjust the effects that you just applied to the image. Paint with black on the mask to remove them and with white to reapply them. This feature is useful for adjusting the effect of a Gradient Filter where there are objects which fall inside the area affected by the filter that you don’t want to be affected by it.

Photoshop camera raw filter 4

You can also alter the Camera Raw Filter settings at any time by double clicking on the Camera Raw Filter entry in the layers palette. This reopens the layer in ACR so you can make changes to the settings.

The benefits of using the Camera Raw filter

The Camera Raw filter offers some real benefits to Photoshop users. One is that you can use the filter to sharpen an image and take advantage of the Masking slider when sharpening in ACR. This lets you limit the areas of the image which are sharpened to just the edges in the image and not areas of flat color.

Photoshop camera raw filter 5

You also get access to tools which aren’t available in Photoshop such as Clarity, and the Graduated Filter, Adjustment Brush and Radial Filter.

The Camera Raw Filter also provides a handy way to work with a JPG image in ACR. You can, of course, open a JPG in ACR but, if you forget to do so, the Camera Raw Filter offers pretty much the same functionality at any time in your workflow.

Other options that the Camera Raw Filter provides is access to the Split Toning effect sliders, presets, the new upright correction, post crop vignette, the new chromatic aberration and defringe tools, and the noise reduction sliders.

Photoshop camera raw filter 6

Provided that you save your image in a layered file format such as PSD then you’ll be able to come back at any time and edit the Camera Raw Filter adjustment that you made.

Chances are that if you are familiar with using ACR for processing your raw images you’ll find that the new Camera Raw Filter in Photoshop CC is a welcome addition to your workflow.

Post originally from: Digital Photography Tips.

Check out our more Photography Tips at Photography Tips for Beginners, Portrait Photography Tips and Wedding Photography Tips.

Adobe Camera Raw (ACR) as a Photoshop Filter

The post Adobe Camera Raw (ACR) as a Photoshop Filter by Helen Bradley appeared first on Digital Photography School.


Digital Photography School

 
Comments Off on Adobe Camera Raw (ACR) as a Photoshop Filter

Posted in Photography


A Review of the ThinkTank Airport Commuter Camera Bag

09 Oct

If you’ve ever had to work your way through a busy airport with your gear, you know that an ordinary camera bag just isn’t going to cut it. Making sure everything is safely packed, moving through security, getting on and off your plane, working your way through yet another airport– it’s a challenge. Think Tank Photo addressed the challenge head-on not too long ago, when they introduced a new line of Airport Backpacks. The line includes (from biggest to smallest) the Airport Accelerator, Airport Commuter, and Airport Essentials, all of which meet U.S. and international carry-on standards. I’ve been putting the Commuter through its paces for the better part of a year, and– as someone who’s never owned a gear bag designed specifically around air travel– I’m really impressed.

As with all things Think Tank, the construction is impeccable. Heavy-duty zippers and stitching, comfortably padded straps and handles, as well as all of the pockets and compartments I’ve come to expect from Think Tank. While lots of pockets isn’t exactly innovative, Think Tank’s newer bags have also been designed with dedicated pockets for tablets or laptops. The Airport Backpack series is designed to hold both. The exterior-access pockets are also right where they do the most good, providing quick access to travel essentials like i.d., credentials, passports, boarding passes, and other travel necessities. A large side pocket is perfect for a bottle of water or paperback book.

All of that great exterior access doesn’t do you much good, though, if the interior doesn’t do its job well. Fortunately, the gear section of this bag is pretty remarkable. The two things I noticed while packing it were (1) how much it holds, and (2) how deep it is.  Without doing any reconfiguring of the pre-installed dividers (OK…I removed one little one in the middle), I packed three bodies, five lenses, two speelights, a set of Pocket Wizards, and all of the cards, cords, batteries, gels, film, pens, business cards, m&m’s, and all of accessories I needed.  And there was room for more.

Other “bonus features” include a locking security cable, removable waist belt, and tripod attachment straps.  To be honest, I was a little disappointed by the tripod attachment.  That great side pocket I mentioned earlier?  That’s where the feet of the tripod go, but I never felt the tripod was truly secure.  I’ll admit my tripod might be somewhat to blame– if it was more of a travel size or if it was carbon fiber I might feel differently.

The only other down side for me personally is that this is a lot of weight for my back.  It is all very well-padded and evenly distributed, but my back’s not what it used to be.  I’m hoping that an Airport 4-Sight rolling bag is somewhere in my future.

Post originally from: Digital Photography Tips.

Check out our more Photography Tips at Photography Tips for Beginners, Portrait Photography Tips and Wedding Photography Tips.

A Review of the ThinkTank Airport Commuter Camera Bag

The post A Review of the ThinkTank Airport Commuter Camera Bag by Jeff Guyer appeared first on Digital Photography School.


Digital Photography School

 
Comments Off on A Review of the ThinkTank Airport Commuter Camera Bag

Posted in Photography


Samsung announces new 13MP camera unit with optical image stabilization

07 Oct

TS520x0~cms_posts-5978951149-OIS_camera.JPG

Samsung has revealed a brand new 13MP smartphone camera unit with optical image stabilization and improved low light performance. Samsung’s press release doesn’t specifically name any devices that the new camera is slated to appear in, but it’s safe to assume that we’ll see it next year in the Galaxy S5 and Note 4. Click through for more details at connect.dpreview.com.

News: Digital Photography Review (dpreview.com)

 
Comments Off on Samsung announces new 13MP camera unit with optical image stabilization

Posted in Uncategorized