RSS
 

Posts Tagged ‘Camera’

A smart camera gets smarter? Samsung NX30 first impressions review

03 Jan

NX30-and-18-55mm-1.png

The Samsung NX30 puts the NX300’s 20 megapixel APS-C sensor and Hybrid AF in a DSLR-like body. It also features a tilting electronic viewfinder and a fully articulated 3-inch AMOLED display, along with Samsung’s familiar suite of connectivity features. Built-in Wi-Fi is available, as is NFC to mediate faster connections with compatible smart devices. We spent a little time getting acquainted with a pre-production model, and have put together some quick first impressions.

News: Digital Photography Review (dpreview.com)

 
Comments Off on A smart camera gets smarter? Samsung NX30 first impressions review

Posted in Uncategorized


30 December, 2013 – Best New Camera of 2013

30 Dec

Yes, I know. Not another "Best of…". But, why not? I’ve used a dozen new cameras this year, and tested and reported on many of them on these pages. But inevitably there is one that keeps asking to go for a walk, to be taken on a trip, and to simply be used more than any other. This year’s hands-down winner is the Olympus OM-D E-M1.

 It wouldn’t be the holiday season without a sale, now would it?
So we’re having a 
25% Off Sale on everything in our online store.

The sale runs from right now through the end of New Year’s Day.
To obtain your 25% off on any purchase just enter…

HappyNewYear-25pc 

…in the Coupon Code box when you check-out.


The Luminous Landscape – What’s New

 
Comments Off on 30 December, 2013 – Best New Camera of 2013

Posted in News


Hands-on with the Panono panoramic ball camera

26 Dec

panono.JPG

The Panono is a ball-shaped panoramic camera with 36 individual camera modules and a built-in accelerometer. We got our hands on a prototype and met with its Berlin-based creators. See what we thought of the crowd-funded camera on connect.dpreview.com.

News: Digital Photography Review (dpreview.com)

 
Comments Off on Hands-on with the Panono panoramic ball camera

Posted in Uncategorized


Fisher Price Camera Tripod Modification – It’s Never Too Early Tutorial

24 Dec

This summer I took my 3 year old son to Big Sur for his first camping trip to show him the Milky Way. Remarkably he held on to this experience beyond expectation and he’s been talking about the Milky Way ever since. On top of that he’s really developed an interest in photography and cameras. I’m not sure how that happened, perhaps it is something in the water supply.  Fast forward to last week when he caught sight of my Joby tripod. I gave it to him to play with thinking it’d be one of the few items he could bend and try to destroy that wouldn’t worry myself or his mother. To my surprise he immediately dug up his retro Fisher-Price toy camera and proceeded to put it on the Joby tripod. The kicker is that he was telling me he was photographing the Milky Way. This would be a short story if it wasn’t for the fact that every day since he’s been setting up his camera and tripod all around the house to photograph different things at all times of the day.

If my little guy is going to get serious about make believe photography I felt it was my parental duty to make sure that he was going to develop good habits. To put it bluntly no one in my household is going to take sub-par make believe photos and to avert that we needed a secure way to fasten his camera to the Joby tripod. When I explained the dilemma to my son he was eager to take me up on my offer to modify his camera.

Here for your entertainment is the Fisher-Price camera tripod modification:

(Have a great Christmas!)

The Fisher-Price rubberband mount wasn’t cutting it. For simple shots sure it worked, but….

The rubberband mount worked well enough for level shots,

but not for all shots.

Any non-level use of the camera resulted in camera instability.

We were pumped to fix the problem and even more so

because we weren’t using toy drills.

Just before we started the modification.

Things would never be the same again.

To create a stable mount we had to drill a hole in the bottom

of the camera to install the Joby base plate.

Looks good lets try it out

Making sure that the base plate was installed as

level as possible we put it to the test.

Our first test was a positive one, but what does the photographer think?

My little photographer was quite content with the new

tripod mount. Now he’s on his way to good make believe

photography technique.

Copyright Jim M. Goldstein, All Rights Reserved

Fisher Price Camera Tripod Modification – It’s Never Too Early Tutorial

The post Fisher Price Camera Tripod Modification – It’s Never Too Early Tutorial appeared first on JMG-Galleries – Landscape, Nature & Travel Photography.


Related Stories

  • Fisher Price Camera Tripod Modification – It’s Never Too Early Tutorial – Enclosure
  • 30 Mile Shadow of Haleakala – Haleakalã National Park
  • 30 Mile Shadow of Haleakala – Haleakalã National Park – Enclosure
Feed Ads by FeedBlitz
powered by ad choices


JMG-Galleries

 
Comments Off on Fisher Price Camera Tripod Modification – It’s Never Too Early Tutorial

Posted in Equipment


27 Amazing Macro Snowflake Images Shot with a DIY Camera Set Up

23 Dec

These amazing Snowflake images by photographer Alexey Kljatov have caught our eye in the last week.

By Alexey Kljatov

What particularly impressed us at dPS HQ was the way Alexey shoots the images using a system that is literally taped together components. He uses a Canon A650 (a point and shoot released back in 2007) with old 2nd hand Helios lens from an old Russian made camera.

11044822583_cf9b4bd45c_o

It’s quite remarkable that something so cobbled together takes such beautiful images but it illustrates just what can be achieved when you put your mind to it! Learn more about his method here.

Here are some more of his Snow Flake Images.

By Alexey Kljatov

By Alexey Kljatov

By Alexey Kljatov

By Alexey Kljatov

By Alexey Kljatov

By Alexey Kljatov

By Alexey Kljatov

By Alexey Kljatov

By Alexey Kljatov

By Alexey Kljatov

By Alexey Kljatov

By Alexey Kljatov

By Alexey Kljatov

By Alexey Kljatov

By Alexey Kljatov

By Alexey Kljatov

By Alexey Kljatov

By Alexey Kljatov

By Alexey Kljatov

By Alexey Kljatov

By Alexey Kljatov

By Alexey Kljatov

By Alexey Kljatov

By Alexey Kljatov

By Alexey Kljatov

By Alexey Kljatov

The post 27 Amazing Macro Snowflake Images Shot with a DIY Camera Set Up by Darren Rowse appeared first on Digital Photography School.


Digital Photography School

 
Comments Off on 27 Amazing Macro Snowflake Images Shot with a DIY Camera Set Up

Posted in Photography


Have Your Say: Best Mirrorless Interchangeable Lens Camera of 2013

19 Dec

bestilcs.jpg

2013 saw a lot of new mirrorless cameras, from minor updates to older models to all-new products like the waterproof Nikon 1 AW1 and the world’s first full-frame enthusiast mirrorless cameras with Sony’s Alpha A7 and A7R. We’ve used almost all of this year’s crop of mirrorless cameras, published numerous samples galleries, wrote first impressions articles and reviews, but now it’s your chance to have your say. What was the best mirrorless interchangeable lens camera of 2013? Click through to cast your vote. 

News: Digital Photography Review (dpreview.com)

 
Comments Off on Have Your Say: Best Mirrorless Interchangeable Lens Camera of 2013

Posted in Uncategorized


Have your say: Best Fixed-lens Compact Camera of 2013

19 Dec

bestfixedlensmirrorless.jpg

2013 saw the release of five cameras in a (relatively) new class, which we’re calling ‘fixed lens compact cameras’. Specifically, large-sensor fixed-lens compact cameras. Fujifilm’s X100S is one of our favorite cameras of the year, addressing many of the faults of its predecessor. Sony followed up on the RX1 from last year with the RX1R, which shares the same 24MP full-frame sensor but minus an AA filter for superior resolution. Meanwhile, both Nikon and Ricoh released APS-C 28mm equivalent cameras, while Sigma’s DP3 offers a 75mm equivalent lens. Click through for a chance to cast your vote and decide which is best. 

News: Digital Photography Review (dpreview.com)

 
Comments Off on Have your say: Best Fixed-lens Compact Camera of 2013

Posted in Uncategorized


The 10 Most Popular Compact System Camera Systems among Our Readers

18 Dec

Over the last few weeks we’ve featured lists of the most popular DSLRs, DSLR Lenses and Camera Bags among our readers. Today we’re turning our attention to compact camera systems.

This last 3 months has seen a bit of a surge in purchases of and interest in this class of camera as an increasing number of our readers seem to be looking for smaller cameras that still have interchangeable lens options. Particularly of interest is Sony’s release of the full farm A7 and A7R cameras which have only been available for a short while but which already feature in our best seller list.

With manufacturers like Sony, Olympus, Fujifilm and Panasonic continuing to develop and improve their offerings in this class I suspect we’ll see it continue to grow.

Here are the the 10 most popular compact camera systems among our readers (we’ve kept it to those with interchangeable lenses) bought in the last 3 months (ranked in order of what our readers bought at Amazon in the last few months*).

10 Most Popular Compact Camera Systems among Our Readers

1. Olympus OM-D E-M1

NewImage

2. Sony NEX-3NL/B

NewImage

3. Olympus E-PM2

NewImage

4. Sony a7R Full-Frame

NewImage

5. Sony NEX-6L/B

NewImage

6. Panasonic Lumix G Series DMC-G6KK

NewImage

7. Panasonic LUMIX GX7

NewImage

8. Samsung NX300

NewImage

9. Sony a7 Full-Frame

NewImage

10. Fujifilm X-E2

NewImage

*Note: these lists were compiled from reports supplied to us from Amazon.com where we are affiliates. One of the ways dPS is able to cover its costs and be a sustainable business is that we earn a small commission when readers make a purchase from Amazon after clicking on our links (including those above). While no personal details are passed on we do get an overall report from Amazon about what was bought and are able to create this list.

The post The 10 Most Popular Compact System Camera Systems among Our Readers by Darren Rowse appeared first on Digital Photography School.


Digital Photography School

 
Comments Off on The 10 Most Popular Compact System Camera Systems among Our Readers

Posted in Photography


DxOMark Mobile analyzes the LG G2’s camera capabilities

18 Dec

product4.jpg

We’ve added DxOMark Mobile’s report to our camera review of the LG G2 smartphone. The report includes DxO Lab’s usual industrial-quality scientific measurements. Their imaging experts analyzed 14 aspects of mobile imaging, including detailed image quality assessment, flash performance, autofocus reliability and more to calculate a final score. See their results on connect.dpreview.com.

News: Digital Photography Review (dpreview.com)

 
Comments Off on DxOMark Mobile analyzes the LG G2’s camera capabilities

Posted in Uncategorized


Working with Off Camera Flash and TTL

18 Dec

Working with Off Camera Flash and TTL

To be able to create a portrait of someone is a wonderful experience. To do so in an interesting location is even better. To be able to make use of lighting techniques that allow your imaginative ideas to come to life and bring out the personality of the subject and the location environment… is where it really gets exciting!

Working with Off Camera & Remote Flash

Step one – analyze the natural light first

The natural, or ambient light, even though it may seem to be everywhere all at once, actually has the same qualities of direction, intensity, colour and softness that are so easily seen in studio conditions. Taking a moment to observe and think about these ambient light qualities is the first step in determining how you can best make use of additional lighting from off camera flash.

You might find it helpful to think of your location portrait setting as a clock or compass with your subject in the middle, and the camera and light sources arranged around the subject in a circular manner, through a 360 degree arc.

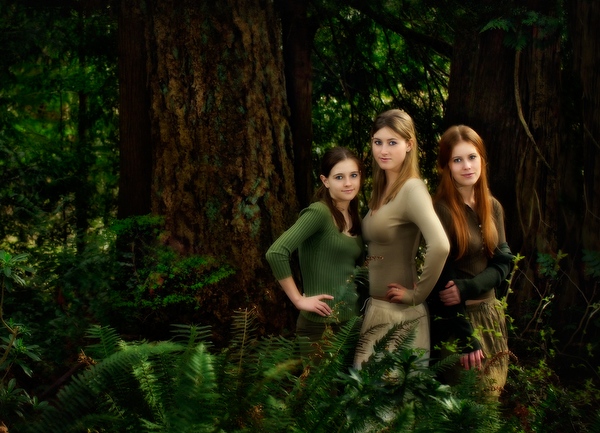
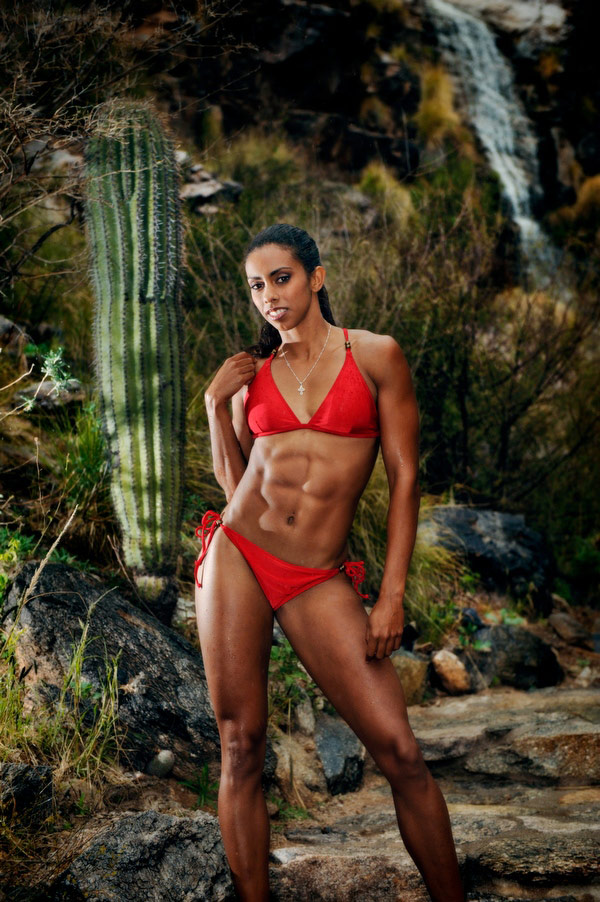
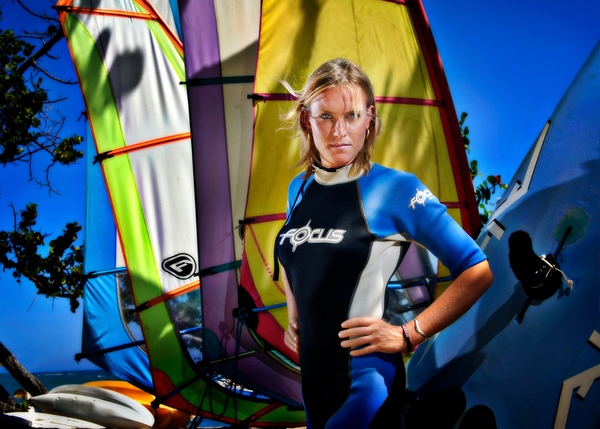
The first example below shows a natural light style portrait, with differing qualities of light on the subject and the background. The ambient light direction comes from slightly behind the subject, through the trees, without being too distinct, but enough to provide interest to the background.

005-Natural-Style-Portrait

Adding more light – main light placement moulds the portrait

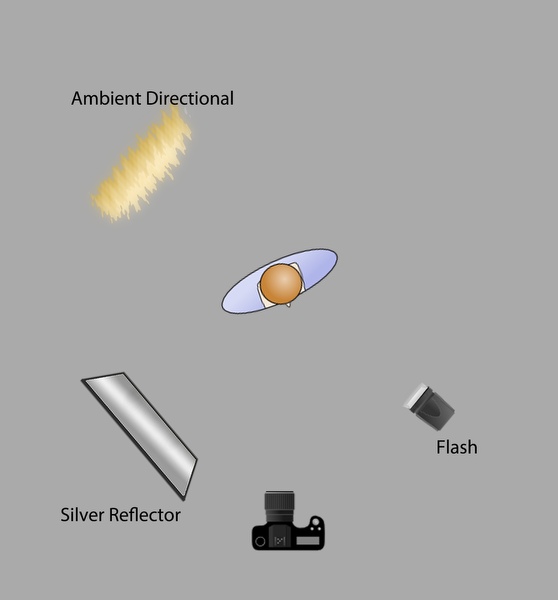
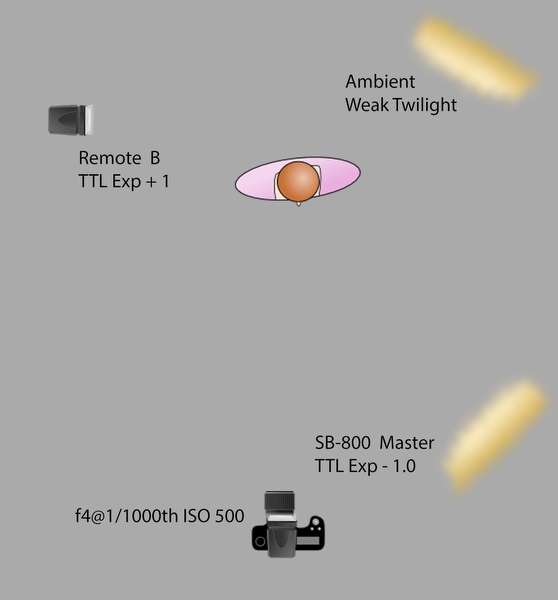
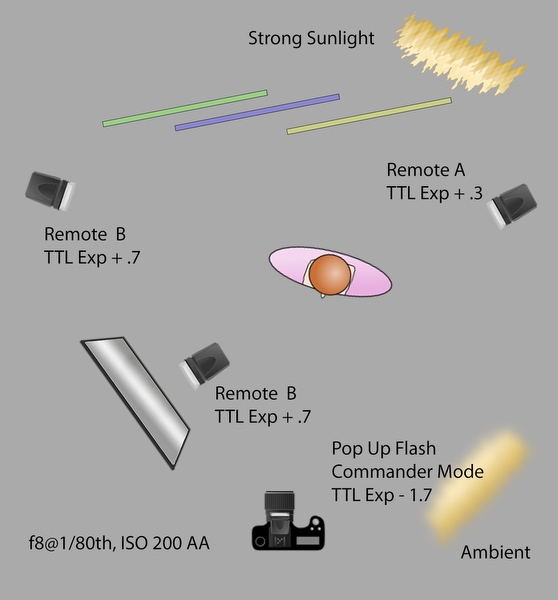
The diagram below shows the lighting setup with the added a reflector and flash to our scene, in a circular arrangement with the subject in the centre. Light sources have been placed at 45 degree positions, relative to the subject and camera.

Working with Off Camera & Remote Flash

Working with Off Camera & Remote Flash

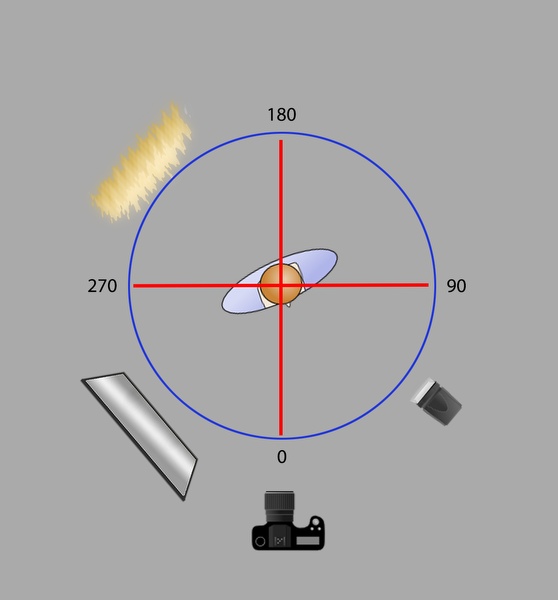
Strong lighting positions

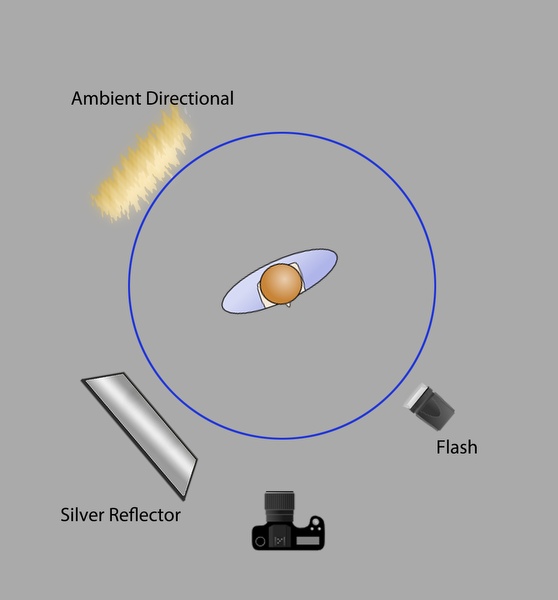
On camera flash, is generally known to be harsh and often not that interesting, similarly, light sources from directly from behind and the side are equally strong and not used that often for traditional portraits. These positions of 0, 90, 180 and 270 degrees are shown in the diagram below. These are not “bad” light setups, you can consider them “strong style” positions that are not as flexible to make use of, so they are used less often than more “desirable” lighting setups.

Working with Off Camera & Remote Flash

007-Athlete-Portrait-Harsh-Light

Working with Off Camera & Remote Flash

Adjusting lighting positions

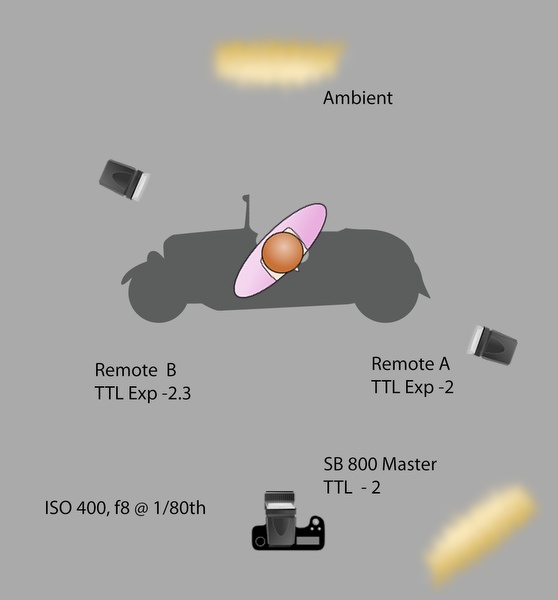
Between these hard angle positions is where you want to position your primary or “Main” light sources. Doing so allows you to shape our subject with light in a natural manner and provides a more flexible set so that your subject can easily adjust their pose without “missing” the light. This is more comfortable setup for the photographer and will almost always provide more pleasing results of the subject. Photographs become more interesting as there is now more definition provided by the presence of highlights and shadows, which are also easier to control when working with this setup (003)

Working with Off Camera & Remote Flash

Adding secondary lights or reflectors

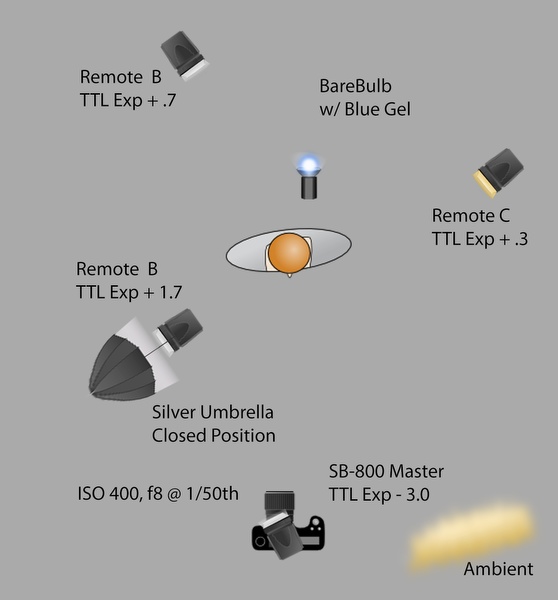
Once you have identified your ambient light conditions, and placed your main light source, you can now determine where to best place your accent lighting with additional flashes or reflectors. These lights provide enhanced interest to the image, by bringing out the subtleties of texture, colour and form. Placing them too close to your primary light will cause them to wash out each other, so remember the desirable angles created by our light compass earlier. When you think of the compass, you’ll want to have your additional light sources at least 90 degrees away from each other. This allows them to be effective on their own, without overlapping the other lights and losing their intended effect.

Working with Off Camera & Remote Flash

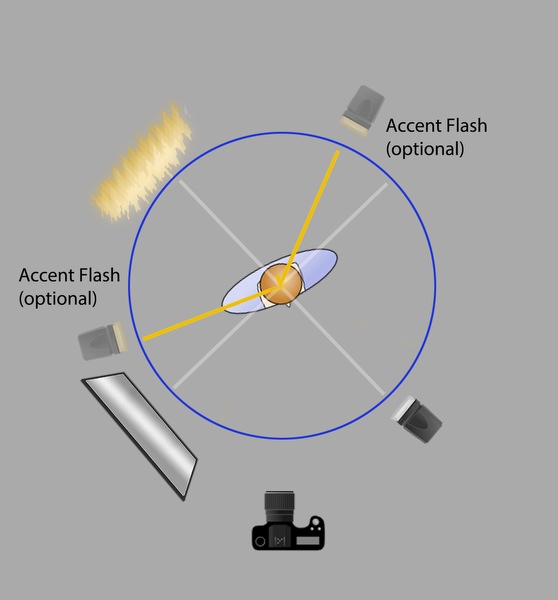
Accent lights are always positioned relative to the main light and tend to provide the feeling of a skimmed light back to the camera. This is the most effective way to enhance the creative style within an image, and is surprisingly easy to do now that you understand how the lights work with each other, and how you can arrange them to work best with your subject and where you position your camera.

Working with Off Camera & Remote Flash

Working with Off Camera & Remote Flash

Working with Off Camera & Remote Flash

Working with Off Camera & Remote Flash

TIP 1: To gain even more flexibility with outdoor flash, make use of the High Speed Sync feature, which will allow you to use shutter speeds that go beyond the traditional limits of 1/125th or 1/250th. Look to your camera manual for setting that up, so you can use speeds up to 1/8000th , it really works!.

It may seem intimidating, but controlling the off camera flashes can actually be very easy, surprisingly intuitive, and very effective. Nikon have their way of remotely controlling the settings of their flashes, with their Creative Lighting System (CLS) using highly accurate Through The Lens (TTL) metering. You can use a separate flash on camera as the “Master” to control the Remotes, or even use the camera’s built-in pop up flash in “Commander Mode”. You can adjust the flash output, so the light portion doesn’t affect your image, or use it as additional fill. Nikon has a separate controller as well, called the SU-800. At half the price, it’s like a flash, but without the actual flash head.

Canon has their equivalent versions available, and other manufactures also enable TTL options. These controls take the fear and pain out of the remote flash experience. Controlling the remote flashes can be as simple as deciding you want more or less light output, then bumping the dial up or down from the camera location.

Tip 2: Setting your camera to under-expose the natural light by one or two steps, allows your flashes to take over the look of the image and dominate the lighting conditions.

You can set your camera Manually or use Aperture Priority, either way the camera will “talk to the flash” to calculate the correct flash exposures as they appear in camera, on the sensor. With the internal technology that works so well, the simple camera and flash setups do the work, so you don’t have to.

Yes, it can be that simple!

More example images and diagrams

013-Executive-Indoor-Portrait

Working with Off Camera & Remote Flash

Working with Off Camera & Remote Flash

Working with Off Camera & Remote Flash

The post Working with Off Camera Flash and TTL by Craig Minielly appeared first on Digital Photography School.


Digital Photography School

 
Comments Off on Working with Off Camera Flash and TTL

Posted in Photography