RSS
 

Posts Tagged ‘Camera’

Fujifilm teases upcoming SLR-style X system camera

20 Jan

ft1-crop2.jpg

Fujifilm is teasing an upcoming SLR-style mirrorless body on its X system page. The camera sports top-plate shutter speed, exposure compensation and ISO dials, along with a prominent central viewfinder ‘hump’. It will be formally announced on January 28th, and as usual we’ll bring you full details then. For now, though, click through for a few more thoughts and a larger version of Fujifilm’s teaser image. 

News: Digital Photography Review (dpreview.com)

 
Comments Off on Fujifilm teases upcoming SLR-style X system camera

Posted in Uncategorized


Metering Modes and How Your Camera Meter Works

20 Jan
Proper Exposure vs. How the Camera Exposes

Proper Exposure vs. How the Camera Exposes

Exposure is a complex beast. Mastering it is of the utmost importance. Exposure and composition are the two most critical components towards making a great image. Exposure is based on three components:

  1. The ISO or sensitivity to light
  2. Aperture or the size of the opening that will let in light, and
  3. Shutter Speed which defines the duration the light will have to pass through the aperture

Whether you shoot in Manual, Aperture Priority or Shutter Priority; there is no difference in how the meter evaluates the scene.

Measuring the light, or brightness of the scene you are trying to capture, is a critical component in determining the perfect exposure. To establish this you need a meter that can read the levels of brightness.

Exposure is measured using light meters.  There are two types: one measures the light falling on the subject or scene, called an incident light meter; the other measures the light reflected off the scene or your subject, and is called a reflected light meter. All meters that are built into digital cameras are reflected light meters, and we will be addressing that type in this article. The more you understand these meters and how they work, the better you will be at understanding and interpreting what they are telling you. Keep in mind that incident light meters are far more accurate than reflected light meters.

How does your camera determine exposure?

Reflected light meters attempt to read the amount of light in the scene you are trying to capture. Unfortunately, those readings are guesses. You may have had the misfortune of photographing a very dark or black subject and have it come out looking over exposed, or a snow scene where the snow looks grey or under exposed. The reason for this behavior is that the camera’s light meter believes that most scenes should average to a mid-grey, also referred to as 18% grey. This middle grey is a mid-point between the darkest shadows and the brightest highlight. Since the camera meter has no idea about white or black, you need to help it using some form of exposure compensation based on the tonality of your subject or scene.

Metering Modes

To help with exposure, and determining how much to compensate, cameras have various metering modes. Typically, the three basic modes are Matrix (also called Evaluative), Center-weighted and Spot metering. Each of these is applicable in particular situations, but do not rely on just one of these modes to do it all for you.

Evaluative Metering

Evaluative Metering

Evaluative Metering

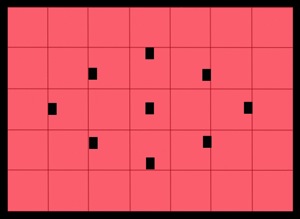
In this metering mode, the meter divides the scene up into a grid and analyzes each segment for highlight and shadow (bright and dark) information. Once that data is collected, it calculates the average value and bases the exposure on that average. Keep in mind that all cameras do not have the same number of areas within the frame. Also, they don’t all calculate the average value for exposure the same way. Manufacturers use complex formulas to arrive at exposure values.  Therefore, it is important that you understand how your camera behaves in various situations and learn when to trust it, and when not to trust it.

Many of the newer DSLR’s not only average the grid, but place additional emphasis on the focusing points that are in use during that particular image capture.

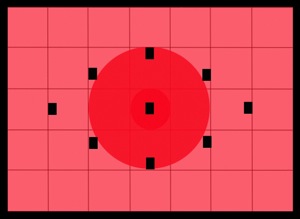
In the next series of images, matrix metering was used to set the exposure. Two foam-core boards, one white and the other black, were placed side by side in the same light.

For the first image, the camera read the exposure while it was pointed in the middle of the white and black boards.  The camera read all the white and the black and came to a reasonable conclusion by averaging the exposure.

S5A9661.jpg

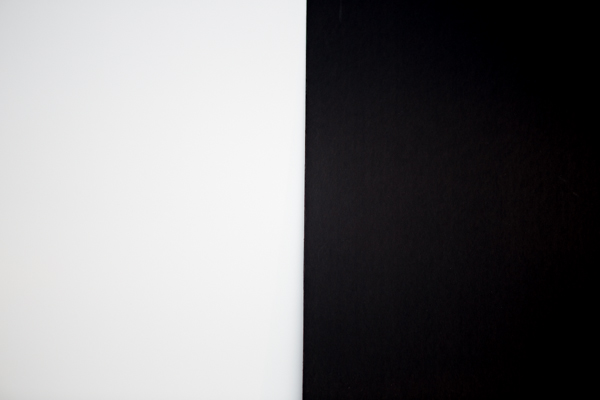
Evaluative Metering – centered between the white and black boards

S5A9658.jpg

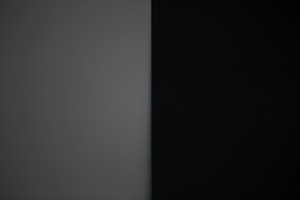
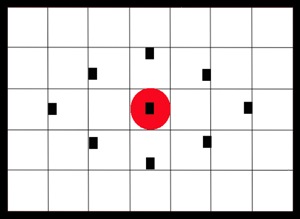
Metered off of the white board


The next image was shot with the camera meter reading taken from the white board.  The white was captured as grey and the black a darker grey.  This is because the camera tries to make everything neutral grey or 18%.


Metered on the Black Board

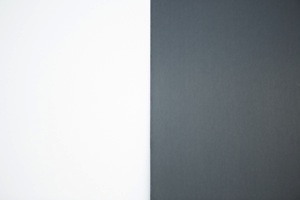
Metered off of the black board


In the third image, the camera read the exposure from the black board.  The resulting image is overexposed making the whites too bright, and a dark grey where it should have been black.


Center-Weighted Metering

center-weighted.jpg

Center-Weighted metering

This method of metering lays the most importance on the central portion of the frame, which can be as much as 75% or more, while little or no importance is given to the corners of the frame. Many pro DSLR’s will allow you to adjust the diameter of the center weight area.

This mode of metering is preferred by many photographers and has a reasonable level of accuracy. Also keep in mind that most subjects tend to be centrally placed when framing. You then obtain the exposure and recompose before capturing the image.

Spot Metering

spot.jpg

Spot metering

This mode measures the light from a very small part of the scene only.  The area measured is typically the center of the image, using approximately a 3 to 7 degree range of measurement.  It is usually less than 5% of the area of the frame. With most of the mid to upper end DSLR’s, you can arrange the placement of the spot within the frame so as to identify where you want the reading captured (usually it follows where you focus).

This is a very accurate metering mode. It will provide precise readings from small areas of your scene and is most effective in high contrast situations.

The same white and blackboards were photographed once again using spot metering. As you can see in the images below, the same problem exists. Even the spot meter was fooled.

_S5A9659A

Spot metered on the black (left image) and then Spot metered on the white board (right image)

To obtain a correct exposure so the camera is not fooled, a spot meter reading was taken using a grey card placed in the same light as the black and white boards.  This exposure setting based on the grey card was used to photograph the two boards.  The image below shows good exposure.

S5A9661.jpg

Exposure reading using a grey card

How do you switch metering modes?

The Metering icon is represented by an eye-shaped graphic within a rectangle. Your camera’s metering system may have three or more metering modes and the display will change based on which mode is selected.

Which Metering Mode should you use and when?

Matrix metering

Matrix metering works well for scenes that are evenly lit.  It can be used as a go-to method for grab shots. Even though the camera meter may fail you, these meters are highly sophisticated, computer controlled devices and can be relied upon for general photography. You can leave your camera on this mode and use it as a means of exposure education.

Center-Weighted metering

Use this for any scene where you want the primary subject to be correctly exposed while the rest of the image can be generally ignored for proper exposure. This is ideal for people and pet portrait photography, Still life and some product photography.

Center-Weighted is much more consistent and predictable compared to matrix metering. Use it wisely to control where the camera will be measuring the scene and those areas where the lighting does not play a key role in your composition.

Use this mode for outdoor portraits, high contrast scenes, product and food photography to name a few.

Spot metering

Spot metering gives the maximum accuracy and exposure control. This is ideal for back-lit subjects, close-up and macro photography. It can be used to read the brightest and darkest zones for landscapes. You could not do lunar photography without this mode.  Remember to use this mode any time it is important to correctly expose for a subject that does not fill the frame.

Spot metering mode works exceptionally well in situations where your primary subject is much lighter or much darker than its surroundings.

Exposure compensation

In a number of situations, you will need exposure compensation to get the right exposure, irrespective of the metering mode you select. Scenics with a lot of snow cover will be under exposed and will require an increment of +1 or more stops of exposure to make the snow look white.

Conversely, a black furry bear or a person wearing very dark clothing will be overexposed and will require negative exposure compensation of -1 or more stops.

So which mode should you use?

The answer is – it depends on the subject, the light direction, etc. Choose matrix or evaluative metering for evenly lit scenes. Use Center-weighted for scenes that have high contrast and where you want the primary subject to be properly exposed. Use Spot metering for back-lit subjects until you get very familiar with metering, use the spot meter for back lit subjects.

In conclusion, for exposure accuracy an incident light meter can be helpful as your camera’s light meter is easily fooled. But learning how your camera meter works will help you get better, more accurate exposures as well.

The post Metering Modes and How Your Camera Meter Works by Shiv Verma appeared first on Digital Photography School.


Digital Photography School

 
Comments Off on Metering Modes and How Your Camera Meter Works

Posted in Photography


Open source Lux camera is a DIY project for ambitious photographers

17 Jan

11554619543_d263eb6afc_b.jpg

Kevin Kadooka’s Lux is an experiment in DIY camera building. With a waist-level viewfinder, it accepts 120 roll film. Rather than borrowing parts from old cameras as he’s done in previous projects, Kevin’s Lux camera is comprised of off-the shelf parts. All of its construction specifications are available to enterprising individuals looking to build their own. Click through to learn more

News: Digital Photography Review (dpreview.com)

 
Comments Off on Open source Lux camera is a DIY project for ambitious photographers

Posted in Uncategorized


Lenstag: a World Without Camera Theft

17 Jan

Lenstag is a recently-launched, free online service for iOS, Android, and the web that records the serial numbers of your lenses, cameras, flashes, laptops and anything else in a secure, private registry before they are stolen.

If one or more of your items disappear, you can immediately flag the missing items as stolen which creates a public web page, quickly indexed by search engines. The serial number is then discoverable by a single Google search (example: ’75165 lenstag’) or by checking the Lenstag apps. Thanks to Lenstag’s growing relationships with the pawn shop industry and law enforcement, the exchange of money for that stolen item becomes much more difficult akin to trying to sell a stolen vehicle. The idea behind this service is that if everyone gets into the habit of checking serials numbers online before purchasing used equipment, it will become harder and harder over time to peddle hot items and thieves will get arrested when they try to pawn them. Think of it like a DMV for camera equipment.  The more people who register their gear, the more effective the registry system becomes.

By locking down a particular serial as belonging to you, the reselling and pawning of that stolen item becomes discouraged. Serials on Lenstag marked as stolen are indexed online.

By locking down a particular serial number as belonging to you, the reselling and pawning of that stolen item becomes discouraged. Serial #s on Lenstag, marked as stolen, are indexed online.

There is currently no foolproof way to prevent potentially having all of your gear stolen, even if your equipment never leaves your home. Insurance can protect you financially, but you permanently lose your original items and any images or video stored on them. There is no guarantee Lenstag can get your original items back either, but with Lenstag there is a chance that only increases with time.

The more serials that get checked prior to purchase on the used market, the safer everyone’s gear becomes.

The more serial numbers that get checked prior to purchase on the used market, the safer everyone’s gear becomes.

With Lenstag, you have a centrally-located place to store all of your serial numbers. They can be easily transferred to another Lenstag user if you decide to sell your gear. Your serial logs are date marked. This is handy if you ever need, for whatever reason, to prove that you have owned a certain piece of gear for at least as long as it has been registered. You can make your gear lists public as well. This is handy for showing clients what you own or for resource planning with collaborators.

Transfer serials, share gear lists with others, or prove what you own via an clear-cut dashboard.

Transfer serials, share gear lists with others, or prove what you own via an clear-cut dashboard.

You should use Lenstag if?

  • You don’t have any insurance. This service is free and is better than having absolutely no protection at all.
  • You already have insurance but want just a little extra peace of mind.
  • You collaborate with other photographers a lot or work with clients who need to know what equipment you are using.
  • You, for whatever reason, need to prove you own something without having to carry around a bunch of receipts or registration cards.
  • You buy a lot of used gear. You don’t have to be a Lenstag user to check a serial # but having the app on-hand for checking makes the process very easy. You can also use Lenstag’s text-to-check feature by texting the serial number in question to +1-415-749-9808. This works regardless of whether or not you’re registered on Lenstag.
Text to check a serial in question, regardless of whether or not you are registered on Lenstag.

Text to check a serial in question, regardless of whether or not you are registered on Lenstag.

Lenstag is used by all three of the major rental houses in the United States: BorrowLenses.com, LensRentals.com, and LensProToGo.com. It is currently being used in over 150 countries worldwide. Uploading an image of your item is quick and helps discourage theft one indexed serial at a time. Be sure your serial # is visible on your item when taking its picture for inclusion in your personal registry.

Not every number on your lens is a serial. Be sure you are reading the right thing.

Not every number on your lens is a serial. Be sure you are reading the right thing.

Want to know how gear gets stolen the most? The results may surprise you. Lenstag took the stats of its reported serials to learn the most common ways gear got stolen in 2013, along with the most commonly stolen models.

Don’t leave it behind! You’re most likely to have items taken from your car.

Don’t leave it behind! You’re most likely to have items taken from your car.

How to use & find Lenstag
Lenstag can be download for iOS and Android. You can also use their service via their desktop site.

The post Lenstag: a World Without Camera Theft by Jim Goldstein appeared first on Digital Photography School.


Digital Photography School

 
Comments Off on Lenstag: a World Without Camera Theft

Posted in Photography


Sakar shows QX-style, Vivitar-branded modular smart camera

14 Jan

CES2014_0110_201_L.jpg

One of the stands we didn’t get a chance to visit at CES 2014 was that of Sakar International. Its Vivicam IU680 (as seen by digitalcamera.jp) at first looks like a competitor to Sony’s QX models and JK Imaging’s Kodak Smart Lenses. However, a closer look reveals that the lens module is interchangeable. We say lens module, rather than lens because it appears to be the same 10-30mm lens/sensor combination shown by Sakar at last year’s CES under the Polaroid brand.

News: Digital Photography Review (dpreview.com)

 
Comments Off on Sakar shows QX-style, Vivitar-branded modular smart camera

Posted in Uncategorized


UFO Abducted My GoPro Camera …

13 Jan

Phantom 2

UFO showed up over my backyard yesterday afternoon …

Phantom 2

it landed …

Phantom 2

abducted my GoPro camera …

Phantom 2 flying with GoPro camera

…and, flew away,

Phantom 2

disappearing in clouds. Well, almost …

Phantom 2

Will it return back?


paddling with a camera

 
Comments Off on UFO Abducted My GoPro Camera …

Posted in Photography


Holding Your Digital Camera Properly Like It’s Your Baby

10 Jan

When you own a digital camera, you’ve got to treat it right, almost as if it were your very own baby. Wait…just a second there! It IS your very own baby, so you had better hold it gently and carefully. If that’s not convincing enough for you, then maybe a practical reason will affect you better: To avoid buying a Continue Reading

The post Holding Your Digital Camera Properly Like It’s Your Baby appeared first on Photodoto.


Photodoto

 
Comments Off on Holding Your Digital Camera Properly Like It’s Your Baby

Posted in Photography


GearShop videos: Advice and recommendations on camera technology

08 Jan

gsbug.jpg

We’ve added four new clips to our series of informative videos hosted by professional photographer Ryan Phillips. In this installment, he explores how sensor size can help you decide on your next camera, the benefits of shooting video on mirrorless cameras, Fujifilm’s unique technologies, and if image stabilization really makes a difference in your photos. See videos

News: Digital Photography Review (dpreview.com)

 
Comments Off on GearShop videos: Advice and recommendations on camera technology

Posted in Uncategorized


Canon shows off new PowerShot N100 ‘Story Camera’

06 Jan

PowerShot_N100_White_06.png

CES 2014: Canon has announced the PowerShot N100, which it’s calling a ‘Story Camera’. The feature that gives it this moniker is its rear-facing camera, which captures an image of the photographer at the moment the shutter is released (this works for stills and video). The photo or video from the rear camera is then put into one of the corners of the image that was taken. Photo quality should be a strong point, as the N100 uses the same lens and sensor as the PowerShot S120. Other features include a 3-inch LCD that tilts upward by 180 degrees, 1080/60p video recording, and Wi-Fi with NFC.

News: Digital Photography Review (dpreview.com)

 
Comments Off on Canon shows off new PowerShot N100 ‘Story Camera’

Posted in Uncategorized


Android-powered Samsung Galaxy Camera 2 adds processing power

03 Jan

GALAXY-Camera-2_004_Right-Angle1_white.png

Samsung has released its newest Android-powered Galaxy Camera, aptly named the Galaxy Camera 2. While the GC2 retains the slim form factor, 21X zoom lens, and huge 4.8-inch touchscreen LCD of its predecessor, it adds a faster quad-core processor, double the memory, a more recent version of Android (4.3), and a more powerful battery. Naturally, the camera has Wi-Fi built in (with NFC), and has the latest and greatest Samsung ‘Smart’ features, including a ‘selfie alarm’. 

News: Digital Photography Review (dpreview.com)

 
Comments Off on Android-powered Samsung Galaxy Camera 2 adds processing power

Posted in Uncategorized