
The weather resistant Fujifilm X-T1 Mirrorless Camera
I was thrilled when Fujifilm Canada sent me their brand new X-T1 to play with just over a month ago. Along with the camera body itself they sent me three lenses including the XF 55-200mm F3.5-4.8 R LM OIS, the XF 35mm F1.4R and the XF 60mm F2.4 R macro lenses. Upon removing these items from the box I was immediately impressed with the professional fit and finish of the camera body, lenses and lens hoods. Larger companies like Canon could learn a thing about lens hood design from Fujifilm. While the camera body is weather resistant, none of the lenses currently available at the time of this review shard that characteristic.
Electronic viewfinder
Mirrorless cameras seem to be all the rage these days and for good reason. Leaving the mirror out of the light path allows for smaller, lighter, less mechanically complex cameras to be built. But, without a mirror to reflect light into the viewfinder, mirrorless cameras are dependent on providing a viewfinder image via an electronic viewfinder (think of a tiny monitor). Past attempts at electronic viewfinders by Fujifilm and other manufacturers has generally resulted in sub-standard results due to laggy (slow to respond) electronic viewfinders with hard to view results.

Fujifilm Viewfinder Layout
The X-T1’s viewfinder suffers from none of these problems. The viewfinder is large, bright and very responsive. I normally shoot with one of Canon’s pro cameras and the X-T1’s viewfinder was, surprisingly, a tiny bit larger. An advantage of the electronic viewfinder is that extra information can be superimposed over the image, allowing photographers to make real-time adjustments to exposures before the image is made by glancing at a histogram, instead of having to wait until after the photo is made as is the case on a standard digital SLR camera.
Autofocus
Another issue plaguing many mirrorless cameras has been their autofocus performance. Fujifilm has tackled this head-on by providing 49 focus points spread out across the entire image and those focus points are adjustable in size so that you can customize them based on the type of subject you are photographing. Where most mirrorless cameras rely on a type of autofocus system detecting contrast to determine whether the image is in focus or not, the central nine focus points on the X-T1 use the faster, more accurate phase modulation focus system for superior results.
Image quality
I found the images produced by the sensor of the X-T1 to be especially nice; low in noise and more resolution than I was expecting from a 16 megapixel APS-C sized sensor. That could be due to the fact that the X-Trans CMOS II sensor in the X-T1 uses a unique arrangement of colour filters which supposedly eliminate the need for an optical low-pass filter thereby resulting in increased resolution and perceived sharpness.
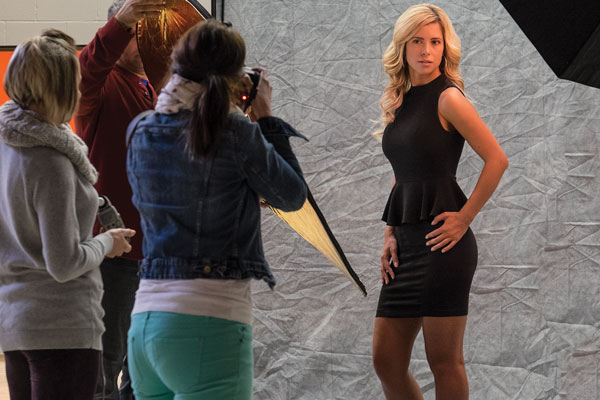
Students photographing model – ISO 3200 – XF55-200mm F3.5-4.8 R LM OIS Lens
1/25 at F6.4, ISO 3200, 95mm
WiFi
The X-T1 also has built in WiFi capabilities that allow you to download a free app for your smart device. This app allows you to remotely control your camera from a distance. A nifty application that requires additional hardware on most other current cameras to achieve similar results.
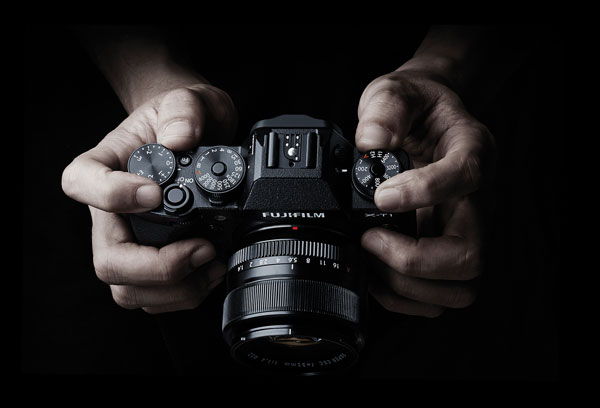
Controls on top of the camera
Camera controls
What I became especially fond of while working with the X-T1 is the controls for aperture, shutter speed, ISO and exposure compensation. Aperture is controlled by rotating a ring on the lens, just next to the body. ISO, shutter speed and exposure compensation are all controlled via dials on the top of the camera. Reminded me of some of my old-school SLR cameras, but it took me virtually no time to adapt from the Canon cameras I’ve used for the last 20 years or so.
Size and weight
The camera body itself is extremely light-weight but fit comfortably in my somewhat gigantor hands. I suspect adding the optional battery grip and/or hand grip would make it even better and of course battery grips always help with the making of vertical photographs. That said, most of the controls were easily accessible and with the body itself weighing in at just 440g (15.4 ounces), it is a camera that I could easily carry and shoot with for extended periods of time with little or no hand/shoulder/arm fatigue setting in. Even with the 55-200mm lens attached, the weight was just 1020g (36 ounces).
Customization
Another pro-camera feature I was thrilled to find on the X-T1 was a total of six different completely configurable multi-function buttons. This allowed me to fine-tune access to features like selecting focus points, depth-of-field preview, macro mode, autofocus mode and white balance so that I could program the buttons most convenient for me to the functions I use most.
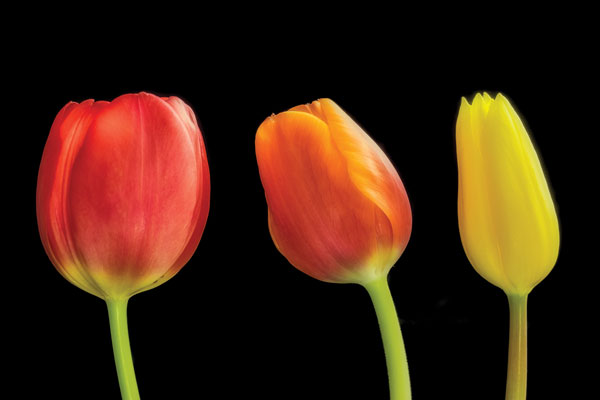
Studio Tulips – XF60mm F2.4 R Macro Lens
5.3 Seconds at F8.0, ISO 200, 60mm
Dislikes
If you’re wondering if there is anything I didn’t like about the camera, there is. I strongly dislike the four-way controller on the back of the camera. Where the other buttons on the camera offer tactile feedback when pressed, that feedback is absent on the four-way controller. Since I needed to use the four-way controller to select different focus points, I was constantly using (or trying to) the four-way controller. I found it virtually impossible to use without glancing towards it (thus removing my eye from the viewfinder and missing a chance at retiring via a photo of a brief appearance by Sasquatch if that circumstance had occurred) and continually frustrated by it. Living where I live in Canada and therefore in cooler temperatures, it is absolutely impossible to use with any sort of gloves in conjunction with the four-way controller, and on a mostly professional-feel camera like this, it was a bad design or manufacturing decision.
Another quality issue on the camera body is the door that slides opens to allow for the removal of the SD memory card. It feels ridiculously flimsy and I felt lucky to be able to send the camera back to Fujifilm with the door intact because it always felt like it was about to break off.
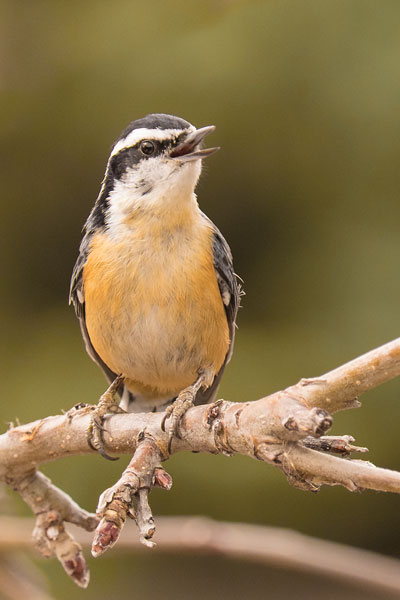
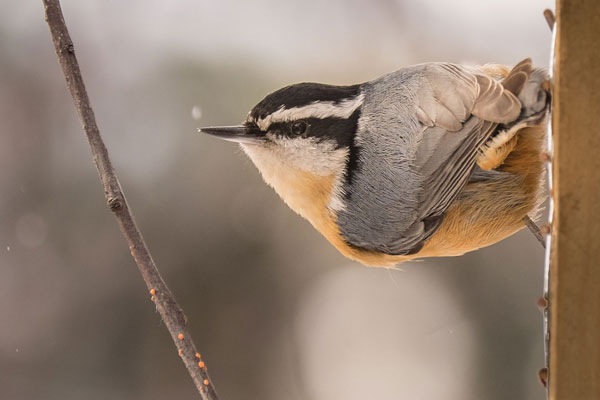
Red-breasted Nuthatch – XF55-200mm F3.5-4.8 R LM OIS Lens
1/800 at f4.8, ISO 800, 200mm
Overall
Overall though, this camera is a gigantic win for Fujifilm in my opinion. I’m a wildlife photographer by nature and for the most part, that’s the type of shooting I did with the camera. I was suitably impressed with the autofocus, and was thrilled with the quality of the lenses and sort of images that the sensor produced. Regardless of the situation (high or low ISO), the images were always impressive and the camera did a great job at judging the white balance although I always shot in RAW mode just to give me that extra flexibility in case the camera got in terribly wrong.
Need for longer lenses
For a wildlife photographer though, Fujifilm’s biggest weakness is the lack of larger lenses. The biggest lens I could get my hands on was the 55-200mm (84-305mm equivalent on a full-frame camera). While that’s okay for casual wildlife photography, it stops well short of “real” telephoto focal lengths. For instance, just a couple of days ago I was out at my favourite marsh with my camera, 500mm lens with two teleconverters attached (2.0x and 1.4x) for a grand total of 1400mm of image magnification. However, Fujifilm representatives tell me they have plans for bigger glass in the future and if that comes to be, I know that it would make a tempting package for me to have in my kit.
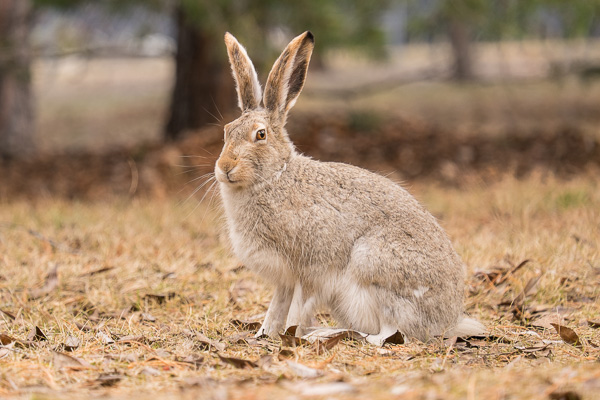
Snowshoe Hare – XF55-200mm F3.5-4.8 R LM OIS Lens
1/200 at f 4.8, ISO 400, 200mm
Room for improvement in some areas
Another area that still needs some work is the autofocus system. While the X-T1 is a great improvement over other mirrorless systems I’ve tried, it still suffers from performance issues with moving subjects rapidly changing distances between shots. Theoretically, the X-T1 can shoot 8 frames-per-second in continuous drive and focus modes. However, if the subject you’re focused on is rapidly moving towards you, the camera’s processing slows down and I was lucky to get 2 or 3 frames per second.
An additional improvement I’d like to see is an expansion in the number of phase-detect autofocus points. Nine out of forty-nine isn’t a bad ratio, but more would be better. I love the control over the size of focus points, but having more of the high-performance phase-detect points would help a lot too for composition on moving subjects.
For accurate exposures, I love having a live histogram overlaid on my image in the viewfinder. However, it was frustrating to have that histogram disappear when I half-pressed the shutter button to focus on my subject. While in continuous focus mode, having the histogram remain visible would help me make better exposures overall.
Red-breasted Nuthatch – XF55-200mm F3.5-4.8 R LM OIS Lens
1/800 at f5.6, ISO 400, 200mm
Final word
Overall, I highly recommend this camera. I teach hundreds of photography students each year the basics of operating their interchangeable lens cameras. I can confidently state that a student with this camera system would probably find learning the basics a bit easier than with a standard digital SLR camera system if for no other reason than the live histogram available in the electronic viewfinder and the easy to access, logically laid out controls. Further, for the seasoned user, the X-T1 body and lenses make a great combination for producing high-quality professional results.
The post Fujifilm X-T1 Mirrorless Camera Review by Paul Burwell appeared first on Digital Photography School.

Digital Photography School


You must be logged in to post a comment.