RSS
 

Posts Tagged ‘Camera’

Leica launches its first rugged camera with the X-U (Typ 113) underwater compact

21 Jan

$ (document).ready(function() { SampleGalleryV2({“targetContainerClass”:”sampleGalleryImageViewerContainer”,”galleryId”:”5760715033″,”isEmbeddedWidget”:true,”selectedImageIndex”:0,”startInCommentsView”:false,”isMobile”:false}) });

German camera manufacturer Leica has announced it has produced a waterproof, shock-proof and dust-proof compact camera that uses an APS-C sensor. The Leica X-U (Typ 113) joins the X family of compacts, but offers waterproofing to 15m / 50ft and a body that is designed to be used both beneath and above the waves.

The camera uses a 16.3MP CMOS sensor like the other models in the X series, but sports a 23mm F1.7 Summilux ASPH lens that delivers the same angle of view as a 35mm lens would on a full-frame camera. The lens can focus down to 20cm and features a flash housing directly above the axis of the front element that reduces the distance between the flash and the subject – which will be useful underwater, as illumination drops off quickly. The flash has a guide number of only 5m at ISO 100, and according to Leica has an operating range of 0.3-2m at that ISO setting. 

The camera shoots both Raw and JPEG files, and has a movie mode that records at 30 fps in 1080 HD resolution. When used underwater a press of the UW button activates Underwater mode, which adjusts the white balance accordingly and sets distortion correction to suit the conditions.

Leica says the camera was designed in collaboration with Audi Design, and that the top plate is made from high grade aluminum and the body coated in ‘high-grip TPE armoring’. 

The camera is available now, and costs £2400 / $ 2,950. A floating neck strap is available for £50 / $ 95 and a wrist strap for £32 / $ 65. Correct me if I’m wrong, but I think this is Leica’s first ever commercially available underwater camera.

For more information see the Leica website. 


Press release:

Built for the challenge – born for adventure: Introducing the Leica X-U

New outdoor camera from Leica delivers outstanding picture quality in the harshest conditions   

Leica Camera has unveiled its first camera designed specifically for outdoor and underwater photography – the Leica X-U (Typ 113).  

Incorporating a fast Leica Summilux 23mm f/1.7 ASPH. lens (equivalent to 35mm in 35mm format) with underwater protection filter, and a large APS-C CMOS sensor, this fully waterproofed member of the Leica X family delivers images with exceptional brightness and clarity, even in the harshest of conditions.  

Created for the adventurous photographer, the Leica X-U allows the user to capture breathtaking underwater moments in perfect detail, at depths of up to 15 metres. Shock-resistant, dust-sealed and shatter-proof, this rugged camera is the ideal companion for any outdoor expedition or adventure – whether it’s action or underwater shooting, extreme sports, travel, architectural or landscape photography – and also offers video capture in full HD quality.  

Optimum picture performance is guaranteed, thanks to the cutting-edge technology the X-U shares with all models in the Leica X range. Combined with its professional 16.5 MP (16.2 MP effective) APSC CMOS sensor, the Leica X-U’s premium Summilux 23 mm f/1.7 ASPH. lens ensures natural colour reproduction and outstanding resolution, even at the closest focusing distance of 20 centimetres. Its fast f/1.7 maximum aperture also offers the freedom to explore the creativity of selective focusing. In addition, due to the camera’s excellent resistance to stray light and flare, the Leica X-U is the perfect choice for an extensive range of indoor and outdoor lighting conditions – at any time of day or night.  

Made in Germany in collaboration with Audi Design, the stylish yet minimal Leica X-U focuses on the essential features: simple and intuitive operation, as well as ultimate precision. With a top plate made from premium aluminium and high-grip TPE armouring, the body ensures exceptional usability, handling and durability, as well as water resistance to a depth of up to 15 metres.  

Designed to embrace the elements, and for the most ambitious photography projects, the Leica X-U incorporates a non-slip body, a toughened monitor screen cover, and a failsafe double locking system for the battery compartment and memory card slot. These robust protective features ensure that photographers can concentrate fully on their subject, with full confidence in the camera’s durability.  

Furthermore, the minimal, intuitive design of the Leica X-U puts the most important creative tools directly at the photographer’s fingertips. Aperture and shutter speed can be set quickly and easily using the straightforward, typical ’Leica-style’ dials, while a practical underwater snapshot button ensures the camera is ready to capture the wonders of the underwater world immediately – without the need to search through menus. Thanks to the camera’s high resolution three inch screen and a wide range of useful automatic features, it takes just seconds to find the precise settings the photographer requires to capture their decisive moment.

Additionally, with its anodised aluminium control dials and an integrated flash above the lens, the Leica X-U is a perfect example of exceptional quality and attention to detail.

For those on a challenging professional assignment or a magical holiday of a lifetime, important moments can also be recorded in full HD, cinema-quality video – with a choice of 1920×1080 or 1280×720 pixel resolution, at 30 full frames per second in MP4 format. And whether the footage is intended for a professional production or a home movie to share with friends and family, the Leica X-U delivers high quality results that perfectly capture that special adventure.

Leica X-U (Typ 113) specifications

Price
MSRP $ 2950
Body type
Body type Large sensor compact
Body material Aluminum
Sensor
Max resolution 4928 x 3264
Image ratio w:h 3:2
Effective pixels 16 megapixels
Sensor photo detectors 17 megapixels
Sensor size APS-C (23.6 x 15.7 mm)
Sensor type CMOS
Color space sRGB
Color filter array Primary color filter
Image
ISO Auto, 100-12500
White balance presets 5
Custom white balance Yes (2 spots)
Image stabilization No
Uncompressed format RAW
JPEG quality levels Super fine, fine
File format
  • JPEG (Exif v2.3)
  • Raw (DNG)
Optics & Focus
Focal length (equiv.) 35 mm
Optical zoom 1×
Maximum aperture F1.7 – F16.0
Autofocus
  • Contrast Detect (sensor)
  • Multi-area
  • Center
  • Selective single-point
  • Single
  • Continuous
  • Live View
Autofocus assist lamp Yes
Normal focus range 20 cm (7.87)
Number of focus points 11
Screen / viewfinder
Articulated LCD Fully articulated
Screen size 3
Screen dots 920,000
Touch screen No
Screen type TFT LCD
Live view Yes
Viewfinder type None
Photography features
Minimum shutter speed 30 sec
Maximum shutter speed 1/2000 sec
Exposure modes
  • Program
  • Aperture priority
  • Shutter priority
  • Manual
Built-in flash Yes
Flash range 2.00 m (at ISO 100)
External flash Yes
Flash modes Automatic, automatic/red eye reduction, on, on/red eye reduction, long-term synchronization/red eye reduction, off
Drive modes
  • Single
  • Continuous
Continuous drive 5.0 fps
Self-timer Yes
Metering modes
  • Multi
  • Center-weighted
  • Spot
Exposure compensation ±3 (at 1/3 EV steps)
AE Bracketing ±3 (3 frames at 1/3 EV steps)
Videography features
Resolutions 1920 x 1080 (30p), 1280 x 720 (30p)
Format MPEG-4
Microphone Stereo
Speaker Mono
Storage
Storage types SD/SDHC/SDXC
Connectivity
USB USB 2.0 (480 Mbit/sec)
HDMI No
Microphone port No
Headphone port No
Remote control No
Physical
Environmentally sealed Yes
Battery Battery Pack
Battery description BP-DC8 lithium-ion battery & charger
Battery Life (CIPA) 450
Weight (inc. batteries) 635 g (1.40 lb / 22.40 oz)
Dimensions 140 x 79 x 88 mm (5.51 x 3.11 x 3.46)
Other features
Orientation sensor Yes
GPS None

Articles: Digital Photography Review (dpreview.com)

 
Comments Off on Leica launches its first rugged camera with the X-U (Typ 113) underwater compact

Posted in Uncategorized


Fujifilm’s budget FinePix XP90 rugged camera makes a splash

18 Jan

$ (document).ready(function() { SampleGalleryV2({“targetContainerClass”:”sampleGalleryImageViewerContainer”,”galleryId”:”1687256184″,”isEmbeddedWidget”:true,”selectedImageIndex”:0,”startInCommentsView”:false,”isMobile”:false}) });

Fujifilm has released the FinePix XP90, a relatively minor update to last year’s XP80 rugged camera. As with its predecessor, the XP90 is waterproof to 15m/50ft, shockproof from 1.8m/5.8ft, freezeproof and dustproof. The only major new feature is the LCD, which received a bump in both size and resolution (3″ vs 2.7″ and 920k vs 460k-dot).

It sports a 16MP BSI CMOS sensor and F3.9-4.9, 28-140mm equivalent lens with image stabilization. The camera has numerous special effects modes and can take HDR and panoramic photos. Video can be captured at 1080/60p or at frame rates of up to 480 fps (at lower resolutions). Naturally, Wi-Fi is also built in.

The XP90 can also serve as an action cam, with support for standard mounts and a dedicated mode which turns off the LCD for extended battery life. An optional 18mm equivalent wide-angle conversion lens is also available.

The FinePix XP90 will available in yellow, blue, orange and green for $ 229.95.

FUJIFILM ANNOUNCES NEW ADDITIONS TO THE X-SERIES LINE OF CAMERAS AND LENSES

X-Pro2, X-E2S, X70 and XF100-400mmF4.5-5.6 R LM OIS WR join the X-Series; all-weather FinePix XP90 gets the shot from sand to slopes

Valhalla, N.Y., January 14, 2016 FUJIFILM North America Corporation, a leader in digital imaging, today announced new additions to the award-winning X-Series line of premium fixed and mirrorless cameras, and ultra-high quality lenses, including: the FUJIFILM X-Pro2, FUJIFILM X-E2S, FUJIFILM X70 and FUJINON XF100-400mmF4.5-5.6 R LM OIS WR.  Fujifilm also introduced the new rugged and waterproof FinePix XP90, perfect for capturing amazing images everywhere, from underwater to mountain tops.

FUJIFILM X-Pro2

The FUJIFILM X-Pro2 is the new flagship range-finder style camera in the award-winning X-Series line. The X-Pro2 is the pinnacle of X-Series photography, and gives professional photographers an innovative Advanced Hybrid Multi Viewfinder capable of instantly switching between optical and electronic finders, a new 24.3MP X-Trans CMOS III sensor for truly remarkable image resolution, and a new X-Processor Pro that delivers dramatically improved response times for unmatched performance.

By combining these features with the ultra-high image quality of FUJINON X-Mount lenses and the world-renowned color reproduction technology refined over more than 80 years as a photographic film leader, the FUJIFILM X-Pro2 delivers the best ever results from an X-Series camera.

FUJIFILM X-Pro2 key features:

  • World’s first Advanced Hybrid Multi Viewfinder with 2.36 million dots and maximum speed of 85 frames per second
    • Diopter correction mechanism with an eye point of 16mm and a telephoto bright frame with enlarged focal length of 140mm
  • 24.3MP APS-C X-Trans CMOS III Sensor
    • Fast AF of up to 0.08 seconds
    • Phase detection AF and motion predictive AF for continuous shooting up to 8 frames per second
    • Start-up time of 0.4 seconds
    • Shutter time lag of 0.05 seconds
    • Shooting interval of 0.25 seconds
    • Focal plane shutter top speed of 1/8000 second
    • Flash sync speed up to 1/250 second
  • Dust and splash-resistant body with more than 61 points of weather sealing and freeze resistance to 14°F
  • High-precision 3” rear display with 1.62 million dots
  • Dual memory card slots (Slot 1 compatible with UHS-II Standards)
  • New monochrome  ACROS film simulation for smooth tones, deep blacks and rich textures
  • New Grain Effect mode for images reminiscent of old film photos, especially when printed
  • Maximum ISO performance up to 12800 sensitivity; Extended ISO ISO100, 25600, 51200
  • Improved electric charge transfer rate for ultra-fast readout speeds
  • Interval timer for shooting time-lapse sequences of one second to 24 hours, up to 999 frames
  • Free FUJIFILM Camera Remote application and Wireless Communication function allows users to remotely shoot images from smartphones and tablets via WiFi
  • Photos can be sent to the INSTAX Share Printer using the free INSTAX Share App (iOS and Android) SHARE Smartphone Printer
  • Full HD video 1080p at 60fps; bit rate of 36Mbps for clear capture of delicate movements; frame rates of 60 fps, 50fps, 30fps, 25fps and 24fps, supporting worldwide motion picture formats
  • Advanced creative filters
  • Optional accessories:
    • Hand Grip MHG-Xpro2 – improves grip and retains access to battery and SD card, and compatible with an Arca Swiss plate
    • Leather Case BLC-XPRO2 – genuine leather bottom case elegantly shows off the X-Pro2’s classic design while protecting the camera body with battery access


FinePix XP90

The new FinePix XP90 rugged digital camera is waterproof to 50ft./15m, shockproof from 5.8ft./1.75m., freezeproof to 14°F/-10°C and dustproof*,**. It features a 16.4MP CMOS sensor with a 28-140mm 5x optical zoom lens, Wi-Fi® connectivity for one touch transfers to smartphones and tablets, and captures full HD movies at 1080p, even underwater.

FinePix XP90 key features:

  • 16.4MP 1/2.3” CMOS sensor
  • Waterproof to 50ft./15m, Shockproof from 5.8ft./1.75m, Freezeproof to 14°F/-10°C and Dustproof
  • Complies with IP68 standards
  • 5x optical zoom with 28mm wide-angle setting
  • 3” LCD with anti-reflection coating
  • Wireless connectivity for instant image and movie sharing
  • Action Camera mode
  • Optical Image Stabilization
  • Full HD movie capture at up to 60 frames per second
  • Interval Timer Shooting and Time-Lapse Movie function
  • 480 frames per second slow motion mode
  • 11 Advanced Creative Filters
  • High Dynamic Range (HDR) capture
  • Motion Panorama 360°
  • Available in Blue, Yellow, Graphite with green, and Graphite with orange

The FinePix XP90 will be available in February 2016 for USD $ 229.95 \ CAD $ 239.99.

* Waterproof and dustproof protection standards of products, stipulated by IEC (International Electrotechnical Commission)

** Measurement method of MIL-Standard 810F Method5 16.5-Shock of the “MIL Standard”, a standard stipulating the durability of supplies procured by the American military, set by the United States Department of Defense

FinePix XP90 specifications

Price
MSRP $ 229
Body type
Body type Compact
Body material Metal, composite
Sensor
Max resolution 4608 x 3456
Other resolutions 4:3 (3264 x 2448, 2048 x 1536), 3:2 (4608 x 3072, 3264 x 2176, 2304 x 1536), 16:9 (4608 x 2592, 3264 x 1840, 1920 x 1080), 1:1 (3456 x 3546, 2432 x 2432, 1728 x 1728)
Image ratio w:h 1:1, 4:3, 3:2, 16:9
Effective pixels 16 megapixels
Sensor photo detectors 17 megapixels
Sensor size 1/2.3" (6.17 x 4.55 mm)
Sensor type BSI-CMOS
Color space sRGB
Color filter array Primary color filter
Image
ISO Auto, 100-3200, 6400 available at lower resolutions
White balance presets 7
Custom white balance No
Image stabilization Sensor-shift
Uncompressed format No
File format
  • JPEG (Exif v2.3)
Optics & Focus
Focal length (equiv.) 28–140 mm
Optical zoom 5×
Maximum aperture F3.9 – F4.9
Autofocus
  • Contrast Detect (sensor)
  • Multi-area
  • Center
  • Tracking
  • Single
  • Continuous
  • Face Detection
  • Live View
Autofocus assist lamp Yes
Digital zoom Yes (2X)
Manual focus No
Normal focus range 60 cm (23.62)
Macro focus range 9 cm (3.54)
Screen / viewfinder
Articulated LCD Fixed
Screen size 3
Screen dots 920,000
Touch screen No
Screen type TFT LCD
Live view Yes
Viewfinder type None
Photography features
Minimum shutter speed 4 sec
Maximum shutter speed 1/2000 sec
Exposure modes
  • SR Auto
  • Program
Scene modes
  • Portrait
  • Landscape
  • Sport
  • Night
  • Night (Tripod)
  • Sunset
  • Snow
  • Beach
  • Underwater
  • Underwater (Macro)
  • Party
  • Flower
  • Text
Built-in flash Yes
Flash range 4.40 m (with Auto ISO)
External flash No
Flash modes Auto, flash on, flash off, slow synchro
Drive modes
  • Single
  • Continuous Top
  • Continuous Last
  • Self-timer
Continuous drive 10.0 fps
Self-timer Yes (2 or 10 sec, group)
Metering modes
  • Multi
Exposure compensation ±2 (at 1/3 EV steps)
WB Bracketing No
Videography features
Resolutions 1920 x 1080 (60p, 30p), 1280 x 720 (60p), 640 x 480 (30p)
Format MPEG-4, H.264
Microphone Mono
Speaker Mono
Storage
Storage types SD/SDHC/SDXC, Internal
Storage included 96MB
Connectivity
USB USB 2.0 (480 Mbit/sec)
HDMI Yes (micro-HDMI)
Microphone port No
Headphone port No
Wireless Built-In
Wireless notes 802.11/b/g/n
Remote control Yes (via smartphone)
Physical
Environmentally sealed Yes (waterproof to 15m/50ft, shockproof to 1.8m/5.8ft, freezeproof to -10C/+14F, dustproof)
Battery Battery Pack
Battery description NP-45S lithium-ion battery & charger
Battery Life (CIPA) 210
Weight (inc. batteries) 203 g (0.45 lb / 7.16 oz)
Dimensions 110 x 71 x 28 mm (4.33 x 2.8 x 1.1)
Other features
Orientation sensor Yes
GPS None

Articles: Digital Photography Review (dpreview.com)

 
Comments Off on Fujifilm’s budget FinePix XP90 rugged camera makes a splash

Posted in Uncategorized


Fujifilm announces its flagship 24 megapixel X-Pro2 mirrorless camera

17 Jan

$ (document).ready(function() { SampleGalleryV2({“targetContainerClass”:”sampleGalleryImageViewerContainer”,”galleryId”:”2153749715″,”isEmbeddedWidget”:true,”selectedImageIndex”:0,”startInCommentsView”:false,”isMobile”:false}) });

Fujifilm has released the long-awaited followup to its flagship X-Pro1 mirrorless camera, aptly named the X-Pro2. While similar in design to its predecessor, virtually everything else about the X-Pro2 is new.

First is an all-new 24.3 megapixel X-Trans CMOS III sensor, making the X-Pro2 the highest resolution Fujifilm camera yet. It can capture images at sensitivities as high as ISO 51200 and also supports compressed Raw (a first for the X-series). The camera’s focal plane shutter tops out at 1/8000 sec (with an x-sync speed of 1/250 sec), with the electronic shutter offering speeds up to 1/32000 sec.

Another big leap is in terms of autofocus. The X-Pro2 has a Hybrid AF system with 273 total points, of which 77 are phase-detect and cover 40% of the frame. Fujifilm claims the X-Pro2 offers the fastest AF of any of its X-series models, though it’s worth keeping in mind that performance will vary based on lens – many lenses in the line, particularly primes, tend to have slower focus motors that can significantly affect continuous AF performance. 

While the X-Pro1 was already a sturdy camera, its successor is even more durable. Its magnesium alloy body has 61 points which are sealed against dust and moisture. It offers direct control for shutter speed, ISO and exposure compensation via dials on the top plate. The X-Pro2 is Fujifilm’s first camera with dual memory card slots, both of which take SD cards. The first slot is compatible with ultra-high speed UHS-II media.

Fujifilm has also updated the X-Pro1’s hybrid viewfinder, bringing it more in line with what’s found on the X100T. It can still be both an optical or electronic viewfinder, with the resolution of the EVF panel being bumped to 2.36 million dots. X-Pro1 users have always been able to overlay shooting data and bright lines onto the optical view, but now there’s a ‘tab’ at the lower-right which can display a projected LCD display showing a magnified view of the focus point, peaking, or a digital split prism. In addition to the hybrid viewfinder, the X-Pro2 also has a 3″ LCD with 1.62 million dots.

Some other new features of note include a monochrome Acros film simulation mode ‘for smooth tones’, a grain effect, interval shooting, 1080/60p video and, of course, Wi-Fi support.

The X-Pro2 will be available next month at a price of $ 1699.95.

FUJIFILM ANNOUNCES NEW FLAGSHIP X-PRO2 MIRRORLESS CAMERA

Weather-resistant X-Pro2 features the world’s first Advanced Hybrid Multi Viewfinder, new 24MP X-Trans CMOS III sensor, and creative monochrome ACROS film simulation

Valhalla, N.Y., January 14, 2016 FUJIFILM North America Corporation, a leader in premium mirrorless cameras, today announced the FUJIFILM X-Pro2, the new flagship range-finder style camera in the award-winning X-Series line. As the new pinnacle of X-Series photography, the X-Pro2 gives professional photographers an innovative Advanced Hybrid Multi Viewfinder capable of instantly switching between optical and electronic finders, a new 24.3MP X-Trans CMOS III sensor for truly remarkable image resolution, and a new X-Processor Pro that delivers dramatically improved response times for unmatched performance.

By combining these features with the ultra-high image quality of FUJINON X-Mount lenses and the world-renowned color reproduction technology refined over more than 80 years as a photographic film leader, the FUJIFILM X-Pro2 delivers the best ever results from an X-Series camera.

Advanced performance for professionals
The FUJIFILM X-Pro2 has the world’s first Hybrid Multi Viewfinder that allows photographers to take advantage of both an optical finder for a direct view of the subject as well as an electronic viewfinder to preview settings. The ability to instantly switch between these two types of viewfinders was first installed on the FUJIFILM X100 in 2011, but the latest version found on the X-Pro2 is the most advanced. It now features a Multi-Magnification function that automatically switches viewfinder magnification according to the lens in use and an Electronic Rangefinder that simultaneously displays the electronic viewfinder on top of the optical viewfinder.

Working together, the newly developed 24.3MP X-Trans CMOS III sensor and the high-performance X-Processor Pro image engine deliver pictures with a perceived resolution far greater than the actual number of pixels used. Moreover, the X-Pro2 now boasts 4x the processing speed of conventional image processing engines, which in turn gives users increased response times, even with the increased resolution. The powerful X-Processor Pro dramatically improves a wide range of response times, including a start-up time of just 0.4 seconds, the shortest shooting interval of 0.25 seconds, a shutter time lag of 0.05 seconds, and autofocus speeds as fast as 0.06 seconds. And with the option to use compressed RAW files, the X-Pro2’s performance and functionality now exceed the needs of professional photographers, including faster live view and even higher definition movies.

Cutting-edge autofocus system
The FUJIFILM X-Pro2 uses a new autofocus (AF) system that gives users an expanded number of selectable focusing points with 273 AF points. 77 of these are phase detection – for greater functionality and faster autofocus. With the X-Pro2, approximately 40% of the imaging area is now covered by fast, precise phase detection AF pixels, which means focusing speeds when photographing moving subjects have improved dramatically. By combining the processing capabilities of the new X-Processor Pro with a contrast AF readout speed that is 2x faster than before, the X-Pro2 delivers the fastest AF performance ever in an X-Series camera.

Weather-resistant for challenging shooting environments
The FUJIFILM X-Pro2 has a robust, weather-resistant body to meet the needs of professional photographers in tough shooting environments. The camera’s chassis is made from four pieces of magnesium alloy and is sealed with more than 61 points, making it dust-proof, splash-proof and capable of operating in temperatures as low as 14°F. In addition, it has dual SD card slots, for more reliable image storage and less card changing while on location.

Improved layout and new user interface design
The new FUJIFILM X-Pro2 embodies the true craftsmanship that the X-Series is known for around the world. The shutter speed dial, exposure compensation dial and finder switching lever are all milled from aluminum for a premium look and comfortable feel. The ISO sensitivity dial is now built-in to the shutter speed dial so camera settings can be confirmed at a glance without having to turn the power on. And the command dial position has been added to the exposure compensation dial. Selecting this function switches exposure compensation operation to the front command dial and expands the range to ±5EV.

The FUJIFILM X-Pro2 features Command dials on both the front and rear of the camera. And by adding a push function, they are easier to use, and still retain dust and water resistance. There are six function buttons to allow easier access to regularly used functions, and a new Focus Lever enables users to quickly select a focusing point, speeding up operation.

Photographers will find a new, easy-to-use graphical user interface design in the FUJIFILM X-Pro2 with fresh categories added to the tabs on the menu screen, allowing faster access to the item required. Users can register a maximum of 16 frequently used items in the new My Menu feature, and when combined with the 16 items from the Q Menu, a total of 32 shortcuts can be created.

The viewfinder display in the FUJIFILM X-Pro2 now offers a greater level of customization so it can further match the individual needs of the photographer. The X-Pro2 gives users a Bright Frame Simulation function in the optical viewfinder mode so the angle of view of each focal length can be confirmed without having to replace the lens, so the user can change lenses more accurately.

FUJIFILM X-Pro2 key features:

  • World’s first Advanced Hybrid Multi Viewfinder with 2.36 million dots and maximum speed of 85 frames per second
    • Diopter correction mechanism with an eye point of 16mm and a telephoto bright frame with enlarged focal length of 140mm
  • 24.3MP APS-C X-Trans CMOS III Sensor
    • Fast AF of up to 0.08 seconds
    • Phase detection AF and motion predictive AF for continuous shooting up to 8 frames per second
    • Start-up time of 0.4 seconds
    • Shutter time lag of 0.05 seconds
    • Shooting interval of 0.25 seconds
    • Focal plane shutter top speed of 1/8000 second
    • Flash sync speed up to 1/250 second
  • Dust and water-resistant body with more than 61 points of weather sealing and freeze resistance to 14°F
  • High-precision 3” rear display with 1.62 million dots
  • Dual memory card slots (Slot1 compatible with UHS-II standards)
  • New monochrome  ACROS film simulation for smooth tones, deep blacks and rich textures
  • New Grain Effect mode for images reminiscent of old film photos, especially when printed
  • Maximum ISO performance up to 12800 sensitivity; Extended ISO ISO100, 25600, 51200
  • Improved electric charge transfer rate for ultra-fast readout speeds
  • Interval timer for shooting time-lapse sequences of one second to 24 hours, up to 999 frames
  • Free FUJIFILM Camera Remote application and Wireless Communication function allows users to remotely shoot images from smartphones and tablets via WiFi
  • Photos can be sent to the INSTAX Share Printer using the free INSTAX Share App (iOS and Android) SHARE Smartphone Printer
  • Full HD video 1080p at 60fps; bit rate of 36Mbps for clear capture of delicate movements; frame rates of 60 fps, 50fps, 30fps, 25fps and 24fps, supporting worldwide motion picture formats
  • Advanced creative filters
  • Optional accessories:
    • Hand Grip MHG-Xpro2 – improves grip and retains access to battery and SD card, and compatible with an Arca Swiss plate
    • Leather Case BLC-XPRO2 – genuine leather bottom case elegantly shows off the X-Pro2’s classic design while protecting the camera body with battery access

The FUJIFILM X-Pro2 (body only) will be available in February 2016 for USD $ 1,699.95 and CAD $ 1,899.99.


Fujifilm X-Pro2 specifications

Price
MSRP $ 1699/£1349 (body only)
Body type
Body type Rangefinder-style mirrorless
Body material Magnesium alloy
Sensor
Max resolution 6000 x 4000
Other resolutions 3:2 (4240 x 2832, 3008 x 2000), 16:9 (6000 x 3376, 4240 x 2384, 3008 x 1688), 1:1 (4000 x 4000, 2832 x 2832, 2000 x 2000)
Image ratio w:h 1:1, 3:2, 16:9
Effective pixels 24 megapixels
Sensor size APS-C (23.6 x 15.6 mm)
Sensor type CMOS
Processor EXR Processor III
Color space sRGB, Adobe RGB
Color filter array X-Trans
Image
ISO Auto, 200-12800 (expandable to 100-51200)
Boosted ISO (minimum) 100
Boosted ISO (maximum) 51200
White balance presets 7
Custom white balance Yes (3 slots)
Image stabilization No
Uncompressed format RAW
JPEG quality levels Fine, normal
File format
  • JPEG (Exif v2.3)
  • Raw (14-bit RAF, lossless compressed or uncompressed)
Optics & Focus
Autofocus
  • Contrast Detect (sensor)
  • Phase Detect
  • Multi-area
  • Center
  • Selective single-point
  • Tracking
  • Single
  • Continuous
  • Face Detection
  • Live View
Autofocus assist lamp Yes
Manual focus Yes
Number of focus points 273
Lens mount Fujifilm X
Focal length multiplier 1.5×
Screen / viewfinder
Articulated LCD Fixed
Screen size 3
Screen dots 1,620,000
Touch screen No
Screen type TFT LCD
Live view Yes
Viewfinder type Electronic and Optical (tunnel)
Viewfinder coverage 92%
Viewfinder magnification 0.6×
Viewfinder resolution 2,360,000
Photography features
Minimum shutter speed 30 sec
Maximum shutter speed 1/8000 sec
Maximum shutter speed (electronic) 1/32000 sec
Exposure modes
  • Program AE
  • Shutter priority
  • Aperture priority
Built-in flash No
External flash Yes (via hot shoe or flash sync port)
Flash modes Auto, forced flash, slow synchro, suppressed flash, rear-curtain synchro, commander)
Flash X sync speed 1/250 sec
Drive modes
  • Single
  • Continuous (hi/low)
  • Self-timer
  • Interval
Continuous drive 8.0 fps
Self-timer Yes (2 or 10 secs)
Metering modes
  • Multi
  • Center-weighted
  • Spot
Exposure compensation ±5 (at 1/3 EV steps)
AE Bracketing ±2 (at 1/3 EV, 1/2 EV, 2/3 EV, 1 EV, 2 EV steps)
WB Bracketing Yes
Videography features
Resolutions 1920 x 1080 (60p, 50p, 30p, 25p, 24p), 1280 x 720 (60p, 50p, 30p, 25,p, 24p)
Format MPEG-4, H.264
Microphone Stereo
Speaker Mono
Storage
Storage types SD/SDHC/SDXC (Dual slots, UHS-II support in slot 1)
Connectivity
USB USB 2.0 (480 Mbit/sec)
HDMI Yes (micro-HDMI)
Microphone port Yes
Headphone port No
Wireless Built-In
Wireless notes 802.11b/g/n
Remote control Yes (Wired or via smartphone)
Physical
Environmentally sealed Yes (water and dust resistent)
Battery Battery Pack
Battery description NP-W126 lithium-ion battery & charger
Battery Life (CIPA) 350
Weight (inc. batteries) 495 g (1.09 lb / 17.46 oz)
Dimensions 141 x 83 x 56 mm (5.55 x 3.27 x 2.2)
Other features
Orientation sensor Yes
Timelapse recording Yes
GPS None

Articles: Digital Photography Review (dpreview.com)

 
Comments Off on Fujifilm announces its flagship 24 megapixel X-Pro2 mirrorless camera

Posted in Uncategorized


Hasselblad gives away a camera each to the winners of its Masters competition

17 Jan

$ (document).ready(function() { SampleGalleryV2({“targetContainerClass”:”sampleGalleryImageViewerContainer”,”galleryId”:”4521431257″,”isEmbeddedWidget”:true,”selectedImageIndex”:0,”startInCommentsView”:false,”isMobile”:false}) });

Medium format equipment manufacturer Hasselblad has announced the winners of its Masters competition, and has awarded the winners of each category a high end medium format camera. The company does not specify which cameras will constitute the prizes, but they will be presented at a ceremony during September’s Photokina show in Germany, at which the company is speculated to be launching major new products. 

The competition winners will have their work featured in the Hasselblad Masters book, and will be able to use the title Hasselblad Master for ever. 

This year’s theme was ‘Inspiration’, which Hasselblad says was chosen to commemorate the 75th anniversary of the company’s founding. There were ten categories to enter, and the competition was open to ‘all photographers who have been active professionals for more than three years and who are using digital cameras of at least 16 Megapixel, or film cameras, regardless of brand and format.’ The ‘Project 21’ category was open only to those under the age of 21. 

The judging panel was made up of 23 professional photographers and editors, including some past competition winners. 

For more information see the Hasselblad website. 


Press release:

Hasselblad has announced the ten winners of its Masters Awards 2016 – widely acclaimed as one of the world’s most prestigious professional photography competitions. The winners were selected by a combination of a public vote and a professional Masters Jury – comprising internationally renowned photographers and imaging experts.

For the first time in Hasselblad Masters Awards history each winning photographer not only gains ‘Master’ status but also a brand new Hasselblad medium format camera.

Winners will receive their awards, cameras and trophies at a special photokina 2016 ceremony in Cologne this September.

The Hasselblad Masters Awards 2016 winners:

  • Swee Oh (USA) Architecture
  • Roy Rossovich (Sweden) Fashion/Beauty
  • Katerina Belkina (Germany) Fine art
  • Lars Van De Goor (Netherlands) Landscape
  • Natalia Evelyn Bencicova (Slovakia) Portrait
  • Georgio Cravero (Italy) Product
  • Jake Reeder (Australia) Project//21
  • Ali Rajabi (Iran) Street/Urban
  • John Paul Evans (UK) Wedding
  • David Peskens (Netherlands) Wildlife

Perry Oosting, Hasselblad CEO: “The Masters Awards have always been the ultimate showcase to capture talent that flourishes across the globe. Our 2016 Masters has again demonstrated the outstanding skills out there across the entire spectrum of photo-disciplines”.

Judges scrutinised thousands of supreme quality images from professional veterans to aspiring young photographers determined to make their mark.

Masters Jury member Jonathan Beer said: “Picking my favourites from the 2016 finalists was immensely tough. Some categories had obvious stand-out entries but others were much closer to call. Exciting creativity backed-up with technical excellence was what I was looking for.

He added: “The Hasselblad Masters has always been one of the most prestigious competitions in the industry. The winners can take pride in and benefit from the coveted title ‘Hasselblad Master’ for the rest of their careers. I cannot wait to see what the winners create for the 2016 Masters Book.”

* The ten winners will be tasked to create a new and unique set of images embracing the theme ‘Inspire’ (coinciding with Hasselblad’s 75th anniversary) for the latest edition of the Hasselblad Masters Commemorative Book.

Articles: Digital Photography Review (dpreview.com)

 
Comments Off on Hasselblad gives away a camera each to the winners of its Masters competition

Posted in Uncategorized


Behind the Camera: Sue Bryce’s contemporary portraiture

17 Jan

If there’s been a theme to Sue Bryce’s career, it might be one of evolution. She started making portraits when she was 18 with a Hasselblad film camera, and with grit and sheer determination she built and marketed her own business. Classifying her work as contemporary fashion portrait photography, she’s evolved through decades in a shifting industry, and in addition to running her highly successful studio now offers online workshops for newcomers. We sat down with her recently to learn more about her work, vision and history with photography. 

Articles: Digital Photography Review (dpreview.com)

 
Comments Off on Behind the Camera: Sue Bryce’s contemporary portraiture

Posted in Uncategorized


CES 2016: Close up with Kodak’s new Super 8 movie camera

14 Jan

In a bit of a surprise, one of the hottest products to make an appearance at CES 2016 was an analog product: Kodak’s Super 8 movie camera. Built around the classic Super 8 film format, the camera does make some nods to contemporary digital technology: instead of an optical viewfinder there’s a flip out LCD screen, and there’s also a SD card slot for recording sound.

But the film is the real star of the show, and processing is included in the cost. If you’re into the retro thing looking to make some films (or even just someone on a quest for the nostalgic look of Super 8) this might be just the camera you need to go along with your vinyl albums. DPReview editor Dale Baskin talks with Kodak’s Josh Coon to learn a bit more about this camera.

Articles: Digital Photography Review (dpreview.com)

 
Comments Off on CES 2016: Close up with Kodak’s new Super 8 movie camera

Posted in Uncategorized


Google awarded patent for folding handheld camera design

14 Jan

$ (document).ready(function() { SampleGalleryV2({“targetContainerClass”:”sampleGalleryImageViewerContainer”,”galleryId”:”6782824935″,”isEmbeddedWidget”:true,”selectedImageIndex”:0,”startInCommentsView”:false,”isMobile”:false}) });

Global tech giant Google could be joining the camera business if a patent it was awarded this month is anything to go by. Filed in June 2014 and just approved on the 12th January this year, the patent issued by the United States Patent and Trademark Office is for a design for a folding camera that’s hinged in the middle like a clamshell mobile phone. The design appears to allow the camera to stand upright on its own, which presents a great deal of stability and also the ability to shoot selfies. It isn’t clear from the drawings whether the camera’s screen is inside the fold or on the back outer surface, but the significant bulge of the lens housing suggests the camera has a wide ranging zoom or high class optics.

The design allows the camera to open out so that its backside outer cover/screen can be brought to face in the same direction as the lens, with the front and back of the device creating one long flush surface, other than a gutter in the fold.

The patent might, of course, come to nothing, but it isn’t inconceivable that the company that seems to be into everything should want to create a standalone camera too. We will have to wait and see, but in the meantime can enjoy a little speculation – the patent is good for 14 years.

Do you think the camera will come to life or would Google be crazy to produce it? Let us know in the comments.

For more information visit the US Patents and Trademarks office website. 

Articles: Digital Photography Review (dpreview.com)

 
Comments Off on Google awarded patent for folding handheld camera design

Posted in Uncategorized


Do These 5 Quick Exercises to Learn What Your New Camera Can Do

13 Jan

new=-camera-experiments-1Have you learned everything your new camera can do yet? If not, then you’ve found the right article.

I present you with five quick exercises you can try right now, to help you better understand your new camera, and how it captures light. I’ll give you some hints about what is happening, but you will need to come to your own conclusions.

If you get stuck after running the experiment, there are answers at the bottom of the article. Don’t cheat! You have to try to come to the conclusion yourself first, you will learn more if you can do that.

To do these exercises your camera will need to have a shutter (although mirrorless cameras will work here), variable aperture, and adjustable ISO. It will also be helpful if you have a Program Mode, Aperture Priority, Shutter Priority, and Manual Mode. Check your user manual to see if these exist on your new camera.

1. Play with depth of field using the aperture

You might have learned a little about your camera’s aperture in this DPS article: Seeing in Depth of Field: A Simple Understanding of Aperture. If not, take a quick look.

This first exercise is easy. I want you to line up three objects on a table in front of your camera. Make sure the objects are something easy to focus upon (have lots of lines or contrast). If you need to, borrow toys from your kids, I find those work best.

During this exercise your camera will not move, so set it on the table in one spot. Place your first object directly in front of the camera, about two feet (0.6 meters) away. Your second object should be one foot (0.3 meters) beyond the first, and the third object, another foot beyond the second. It should look something like this:

new-camera-experiments-2

The objects should be staggered sideways to ensure they are all visible from the camera angle.

Set your camera to Aperture Priority mode. You may need to reference your camera’s user manual to find the setting. Usually it is the A or Av label on your camera’s main dial. Then set your ISO to Auto, and your focus dot to the camera’s central focus point. Again, you may need to reference the manual as all cameras are a different in how they choose focus points.

Point your camera at the first object (so the active focus point is on it), so that your camera focuses there. Set your aperture to the smallest f-number your lens can achieve; it will around f/1.8 or f/3.5. If you are using a zoom lens, pick a focal length somewhere in the 40-60mm range.

new-camera-experiments-3

Now take a picture. Without moving your camera, change the aperture to f/8. Take another picture. Then change your aperture to the largest number (smallest opening) your lens can achieve; this might be f/22 or even higher. Take a third picture.

Next, point your focus point at the second object, so it is sharp, and repeat the steps above so you have three new images at a low number aperture (f/3.5), a medium number (f/8), and a high number (f/22).

Lastly, focus on the third object and repeat the steps again.

You should now have nine images; three of each of the objects in sharp focus, at three different apertures.

The aperture on your camera controls the depth of field. What do you notice as the aperture number (or f-number) gets larger? Are more or less things in focus? What about when you focus on an object further away and look at the same aperture setting as a close object? Is more or less in focus?

BONUS EXPERIMENT: Run this experiment again and set your focal length to a smaller number (wide angle view) such as 18mm. What differences do you notice now?

2. Exposure compensation when the exposure is wrong

new-camera-experiments-5This may be disappointing to find out, now that you have a fancy new camera; but your camera is often wrong with its automatic settings. I’m sorry, but it just is. It’s not human and it has limits, but you can get around them.

Choose two objects for this experiment. One should be predominantly white, and the other should be predominantly black. Set them side by side. I chose a black iPad cover and a dish towel in this case.

Set your camera to Aperture Priority and choose the lowest f-number you can (e.g. f/1.8 or f/3.5). Set your ISO to 400 and turn autofocus on. Reference your user guide to set your camera’s metering to Spot or Center Weighted. This is typically signified by a small circle in the middle of the viewing area.

new-camera-experiments-4

Set up your camera in one position so it doesn’t move much, and point that center metering spot at the black object, so it fills the entire metering area. If you are using Center Weighted metering, fill as much of the center area with the black object. Take a photo.

exposure-compensation
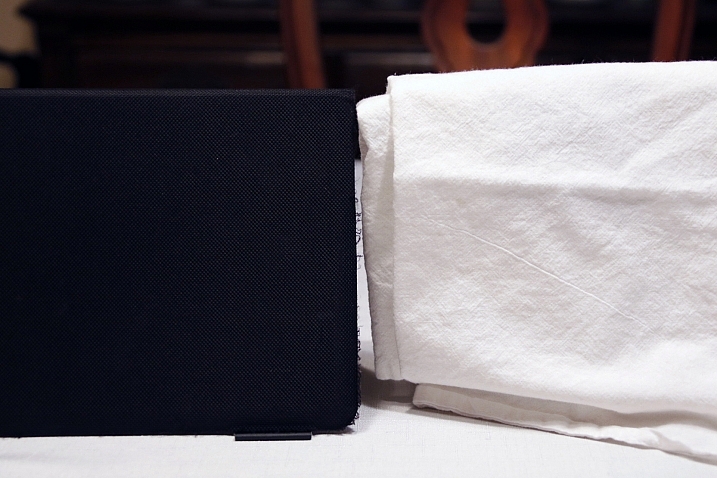
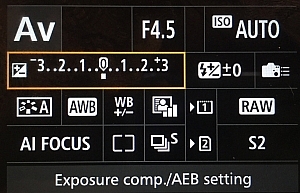
Now find the exposure bias (or exposure compensation) feature on your camera. It will look something like this:
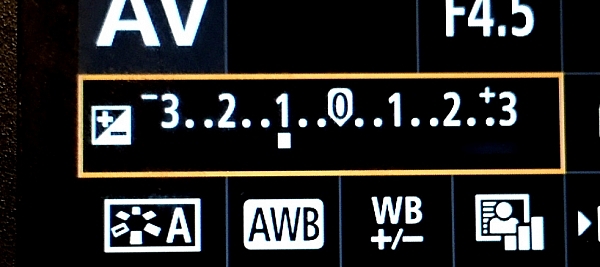
Change the exposure bias/compensation so it is set to underexpose by one stop. This will either look like “-1” or on some cameras there will be a scale with tick marks and one should be labeled “-1”. Move to that point. Take another identical photo of your black object.

new-camera-experiments-6

Reset your exposure bias to zero (0) and point your camera over to the white object, so that it fills the metering area; take a photo. Then change the exposure bias/compensation to “+1”.

You now have four images. Looking at the two shots of the black object, which one makes the object look more like its actual color? What about the white object?

3. Test your ISO

Modern cameras have an awesome range of ISO settings, but they still have their limits. Don’t get fooled into thinking you can just shoot at ISO 6,400 in a dark room and things will be peachy. This experiment is set to help you understand what happens when you change ISO, and what your personal limits might be for your camera.

new-camera-experiments-7

Set up a few objects on a table, at one end, and set your camera at the other end. Zoom in so the viewfinder is mostly filled with the scene in front of you. Include white and black objects, and some other colors. Have a couple of lights on in the room so it is normally lit, make sure the camera’s flash does not fire for this exercise.

Set your camera to Aperture Priority and your aperture to f/5.6. Set your ISO at 100 and take a photo. Without moving your camera much, change to ISO 200 and take another photo. Then ISO 400, take photo, ISO 800, take another shot, and so on (doubling the ISO each time) until you run out of ISO settings.

Examine the images, preferably on a computer screen, or use the zoom feature when reviewing images on your camera. You want to zoom in on the darker areas.

new-camera-experiments-8

What do you see happening from low ISO settings to the higher ones? Do you notice a big difference between white areas as compared to black areas?

If you need a hint about what is happening read: 6 Tips for Using ISO Effectively With Your Camera.

4. Add some blur with a slow shutter speed

This one is easy and quick. You may need a willing assistant, or you can find cars moving on a city street. You will want objects moving past your field of view, from side to side (not front to back) at a fairly consistent speed.

Set your camera on a solid object; this can be a tripod, desk, the hood of a car, etc. Point your camera toward the moving objects. Set your camera to Shutter Priority (S or Tv) Mode, ISO should be 100, and set your shutter speed to 1/500th.

Take a photo of the objects passing in front of your camera. Change your shutter speed to 1/60th and take another photo as the objects move.

new-camera-experiments-9

Lastly, set your shutter speed to 1/10th and take another photo. What do you notice happened in the three photos?

BONUS EXPERIMENT: What happens when you keep the slow shutter speed of 1/10th and move with the subject while you shoot?

5. White Balance is important for good color

White Balance is very important if you shoot in a file format other than RAW, such as JPEG. Your camera will usually do a good job of guessing the correct White Balance settings, but it is important to know how to control your camera if it messes up.

You will need a place with three different light sources to make this one work. It’s okay if they are not in the same spot, you can walk around. You will also need a piece of white paper with writing on it, to help focus.

Set your camera on Program Mode. This allows your camera to handle shutter speed, ISO and Aperture automatically, but you are going to take control of the White Balance. Again, you may need to reference your camera’s manual as each manufacturer handles these changes differently.

new-camera-experiments-12

First, find a scene that is lit by daylight. Set your camera’s white balance to the Daylight Preset. It’s setting looks like a little sun in the image above. Take a photo of your white paper with the daylight hitting it. If you can only manage cloudy daylight, that will be okay as well.

Without moving much, set your White Balance to incandescent or tungsten (looks like a little lightbulb). Take the exact same photo you did before. Lastly, set your White Balance to shade (a little house icon with shade next to it). Take the exact same photo.

new-camera-experiments-11

Which White Balance preset under daylight conditions produces this color?

Next, move to an area lit by incandescent or fluorescent light. This would also include compact fluorescent bulbs. You can hold your paper close to the light source for these next photos, just make sure the light is falling on the page and not coming through it.

Run through the same three White Balance settings as before; daylight, incandescent and shade.

new-camera-experiments-10

Which White Balance preset under incandescent lighting produces this color?

What happens to the color of the white paper when each of these changes are made? Its color changes, doesn’t it? When you shot with the shade setting, did things get more blue or more yellow? Think about  how you can use this in your photography once you understand how it works.

Answers and Helpful Hints

Now that you have played around a little, let me help clarify what you should have seen in each exercise.

1. In the first exercise you should see more depth of field (more things in focus, front to back) as the aperture number increases. As you focus further away from the camera, the depth of field also increases at the same aperture. This might be hard to see in this limited of a test, but it is explained better here: How to Control Aperture and Create Images You Love.

2. Your camera is set to expose the world as if it were 18% gray. This means objects that are black are exposed to make them more gray; the same goes for white things. If you are taking pictures of something already gray, like pavement, then there is no adjustment needed. Otherwise, to make white things white, you need to tell your camera to overexpose (that was the “+1”) and to make black things black, you need to under expose (“-1”). More info on exposure compensation is available here: Using Exposure Bias To Improve Picture Detail.

3. As ISO increases, digital noise (not the same as grain in the days of film, but similar) increases. Noise is usually not desired but as time goes on, camera manufacturers get better at reducing it. That’s why camera owners five years ago were told not to go over ISO 800, or there would be too much noise. Now, I regularly shoot at ISO 2000 with results that work for me. It’s important to know the limits of your camera so you are okay with exceeding them in certain circumstances.

4. As your shutter speed gets slower, the chance for blur increases. This can be blur from you moving the camera (we have all done this before) or from your subject moving. Blur is not an inherently bad thing, it can be used with great affect. But it’s important to know when, and how much, works best for you. Play around on this one a little with different subject speeds and shutter speeds.

5. White Balance can be trickiest when there is more than one light source and it’s helpful to know which way to adjust the colors. A lower temperature (incandescent and fluorescent) give more of a yellow/green cast while cloudy and shady gives your more of a blue tone. If you want to eliminate that color cast in your images, move the White Balance toward those settings.

The great thing about photography is it is highly reproducible. When you do this, that happens – and when you do this again, that happens again. That makes it a great art form, in which experimenting can teach volumes, if you keep control of the variables. You might note that only one variable was allowed to change in each of these exercises, that was on purpose.

Go forth and experiment more with your new camera. The more you shoot and the more you experience through the lens of your camera, the more you will learn!

googletag.cmd.push(function() {
tablet_slots.push( googletag.defineSlot( “/1005424/_dPSv4_tab-all-article-bottom_(300×250)”, [300, 250], “pb-ad-78623” ).addService( googletag.pubads() ) ); } );

googletag.cmd.push(function() {
mobile_slots.push( googletag.defineSlot( “/1005424/_dPSv4_mob-all-article-bottom_(300×250)”, [300, 250], “pb-ad-78158” ).addService( googletag.pubads() ) ); } );

The post Do These 5 Quick Exercises to Learn What Your New Camera Can Do by Peter West Carey appeared first on Digital Photography School.


Digital Photography School

 
Comments Off on Do These 5 Quick Exercises to Learn What Your New Camera Can Do

Posted in Photography


Do This Before You Upgrade a Lens for Your New Camera

13 Jan

new-camera-tips-5

So, you just got a new camera! Congratulations! You’re in the right place, DPS is absolutely full of amazing tutorials that will help get you started, and point you in the right direction. As for me, if there’s one thing that I could say to someone who has just purchased, or received a new camera, this is it:

If this is your first DSRL or mirrorless camera with interchangeable lenses, don’t buy any new lenses or gear for at least a month.

I know, I know. You’ve probably heard that the kit lens is terrible. You’ve probably already been given a list of things that are “must-buys” in order to take amazing photos. You may have even tested out your brand new camera, and been disappointed that your images don’t quite look like you’d hoped they would after you upgraded.

I understand, because I’ve been there. However, waiting to upgrade for at least a few months (get that you need like batteries and memory cards, but hold off on any major purchases like lenses) may actually benefit your photography in the long run. To explain why, let me tell you a little about me and my story.

New-Camera-Tips-1

I received my first DSLR, a Canon Rebel XS, in 2009. I’d done black and white film photography for years, so photography itself wasn’t new to me, but my old fully manual Pentax camera didn’t have things like white balance, or the ability to choose metering modes, and neither did my point-and-shoot digital camera at the time (at least not that I knew of), so there was definitely a big learning curve for me as I transitioned to a digital SLR.

The image above was one of the first that I took with my new camera, and I remember being so frustrated. I hated how yellow it was. I hated the fact that it didn’t really look any better than the images I took with my point-and-shoot camera, and it might have even looked worse! It didn’t take much complaining on my end before well-meaning friends and family members started suggesting different lenses, flashes, and other gear that would help me achieve the look that I was hoping to achieve.

Although I was confident that I’d need to upgrade lenses if I wanted to take my photography to a new level, my husband and I were still pretty newly married and money was tight, so I just kept on with my Rebel XS and Kit lens. I was really frustrated about not being able to upgrade at the time, but the truth was that I didn’t need a lot of new gear, I really just needed to learn how to utilize the gear that I already had.

new-Camera-Tips3

I was pretty sure that I was more interested in photographing landscapes and abstract items than I was photographing people. So, I’d take my camera to work with me and go on photo walks during lunch breaks, taking photos of whatever was around. I discovered how white balance worked, and started to chip away at learning a little more about how my camera functioned. The images still weren’t perfect, as you can see by the examples above and below, but I felt like I was making progress in terms of the overall aesthetic of the photos, and I was really starting to have fun. I was still itching to upgrade, but am forever grateful that we just couldn’t afford it at the time, because it turned out that the type of photography that I thought I was interested in, wasn’t actually my passion after all.

New-Camera-Tips-2

Over the course of the next year, I started taking photos of my nieces and nephew just for fun, and much to my surprise, discovered that I loved taking candid photos of kids. I had experience with portrait photography in high school and college, but thought I didn’t like it. As it turns out, most of my portrait experience had been in a studio setting with a professor who was very, very passionate about Rembrandt Lighting. I didn’t enjoy that kind of photography, but I discovered that I loved sitting in the grass in the backyard, and taking photos as my nieces and nephew played. I loved taking pictures while singing funny songs, and telling little jokes to see if I could make them laugh. Around the same time, I took a few senior portraits for some family friends, and discovered that it wasn’t just kids I enjoyed photographing. I loved taking pictures of people, and I especially loved taking portraits of people.

I also really loved portraits that had a nice blurry background, which was hard (but not impossible) to achieve with my kit lens. I began to look into how I could achieve that effect more easily, and quickly came across Canon’s Nifty Fifty Lens (50mm f/1.8). I purchased that lens shortly before my first daughter was born. It stayed pretty permanently attached to my camera body for the next several years.

New-Camera-Tips-4

My love for portraits has only intensified, and though I have made a number of upgrades to my gear since 2010, I’m glad that it took me about a year to make my first purchase. Being forced to wait allowed me time to discover which type of photography I was really interested in. Had I upgraded right away, I probably would have purchased a lens that would be collecting dust in the back of my closet, because I would have gotten something targeted towards landscapes or macro, rather than something more appropriate for portraits. It’s not the end of the world to own a lens that you don’t use all that often, but it’s also something that can be avoided with just a little patience!

new-camera-tips-6

Waiting to upgrade also forced me to really learn to use the camera that I had, which was actually a great camera, kit lens and all! Still need a little extra convincing that the kit lens isn’t terrible? Check out this Flickr Group called Kit Lens Losers. There are some incredible images in there, all taken with the standard kit lens. You CAN take great images, right out of the box. I promise.

When it did finally come time to upgrade to a new lens, I did so knowing that the upgrade was necessary in order to achieve something (better bokeh and the ability to shoot wide open), that my previous setup limited. The lens was important in helping me achieve the aesthetic that I like in photography, but it was only one piece of the puzzle. Learning about white balance, metering modes, shooting in RAW, and a whole slew of other camera settings were just as important as a new lens in terms of the overall affect on my photography.

I’m not saying that you need to have a perfect understanding of your camera before you upgrade, but I firmly believe that we’re never done learning when it comes to photography. What I am suggesting is that if you spend some time really getting to know your camera and what it is capable of before you upgrade, you’ll be able to ensure that you’re spending your money intentionally, in ways that will allow you to continue to grow in your photography – and that’s always a good thing.

new-camera-tips-7

Have you upgraded you gear? If so, what was your first purchase? If you haven’t, please share what has made you decide to wait.

googletag.cmd.push(function() {
tablet_slots.push( googletag.defineSlot( “/1005424/_dPSv4_tab-all-article-bottom_(300×250)”, [300, 250], “pb-ad-78623” ).addService( googletag.pubads() ) ); } );

googletag.cmd.push(function() {
mobile_slots.push( googletag.defineSlot( “/1005424/_dPSv4_mob-all-article-bottom_(300×250)”, [300, 250], “pb-ad-78158” ).addService( googletag.pubads() ) ); } );

The post Do This Before You Upgrade a Lens for Your New Camera by Meredith Clark appeared first on Digital Photography School.


Digital Photography School

 
Comments Off on Do This Before You Upgrade a Lens for Your New Camera

Posted in Photography


Camera Modes Explained for Newbies

12 Jan

Okay, so for one reason or another you’ve decided to step up to a new, more capable camera. Maybe you’ve moved up from a point and shoot, or maybe your phone just doesn’t cut it for you anymore. But now what? There are all these buttons and dials to make sense of – where do you even start? Not to worry, read on!

Your Mode Dial Explained

Manual Mode is used to capture long exposure images such as this.

The Camera Mode Dial

Well, the first place to start, is by learning about camera modes. This is where you’ll tell the camera how you want to capture an image. Very likely, you’re looking at this dial, or it may be a display on the screen, and you’re wondering what all those different camera modes are.  I’ll explain all of that in a moment, but first I’ll need to go over a few definitions:

Aperture

This is the opening in the lens, that determines how much light enters the camera. The aperture also affects depth of field, which is the range of objects that are in focus – from those that are closest to you, to those farthest away. A smaller aperture setting will give you greater depth of field, while a larger aperture setting gives you shallower depth of field. Aperture settings work a bit backwards, in that the higher the number, the smaller the opening. For instance, f/4 is a larger aperture than f/11. Of those two, a setting of f/11 will give you greater depth of field. For more on how the aperture works, see How to Take Control of Aperture and Create Stronger Photos.

Shallow-DOF

Use of a large aperture creates a shallow depth of field as in this image, where only a small portion is in sharp focus.

Shutter Speed

The shutter speed determines the amount of time that light is allowed to enter the camera. It also determines how movement is recorded in an image. A faster shutter speed will freeze motion, while a slower one will blur motion. Faster shutter speeds are often referred to in fractions of a second, such as: 1/125th, 1/60th, 1/500th and so on – while longer shutter speeds can be one second, 5 seconds, or even 30 seconds long. For more on shutter speed, check out Demystifying Shutter Speed.

ISO

Your camera’s ISO determines how sensitive it is to light. Lower numbers, such as ISO 100 or 200, mean your camera is less sensitive, and are used in bright situations, such as outdoors on a sunny day. Higher numbers, such as ISO 800 or 1600, make your camera more sensitive to light, and are used when there is less available light, such as outdoors on a cloudy day, or indoors when you can’t use flash. Read 6 Tips for Using ISO Effectively With Your Camera for more on setting your camera’s ISO.

Every camera’s mode dial is a bit different. The major manufacturers all tend to have the same, or similar basic modes, but each may have their own spin on things, or even throw in a few of their own special modes. In this article I’ll deal with the basic modes that are common to pretty much everyone.

The Basic Modes

Mode Dial

The Mode Dial (a Nikon dial is shown here)

Your camera will have a few basic modes, where the camera takes control of everything, and all you have to do is push the shutter button to take the picture. These modes can be a good place to start if you’re unsure of how to get a specific type of picture.  Keep in mind that when using these modes, the camera is controlling everything, including: color, contrast, white balance, shutter speed, aperture, and ISO. The most common of the basic modes are:

Auto Mode

Depending on your camera’s brand, this will be indicated in one of several different ways. Sony uses a green camera icon, Canon uses a green box, and Nikon uses a camera with the word Auto above it. What you need to know about this mode, is that the camera is making all exposure decisions for you. If the camera is a recent release, it may also be using a type of Intelligent Auto mode, where it analyzes the scene you are taking a picture of to determine the best settings. The flash may pop up if needed. The camera will set an appropriate aperture, ISO, and shutter speed to allow you to hold the camera and get a good exposure.

Portrait Mode

Portrait Mode is usually indicated by a head icon of some kind. When this mode is selected, the camera optimizes your settings for taking pictures of people. It will select color settings, choose a fairly shallow depth of field, and a fairly fast shutter speed, to ensure that your subject is not blurry. The camera may decide that flash is necessary, and fire if it is needed for exposure. Want to learn more about shooting portraits? See 10 Crucial Things You Need To Think About for Portrait Photography.

Portrait Mode

Portrait mode is great for capturing images of people. Be aware your camera’s flash might fire if there’s not enough light!

Landscape Mode

This mode is generally indicated by an icon containing mountains. When you select Landscape Mode, you are telling the camera you’re shooting scenery. The camera will record vivid colors, and set a small aperture for maximum depth of field. You may also need a tripod, as the shutter speed may be too slow to handhold the camera without blurring the image. The flash will not pop up in this mode. For more on photographing landscapes, take a look at 7 Landscape Photography Mistakes That Could be Ruining Your Photos.

Landscape mode is used for scenes like this where you want a lot of depth of field.

Landscape mode is used for scenes like this where you want a lot of depth of field.

Sports Mode

An icon of a running man indicates Sports Mode. This setting is best for capturing subjects that are moving, such as children playing, or a sporting event. The camera uses a faster shutter speed to freeze the motion of the subjects, and will use a wider aperture for shallower depth of field. The ISO may be raised to accommodate the faster shutter speed, and the flash will not fire. If catching action is your thing, Catching the Action: Photographing Youth Sports has some tips for getting started.

Sports Mode

Sports mode will set a shallow depth of field and a fast shutter speed to stop action.

Night Portrait Mode

That picture of the person with a star or moon behind them? That’s night portrait mode. This mode is used to capture pictures of people at night, usually firing the camera’s flash to illuminate them. However, the camera will also use a slightly slower shutter speed, and a higher ISO, to allow any ambient light to record in the image as well. Think of it this way – if you want to take a picture of someone at night in front of a neon sign, and you want the glow of the neon to show up in the image, this is the mode to use.

Close-up Mode

Almost invariably, an icon featuring a flower indicates Close-up Mode. Many people incorrectly call this Macro Mode. I say incorrectly, because macro generally means you are recording the objects you are photographing at life size, or larger. Close-up mode is used when you are photographing an object very close to the camera. Each manufacturer uses this mode a bit differently. While Nikon states that the camera will use a small aperture to maximize depth of field, Canon states that it will use a wide aperture to blur the background. The camera will also attempt to focus on the nearest subject to the camera. In each case a tripod may be necessary to work with a slower shutter speed.

Close-up Mode

Advanced Modes

The advanced modes on your camera’s mode dial grant you more control over exposure choices to some degree, depending on which mode you select. In addition, you’ll have the flexibility to choose picture styles, white balance, and other settings as well. Let’s start with the more basic of the advanced modes, and move on from there.

Program Mode

Contrary to popular belief, the “P” on the mode dial does not stand for “Perfect”. It stands for Program, and is Auto Mode’s big brother. Program mode is a good general use option. The camera will select the ISO, aperture, and shutter speed for you. Sounds like Auto Mode, right? It’s similar, but in Program mode, you have the ability to choose the white balance you want, the picture style you want, and you have the ability to shift the exposure, so if the camera selects a shutter speed or aperture you don’t want, you can shift that setting, and the camera will adjust the others accordingly. Your Guide to Understanding Program Mode on Your Camera can provide further insight into this setting.

Aperture Priority Mode

Aperture-Priority

Once you know how the advanced modes work, an image like this can be done a number of ways. Either Aperture Priority with a small aperture, or Manual mode with full control, could be used.

On Canon or Pentax cameras, this mode is indicated by an Av on the dial, while other manufacturers simply use an A. This mode is exactly what it says – you choose the aperture setting you want, usually deciding on such a setting to achieve a specific depth of field, the camera will then set the appropriate shutter speed to achieve proper exposure. You will also be responsible for choosing an ISO setting. Many cameras now feature an AUTO ISO setting, which lets the camera choose the ISO, if you’d rather not be bothered with selecting it yourself.

Aperture priority is best used when you know you want a specific depth of field for your image. For instance, if you’re shooting a landscape or grand vista, you’ll likely want the entire scene in focus, so you’ll want to choose a smaller aperture, such as f/16, to achieve that. The camera will then set the appropriate shutter speed for proper exposure. You’ll need to be aware of the shutter speed the camera selects, as you may need a tripod to keep the camera still if a slower shutter speed is necessary.

Shutter Priority Mode

The S on your mode dial (Tv if you have Canon or Pentax) stands for Shutter Priority mode. The Tv stands for Time Value, or the length of time the shutter remains open for exposure. This mode is the opposite of Aperture Priority. You’ll choose the shutter speed, and the camera will set the appropriate aperture, to give you the proper exposure. Remember, you’ll also need to set the ISO to ensure your exposure is correct, or set AUTO ISO so the camera can do it for you.

Shutter-Priority-Panning

Use of shutter priority allows you to select the shutter speed for panning shots like this one.

Shutter priority is useful when you know you want to use a certain shutter speed to capture motion in a specific way. For instance, if you are photographing sports, you know you want a faster shutter speed to freeze the action. You’ll likely set a shutter speed of 1/500th (or faster) to ensure you’re doing that, and let the camera set the aperture for the appropriate exposure. For more information on both Aperture Priority and Shutter Priority modes, see Getting off Auto – Manual, Aperture and Shutter Priority modes explained.

Manual Mode

Universally indicated by an M on your mode dial, in Manual Mode you are truly flying solo. You are responsible for setting your aperture, shutter speed, and the ISO, to achieve the proper exposure. This gives you the ultimate freedom in creating images, as all camera settings are available for you to set, and change as you see fit. You’ll want to keep an eye on your camera’s meter to be sure you aren’t over or underexposing the image. How to Learn Your Camera’s Light Meter and Master Manual Mode is a great primer if you’re ready to take the plunge and learn to shoot manually.

If you’re still not sure where to start, have a look at A Beginner’s Guide to Choosing Shooting Mode for further clarification.

googletag.cmd.push(function() {
tablet_slots.push( googletag.defineSlot( “/1005424/_dPSv4_tab-all-article-bottom_(300×250)”, [300, 250], “pb-ad-78623” ).addService( googletag.pubads() ) ); } );

googletag.cmd.push(function() {
mobile_slots.push( googletag.defineSlot( “/1005424/_dPSv4_mob-all-article-bottom_(300×250)”, [300, 250], “pb-ad-78158” ).addService( googletag.pubads() ) ); } );

The post Camera Modes Explained for Newbies by Rick Berk appeared first on Digital Photography School.


Digital Photography School

 
Comments Off on Camera Modes Explained for Newbies

Posted in Photography