RSS
 

Posts Tagged ‘Camera’

Accessory review: MindShift Gear SidePath camera backpack

05 Nov

The MindShift Gear SidePath
$ 99.99 | MindShiftGear.com

MindShift Gear makes a lot of cool bags; I’ve used several over the years and have been impressed with their durability. The most recent bag to join the MindShift Gear family is the SidePath. It caught my attention because it features a near identical design to one of my all time favorite camera backpacks, the Lowepro Hatchback. These ‘hatchback’ style bags consists of two main compartments: an upper area to store personal stuff and a lower area, accessible via the back of the bag, for storing one’s camera gear.

I’ve found this style of bag to be exceptional for everyday use. I almost always have a camera on me (usually a Nikon D750 and 35mm F2), but often need additional room in my bag for carrying my hard drives, extra clothes and a snack. With the SidePath, I have plenty of room to do this. I was also able to keep my camera and hard drives separate from my cloths and food. Also convenient: the bag has a trapdoor to open up the two compartments into one. This makes it a good grocery-getter as well.

The SidePath is available in one size only, and offers a total volume of 14 liters (by comparison, Lowepro has a 16L and 22L version of the Hatchback).

Specifications:

  • Exterior Dimensions 10.6″ W x 19″ H x 5.9″ D (26 x 47 x 15 cm)
  • Camera Compartment: 9.1″ W x 6.7″ H x 5.5″ D (24 x 15 x 14 cm)
  • Tablet Slot: 8.3″ W x 9.8″ H x 0.6″ D (22 x 25 x 2 cm)
  • Weight: 1.6 lbs (0.7 kg) (includes rain cover)

Design and Construction

I live in Seattle and spend a lot of time walking and biking between my apartment, the office and concert venues. I had previously been using the Lowepro Hatchback before swapping it out for the SidePath and found I sacrificed very little in the switch (I have the 16L Hatchback, so I did lose some volume.) After three weeks using the SidePath, including a weekend trip to Santa Cruz California, and I have mostly positive things to say.

What I like most about the design of this bag is how ordinary it looks; it doesn’t scream ‘I’m a camera bag!’ Moreover, I love how well-protected my camera gear is in the hidden lower compartment. Now, I’m not suggesting you sneak your camera somewhere it doesn’t belong, but the lower gear pocket makes doing just that VERY easy. And because the lower compartment is padded, it also doubles as a cooler-like area. Once again, I’m not suggesting you fill the compartment with brews, but it does perfectly fit a six pack of cold beverages.

The exterior of the bag has a water repellent coating while the inside is coated in polyurethane. This helps to keep your stuff dry when not using the dedicated rain cover. More on that later.

The side pockets are impressively stretchy. As you can see from the photo, I was easily able to stuff a water bottle in one and a Manfrotto BeFree tripod in the other. The two bungee cords located on the upper left and right of the bag can be used to further secure any oversized gear, like a tripod or flash stand.

Comfort

I’m 5’10” and have found the SidePath comfortable to wear, even for an extended period of time. It is also perfectly sized for every day out-and-about use (the next slide will give you a better idea of just how much you can lug). The back is well-padded, though the shoulder straps could benefit from some additional padding.

Another benefit of the hatchback-style design is that most hefty items, like your camera and lenses, will be located in the lower portion of the bag, right up against your back. This makes hauling heavy equipment less painful. There is also a chest strap and buckle on the over-the-shoulder straps for added support.

Capacity

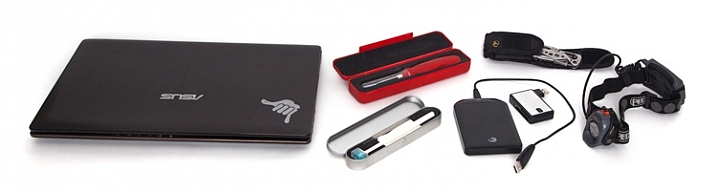
You can seriously fit a lot of stuff in this bag, including: a full frame DSLR body (Nikon D700), 2 lenses (Tokina 17-35mm F4, Nikon 85mm F1.8), two film cameras (a Polaroid 300 and Olympus Stylus Epic), a flash, card wallet, rain cover, 11-inch Macbook Air (you could probably squeeze a 13-inch in there instead), laptop charger, water bottle, tripod, US map, sunglasses, extra socks (it rains a lot in Seattle) and various personal items.

Upper Storage

The SidePath has only one interior zippered pocket, which I found disappointing. The more places I can organize and secure my stuff the better. It’s located up against the front inside of the bag. There is also a pocket against the back of the bag that MindShift is advertising can fit a 10” tablet or 1.5L hydration reservoir. I didn’t attempt to fit either of those in the pocket, but did find it a useful space for stowing my notebook, memory card wallet and extra Instax film. I only wish it had some way of securing itself closed, whether it be Velcro or a zipper.

An 11″ laptop can easily slide down into the front portion of the bag. I also used that area to store my iPad while flying to Santa Cruz. There is also quite a lot of space in the open portion of the top area, which I was able to fill up with my flash, laptop charger and Polaroid camera.

Lower Storage

Whether you’re hauling sodas or camera gear, the lower area is well-padded and well-secured. The bag ships with three padded velcro pieces that can be reconfigured to your liking.

One feature the Lowepro Hatchback offers that is missing on the SidePath is the ability to remove the lower gear portion of the bag completely. Still, it is nice that the divider between the upper and lower area can be dropped down to combine the two area into one.

Side Pockets

The ability to haul lightstands or a tripod securely is invaluable. The previously mentioned bungees chords located on either side of the bag are an excellent feature. And one not offered by the competition.

Rain Cover

The SidePath ships with a rain cover. Good thing because I tested the bag during the month of October, which just so happened to be the wettest October in Seattle history. Thankfully, never once did I find myself with wet gear. I’m also quite fond of the clips on the rain cover: they really help secure it to the bag and ensure no moisture is getting in.

Areas for improvement

There are aspects of the bag’s design I feel could be improved upon. The zipper track for the upper compartment allows the bag to open up dangerously wide. On several occasions over the course of this review, I unzipped the bag only to have it flop open and spill the contents of the upper compartment everywhere. If the zipper started and ended an inch or two higher than the bottom of the compartment, I think this would go a long way to rectify this issue. Or maybe I just need to get use to not opening the zippers all the way.

I mentioned it before, but the back pocket could also really benefit from a zipper or velcro to secure itself closed. Because seriously, only one zipper pocket on a camera backpack is not enough, ever.

The bottom line

The MindShift SidePath is not a carbon copy of the Lowepro Hatchback, but the two are strikingly similar in design. There are aspects of each I like better, for instance I love the SidePath’s bungee cords for securing light stands or tripods, and I love the Hatchback’s removal lower compartment.

On its own, the SidePath is an excellent day pack or travel pack. It can haul an impressive amount of gear, all in secure fashion and is well-versed to deal with inclement weather. At $ 100 MSRP it is pricier than the Lowepro Hatchback 16L (and a bit smaller), but it easily gives my favorite camera bag of all time a run for its money.

What we like:

  • Lightweight
  • Spacious design with an impressive amount of room
  • Two compartments, one for personal items, one for gear
  • Camera gear compartment is secured against one’s back when wearing the bag
  • Trapdoor allows the two compartments to be one
  • Exterior of the bag is treated with a water repellent and it ships with a rain cover
  • Side pockets can easily fit a small tripod or light stand
  • Bungee cords allow for tripods or light stands to be easily secured to the bag

What we don’t:

  • Only one interior zipper pocket
  • Camera compartment can not be removed
  • Upper compartment opens too wide, this sometimes lead to its contents spilling out
  • Shoulder straps could use a little more padding

Score:

Articles: Digital Photography Review (dpreview.com)

 
Comments Off on Accessory review: MindShift Gear SidePath camera backpack

Posted in Uncategorized


The Oberwerth William is a gorgeous, pricey leather camera bag

04 Nov

$ (document).ready(function() { SampleGalleryV2({“containerId”:”embeddedSampleGallery_0446095876″,”galleryId”:”0446095876″,”isEmbeddedWidget”:true,”standalone”:false,”selectedImageIndex”:0,”startInCommentsView”:false,”isMobile”:false}) });

Luxury bag maker Oberwerth has introduced its latest model, the William. Handmade in Germany from tumbled, full-grain cow-hide leather, its camera insert offers enough space for a DSLR, a couple of lenses and accessories, such as a flash and batteries. There is also room for a 13″ laptop and an 11″ tablet in a padded exterior pocket.

The camera insert is covered with water-resistant Cordura fabric and lined with an adjustable padding. When the insert is not needed it can be removed to transform the William into a business or casual bag. The adjustable strap features leather padding and smaller items, such as smartphones or a wallet can be stored in two smaller front pockets. The Oberwerth William is now available in dark brown or black from selected retailers or directly from the Oberwerth website for €599 (approximately $ 665).

Articles: Digital Photography Review (dpreview.com)

 
Comments Off on The Oberwerth William is a gorgeous, pricey leather camera bag

Posted in Uncategorized


DPReview Asks: What was your first camera?

04 Nov

We recently asked ten well-known photographers a simple question: “What was your first camera?” Some of the answers may surprise you.

Articles: Digital Photography Review (dpreview.com)

 
Comments Off on DPReview Asks: What was your first camera?

Posted in Uncategorized


Overview and Field Test of HoldFast Gear’s Money Maker Leather Camera Strap

02 Nov

The camera strap is one accessory that has definitely evolved along with the photography industry. While the default strap that comes with every camera might suit your basic shooting needs, there are plenty of options available with enhanced features (and style). Some help you shoot more ergonomically by better balancing heavy gear across your body, and some just give you the appearance of looking like a more polished professional. This product review is a camera strap that meets both ergonomic and stylistic needs of today’s photographers: the Money Maker leather camera strap by HoldFast Gear.

best leather camera strap Holdfast Moneymaker Review

About the MoneyMaker strap

The MoneyMaker is one of several camera strap products created by HoldFast Gear founder Matthew Swaggart. As a photographer himself, Swaggart created his line of camera straps to efficiently carry his own camera gear and pocket items, while also maintaining a nice aesthetic. Beginning with his very first product, the RuckStrap, Swaggart’s brand is perhaps best known for the MoneyMaker leather dual camera strap. Based in Tulsa, Oklahoma, every single HoldFast product is made in the USA, and Swaggart has been known to openly collaborate with customers to design custom straps.

best leather camera strap Holdfast Moneymaker Review

Benefits of Dual (or Double) Camera Straps

While dual (or double) camera straps are already very popular among photographers who carry multiple camera bodies, many of them such as the popular Black Rapid Double have designs that resemble tactical SWAT team gear. As a petite female photographer using these dual camera straps, I’m frequently met with raised eyebrows and asked if I’m getting ready for battle.

This is where the HoldFast MoneyMaker comes into play. Once I switched from Black Rapid to the MoneyMaker, I noticed even more raised eyebrows, but this time with the question, “Where did you get that beautiful camera strap?”

best leather camera strap Holdfast Moneymaker Review

MoneyMaker Basics

Crafted from high-grade leather and metal fasteners and buckles, the MoneyMaker is worn like suspenders, with a camera suspended from each end. The design balances the weight of the cameras so they both hang down by your hips, and you can even attach a third camera to the front by using an optional attachment leash. One of the best features, that is lacking from competitors such as BlackRapid, is the MoneyMaker’s inclusion of a Safety Catch clip that adds an extra layer of security to your camera.

best leather camera strap Holdfast Moneymaker Review

If you’ve ever used a Black Rapid camera strap, the mechanics of the MoneyMaker will be very similar.

  1. Start by first putting on the MoneyMaker Straps, then fasten the HoldFast screws to the tripod mount of your camera.
  2. Next, attach the circular split ring from the Safety Catch to your camera. This can be a bit tricky for Canon DSLRs.

best leather camera strap Holdfast Moneymaker Review

MoneyMaker Options and Variations

Textures

There are several standard variations you can choose from with the MoneyMaker to make it more comfortable and stylish. First, the MoneyMaker comes in several different materials including English Bridle, Water Buffalo, Great American Bison, and even Genuine Python. Prices and color options vary according to the material you choose, with Bridle Leather being the lowest priced, and Genuine Python costing the most.

best leather camera strap Holdfast Moneymaker Review

For those preferring camera straps not made of leather, HoldFast offers the Camera Swagg collection featuring the same MoneyMaker design crafted from high-grade nylon. Slightly lighter in weight and more affordable in price compared to leather options, this ultra-light option also comes in a wider array of colors including copper, navy, red, and black.

pratt_holdfast-gear-camera-strap_16

If you want a truly unique, one-of-a-kind camera strap, you can even opt for the hand tooled, hand painted leather MoneyMaker. Each is custom made to order and results in a beautiful, functional piece of art that embodies the art of leather craftsmanship.

Sizes

All of the leather straps can be ordered in the Original (1 1/2″ wide) or Skinny (1″ wide with 1 1/2 inch removable shoulder pads) version. They also come in Small, Medium, or Large, depending mainly on your height and build, with optional D-ring metal loops that can add extra attachment options. As a 5’2″ petite female, I opted for the Bridle Leather MoneyMaker in Chestnut color, size Small, and the Skinny version with no D-rings (they are’t recommended if you have long hair). It was a perfect fit!

best leather camera strap Holdfast Moneymaker Review

My Experience Shooting with the MoneyMaker

While the MoneyMaker is very popular among wedding photographers, I found it to be perfect for shooting concerts and corporate events as well. At concerts and music festivals, in particular, where leather camera straps aren’t yet prevalent, the MoneyMaker proved to be an excellent conversation starter among other photographers and concert-goers.

best leather camera strap Holdfast Moneymaker Review

When I shoot big concerts and events, I typically have the following camera setup:

  • (1) Canon 5D Mark III (B&H or Amazon pricing) with a 70-200mm f/2.8 attached  (B&H or Amazon pricing)
  • (1) Canon 6D (B&H or Amazon pricing) with a 24-70mm f/2.8 attached (B&H or Amazon pricing)
  • (1) 580 EXII Flash (B&H or Amazon pricing)
  • (1) Wallet with extra memory cards, batteries, and business cards

Using the MoneyMaker to carry my two camera bodies, I also used a lightweight ThinkTank belt pack to carry my flash and wallet. This combination helps balance the weight in my upper body and allows me to emerge with zero back and shoulder pain after shooting a multi-day music festival and two corporate conferences.

best leather camera strap Holdfast Moneymaker Review

best leather camera strap Holdfast Moneymaker Review

Things to Note

While my experience with the MoneyMaker was highly positive, there are a couple things about this camera strap system to note.

First, the use of all authentic leather makes the MoneyMaker heavy compared to the all-nylon systems of Black Rapid and other competitors. This isn’t a problem when you’re wearing and using the camera straps, but it can feel and appear somewhat intimidating right out of the box.

best leather camera strap Holdfast Moneymaker Review

Second, leather takes some time to break in, so the straps aren’t the softest and most supple at first. That doesn’t mean the straps aren’t comfortable, but you’ll need to use them frequently over time to get them to loosen up. Also, you’ll want to take extra care of the material if you go with a genuine leather camera strap option so it retains high quality.

Over to you

Do you have a certain camera strap that you prefer to use other than the default strap you automatically receive when you buy a camera? Is style as important as function when it comes to your ideal camera strap? What do you look for in a strap?

Please share in the comments below.

best leather camera strap Holdfast Moneymaker Review

googletag.cmd.push(function() {
tablet_slots.push( googletag.defineSlot( “/1005424/_dPSv4_tab-all-article-bottom_(300×250)”, [300, 250], “pb-ad-78623” ).addService( googletag.pubads() ) ); } );

googletag.cmd.push(function() {
mobile_slots.push( googletag.defineSlot( “/1005424/_dPSv4_mob-all-article-bottom_(300×250)”, [300, 250], “pb-ad-78158” ).addService( googletag.pubads() ) ); } );

The post Overview and Field Test of HoldFast Gear’s Money Maker Leather Camera Strap by Suzi Pratt appeared first on Digital Photography School.


Digital Photography School

 
Comments Off on Overview and Field Test of HoldFast Gear’s Money Maker Leather Camera Strap

Posted in Photography


Facebook takes aim at Snapchat and Prisma with new camera features

28 Oct

If cute animal selfie masks are the wave of the future, then Facebook isn’t going to sit idly by. The company will be updating its in-app camera function with some Snapchat and Prisma style functions soon. It is currently testing a new version that includes animated selfie masks, overlaid graphics, and geofilters, similar to those available on Snapchat, and a range of filter effects that convert your images and videos into fine-art paintings, like on the popular Prisma app.

In addition there is a series of new ‘reactive’ filters that respond to movements of your body. They cover the screen with ‘bubbles’ that can be move around by waving your arms, or line patterns than be disrupted by motion. 

Once you have accessed the new camera, filter options can be made visible by swiping down. In addition, you can tap on the new creative tools button for even more effects. The latter include pieces of virtual clothing and fashion accessories and art-filters. And it’s not just the filters that will remind you of Snapchat. Like on Snapchat, photos disappear after a 24 hour period, unless unless someone leaves a comment to start a conversation. The new Facebook camera features are currently being tested in Ireland, but should be expected to roll out globally soon.

Articles: Digital Photography Review (dpreview.com)

 
Comments Off on Facebook takes aim at Snapchat and Prisma with new camera features

Posted in Uncategorized


Video: Game Boy Camera revisited

28 Oct

Some of us were thrilled to be reunited with the Game Boy Camera of our childhood. Others? Less thrilled. Watch as DPR staff revisit the Game Boy Camera – or in some cases, pick it up for the very first time. 

Read more about the Game Boy Camera

Articles: Digital Photography Review (dpreview.com)

 
Comments Off on Video: Game Boy Camera revisited

Posted in Uncategorized


What’s In My Bag: A Look at the Camera Gear of a Nature Photographer

27 Oct

Being a landscape or nature photographer is like enjoying ice cream and having unlimited choice in the ice cream shop. There are so many different kinds of images to make, and different ways of making them in the outdoors, that having a wide variety of gear to choose from is important. This article will take you on a little journey through what’s in my bag. From my own camera gear to the different tools that I use to help me photograph the scenes in nature that capture my attention, and turn ordinary life into extraordinary art.

whats-in-my-bag-a-look-at-the-camera-gear-of-a-nature-photographer

sunset reflected in water

Hudson Bay Mountain Sunset

The Backpack

camera-bag-gear-02

The biggest piece of gear I use is the Tilopa backpack from f-stop. It’s a rugged 50L pack that’s well suited for a wide variety of outdoor scenarios. There are all manner of straps and zippered compartments both outside and inside the pack that are useful for attaching and storing both large and small pieces of equipment. There are three things however that have proven to be especially valuable to me:

  1. Rear Panel Access – instead of just having access to the inside from the top, the Tilopa has a zippered section that allows you access to the bag when you lay it on the ground. This is helpful when you have gear at the bottom of the pack and you don’t want to excavate everything on top of it to get access (as you’d have to do when going in from the top as is typical in a lot of other backpacks).
  2. Internal control unit (ICU) – ICU’s come in different sizes and shapes and allow you to organize and protect your camera equipment. My Tilopa allows for a large ICU with space at the top of the pack for a jacket or food depending on my needs. The backpack also has attachment points that you can use to secure your ICU to the inside of the pack. One really nice feature is that the ICU itself can be zippered shut and removed or carried. If you fly a lot and find that your pack is overweight, you can remove the ICU with your valuable gear and take it with you on the plane while checking the rest of the bag.
  3. Padded Hip Belt – to carry some of the weight on my hips.

Backup Camera Bodies

camera-bag-gear-03

The first digital SLR I owned was the Canon 5D. It was such a huge step up, both in price and quality from its predecessor (a film Canon Rebel). I remember being amazed at how much more of the scene I saw when looking through the viewfinder (thanks to the full-frame sensor). In 2007 I purchased an additional body (Canon 5D Mark II), which meant that I now had a backup. Having two cameras available for use provides a nice sense of security, knowing if one has issues, there won’t be any loss of productivity. The main differences between the two bodies that I appreciate are the live view, greater dynamic range, and higher resolution screen that the 5D MK II provides.

Extra Batteries – Charging Devices

Having spare batteries is especially important when I am out shooting for extended periods of time, or I am photographing winter scenes. I also appreciate having grips for each of my camera bodies that gives me the option of going out with two batteries at a time.

Another situation where a longer battery life is appreciated is when I shoot time-lapse sequences. I can shoot several thousand images at a time and it’s nice to know that I can leave the camera firing away with ample power, and not have to continually come back and check to make sure the battery hasn’t died.

Not only do I have backup camera batteries, but I also had a portable battery charger (Goal Zero Switch 8) for my phone. I say HAD because I used it so much it’s worn out. I am planning on purchasing an upgraded power charger soon. This device can be charged at home by plugging it into a USB port, and then used in the field to recharge a phone (or other devices such as headlamps).

Image Storage

camera-bag-gear-04

Apart from the Compact Flash (CF) cards in the cameras, I also carry a small (older model) Pelican case with room for 4 CF cards. The majority of my cards are 16GB, but I also carry a 2GB one as an emergency backup in a small pocket in my backpack.

Apart from the flexibility that having multiple cards provides, I sincerely believe in redundancy. You never know when a card might fail, and so to be ready on the occasion that one does, it’s nice to know you can keep shooting. Most of the time I don’t fill the 16GB cards to capacity when I’m out for the day on a photo-adventure. There are occasions however when I’m on a commercial job where having multiple cards is an absolute must.

Lenses

camera-bag-gear-05

The three lenses I have are all Canon L-series glass.

  • 14mm, f/2.8: This wide-angle prime lens is really useful for capturing wide open vistas. It also comes in handy when you find yourself in tight quarters and don’t have a lot of physical depth between you and your subject. The trick when you’re really close though, is to make sure your main subject is near the center of the frame. Because of the nature of this almost fish-eye lens, objects near the corners of the frame have exaggerated perspectives. It’s almost as if they are unnaturally stretched. (Price it out on Amazon or at B&H)
  • Canon 24-105mm, f/4: This is the lens that I have on my camera the most, primarily because it has the greatest degree of flexibility when it comes to focal length.
  • 70-200mm, f/2.8: Every once and while I go out with the goal of focusing on more detailed aspects of nature, rather than a wide-angle view of a scene. The added focal length as compared to the 24-105mm lens helps me to do that. The large aperture can also provide a nicely blurred background when the need arises.

Tripod

camera-bag-gear-06

My current tripod is the carbon-fibre Feisol CT-3342 with a Feisol CB-50DC ball head. This allows for flexibility when composing your image and also has the capability to rotate when the camera is locked in place (there are degree markings to help when specific movements are required, for example when doing panoramas). There is a tiny removable hook (which you can hang things from) that screws in underneath the head which is useful when it’s windy and you need that extra measure of stability.

The tripod has 3-section adjustable legs that extend or contract with the simple twist of a rubber ring. One of my favourite features (as I do a lot of winter photography), is the screw-in metal spikes that attach to the bottom of the tripod legs. These come in handy when I’m out on ice, or other slippery situations, to keep the tripod secure during each exposure the camera makes.

I also have a small tripod clamp that comes in handy in situations where using a tripod simply isn’t possible.

A relatively new purchase has been the Capture Pro from Peak Design. This is a device that I attach to the shoulder strap of my backpack and then click my camera (with the appropriate shoe) into it. So the camera is always close at hand when I go out on my adventures. It means every time I want to make a photograph, I can just reach down and release the camera from the clip instead of stopping and getting the camera out of the backpack.

Shutter Release Mechanisms

camera-bag-gear-07

There are two different ways that the shutter on the camera can be activated. First of all, a wired shutter release can be plugged into the side of the camera.

You can accomplish hands-free shutter release wirelessly as well. The Pocket Wizard PlusX transceivers are the ones that I use. One gets attached on your camera’s hot-shoe and plugged into the appropriate port on the side of the camera. Then as long as that device and the second one you can hold in your hand (or even on another camera) are both set to the same channel, when the remote device is triggered, the transceiver on the hot-shoe will fire the camera.

Why remote triggering? It’s very useful in low-light situations where a sharp image is required and hand-holding the camera is not possible. It’s also absolutely essential when doing long exposures.

Promote Control

camera-bag-gear-08

This remote control device can be used for a number of different things, including bulb-ramping and focus stacking. However the most commons things I use it for are my time-lapse sequences and HDR bracketing.

LEE Big Stopper

camera-bag-gear-09

Essentially this is a piece of glass that allows me to make long exposures beyond the normal capabilities of my camera. Practically, it’s a 10-stop neutral density filter that allows me to make a long exposure of a waterfall and turn raging water into silky smoothness. I also use it to capture the motion of clouds in the sky. There is the 4″x4″ piece of glass that slides into a holder, which itself attaches to the camera via a ring that screws into the end of the lens.

Waterfall: 30 seconds, f/4, 12:36pm
Clouds: 30 seconds, f/14, 12:03pm

Other Equipment

There are a few other pieces of equipment that find their way into my pack every once and a while:

camera-bag-gear-10

  • Tools for cleaning the camera sensor: I have an older version of the Visible Dust Arctic Butterfly as well as a sensor gel stick.
  • A laptop CF card reader adapter for extended trips where I’m away from my office and need image storage and editing capability.
  • An external hard drive for image backup.
  • Camera battery charging devices
  • Phone for safety
  • Lens cloth
  • Leatherman multi-tool device
  • Headlamp

Final Thoughts on Camera Gear

There you go, a fully-loaded backpack that weighs 35 pounds (15.9 kg). Thankfully not everything comes with me all the time, my back would definitely have something to say about that. With the years I’ve been doing photography, picking and choosing the tools that best suit the goals I have on any given day is what helps me turn ordinary life into extraordinary art.

What tools do you use? Please share in the comments below.

googletag.cmd.push(function() {
tablet_slots.push( googletag.defineSlot( “/1005424/_dPSv4_tab-all-article-bottom_(300×250)”, [300, 250], “pb-ad-78623” ).addService( googletag.pubads() ) ); } );

googletag.cmd.push(function() {
mobile_slots.push( googletag.defineSlot( “/1005424/_dPSv4_mob-all-article-bottom_(300×250)”, [300, 250], “pb-ad-78158” ).addService( googletag.pubads() ) ); } );

The post What’s In My Bag: A Look at the Camera Gear of a Nature Photographer by Curtis Cunningham appeared first on Digital Photography School.


Digital Photography School

 
Comments Off on What’s In My Bag: A Look at the Camera Gear of a Nature Photographer

Posted in Photography


Throwback Thursday: Game Boy Camera

27 Oct

Throwback Thursday: Game Boy Camera

It’s probably no surprise that you won’t find a review or a score for the Game Boy Camera in DPReview’s archives. Even by 1998 standards, the Game Boy Camera was a bit underwhelming in terms of technology. It took 0.5MP still images and displayed them at half that resolution. Output options were extremely limited: you either displayed your photos on the screen and passed your Game Boy around the room, or you acquired the Game Boy Printer – a glorified receipt printer that spits out tiny renditions of your subject on thermal paper.

But it was also the first camera that some of us on the DPR staff called our own, and for that reason holds a special place in our hearts. Take a look back at the Game Boy camera with us in all its 8-bit glory.

Throwback Thursday: Game Boy Camera

The camera itself attaches to a standard Game Boy cartridge, and the camera unit itself can swivel 180-degrees to face forward or backward. That’s right, Nintendo was so far ahead of the selfie craze that we didn’t even have an obnoxious name for them yet.

Throwback Thursday: Game Boy Camera

The menu system is about as straightforward as it gets: your three options are Shoot, View and Play. Of course, it needed to have a game element, so the Game Boy Camera offers three simple mini-games. But the real attraction is that camera on top. Hitting ‘shoot’ brings you to a screen where you can choose to just jump right into a fantastically laggy live view experience, or navigate to menu options called things like ‘Items’ and ‘Magic’. There’s a kind of Easter Egg if you select an option called ‘Run,’ but the less said about that the better.

Throwback Thursday: Game Boy Camera

Here’s what’s surprising about the Game Boy Camera – it offers quite a bit more than meets the eye. There are time-lapse, panorama and self-timer options. Nine different ‘trick lenses’ unlock more effects, like posterize, mirror and a 4×4 collage. You can also add hotspots to images, that when clicked take you to other images in your album. If you’ve got the time and imagination, you can actually do a lot with it. Heck, the cover of one of Neil Young’s albums was taken with a Game Boy Camera.

That said, low light shooting is not at all a strength of the camera, so any photo taken in less than ideal light comes out as not much more than some dark, indistinguishable pixels.

Throwback Thursday: Game Boy Camera

Choosing ‘View’ from the main screen brings you to a simple 3×3 grid where you can select images individually to view at larger size (weirdly, you can’t scroll between images in this view). On this screen you can unleash all kinds of mischief – zany borders, eyeball-shaped stamps and comments. But the party really started when you hooked up your Game Boy Printer.

Throwback Thursday: Game Boy Camera 

That’s right, if you really wanted to share your photos, you had to shell out some more cash for the printer. It outputs images on tiny strips of thermal paper at about the size of a postage stamp. The best part? The back of the paper can be peeled away to reveal an adhesive strip, which was ideal for attaching to photos to your Trapper Keeper.

Throwback Thursday: Game Boy Camera

The thing we remember most about the Game Boy camera is that it was just plain fun. In 1998, digital cameras were still making their way into the hands of the masses. Being a kid and suddenly having the ability to attach a camera to your beloved handheld game system was kind of magical. It encouraged silliness, inspired creativity and was the first step toward a lifetime of photo geekery, at least for a few of us.

Articles: Digital Photography Review (dpreview.com)

 
Comments Off on Throwback Thursday: Game Boy Camera

Posted in Uncategorized


Google acknowledges lens flare issue on Pixel camera, promises software fix

27 Oct

Since the Google Pixel and Pixel XL smartphones have become available for purchase, there have been several reports about the camera of the devices, despite stellar scores in the DxOMark ranking, being very prone to lens flare with the sun at a certain angle to the camera lens. Now a group of affected Reddit users has described the problem in the Google Product Forum and got a quick reply from a Google employee:

‘First, for some background — flare is a property of ALL camera lenses. It comes in a ton of different shapes and sizes and can even be used for creative effect — good and bad :-). The shape, color, amount, etc. of flare is related to dozens of different parameters of the lens structure and inclement light. However, we have seen reports about this “halo/arc flare”. This is the specific kind of flare that appears as a bright/low-contrast arc in the corners of the frame.
 
You can expect a software update in the next few weeks that will improve the effects of this issue. We’re working on some algorithms that recognize the halo/arc flare, characterize it mathematically, and then subtract it from the image. 🙂 You will need to use HDR+ to see the benefits of this software.’
 
So it appears Google is planning to solve a hardware problem with a software solution and bake an algorithm, that mathematically removes the flare from the image, into the Pixel camera’s HDR mode. This means the measure will only be effective when shooting in this mode and it remains to be seen if there is any impact on noise and/or image detail in the affected areas of the image. We will certainly have a closer look at the Pixel’s flare behavior in our own test of the device.

Articles: Digital Photography Review (dpreview.com)

 
Comments Off on Google acknowledges lens flare issue on Pixel camera, promises software fix

Posted in Uncategorized


Chronos 1.4 is a $2500 camera that can shoot at 21,650 fps

27 Oct

Late last month, a homemade camera dubbed Chronos surfaced alongside the claim that it can shoot at speeds up to 21,650 fps. The camera was notable not only for its ultra-high-speed shooting capabilities, but also its comparitively affordable $ 2500 price tag. The camera was the subject of a recent YouTube video showing off its various features and functionalities.

Chronos 1.4 is the brainchild of engineer David Kronstein, who first demonstrated the camera’s hardware and recording capabilities with a production-level prototype under his YouTube handle ‘tesla500.’ The camera can record 1,057 fps at 1280 x 1024, and up to 21,650 fps at lower resolutions. Kronstein lists the pre-production camera features as the following:

  • 1.4 Gigapixel per second throughput
  • 1280 x 1024 at 1050 fps
  • Lower resolutions at higher speeds
  • 8, 16, or possibly 32GB RAM
  • Storage on SD card, USB drive, SATA hard drive
  • Raw video saving
  • No PC needed for operation
  • AC Adapter or battery (1.75 hour per charge)

You can see a full review of the camera in Taofledermaus’s new video below. Per his video, it seems the current plan is to launch the camera on GoFundMe rather than Kickstarter in the next month or so, but details on that are still slight at this time.

Via: PetaPixel

Articles: Digital Photography Review (dpreview.com)

 
Comments Off on Chronos 1.4 is a $2500 camera that can shoot at 21,650 fps

Posted in Uncategorized