RSS
 

Posts Tagged ‘Bokeh’

Got Bokeh? DxO reviews the Nikkor AF-S 105mm F1.4E ED

15 Dec

We had the opportunity to shoot the Nikkor AF-S 105mm F1.4E ED a few months back and everyone here was very impressed with its performance. DxO just published their review, and their analysis of the lens’ performance backs up what we saw in the field: it’s one of the sharpest lenses that Nikon currently produces. Check out their full review here.

See our Nikkor AF-S 105mm F1.4E ED
sample gallery


$ (document).ready(function() { LensWidget({“containerElement”:”#reviewLensWidget”,”allowProductChange”:false,”enableKeyboardShortcuts”:false,”state”:{“lensId”:”nikon_105_1p4_e_ed”,”cameraId”:”nikon_d810″,”version”:”0″,”view”:null,”aperture”:null,”focalLength”:null}}) })

Articles: Digital Photography Review (dpreview.com)

 
Comments Off on Got Bokeh? DxO reviews the Nikkor AF-S 105mm F1.4E ED

Posted in Uncategorized


No dual-cam? No problem: Patch app for iOS uses neural networks to create fake bokeh images

11 Nov

Most dual-cam equipped smartphones offer a ‘fake bokeh’ feature. Thanks to the slightly offset position of their two lenses, cameras in devices like the Apple iPhone 7 Plus, Huawei P9 or LG G5, can distinguish between objects in the foreground and background of an image. By applying digital blur to the latter they can simulate effects of shallow depth-of-field you would typically achieve with a DSLR and fast lens.

If your phone just has one camera, there are still a few pure software solutions out there to achieve the same effect. The Patch app for iOS is the latest and uses neural networking to identify the foreground subject in an image and isolate it from the background. If the scene is too complex for the algorithms to work automatically, there is also a manual selection tool that can be used to optimize the results. You can paint in areas that should be sharp, and remove areas that should be blurred. A zooming function allows for greater precision in this task. 

Once the selection is finalized users can choose from 5 different blur strengths to generate the desired effect. Patch does not have any particular camera hardware requirements and therefore works with most iOS devices. If you want to try the app you can download a free version that will leave a watermark on your images from the Apple App Store. A $ 1 in-app purchase will get you an upgrade to the watermark-free version.

Articles: Digital Photography Review (dpreview.com)

 
Comments Off on No dual-cam? No problem: Patch app for iOS uses neural networks to create fake bokeh images

Posted in Uncategorized


Weekly Photography Challenge – Bokeh

07 Nov

Have a look at these images of bokeh to get some ideas.

bo·keh /b??k?/noun
PHOTOGRAPHY
noun: bokeh
  1. the visual quality of the out-of-focus areas of a photographic image, especially as rendered by a particular lens.
Web4camguy

By web4camguy

Weekly Photography Challenge – Bokeh

This week your challenge is to create and shoot some bokeh. If you need some help check out these articles:

  • How to Achieve Background Blur or Bokeh
  • How to Create a Delicious Blurry Bokeh Background in 4 Easy Steps
  • How to Create Bokeh In-camera and Using Photoshop
  • How to Create a Spectacular Background Using an El Bokeh Wall
  • How to Create a Unique Bokeh Portrait for Under $ 10

JD Hancock

Abdul "B.as.it" IM

By Abdul “B.as.it” IM

Chris Jones

By Chris Jones

Share your images below:

Simply upload your shot into the comment field (look for the little camera icon in the Disqus comments section) and they’ll get embedded for us all to see or if you’d prefer, upload them to your favorite photo-sharing site and leave the link to them. Show me your best images in this week’s challenge. Sometimes it takes a while for an image to appear so be patient and try not to post the same image twice.

Share in the dPS Facebook Group

You can also share your images on the dPS Facebook group as the challenge is posted there each week as well.

googletag.cmd.push(function() {
tablet_slots.push( googletag.defineSlot( “/1005424/_dPSv4_tab-all-article-bottom_(300×250)”, [300, 250], “pb-ad-78623” ).addService( googletag.pubads() ) ); } );

googletag.cmd.push(function() {
mobile_slots.push( googletag.defineSlot( “/1005424/_dPSv4_mob-all-article-bottom_(300×250)”, [300, 250], “pb-ad-78158” ).addService( googletag.pubads() ) ); } );

The post Weekly Photography Challenge – Bokeh by Darlene Hildebrandt appeared first on Digital Photography School.


Digital Photography School

 
Comments Off on Weekly Photography Challenge – Bokeh

Posted in Photography


How to Achieve Background Blur or Bokeh

31 Jul

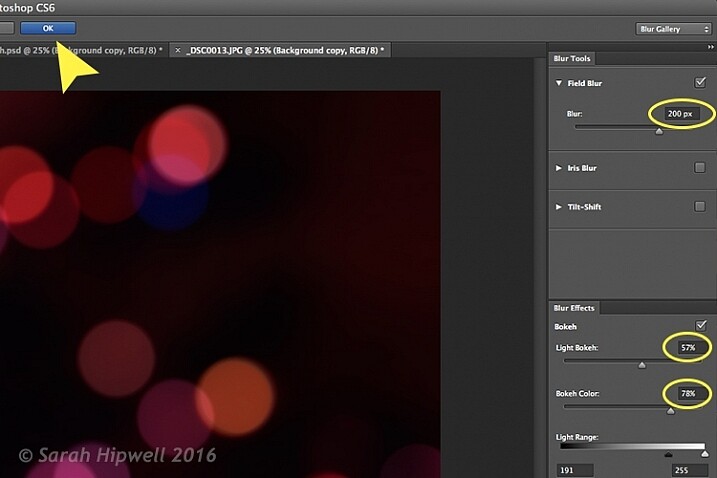
If I show you two different portraits, one with a blurred background and one with a sharp background, you will automatically prefer the one with the creamy bokeh. Why? Because that’s just how it is. No, the bokeh effect is very flattering because it isolates the main subject by separating it from the background.

If you did not know, bokeh means blur in Japanese, and it is purely aesthetic.

Most portrait photographers blur their backgrounds, and I certainly do it because when I take a picture of someone, I want the viewer to focus on the person’s face and not what’s going on behind them.

IMAGE 1

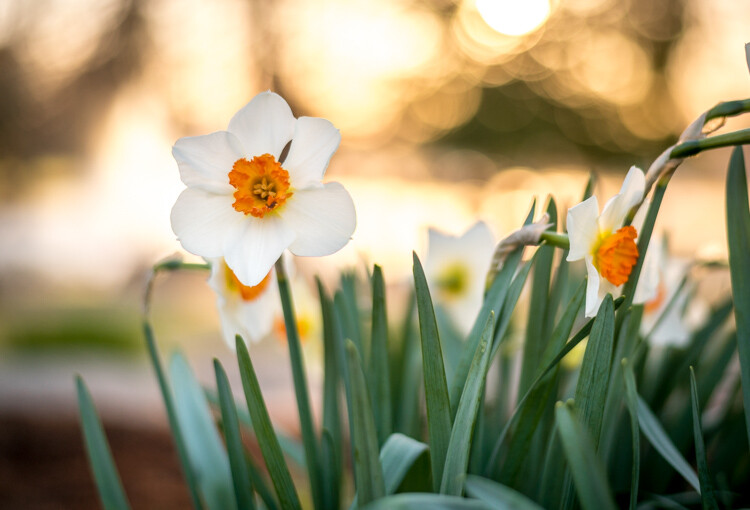
Portrait with nice bokeh in the background.

I always want good background blur when I shoot portraits, that’s one of the main reasons why I shoot on Aperture Priority and let the camera do all the rest of the work. My minimum shutter speed has to be 1/100th, so I increase my ISO to 400 to compensate – this is for portraits with natural light.

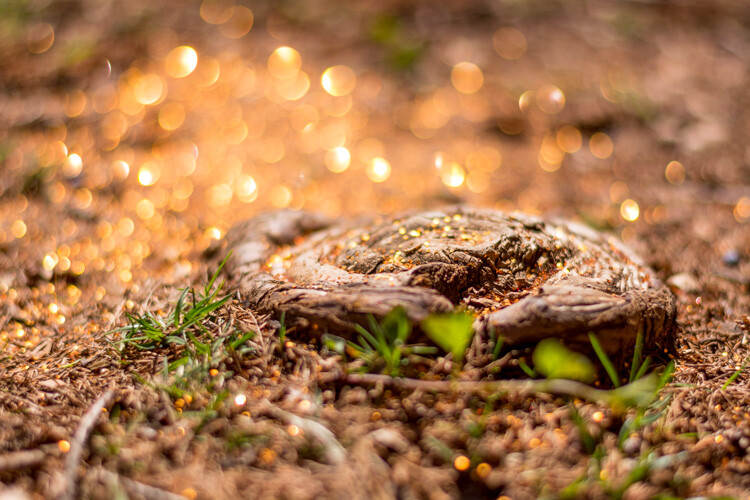
Bokeh basically depends on how shallow your depth of field is (note that the further the background is from your subject, the smoother the bokeh). Depth of field depends on three main things

IMAGE 2

In this image, the bokeh looks really good because the background was really far from the subject (the bird).

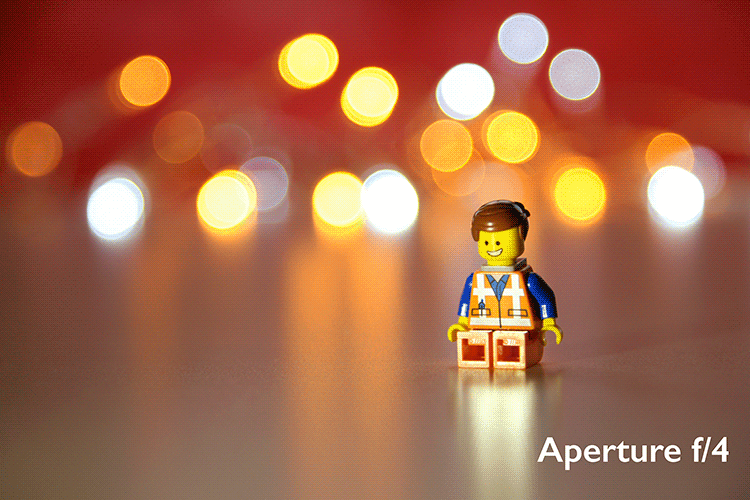
The Aperture Matters!

The bigger your aperture (smaller the f-number), the shallower your depth of field (e.g., f/2.8 is a large aperture opening, and it creates shallow depth of field).

The first thing I did not understand when I first started photography is that I used the biggest aperture on my lens but the background was not completely blurred.

At that time I used the 18-55mm canon kit lens with its maximum aperture of f/3.5. The user’s manual on my camera told me to just use the smallest f/stop on my lens and I would automatically blur the background. However, they did not mention a lot of other factors to get this result, like how big should my aperture be. After hours of trying to get a background blur with my aperture of f/3.5, I was left very frustrated because I did not get the results that I saw on the internet.

I later understood that bokeh depended a lot on how big my aperture was – I wanted to get bokeh for portraits with a focal length of 50mm. I had to buy a lens with a bigger aperture to get a completely blurred background, and the Canon 50mm f/1.8 was the answer. It is a relatively cheap lens to get started with portraits. You can find other lenses with an aperture of f/1.4 or f/1.2 but the bigger the aperture, the more expensive the lens.

IMAGE 3

Portrait with an aperture of f/1.8

With a regular lens like 50mm, you will start getting nice bokeh starting from f/2.8. So lesson number one is to buy a lens with a really big aperture – this is the first way to achieve flattering background blur. You probably know this already, but this is important to mention before giving the two other points.

With a big aperture, you will be sure to get a nice background blur. But, there are other ways you can blur your background without having a wide aperture.

The camera to subject distance controls the depth of field

Let me show you my point: lift your right thumb (or left thumb -it doesn’t really matter) in front of your right eye and stare at it while closing your left eye. While focusing on your thumb, notice that you cannot clearly see the background. Now move your thumb farther away from your eye, keeping your thumb in focus. You will notice that the background won’t be blurred anymore. This works with your camera the same as it down with you eyes. The closer you get to your subject, the more blurred the background will be.

IMAGE 4

At 40mm, f/5.6 you can see that I’m not getting any bokeh in the background.

IMAGE 5

At 40mm, f/5.6 you can see that with the same focal length and aperture I can get a nice bokeh by getting closer to the tree.

IMAGE 6

At f/1.8 I get a nice bokeh with the 50mm lens.

IMAGE 7

Still at f/1.8 with the 50mm, if I get closer the effect gets more intense.

I understood this when I finally managed to get nice bokeh with my kit lens (I still did not have my beloved 50mm f/1.8). I used to practice my photography, and background blur on a tree. The f/3.5 aperture was not good enough for me so I tried different things. The first satisfying bokeh I got was when I focused my camera really close to the tree.

If you take a second and think, you will realize that all the macro photography images have a shallow depth of field, therefore a smooth bokeh. This is because macro photographers get really close to their subjects.

IMAGE 8

By getting close to your subject you will blur the background.

IMAGE 9

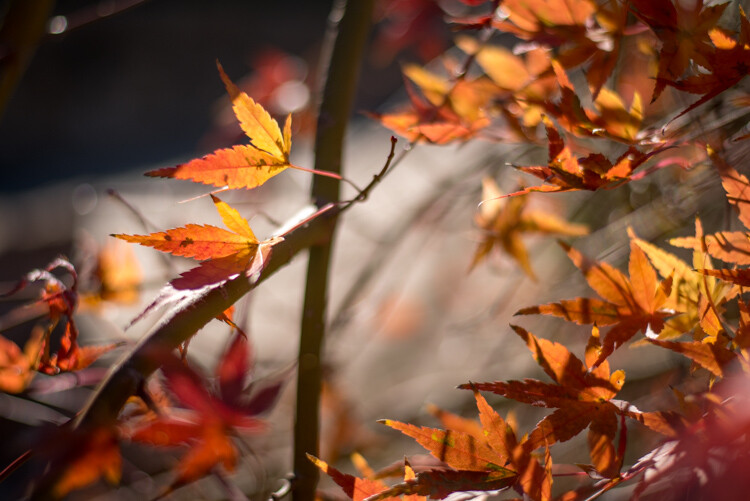
Here I used a zoom macro lens (at 300mm) and got as close as possible to the leaf.

IMAGE 10

Here I used an aperture of f/1.8 with the 50mm, and got as close as possible.

Even if you have an aperture of, let’s say f/5.6, if you get your camera really close to your subject, you will have a blurry background.

Note that macro photographers use special lenses that enables them to take images really close to their subjects. Standard lenses have a limit regarding their focussing distance. If you cannot afford a lens with a big aperture nor a macro lens, extension tubes are a good solution to extend your focusing distance.

The shorter the distance between your subject and the camera, the shallower the depth of field will be. The bokeh really depends on that distance, because I can shoot a landscape scene with an aperture of f/1.8, and there will be no background blur. That is because there is a huge distance between my camera and the subject I’m trying to photograph.

The lens focal length changes the perceived depth of field

If you cannot get close to your subject, but still want to isolate it with a background blur, then use a long focal length lens.

IMAGE 11
Image taken with a long telephoto lens.

The cool thing with longer focal length lenses, is that you can photograph portraits, wildlife, macro, and isolate anything you can’t get close to. The other advantage is that you don’t need a large aperture, an aperture of f/6.3, for example, will give you creamy backgrounds.

A longer focal length will appear to give you a shallower depth of field, because the subject is compressed, and the isolation between your subject and the background is more important.

IMAGE 12

A shorter focal length will appear to give you a larger depth of field. Let’s go back to the example of the tree. If I put my aperture at f/4 on a 16mm lens in front of the tree, the background will appear quite sharp. Whereas if I focus on the tree from the same distance, with the same aperture, but with a focal length of 50mm, I will notice that I get a background blur and a shallow depth of field.

IMAGE 13

Taken at f/5.6 and 70mm.

IMAGE 14

Taken at f/5.6 and 300mm without moving.

Conclusion

So you must be thinking: the best bokeh you can get is to have a long telephoto lens, focused really close to your subject, with a really wide aperture. That’s pretty much it!

The sad part is that these lenses are very expensive. But, I have two portrait lenses, and together they cost less than $ 400 – and, I am still able to take good looking portraits with nice bokeh. So it’s about combining these things, the best you can with the tools you have.

IMAGE 15

Using a telephoto lens and getting really close.

googletag.cmd.push(function() {
tablet_slots.push( googletag.defineSlot( “/1005424/_dPSv4_tab-all-article-bottom_(300×250)”, [300, 250], “pb-ad-78623” ).addService( googletag.pubads() ) ); } );

googletag.cmd.push(function() {
mobile_slots.push( googletag.defineSlot( “/1005424/_dPSv4_mob-all-article-bottom_(300×250)”, [300, 250], “pb-ad-78158” ).addService( googletag.pubads() ) ); } );

The post How to Achieve Background Blur or Bokeh by Yacine Bessekhouad appeared first on Digital Photography School.


Digital Photography School

 
Comments Off on How to Achieve Background Blur or Bokeh

Posted in Photography


How to Create a Delicious Blurry Bokeh Background in 4 Easy Steps

02 May

Blurry backgrounds are nothing new when it comes to photography. The technique of blurring the background to emphasize a subject in the foreground has been used by photographers for decades, and by painters and other visual artists for hundreds of years. Now thanks to the proliferation of digital cameras this phenomenon has exploded in recent times.

Many people like photos with a tack-sharp subject and a smooth blurry background, and even though some might say it’s more of an over-used trend, the truth is that bokeh is here to stay. The trick to using it effectively, is to learn how to use the physical properties of lenses and light to create the look you are going for. While some people turn to creative editing tricks like adding blurry filters or doing Photoshop gymnastics there really is no substitute for the genuine article. If this is something you have always wondered about or wanted to try for yourself, here are four easy steps to get you started.

50mm, f/4, 1/350 second, ISO 400

50mm, f/4, 1/350th of a second, ISO 400

The term bokeh is a Japanese word that doesn’t have a precise English translation, but refers to the type and quality of the out-of-focus areas of an image. In other words, when the blurry parts of a picture look nice, you might say the image has good bokeh. While a thorough discussion of what bokeh is, what causes it, and what affect your lenses and lens elements have on the type and quality of bokeh could go on for several pages, this article is going to be a bit more basic look at how to create visually pleasing blurry elements in your photos. If you don’t want things to get too complicated, and aren’t quite ready for a thorough breakdown of aspherical elements or the circle of confusion, then get out your camera and follow along with these few simple tips to help you get the look you have always wanted.

understanding-bokeh-golden-glow

50mm, f/1.8, 1/6000th, ISO 100

1 – Shoot with a wide aperture

Take a look at the front of your lens, you will probably see a few numbers that look like 1:3.5-5.6, or 1:2.8, or f/4 (read: What the Numbers on your Lens Mean for more on how to find this). These numbers refer to the size of the aperture in the lens itself, and how big the opening can get. Ironically smaller numbers are bigger, and a lens that says 1:2.8 will be able to let in much more light than a lens that says 1:4 or f/4. (Some manufacturers use different schemes to show the aperture size but it’s always the number after the colon, or on the second side of the / that you want to look for when determining the maximum size of the lens opening.)

The smaller the number, the wider your aperture will be, and the less light you will need to take a properly exposed photo. Wide apertures also mean your photos will have a shallower depth of field, and anything out of focus behind your subject will begin to take on a smoother, more visually pleasing blur. In other words, wide apertures help give you more bokeh.

understanding-bokeh-leaves

50mm, f/1.8, 1/4000 second, ISO 100

If you’re itching to get some pictures with the same kind of buttery-smooth background blur you have seen in nature magazines or fashion spreads, put your camera in Aperture Priority mode (on Nikon) or Av (Canon, Pentax, etc.) and turn the control dial until the aperture value number is as close to zero as it can go. It helps if you have a prime lens that doesn’t zoom in and out, since they usually have wider maximum apertures, but even a kit lens can give you decent results if you have enough light. Now go out and find something to photograph, even if it’s just a coffee mug on your office desk.

To put my money where my mouth is, I took my camera to work and literally snapped a picture of a coffee cup on my desk. No photoshopping or magic tricks here, just a wide f/1.8 aperture. 50mm, 1/100 second, ISO 160

To put my money where my mouth is, I took my camera to work and literally snapped a picture of a coffee cup on my desk. No photoshopping or magic tricks here, just a wide f/1.8 aperture. 50mm lens, 1/100 second, ISO 160

2 – Put your subject far away from the background

If you have been trying to get the kind of silky, blurry bokeh you seem to notice in everyone else’s photos you might try this one simple trick and you won’t believe what happens! Simply putting a great deal of distance between your subject and whatever is behind it, can go a long way towards creating the bokeh you have always dreamed about.

understanding-bokeh-flowers-sunrise

50mm, f/1.8, 1/1000 second, ISO 100

If you are shooting portraits, try moving your subjects to a location where there is a great deal of space behind them, or even just repositioning yourself so you are looking at your subjects from a different angle that puts more distance between them and the background. In the photo below, I specifically shot the scene so that there was about 50 meters between the couple and the fountain, which caused it to have a nice blurry out-of-focus appearance that complements the woman and her fiancée quite well. I could have used a bench that was much closer to the fountain, but it would have had a very different affect on the picture, and it would not have given me nearly the same amount of bokeh as you can see in the final image below.

understanding-bokeh-fountain

85mm, f/2.4, 1/2000 second, ISO 200

3 – Get close to your subject

As I mentioned in the opening paragraph there are many different optical elements that come into play when dealing with bokeh and background blur, and certainly shooting with wide apertures while putting a great deal of distance between your subject and the background are critical elements of the equation. Another thing you can do, is position your camera and lens physically close to the subject you are shooting. Combine this technique with the first two, and you’re virtually guaranteed to get good results.

understanding-bokeh-fence

This shot has all the techniques rolled into one: a wide f/1.8 aperture, a far-away street light in the top left corner, and a very short distance between my camera and the fence bar on the right side.

4 – Zoom in, waaay in

If you are trying to get bokeh-licious shots and not having much luck, there’s another technique that could mean the difference between frustration and celebration. Due to how lenses collect, and focus incoming light rays, it’s easier to get blurry backgrounds with longer focal lengths. This is why these types of shots are difficult to get on mobile phones, which generally have lenses with a much wider angle of view. Grab your nearest camera, whether it’s a DSLR or a humble little point-and-shoot, and zoom the lens as far in as it will go. Now use the other tips I have already mentioned: set the aperture to the widest setting, find a subject that’s relatively close to you, and make sure there is plenty of room between the subject and the background.

A golden eagle, taken with my 400mm f/4 lens on a Nikon D7200. A very expensive combination, but it produces outstanding results with silky-smooth bokeh.

A golden eagle, taken with my 300mm f/4 lens on a Nikon D7200. A very expensive combination, but it produces outstanding results with silky-smooth bokeh.

You might not get the photo of your dreams, but with a little bit of practice you should start to see some improvements, as you begin to understand how to use your camera to create sharp subjects with pleasing out-of-focus areas.

Just kidding! I took the first shot with a $  150 Panasonic ZS7 pocket camera. All I did was zoom in as far as it would go. This is the same scene with the same camera a few seconds later, shot at the camera zoomed all the way out.

Just kidding! I made that first image above with a cheap Panasonic ZS7 pocket camera, and all I did was zoom in as far as it would go. This is the same scene, with the same camera, a few seconds later – but zoomed all the way out.

Now with all this being said, I have a challenge for all of you dPS readers: What is your favorite picture you have taken that has nice pleasing bokeh? Is it a portrait, a wild animal, or more along the lines of abstract art? Share your picture in the comments section below along with a few tips of your own to help others take similarly beautiful bokeh photos.

googletag.cmd.push(function() {
tablet_slots.push( googletag.defineSlot( “/1005424/_dPSv4_tab-all-article-bottom_(300×250)”, [300, 250], “pb-ad-78623” ).addService( googletag.pubads() ) ); } );

googletag.cmd.push(function() {
mobile_slots.push( googletag.defineSlot( “/1005424/_dPSv4_mob-all-article-bottom_(300×250)”, [300, 250], “pb-ad-78158” ).addService( googletag.pubads() ) ); } );

The post How to Create a Delicious Blurry Bokeh Background in 4 Easy Steps by Simon Ringsmuth appeared first on Digital Photography School.


Digital Photography School

 
Comments Off on How to Create a Delicious Blurry Bokeh Background in 4 Easy Steps

Posted in Photography


Meyer-Optik launches Kickstarter campaign for 50mm ‘Soap Bubble Bokeh’ Trioplan lens

15 Apr

$ (document).ready(function() { SampleGalleryV2({“containerId”:”embeddedSampleGallery_3223429076″,”galleryId”:”3223429076″,”isEmbeddedWidget”:true,”standalone”:false,”selectedImageIndex”:0,”startInCommentsView”:false,”isMobile”:false}) });

German optical manufacturer Meyer-Optik Gorlitz has begun a Kickstarter campaign to raise funds to produce a modern 50mm F2.9 version of its Trioplan lens. The Trioplan design is known for its exaggerated circular bokeh which earned it the nickname ‘Soap Bubble Lens’ in its original version. The company has recently released a 100mm F2.8 Trioplan after a similar Kickstarter campaign that raised almost $ 360,000. On this occasion the company is hoping to reach an initial target of $ 50,000 – which is going swimmingly, as it met that goal within hours of the campaign going live.

The new lens will be an updated version of the company’s original 50mm Trioplan but using glass from the Schott factory and with modern coatings and production standards. The new 50mm Trioplan also has a movable front element that allows much better close focusing and a maximum reproduction ratio of 1:4.

The lens uses a basic Triplet design with three elements in three groups with a 12-bladed iris designed to help produce smooth and circular out-of-focus highlights at all apertures.

Meyer Optik plans to produce the manual focus lens in mounts for:

  • Canon EF
  • Nikon F
  • Sony
  • FujiX
  • Micro Four Thirds
  • M42
  • Leica M (rangefinder not supported/focusing via live view)

The expected price is $ 1299 though discounts can be had by backing the Kickstarter campaign. For more information visit the Meyer-Optik Gorlitz website.


Press release:

Today Is the Day.
Support the Historic and Innovative Trioplan 50 Now!  

We just launched our Kickstarter for the Trioplan f2.9/50, a special new lens that returns the tradition of a versatile soap bubble bokeh lens to the Meyer Optik line up. Order the art lens that you will always keep attached to your camera body now!  In addition to its regular focus element, the Trioplan f2.9/50 features a second front focus element that opens a whole new horizon of creativity to the world of photography.

These elements and the quality of the glass used takes the legendary Trioplan 50mm soap bubble bokeh lens to a wider variety of creative photographic situations, including events, travel, street, nature, portraits, macro and so many more scenes.  

The new Trioplan f2,9/50 is the one lens you can use for every situation. It is ultra compact and features an innovative front focusing element putting incredible amounts of creative opportunity into the palm of your hand. The movable front lens reduces the minimum focusing distance to less than 30 cm (under 12 inches) and raises the image ratio up to 1:4.

This feature takes the Trioplan 50 into the Macro-Spheres.  Carrying a heavy set of lenses is something that most photographers choose to shed at some point, but they do not want to cut back on their creativity. We give you the best of both worlds in one lens – with only 200 g or about 7 ounces — it has never felt so light to be this prepared.

The Trioplan 50 produces smaller, finer soap bubbles that turn into a small swirl effect in the corner of the image. Sharpness and contrast are also the highest yet of any Trioplan lens.  

Surprisingly, for a 50 mm lens it is a perfect tool for portraiture especially including awesome landscapes in the image. Moreover the possibilities in street photography are awesome and the macro capabilities are stunning. This is more than just a nostalgic art lens. It is the most modern innovative lens you can imagine.

The lens will be available with mounts for
* Canon EF
* Nikon F
* Sony
* FujiX
* Micro Four Thirds
* M42
* Leica M (rangefinder not supported/focusing via live view)

The most creative historic lens you have ever held in your hands is available to Kickstarter Backers starting at $ 449!

The lens is estimated list price is $ 1299. Restore 100 Years of Tradition with the Most Versatile Soap Bubble Bokeh Lens.

What better way to bring back the Trioplan lens than with the most versatile version possible, the f2.9/50 with its new innovative front variable element? Innovating upon the classic, modernizing the traditional, extending soap-bubble bokeh creativity to a new modern era. Help us bring back the Trioplan 50. Pledge your support now !  Click the Link to visit our Kickstarter campaign.

Sincerely,
Dr. Stefan Immes and the whole MOG team.

Articles: Digital Photography Review (dpreview.com)

 
Comments Off on Meyer-Optik launches Kickstarter campaign for 50mm ‘Soap Bubble Bokeh’ Trioplan lens

Posted in Uncategorized


Swirly bokeh: Lensbaby announces Twist 60 lens

12 Apr

Lensbaby has announced the Twist 60, a new lens for creative photography. From what we can see, the Twist 60 is all about bokeh. The 12 aperture blades and a maximum aperture of F2.5 should give a soft, well-rounded bokeh with good separation of the subject from the background, but the real ‘twist’ is just that – the twist. Specifically the twisty, swirly bokeh. Lensbaby claims the lens is modeled after Joseph Petzval’s Classic 19th-century design, giving photographers the ability to introduce and control that distinctive circular bokeh that is unique to Petzval-type lenses.  

We are interested to see how this lens performs, as it is almost half the price of similar lenses recently announced and it is available (via the Lensbaby Optic Swap System) in a wide variety of mounts.

$ (document).ready(function() { SampleGalleryV2({“containerId”:”embeddedSampleGallery_1483721425″,”galleryId”:”1483721425″,”isEmbeddedWidget”:true,”standalone”:false,”selectedImageIndex”:0,”startInCommentsView”:false,”isMobile”:false}) });

The Twist 60 is available for pre-order starting April 12, 2016 and is currently offered in Canon, Nikon, and Sony E mounts. It is priced at $ 279.95/£196 for the full lens or $ 179.95/£126 for the Twist 60 Optic (for use with other Lensbaby Optic Swap System lenses).


Press release:

Lensbaby’s New Twist 60 Lens Exudes Pure Magic of Vintage Photography

Company’s love of old lenses inspires new creativity with classic image elements optimized for full frame photographers
 
Portland, OR – April 12th, 2016 – Lensbaby, makers of award-winning creative effects lenses, optics and accessories, today announced the availability of the Twist 60 lens. Twist 60 helps creative photographers find their visual voice by seeing the world differently.
 
This metal-bodied 60mm f/2.5 lens with gold anodized accents creates powerful portraits, spotlighting subjects by freeing them from their background and surrounding them with swirly blur and enhanced vignette. The brighter the aperture, the greater the swirl and the greater the vignette.
 
“Twist 60 embodies our love of old lenses and their unique ways of helping photographers discover creative possibilities,” said Craig Strong, Lensbaby Co-Founder & Chief Creative Officer. “True to an 1840 design by Joseph Petzval, this lens reveals striking separation between subjects and their background, a quality that modern lens designs lack.”
 
Twist 60 Lens specs:
? 12 blade f/2.5-22 aperture
? 60mm focal length
? Twisty, swirly blur
? Recommended for use on full frame cameras
? Available in Canon EF, Nikon F, and Sony E mounts
? 4 elements in 3 groups
? Filter threads: 46mm
? Black anodized body with gold anodized aperture ring
? Minimum focus distance – 18”
 
Availability
Twist 60 lens retails for $ 279.95 and is available via pre-order beginning April 12, 2016 (shipping May 5th, 2016). Twist 60 Optic will also be sold separately for use with other Lensbaby Optic Swap System-compatible lenses. It retails for $ 179.95. For best results, when using it in a tilting Lensbaby such as the Composer Pro, photographers should shoot with Twist 60 pointed straight ahead. Lensbaby products are available at lensbaby.com, B&H, Adorama, and from select specialty photo stores worldwide.
 
About Lensbaby
For over a decade, photographers have relied on Portland, Oregon based Lensbaby to help them break free of routine, tinker, and open themselves up to unexpected results – dancing, playing and delighting in what’s possible with a creative lens and their imagination.

Lensbaby makes award-winning creative effects lenses, optics and accessories that follow this philosophy, including the Velvet 56, a versatile portrait and macro lens; their unique Optic Swap System, which lets photographers swap their optic and tilt their lens for limitless effects; and mobile lenses that transform everyday smartphone photography. Lensbaby products are sold and distributed worldwide. For more information, visit www.lensbaby.com

Lensbaby Twist 60 specifications

Articles: Digital Photography Review (dpreview.com)

 
Comments Off on Swirly bokeh: Lensbaby announces Twist 60 lens

Posted in Uncategorized


How to Create Bokeh In-camera and Using Photoshop

26 Jan
Title-Emmet-with-Bokeh

Emmet with background bokeh from small LED lights.

As the holidays are over, I couldn’t resist taking a classic bokeh shot before putting away the lights and decorations for another year.

In this article I’ll show you how you can create this effect in-camera in your own living room. Plus I’ll show you how easy it is to create a bokeh effect using Photoshop as well.

What is Bokeh?

Bokeh comes from the Japanese word boke, which means blur or haze, or the phrase boke-aji which is the blur quality. It isn’t just that any blur will do. It’s more to do with an aesthetic quality of the blur.

What does Bokeh look like?

The easiest way to see the shape of the bokeh is by taking a photo with small lights in the background, thrown way out of focus (see second image below).

Small-LED-lights-with-window-in-background

Small LED Lights placed in front of a big window with red see through fabric.

Bokeh-effect-using-aperture-f4

Bokeh effect created in-camera using an aperture of f/4, with a 120mm focal length lens.

Is shallow Depth of Field (DOF) the same as bokeh?

No, but it is important to understand DOF and how it can play an important aspect in creating a bokeh effect. Depth of field (DOF) is the area of your image that is in focus.

Shallow depth of field refers to the object or subject being in focus, but the areas in front, and especially in the background, are blurred. Whereas bokeh is the term that refers to the aspect of light sources that are blurred in the background or foreground.

When discussing DOF, we need to take into consideration three other factors:

  • Aperture size
  • Distance from the lens
  • Focal length of the lens

In practice, photographers who shoot portraits, will in general, use long focal lengths and a wide aperture setting (f/2.8-f/5.6). For example, when you are shooting outdoors with your model, and you don’t want the background in focus. Street lights, or interior building lights, can be used effectively for creating bokeh in the background of your subject.

Aperture

Bokeh is affected by the shape of the diaphragm blades (the aperture) of the lens. A lens with more circular shaped blades will have rounder, softer circles, of out-of-focus highlights. Whereas a lens with an aperture that is more hexagonal in shape, will reflect that shape in the highlights. Generally speaking, the faster the lens, the better the bokeh.

In the following animated gif, you can see that the wider the aperture (the lower the f-number), the shallower your depth of field. The lowest aperture setting on my lens is f/4 but I zoomed out to its maximum focal length of 120mm.

Aperture-animation

Animated gif illustrating the different apertures and how they deal with the lights in the background being thrown out-of-focus.

Create your own bokeh

This setup is really easy to try at home. Use whatever lens you have. Set your DSLR camera to Aperture priority or Manual mode ,and use a tripod. I used small LED christmas lights that were battery operated.

Small-LED-lights

Small battery operated LED lights.

Place your object a good distance away from the camera, and in front of the lights. The distance will vary depending on the lens (focal length) that you are using, so it will be trial and error exercise. Your object must be as near as possible to the camera lens.

Begin with the widest aperture on your lens. The objective is to get the circles of light as round, and as smooth as you can. You may need to experiment by moving the object further away from the lights.
The lighting I used for this setup was a big window light and a small small LED light on Emmet.

Lighting-setup-to-create-Bokeh-in-your-own-home

Lighting diagram to show the setup for doing bokeh shots in your own home.

Creating bokeh in Photoshop

Once I got my shot in-camera, I then decided to see if I could create a great bokeh effect in Photoshop.

In the Filter Gallery, under Blur is a fantastic option called Field Blur, which has a dedicated Bokeh feature. I took a few random close-up shots of my christmas tree. I focused only on the lights.

Christmas-tree-with-lights

Random shot of a christmas tree with lights.

Next, I brought it into Photoshop (CS6). I used the image straight out of camera (SOOC), I didn’t do any other post-processing. Go to Filter > Blur > Field Blur.

Filter-Blur-Field-Blur

The Field Blur in the Filter Gallery in Photoshop has its own bokeh feature.

Two panels appear on the right: Blur Tools and Blur Effects. Under Blur Tools, enter 200 px in the Field Blur option. Under Blur Effects, move the Light Bokeh slider to 57%, and the Bokeh Color slider to 78%. Then press the OK button. It takes a few seconds for the blur to take place. Et voilà!

Field-Blur-dialog-options

You can experiment with the input figures for the Blur and Blur Effects to get the desired bokeh. I chose these.

Bokeh-from-christmas-tree-lights

Bokeh effect created in Photoshop using the Field Blur.

Okay, so now what do you do with the image? Use it as a background. I shot a series of playing cards images against a black background.

Playing-cards

One of a series of images I shot against a plain black background.

This is where the power of Blending Modes and Layer Masks comes into their own.

By placing the bokeh image on its own layer. I duplicated it to make another copy. Then I reduced the size of the original and moved this over to the left side of the image. I changed the Blend Mode to Screen and reduced the Opacity. I wanted the lights to appear further away from the playing cards, to give it a better depth of field. The screen blend option eliminates the dark areas and makes the light areas show through, making the bokeh appear.

For the copy layer, I left the size as it was and moved it over to the right. I increased the brightness by using a Levels Adjustment layer to match the light source. I also changed the Blend Mode of this layer to Screen. Lastly, I masked out any hard lines using Layer Masks.

Playing-cards-with-bokeh-background

Bokeh effect created in Photoshop and then applied to a background in this image.

I was well pleased with the result.

Now it’s your turn. Let’s see your images with “Bokeh-licious” images posted below.

googletag.cmd.push(function() {
tablet_slots.push( googletag.defineSlot( “/1005424/_dPSv4_tab-all-article-bottom_(300×250)”, [300, 250], “pb-ad-78623” ).addService( googletag.pubads() ) ); } );

googletag.cmd.push(function() {
mobile_slots.push( googletag.defineSlot( “/1005424/_dPSv4_mob-all-article-bottom_(300×250)”, [300, 250], “pb-ad-78158” ).addService( googletag.pubads() ) ); } );

The post How to Create Bokeh In-camera and Using Photoshop by Sarah Hipwell appeared first on Digital Photography School.


Digital Photography School

 
Comments Off on How to Create Bokeh In-camera and Using Photoshop

Posted in Photography


How to Create a Spectacular Background Using an El Bokeh Wall

11 Aug

Bokeh is the aesthetic quality of the blur, in the out-of-focus areas of an image. You can easily get this spectacular background blur in your photos using a fast prime or macro lens (basically ones with an aperture of f/2.8 or greater), and a technique involving what many call the El Bokeh Wall.

Photo A  Uddhav Gupta  uddhav98 gmail com

In my opinion, the El Bokeh wall is very effective at creating eye-popping bokeh, which can help make your picture more interesting and unique in its own right. However, keeping in mind the potential it has, it doesn’t seem to be used often enough. It is very simple though, you can do it without any special equipment, using things you will probably be able to find lying around at home.

(NOTE: Several demonstrations of this technique use a speed-light. For those without such equipment, don’t worry, there IS a very good alternative which this tutorial will tell you about!)

THINGS YOU’LL NEED:

  • A camera
  • A macro or prime lens with a large aperture for nice bokeh (you can still try to do it even if you don’t have one of these, but your attempt may or may not be successful)
  • A tripod
  • Aluminium foil (You’ll probably have some in the kitchen. If not, it’s very cheap to buy)
  • A speedlight, or as in this tutorial, use an alternative light source instead. You can use a flashlight or download an app onto your smartphone which allows you to use its flash as a light)
  • A subject
  • A background (you can use a piece of cardboard)

STEPS FOR SETTING UP THE EL BOKEH WALL

You’ll be surprised at how simple it really is:

Step one: Get as much aluminium foil as you think you will need to sufficiently cover your background

Step two: Crumple the aluminium foil into a loose ball (as shown here)

Step 2

Step three: Open up the ball, without smoothing out the crinkles (these will reflect the light, which will create the magnificent bokeh you need) – be careful not to tear the foil in this step.

Step 3

Step four: Stick the foil to the background (you may use some transparent tape to do so).

Step 4

HOW TO CREAT A PICTURE WITH AMAZING BOKEH

Without the use of a speedlight!

  • Place your camera and tripod some distance away from the El Bokeh Wall. The desired part of the subject (or the whole subject) is typically included along with some of the bokeh from the foil.
  • Place the subject a suitable distance away from the El Bokeh Wall. You will need to judge what this suitable distance is on your own, as that will vary depending on your chosen subject, and the camera and lens combination you’re using. While constantly checking your camera’s LCD monitor (it’s just easier this way – remember to switch to Live View), place the subject in a the position that makes the bokeh pops the most.
  • Get your camera to focus on the subject (with the background properly out of focus to obtain good bokeh) and then switch to manual focus.
  • Experiment with your lighting (since you’re not using any fixed lighting). Hold up your flashlight or smartphone and experiment with various angles until you get the best result.
  • Set the two second self-timer on your camera to count down.
  • Keep holding the light source at the angle which yield the best results until the picture is taken.

THAT’S IT!

You should now have a great picture with marvellous bokeh like this:

Photo B  Uddhav Gupta  uddhav98 gmail com

Photo C  Uddhav Gupta  uddhav98 gmail com

Give it a try and please leave your comments below.

googletag.cmd.push(function() {
tablet_slots.push( googletag.defineSlot( “/1005424/_dPSv4_tab-all-article-bottom_(300×250)”, [300, 250], “pb-ad-78623” ).addService( googletag.pubads() ) ); } );

googletag.cmd.push(function() {
mobile_slots.push( googletag.defineSlot( “/1005424/_dPSv4_mob-all-article-bottom_(300×250)”, [300, 250], “pb-ad-78158” ).addService( googletag.pubads() ) ); } );

The post How to Create a Spectacular Background Using an El Bokeh Wall by Uddhav Gupta appeared first on Digital Photography School.


Digital Photography School

 
Comments Off on How to Create a Spectacular Background Using an El Bokeh Wall

Posted in Photography


Petzval 58 Bokeh Control Art Lens launched on Kickstarter

29 May

Lomography has launched its new Petzval 58 Bokeh Control Art Lens, the second lens it has introduced based on the Petzval optic invented by Joseph Petzval in 1840. This newest Petzval lens features Russian glass optics, is constructed by hand, and is offered in a brass finish. The lens results in photographs with a ‘swirly bokeh,’ and the strength of the effect can be controlled via a Bokeh Control Ring, a feature not available in Lomography’s existing 85mm Petzval. Read more

Articles: Digital Photography Review (dpreview.com)

 
Comments Off on Petzval 58 Bokeh Control Art Lens launched on Kickstarter

Posted in Uncategorized