RSS
 

Posts Tagged ‘Black’

How to See in Black and White

25 Jun
Andrew’s book Mastering Lightroom: Book Three – Black & White is on sale now at Snapndeals for 40% off. This is a limited time offer, so grab it while it’s available.
 
How to see in black and white

In my previous article I showed you how to convert colour photos to black and white in Lightroom. However, no matter which technique you use, good monochrome photography starts in your mind. If you can learn to see in black and white, you can create beautiful monochrome images. Here are some tips to get you started.

Understand the appeal of Black and White

Colour photography is very literal. It depicts the world as it really is. Black and white, on the other hand, gives us a new way of seeing. Removing colour takes us a step away from reality and towards creating an artistic interpretation. Shape, form, tone and texture are revealed to the eye, rather than overpowered by colour.

But the appeal of black and white photography goes deeper than that. The monochrome image, at its best, is beautiful. It’s art. It captures the beauty and soul of the subject. It moves people. It’s powerful and it endures.

Learn to see tonal contrast

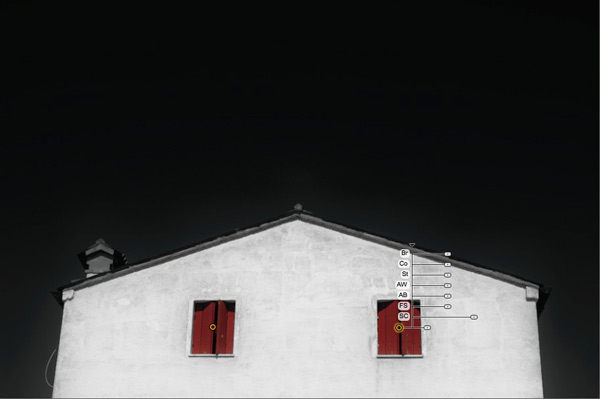
Tonal contrast happens when there is a clear difference in brightness between your subject and the background. Here are two examples.

How to see in black and white

The photo on the left shows a white sticker pasted on a door. There is tonal contrast between the light and dark tones. In this image you find a light tone (the sticker) surrounded by dark tones (the door), a type of tonal contrast that works very effectively in Black and White.

The photo on the right shows a dark statue against a near white background. This is the opposite type of tonal contrast, where a dark toned subject is shown against a light background.

Tonal contrast is the basis of many successful black and white photos. Images that make good use of tonal contrast convert to monochrome with little effort. Let’s take a look at a couple of practical examples.

How to see in black and white

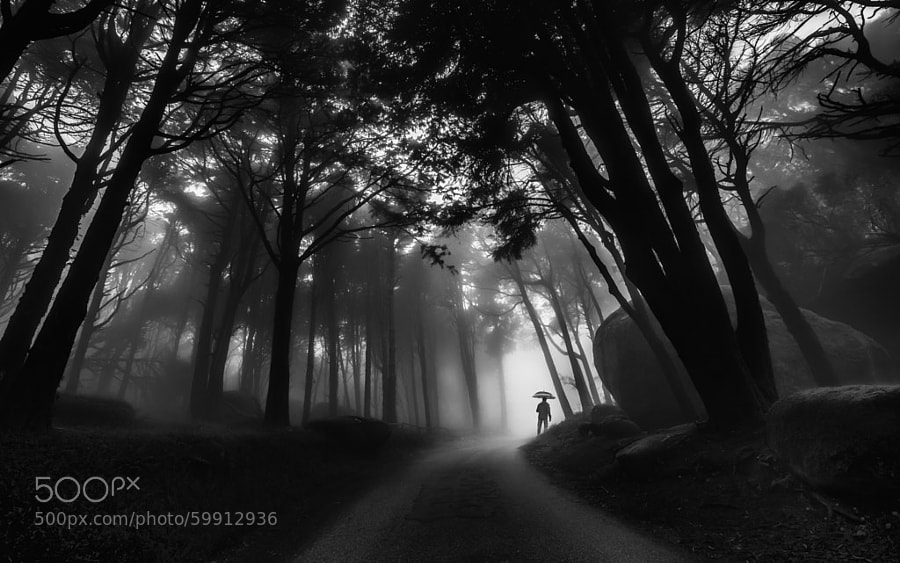
In this portrait I positioned the model against a dark background to take advantage of the difference in brightness between the light falling on her and the light falling on the trees behind her (which were in shade). If you want to create powerful black and white portraits, this style will serve you well.

How to see in black and white

Here I took advantage of the difference in brightness between the twigs in the home-made broom and the dark stones. You can see the same principle in action as in the portrait, a light toned subject against a dark toned background. I knew this would make a strong black and white image because it contains two things that look good in monochrome: texture and tonal contrast.

You can learn more about tonal contrast in my article Improving Composition with Tonal Contrast.

Simplicity and negative space

All the photos I’ve shown you so far have two more things in common. One is that the composition is very simple. I’ve deliberately moved in close to the subject and framed it in such a way to eliminate distracting elements. An added benefit is that the tonal contrast becomes much stronger when the composition is simplified.

Here’s another example.

How to see in black and white

I moved in close to crop everything but the vendor’s hand and the Chairman Mao pocket watch in this photo taken in an antique market in Shanghai. The simple composition emphasises the texture of the watch and hand as well as the difference in brightness between them and the background.

Negative space is the area surrounding your subject. It is negative space if it doesn’t contain much detail. In black and white, it would be an area of white, black or grey that creates a kind of frame for your subject, giving it room to breathe within the composition.

How to see in black and white

This portrait is a good example of using negative space. The model’s face (a light tone) is surrounded by an area of dark space that contains just enough detail for you to see what it is (his shirt and the wall behind him). In this portrait you can see the principles of tonal contrast, negative space and simplicity of composition working in harmony together.

My article Composition and Negative Space goes into this topic in more detail.

Monochrome previews

How to see in black and white

So far we’ve looked at some of the elements that contribute to strong Black and White images, but that may not be a great help when you’re faced with a colourful subject and the colours are so strong that you can’t visualize how it will turn out in Black and white. Don’t worry if this happens to you – it takes time and practise to learn to see in monochrome.

One thing you can do to help you visualize the subject in Black and White is switch to your camera’s monochrome mode. The key is to select the Raw format, so that the image is recorded in full 12 or 14 bit colour (essential for good Black and White conversions).

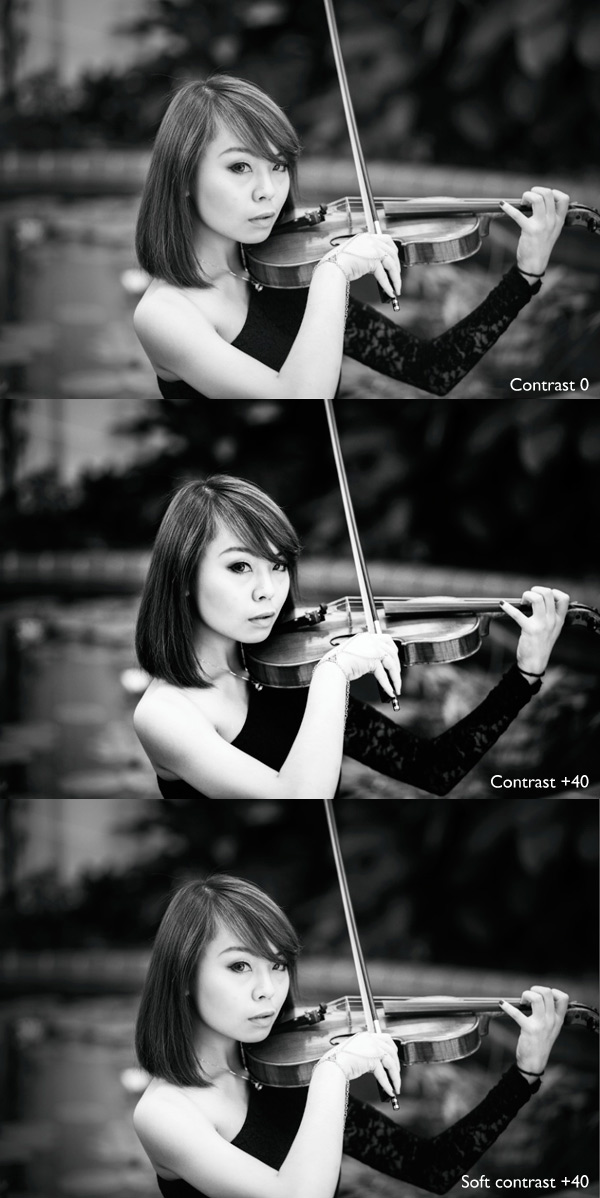
But when you play back your images on the camera’s LCD screen, they will be presented in Black and White. If you have a camera with an electronic viewfinder it may even display the scene in black and white as you look through it. This helps you see how the colours in the scene translate to the grey tones that make up a monochrome image. If the image is a little flat, which will happen if you’re not shooting in bright sunlight, increase the contrast to add some pop.

My article Mastering Monochrome Mode goes into this in more detail.

Over to you

Hopefully these tips will help you see in black and white and create better monochrome images. Do you have any tips for seeing in black and white? Please add them in the comments below.


Mastering Lightroom: Book Three – Black & White ebook coverMastering Lightroom: Book Three – Black and White

Andrew’s book Mastering Lightroom: Book Three – Black & White is on sale now at Snapndeals for 40% off. This is a limited time offer, so grab it while it’s available.

The post How to See in Black and White by Andrew S. Gibson appeared first on Digital Photography School.


Digital Photography School

 
Comments Off on How to See in Black and White

Posted in Photography


How to Convert Photos to Black and White in Lightroom

18 Jun

Andrew’s book Mastering Lightroom III is on sale now at Snapndeals for 40% off. This is a limited time offer, grab it while it’s available.

Black and white conversions in Lightroom

Today I’m going to show you just how easy to use, and effective Lightroom is, for converting colour photos to powerful black and white images.

The key to getting the best out of it is to use the Raw format rather than JPEG. The extra bit depth means they contain far more information for Lightroom to use. The end result is that you have more options and get smoother conversions.

This article concentrates on global adjustments – those that affect the entire image (I’ll leave local adjustments to another article).

There are two ways to convert an image to black and white in Lightroom:

  1. Set Treatment to Black & White in the Basic panel
  2. Go the B&W tab in the Color/HSL/B&W panel

Let’s take a look at each of these in turn.

Set Treatment to B&W in Basic panel

A good way to start is with a colour image that has already been processed. Before you start, set Saturation and Vibrance to zero, and adjust the White Balance sliders to give a neutral colour balance (the Auto setting works well most of the time).

Black and white conversions in Lightroom

This preps the image for the conversion. Here’s my starting image.

Black and white conversions in Lightroom

And this is what it looks like with Treatment set to Black & White.

Black and white conversions in Lightroom

The next step is to refine the conversion using the Tone sliders. These are the most useful ones, working in order from top to bottom:

Exposure – sets the overall brightness of the image. Adjust this first. If you started with a processed colour image, you may not have to.

Contrast – sets the overall contrast. Most black and white images benefit from higher contrast than you would use for colour processing. Set Contrast second.

Shadows – adjusts the darkest tones in the photo independently of the others. Use this to make the shadows lighter or darker.

Highlights – adjusts the lightest tones independently of the others. Use it to make the highlights lighter or darker.

With my photo I increased Contrast, moved the Highlights slider left to make the model’s skin darker, revealing texture, and the Shadows slider left to darken the shadows and add drama. Here’s what it looks like so far.

Black and white conversions in Lightroom

There are three other sliders you may find useful:

Clarity – increases mid-tone contrast, emphasizing sharpness and texture. A side effect is that the image often becomes a little darker when you increase Clarity, so you may need to return to the Exposure or Shadows sliders to lighten the photo.

My article Four Ways to Improve Your Photos With the Clarity Slider in Lightroom goes into the topic in more depth.

White Balance – after you have used the other sliders, you can go to the Temp or Tint sliders and move them to see the effect they have on your conversion. These sliders change the colour balance in the original photo, which in turn alters the tones in the image. Experiment with these to see if they improve the tones in your image.

These three images show the difference it can make. Moving the Temp slider altered the skin tones (see second image), and moving the Tint slider mostly affected the green background (see third image). The differences are subtle, you may have to look closely to see them.

Black and white conversions in Lightroom

Activate the B&W tab in the Color/HSL/B&W panel

The second option for converting photos to black and white in Lightroom is to go straight to the B&W tab in the HSL/Color/B&W panel.

Black and white conversions in Lightroom

Again, it is a good idea to start with a processed colour photo with a neutral colour balance and Vibrance and Saturation zeroed.

Black and white conversions in Lightroom

The eight sliders under this tab let you make the tones corresponding to the colours in the original photo lighter or darker.

For example, if you move the Blue slider left Lightroom makes any grey tones converted from blue darker. Move it right and it makes them lighter. The most obvious use of this slider is for making blue skies go dark and dramatic in black and white.

Black and white conversions in Lightroom

The other coloured sliders work the same way. Alternatively you can use the Targeted Adjustment Tool. To do so, click on the Targeted Adjustment Tool icon (see below red arrow on the left) and move the mouse over the grey tone you wish to adjust in the image. The Targeted Adjustment Tool icon and a cross-hair appear (see below, arrow on the right). Hold the left mouse button down and pull the mouse down to make the tones underneath the cross-hair darker, or up to make them lighter. Lightroom analyses the colours under the cross-hair and moves the appropriate colour sliders accordingly.

Black and white conversions in Lightroom

Be careful not to move the colour sliders too far or you will introduce unwanted artefacts and haloes into the image. The point at which this happens depends very much on the content of your photo. The best approach is to get in the habit of zooming to 100% and checking to make sure that there are no haloes around edges, and that the transitions are smooth in the affected colours.

This screenshot shows what happens when you push the sliders too far (in this case the Blue slider to -58). The edge of the sculpture is marked by a thin halo that isn’t present in the original photo:

Black and white conversions in Lightroom

Note that the initial position of the colour sliders in the B&W tab depends upon a setting in the Presets tab in Preferences. If the Apply auto mix when first converting to black and white box is unticked, the sliders will be in their zeroed positions.

If it is ticked, then Lightroom sets them according to what it calculates will make a good conversion. My preference is to have the colour sliders zeroed, and it’s what I advise you to do. If you’d like to see Lightroom’s conversion, you can press the Auto button at the bottom of the B&W tab at any time.

Black and white conversions in Lightroom

After you have finished in the B&W tab you can go to the Basic panel and make further adjustments with the sliders as explained above. Of course, if you elected to go to the Basic panel first, you can then go to the B&W tab to make changes there. In reality you may find yourself switching between the two panels as you refine the image.

How do you know which panel to go to first? That depends on the image. If it’s a photo with strong colour, then the B&W tab will probably be the most useful. But if the colours are not so strong, then the Basic panel may be better. It’s a judgement call that becomes easier with experience.

I’ve only touched on the topic of black and white conversion in this article. Now you have learnt how to make global adjustments. In my next article I will show you how to make local adjustments to really bring your black and white images to life.

Andrew’s book Mastering Lightroom III is on sale now at Snapndeals for 40% off. This is a limited time offer, grab it while it’s available.


Mastering Lightroom: Book Three – Black & White

Masterlng Lightroom: Book Three – Black & White by Andrew S GibsonMy ebook Mastering Lightroom: Book Three – Black & White goes into the topic of black and white in depth. It explains everything you need to know to make dramatic and beautiful monochrome conversions in Lightroom, including how to use the most popular black and white plug-ins. Click the link to visit my website and learn more.

The post How to Convert Photos to Black and White in Lightroom by Andrew S. Gibson appeared first on Digital Photography School.


Digital Photography School

 
Comments Off on How to Convert Photos to Black and White in Lightroom

Posted in Photography


Weekly Photography Challenge – Black and White

14 Jun

Earlier today I professed my love of black and white photography and shared a collection of some powerful B&W images and some articles on tips for making your own B&W images.

So now it’s your turn to show us your images. The weekly photography challenge this time around is black and white.

A few images to inspire you

By Marco Calabrese

By Yasin Hassan – ????? ???

By Chris JL

By { pranav }

By Simon & His Camera

By gato-gato-gato

By gato-gato-gato

By Greg McMullin

By i k o

By i k o

Need help converting to Black and White?

  • How to Convert Photos to Black and White in Lightroom
  • 3 Tips for Better Black and White Conversion using Lightroom
  • Converting Images to Black and White Properly
  • Tips for Shooting and Processing Better Black and White Photographs
  • An Adjustable Black and White Conversion in Photoshop Elements
  • How to Create a Black and White High Contrast Sky from a Colour Image

Show use your Black and White images

Simply upload your shot into the comment field (look for the little camera icon in the Disqus comments section as pictured below) and they’ll get embedded for us all to see or if you’d prefer upload them to your favourite photo sharing site and leave the link to them. Okay, ready to impress us?

The post Weekly Photography Challenge – Black and White by Darlene Hildebrandt appeared first on Digital Photography School.


Digital Photography School

 
Comments Off on Weekly Photography Challenge – Black and White

Posted in Photography


A Collection of Powerful Black and White Images

13 Jun

I have a background in black and white photography – using actual film and processing in a darkroom. The entire first year of my two year college photography program was spent doing black and white photography only, nothing else. I came to love working in the darkroom and seeing the image appear on the paper was magic.

Now in the digital age, making black and white is a choice you can make after you shoot the images – which gives you options we didn’t have in the film days. So I wanted to share some B&W images to get you thinking about the possibilities.

For some some tips on shooting and converting to B&W try these:

  • Tips for Shooting and Processing Better Black and White Photographs
  • Black and White Conversions: An Introduction to Luminosity
  • 3 Tips for Better Black and White Conversion using Lightroom
  • How to See in Black and White [and how HDR can be a Powerful Tool for the Monochrome Photographer]

Photograph Through the mist by Paulo Mendonça on 500px

Through the mist by Paulo Mendonça on 500px

Photograph The Old Bridge by Mostafa Hamad on 500px

The Old Bridge by Mostafa Hamad on 500px

Photograph The Winner by Andrius Petrucenia on 500px

The Winner by Andrius Petrucenia on 500px

Photograph Untitled by enzo farina on 500px

Untitled by enzo farina on 500px

Photograph City of Fog by Johannes Burkhard on 500px

City of Fog by Johannes Burkhard on 500px

Photograph Winter in the Ore mountains II by Daniel ?e?icha on 500px

Winter in the Ore mountains II by Daniel ?e?icha on 500px

Photograph Milford Sound, Fiordland National Park, Southland, New Zealand by Russell Pike on 500px

Milford Sound, Fiordland National Park, Southland, New Zealand by Russell Pike on 500px

Photograph Darkness Peaks by Simon Pouyet on 500px

Darkness Peaks by Simon Pouyet on 500px

Photograph La Familia by Luis Beltrán on 500px

La Familia by Luis Beltrán on 500px

Photograph Fisherman Wanderer by Joel Santos on 500px

Fisherman Wanderer by Joel Santos on 500px

Photograph Corpus Christi at Night by Joe V on 500px

Corpus Christi at Night by Joe V on 500px

Photograph Ancient Light of Wisdom by Joel Santos on 500px

Ancient Light of Wisdom by Joel Santos on 500px

Photograph *** by Ann Nevreva on 500px

*** by Ann Nevreva on 500px

Photograph Black is my colour.. by Marianna Roussou on 500px

Black is my colour.. by Marianna Roussou on 500px

Photograph Tiny Feet by Lisa Holloway on 500px

Tiny Feet by Lisa Holloway on 500px

Photograph A Sea of Stars by Lisa Holloway on 500px

A Sea of Stars by Lisa Holloway on 500px

Photograph Daisy codera by Rainer Ressmann on 500px

Daisy codera by Rainer Ressmann on 500px

Photograph Almost closed by Kimhwan SEOULIST on 500px

Almost closed by Kimhwan SEOULIST on 500px

Photograph Paint Noir by András Sümegi on 500px

Paint Noir by András Sümegi on 500px

Photograph shielded from the danger of the outside world by David Mar Quinto on 500px

shielded from the danger of the outside world by David Mar Quinto on 500px

Photograph Alone by Ana Grama on 500px

Alone by Ana Grama on 500px

Photograph Go, go by Edwin Leung on 500px

Go, go by Edwin Leung on 500px

Photograph Breakfast by La Mo on 500px

Breakfast by La Mo on 500px

Photograph 77.2013 - Canary Wharf ... by Pawel Tomaszewicz on 500px

77.2013 – Canary Wharf … by Pawel Tomaszewicz on 500px

Photograph Building in the Building by Roman K on 500px

Building in the Building by Roman K on 500px

Photograph Mantis by Arnaud Bratkovic on 500px

Mantis by Arnaud Bratkovic on 500px

Photograph Hammer by Enrico Panina on 500px

Hammer by Enrico Panina on 500px

Photograph BB King by Ken Stewart on 500px

BB King by Ken Stewart on 500px

Photograph Rocks JK by Daniel Czerwinski on 500px

Rocks JK by Daniel Czerwinski on 500px

Photograph Recursion by Frank Wijn on 500px

Recursion by Frank Wijn on 500px

Photograph A monochrome end of fall by Felicia Simion on 500px

A monochrome end of fall by Felicia Simion on 500px

Photograph Behind the old Window by Adrian Limani on 500px

Behind the old Window by Adrian Limani on 500px

Photograph Havana Life by Liban Yusuf B&W on 500px

Havana Life by Liban Yusuf B&W on 500px

Photograph Broken B&W by Liban Yusuf B&W on 500px

Broken B&W by Liban Yusuf B&W on 500px

Photograph M o t i o n   BW by Liban Yusuf B&W on 500px

M o t i o n BW by Liban Yusuf B&W on 500px

**I just love this guy’s images of Cuba, inspires me to do more night shooting when I go back in January. So I had to share a few of his shots.

Photograph Kissed by light by Bipphy Kath on 500px

Kissed by light by Bipphy Kath on 500px

Photograph Angel....please give me your light... by Ines van Megen-Thijssen on 500px

Angel….please give me your light… by Ines van Megen-Thijssen on 500px

Photograph No sigh, immured tears by regis boileau on 500px

No sigh, immured tears by regis boileau on 500px

Photograph Ballerina III by Vanessa Paxton on 500px

Ballerina III by Vanessa Paxton on 500px

Photograph Ex ospedale psichiatrico di Mombello by PierSparrow  on 500px

Ex ospedale psichiatrico di Mombello by PierSparrow on 500px

The post A Collection of Powerful Black and White Images by Darlene Hildebrandt appeared first on Digital Photography School.


Digital Photography School

 
Comments Off on A Collection of Powerful Black and White Images

Posted in Photography


8 Reasons to Use Silver Efex Pro 2 for Your Black and White Conversions

13 Jun

Silver Efex Pro 2 review

You can convert colour photos to black and white in Photoshop and Lightroom (or your Raw conversion software of choice). But the last few years have also seen an increase in the number of plug-ins built to do nothing else, other than convert photos to monochrome.

Today I’m going to look at what many people consider to be the best black and white plug-in around – Nik Software’s Silver Efex Pro 2. Rather than provide a comprehensive review of the software, I’m going to look at some of the things you can do with it that you can’t (or would be much more difficult) in Photoshop or Lightroom.

1. Presets

Silver Efex Pro 2 has 38 presets that you can use as starting points for your processing work, including vintage looks as well as modern ones. This places the plug-in ahead of Photoshop, and probably ahead of Lightroom too. You can buy Develop Presets for Lightroom, but it will be difficult to find some that give you as many options as those in Silver Efex Pro 2.

Here’s a sample of some of the presets. The original colour photo is shown top left.

Silver Efex Pro 2 review

2. There are more tools for enhancing texture

Silver Efex Pro 2 review

The full set of Contrast and Structure sliders in Silver Efex Pro 2.

One of the elements that makes black and white photos so effective is texture. You can enhance texture in both Photoshop and Lightroom (the Contrast and Clarity sliders are my favourite tools for this) but Silver Efex Pro 2 takes it several steps further.

The Contrast sliders

Silver Efex Pro 2 has four sliders for adjusting contrast. The Contrast slider is the same as the one in Lightroom or Adobe Camera Raw. The Amplify Whites and Amplify Blacks sliders let you increase Contrast in the highlights and shadows respectively. There’s also a Soft Contrast slider that increases contrast but in a less aggressive way, almost as if there is an overlay of gaussian blur. This slider is very useful for portraits.

If you get carried away with the Contrast sliders you can lose detail in the highlights and shadows. So, in addition to the four sliders already mentioned, there are two Tonality Protection sliders used to bring back detail in clipped areas.

Silver Efex Pro 2 review

These portraits show the difference between Contrast and Soft Contrast. Soft Contrast is ideal for portraits, while Contrast is better for subjects like architecture and the landscape.

The Structure sliders

Structure slider is similar to Clarity in Lightroom and Adobe Camera Raw. But while in those programs the Clarity slider affects all the tones in the selected area, in Silver Efex Pro 2 you can choose to adjust Structure independently in the shadows, midtones and highlights. There is also a Fine Structure slider for increasing mid-tone contrast in areas of fine detail.

Silver Efex Pro 2 review

The above photo shows three close-ups of the same portrait used earlier.

Top: A neutral black and white conversion, with no increase in Clarity.

Middle: This is what happens when you increase Clarity to 100% in Lightroom (note that you wouldn’t normally push it that far for a portrait, I did it here to show you the effect). Clarity is increased uniformly across the frame, affecting the skin tones as well as the hair.

Bottom: Shadows Structure set to 100% in Silver Efex Pro 2. Only the shadows are affected, leaving the midtones and highlights alone. This brought out the detail in the model’s hair and eyes, but left her skin untouched. You would have to use a selection or a mask in Photoshop or the Adjustment Brush in Lightroom to achieve the same effect.

3. Control Points make local adjustments easy

Just like in Photoshop and Lightroom you can apply adjustments locally as well as globally, using a system called Control Points.

A Control Point is the centre of a circle within which you can make tonal adjustments. The adjustment is applied to tones similar in brightness and colour to the pixels underneath the Control Point itself. For example, if you place a Control Point over a dark tone, then increase the brightness, only the dark tones within the circle are adjusted. Light tones remain untouched.

Silver Efex Pro 2 review

The yellow and black dot marks the Control Point. Adjustments are made to pixels matching the colour and brightness of the pixels underneath it. There are seven sliders you can adjust: Brightness (Br), Contrast (Co), Structure (St), Amplify Whites (AW), Amplify Blacks (AB), Fine Structure (FS) and Selective Colorization (SC).

It may sound complicated but it only takes a little practice to understand how it works. You can use as many Control Points as you want in an image, and group them together to cover areas that don’t conform easily to a circular shape.

4. Selective colouring is easy

Selective colouring is the technique of converting an image to black and white while leaving part of it in colour. This is easy with Silver Efex Pro 2 as all you have to do is place a Control Point over the area where you want to retain colour.

I used two Control Points in the following example, one on each coloured shutter:

Silver Efex Pro 2 review

5. The History panel is excellent

Silver Efex Pro 2 has the best History panel I’ve seen in any software. Every adjustment you make to your photo is listed.

Silver Efex Pro 2 review

The History panel works together with the Compare view. The yellow tab on the left indicates the photo used for the Before view, and the entry used for the After view is displayed in yellow text. This simple method lets you compare any two entries in the History panel.

6. The Zone System

Silver Efex Pro 2 can show you where the tones in your photo fall within the eleven zones of the Zone System. One useful application of this is that you can use it to see which areas of your photo may block up in print because they are too dark or too light.

This screenshot shows the tones which fall into zone 3. They are indicated by the brown diagonal lines.

Silver Efex Pro 2 review

7. Black and White film emulation

The Film Types panel gives you a choice of 18 different black and white films. When you choose one the plug-in emulates the tonality and grain structure of the selected film. It’s an easy way to get the film look without having to shoot, develop, and scan black and white film.

8. Silver Efex Pro 2 comes bundled with other software

Silver Efex Pro 2 is part of the Nik Collection, which includes seven applications and costs $ 149. That works out to less than $ 25 a plug-in.

Note: If you’re on a tight budget, the standalone version of OnOne Software’s Perfect Photo Suite 8 represents even better value at $ 79. Click the link to learn more.

Further resources

You can learn more about Silver Efex Pro 2 at these links:

  • Silver Efex Pro 2 official page
  • Silver Efex Pro 2 tutorials
  • Silver Efex Pro 2 videos on YouTube

Your turn

What software do you use for black and white conversions? Do you prefer Photoshop, Lightroom, another Raw conversion program or a plug-in? Let us know in the comments – what would you recommend to other readers?

The post 8 Reasons to Use Silver Efex Pro 2 for Your Black and White Conversions by Andrew S. Gibson appeared first on Digital Photography School.


Digital Photography School

 
Comments Off on 8 Reasons to Use Silver Efex Pro 2 for Your Black and White Conversions

Posted in Photography


Tips for Shooting and Processing Better Black and White Photographs

01 Jun

Photography, as you know, is fundamentally the capturing of light; you are not taking pictures of objects as much as you are recording the light that is bouncing off of them. In the early days of photography, the only medium available to capture this light was monochromatic film, commonly known as black and white. In the 1930s, the invention of Kodachrome, the first successfully mass-produced color film, ushered in an age of color to the art form.

Bw article3 NEW

Instead of fading away, however, black and white photography remained throughout the birth of color, and even increased in popularity in the following decades, due to its simplicity and ability to display tones more dramatically than color usually can.

What makes black and white photography retain its timelessness? A compelling picture is always based on the same fundamentals; lighting, tonal range, shapes, patterns and textures. A black and white photo breaks these fundamentals down to their basics, and is not hindered by the distraction and complexity that color can sometimes contribute. It is truly an art form. The reality of a scene depicted in color is transformed into an artistic interpretation when shown in shades of grey.

So what do you need to understand in order to produce a great monochrome photo?

Visualize in Black and White

One of the most helpful things you can do is something that takes place before you even click the shutter button. Training yourself to envision a scene in black and white will help determine if it will work in that state, or if it would be better left to color. Since you won’t have color in the final shot, you’ll need to visualize the core of the scene instead:

  • How is the light behaving on the objects in the scene?
  • What forms are involved?
  • Are there lights, darks, and shades in between, giving you a good tonal range?

Scenes that contain contrast and texture will usually provide a good end result when converted to black and white. Fortunately, you can apply monochrome to almost any type of photography, including landscape, portrait, and street photography. The resulting feel of the image depends on the subject; landscape shots of the ocean will have more highlighted textures of the waves, and street portraits done in black and white can have a grittier, more dramatic feel.

031814 siestaguarshack2 sized

Taking the Shot

Many of the basic principles of photography apply when shooting for black and white as well. You’ll need to compose the scene properly, utilizing the rule of thirds where applicable, and properly expose the shot. As always, you’ll want to shoot in RAW, so that any necessary adjustments can be made such as exposure and levels before you begin post-processing.

When composing, pay special attention to the lines and shapes in the image. These components are even more important when the photo is desaturated.

Finally, you may benefit from using a polarizing filter. This lens attachment will reduce, or remove, reflections that may be apparent in water or other shiny surfaces. Since these reflections could take away focus from your subject matter, it’s best to do this during the shooting process rather than post-production.

040613 siesta feet sized

Post-production

The most important step in this process is actually converting the shot into black and white. While almost all DSLRs have the ability to shoot in black and white initially, you’re losing an important advantage; the photo will permanently be monochrome. Photographers sometimes think that a poor image can somehow be “saved” by being converted into black and white; this is not always the case. If you shoot in JPG format and the black and white (monochrome) setting on your camera, you’ll be producing a black and white JPG image, and lose the ability to convert to color or take advantage of RAW adjustments. BUT if you shoot in RAW in this mode you will still have all the colour data but have the advantage of seeing a black and white preview on the camera screen.

Black and white conversions in an image editor such as Photoshop can usually be categorized in two ways; destructive, and non-destructive. Obviously, destructive methods actually modify pixels and cannot be easily adjusted. Converting directly to greyscale is a long-used example of this method. Preferably, you want to use a non-destructive method that will allow you to make continued adjustments to the image until you have the tone and shading desired.

The easiest method (and the one that I prefer) is to use the Hue/Saturation/Luminosity tab in the RAW importer in Photoshop (the HSL panel in Lightroom also does the same thing). Alternatively, you can accomplish the same thing (albeit with a bit less control) by using a Channel Mixer adjustment layer after you’ve imported the RAW file into Photoshop.

Converting to Black and White with the RAW HSL Controls

Not only does this method offer more control than simply desaturating the image, it keeps the color profile loaded into the RAW (.CR2) file, allowing you to reopen and adjust it as you see fit. To convert using this method follow these steps:

  • Select the RAW file you wish to convert and open it. The file will open within Adobe’s RAW import dialog.

Bw article ps1 FINAL

  • Click the HSL/Greyscale tab on the right side of the dialog box (this should be the 4th tab).

Bw article ps2 FINAL

  • Tick the “Convert to Greyscale” box.

Bw article ps3 FINAL

  • You will be presented with eight color sliders. Adjust these sliders individually (ensure the “Preview” checkbox is ticked near the top) to see real-time changes in those color channels, and how those changes impact your desaturated image. With a color image, moving the “yellow” slider would modify the yellow in your image, but here, it will make the portions of the image that were yellow change in shading, either lighter or darker depending on which direction the slider is moved.

Bw article ps4 FINAL2

That’s it, you’re all done. Few accomplishments in photography are as satisfying as producing a well-done black and white image. You have discarded color, and envisioned your story instead with shapes, lines, shadows, and textures. You’ve opened up a new world of imagery to yourself, and exponentially expanded your repertoire.

Now…what will you do with it? Share in the comments below if you have anything to add or would like to show us your new black and white images.

The post Tips for Shooting and Processing Better Black and White Photographs by Tim Gilbreath appeared first on Digital Photography School.


Digital Photography School

 
Comments Off on Tips for Shooting and Processing Better Black and White Photographs

Posted in Photography


Turn Your Photos IntoIncredibly Large Black & White Prints

27 May

Extra photos for bloggers: 1, 2, 3

Engineer Prints are big big big (big) photo prints made on large format printers normally used for architecture and engineering plans.

The unique, lo-fi characteristics of the Engineer printing process has made it a favorite amongst the creative community, and us!

Streaked, striated and wacky black and gray tones combine to create a super unique look that’s no ordinary photo print.

Our Engineer Prints are inked on 4-feet wide (!) 20lb bond paper that’s so light it’s easy to pin or tape anywhere, no frames or nails!

We’ve made it a cinch for you to have one of your very own. No printer proofs, resolution wrangling or printer research required!

Make Your Own Engineer Print
$ 25 flat w/ free shipping, at the Photojojo Shop


© laurel for Photojojo, 2014. |
Permalink |
No comment |
Add to
Incredibly Large Black & White Prints”>del.icio.us

Post tags:


Photojojo

 
Comments Off on Turn Your Photos IntoIncredibly Large Black & White Prints

Posted in Equipment


The Black Series

01 May

Vor über einem Jahr stellte Claudia Wycisk eine neue Fotoserie bei uns vor: „Woman in Black“ zeigte schwarzgekleidete Frauen in klaren Schwarzweiß-Portraits. Seitdem ist ihre Serie gewachsen und fand vor Kurzem mit dem hundertsten Portrait ihren Abschluss. „The Black Series“ heißt sie nun und zeigt auch Männer, Kinder und sogar ganze Familien.

Ihre Portraits wirken wie aus einer anderen Zeit. Claudia wählte besonders charakteristische Gesicher aus und fuhr für einige Shootings mit ihrem mobilen Studio quer durch Deutschland. Auch in Bonn machte sie Halt, um mich mit meiner jüngsten Tochter zu portraitieren. Ihre ruhige, geduldige Art half mir sehr, mich in die Rolle einzufühlen.

Nur wenige Stunden später schickte mir Claudia vier Fotos fertig bearbeitet und obwohl ich die bisherigen Bilder ihrer Serie kannte, war ich überrascht. Die simple Lichtsetzung, die Schnelligkeit, aber auch mich selbst so anders zu sehen, war für mich überraschend. Vielen Dank liebe Claudia, dass ich Teil dieser großartigen Serie sein darf.

Das abgeschlossene Projekt wird in einem Bildband zu sehen sein, limitiert auf 300 Exemplare. Wer Interesse hat und Claudia beim Druck durch eine Vorbestellung unterstützen möchte, kann dies noch bis zum 30. Juni tun.

© Claudia Wycisk

© Claudia Wycisk

© Claudia Wycisk

© Claudia Wycisk

© Claudia Wycisk

© Claudia Wycisk

© Claudia Wycisk

© Claudia Wycisk

© Claudia Wycisk

© Claudia Wycisk

© Claudia Wycisk

© Claudia Wycisk

© Claudia Wycisk

© Claudia Wycisk

Das Projekt könnt Ihr auch auf Facebook verfolgen. Sehenswert sind ebenfalls Claudias andere Fotografien, die Ihr auf ihrer Webseite findet. Wir freuen uns schon auf ihr nächstes Projekt.


kwerfeldein – Fotografie Magazin | Fotocommunity

 
Comments Off on The Black Series

Posted in Equipment


Dunkle Geschichten aus den Black Mountains

20 Mar

Ein Beitrag von: Rosie Anne

Ich bin Fineart-Fotografin und lebe in den Black Mountains in Wales, worauf sich vor allem ein sehr großer Teil meiner Arbeiten stützt. Ich fotografiere verlassene ländliche Orte, Natur und kleine Schätze vom Dachboden meiner alten Familie, die sie „hinter sich gelassen“ haben, um meine Geschichten zu erzählen.

Dabei habe ich mich auf Selbstportraits spezialisiert. Obwohl meine Fotografien nicht streng autobiografisch sind, ziehe ich Inspiration aus meinen eigenen Erfahrungen und oft merke ich auch, was für eine große Rolle mein Unterbewusstsein spielt. Ich übernehme oft die Rolle einer Heimatlosen, die in seltsamen und leicht surrealen Welten gefangen ist. Diese Charaktere kämpfen selten gegen die Landschaften an, sie sind ruhig und verständnisvoll.

© Rosie Anne

© Rosie Anne

Ich habe in den Black Mountains fast mein ganzes Leben gelebt. Ich ging nur kurz weg und als ich wiederkam, realisierte ich, wie sehr mich dieser Ort verfolge, aber nicht auf eine schlechte Art. Ich fühle eine starke Präsenz hier. Ich spüre die Atmosphäre der Landschaft; sie spricht zu mir, erzählt mir Geschichten.

Ich bemühe mich, stimmungsvolle Erzählungen mit einem Hauch von Mysterium zu erschaffen. Bilder, mit einer Stille, die den Betrachter anhalten, erwartungsvoll gemeinsam mit dem Charakter dem Fortgang der Geschichte zu harren.

© Rosie Anne

© Rosie Anne

Ich kreiere Welten, die von der Form her an Märchen erinnern, aber mit einer bedrohlichen Präsenz, einer provozierenden Geschichte, die Fantasie anregen. Sie zeigen auch die Entfremdung von der Natur und die Verbindung zwischen Mensch und Natur auf.

Es gibt einen gewissen Grad von Intimität in dem Raum, den die Charaktere einnehmen, sodass der Betrachter fast versucht ist, nach ihnen zu greifen. Meine Arbeiten sind gekennzeichnet durch die Verwendung von starken atmosphärischen Stimmungen, der Nutzung kräftiger Farben und effektvollem Licht, was zusammen etwas beinahe Malerisches erreicht.

Dieser Artikel wurde von Katja Kemnitz für Euch aus dem Englischen ins Deutsche übersetzt.


kwerfeldein – Fotografie Magazin | Fotocommunity

 
Comments Off on Dunkle Geschichten aus den Black Mountains

Posted in Equipment