RSS
 

Posts Tagged ‘Better’

6 Tips for Taking Better Natural Light Classic Portraits

10 Sep

On now until September 22nd (2015) over on Snapndeals – 20% OFF Wayne’s eBooK – Portrait Tips and Techniques: Natural Light Black & White Portraiture. Grab it before the deal expires.

DPS STUDY 1

RETHINKING NATURAL LIGHT

Many photographers choose to use natural light as their chosen style, almost as a badge of honour. Natural light is a wonderful source, providing ease of use and flattering light to your subjects, but you should be using it the same way as you would studio lights. You need to create light and shade that will add emotion or mood, not flat lighting that gives no shape, texture or mood. Hopefully these tips will help you on a path to refining your natural light classic portraits.

#1 – FINDING QUALITY LIGHT AND SHADOWS

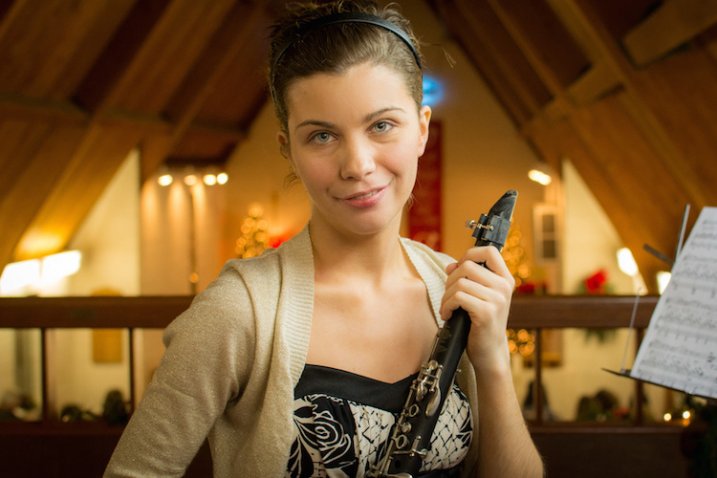
First, find good quality light – preferably open shade, as this offers soft flattering light and is lower in contrast. Avoid the sun as your main light as it will cause harsh shadows and squinting, which is undesirable for quality portraits.

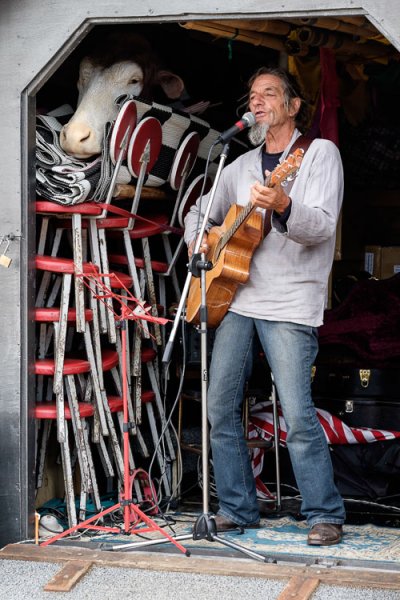
Open shade can be found under awnings, the edge of trees or buildings, and inside doorways or windows, for example. In these images the girls are positioned approximately 1.5 metres (5 feet) inside the doorway of an old timber shed.

Look for the shadows; they are equally important. Shadows subtract the light and create shape and mood.

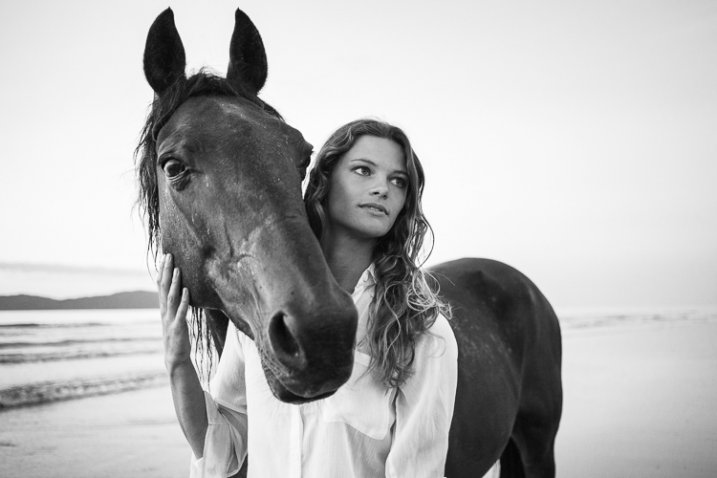
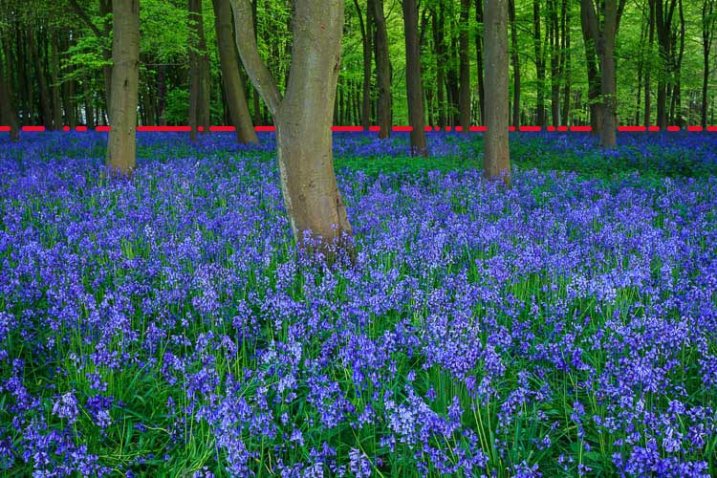
After you have established your location, check the background. Even if you have found the perfect, open shaded location, make sure the background isn’t too contrasty with sunlit areas. These can be visually distracting, so try and select uncluttered backgrounds that are lower in contrast and darker than the subject’s face. This will allow the face to project forward by being the lightest tone against the background (all the images in this article demonstrate this).

DPS STUDY 2

#2 – FIND THE DIRECTION OF LIGHT

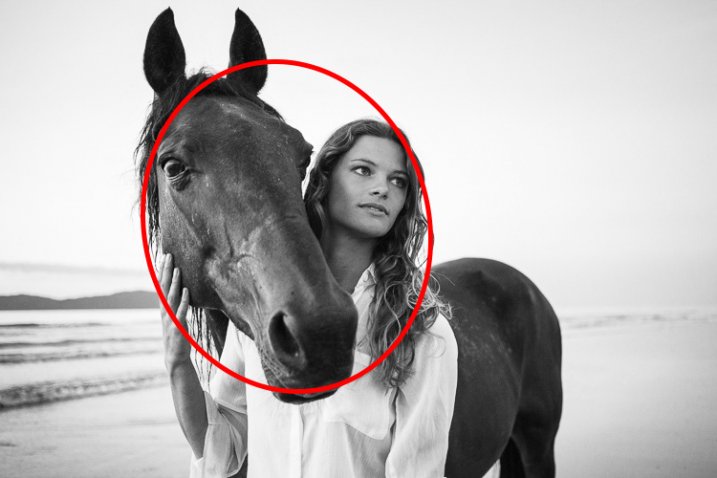
Once you have found good quality of light, check its direction. You want the light to come across your subject’s face at approximately 45 degrees to the nose, and from a higher angle. That height should also be at around 45 degrees, as a basic starting point.

You can check the catchlight positioning by looking at the eyes; there should be one in both eyes at around 10-11 or 1-2 o’clock. (This depends on the side of the face that is being lit and the structure of the eye sockets). Deep-set eyes will need a slightly lower light source. You should also notice the nose shadow to be at around 45 degrees.

To lower the catchlights you need to change the angle of your subject’s head by tilting more or less. Even moving the subject further away from the edge of an overhang will lower the angle of the light. It’s the opposite of being in a studio where you can move the lights. Natural light is fixed and requires you to move the subject and/or camera to achieve good lighting.

DPS STUDY 3

#4 – EYES ARE WINDOWS TO THE SOUL

Catchlights are very important in portraiture. They not only guide you where the light is coming from, but also create a sense of depth. TIP: no catchlights = NO photo. When there are no catchlights, there will be minimal, if any, texture and colour in the eyes. Always study the eyes for guidance.

#5 – SIMPLE POSING

The portraits here are the basic classic style, looking into the camera. It’s usually more flattering to angle the shoulders away from the camera, again 45 degrees is a handy starting point. Leaning the bodies and heads toward each other gives an emotional connection. Upright or leaning away would show detachment from each other.

It’s also a good practice to have the noses turned slightly away from the camera, particularly with adults. Noses that point directly at the camera will look broader in many cases, particularly when combined with flat lighting. With kids, it’s not as critical and good lighting will create better shape.

Arms and hands need to be posed simply so as not to draw attention. In images #1 and #2 above (top of article), the lower arms are bent downwards and the hands clasped softly. Things you should avoid are open fingers, particularly draped over a shoulder, as this can make a portrait busy and untidy. Elbows bent at 90 degrees should also be avoided. Here’s a simple mantra to remember when it comes to posing people’s heads, arms, legs, hands, hips, shoulders, etc:

IF IT BENDS – BEND IT. IF IT CURVES – CURVE IT. IF IT TWISTS – TWIST IT.

Applying this will help you avoid static poses.

DPS STUDY 4

DPS STUDY 5

#6 – EXPRESSION

Above all else, expression is the most important element in a portrait. In most cases, a poorly lit and posed portrait with a beautiful expression will trump a technically perfect portrait with an average expression in most cases, but this is no reason to pursue a path of mediocrity.

Expression is a personal thing. A moody, soulful style is my preference, but your sessions should always include various expressions such as laughing, smiling, pensive, etc. To achieve this soulful style you can’t be jumping around in a hyperactive mood expecting soulful looks. The best approach is a more Zen-like style, quietly giving direction. These classic style portraits produce beautiful open eyes, relaxed facial muscles, and true shape to the lips. Truly timeless, heart and soul portraits, but it all takes PRACTICE.

DPS STUDY 6

SUMMARY

  • Treat natural light photography the same as studio lighting.
  • Find quality soft light.
  • Look for shadows to create shape and mood.
  • Place your subject at 45 degrees to the light as a starting point.
  • The light source is fixed, so move your subject and camera to reduce the height of the light in the eyes.
  • Check for catchlights in the eyes.
  • Simplify your posing.
  • Soft expressions work best for classic low-key portraits.

SPECIAL NOTES

With each of these images, other angles of the face (2/3 face and profile) can be achieved by simply moving the camera position. Although the pose and light would remain the same, you may have to adjust the head tilts slightly and check your backgrounds.

Clothing colours also play a big part with quality portraits. Darker clothing works best for low-key portraits. Your eyes should be drawn to the brightest tone in the portrait, therefore, light-coloured clothing would be visually distracting.

On now until September 22nd (2015) over on Snapndeals – 20% OFF Wayne’s eBooK – Portrait Tips and Techniques: Natural Light Black & White Portraiture. Grab it before the deal expires.


googletag.cmd.push(function() {
tablet_slots.push( googletag.defineSlot( “/1005424/_dPSv4_tab-all-article-bottom_(300×250)”, [300, 250], “pb-ad-78623” ).addService( googletag.pubads() ) ); } );

googletag.cmd.push(function() {
mobile_slots.push( googletag.defineSlot( “/1005424/_dPSv4_mob-all-article-bottom_(300×250)”, [300, 250], “pb-ad-78158” ).addService( googletag.pubads() ) ); } );

The post 6 Tips for Taking Better Natural Light Classic Portraits by Wayne Radford appeared first on Digital Photography School.


Digital Photography School

 
Comments Off on 6 Tips for Taking Better Natural Light Classic Portraits

Posted in Photography


6 Tips for Better Low-Light Landscape Photography

02 Sep

2-for-1 special

As part of Landscape Photography Week here on dPS, we’re offering TWO for the price of ONE on our best-selling Living & Loving Landscape Photography ebooks!

Click here to take advantage of this offer.


A glorious sunset will always attract a crowd of photographers. Yet the moment the sun dips behind the horizon, it seems everyone departs in a hurry. What they don’t realize is how exceptional the scene can become at dusk and into the early evening. The hours following sunset are actually ideal for landscape photos. Of course, working in low light isn’t without its fair share of challenges.

With these six tips though, it’s possible to extend the magic hour and continue creating stunning images long into the night.

1) Compose Thoughtfully

It’s easy to be mesmerized by the bold colors of dusk. Yet, the photographer who works to add more visual interest will ultimately create a better image. About a half hour before the sun sets, I start the search for a foreground element that will anchor my composition. This can be a field of flowers, a boulder, a tree, or even a man-made object. The idea is to add visual interest all the way through the frame. As you explore various options, be sure to try different perspectives including the view from the ground. By having this location worked out in advance, you’ll be ready to capture the peak moment of brilliance.

2) Switch to Live View

When autofocus struggles, Live View becomes an extremely helpful focusing aid. By switching to manual focus and magnifying the scene on the LCD, you have the ability to carefully micro-focus on whatever is important in your scene. At 5x and 10x magnification, you don’t have to solely rely on your eyesight, making focus easy to achieve. Remember, the enlarged view on your LCD is not representative of the actual focal length, or view the camera sees. Upon pressing the shutter, the entire scene will be captured in sharp detail. With this level of precision, I find this feature ideal for low-light photography.

3) No Tripod? No Problem

It’s true, a tripod is a landscape photographer’s best friend, especially in near darkness. Yet, there are definitely occasions where carrying one is just not possible. With a bit of ingenuity, you can still create a sharp photographs. The key is to set your camera to the two second timer. Compose your shot with the camera resting on a rock or bag and press the shutter release. The timer will count down for two seconds. This is enough time to eliminate any camera shake before firing. Using this technique, you can still use very long shutter speeds even without a tripod.

4) Safety First

In extremely low-light, small camera buttons and dials become difficult to see. A small flashlight, or even your smartphone can provide the proper amount of illumination. This also comes in handy for navigating dark trails and rocks. To keep it from getting lost, I prefer the key ring type that can be attached to a camera bag. While this seems like a common sense item, don’t underestimate its usefulness. Hiking back to your car after dusk can be dangerous without artificial light to lead the way.

5) Cool Down the White Balance

During the day, I often enjoy the warmer White Balance presets like Cloudy or Shade. Similar to a painter adding more yellow to their brush, these settings introduce a golden quality of light to a landscape. At dusk however, this can look artificial and overprocessed. To better match the cooler color temperature of low light situations, Auto White Balance is actually quite accurate. While I do work in RAW, I enjoy shooting in a white balance that best represents the scene. This provides a more complete understanding of how the image will look and allows me to make adjustments accordingly.

6) Stay Just a Little Bit Longer

Night photography can offer some spectacular opportunities, especially when the moon is full. You can check this beforehand using apps like the Photographer’s Ephemeris. In these low-light conditions, you will need to take some special steps to get the shot. First, a solid tripod is essential to prevent camera shake. In the mountains, winds can be strong, so opt for a sturdy set of legs. Even with the light of the moon, it was necessary to use a 15″ (fifteen second) exposure. Camera settings: ISO 400, F/4, 15 seconds at 17mm. This same location midday, was a completely different scene with idling buses, flocks of tourists, and harsh contrasty light.

So how can you use these tips in your photography? Do you have any others to add? Please do so in the comments below.

Editor’s note: This is the first of a series of articles we’re featuring here in a deep dive on landscape photography, this week on dPS. Watch for another later today and more daily. 

googletag.cmd.push(function() {
tablet_slots.push( googletag.defineSlot( “/1005424/_dPSv4_tab-all-article-bottom_(300×250)”, [300, 250], “pb-ad-78623” ).addService( googletag.pubads() ) ); } );

googletag.cmd.push(function() {
mobile_slots.push( googletag.defineSlot( “/1005424/_dPSv4_mob-all-article-bottom_(300×250)”, [300, 250], “pb-ad-78158” ).addService( googletag.pubads() ) ); } );

The post 6 Tips for Better Low-Light Landscape Photography by Chris Corradino appeared first on Digital Photography School.


Digital Photography School

 
Comments Off on 6 Tips for Better Low-Light Landscape Photography

Posted in Photography


Take Better Pics Through Windows

01 Sep

The windows of high rise buildings offer the best city views. Capturing that view, without reflections that make the city look like it’s under alien attack, can be a frustrating venture.

QT Luong, a photog famous for capturing all 59 US National Parks in large format, offers up some advice on avoiding window pain.

We love his “oh duh” tip of cleaning the window as well as the more advanced advice like ensuring the window is shaded from sunlight, using a rubber hood or dark cloth to make a seal with the window and removing your polarizing filter. Techniques that work well for DSLR and phone cameras alike!

Photo by QT Luong


© Erin for Photojojo, 2015. |
Permalink |
No comment |
Add to
del.icio.us

Post tags:


Photojojo

 
Comments Off on Take Better Pics Through Windows

Posted in Equipment


5 Ways to Change Your Composition For Better Photos

28 Aug

If there is one thing in photography that every photographer can work on, it’s composition. Like many of the other techniques in photography, your composition will improve the more you practice. Very often, photographers seem to go to their comfort zone of the rule of thirds. I personally like the rule of thirds as a starting point, not every photograph however, needs to be composed on the rule of thirds. In fact, it is a good idea to shoot the same scene in a few different compositions, even depth of field can be used as a compositional tool.

A good way to work on your composition is to start with the rule of thirds, then change it up, try a few different compositions and see how that works. The challenge is this, what other compositions can you use? Let’s take a look at some advanced compositional techniques that you can try out on your next shoot.

1. Left to right

The smooth curving water leads our eye to the rock on the right of the image

The smooth curving water leads your eye to the rock on the right of the image

In the western world, we read the words on a page from left to right. It is logical to think that when someone views your image, they will generally begin on the left side of the image, and move to the right. You can use this technique in a few ways.

Firstly, you could place your subject on the right hand side of the frame with a leading line drawing the eye to your subject. The leading line could be a river, a road, or a railway track – it doesn’t really matter, all that it needs to do is allow the eye of the viewer a natural entry point, then lead them to the subject.

Secondly, if you were shooting street photography, you might have a person in the frame on the left hand side, looking toward your subject on the right. You might even have a vehicle such as a car or a motorcycle, moving from left to right. These techniques will immediately draw the eye to the right side of your image.

2. Use shapes – both seen and unseen

In many images, there are hidden and visible shapes. Window frames are square or rectangular, doors are rectangles, and so on. Look for shapes in your images, look beyond what the actual object is and see its shape. You can also compose the scene to create a shape. Sand dunes can become triangular shapes, open fields can be green rectangles, so look for shapes in your scene and compose your image to include them.

There are many shapes in each scene, use them to enhance your composition

There are many shapes in each scene, use them to enhance your composition

3. Use numbers – not literally!

If you are shooting a scene with trees or leaves, or even a river with some exposed rocks, try and use odd numbers of things. Odd numbers tend to create a dynamic feel in your scene – three trees or rocks will feel more dynamic than two trees or four rocks. This also works well for groups of people. If you have a large group of say 12 people, try not to make three rows of four people, maybe have them pose in two rows, one with seven people and one with five. For people photography, you can also try and create a triangle shape with your subjects. Three people naturally creates a triangle, give it a try!

Odd numbers work well in most images

Odd numbers work well in most images

4. Use negative space

Negative space can really make an image interesting. Negative space is essentially blank space, but really, it helps to anchor your image. It provides really important information about the image. A blue sky can be used to create negative space. The blueness of the sky tells the viewer that it was a sunny day. Your blue sky may have one small cloud in it and that can make the negative space seem interesting.

The blue sky and the hint of a cloud makes this negative space interesting

The blue sky and the hint of a cloud makes this negative space interesting

5. Framing

Framing can be used very effectively to showcase your subject. You can use a window, a door, or even trees to frame a subject. The idea is to create a frame around the subject that does not distract from the subject, but causes the viewer to know immediately where to look.

A tree, framed by an old wooden door.

A tree, framed by an old wooden door.

When you are looking at a scene for the first time, try some of these techniques, or try a combination of them. Shoot from different angles and move around your subject before settling on a composition. You will find that by looking at the scene in many different ways, you will unlock more creativity. Your best shot, may not be your first compositional choice. Composition is one of the more flexible tools in your creative toolbox. You don’t need any particular piece of equipment to change it, you simply need to move your camera around. Give it a try, load your results up in the comments!

googletag.cmd.push(function() {
tablet_slots.push( googletag.defineSlot( “/1005424/_dPSv4_tab-all-article-bottom_(300×250)”, [300, 250], “pb-ad-78623” ).addService( googletag.pubads() ) ); } );

googletag.cmd.push(function() {
mobile_slots.push( googletag.defineSlot( “/1005424/_dPSv4_mob-all-article-bottom_(300×250)”, [300, 250], “pb-ad-78158” ).addService( googletag.pubads() ) ); } );

The post 5 Ways to Change Your Composition For Better Photos by Barry J Brady appeared first on Digital Photography School.


Digital Photography School

 
Comments Off on 5 Ways to Change Your Composition For Better Photos

Posted in Photography


7 Tips for Better Skyline Photography

30 Jun

Reminder: now until July 7th (AUS EST) the Landscapes, Cityscapes & Photography Tricks eBook is on 50% off at Snapndeals.

When we talk about cityscape photography, one of the most basic and trademark shots is the full skyline; the artificial horizon, made of buildings and towers jutting up and down into the sky above. Skylines can be jagged and coarse, or faint and smooth, often depending on the nature of the city itself.

Follow these tips for better skyline photography:

1. Find a Good Vantage Point Outside the City

Skyline image1

To find the city, escape it. One surefire way to capture a city skyline is to leave the city itself. If it’s sitting on a river, hop across; if it’s in a valley, climb the mountain outside. There are terrific vantage points outside cities, like hills, islands and boats, but all will involve a fair bit of travel time and some physical stamina to keep moving until you find a wide enough angle.

Take, for example, downtown Los Angeles: to capture this magnificent skyline, most photographers would hike up a nearby hill or visit the Griffith Observatory until they find a good angle. If you want to include major sites, you’ll need to go even farther: take a boat down to the islands south of Toronto, and you’ll find a clear shot of the CN Tower amid one of the world’s most recognizable downtown skylines. You’ll have to venture to uncommon places to find these angles.

2. Focus on the Corner of a Building

Finding the right focus can be difficult with the city miles away, especially in low light. In LiveView mode, use the LCD screen to zoom in on the corner of a building, and then manually focus until it is crisp.

Skyline image2

This will help ensure that your skyline comes out crisp, and not fuzzy with the autofocus guessing game.

3. Take Some Shots During the Blue Hour

Skylines can light up right after the golden hour, in what’s known as the Blue Hour, that short moment in twilight when the sky is still blue, but the city lights have already turned on. Shooting in pitch-blackness is harder to get good results, and not as visually stimulating, assuming you’re keeping your shot in color. Blue Hour will give your skyline a hearty azure backdrop, and make your image that much more interesting.

Skyline image3

4. Go Wide Angle

For skylines and cityscapes, focal lengths between 12mm-35mm are a good bet. It’s not a necessity, but you will appreciate the wide angle more often than not. This will allow you to capture a nice skyline without having to be miles outside the city.

Skyline image4

5. Use a Deeper Depth of Field

If you want a deeper depth of field, you’ll need a narrower aperture, something like f/11 – f/16, which will create a consistently detailed image.

Skyline image5

Typically, when capturing cities and landscapes, deeper depths of field is more desirable, so every detail of the frame appears in focus. This calls for a narrow aperture, or high f-stop.

6. Consider a Panorama

Sometimes even with a wide angle lens skylines are too long to fit in one photo, that’s when you’ll find a perfect opportunity to try capturing it as a panorama.

Skyline image6

A panorama is where you take multiple photos in a row with overlapping edges, then stitch them together to make a single image. Naturally, this shot is wider than most, long and narrow, it can capture a full skyline, bypassing adding in too much excess sky or ground.

7. Use Your Self-Timer and Bracket at Night

Just after sundown, I usually try and take five bracketed shot sequences in cities; the variety of light, between the bright street lights and the cooling sky, makes for a full palette of color and light that should be captured as accurately as possible. By capturing all these exposure levels you can ensure you are capturing all the light in the scene. You can choose which is best later or combine them with HDR processing techniques.

Skyline image7

Later into the evening, as shutter speeds get longer, I usually condense that to just three bracketed shots because of time. Sometimes even single exposures can do the trick, if I’m spending too long on a shot.

If you set your 2-second self-timer, and use a DSLR with exposure bracketing features – you can click the shutter and the camera will fire off all the shots without you needing to hold it, which risks blur from shaky hands (very useful on a cold rooftop).

Hope these tips have been helpful getting you started, have fun out there!


For Further Training:

SnapnDeals currently has a discount on this new in-depth eBook designed to help you master challenging lighting conditions no matter your experience level, take more compelling photos, post-process them to perfection, and delve even further into long exposure tricks so you know all the possibilities. Get Landscapes, Cityscapes & Photography Tricks at 50% Off now.

googletag.cmd.push(function() {
tablet_slots.push( googletag.defineSlot( “/1005424/_dPSv4_tab-all-article-bottom_(300×250)”, [300, 250], “pb-ad-78623” ).addService( googletag.pubads() ) ); } );

googletag.cmd.push(function() {
mobile_slots.push( googletag.defineSlot( “/1005424/_dPSv4_mob-all-article-bottom_(300×250)”, [300, 250], “pb-ad-78158” ).addService( googletag.pubads() ) ); } );

The post 7 Tips for Better Skyline Photography by Richard Schneider appeared first on Digital Photography School.


Digital Photography School

 
Comments Off on 7 Tips for Better Skyline Photography

Posted in Photography


Portrait Posing Tips- How to Help People to Relax and Take Better Photos

11 Jun

Editor’s note: this week we will be featuring a series of articles on posing for portraits. Look for a new one each day. If you miss any make sure you subscribe to our newsletter and you’ll get a reminder of all our articles once a week.

One of the trickiest parts of doing a portrait photo shoot has nothing to do with operating your camera, mastering your lenses, controlling the light, or even dealing with uncontrollable weather. Getting your clients to relax, take it easy, and enjoy themselves during your time with them is just as important as making sure you have all the technical aspects of your equipment figured out.

This is often the key to a successful photo shoot, and yet it’s so easy to get caught up in learning about your camera equipment and buying new gear that many people forget to invest time in developing the human element of a photo session. Portrait posing and how to help your subjects relax is key to taking better people photos.

parent-holding-baby

If this aspect of your craft is not managed properly you could easily find yourself in the middle of a photo session where your clients are confused, agitated, bored, or worst of all, frustrated and angry. Every photographer has their own unique style, but generally speaking if you can get your subjects to get comfortable and relax, you can get more of the photos you (and they) are really looking for. It’s a tricky situation to be sure, and every photo shoot is different, but here are three techniques that may be helpful:

1. Get to know your clients beforehand

At its most basic level taking photos for clients is a simple business transaction wherein they pay you money for a service you provide. But it’s really much more than that: people are inviting you to record a point in their lives that they will hold dear for decades to come. When you order a sandwich or cup of coffee it doesn’t matter who you are, what hobbies you enjoy, what professional goals you have, or whether you woke up on the wrong side of the bed that morning. You hand over some cash, get what you ordered, and go about your day. However, taking portraits is almost the polar opposite because everything matters. A good portrait photographer will strive to capture the essence of the people they are working with, and getting to know them first is a key element of making this happen.

family-sitting

On my website I have three simple questions on my Contact page:

  1. Families: What was the best family vacation you ever went on?
  2. Children: If you could have the perfect birthday party, what would it be like?
  3. High School Seniors: If you had $ 1000 to spend, and a week off from school, what would you do?

The answers to these questions help me understand more about my potential clients, but also send a message to them that they mean more to their photographer than just a pay-check. This helps with any pre-session discussions we might have, as well as the photo shoot itself, because the seeds have already been sown for good conversation and a relaxed atmosphere.

I’m a teacher by trade, having taught in K-12 schools as well as at the college level (in addition to six-week classes for other teachers), and one common thread that I have found among people of all ages, is that most of them just want someone who will listen to and take an interest in them. With this foundation laid, classes are always much more productive for me and my students. So it goes for the photographer as well: if you show your clients that you are interested in them as people, you will find them to be much more cooperative as photography subjects. It might take some time to get to know them before you photograph them, but this will pay off handsomely for you and your clients throughout the entire picture-taking experience.

senior-brick-wall

2. Don’t treat the photo shoot like a photo shoot

I did a photo session recently for a bright, intelligent, outgoing young man who simply did not want to have his picture taken. He was nearing the end of his time in high school and his parents wanted to get some nice photographs before graduation, particularly of him in his cap and gown. He would much rather have been at home playing video games or hanging out with friends, but instead was obliged to spend the late afternoon with me taking photos – a prospect that was about as much fun for him as getting a tooth drilled. How on earth can you possibly get someone like this to relax, have fun, and enjoy a photo shoot? Simple: don’t make it about the photos.

One of the first things I said to this student as I hoisted my camera bag to my shoulder was “What video games are you playing right now?” He immediately relaxed and started telling me about one of his current favorites, which then branched into discussion of what his friends were playing, which then led to a dialogue about the recent school year and even his career goals. All the while I was snapping photos, while giving him subtle directions without interrupting the flow of our conversation. I got more good shots than I ever thought I would, and he enjoyed our time together far more than he had anticipated.

This girl was a bit nervous about having her picture taken so instead we just talked about music. I don't know much about the clarinet, but she was more than happy to tell me about it, and in the process gave me plenty of good photo opportunities.

This girl was a bit nervous about having her picture taken so instead we just talked about music. I don’t know much about the clarinet, but she was more than happy to tell me about it, and in the process gave me plenty of good photo opportunities.

This is just one example, but I have seen the same scenario repeat itself over and over: people tend get nervous and self-conscious when getting their photos taken, so if you want them to relax, have fun, and enjoy the photo shoot, try treating it as an hour of just hanging out. They’ll enjoy it much more and you’ll be surprised at the nice results you can get.

3. Build long-term relationships

When you order a pizza or pick up a tool from the hardware store you’re not looking for any type of lasting personal commitment. It’s merely a simple business transaction that serves a functional purpose, whereas photography is quite the opposite. Because you are dealing with people, and not objects, you should not only get to know your clients and seek to build a rapport with them, but find ways to build a professional relationship with them after money and pictures have changed hands. This won’t necessarily improve a current photo session, but it will pave the way for many successful future sessions while also helping to spread the word to the client’s friends, family, and co-workers about your photography services. A few ideas to try include:

Send a real thank you card

Send a thank-you card to the client (not an email, but a physical handwritten card) a few weeks after they receive their photos. Let them know how much you enjoyed working with them and appreciated their business, which is a good way to build a positive professional relationship that will last for years to come, and help make future photo sessions much more relaxed and enjoyable. You can also slip in a discount for a future photo session, which will give them even more incentive to do business with you again. This is especially important if you work with children or families, as you can easily lay the groundwork for many years of photo sessions by letting them know how much you appreciate them and enjoy working with them.

child-bench-book

This boy’s parents had such a positive experience on his photo shoot that they asked me to take pictures for their whole family a few months later.

Post about the session on social media

As more clients share their lives online, you can take advantage of the medium to publicly say how much you enjoyed working with a particular client, how good the photos turned out, or how you are already looking forward to a future session. Clients often respond quite positively, and this type of public recognition helps to reaffirm their good opinion of you as a photographer. Note that you will want to get your client’s permission first, and posting about a client on Facebook is not the same as friending a client. I don’t necessarily recommend that, though I know several photographers who do.

Scratch their back, and they’ll scratch yours

Many of your clients (or their parents) are working professionals and would appreciate your patronage as much as you like to have theirs. Remember the father of the cute kid from last week’s session who is a local plumber? Give him a call the next time your sink overflows. What about the upcoming wedding shoot with the couple who owns a local deli? Take your family there the next time you go out to eat. Building these types of professional relationships is a good way to help ensure that future photo sessions are relaxed and comfortable for your clients. They will start to trust you, be at ease around you, take directions from you, and also recommend you to their friends and family. This also sends the message that you are interested in more than just taking pictures, but are an active and supportive member of your local community, which is filled with people who might be looking for a photographer to do their next portrait session!

family-portrait

Getting to know this family, finding out about their interests, and building on experiences from previous photo shoots helped make this session fun and enjoyable for them and much easier for me as a result. The children knew me from their photo session earlier in the year, which not only helped them relax but put the adults at ease too.

These are just three ways to help you get people to relax in your photo sessions, but there are many other ideas as well. What about you? What tips and tricks have you learned over the years to help your clients relax, enjoy themselves, and help you get the best shots you can? Leave your thoughts in the comments below.

googletag.cmd.push(function() {
tablet_slots.push( googletag.defineSlot( “/1005424/_dPSv4_tab-all-article-bottom_(300×250)”, [300, 250], “pb-ad-78623” ).addService( googletag.pubads() ) ); } );

googletag.cmd.push(function() {
mobile_slots.push( googletag.defineSlot( “/1005424/_dPSv4_mob-all-article-bottom_(300×250)”, [300, 250], “pb-ad-78158” ).addService( googletag.pubads() ) ); } );

The post Portrait Posing Tips- How to Help People to Relax and Take Better Photos by Simon Ringsmuth appeared first on Digital Photography School.


Digital Photography School

 
Comments Off on Portrait Posing Tips- How to Help People to Relax and Take Better Photos

Posted in Photography


7 Tips for Using the Gestalt Theory for Better Composition

08 Jun

Andrew’s newest ebook Mastering Composition is now on special for a limited time only at Snapndeals.

Gestalt theory and composition

Gestalt theory evolved in the 1920’s to explain some of the ways in which people perceive the world around them. The basic idea is that, when faced with a visually chaotic scene, the human mind simplifies it into more recognizable patterns and shapes.

Gestalt theory provides an insight into the pattern recognition process that occurs when people look at photographs. Once you understand the principles of gestalt theory, you can use them to improve the composition of your photos.

These are some of the useful aspects of the gestalt theory.

1. Proximity

A pair or group of objects that are close to each other are more likely to be perceived as belonging together than if they are far apart.

In this portrait, the proximity of the girl and horse suggest a close relationship between them. If closeness is what you want to show, it would be far less effective to position them with their heads further apart.

Gestalt theory and composition

Gestalt theory and composition

2. Similarity

Objects that are similar in shape, size or colour are seen as belonging together.

In this landscape photo, the three rocks in the middle distance are linked by proximity (the previous point) and by their similarity in texture, colour and shape.

Gestalt theory and composition

Gestalt theory and composition

3. Closure

The mind completes shapes that don’t exist. This is a principle used in some optical illusions but it also applies to photography. Part of the skill of composition is learning to recognize shapes, and building the design of the image around them. The principle of closure helps you see shapes in the subject.

For example, take a look at the landscape below. The bluebells form a solid block of colour in the lower two-thirds of the photo, with a strong horizontal line along the top. The line is interrupted by the trees passing through it, yet we still perceive it is a continuous straight line. The mind automatically fills in the gaps.

Gestalt theory and composition

Gestalt theory and composition

4. Simplicity

The mind perceives parallel lines that are close together as a single line.

The landscape photo below contains several lines, all leading towards a vanishing point on the horizon. The lines that are close together, like the cables dangling from the telegraph pole, are simplified by the mind which sees them as a single line.

It’s the same with the fence. This set of short, vertical lines is simplified into a long, diagonal line that follows the side of the road.

Gestalt theory and composition

gestalt-theory-composition-5a

5. Continuation

The mind assumes that lines extend beyond the edges of the frame. In the landscape photo above this principle helps create a sense of depth (along with the use of a wide-angle lens) as the mind believes that the road continues beyond its vanishing point.

6. Segregation

For human figures to be recognizable they must stand out from the background. That way we can identify them easily even if they’re small in the frame. This is a useful principle because you can include small human figures in the landscape to indicate scale. But it is important that they don’t merge into the background, otherwise they are difficult to see.

In this landscape, the man walking away from the camera is a dark figure against a light background (tonal contrast in action), and is easy to see and recognize.

Gestalt theory and composition

Gestalt theory and composition

7. Emergence

The viewer may not notice something in the photo when he first looks at it, but it becomes apparent after a period of study. This is an important concept because it is a way of making photos more interesting by presenting the viewer with something that is not evident at first, but reveals itself after reviewing the image. It’s a way of rewarding the viewer, and gives photos staying power.

For example, how long did it take you to see the cat in the photo on this page? Or the cow’s head in the opening photo (top of the article) of the singer?

Gestalt theory and composition


Mastering Composition ebookMastering Composition

My new ebook Mastering Composition will help you learn to see and compose photos better. It takes you on a journey beyond the rule of thirds, exploring the principles of composition you need to understand in order to make beautiful images. It’s on special for a limited time only at Snapndeals.

googletag.cmd.push(function() {
tablet_slots.push( googletag.defineSlot( “/1005424/_dPSv4_tab-all-article-bottom_(300×250)”, [300, 250], “pb-ad-78623” ).addService( googletag.pubads() ) ); } );

googletag.cmd.push(function() {
mobile_slots.push( googletag.defineSlot( “/1005424/_dPSv4_mob-all-article-bottom_(300×250)”, [300, 250], “pb-ad-78158” ).addService( googletag.pubads() ) ); } );

The post 7 Tips for Using the Gestalt Theory for Better Composition by Andrew S. Gibson appeared first on Digital Photography School.


Digital Photography School

 
Comments Off on 7 Tips for Using the Gestalt Theory for Better Composition

Posted in Photography


How to Use the Right Captions on Your Photos to Better Connect With Viewers

03 Jun

30 years ago, we used slides, prints and albums to share photos with family and friends.  Now, between Facebook, Instagram, Flickr, Google+ and 500px, you have more options than ever to share your photos.  The problem is, how do you connect to this much larger audience?

Sharing a story alongside your photo will help you connect with your followers, and often turn a great photo into something spectacular.

When you share a photo, people may wonder where it was taken, why you were there, what made you photograph the scene, or what was going through your head the moment you snapped the shutter. These are all questions that can be spun into a narrative and shared along with your photo.

The right caption draws viewers into the image

Here’s an example. Which of the following captions draws you in and makes the photo more interesting for you?

Image1

Caption 1: Kayakers on the Hudson River

Caption 2: Springtime in upstate New York is full of variable weather. The changing temperatures coupled with different types of precipitation can make for beautiful and unpredictable landscapes. On this particular morning, the Hudson River was covered in a thick fog and knowing how fleeting that can be, I hurried down to the waterfront hoping to capture some shots. Out of nowhere, two colorful kayakers appeared, adding life to my scene as they cut their way down the river and disappeared into the abyss.

I may be biased, but for me it’s Caption 2. Seeing a beautiful photo with a story attached to it pulls me in. It puts me in the same space that the photographer was in when they took the photo, enriches my experience, and ultimately makes the photo, which was good in the first place, a great one.

If you went to a yard sale and and saw a beautiful glass bowl for $ 20 you may think, “Well, that’s a bit steep for a simple bowl at a yard sale.” But, I bet your mindset would change if the owner told you a story about the bowl — how she acquired it at a glass blowing factory in Halifax back in the 1950s, how it was one of just a handful made and how the bowl moved around the United States with her and family for the past 60 years. Now $ 20 seems like a bargain!

Nothing changed, you just got some more information. A story enriched your understanding, and in turn, completely changed how you experienced something.

Here’s another example:

Image2

Caption 1: The Mohonk Mountain House after an ice storm

Caption 2: It was early December and an ice storm had just ripped through the Hudson Valley leaving debris, destruction, and a clear blue sky in its wake. My wife and I began our hike that day at a lower elevation, and realized as we got higher that the entire forest was encased in ice. It was a winter wonderland that was both beautiful and dangerous. Limbs of trees were scattered everywhere, boulders were slick with ice and in some spots, five foot long icicles hung like stalactites above our heads. As we made our way to the top of the mountain, I stepped into a small gazebo overlook and focused on the Mohonk Mountain House and surrounding landscape, letting the icicles in the foreground frame my shot.

There’s nothing wrong with the first caption, but the second caption really paints a picture in the viewer’s mind and places them there with you.

Here’s another shot I took this winter.  In the past I would have shared it with Caption 1 below, but instead I shared it with Caption 2,  and found that it really resonated with my audience.

Image3

Caption 1: Winter Sunset

Caption 2: It was a Friday night and I rushed out of work wanting to photograph something. I made a quick stop at home, put on boots, and grabbed my snowshoes just in case. With so much snow on the ground I racked my brain for a spot that I could easily get to with the potential for a decent sunset shot. Luckily, this incredible vista is just down the street from me. I got there when the sky was beginning to turn all sorts of colors, hurriedly set up my tripod, and captured this winter sunset. I stayed for a little while, watching blues give way to pinks, yellows and oranges until all the color in the sky was gone and my frozen hands signalled to me that it was time to go home.

Viewer experience is enhanced

Not every photo needs a page of text written alongside it, but it’s been my experience that adding a couple of sentences, rather than just a few words (or none at all), greatly enhances the experience of the viewer.  It helps them to connect to your photo and ultimately with you as a photographer.

Image4

Caption 1: The Space Needle in Seattle

Caption 2: After an afternoon touring Seattle and Pike Place Market, my wife and I headed over to the Olympic Sculpture Park but found it was closing just when we arrived. Disappointed that I wasn’t able to capture any images of the park, I turned my camera around towards the city as we left and captured this unique view of the iconic Space Needle.

Summary

When I share a photo, I want people to respond to it. I want them to share in the moment and feel what I was feeling when I took the photo. Your story might seem mundane to you, but to your audience it gives them a closer look at who you are and how you think — as a person and a photographer.

googletag.cmd.push(function() {
tablet_slots.push( googletag.defineSlot( “/1005424/_dPSv4_tab-all-article-bottom_(300×250)”, [300, 250], “pb-ad-78623” ).addService( googletag.pubads() ) ); } );

googletag.cmd.push(function() {
mobile_slots.push( googletag.defineSlot( “/1005424/_dPSv4_mob-all-article-bottom_(300×250)”, [300, 250], “pb-ad-78158” ).addService( googletag.pubads() ) ); } );

The post How to Use the Right Captions on Your Photos to Better Connect With Viewers by Joe Turic appeared first on Digital Photography School.


Digital Photography School

 
Comments Off on How to Use the Right Captions on Your Photos to Better Connect With Viewers

Posted in Photography


12 Tips for Travellers to Bring Home Better Photos

30 May

There’s nothing better than browsing through old holiday photos during a long cold winter. Capturing the joy of our friends and family as they explore new cities and lands is priceless – travel photography is just as about the subjects as it is about the surroundings. Here are top 12 tips for travellers to help you make the most from Continue Reading

The post 12 Tips for Travellers to Bring Home Better Photos appeared first on Photodoto.


Photodoto

 
Comments Off on 12 Tips for Travellers to Bring Home Better Photos

Posted in Photography


Understanding Light for Better Portrait Photography

29 May

A solid understanding of light can make you stand out from an average photographer. In fact, in portrait photography, light is even more important than the subject and location. This is because without the proper use of light, you can ruin the shot, even with the best looking subject, at the most awesome location in the world!

In this article, I’m going to break down the understanding of Light for you into six simple terms. Once you understand and apply these concepts, you will immediately notice the improvement of quality in your portrait photographs.

The six principles of light are: intensity, dynamic range, direction, diffusion, White Balance and reflection.

1) Intensity of Light

Intensity of light resized

Intensity is the brightness level of light and it brightens up your subject. For both natural light and studio light, you can modify the light source to change the intensity. I’ll cover the basics of light modifiers later, but the most important fact about intensity is that the distance between the light source and your subject has a massive impact on the intensity of light.

This is also known as the Inverse Square Law.

It is an equation that dictates the intensity of light produce at a given distance. It states that the intensity of light changes in inverse proportion (one over that number) to the square of the distance from the source. Meaning:

  • At one foot it is 1 over the square of one or 1/1 or 100%
  • At two feet it is 1 over the square of 2 (2×2) or ¼ or 25%.

In plain English, that means if you double the distance from one to two feet, the light intensity will decrease by 75%. On the other hand, if you bring the light source closer from two feet to one foot the intensity of light is going to increase by four times.

With the knowledge of inverse square law, you will be able to determine the placement of your subject for better portrait photography.

2) Dynamic Range

Dynamic range and stops have a very close relationship. Dynamic range is the difference between the lightest and darkest tones of an image, and a stop is the measurement of this range. Since a stop measures light in representation of numbers, what’s the relationship between the two?

The difference of one stop of light means the light is twice (or half) as intense. Human eyes can detect roughly 10-14 stops of light, while a DSLR camera can only detect around 8-10. With that said, your camera sees a lot less than your eyes. Dynamic range issues occur when this range goes beyond what the camera can record in details. These areas come out as pure white or pure black in the photograph.

Generally, most people tend to avoid pure white and black in portrait photography unless it is for artistic reasons. Otherwise, it may look like as if you exposed the picture incorrectly.

Dynamic range resized

3) Direction of Light

The position of your light source is very important because it determines how light hits your subject. It has a great affect on the quality of your photograph and a few small inches of light misplacement could bring your shot down to a snapshot.

A common question people always ask is, “Why do I need to worry about the direction of light when the subject is properly exposed?” Everyone has different opinions, but my point of view is that this is how you create mood, define shadows, and shows depth to your subject.

The biggest thing to avoid in portraits is flat images (which is created by lighting your subject directly from your camera angle). Reach into your wallet now and grab your driver’s license. That is an example of a flat image. The picture is either too bright or too dark; there is no shadow on your face (or a very harsh one) because the flash was pointed straight at you; and the worst thing is you probably look 10 years older! Without saying any further, I am almost certain that it is one of the worst pictures of yourself.

So what are some ways to light your subjects? Below are two of the most common ways:

Split Lighting – This direction of light divides the face equally in half so one side is in shadow while the other is toward the light. You can simply place the light source 90 degree to the left or right of your subject. If you are using natural light, just ask your subject to turn to such an angle. It creates a very deep dramatic shadow that casts strong moods for your subject. It is great for artistic type portrait shots.

James Willamor

By James Willamor

Loop Lighting – Perhaps the most common lighting method for portraits. Simply place the light source about 45 degrees to your subject. The shadow it casts is going to show nice depth; this method is great for single portraits. Make sure you place the light just slightly above eye level to make the best of this lighting style.

Dragos Jianu

By Dragos Jianu

There is no right or wrong direction of light in portrait photography. They are more personal preference, mixed with different style and purpose. The main thing is that you make your subject look good in front of the camera.

4) Diffusion of Light

Diffusion relates to hardness and softness of light. It also determines the intensity of the shadow. As a general rule, the bigger the light source and the closer it is to the subject, the softer the light.

When photographers talk about hard light, it means there is a rapid falloff between bright and dark areas in the photograph creating harsh, sharp-edged shadows. As such, the photograph doesn’t look as appealing to the viewer.
An example of hard light would be taking picture under a bright sunny day or when you overexpose studio light photographing your subject. Generally, hard light is not something you should be looking for in portrait photography unless for artistic reasons.

Diffusion of light resized

As you might have guessed, opposite hard light, there is soft light. This kind of light has mild falloff between bright and dark areas in a photograph. The light is evenly spread and it looks like it wraps around the subject.
An example of soft light would be taking pictures under an overcast day or using studio light with modifiers. The portrait looks more pleasing to the viewer and the photograph does not show much contrast.

5) White balance

White balance is the color temperature of your camera’s setting. Matching the right color temperature in the environment you are shooting is very important. This is how you remove an unrealistic colorcast, so that your photograph represents true color that you see in real life.

Depending on your camera model, you should have a different white balance presets to choose from: Tungsten, Fluorescent, Daylight, Flash, Indoor, Cloudy, Shade, Custom (PRE), and Kelvin (K).

As the photographer you need to make sure white appears white and not yellow/orange on the hot end, and blue/green on the cold end on the Kelvin scale.

If you shoot RAW, you can modify the white balance during post-processing of your images. This can also be changed easily in Adobe Lightroom or Photoshop. By the way, this is one of the reasons why it is important to shoot RAW instead of JPEG.

6) Reflection of light

Light has one very distinct behaviour; it travels in straight lines. Which means no matter whether you are using natural light or studio light, it is only going to travel in one direction until it reaches a surface.

Once the light reaches a surface it reflects off at the same angle it hits. The amount of light being reflected is going to be determined by the color and texture of the surface.

So why is reflection of light important for portrait photography?

Once you understand light behaviour you can then modify it to control how much light you want for your subject. For example, if you want soft light and you have no other equipment, you can bounce light off a wall. As mentioned before the larger the light source the softer the light, you can now control both the direction and intensity of light for your portrait photographs by doing so.

Reflection of light resized

Another common way to modify light is using a softbox such as a brolly box (umbrella softbox). This is a type of softbox where the external flash is placed inside of it. When the flash fires, light bounces all around inside the box until it exits out the white diffuser on the front. If you have an assistant to hold the brolly box you now have a portable light source producing soft light everywhere you go. This is a must-have for portrait photography.

I hope by breaking down the understanding of light into six categories they are going to be able to level up your skills as a portrait photographer. Be sure to practice as much as you can, but most importantly, enjoy this process and have fun in photography.

googletag.cmd.push(function() {
tablet_slots.push( googletag.defineSlot( “/1005424/_dPSv4_tab-all-article-bottom_(300×250)”, [300, 250], “pb-ad-78623” ).addService( googletag.pubads() ) ); } );

googletag.cmd.push(function() {
mobile_slots.push( googletag.defineSlot( “/1005424/_dPSv4_mob-all-article-bottom_(300×250)”, [300, 250], “pb-ad-78158” ).addService( googletag.pubads() ) ); } );

The post Understanding Light for Better Portrait Photography by Gary Lun appeared first on Digital Photography School.


Digital Photography School

 
Comments Off on Understanding Light for Better Portrait Photography

Posted in Photography