RSS
 

Posts Tagged ‘Better’

How 10 Minutes a Day with Your Camera Will Help Make You a Better Photographer

08 Jan

How to make sure that the camera is your tool, so taking photos can be your passion.

9990207

Spend 10 minutes with your camera every day

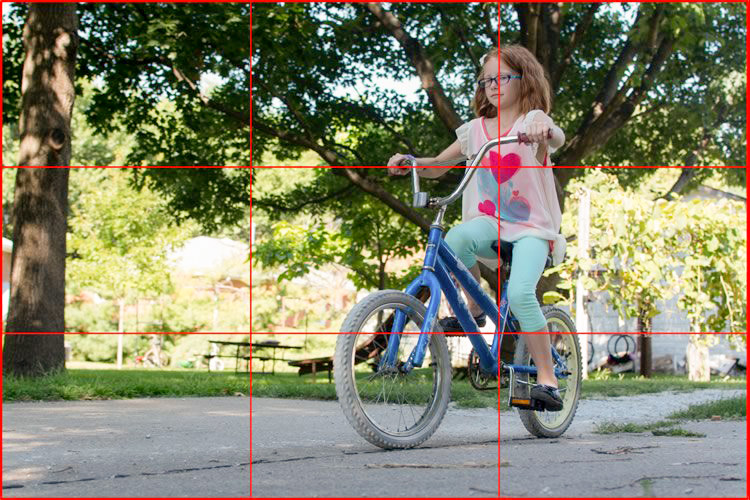
Have you ever found yourself standing in front of an awesome moment trying to decide which camera setting to choose?
Try the following tips for just 10 minutes a day with your camera, and soon enough you will forget it’s even there. The camera will become a natural extension of your eye and hand, and will not be an issue when you see a photo you want to take.

This self-tutoring plan is based on natural human curiosity, and on the fact that muscle memory can do a better job than brain memory in performing manual tasks, such as setting the desired shutter speed. Once you have created a link between your vision, and the finger that turns a dial, or presses a button on your camera, it will stay in that finger’s muscle memory for good. Then, next time you think about that function, it will happen magically by itself.
Here are some examples for 10 minute exercises to do with your camera. Take them as inspiration for making some of your own.

9720526

Explore your camera like a toddler

A toddler is crawling and exploring, seeing new bits and pieces of the world, then stands up and making a new step every day, walking while seeing things from a higher vantage point. You can do the same with your camera if you allow yourself to touch and turn dials, push buttons, or change menu settings without a specific goal. Do that on a daily basis, not in a moment before you need to capture an exciting event. Practice this until you feel safe to take a wrong turn on your camera’s menu, and remember there is always a way back in, by using “Reset Menu”.

DSF9376

One Day, One Button

The secret for fast learning is in keeping it simple. The human brain is really good at learning and performing one process at a time. So if you choose one variable, and focus your attention on it for the whole 10 minutes, it will burn into your brain and stay there.

The place to start is the shutter release button. For 10 minutes, work on different ways to half press it, then fully depress it, and then retrieve your finger tip back to half press. This is better done in front of a mirror, so you can look at your index finger while it’s working. Start at a fast shutter speed and adjust it slower after each shot. When your photos become blurry, try again until the movement of your finger tip is unnoticeable. You’ll start to see that you can shoot hand-held using slower shutter speeds with every minute of practice do you. This will help you discover your lower limit for shooting hand-held.

20100413OT0864 copy

Repeat

Even an experienced professional musician plays repeating scales for few hours a day, before the real work begins. If you repeat your camera’s operation in a simple, yet systematic way, you will feel the difference from day one. Unlike the musician, it will only take you 10 minutes a day to create a change.

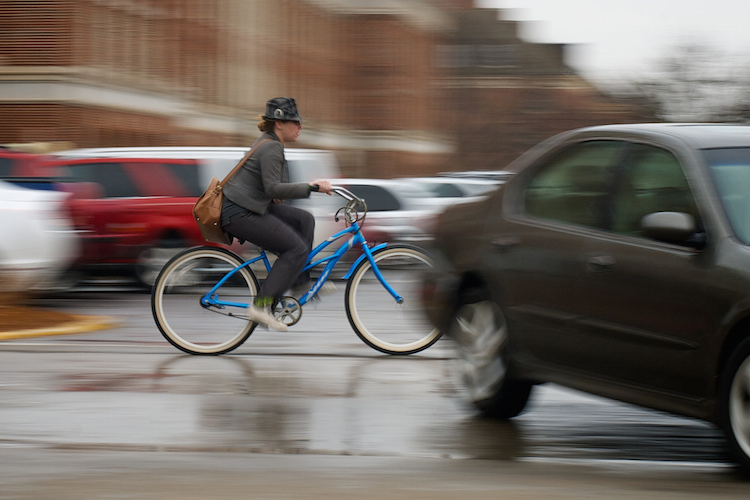
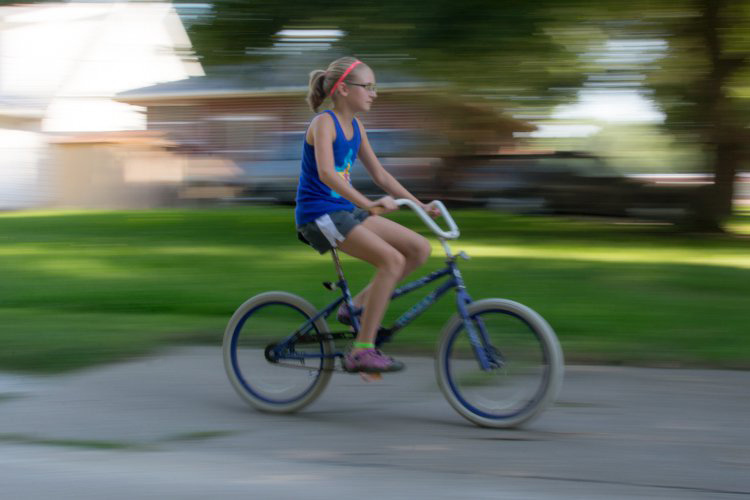
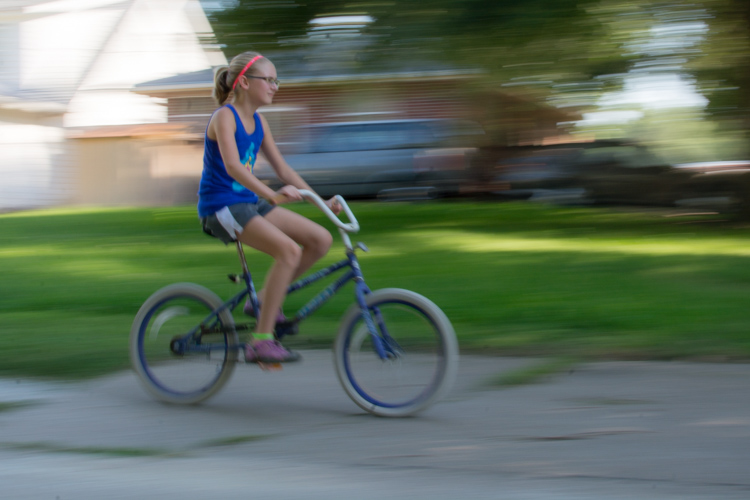
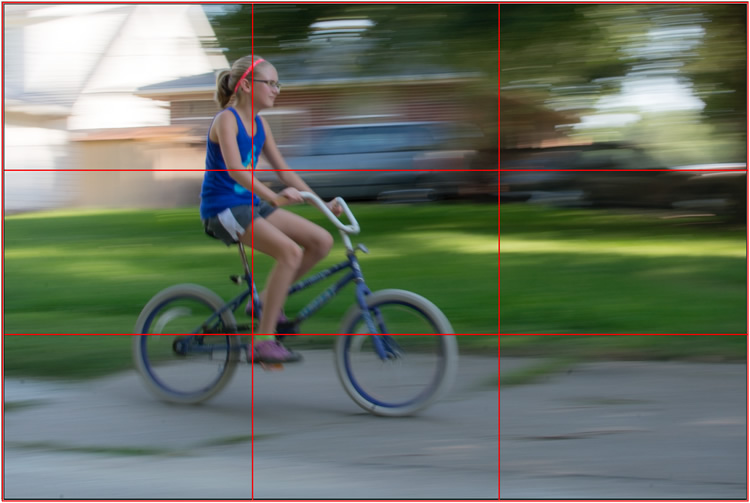
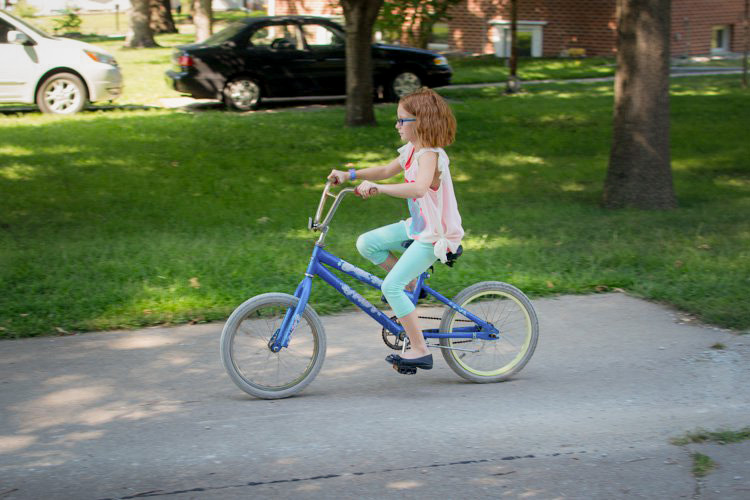
For example try standing on a busy street corner following passing cars with your camera (panning), taking some shots with a slow shutter speed. Try to blur the surroundings and keep the car as sharp as possible. For 10 minutes do just that, and explore different ways to hold and move your camera along with the passing car. Shoot at different shutter speeds every time, building your eye-arm-finger connection to work together for the simple task over and over again. Do only that, and nothing else on those 10 minutes.

DSC 5930

Belz Mazzos20120328002

Take your camera everywhere with you

Your body language tell everyone around you about your feelings. The moment you feel uncomfortable, others around you can tell, and then they will feel the same.

SofiaOT4115

The way you are perceived by others, reflects your confidence with your camera. Try taking the camera on your shoulder while going to the supermarket or post office for errands. After about 10 minutes of being out doing daily chores with your camera, you will forget it’s even there, and will project that to others around you. Then you can start taking photos everywhere.

Summary

If you let yourself play with your camera for just 10 minutes a day, you’ll feel different and see the results right from day one. Remember that you learn your camera in order to forget it’s there, so you can focus on your photos.

Do you have any other ideas or tips for using your 10 minutes a day? Please put them in the comments section below.

googletag.cmd.push(function() {
tablet_slots.push( googletag.defineSlot( “/1005424/_dPSv4_tab-all-article-bottom_(300×250)”, [300, 250], “pb-ad-78623” ).addService( googletag.pubads() ) ); } );

googletag.cmd.push(function() {
mobile_slots.push( googletag.defineSlot( “/1005424/_dPSv4_mob-all-article-bottom_(300×250)”, [300, 250], “pb-ad-78158” ).addService( googletag.pubads() ) ); } );

The post How 10 Minutes a Day with Your Camera Will Help Make You a Better Photographer by Ouria Tadmor appeared first on Digital Photography School.


Digital Photography School

 
Comments Off on How 10 Minutes a Day with Your Camera Will Help Make You a Better Photographer

Posted in Photography


7 Quick Tips on How to Use Visual Balance to Make Better Photographs

19 Dec

Balance is one of the characteristics of good composition. It is the way elements of an image are arranged to create a feeling of stability. If you imagine that your image is a set of scales, all elements of your composition should be balanced to make a photograph feel stable.

balance 1 eva polak

There are many ways to create balanced images. The easiest way to achieve it is by using symmetry, as it guarantees left to right, or top to bottom balance. The results look formal, organized, and orderly.

If you would like to create a balanced composition that feels more casual, free, and energetic, then use asymmetry.
To understand this concept, let’s go back to our analogy of a set of scales. If you have several small items on one side, they can be easily balanced by one large object on the other side. Visual balance works in a very similar way, but it can be affected not only by the size of objects, but also by their value, colour, texture, quantity, orientation and isolation.

Different colours, shapes and sizes create different degrees of visual interest. So, to achieve asymmetrical balance you need to arrange elements of all different visual weights, when composing your image, in such a way that each side is still balanced out.

balance 2 eva polak

There are seven basic factors to consider when you compose your images with visual balance in mind. Let’s have a close look at how you can use these different factors affecting visual weight and gain some advantage.

1 – Colour

1 Colou by Eva Polak

Colour has many properties that can affect an object’s visual weight relative to others in the photograph, such as saturation, brightness, darkness, and hue. Warm colours advance into the foreground and tend to weigh more than cool colours, which recede into the background. Red attracts attention better than any other colour, and thus has the highest visual weight as opposed to yellow, which has the least visual weight. Also bright colours attract more attention than subdued colours.

2 – Size

2 Size by Eva Polak

Large elements appear heavier than small ones. Size is an evident visual weight factor because, in the physical world, an object that’s bigger than another will naturally be heavier, and will take up more physical space. Large elements command more attention. We naturally see them first, or spend more time looking at them anyway.

3 – Value


3-Value-by-Eva-Polak.jpg

Value is a powerful tool for balancing images. Dark elements feel heavier than light items. The higher the value-contrast (between object and background), the heavier will be the weight of the object.

4 – Texture

4-Texture-by-Eva-Polak.jpg


Texture adds visual weight to items in photographs. Texture is just more interesting and our eyes are drawn to it. Smooth areas will feel lighter than those with a lot of heavy texture.

5 – Isolation

Objects isolated in a space appear heavier than those surrounded by other elements. Look at the image below with a brown circle on it. Your eyes go directly to the brown circle first because there’s nothing else to see.

5-Isolation-by-Eva-Polak.JPG


6 – Quantity

A few small objects can balance out a single large object. Repetition of objects can be used here as well. In the example below, the three small berries are balancing out the large berry.

6-Quantity-by-Eva-Polak.jpg


7 – Orientation

Vertical objects appear heavier than horizontal objects. A diagonal orientation carries more visual weight than a horizontal or vertical one. Lines can be very powerful in your composition. Pay close attention to them.


7-Orientation-Eva-polak.JPG

Remember, you don’t have to balance colour with colour, or light with dark – you can mix and match your visual weights. For example, a counterweight to a large, bright area might be a small red object. Experiment with different kinds of balance and play around with visual weight. See what works best for your images and the story you want to tell.

As you go out exploring with your camera on your next photo shoot, keep balance in mind and the seven factors of visual weight. Look closely and try to determine which elements are commanding the most visual weight when you compose your photographs, and see how they affect balance in your images.

If you have any comments or questions please post them below. And we’d love to see your visually balanced images.

googletag.cmd.push(function() {
tablet_slots.push( googletag.defineSlot( “/1005424/_dPSv4_tab-all-article-bottom_(300×250)”, [300, 250], “pb-ad-78623” ).addService( googletag.pubads() ) ); } );

googletag.cmd.push(function() {
mobile_slots.push( googletag.defineSlot( “/1005424/_dPSv4_mob-all-article-bottom_(300×250)”, [300, 250], “pb-ad-78158” ).addService( googletag.pubads() ) ); } );

The post 7 Quick Tips on How to Use Visual Balance to Make Better Photographs by Eva Polak appeared first on Digital Photography School.


Digital Photography School

 
Comments Off on 7 Quick Tips on How to Use Visual Balance to Make Better Photographs

Posted in Photography


5 Tips for Better Landscape Photos

18 Dec

Landscape photography seems simple to most people – there’s a pretty scene, you walk in, take a couple shots and you’re done … and chances are that you end up with a version of the scene that everyone else has.  So how do you take your “snapshot” to the next level?  Other than the “straight horizon” suggestion that you may have heard before, here are five basic tips you can try out when next you are on the field to help you take better landscape photos:

WinterLighthouse

1. Survey Your Scene

Think about the scene differently. Is there another angle that you can shoot from? Can you get your camera higher or lower? Scouting your location to find different and more interesting vantage points is time well spent.  Also check for elements of interest in the location that can be used to give your photo a sense of scale or add texture. So take a moment, survey your scene, take a chance, shoot from a different perspective and see what you might have missed initially.

CastleHill

2. Look for the Light

Most surreal landscape photography moments happen in the golden hours (dawn and dusk). Sunrise is definitely worth getting out of your bed for in the wee hours of the morning, and sunset is a nice exercise in patience to catch that ideal, magical light. It certainly helps to do research before you head out to determine where the sun rises and sets, or even which season works well for the area you intend to shoot. If you’re still unsure about your directions, walk with a compass (a compass apps for your phone is an easy way to always have one with you).

DesertSun

SunsetBrickfield

There is no harm in light chasing during the day either – sometimes it’s the only time you have with a scene, and you have to make the most of it. You need to be aware that shooting in harsh sunlight produces very contrasty light, which means that you don’t capture much detail in the highlight and shadow areas. An overcast, or cloudy day, softens the light a bit. Outside of the golden hours, the key would be to find an angle where the light is flattering to your subject, or put the sun to your back and give it a go!

CaribbeanDay

HorseshoeBend

Note: I have found that midday sun works well for infrared landscape photography.

3. Lines and Repetition

Lines and repetition in a scene catch your viewer’s attention almost immediately, and serves to lead them into the photo. Lines also encourages their eyes to wander around the photo, especially if they start at a corner of the frame. Think about photos of roads and fences, and even the angle of the ocean when composing your shot. Repetitive items or patterns also have a way of holding your viewer’s fascination, and they are everywhere – any element that creates a nice line or geometric shape can give your images structure and form – look for them!

BeavertailLighthouse

PathwaytoGoodbye

4. Foreground Elements

Placing a foreground element in your shot gives the image extra depth and dimension. It can also be used to convey scale and distance, as well as balance out your photo. A dominant foreground object can draw your viewer in, and quite simply makes your photo a more interesting one.

SunsetWaterloo

SmokyCreek

5. Use a Tripod

There are different schools of thought on the necessity of always having a tripod, and yes there are many times you can get away without having one. However, outdoor photography comes with many elements of movement, from a gentle breeze to crashing waves, to the sun – something is always moving. Sharp images are ideally what you want, and using a tripod is one way to deal with such movements.

Tripods are also a must for when you lengthen your shutter speed. You may do this for several reasons; the most common are when using a smaller aperture (higher f-numbers equals smaller aperture opening, which equals less light hitting the sensor) or shooting long exposures (where moving elements are blurred intentionally, e.g., that silky water effect).

LighteningArches

SmokyFalls

Conclusion

Many of these may not be new to you, but the key is remembering a few when you are out there, and trying to make that scene before you, one that is your own. Maybe you’ll spend a little more time surveying the scene or perhaps looking for lines and repetition?

Feel free to share any of your landscape photos that you think successfully utilizes any one of these tips in the comments below.

googletag.cmd.push(function() {
tablet_slots.push( googletag.defineSlot( “/1005424/_dPSv4_tab-all-article-bottom_(300×250)”, [300, 250], “pb-ad-78623” ).addService( googletag.pubads() ) ); } );

googletag.cmd.push(function() {
mobile_slots.push( googletag.defineSlot( “/1005424/_dPSv4_mob-all-article-bottom_(300×250)”, [300, 250], “pb-ad-78158” ).addService( googletag.pubads() ) ); } );

The post 5 Tips for Better Landscape Photos by Nisha Ramroop appeared first on Digital Photography School.


Digital Photography School

 
Comments Off on 5 Tips for Better Landscape Photos

Posted in Photography


DxO ONE gets 1/20,000sec top shutter speed and better handling via firmware version 1.2

01 Dec

The DxO ONE smartphone companion camera is to benefit from a host of improvements and new features when the company releases new firmware early in December. General handling will be improved with what DxO vaguely describes as ‘instant access to advanced capture parameters and photo information with a simple swipe’ and ‘more control over the entire photo and video capture process’. The DxO ONE will also be compatible with the Apple Watch via a new app designed especially for it, and the DxO ONE will go on sale in Apple Stores. 

New features in firmware version 1.2 include the broadening of the shutter speed range to encompass 30-1/20,000sec, and continuous shooting – though the company doesn’t say at what rate. The video mode will allow manual control of aperture, ISO, white balance and ‘more’. 

DxO says that the changes have been instigated by user feedback from photographers, and that the new firmware will make the device ‘even more powerful’. For more information visit the DxO website.


Press release:

FOR IMMEDIATE RELEASE

Powerful new features added to the DxO ONE connected camera via software update

Version 1.2 available as a free download for existing DxO ONE users early December

PARIS and SAN FRANCISCO—November 24th, 2015—DxO announced today the availability of the first major software update for the award-winning DxO ONE Professional Quality Connected Camera. The DxO ONE app version 1.2 will be available early December via the iTunes App Store, and will introduce new camera controls based on direct feedback from DxO’s rapidly expanding community of photographers. Version 1.2 makes the DxO ONE camera even more powerful, including new ways to view and interact with advanced photo info, and provides more control over the entire photo and video capture process including via a companion Apple Watch app. The DxO ONE connected camera is now also available in select Apple retail stores nationwide, as well as on Apple’s online store.

“Using the camera has become second nature to me—it’s crazy good. I never imagined standing in a pit lane at a major motorsports event and immediately being able to provide a PR rep images of his team’s pit stop literally seconds after the car pulled away,” said John Thawley, whose images have been featured in print for companies such as Ferrari, Jaguar, Lexus, and Maserati. “I’ve been equally impressed with the DxO team and their responsiveness to feedback and suggestions. It’s nice working with a company that is listening, and I can’t wait to see what the DxO ONE team does next.”

The way you interact with the DxO ONE is even better, thanks to new features that let users get instant access to advanced capture parameters and photo information with a simple swipe. Continuous shooting offers users the ability to shoot several photos in a row by simply depressing the shutter button. The manual focus mode now provides one tap access to hyper-focal distance, and the ability to reposition the magnification loupe for critical focusing. At the request of pro photographers, the shutter speed range has been expanded for capturing even faster motion (1/20000) and longer low-light exposures (30s). Users can now capture high quality video with full manual control of aperture, ISO, white balance and more. DxO ONE selfies are now available in every capture setting and mode, including the ability to record high quality video selfies, ready to share with the world. There’s even a new companion app that lets users remotely trigger a DxO ONE camera with their Apple Watch.

The image scientists, engineers, and designers at DxO are committed to refining the connected camera experience. This relentless pursuit of perfection has been aided by the generous outpouring of support and direction provided by DxO ONE photographers, many of whom, like John Thawley, are established and respected members of the professional community. Thanks to this tight feedback loop, DxO ONE owners can expect to receive a regular cadence of exciting new features in the months and years to come.

Pricing and availability

The DxO ONE Professional Quality Connected Camera is available for purchase at dxo.com and photo retailers for a price of £449 (including VAT). Purchase price includes DxO FilmPack Elite, and for a limited time, DxO OpticsPro Elite (a £258 value). 

The DxO ONE iOS app update, and companion Apple Watch app will both be available as free downloads via the iTunes App Store early December. New firmware, also available at the same time, can be easily downloaded via the app and installed on the DxO ONE. 

Articles: Digital Photography Review (dpreview.com)

 
Comments Off on DxO ONE gets 1/20,000sec top shutter speed and better handling via firmware version 1.2

Posted in Uncategorized


5 Ways to Use Lightroom Virtual Copies Better

20 Nov
Virtual Copies in Lightroom

Virtual Copies in Lightroom

Imagine that you have just processed a colour image and you are happy with the result, but you’d also like to experiment with it a little. Perhaps you’re curious to see how it will look if you convert it to black and white. Maybe you’d like to apply a Develop Preset or two, or crop to the square format, or even all three.

It’s easy in Lightroom. All you have to do is make a Virtual Copy and experiment.

A Virtual Copy is an exact replica of the original photo, including all edits made in Lightroom. Once you have made a Virtual Copy you can process it any way you like without affecting the original.

Virtual Copies are a fantastic tool because they let you make multiple copies of a single image, while using very little hard drive space (it only makes a new thumbnail it doesn’t duplicate your image file). You can try out different techniques, and keep all the results. Each Virtual Copy exists as a set of text commands in the Lightroom Catalog, an addition measured in kilobytes rather than megabytes.

You can review this by reading A Brief Introduction to Lightroom if you are unsure how it works.

Are you making the most of Virtual Copies? Here are five ways to use them better in Lightroom.

Creating Virtual Copies

There are four ways to create a Virtual Copy.

Start in Grid View in the Library module (press the G key to go there from any part of Lightroom). Select the image (or images) that you want to make Virtual Copies of:

1. Go to Photo > Create Virtual Copy. Lightroom creates the Virtual Copies and places them in the same Collection as the original images.

2. Alternatively, use the keyboard shortcut. If you’re using Windows press Ctrl plus apostrophe (Ctrl + ‘), on a Mac press Command plus apostrophe (Cmd + ‘).

3. Alternatively, right click on one of the selected photos and choose Create Virtual Copy.

Virtual Copies in Lightroom

When you create a Virtual Copy it appears alongside the original in Grid View, and is identical in every way. You can make as many changes to the Virtual Copy as you lik,e without affecting the original.

4. The fourth way is to go to Library > New Collection. The Create Collection window opens. Under Options, tick the Include Selected Photos and Make New Virtual Copies boxes. Lightroom creates a new Collection (with the name you give it), and adds Virtual Copies of the selected images.

Virtual Copies in Lightroom

Using Virtual Copies Better

Now you know how to create Virtual Copies, let’s look at some ways you can use them better in Lightroom.

1. To create multiple versions of the same photo

This is the main reason that you would want to create Virtual Copies – so you can process the same photo, a number of different ways. The photo shown below is a great example. I created a colour version first, then made a Virtual Copy and converted it to black and white. Then I made some more Virtual Copies and experimented with different Develop Presets and split tones. I ended up with 22 different versions in a mixture of colour and black and white.

Virtual Copies in Lightroom

2. Stacking Virtual Copies

You can use Stacks to simplify the thumbnails displayed in Grid View. In this example I’m going to create two Stacks – one containing colour photos, and the other black and white.

  • Select the photos you want to place in the same stack. Click and drag thumbnails to rearrange them in Grid View if you need to. Here, I grouped all the colour photos together.

Virtual Copies in Lightroom

  • Go to Photo > Stacking > Group into Stack. You can also find this option by right-clicking a thumbnail. Or use the keyboard shortcuts, Ctrl+G (Windows) or Cmd+G (Mac).

Lightroom places the photos into a Stack. The first photo in the selection is used as the cover image. The Stack icon is displayed in the top left corner of the thumbnail (marked below). The number inside tells you how many photos are in the Stack.

Virtual Copies in Lightroom

Repeat if you want to group other Virtual Copies into another stack. Below, you can see that I did the same with the black and white versions.

Virtual Copies in Lightroom

To view the photos in a Stack, click on the Stack icon in the thumbnail. Click it again to hide the stacked photos.

Virtual Copies in Lightroom

3. For working with plug-ins and Photoshop

If you want to send a photo to a plug-in or Photoshop, the recommended approach is to process it in Lightroom first (applying at least basic settings such as Camera Calibration, Lens Corrections and tonal adjustments in the Basic panel).

Before the export, make a Virtual Copy and send the Virtual Copy to the plug-in or Photoshop. Then, when you return to Lightroom, you can compare the two. You can also make more Virtual Copies from the original to send to other plug-ins, or to work on in Lightroom.

4. Set up View Options to show which images are Virtual Copies

In the screen shot below, you can see that the image on the right is a Virtual Copy as it is labelled Copy 22. The image on the left is the original and just has the file name.

Virtual Copies in Lightroom

You can set this up in View Options (View > View Options or Ctrl+J/Cmd+J). Tick the Show Grid Extras and Top Label boxes (marked below). Set Show Grid Extras to Expanded Cells and set Top Label to File Base Name and Copy Name (the other options in the same section do a similar thing).

Virtual Copies in Lightroom

5. Use the Excessor plug-in to create a Collection of photos processed with different Develop Presets

The Excessor plug-in creates Virtual Copies and applies a different Develop Preset to each one. This is how to use it:

  • Go to the Capture Monkey website and download the Excessor plug-in. It is available on a shareware model – you can download and use it, and if you find it useful, you are encouraged to pay a one time registration fee of $ 10. Add it via the plug-ins manager (my article Useful Lightroom Plug-ins explains how – scroll to the bottom for instructions).
  • Select the photo you want to work with. Go to Library > Plug-in Extras > Excessor.
  • The Excessor window opens. Use the top menu to select a Develop Presets folder. Select Preset name from the bottom menu to give each Virtual Copy the name of the Develop Preset used to process it. Press OK.

Virtual Copies in Lightroom

  • Lightroom creates a Virtual Copy for each Develop Preset in the selected folder.

Virtual Copies in Lightroom

Tip: Create Preset folders containing your favourite Develop Presets. You can create different folders for different subjects: e.g., a folder for portraits, another for landscapes, another for black and white, another for vintage presets, and so on. Then you can use the Excessor plug-in as a shortcut to applying your favourite presets to a photo.

Your turn

These are my five suggestions for using Virtual Copies better in Lightroom, but how do you use them? Have you come up with anything that I haven’t thought of? Let me know in the comments.


The Mastering Lightroom CollectionMastering Lightroom ebook bundle

My Mastering Lightroom ebooks are a complete guide to using Lightroom’s Library and Develop modules. Written for Lightroom 4, 5, 6 and CC  they  show you how to import and organise your images, use Collections, creatively edit your photos and how to work in black and white.

googletag.cmd.push(function() {
tablet_slots.push( googletag.defineSlot( “/1005424/_dPSv4_tab-all-article-bottom_(300×250)”, [300, 250], “pb-ad-78623” ).addService( googletag.pubads() ) ); } );

googletag.cmd.push(function() {
mobile_slots.push( googletag.defineSlot( “/1005424/_dPSv4_mob-all-article-bottom_(300×250)”, [300, 250], “pb-ad-78158” ).addService( googletag.pubads() ) ); } );

The post 5 Ways to Use Lightroom Virtual Copies Better by Andrew S. Gibson appeared first on Digital Photography School.


Digital Photography School

 
Comments Off on 5 Ways to Use Lightroom Virtual Copies Better

Posted in Photography


10 Tips for Better Landscape Photography

06 Nov

Landscape photography is a very popular genre and many amateur photographers start their hobbies doing it. There is, however, a lot more to it than just going out somewhere beautiful, putting your camera up to your face, and clicking the shutter button.

Have you gone out and taken some landscape photos, then found that they didn’t look that good when you got home? Do you get lost when you go out, and don’t know what to photograph, or how? Here are 10 tips to help you get you do better landscape photography.

leanne-cole-ten-tips-landscape-3611

A bush trying to grow on the edge of some cliffs show how harsh the environment is and leads you to the cliffs.

1 – Work the scene

One thing you see a lot of new photographers doing is walking up to a scene, taking one photo, and think they are done. However, a more experienced person will take a lot more photos, and spend time walking around and seeing what they can get from that scene.

Think about different angles, and different heights. With digital you can take so many photos, and it won’t cost you anything, other than a few minutes. So work the scene, and see what else you can get.

2 – Leading lines and patterns

This is something that we all learn from the beginning, find a leading line that will take your viewer into the image. Fences, roads, or anything that is like a line, that starts at the side of the frame, and takes people into your image. It is the invitation to look at the photo.

Patterns can be a great way attracting attention. If you notice a pattern somewhere, and take a photo of it, there is a good chance that your audience will also find it interesting. Patterns can be anywhere, in the ground, on the bark of trees, how they are planted. They can be fascinating.

leanne-cole-ten-tips-landscape-3836

Roads can be great leading lines to take your viewer into your image.

3 – Time of day

This is something that we all learn at the beginning, time of day is important. It is also dependent on the time of the year. Here in Southern Australia you can shoot all day long in winter. The sun is never high in the sky, the shadows are soft, and it is a great time of the year to take photos. On the other hand, summer is terrible. It is hot, the light is harsh, the shadows are sharp, and often the colors in your images can look bleached.

Think about where you are, and what time of the day is best where you want to take photos. Some people prefer early morning, there aren’t many people around, and you can get what you want before the day starts. Others prefer later in the day, and don’t mind sharing their location.

Some areas that you want to photograph will be better for sunrise, as you may not be able to get a sunset there. Or it could be the other way around. Many coastal areas on the east coast of Australia mean that is it almost impossible to get a sunset, so you need to get up early and aim for sunrise instead.

leanne-cole-ten-tips-landscape-0122

Early morning can mean sunrise, but at certain times you can also get mist on water.

4 – Look at your foreground

The foreground is often forgotten when taking landscape photos, but sometimes what is right in front of you is exactly what you need to make your image stronger.

Some images of landscapes can be a bit more interesting by adding a small plant or something that is in the front, close to the camera. It can also be a leading point to the scene at the back of the image.

leanne-cole-ten-tips-landscape-7254

The foreground plants give interest to the landscape behind.

5 – Look at what other photographers do

Without a doubt, one of the best things you can do is to look at other photographers, and take note of what they do. Don’t underestimate how much you can learn by looking at the work of others. Not just good or professional people, but also amateurs, you can see the good and the bad.

Look work that you like and determine why you like it, exactly what it is that you think makes it work. Can you pinpoint what it is about that image that makes you jealous that you didn’t take it?

Take notes of images that you don’t think are very good. Analyze them and see what it is that you find isn’t working. Learn from them, and make sure you don’t make the same mistakes.

6 – Think about the seasons

It’s very easy to go out one day and take photos of a particular place, then forget it exists, but what about thinking about other times of the year. Some places will look better in summer than they do in winter. Spring could be a time with lots of flowers, while autumn will give you colourful trees.

Photographing the same place throughout the year can give you a different feeling to your images every time you go there.

It is also a good idea to think about where you want to take photos, then consider what will be the best season to show it off. The mountains can look sparse and uninspiring in the summer, but in winter they are covered in snow; it adds a different dimension.

leanne-cole-ten-tips-landscape-1050

Autumn can bring lots of color to your landscape photography.

7 – Look for the smaller landscape

When you are out, it is very easy to put on a wide angle lens, and take all your photos with it. Most landscapes are wide vistas showing the scene that is before you. But, there are other ways to show what is there. Look around for objects or flora that you can use in the foreground. This is especially good if the subject is in the distance. It can give something interesting in front of your image.

Try taking a zoom or macro lens with you. You might be able to photograph something like the flora. Don’t just zoom right in on flowers that may be growing on it, try considering the whole plant and where it is situated. It can you give it some context as to its environment. This can help you tell a whole other story at times.

leanne-cole-ten-tips-landscape-7351

Flowers trying to grow in sand helps to tell the story of the location.

8 – What equipment do you need

You don’t need anything special to photograph landscapes, a camera with a decent lens is enough. You can use a compact camera just as well as a DSLR, it is really up to you.

If you are using a DSLR then you probably want a wide angle lens, or something a bit longer. Landscape photographers tend to use wide angles more, though many also use up to 200mm lenses as well. You don’t need the best camera that is available, and often it’s the lens choice that will give you the best results.

A sturdy tripod is good to have. The best advice is to get the best you can afford, don’t skimp on the price, you will regret it later if you do. A remote shutter release is a great piece of kit to have as well, or you can use the self-timer on your camera.

When you progress, and as you get more skilled at landscapes, the equipment list tends to grow. You will find yourself wanting items like filters for long exposures or better lenses. The list can be endless.

9 – Tripod: when to use or not

There is an opinion that if you are a serious landscape photographer, then you will always use a tripod, no matter what. If you are not, then you can’t be sincere about your craft.

It’s one way of looking at it. But, so many new and experienced photographers, find it can be limiting, or stifle your creative flow; that you can’t move around easily when taking your photos.

The short answer to this is that you have to feel comfortable when you are doing photography, so there is nothing wrong with not using a tripod. Though you also have to accept that, at times, you may not get the sharpest images – so it’s a trade-off.

If you are shooting at night then a tripod is a must, especially if you don’t want noisy photos. A tripod means you can use the best settings on your camera to get the highest quality image.

10 – Look for the story

There is no denying that some places you go to will seem boring, and you will wonder why on earth you went there. It’s one of those times when you will want to consider other tips here, but one tip that can really help is to find the story of the area.

Consider where you are, and why you went. Is there some history that you can see that still remains? How can you incorporate that into the image to show the story?

In many places in Victoria, Australia, you can travel to a town and find very little there. The only thing there might be grain silos, and fields of crops in various stages of growth. Look at the silos up close, and see if you can photograph how long they have been standing there. Look for how they are used. There will always be railway tracks next to them, so shoot how they lead you to the silos (see tip #1 above). Maybe do one from a distance showing the silos standing tall in a flat country. The story becomes all about the silos and that countryside.

Landscape photography is wonderful, and what you can take photos of is endless. Think about all the tips here and they should help you do your best landscape photography.

Please share any other tips you have for landscape photography, and your images in the comments below. If you use some of the tips, let me know how they worked out for you.

googletag.cmd.push(function() {
tablet_slots.push( googletag.defineSlot( “/1005424/_dPSv4_tab-all-article-bottom_(300×250)”, [300, 250], “pb-ad-78623” ).addService( googletag.pubads() ) ); } );

googletag.cmd.push(function() {
mobile_slots.push( googletag.defineSlot( “/1005424/_dPSv4_mob-all-article-bottom_(300×250)”, [300, 250], “pb-ad-78158” ).addService( googletag.pubads() ) ); } );

The post 10 Tips for Better Landscape Photography by Leanne Cole appeared first on Digital Photography School.


Digital Photography School

 
Comments Off on 10 Tips for Better Landscape Photography

Posted in Photography


Start Making Photographs to Become a Better Photographer

25 Sep

If you are an avid reader of this site, most likely you are a photography enthusiast wanting to learn more and advance your craft. If you really care about doing so, it is time to stop taking snapshots and start making photographs to become a better photographer.

Taking versus making can be a question of semantics; that’s why I prefer to call it snapshot versus photograph. But beyond semantics, in my humble opinion, you graduate as a photographer the moment you start making photos instead of taking them, regardless of the results. But wait, regardless of the results? Well, not really. Of course, you want great photos. What I mean by that is that you’ll progress in your craft the moment you start thinking about your photos, your vision, and how to reflect it with your image. The results could be bad or good, but you are thinking as a photographer. When you start thinking as a photographer, the results will come, sooner or later.

New Orleans Skyline

So what’s the difference? Taking a photo is the result of an impulsive reaction; you just press the shutter because you are there and you shoot it. Taking a photo is just snapping what you see. Instead, making a photograph is a process. When you make a photo, you are creating something from your vision. You are constructing it, and you are putting what comes from you in it.

The process of making a photo can take different periods of time. For some, it is a longer, thoughtful process, and for others it is a just a moment. For a National Geographic photographer, making a photo can take months; there is a lot of planning, research and being there just to get the right image that makes the cover of the magazine. For a street photographer, making a photo is totally different; they only have a split second to get it right without the luxury of setting up. But, there are other things they can control, like location, time of the day for best light, and so on.

I am telling you that you graduate as a photographer when you start making photographs because, for most us, enjoying the creative process is what makes us different from the rest. It does not matter if you are an enthusiast, serious amateur, or pro – we all enjoy it. Sure, learning how to expose, compose and post-process is important, but it’s something you can learn with enough practice and attention. That’s the technical aspect of photography, and when you master the basics, there will be always something new learn. But besides that, it comes with the freedom to stop thinking about aperture/depth of field and ISO/noise, and focus more on the photos you want to create.

Making a photograph will also help you to cut the clutter. When I first started to go on travel photography trips, I used to come back home with thousands of photos that were taken in just a span of a couple of days. That made the selection process a daunting task. First, who really wants to see thousands of photos? Second, is there any meaning in them? When you take the time to plan a more thoughtful photograph, you cut the clutter because often you’ll shoot less, but come out with better content.

Happy woman in Taung Tho Market Inle Lake

Last, I want to leave you with a couple of examples, starting with the opening picture of this article. I was going to be in New Orleans only for a long weekend and one the things I wanted to photograph was the skyline of the city. So, I started my research ahead of time to find the best spot to do it. I only had three nights in the city and as I wanted to shoot during the blue hour, I really didn’t have the chance of messing it up. Once I knew where I was going to make my photo from, it was all a matter of arriving there in time to set up and wait for the right moment. So besides finding the location and arriving early to set up, I also had the right tools with me to make it happen. I knew I wanted to include the Crescent Connection Bridge, so I brought a wide angle lens. I knew that it was going to be a long exposure, not only because of the time, but also because I wanted a smooth reflection over the Mississippi River, so I also brought a tripod and a neutral density filter to make a long exposure.

Sometimes making a photo also means finding an interesting subject, and trying to learn more from them by staying for a while, instead of grabbing a shot and moving. I found this amazing woman for this photo (above) from the Taung Tho Market of Inle Lake in Myanmar. I sat there taking pictures of her for a while, and I remember she pretended I was not there until I told my guide to tell her that she was beautiful. Her reaction was priceless and that made the photo.

Monk in the Punakha Dzong

Other times, making a photo means waiting for something interesting to happen if you are in the right place. For the Bhutanese monk above, I found myself on a big patio surrounded by typical and colorful windows that I wanted to photograph, while I was visiting one of the many monasteries. But I needed something else besides the windows. Because I had seen them earlier, I knew that another monk would walk across my frame sooner or later, so I carefully composed my photo and waited until this one walked by.

There you have it. As you can see, there are different meanings and ways to create photos, and not just take them. But the most important thing is for you to understand that you can be a better photographer by making photos instead of just taking them. Plan and enjoy the process, and results will follow. By the way, if you are already making photos, why don’t you share one with us in the comments below with a short caption on how you made it and why.

googletag.cmd.push(function() {
tablet_slots.push( googletag.defineSlot( “/1005424/_dPSv4_tab-all-article-bottom_(300×250)”, [300, 250], “pb-ad-78623” ).addService( googletag.pubads() ) ); } );

googletag.cmd.push(function() {
mobile_slots.push( googletag.defineSlot( “/1005424/_dPSv4_mob-all-article-bottom_(300×250)”, [300, 250], “pb-ad-78158” ).addService( googletag.pubads() ) ); } );

The post Start Making Photographs to Become a Better Photographer by Daniel Korzeniewski appeared first on Digital Photography School.


Digital Photography School

 
Comments Off on Start Making Photographs to Become a Better Photographer

Posted in Photography


Using the Histogram to Take Better Pictures

20 Sep

You might have seen some articles here on Digital Photography School about using the histogram when editing pictures in Lightroom and Photoshop, but it can also be a very handy tool when you are out shooting images as well. Most cameras have the ability to show you the histogram when you review your photos on the rear LCD screen, and some even allow you to see a real-time histogram in Live View. While this might seem a bit intimidating at first, learning to use the histogram when out shooting pictures can have a dramatic impact on your photography and help you understand how to get the right exposure for the photos you are taking.

histogram-sorority-bid-day

Sorority Bid Day brought to you by the magical properties of the histogram.

In a nutshell, the histogram shows how much data is recorded for various Red, Green, and Blue color values in a picture. While you can usually see data for all three colors separated into discrete graphs, the one I find most useful for general shooting is the histogram that combines all three RGB values into one visual representation. A histogram shows how much data has been recorded across the tonal range of a photograph from very dark to very light. A spike in the graph means a lot more data has been recorded for those particular values of darkness or lightness, and a dip means that not much data has been saved. In general, a properly-exposed picture should have a histogram that looks something like this:

histogram-example

An example of a hypothetical histogram for a properly exposed photo.

A histogram similar to this example would mean that most of the color data is concentrated in the middle: the greatest quantity of pixels is neither too dark nor too light. Most photos will have some darker pixels and some brighter pixels, but in general all the information captured by a camera’s image sensor should fall somewhere between the darkest of darks (i.e. very black) and the lightest of lights (i.e. very white). A histogram that is skewed to the right would indicate a picture that is a bit overexposed because most of the color data is on the lighter side, while a histogram with the curve on the left shows a picture that is underexposed. This is good information to have when using post-processing software because it shows you not only where the color data exists for a given picture, but also where any data has been clipped: that is, it does not exist and, therefore, cannot be edited. It’s also good information to have out in the field, such as in the following example:

histogram-quidditch-overexposed

Most cameras allow you to overlay the histogram on top of a given photo during playback, or as you shoot the photo when using Live View.

I could tell right away that this picture of some college students playing Quidditch was a little overexposed, but looking at the histogram data right on my camera gave me additional information that helped me adjust my shooting on the spot. The large curve on the right-hand side tells me that most of the color information is concentrated on the lighter side, which is actually a good thing because more data is actually collected in the highlight portions of the image which can then be brought down later in a program like Lightroom. (This is a technique called expose to the right, which is a fantastic way to get a little more out of your photography if you are willing to put in a bit of time editing pictures on your computer.)

The problem with this image, as you can see in the above histogram, is that the graph literally goes off the chart on the right-hand side. This means that some of the highlights have been clipped: there is no longer any data that can be recovered, and no matter what I do in Photoshop or Lightroom there are some portions of my image that show up as pure white and can’t be edited. An example histogram from a photo that is clipped on both the darkest and lightest areas would look like this:

histogram-example

After taking the first photo and realizing that some of the data would be lost due to clipping, I was able to adjust my exposure settings and get a much better image:

histogram-quidditch-properly-exposed

Quidditch isn’t only played at Hogwarts.

The histogram for this picture was also concentrated a bit more to the right-hand side, but right after I shot it I was able to see that no data had been lost due to clipping. This didn’t help much in the immediate moment, but it meant that I had plenty of information to work with later when editing the picture in Lightroom. As another example, here’s a picture of a unique building on the Oklahoma State University campus:

histogram-example-building-exterior

The Noble Research Center on the campus of Oklahoma State University.

When I looked at the back of my camera it seemed as though the photo was pretty good. The sky was a bit bright, but I thought everything would be just fine overall. This is similar to many situations I have been in when I thought I could tell simply by looking at the photo on my camera’s LCD screen if it was exposed properly, but a quick check of the histogram can yield much more information. Even though the above image seemed decent at first, the camera histogram told another story:

histogram-example-noble-center-D7100

The histogram for the above photo indicated severe clipping on the highlights, meaning some parts of the photo were so bright that I wouldn’t be able to fix it in Lightroom.

Had I not looked at the histogram I would have never seen that a good chunk of the sky was clipped which meant there was no color data at all for the brightest portions of the photo. This would be a serious problem for my post-processing when I bring my pictures into Lightroom and adjust various parameters to get the image to look like I want. After looking at the histogram I re-adjusted my exposure settings and took another photo which had an improved balance of color data across the spectrum:

histogram-example-noble-center-D7100-proper

The same composition, but with different exposure settings that resulted in a better exposure with no clipped data.

One curious aspect of this image is that while the sky is now properly exposed, the glass panels on the building appear to be too dark. Looking at the histogram you can see that while there is certainly a lot of data on the darker portions of the image (hence the spike on the left-hand side of the graph), no data has been lost due to clipping. This means I had a lot of flexibility to improve the image in Lightroom, which resulted in the following finished photograph:

histogram-example-building-exterior-proper

One nice thing about most mirrorless cameras, as well as some DSLRs when shooting in Live View, is their ability to give you a real-time indication of any areas of the image that will be over – or under – exposed. This is normally referred to as a zebra pattern and it essentially overlays a series of stripes over any portion of your image where data is going to be clipped. And remember, as I stated earlier, many cameras today have the ability to show you a live histogram that updates in real-time so you can see not only where the color data on your image is concentrated across the light/dark spectrum, but also alert you to any clipping that will happen when you take the photo.

These are just a few examples of how the histogram can be useful when you’re out shooting photos, not just when you’re editing them on your computer. How do you use the histogram, and what other tips and tricks do you have to share about using it to enhance your photography? Leave your thoughts in the comments below.

googletag.cmd.push(function() {
tablet_slots.push( googletag.defineSlot( “/1005424/_dPSv4_tab-all-article-bottom_(300×250)”, [300, 250], “pb-ad-78623” ).addService( googletag.pubads() ) ); } );

googletag.cmd.push(function() {
mobile_slots.push( googletag.defineSlot( “/1005424/_dPSv4_mob-all-article-bottom_(300×250)”, [300, 250], “pb-ad-78158” ).addService( googletag.pubads() ) ); } );

The post Using the Histogram to Take Better Pictures by Simon Ringsmuth appeared first on Digital Photography School.


Digital Photography School

 
Comments Off on Using the Histogram to Take Better Pictures

Posted in Photography


7 Tips for Better Commercial Food Photography

14 Sep

Earlier this summer, I was awarded a dream photo shoot to photograph chocolate chip cookies for my local grocery store. What sounded like a simple job at first, ended up being more challenging than expected, and in this article, I’ll walk through the process of approaching a commercial food photo shoot for a real client, with seven key tips to keep in mind.

Select your gear

One of your best friends in food photography is a macro lens, as it lets you zoom-in and capture small details and perspectives, that your client’s camera phone can’t. In a day where just about everyone has the ability to take pretty good food photos with their cell phone, it’s important to always create photos that your client couldn’t easily capture themselves using low level gear. Personally, I always photograph food with two camera bodies (a Canon 5D Mark III and Canon 6D) and two lenses (24-70mm f/2.8 and a 100mm f/2.8 macro lens).

Lighting-wise, you can easily use reflectors and natural lighting if it’s at your disposal, but I prefer a simple and cheap off-camera flash setup consisting of a Canon 580 EXII Speedlight flash, Yongnuo wireless flash triggers, a simple lighting stand, and a shoot through umbrella. My lighting setup is in the diagram below.

Food photography tips

Depending on what kind of food photography quality you’re aiming for, it may also be wise to invest in a food stylist. In this case, I did not use one, but started to wish I did at certain key moments, which I’ll address later.

Set up the shot

Generally speaking, food photography can be done just about anywhere, but you should always check with your client to see if they have a preference of shooting on site in a particular location, or if they want you to conduct the shoot in your space. In this case, the latter scenario applied. Since the photo style we were going for would be pretty cropped and zoomed in, I didn’t need a fancy kitchen or dining room setup. But I would need a variety of surfaces and props to enhance those heavily cropped images.

Tip #1: Understand the client’s photo needs

There tend to be two main scenarios when it comes to food photography. Sometimes the client will have a menu of dishes prepared and you need to shoot as many as possible in a given time frame, OR the client has one particular dish or menu item that they want highlighted. This assignment falls into the latter category, as the whole point was to take images of one particular item: an extraordinary large chocolate chip cookie, dubbed “The Cookie.”

My local grocery store had spent a year experimenting in the kitchen to come up with a recipe for a gigantic chocolate chip cookie, and they needed photos of the product to help with promotional marketing. These photos in particular had a very specific purpose of being blown up into large decals and posters, that would be plastered on walls and windows throughout the store, so the highest resolution photos would be needed.

Food photography tips

Tip #2: Research with Pinterest

After understanding the client’s basic photo needs, I always conduct research on Pinterest to get inspired and visually identify patterns among other similar photo shoots. While many clients encourage photographers to add their own twist or dose of creativity, it’s also a good idea to have a sense of traditional ways that others have executed similar photo shoots, in case your client ends up wanting a more traditional image. A quick search for “chocolate chip cookies” on Pinterest gave me a slew of ideas on different ideas to effectively photograph, “The Cookie.”

Tip #3: Use a variety of surfaces

Per the researched examples that I had found, plus my personal approach to food photography, I set out to shoot these cookies using three main surfaces: a ceramic plate on a granite countertop, a wooden cutting board, and the white paper napkins and packaging that came with each cookie. The purpose was to offer the client a variety of surfaces and textures to choose from, in addition to a variety of implied settings in which “The Cookie” might be consumed.

Food photography tips

Tip #4: Incorporate people and action into the scene

The next photographic approach I took involved having a human model interact with my photo subject. Incorporating a human element, either by simply including a body part such as a hand holding the cookie, or a partially eaten cookie, gives the photo subject a sense of purpose and utility that the client might find helpful. It also adds a sense of scale – important to show the size of “The Cookie”.

Food photography tips

Tip #5: Use ingredients and pairings

Pretty much every food has a logical pairing, such as white wine and fish, beer and burgers, and milk and cookies. Instead of just focusing on one component, why not set the scene by introducing a natural pairing to the photo subject? This not only sets the scene, but it can also help provide scale, in this case showing how large “The Cookie” is compared to a glass of milk.

Food photography tips

Tip #6: Be open to feedback and further collaboration

After going through the above scenarios, and putting together a first batch of photos for client feedback, I was a bit surprised when they replied saying, “These are great, but not quite fitting our ideal vision.” Luckily, I asked for feedback early in the shoot and was able to collaborate further with the client to hone in on what they were actually looking for, which were photos more to the tune of this:

Food photography tips

While the client’s initial instructions were to produce a variety of photos of the cookie, like the ones I first delivered, it took an extra conversation with them to realize that there were two main points they really wanted to illustrate:

  1. Size mattered: Since “The Cookie” was truly large, similar in size to that of a DVD, we really needed to emphasize its huge size.
  2. Have to see the goo: The selling point of “The Cookie” is the super gooey melted chocolate center of each cookie.

With these two points really emphasized, the resulting images ended up being purely macro shots, but the challenge was capturing the gooey melted chocolate centers. This is when a food stylist probably would have come in handy, but through trial and error, I was able to use my oven and microwave to re-create the melted chocolate look in my own kitchen.

Tip #7: Find the finished product and document it!

Whenever you perform photography services for a client, make every effort to get your hands on the final product that has your photo(s) in use. Having proof of your published photos is excellent for building your portfolio and credibility as a photographer, not to mention it just feels really good to see your images blown up on the side of a building.

Food photography tips

The final product: my photos used in decals on the side of a building.

Conclusion

Do you have any other tips or approaches for tackling commercial food photography jobs? Let me know in the comments below!

googletag.cmd.push(function() {
tablet_slots.push( googletag.defineSlot( “/1005424/_dPSv4_tab-all-article-bottom_(300×250)”, [300, 250], “pb-ad-78623” ).addService( googletag.pubads() ) ); } );

googletag.cmd.push(function() {
mobile_slots.push( googletag.defineSlot( “/1005424/_dPSv4_mob-all-article-bottom_(300×250)”, [300, 250], “pb-ad-78158” ).addService( googletag.pubads() ) ); } );

The post 7 Tips for Better Commercial Food Photography by Suzi Pratt appeared first on Digital Photography School.


Digital Photography School

 
Comments Off on 7 Tips for Better Commercial Food Photography

Posted in Photography


How to Create Better Photos by Adding a Sense of Motion

10 Sep

Photographing subjects in motion can be kind of tricky because of the very nature of photography as an art form: cameras capture still images, not moving pictures (unless you are Harry Potter and like to read the Daily Prophet).

Of course, one solution is to record a movie with your camera or phone, but even a movie is in itself a series of still images projected quickly, that only give the illusion of motion. Each individual frame is not moving, but put together it appears as though everything you see is changing. Another solution, and one I generally prefer, is to use some knowledge of composition to create a sense of motion in a single photograph. It’s not all that difficult, but these techniques do require a bit of knowledge, a lot of practice, and in the end your photos will be much more dynamic and interesting as a result.

motion-and-composition-bike-car

One of the most basic elements of composition is called the Rule of Thirds. It has to do with putting your subjects off-center in order to add more visual impact to your photos. It’s not a hard-and-fast rule, and some people swear by it while others reject it altogether, but understanding how it affects motion photography can go a long way towards giving your pictures an extra boost. To offer an example, take a look at the following image of my niece on her bike.

motion-and-composition-bike-center-panning-2

My niece on her bike. There’s clearly a sense of motion, but putting her in the center is not the best use of photographic compositional space.

This image involves a technique called panning, which helps create the illusion of motion by tracking a moving subject with your camera, while the shutter is open. But, take a look at how the girl is framed – she in the center of the image, and you can see her surroundings on all sides. It seems like a good picture at first, but take a look at how a simple compositional change can have a dramatic impact on the sense of motion created by the image.

motion-and-composition-bike-center-panning

Putting the subject off-center shows not just that the girl is biking, but the space into which she is traveling.

I took this second picture using spot focus on my camera which allowed me to select which focusing point to use, and selected a point on the left side of the frame. Doing this placed my niece right along one of the vertical gridlines, if we look at this image as it relates to the classic Rule of Thirds:

motion-and-composition-bike-left-panning-grid

Both the girl, and her bicycle, line-up with the one-third dividing lines, which helps create a more pleasing and dynamic composition.

Aligning my subject on the left third of the image (and the horizontal center of the bike along the bottom third) has done a couple of things. First, it makes for a more pleasing image due to the off-center placement of my subject. It allows us to see more context overall, since she is on one side and not dominating the entire image. Second, the other goal this placement accomplishes has to do with motion – we see her not only biking, but biking to somewhere. By showing us where she is going, our minds essentially create a greater sense of movement because we can see more context.

This works almost any time you have an object in motion, whether you employ the panning technique or not. Simply placing your subject on one side of the image (often along one of the dividers according to the Rule of Thirds) such that it is moving in the direction of the rest of the image (put more space in front of the subject than behind), will help your photos will seem much more dynamic and interesting. It helps your viewers to get a sense that they were actually there with you at the moment of the picture.

If panning isn’t quite your thing, you can still employ some compositional techniques to create a greater sense of motion. Here’s a picture of my other niece riding her bike that I took from a standing position. I see pictures like this posted online quite a bit, and while they are not bad photos, a change to how they are composed can dramatically alter the visual impact.

motion-and-composition-bike-center-2

My other niece biking, taken from a standing position without much thought put into overall composition.

Again you see that she is in the center of the image (above), and while this picture is perfectly serviceable, there is a lot that can be done to create a greater sense of motion. Here’s another picture of the same scenario, but taken from ground level as she approached me down the alley.

motion-and-composition-bike-right-2

Altering my angle to be low to the ground, and putting the girl on the right-hand side, creates a much more dynamic photo. This was shot with a DSLR but could have easily been taken with any camera or even a mobile phone.

I had to lie on the ground to get this shot, but the results were well worth it. The low angle helps make the shot much more interesting, and the open space on the left side shows us the empty street that she will soon be riding on. This general framing is used all the time in photos of moving objects, and is a favorite of the advertising industry as well: you will often see pictures of sports cars not from the top and side (as in the first of these two bike photos) but from a low angle, and the front wheels turned away from the viewer, much more akin to the second photo. And sure enough, this image also conforms quite well to the good old-fashioned Rule of Thirds.

motion-and-composition-bike-right-grid-2

There are other ways to play with composition to create a sense of motion in photos; the Rule of Thirds is just the beginning. This photo of a man walking past a fountain violates the first rule about showing the subject on one side moving towards the rest of the image, but it works because we’re not so much interested in where he is going but what the entire scene is about.

motion-and-composition-fountain

Putting the subject on the left side of this photo creates a different mood and tone than if the man were on the right-hand side.

By using a longer shutter speed, and holding my camera still I was able to capture motion, not only in the man walking, but the water rolling off the fountain. If the position of the man and the fountain were reversed it might look as though he is walking into it. But as it is, the motion of my human subject is one part of the picture as a whole, and the falling water adds another dynamic layer to the image.

The placement of the man creates a bit of tension as well; he is clearly carrying something, and from the words on the wall it’s obvious that he is walking past a library. Is he a student that’s late for class? Is he walking fast to catch up to some friends who are out of the frame? Putting him on the right-hand side would make the image seem a bit more casual and informal. But, intentionally composing this shot so that he is about to walk out of the frame, imparts a different feeling on the viewer that can be very effective when used properly. Also note that both the fountain and the man line up roughly with the traditional Rule of Thirds grid, which helps create a more pleasing composition all around.

I should note that the reliance on the Rule of Thirds can become a crutch, and there are many creative ways to take motion-based images without it. What about you? What are some compositional tricks you have found to help create a sense of motion in your photographs? Do you have any favorite motion images to share? Leave your thoughts in the comments below.

googletag.cmd.push(function() {
tablet_slots.push( googletag.defineSlot( “/1005424/_dPSv4_tab-all-article-bottom_(300×250)”, [300, 250], “pb-ad-78623” ).addService( googletag.pubads() ) ); } );

googletag.cmd.push(function() {
mobile_slots.push( googletag.defineSlot( “/1005424/_dPSv4_mob-all-article-bottom_(300×250)”, [300, 250], “pb-ad-78158” ).addService( googletag.pubads() ) ); } );

The post How to Create Better Photos by Adding a Sense of Motion by Simon Ringsmuth appeared first on Digital Photography School.


Digital Photography School

 
Comments Off on How to Create Better Photos by Adding a Sense of Motion

Posted in Photography