RSS
 

Posts Tagged ‘Better’

Brand Name Versus Third-Party Photography Gear: Which is better?

07 Jun

Not long ago, there were two types of camera accessories to buy: brand items designed by known manufacturers such as Canon and Nikon, OR third-party items of questionable quality that you’d likely buy only if you were on a tight budget. Today, this situation has changed, with third-party manufacturers such as Sigma and Tamron stepping up their game and producing alternatives that even serious professionals have begun using.

Still, the question remains: does the brand name truly matter when it comes to camera accessories?

Let’s explore some of the pros and cons of each side. Keep in mind that this is a highly debatable topic, and this is just a short list of general pros and cons for using brand name and third-party items. If you have any other points to add, please mention them in the comments below.

third party camera lenses

Why brand names matter

Brand name items are almost always going to be more expensive than third-party ones, but as most photographers say, “you get what you pay for.” Some reasons for the premium pricing on brand name items include:

Better build quality and dependability

This can be extremely important if you belong to any professional organizations such as Canon or Nikon Pro Services, as cleaning and repair of brand name gear is generally included in your membership. While most third-party manufacturers have begun adding their own repair services, they’re not known to be as fast and consistent as name brands, and guaranteed compatibility with your brand name camera of choice.

third party camera lenses

Guaranteed compatibility

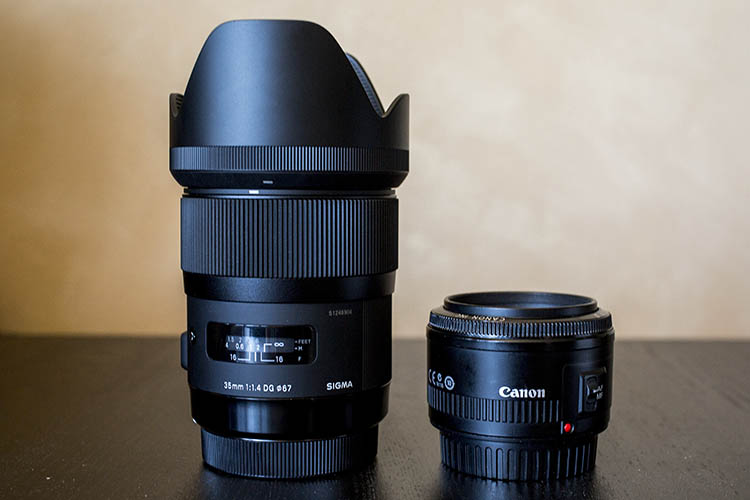
Third-party vendors thrive on the ability to produce accessories and items that are compatible with many major brand name cameras. If you buy say a Sigma 35mm f/1.4 lens, there will be both a Nikon and Canon mount option. This means you have to be ultra diligent to make sure a third-party item will work with your camera model. However, if you buy a 35mm f/1.4 lens from Nikon (for example), you know for sure that lens will work your Nikon camera.

Respect from other photographers

When you shoot with a brand name accessory, you’re more likely to get nods of respect from other photographers who recognize the value of that authentic, name brand lens (the coveted red ringed lenses from Canon and gold ring on Nikon lenses). This is becoming more of a debatable point lately with the rise of high-quality third-party gear options, but there’s still something to be said about acknowledging the real deal over a third-party brand.

Why third-party brands are coming up

Unique innovations

third party camera lenses

As mentioned earlier, the scene for third-party brands has shifted to the point where Sigma and Tamron are no longer necessarily viewed as compromises, just for the budget-minded photographer. Instead, these brands are focusing not only on improving old designs perfected by established name-brands, but they’re innovating alternatives that even Canon and Nikon haven’t come up with. Consider the Sigma 120-300 f/2.8, which is already in its third incarnation, or the Sigma 18-35mm f/1.8 lens, the first zoom lens for DSLRs that holds a consistent f/1.8 aperture throughout its entire zoom range. These are lenses with features that even Canon and Nikon have yet to offer. Quality and consistency of these Sigma lenses might be questionable depending on your photography standards, but the fact that a third-party brand is innovating and selling unique lenses speaks to how third-party brands are shifting in the overall industry. (Read this to see why one dPS writer uses the Sigma 150-600mm for wildlife photography.)

The price is right

Every photographer knows that camera gear isn’t cheap, and while brand name items may be ideal, sometimes they just aren’t realistic price points for what is affordable. This is where third-party items can help beginners, or photographers on a budget, can get their hands on some quality equipment. If the gear is kept in good shape, resale value should still be pretty decent, if and when they decide to upgrade to a brand name alternative down the road.

third party camera lenses

One item you probably shouldn’t buy third-party

When it comes to third-party accessories, there’s one in particular that you may want to make sure is brand name authentic: your camera batteries. Personally, I’ve had mixed experiences using third-party batteries on both my DSLR and mirrorless cameras. Most of the time they work, but every once and a while, there’s a battery that just won’t hold a charge, or fails for some mysterious reason. That battery is always from a third-party brand. A simple way to work around this would be to stock your camera battery arsenal with some brand name batteries, and some third-party ones to make sure you’re covered. There’s nothing worse than having a battery fail when you need it the most.

Over to you

What has been your experience using brand names and third-party brands? Are you partial to one over the other? Do you go for brand name camera bodies and lenses, and opt for third-party accessories like filters, tripods, and batteries?

What has your experience been, let us know in the comments below.


Editor’s Note: This is one of a series of articles this week that are Open for Discussion. We want to get the conversation going, hear your voice and opinions, and talk about some possibly controversial topics in photography.

Give us your thoughts below on the article above and watch for more discussion topics.

See all the recent discussion topics here:

  • 7 Commonly Accepted Photography Beliefs Debunked
  • Is HDR dead? Some dPS Writer’s Thoughts on this Controversial Topic
  • How to Find your Personal Photographic Style
  • Why You May be Failing to Reach Your Potential as a Photographer
  • To Process or Not To Process? Let’s Discuss
  • How much do you process your images? – a dPS POLL
  • Does the Camera Matter? SLR versus Mirrorless versus Smartphone
  • Natural Light Versus Artificial Light: Which is Better?
  • How Limitations Can Help You Grow as a Photographer

googletag.cmd.push(function() {
tablet_slots.push( googletag.defineSlot( “/1005424/_dPSv4_tab-all-article-bottom_(300×250)”, [300, 250], “pb-ad-78623” ).addService( googletag.pubads() ) ); } );

googletag.cmd.push(function() {
mobile_slots.push( googletag.defineSlot( “/1005424/_dPSv4_mob-all-article-bottom_(300×250)”, [300, 250], “pb-ad-78158” ).addService( googletag.pubads() ) ); } );

The post Brand Name Versus Third-Party Photography Gear: Which is better? by Suzi Pratt appeared first on Digital Photography School.


Digital Photography School

 
Comments Off on Brand Name Versus Third-Party Photography Gear: Which is better?

Posted in Photography


Natural Light Versus Artificial Light: Which is Better?

06 Jun

Light is the backbone of photography. Without light, there are no photos. After all, the word photo means light. However, which type of lighting is best: natural or artificial? There are a lot of proponents for either camp, but this article will try and dissect the argument from both perspectives, and give you a chance to add your opinion at the end.

Natural Light

natural-light-versus-artificial-light-2689

The arguments in favor of natural light are many, which means it’s not difficult to see why it is attractive to many photographers.

The pros of natural light

Cost

Natural light costs nothing to make use of; there are plenty of gadgets and accessories available, such as reflectors and diffusers, that do help to maximize results, but even without them, it is easy enough to get beautiful results using natural light, without spending any money. This apparent lack of a financial entry barrier makes it much easier for most photographers to immediately assume a preference for natural lighting.

Learning Curve

natural-light-versus-artificial-light-0729

Learning how to see, manipulate and utilize light, whether natural or artificial, is the most critical skill set for a photographer to learn. Fortunately, these break down into many individual skills that can be learned one at a time. In terms of natural light, a lot of these skills are easy to learn and put into practice. For example, you can read a tutorial on using an area open shade to diffuse and soften the light, then put it into immediate practice ten minutes later.

Another thing to keep in mind here is that cameras are designed for use in natural light first. So, a new photographer working their way through the technical basics of their camera, such as metering, aperture and shutter speed, is almost certainly learning with natural light, thereby improving both their camera and lighting skills simultaneously.

Semantics

This point may seem a bit strange, but I have seen it crop up in various conversations, and it does affect some people’s perceptions. We live in a world that is currently obsessed with the word natural. It seems difficult to go more than five minutes without seeing words like organic, all-natural and free from. Of course, most of this applies to food and health products, but the mindset and lifestyle that go with it have become so expansive, that it has seeped into all manner of other aspects in our lives. Whether or not you buy into that sort of thing, try to ask yourself what sounds better and more appealing: natural or artificial? This may not seem rational in terms of photography (an inorganic, mechanical medium), but the appeal is more of an emotional one, and more often than not, emotion trumps rationale.

The biggest concern here is one of marketing. A photographer who refers to themselves as a natural light photographer may very well simply be attempting to appeal to the quite large demographic that holds value over that kind of thing.

The cons of natural light

natural-light-versus-artificial-light-0962While natural light has its advantages, it is not without its own set of shortcomings.

Unpredictability

While the sun is a near constant during daylight hours, the availability of light is only one factor that needs to be taken into account. Clouds and other weather conditions are just a couple examples of things that will alter specific qualities of the light you are trying to work with. Softness, intensity, and color can all change in a split second at the whim of mother nature. If you are attempting to work towards a specific goal, these changes can be a nightmare.

Night

After sunset, what do you do if you’re in a situation where you still want (or need) to take photographs. If you’re relying solely on natural light, the answer is: not a whole lot. Many photographers have no problem with this limitation; however, try to imagine what you can achieve with just another hour or two a day working towards your photography.

Environment

natural-light-versus-artificial-light-2691

Aside from its effect on light, shooting outdoors means you are at the constant mercy of the weather. Cold temperatures, rain, snow, and wind can all make for some uncomfortable experiences for both you and your subjects or clients.

If you’re photographing in areas open to the public, you may be subject to the whims of passers-by. This can lead to an unwelcome audience, or even worse, hecklers. Believe me when I relate, that nothing kills the general mood of a session for both the subject and the photographer faster than excessive and undue attention from strangers.

These environmental problems can often be solved by finding an indoor location and using window light. While the effects of weather and other people are gone, this solution is not without its own limitations. Window light, while often beautiful for photography, can be quite dim and may require slower shutter speeds than you might like for portrait photography. A lack of space is also a common problem when shooting indoors.

Artificial light

natural-light-versus-artificial-light-3213

Like natural light, artificial light, whether strobes, flashguns or continuous lighting, has its own set of advantages and shortcomings.

The pros of artificial light

Convenience

By owning an artificial lighting solution, you have the means to take photographs at any time day or night, indoors or out, and the weather has no effect on you. If for some reason you want to do food photography at midnight, by all means, go for it.

If you own a set of flashguns (speedlights), they are not only convenient, but portable as well, and can be taken just about anywhere and set up with ease.

Versatility

With studio strobes and the like, the sheer number of ways that they can be used for a vast array of creative results is their strongest selling point. These range from simple one light setups that mimic natural light, to complicated setups with seven or more lights.

Control

Another great strength of studio lighting is the control it offers you over your final photograph. By controlling every bit of light in your scene, artificial lighting negates the unpredictability that you get with natural light. If you want a particular look or mood, all that you have to do is set up the lights, and take photos until you have your results. There’s no worry that a cloud will move in and block your light.

Reliability

natural-light-versus-artificial-light-4689

Apart from removing the environmental issues associated with natural light, studio strobes and flashguns are quite reliable. Most models in the moderate price range, and above, are very well made. This means that the power output, as well as color output, is consistent every time it fires. This a huge advantage over the fast changing conditions of natural light.

The cons of artificial light

Cost

natural-light-versus-artificial-light-4563Probably the most off-putting aspect of studio lighting is cost. It doesn’t matter whether you choose studio strobes, flashguns (speedlights), or continuous lighting; decent quality lighting equipment does not come cheap and a good set, along with modifiers, can easily cost over $ 1000. With natural light being a free and capable resource, it’s easy to understand why so many photographers steer clear of artificial lighting.

Learning Curve

Another initial disadvantage of studio lighting is the amount of knowledge you have to gain, in order to start using it. It’s very possible to accidentally take a beautifully lit photo in natural light. With artificial light, that’s next to impossible.

A lot of photographers, me included, would probably gladly tell you how atrocious their first attempts with studio lighting were. To get good results, you have to spend an enormous amount of time reading and practicing. This involves things like new aspects of aperture and shutter speed in relation to flash, qualities of light, effects of modifiers and the dreaded inverse square law.

So, which is better?

In my opinion? Neither and both are better.

It depends on the job at hand. Both are just tools to be used at each photographer’s discretion. After all, nobody walks into a newly built house and waxes lyrical about the type of hammers that were used. Good photography is good photography, no matter how it was made. If something screams out to be lit with natural light, then natural light is better. Likewise with artificial light.

Each method is capable of stunning results and I would rather have a full toolkit to use for every opportunity, than miss out on something because I restricted myself from using the right tool for the job.


Editor’s Note: This is one of a series of articles this week that are Open for Discussion. We want to get the conversation going, hear your voice and opinions, and talk about some possibly controversial topics in photography.

Give us your thoughts below on the article above on natural versus artificial, and watch for more discussion topics this week.

See all the recent discussion topics here:

  • 7 Commonly Accepted Photography Beliefs Debunked
  • Is HDR dead? Some dPS Writer’s Thoughts on this Controversial Topic
  • How to Find your Personal Photographic Style
  • Why You May be Failing to Reach Your Potential as a Photographer
  • To Process or Not To Process? Let’s Discuss
  • How much do you process your images? – a dPS POLL
  • Does the Camera Matter? SLR versus Mirrorless versus Smartphone

googletag.cmd.push(function() {
tablet_slots.push( googletag.defineSlot( “/1005424/_dPSv4_tab-all-article-bottom_(300×250)”, [300, 250], “pb-ad-78623” ).addService( googletag.pubads() ) ); } );

googletag.cmd.push(function() {
mobile_slots.push( googletag.defineSlot( “/1005424/_dPSv4_mob-all-article-bottom_(300×250)”, [300, 250], “pb-ad-78158” ).addService( googletag.pubads() ) ); } );

The post Natural Light Versus Artificial Light: Which is Better? by John McIntire appeared first on Digital Photography School.


Digital Photography School

 
Comments Off on Natural Light Versus Artificial Light: Which is Better?

Posted in Photography


Back in Stock, and Better than Ever

27 May

These gizmos were too popular for their own good, and they ran right out.

Whelp, they’re back, for now, so order ‘em up quick before they fly off our (internet) shelves.

Turn your phone into a light meter, create a photo print masterpiece, eat your favorite camera and more. There’s a reason these gadgets are so well-loved.

(…)
Read the rest of Back in Stock, and Better than Ever (0 words)


© laurel for Photojojo, 2016. |
Permalink |
No comment |
Add to
del.icio.us

Post tags:


Photojojo

 
Comments Off on Back in Stock, and Better than Ever

Posted in Equipment


How to Take Better Wildlife Photos: Be a Naturalist First

29 Apr

I love birds. In fact, I’ve dedicated much of my adult life to the study of birds. In college, I spent days exploring the beaches, forests, and wetlands surrounding southern Puget Sound, strictly in the interest of finding and watching birds. Birds lured me north to current home in Alaska, when I took a job banding songbirds in Denali National Park. My interest in migrant birds carried me into graduate school where I spent several years studying the spring migration in the Sierra de Los Tuxtlas of eastern Mexico. After grad school, I took a job as a Research Biologist here in Fairbanks, where I looked into all kinds of questions about breeding and migrating birds around the state.

Now, though I no longer work as a full-time research biologist (writing, photography, and guiding now rule my life), my passion for feathered creatures is no less strong.

AK-FAI-CreamersField-Migration-Aug2009-39

I give you these biographical tidbits, because I want you to understand something about me: I care about, and understand birds. Knowledge and passion are the two most important tools I know of for better wildlife photography.

Ask someone what a wildlife photographer needs and the first thing you are likely to hear is a big lens. That helps, make no doubt, but it’s hardly the most important. No, the most important thing is an understanding of the critters you want to photograph. It doesn’t matter if your lens is as long as your leg, if you can’t find the animal you’re after.

AK-FAI-RUBL-17

An example: During my years as a Research Biologist, I spent several seasons studying an imperiled species of songbird that breeds in the wetlands of the Boreal Forest, the Rusty Blackbird. This species has been declining in abundance across its range for the past 50 to 100 years, and no one really knows why. In the winter, they are easier to find, when they mix with flocks of other blackbirds in the south-central United States, or forage in small groups in the wetlands of the southern Mississippi basin.

In summer, however, when the males are attired in their crisp, shiny, black plumage, they are very difficult to find. Rusty Blackbirds nest in some pretty unpleasant places: thick, mosquito-infested swamps in the northern forest of Alaska, Canada, and the northeastern states.

AK-FAI-RUBL-44
Having studied them for years, I had a distinct advantage when I set out to photograph this species. I knew where to find them, right down to a specific pair of birds, and I knew where to position myself for the best chance of getting foraging birds to appear within the range of my camera.

AK-FAI-RUBL-48

Thanks to that personal knowledge, I got some great photos of both males and females in breeding plumage, and the rarity of these images has made them some of my most published wildlife photos.

Though it helps, you don’t need the extensive personal knowledge that I was lucky to have of Rusty Blackbirds. You do, however, need a basic understanding of your quarry.

Some things to consider:

Seasonality

Many species migrate, or are difficult (or easy) to find during certain times of year. Birds are an obvious example. If you want to photograph congregations of migrating Sandhill Cranes and waterfowl, then you need to know when the birds are going to be present. A hint: It isn’t during the summer.

A flock of Sandhill Cranes during migration. You only get a few weeks each years to catch big flocks of this species, so you need to be ready.

A flock of Sandhill Cranes during migration. You only get a few weeks each years to catch big flocks of this species, so you need to be ready.

Seasonality isn’t limited to birds, many mammal species may only be available during a narrow time window. The Brooks River in Katmai National Park, Alaska is a famous spot to photograph bears. Though bruins are present in the area just about anytime from May to early October, if you want to photograph them catching salmon at the falls, you are likely to be disappointed if you schedule your trip in any month but July.

Red Salmon, which run up the Brooks River and leap the falls, are most abundant in July. If you don't catch the run, you won't see the bears trying to catch them at the falls.

Red Salmon, which run up the Brooks River and leap the falls, are most abundant in July. If you don’t catch the run, you won’t see the bears trying to catch them like this.

During the salmon run, the bears get close together and juveniles like these, are forced to bicker for a good fishing spot.

During the salmon run, the bears get close together, and juveniles like these are forced to bicker for a good fishing spot.

Range and habitat

Some species have a continent-wide distribution, others may be extremely limited. Almost all wildlife has preferred habitat that will dictate where, within their larger range, they are likely to be found. The range of Pronghorn includes the better part of the American west, but their habitat, intact grass and sagebrush prairie, is much less abundant. Pronghorn habitat also changes with the season, so you can see how range, habitat, and seasonality, all interact to guide you to the best place at the best time.

A Pronghorn in southern Wyoming, first light.

A Pronghorn in southern Wyoming, first light.

Behavior

You may have particular behavior that you’d like to observe or photograph. Many bird species look their best, and are most active during the breeding season, but for some species, that season can be very, very short. Where I live in the interior of Alaska, the courtship period is extremely short, lasting only a few days to a couple of weeks depending on the species. Birds like the Horned Grebe are commonly found on small boreal forest ponds near my home, but they are most easily photographed during a couple of weeks in late May, when the males are setting up territories.

AK-FAI-HOGR-10

Resources

Thanks to the internet, most of the information you need to explore your target species is available right at your finger tips. In fact, they are so numerous, that there isn’t nearly enough space here to list them all, but I do want to make not of a few of my favorites:

  • eBird:  This site, run by the Cornell Lab of Ornithology is a citizen science site where you can document your sightings of birds. While great for birders, it is also a useful tool for photographers. You can explore data here submitted by birders from across the country and world. The mapping function allows you to look, in very close detail, about where different species are found during the year.
  • iNaturalist:  Though put together in a similar way to eBird, iNaturalist is not limited to birds. Here you can find sighting and identification information on plants, mammals, insects, birds and just about everything else.
  • Field Guides:  Classic paper, or digital field guides are still one of the best sources of information on distribution and behavior of wildlife. I’ve got dozens in my collection, and I use them all.
  • Experts:  You can outsource your research by hiring an expert guide to get you where you need to go. If you want to photograph bears or caribou in Alaska, or the wildebeest migration in Africa, there are people who can help you decide on the best time to do it, get you where you need to go, and even point your camera in the right direction for you. Local expertise is very valuable, and though it saves time, it costs money, and may not be as rewarding as learning about, then finding and photographing your target species on your own.

AK-Tflats-HOGR-02

Ethics

Though a discussion of ethics in wildlife photography warrants a post of its own, I want to emphasize the importance of being respectful of the animals you are trying to photograph and the people with whom you share the view. Don’t disturb the animal, if it moves away, bolts, or flushes, you have gotten too close. Such impacts, when they occur again and again, can cause stress, low reproductive success, nest abandonment, or any number of other problems for wildlife. The animal’s welfare matters more than your image, so please, please, please be careful and respectful.

Conclusion

I take great pleasure in being a naturalist. I’d say I’m a naturalist first and foremost, and a photographer second. That might sound strange, but for me, the two go hand in hand. I find a greater understanding of the creatures I photograph leads to better images, and just as importantly a much more rewarding experience. To be a better wildlife photographer, put down the camera, and pick up a book.

googletag.cmd.push(function() {
tablet_slots.push( googletag.defineSlot( “/1005424/_dPSv4_tab-all-article-bottom_(300×250)”, [300, 250], “pb-ad-78623” ).addService( googletag.pubads() ) ); } );

googletag.cmd.push(function() {
mobile_slots.push( googletag.defineSlot( “/1005424/_dPSv4_mob-all-article-bottom_(300×250)”, [300, 250], “pb-ad-78158” ).addService( googletag.pubads() ) ); } );

The post How to Take Better Wildlife Photos: Be a Naturalist First by David Shaw appeared first on Digital Photography School.


Digital Photography School

 
Comments Off on How to Take Better Wildlife Photos: Be a Naturalist First

Posted in Photography


Major Leica SL firmware update brings better AF, new top shutter speed

15 Apr

Leica has introduced firmware version 2.0 for its SL (Typ 601) camera that brings a major change to the camera’s focusing as well as a new top shutter speed of 1/16,000sec. The firmware takes the number of AF points available in single point mode from 49 to 529. Leica claims it has also made improvements to the autofocusing system’s speed, accuracy and tracking abilities.

Exposure compensation gets a new access point with the update and can now be controlled via the top dial and the thumb wheel on the camera’s rear, while the longest exposure timed by the camera goes from 60 seconds to 30 minutes. The company says that it has created a new top shutter speed of 1/16,000sec by using the fast-reactions of the aperture in the system’s SL lenses.

General image quality of JPEG files is also said to have been optimized, as has the focus peaking feature, and Raw files can now be magnified in review mode.

For more information see the Leica firmware download page.


Press release:

Leica releases firmware update 2.0 for Leica SL mirrorless camera system

New firmware enhances camera performance, handling and workflow

Leica Camera has released a new firmware update for the mirrorless Leica SL camera system. Firmware version 2.0 can be downloaded by registered Leica SL owners from the Leica Owners’ Area (https://owners.leica-camera.com). Alternatively, customers can bring their camera to any Leica Store or Leica’s Customer Service department in the UK, for a complimentary update service.

The numerous new features included in firmware update 2.0 have been designed to further improve the performance of the Leica SL and enable a faster photographic workflow. For example, the autofocus function has been revised and optimised. Already impressively fast in combination with SL-Lenses, it now offers even faster focusing, increased precision and optimised subject tracking. A further enhancement increases the number of AF focusing points available for the single point AF setting to 529.

Also new in firmware 2.0 is direct exposure compensation controlled by the top dial and the click wheel on the back of the camera, in the three automatic exposure modes, P, T and A. The firmware update also extends the range of shutter speeds. Timed exposures of up to 30 minutes can now be captured automatically without additional support and, thanks to the fast, electronically-controlled aperture of the lenses, exposures can be made with the highest shutter speed of 1/16,000s.

Additional improvements have been introduced with regard to JPG quality, white balance, the video menu, Auto ISO options and the focus peaking function. Pictures taken in DNG format can now be magnified for better image evaluation, and the camera is also now compatible with all Leica flash units. An update to the app to allow the use of the optimised functions, and three noise reduction settings, complete the improvements provided by this latest firmware update.

More information can be found at uk.leica-camera.com.

Articles: Digital Photography Review (dpreview.com)

 
Comments Off on Major Leica SL firmware update brings better AF, new top shutter speed

Posted in Uncategorized


5 Quick Tips for Better Blue Hour Photography

11 Apr

tips for blue hour photography

Blue hour is a special time for photographers. The sky turns a different shade of blue, it’s velvety and delicious. It’s easy to take photos during blue hour because you don’t have to worry about harsh lighting or shadows.

In this article, you’ll learn:

  • When blue hour takes place
  • How to capture blue hour photos   
  • The best subjects to shoot for blue hour photography 

When is blue hour?

Blue hour happens twice a day, just before sunrise and just after sunset. It lasts between 20 to 40 minutes, depending on the weather, and your geographical location. During this time, the sky can turn different shades of blue and reflect orange, yellow, purple and pink.

blue hour photography tips 2 blue hour photography

To catch the blue hour, look up your local sunrise/sunset times and plan on being there early. There is also a great website that tells you exactly when the blue hour is, based on the date and your location.

5 easy tips for blue hour photography

Blue hour photos look amazing! While they might appear complicated to create, they aren’t. Blue hour photography is easy, the hardest part might be getting there before it’s over. These tips will help beginners get started with blue hour photography.

Howard Ignatius

By Howard Ignatius

1. Shoot in Shutter Priority mode

During the blue hour, the sky will be relatively dark because the sun is below the horizon. You’ll need a long/slow shutter speed to let in enough light for properly exposed photos.

Putting your camera in Shutter Priority mode allows you to manually choose your shutter speed. A shutter speed of one to six seconds should get good results. For the photos in this post, I used a six-second shutter speed in Shutter Priority.

Jeff Wallace

By Jeff Wallace

In Shutter Priority mode, your camera will choose the aperture and ISO (if your ISO is set to auto) automatically. This makes things easier when you’re getting started with blue hour photography.

2. Use a remote or self-timed shutter release

Pressing the shutter release button can cause camera shake, which will create blurry photos. To avoid this, use your remote or set the camera’s self-timer to two seconds.

3. Use a tripod

As mentioned above, you’ll be using a slow shutter speed, so a tripod will help you capture a sharp image. If you hand hold your camera during a slow shutter speed, your photos will be blurry because of camera shake.

Image by dPS Managing Editor – Darlene Hildebrandt

Image by dPS Managing Editor - Darlene Hildebrandt

Image by dPS Managing Editor – Darlene Hildebrandt

4. Shoot in RAW

It’s best to capture RAW files when shooting the blue hour. This will give you the highest quality capture, and the best advantages when editing. One nice advantage of shooting in RAW is that you can adjust the exposure compensation in editing. This way, if your photos came out a little too dark or light, you can adjust them up or down accordingly.

But if you have a point and shoot that only captures JPEGs, don’t worry – you can still get great blue hour shots.

Image by dPS Managing Editor – Darlene Hildebrandt

5. Include electric lights

Your blue hour photography will be easier if you choose a location near electric lights. This extra light may also add drama and interest to your photos.

car-trails-750px-03

Image by Darlene Hildebrandt

blue hour photography tips

Image by Dena Haines

While you want electric lights in your photos, don’t shoot too close to them. If you are standing too close to the light source, lens flare could be a problem. You could get unwanted, randomly placed, light spots in your photos.

What to photograph during the blue hour

The easiest subjects to get started with are landscapes that include electric lights.

Mike Boening Photography

By Mike Boening Photography

Miroslav Petrasko

By Miroslav Petrasko

Some blue hour landscapes to consider include:

  • Cityscapes
  • Busy winding roads
  • Beaches
  • Wharfs
  • Bridges
  • A fair or circus
  • Marinas
tips for shooting the blue hour

I love blue hour photos that include water reflections.

Mac H (media601)

By Mac H (media601)

What are your favorite blue hour subjects? Let me know by commenting on this post. And if you have any tips for blue hour photography, please share as well as your images.

googletag.cmd.push(function() {
tablet_slots.push( googletag.defineSlot( “/1005424/_dPSv4_tab-all-article-bottom_(300×250)”, [300, 250], “pb-ad-78623” ).addService( googletag.pubads() ) ); } );

googletag.cmd.push(function() {
mobile_slots.push( googletag.defineSlot( “/1005424/_dPSv4_mob-all-article-bottom_(300×250)”, [300, 250], “pb-ad-78158” ).addService( googletag.pubads() ) ); } );

The post 5 Quick Tips for Better Blue Hour Photography by Dena Haines appeared first on Digital Photography School.


Digital Photography School

 
Comments Off on 5 Quick Tips for Better Blue Hour Photography

Posted in Photography


5 Tips for Using Risk Taking as a Tool for Better Photography

03 Apr

With the rising tide of enthusiast photographers and the ubiquitous camera phone, there is more competition for eyeballs than ever before in the photo industry. How can you ever stand out from the crowd to be noticed? The trick is both deceptively simple and incredibly complicated: take more risks. Great photographers rarely play it safe, but before you head into the world with reckless abandon, let’s dive into what kinds of risk taking is productive.

1 – Your camera is a tool, not a pet

You’ve received your very first, very shiny, very expensive DSLR kit. Your instincts are to cradle and protect the expensive piece of equipment. Don’t. While you shouldn’t fully submerge your camera, or throw it off the balcony and expect good results, coddling it like your newborn child won’t do you any good either. It’s a tool and is meant to be used out in the world. It should get a few scratches in the paint and some wear and tear on the grip. Take a look at the following images and ask yourself where the camera is.

CmscottiRisk01

CmscottiRisk02

CmscottiRisk03

For the first two, the camera is sitting on the bow of a kayak roughly four inches above the water. For the third image, the camera is a half inch off the muddy ground. Water is often a camera’s worst enemy, but without the risk of the camera getting wet, these images would not be possible. Water is not your camera’s only enemy though. Dings and scrapes, dust, and even wild animals pose a threat.

That said, there are ways to be smart about risk taking and mitigating potential problems. For example, when kayaking you could store the equipment in a dry bag, so it is only exposed when you stop to take a photograph. You could have a friend kayak with you and help stabilize your kayak, or warn you when a large wave is coming. (It is recommended to do outdoor activities with a buddy anyway for general safety). You can use various coverings, coatings, and cases as well to protect your gear.

CmscottiRisk04

You don’t even have to be in the water to expose your camera to harsh elements. The spray from Wli falls in Ghana was strong enough to reach me 300 meters away. I kept a light jacket in front of my camera until the right moment.

2 – Know your tools

In order to take risks in a smart fashion, it helps to know the limitations of your tools. Does your camera have dust or weather sealing? Does the lens? Did you remember to put a clear (UV) filter on the front of the lens to protect against the basic threats? Is the body primarily plastic? Does it have a metal frame? A quick visit to the manufacturer’s website or a websearch for your equipment’s user manuals should get you the information you need.

There are many more things to consider, but the point is to learn as much as possible about your kit. Your DSLR and lens may be weather sealed and can handle light rain but the audio recorder may not be and may wind up being the weak link.

It’s wise to know how to use your camera well. Often in risky situations you will want to expose your equipment to that risk for the least amount of time possible. The better you know your camera, the less time you’ll spend fiddling with settings. Be sure to practice using your equipment in a low-stress environment, before exposing yourself to a risky situation. Digital Photography School is a great resource for articles on the nitty-gritty workings of your camera, so you don’t have to travel far to get started mastering your gear.

3 – Do your homework on your subjects too

CmscottiRisk05

Let’s say you have been given an assignment that involves getting into an occupied cage at the zoo. How do you prepare? It isn’t enough in this situation to know your gear alone. You need to learn about the animals you are interacting with, some basics on their behavioural cues, and what potential stressors may be present. Luckily in this situation you are likely to get help from the zoo’s staff; in fact, they are required to enter the enclosure with you. But be sure to meet with them prior, and take some time online or in a library to supplement your knowledge. Be sure to ask questions specific to your situation as well.

CmscottiRisk06

Photo courtesy of Clare Hancock.

In this case, what do you do if an animal approaches you and grabs, bites, or otherwise latches onto the camera? It turns out in the case of lemurs, just hold still and they’ll lose interest pretty quickly. The point is don’t panic and don’t be afraid to ask questions, even if they sound far-fetched.

CmscottiRisk07

What would you do in this situation? Photo courtesy of Clare Hancock.

In the same vein as asking questions to be prepared, don’t be afraid to ask questions during a shoot either. You are only expected to be an expert photographer. In this particular example, the zoo staff are there to help everything go smoothly. Don’t let pride prevent you from tapping into their expertise. Consider the photo above, I had no idea what to do when a wallaby and her baby decided I made a comfy resting place. I checked with the keepers to make sure there wasn’t any risk to myself or the wallabies. There wasn’t, so I continued to shoot from that position until she eventually hopped away.

Being informed is the best way to enter a potentially risky situation. The zoo session may seem specific, but consider what would go into photographing a tall ship setting sail, or snowboarders screaming down slopes, or even your own dog in your backyard. Snapping good images often involves getting in close, or shooting from a unique angle that could involve having a camera accidentally knocked out of your hands on a crowded ship deck, having snow sprayed onto your camera, or even having an excited dog slobber all over your equipment or tackle you. Do some homework, be aware of your surroundings, ask questions and you will have mitigated most of the riskiness.

4 – Taking risks in your career

Using risk as a tool in your career is not specific to photography, but it is especially important in this field. If you always use the same tried and true portrait poses, and standard three point lighting that you learned in your high school photo course, you are likely going to be stuck at a studio in the mall holding a stuffed giraffe in one hand and a remote trigger in the other, praying that baby Jesse stops crying. (If you work at one of these and enjoy your job, that is awesome and you are honestly a much more patient person than I). Most photographers I know have bigger dreams than this, whether it is running their own mall studio or becoming a successful commercial photographer. Unless you run into some magnificent stroke of luck and were born with real talent, this is going to a lot of time, more effort, and a few risks.

I am no Warren Buffett when it comes to business sense, but I can say the biggest jumps in my own career came from taking big risks. When former Ghanaian President John Atta Mills passed away in July of 2012, I was just coming out of graduate school and interning at the Daily Guide newspaper in Accra. President Mills was the first Ghanaian president to die in office and his state funeral was considered one of the most important stories in the region. I had just arrived in country, knew only what I had read about the culture and only had two weeks to convince my new, sceptical editor to let me be a part of the team covering the story. I worked very hard with my new coworkers, contributing to as many stories as possible, and hanging out with the reporters to learn about Ghanaian politics, history and culture.

CmscottiRisk08

Two days before the funeral, I convinced my editor to let me go on the assignment. Going in I was scared. I felt like I could never be prepared enough, and doubted every decision I made during the assignment. Regardless, I took the risk of screwing up an important assignment, and managed to rise to a challenge. The images ran front page and an entire centrefold was dedicated to my images of the event. Moments like these demand taking risks. If you have ambitions beyond photography as a hobby, you will need to get used to going in over your head. Risk will always force you to be a better photographer.

CmscottiRisk09

However, the risks you can take regarding your career can be mitigated to some extent as well. The key, as you already know, is being prepared. This is a much more abstract process compared to mitigating risks related to camera equipment. While some things are the same, – knowing your tools and subjects well enough to work efficiently – others go a little beyond the act of photography itself. They involve politics in your particular branch of the profession, and knowing just how far you can push yourself.

CmscottiRisk10

As I eluded to earlier, I am not the kind of guy you will see doing family portraits or weddings. I am horrible at convincing the average person to smile or look natural. I simply am no good at those kind of portraits. That said, after I won my first photo award I ran out and bought a Vivitar flash, cloth backdrop and three hot lamps. I was convinced I was going to quit my job waiting tables and pay for my impending college career with my photographic talent. I was wrong… very wrong. I managed to perform poorly on three portrait sessions before realizing that my foray may have been a mistake, and I was out a few hundred dollars in studio gear.

I knew nothing about the family portraiture business. I didn’t do any research aside from reading a couple of gear reviews and really burned myself in the process. Worst of all I didn’t know my equipment very well. I had a total of one lesson in studio lighting under my belt at the time and may have purchased a book, that to this day, I have read a total of three pages of. I took a dumb risk and hurt my confidence and disappointed people in the process.

CmscottiRisk11

Crappy portrait of Markus Sales

5 – When things go wrong

There is one catch to risk taking. What if it doesn’t pan out. You may end up with broken equipment, angry customers, or bodily injury. What now?

Broken equipment is relatively easy to deal with: mourn the loss of your trusted tool, then buy a new one. If you are worried about not being able to afford replacing equipment, talk to your insurance company about whether your homeowners or renters insurance will cover your gear outside your home. Specific camera (and commercial) insurance policies are available as well. Be sure to find out what is covered and how they handle claims.

Smoothing customer relations or repairing a career are tougher issues. Patience and good customer service skills will go a long way, but every case has to be approached individually. Giving a discount for a mediocre portrait shoot might work in one case, but blowing an expensive commercial shoot is going to take a whole different approach. I have been lucky enough that I haven’t had to do this in my own career, but I encourage joining professional associations and talking to other professional photographers to learn what consequences there might be, and how to recover from them.

Bodily injury is the worst on this list. If you are risking your life or serious injury for a photograph, STOP! No photograph is worth getting hurt or dying for. There has been a recent rash of people dying while taking selfies or trying to capture memories from crazy angles over the edge of a skyscraper. It doesn’t matter if it could be the best photo ever taken, this kind of risk is never worth taking in the first place. Broken cameras can be replaced, careers rebuilt, and customer relations smoothed over, but the best photo of your career is worthless if you die or are maimed in the process. Just don’t do it.

One final disclaimer

The nature of risk taking is that the result could be game changing good, or painfully bad. You can fail and fail hard. The advice given here is simply what I have learned over the course of my own career, and it may not apply to you at all. There is no guarantee that taking any kind of risk will result in a positive outcome. Ultimately, you must decide if the risks you take – if any – are worth taking. The outcomes of taking those risks will be entirely yours, so use your best judgment. If you do decide to take a risk, be smart about it and do everything in your power to lessen that risk. Best of luck out there.

googletag.cmd.push(function() {
tablet_slots.push( googletag.defineSlot( “/1005424/_dPSv4_tab-all-article-bottom_(300×250)”, [300, 250], “pb-ad-78623” ).addService( googletag.pubads() ) ); } );

googletag.cmd.push(function() {
mobile_slots.push( googletag.defineSlot( “/1005424/_dPSv4_mob-all-article-bottom_(300×250)”, [300, 250], “pb-ad-78158” ).addService( googletag.pubads() ) ); } );

The post 5 Tips for Using Risk Taking as a Tool for Better Photography by Christopher Scotti appeared first on Digital Photography School.


Digital Photography School

 
Comments Off on 5 Tips for Using Risk Taking as a Tool for Better Photography

Posted in Photography


5 Tips to Take Better Sunset Photos – and Why Not to Photograph the Sunset Directly

31 Mar

As a landscape photographer, I participate in many online groups, and I also teach classes where I get the opportunity to see less experienced photographers’ work. I often see some very good work, but many times I also see missed opportunities. Newer photographers just getting started photographing landscapes often times become so enamored by the colors in the sky, that they neglect other areas of the image. I often see images with weak, underexposed foregrounds, and poor compositions that keep them from being good photos and relegates them to being just pretty snapshots.

Sunset in the background with a starburst

Don’t get the wrong idea. I often photograph at sunrise or sunset. But, the sun or sky is rarely the subject of the photo. It may be an element in the image, but the subject is generally something else. In many ways, it can be more difficult to make a great image at sunset or sunrise, because there is a tendency to be drawn to the pretty colors in the sky. But as photographers, we really need to pay attention to the other elements in the image to ensure we’re creating a complete composition. So below are a few tips to help improve your sunset or sunrise photos.

1- Put the sun in the background

This tip is the most obvious. Sunsets make great backgrounds, but rarely do they make great subjects. You need to find a good foreground. The gorgeous colors in the sky can be so vibrant that they really allow us to see our surroundings differently. The play of light and shadow over objects in the foreground, due to that great directional light given off when the sun is lower in the sky, helps create interest that might not be there in the middle of the day when the sun is higher.

A sunrise in the background adds interest

The best way to do this is to find something of interest right in front of you. Use a wide angle lens, such as the 16-35mm or something around that range, zoom out to as wide as you can, and put your foreground object a few feet in front of you. Stop down and set your aperture to f/11 or smaller, and focus on your foreground object to ensure that it’s sharp. If you want to add some extra interest, try stopping your lens down as far as you can. This will help create a starburst where the sun is, which will add a little extra interest in your scene.

One thing to keep in mind, is that the exposure for your foreground subject and the background exposure, are likely going to be very different. You have a few options here. The first would be to expose once for the foreground, and once for the background, and then blend them together in Photoshop. A great article on blending exposures is 5 Easy Steps To Exposure Blending for High Contrast Landscapes. Next, and generally my preferred method, is to use a graduated neutral density filter to try and darken the bright sky in the background, so that it is more balanced with the foreground subject. Read Using Graduated Neutral Density Filters for Landscape Photography for more on ND Grads.  The last, and easiest option, is to create a silhouette of the foreground objects, while properly exposing the colorful sky and sun in the background.  This works best with a singular object with a distinctive form, such as a bridge, a tree, a distinctive building, or a person in a distinctive pose.

2 – Photograph with the sun at your side

Photograph with the sun at the side

In this case, the sun itself won’t be in your scene at all. The magic of sunsets or sunrises is the soft, warm, directional light they offer. This light can create tremendous light and shadow play within the scene, making textures in your foreground especially desirable. Rocks, logs, trees, grasses, and undulations or patterns on the ground, will create interesting shadows and highlights that draw your viewer’s eye into the scene. In this case, it’s often best to put the sun to your side, so that it rakes across the scene, letting the shadows and highlights play from one side to the other.

Use-Textures-To-Catch-light

With a scene like this, a polarizing filter may help as well, as they are most effective when the camera is aimed 90° from the sun. This will help deepen blue areas of the sky, enhance other colors, and reduce any haze that may be in the scene. You may need to make some choices about exposure, if the contrast between highlight and shadow in the foreground is too great. A graduated neutral density filter can help keep the sky under control if it is still too bright against the foreground.

3 – Keep the sun at your back

Put the sun behind you

At sunrise or sunset, that soft warm light that I mentioned as being great from the side, is also great from behind you. This will help create a soft frontal light on your scene, illuminating all of the details. This is likely to be the easiest exposure of the three situations, in that the light will be very even, with no bright highlight or deep shadow areas in the scene. You’ll likely get soft, warm pastel colors if there are any clouds or haze in the sky to reflect the sun’s light.

Be careful when composing your image, as the sun behind you will cast a long shadow, and you may end up with your own shadow in the photo. To minimize this, try crouching down low, and setting your tripod as low as possible to help shorten the shadow. Also, if using filters for longer exposures, on DSLRs with optical viewfinders, the sun can enter the camera from the rear, affecting your exposure. Take care to cover your viewfinder in these instances.

Sun-At-Your-Back

4 – Arrive early, stay late

You’ll want to get there early for sunrise. The color in the sky can start half an hour, or more, before the sun actually rises, with clouds first showing subtle traces of pink and purple before the red, orange, and yellows appear as the sun breaks the horizon. You’ll want to be set up and ready when that happens, which means trekking through the dark to your location. Advance scouting can be helpful for this.

Stay Late

The same is true at sunset, but in reverse. Just because the sun has gone down, doesn’t mean that the show is over. Generally speaking, the sky will continue to light up, and colors will continue to change for about 30 minutes after the sun goes down. Many photographers have packed up and gone before this happens. Patience will reward you with more subtle color changes, such as reds going to purples and blues, rather than the vibrant yellows and oranges you get during the initial phases of the sunset.

5 – Shoot RAW

More than any other time to shoot, sunset or sunrise creates dramatic colors and fantastic play between light and shadow. Because of that, it can be difficult to try and capture the detail in the shadows or highlights, depending on which way you bias your exposure. A RAW file contains much more information than a JPEG, which will allow you to bring out the details in shadow and highlight areas that may be lost if shooting JPEG files. In addition, shooting RAW files allows you to adjust your white balance in processing to give you better control over the overall tone of the image.

For more on processing RAW files, check out Understanding the Basic Sliders in Adobe Camera RAW, and for more on why you might want to consider photographing in the RAW format, see 5 Reasons To Shoot Your Landscape Images in RAW.

What’s your favorite sunrise or sunset photography tip? Please post your tips and images in the comments below!

googletag.cmd.push(function() {
tablet_slots.push( googletag.defineSlot( “/1005424/_dPSv4_tab-all-article-bottom_(300×250)”, [300, 250], “pb-ad-78623” ).addService( googletag.pubads() ) ); } );

googletag.cmd.push(function() {
mobile_slots.push( googletag.defineSlot( “/1005424/_dPSv4_mob-all-article-bottom_(300×250)”, [300, 250], “pb-ad-78158” ).addService( googletag.pubads() ) ); } );

The post 5 Tips to Take Better Sunset Photos – and Why Not to Photograph the Sunset Directly by Rick Berk appeared first on Digital Photography School.


Digital Photography School

 
Comments Off on 5 Tips to Take Better Sunset Photos – and Why Not to Photograph the Sunset Directly

Posted in Photography


3 Reasons Why Mirrorless Cameras are Better than Digital SLRs for Focusing

30 Mar

Mirrorless cameras and focusing

A lot has been written about the drawbacks of autofocus performance from mirrorless cameras. Most of this focuses on the tracking of moving subjects – an area where the phase detection autofocus found in digital SLRs is still superior (although the gap is closing).

But when it comes to focusing on still subjects, the mirrorless camera is a better tool. Surprised? If you’ve never used a mirrorless camera, you may be. Let’s take a look at the reasons why.

1. Phase detection versus contrast detect autofocus

Mirrorless cameras have a different autofocus system than digital SLRs.

In a digital SLR most of the light coming through the lens is reflected up by the mirror, into the pentaprism and through the viewfinder. A small part is deflected downwards to a dedicated autofocus sensor. It uses a system called phase detection autofocus to calculate the camera to subject distance, and tell the lens where to focus.

Mirrorless cameras and focusing

The red lines in this diagram show the path that light takes through an SLR camera with the mirror in the down position. Most of the light is reflected into the pentaprism and the viewfinder. Part of it is reflected downwards towards the autofocus sensor.

The advantage of phase detection autofocus is that it’s fast (generally speaking – but it also depends on which camera you have) and very good at tracking moving subjects. It’s the best system anyone has managed to come up with for an SLR camera.

However, phase detection autofocus has a significant weakness – lack of accuracy.

There are two main reasons for this. The first is that most digital SLRs have a combination of cross-type and single line autofocus points. Cross-type autofocus points are the most accurate, and should always be used when focus is critical (for example, when using a prime lens at its widest aperture), otherwise the camera may not focus where it is supposed to. Your camera’s manual will tell you which of its AF points are cross-type.

Whenever you use a non cross-type autofocus point, you cannot rely on the camera to focus accurately. This is fine when using small apertures, which give you plenty of margin for error, but not when focus and accuracy is critical.

The second reason is to do with camera and lens calibration. Even when you use a cross-type autofocus point your camera may not focus exactly where it is supposed to. For accurate focus, every part of your camera setup – from the autofocus sensor, to lens and autofocus motors that tell the lens where to focus – must be working in perfect harmony. It only takes a small degree of misalignment to throw the accuracy of the system out.

Most of the time you won’t notice, because there is sufficient depth-of-field to make the focusing inaccuracies irrelevant. But if you use a wide aperture, especially with a telephoto lens, then depth-of-field is measured in millimetres, and accurate focus is essential.

For example, if you are taking a portrait then it is conventional to focus on the model’s eyes. If you miss focus, and her eyes are soft, then people will notice and the portrait will lose its impact.

Mirrorless cameras and focusing

I made this portrait with an EOS 5D Mark II and 85mm lens set to f1.8. With this camera it is necessary to measure and calibrate the autofocus system to ensure accurate focus at wide apertures.

Most mid-range and high-end digital SLRs have a feature that allows you to measure and compensate for inaccurate focusing. Manufacturers have different names for this – Canon and Sony use the term Autofocus micro-adjustment, Nikon calls it Autofocus fine tune, Pentax uses the term Autofocus adjustment and Olympus Autofocus focus adjust. It’s bit of a long winded process – you have to test your lenses by focusing on a ruler, or a purpose made scale, to see if the focus is accurate, and make adjustments if it isn’t.

You can also get your camera and lenses calibrated at a service centre. This is the only way to calibrate an SLR camera that doesn’t have the above feature built-in.

That was bit of a long explanation, but crucial if you are to understand why phase detection autofocus is not as accurate as it should be.

How are mirrorless cameras different?

So, how do mirrorless cameras differ? As they don’t have a mirror, there is no way of deflecting light to a dedicated autofocus sensor. The solution is to take a reading from the sensor. The camera looks at the point on the sensor which is meant to be in focus, and adjusts the lens until maximum contrast is achieved. This is called contrast detect autofocus.

This system is slower, because the camera has to move the lens first one way, then the other, to find the sharpest point. But, it is much more accurate (for still subjects).

With a mirrorless camera autofocus micro-adjustment is redundant. You don’t need it, and you will never have to measure or calibrate the camera’s autofocus system. It also doesn’t matter which autofocus point you use, as they all work equally well. That is why, for still subjects, autofocus in mirrorless cameras is superior to that of digital SLRs.

Mirrorless cameras and focusing

I made this portrait with a 56mm lens at f/1.2 with my Fujifilm X-T1 mirrorless camera. With this camera it is easy to focus on the model’s eye. There is no need to calibrate the camera’s autofocus system.

2. Manual focusing

Mirrorless cameras are also a better tool for utilizing manual focus lenses.

Modern digital SLRs are not designed to be helpful with manual focus lenses. The split prism focusing screens of the past are gone, and assistance is limited to a light that comes in the viewfinder when the subject underneath the selected AF point comes into focus.

Mirrorless cameras are different. They have a tool called focus peaking, which is specifically designed to help you manually focus a lens. The camera highlights the parts of the scene that are in focus, so that you can see which areas are sharp. You can also magnify the image at the touch of the button, making it even easier to see whether the subject is sharply focused.

This feature works best when using lenses at wide apertures. Both tools take advantage of the camera’s electronic viewfinder, a feature that most digital SLRs don’t have.

Mirrorless cameras and focusing

This mock up shows how focus peaking works. I made the portrait with a Helios 58mm manual focus lens at its widest aperture setting of f/2. The red lines indicate how focus peaking shows you what is in focus.

3. Hyperfocal distance

Fujifilm cameras have another tool that will be of interest to landscape photographers as it helps you instantly find the hyperfocal distance without referring to tables or smartphone apps.

The viewfinder has a depth-of-field scale that shows you the point you are focused on and the area in focus on either side, according to the selected aperture. If you move the focusing ring until the depth-of-field scale touches the infinity mark at one end, you have found the hyperfocal distance point. It’s quick and easy.

To be honest, I don’t know if this feature is available in any brand of mirrorless camera other than Fujifilm. I’d be grateful if Sony/Olympus/Panasonic, etc., owners would let us know.

Mirrorless cameras and focusing

This diagram shows how the depth-of-field scale works. The bar shows the point the lens is focused on (white), and how much of the scene is in focus (blue). The lens is focused on the hyperfocal point in this made-up example.

Since buying my first Fujifilm camera a little over 18 months ago, I’ve been pleasantly surprised by what a great tool mirrorless cameras are for photography. They are much better than my old digital SLR for focusing on still subjects, or for using manual focus lenses.

The difference is so great that I predict that one day most photographers will use mirrorless cameras, and digital SLRs will be a niche item built for photographing sports and wildlife.

But what do you think? Please share your thoughts, or ask any questions about focusing, in the comments below.


Mastering Lenses

If you want to know more about lenses and autofocus check out my ebook Mastering Lenses: A Photographer’s Guide to Creating Beautiful Photos With Any Lens.

googletag.cmd.push(function() {
tablet_slots.push( googletag.defineSlot( “/1005424/_dPSv4_tab-all-article-bottom_(300×250)”, [300, 250], “pb-ad-78623” ).addService( googletag.pubads() ) ); } );

googletag.cmd.push(function() {
mobile_slots.push( googletag.defineSlot( “/1005424/_dPSv4_mob-all-article-bottom_(300×250)”, [300, 250], “pb-ad-78158” ).addService( googletag.pubads() ) ); } );

The post 3 Reasons Why Mirrorless Cameras are Better than Digital SLRs for Focusing by Andrew S. Gibson appeared first on Digital Photography School.


Digital Photography School

 
Comments Off on 3 Reasons Why Mirrorless Cameras are Better than Digital SLRs for Focusing

Posted in Photography


Like Fine Wine – Creativity Gets Better With Age

11 Mar

As a culture we are constantly encouraged to believe that youth is a magical time – that everything is at our fingertips, easily captured, and that age will only bring a withering of possibilities and opportunities.

DPS creativityAnthonyEpes01

“Aging seems to be the only available way to live a long time.” – composer, Daniel-Francois-Esprit Auber

Creativity is a huge victim of this idea – that aging destroys it rather, than helping us to flourish. Well, I don’t believe that at all. Creativity can wither with age – but it doesn’t have to. What about our huge amount of experience that we gather throughout life? Isn’t that pretty useful for creating?

Here are some ideas on the benefits of keeping creative with your photography as you age, and why you can get more creative, not less, as you get older.

Very few of us can tap the creative genius at a young age

When you are taking photos and being creative, you want to aim to access that wild creative place deep inside you, where pure inspiration flows. Some people call it the creative flow state. For some it’s a zone, but it could be thought of as a well of inspiration. But, that can be a hard place to get to – you’re encouraged in so many ways in life to prioritize your practical skills (getting a job, buying a house, raising children, etc.) over your creative skills. Some people can access their inspirational, creative space when they are young, but for many it takes years. But what’s great about that, is that it’s only a question of getting there, not whether or not you have it.

“Every day we slaughter our finest impulses. That is why we get a heartache when we read those lines written by the hand of a master and recognize them as our own, as the tender shoots which we stifled because we lacked the faith to believe in our own powers, our own criterion of truth and beauty. Every man, when he gets quiet, when he becomes desperately honest with himself, is capable of uttering profound truths. We all derive from the same source. there is no mystery about the origin of things. We are all part of creation, all kings, all poets, all musicians; we have only to open up, only to discover what is already there.” – author, Henry Miller

DPS creativityAnthonyEpes02

I don’t remember my youth being a place of unfettered, wild creativity. I was a pretty good photographer, but I wasn’t one of those types of artists who excelled in their twenties (think Rankin, Bob Marley, or JD Salinger). So unless you’re one of those young creative geniuses, I reckon that you could be on the same path as me – my creativity is building, and improving over the years.

Let it give you permission for freedom

But becoming more creative as you age isn’t a given, it’s a choice. As a culture we are more likely to give into the idea that we can’t be as creative with age, as when we were young.

“No, that is a great fallacy; the wisdom of old men. They do not grow wise. They grow careful.” – author, Ernest Hemingway.

But it doesn’t have to be that way. You can use what you’ve learned, and seen throughout life to make you more cautious, or you can allow it to give you permission to ignore your fears, ignore what others tell you about aging, and just choose freedom.

DPS creativityAnthonyEpes03

You are not who you think you are (unless you want to be)

Our brains are amazing at creating stability and continuity, so that we can live day-to-day, almost on auto-pilot. Neuroscientists now say that 95% of who you are (habits, behaviours, beliefs) is set by the age of 35. And 70% of the thoughts you will have today, you also had yesterday! So if you aren’t in the habit of being creative, it might seem a little hopeless.

But – and this is an awesome but – neuroscientists are now also saying that we can change our brains any time we like. So even if you haven’t lived a creative life, and are only turning to it at 40, 60 or 85 – you can quite easily change your brain’s habits. Becoming super creative is completely possible at any age. You don’t have to be stuck in the same place, doing the same things, and being the same way forever.

Creativity keeps your mind young

“There is a fountain of youth: it is your mind, your talents, the creativity you bring to your life and the lives of people you love. When you learn to tap this source, you will truly have defeated age.” – actress, Sophia Loren

Some kind of creative thinking, is an amazing way to keep your mind young. Because as Edward de Bono says, in order to be creative you have to use your mind in a different way than before. Anything you do that is new to your brain, creates new neural pathways, and engages those dusty grey parts that maybe you hadn’t used before.

DPS creativityAnthonyEpes04

Photography is about communicating feelings and experiences

“Photography for me is not looking, it’s feeling. If you can’t feel what you’re looking at, then you’re never going to get others to feel anything when they look at your pictures.” – photojournalist, Don McCullin

What more do we have as humans as we age, than experiences, and a rich storehouse of memories and feelings? Let’s draw from that to inject our photos with more meaning and feeling. Let’s use that experience to connect with our subjects, to go deeper into the myriad of experiences happening all around us every day.

“Photography is a way of feeling, of touching, of loving. What you have caught on film is captured forever… it remembers little things, long after you have forgotten everything.” – photographer, Aaron Siskind

Unshackled from expectation – “The man who views the world at 50, the same as he did at 20, has wasted 30 years of his life.” – boxer, Muhammad Ali

I love that now I am in my forties, I care a lot less about what other people expect of me, and my photography. I can go on my own way, and do the things that really inspire me. And you know what, the more inspired I am, the better my photography turns out – so that’s a double win!

DPS creativityAnthonyEpes05

Age can bring freedom from expectation. Many people mind less about what people think as they get older. Use that. Create not for some specific goal, but just for the sheer joy of it, the wonder of discovering new subjects, the beauty of light, the amazing feeling of walking not to get somewhere, but to just see new things.

“We move what we’re learning from our heads to our hearts through our hands. We are born makers, and creativity is the ultimate act of integration – it is how we fold our experiences into our being.” – professor, PhD, author, Brené Brown

Taking photos energizes your mind

Creativity is an amazingly powerful way to smash through lethargy, and that beautiful French word, ennui (a feeling of listlessness and dissatisfaction arising from a lack of occupation or excitement). Maybe your job is boring, maybe your life is a lot of endless tasks that make you feel a bit sludgy, maybe you’ve retired and are thinking – now what?! Well, what better way to greet lethargy, than to meet it with the scintillating excitement of creating something. We are all born to be creative, it’s in our bones, the very fabric of our being. Maybe we hide it under deep layers of other stuff – but it’s still there, burning like a small ember of inspiration.

DPS creativityAnthonyEpes06

Creativity is a journey, not a destination

Creativity is a liberating experience. It will help you discover new parts of yourself, but also help you see the world in a new and refreshing way. Let it liberate you. Let it fill your life with awe at the beauty, craziness, and amazingness of what lies around us in this world.

You are never too old, too set in your ways, too full of habit to embrace the creative journey. Photography has brought amazing, interesting, challenging and awe-inspiring experiences into my life, which make me feel good to be alive.

“Putting things off is the biggest waste of life: it snatches away each day as it comes, and denies us the present by promising the future.” – Seneca

Whatever you do, don’t let age stop you.

Carpe diem! Because if not now, then when?


googletag.cmd.push(function() {
tablet_slots.push( googletag.defineSlot( “/1005424/_dPSv4_tab-all-article-bottom_(300×250)”, [300, 250], “pb-ad-78623” ).addService( googletag.pubads() ) ); } );

googletag.cmd.push(function() {
mobile_slots.push( googletag.defineSlot( “/1005424/_dPSv4_mob-all-article-bottom_(300×250)”, [300, 250], “pb-ad-78158” ).addService( googletag.pubads() ) ); } );

The post Like Fine Wine – Creativity Gets Better With Age by Anthony Epes appeared first on Digital Photography School.


Digital Photography School

 
Comments Off on Like Fine Wine – Creativity Gets Better With Age

Posted in Photography