RSS
 

Archive for September, 2017

How to Understand Reflected Versus Incident Light and Get More Accurate Exposures

14 Sep

Do you ever get under or overexposed photos when you use your camera’s light meter? Do you get frustrated that even in auto-mode you can’t get the correct exposure? That’s because there are two different type of light to deal with when taking a photo.

When you make a photograph the light is your raw material, which is why it’s important to understand how it works. It’s a very broad topic to cover, so for this article, we are just going to focus on the difference between incident and reflective light because that’s the key to getting your exposure right.

Incident versus reflective light


We all know this difference in a very intuitive way; let me give you an everyday example: when there is a sunny day, do you wear white clothes or black ones? Easy! You wear white or at least light colors, but why? If the sun will be the same, why wouldn’t you wear dark colors? Because you know that dark colors absorb light and therefore you’ll feel the heat more than wearing white which will reflect more light and keep you fresher. This is the same principle you need to apply when measuring the light for photography.

The difference explained

Diagram How to Understand Reflected Versus Incident Light and Get More Accurate Exposures

Incident light is that which is illuminating your scene. It falls on the subject before being altered (reflected) by it which is why it’s also a more accurate light reading.

When light hits objects it gets transformed by them and reflected out; this is what we perceive and what the camera captures and reads. This is called reflective light.

Light metering

Let’s see how these two concepts apply to light metering and exposure when you take a photo. In the next examples, I always used the same light for each.

In this first shot, I metered the light once I had framed the image I wanted, so it gave me a reading making an average of the reflective light.

General Reading - How to Understand Reflected Versus Incident Light and Get More Accurate Exposures

The settings were ISO 400, f/5.6, with a shutter speed of 1/80th.

And the resulting photograph looked like this:

General Reading Result - How to Understand Reflected Versus Incident Light and Get More Accurate Exposures

Reflected light from a dark subject

However, like we said when talking about clothes, dark objects absorb light. So if I make the reading by measuring the black part of the photo, the settings that were “correct” before, now appear to be underexposed.

Black Reading - How to Understand Reflected Versus Incident Light and Get More Accurate Exposures

Even if the lighting is always the same, your camera thinks there is less. As a result, your photos will be overexposed.

Black Reading Result - How to Understand Reflected Versus Incident Light and Get More Accurate Exposures

Exposure: ISO 400, f/5.6, shutter speed 1/13th.

Reflected light from a light subject

On the other hand, light objects reflect most of the light, so your camera will receive the message that it needs to reduce the exposure if you meter off something light.
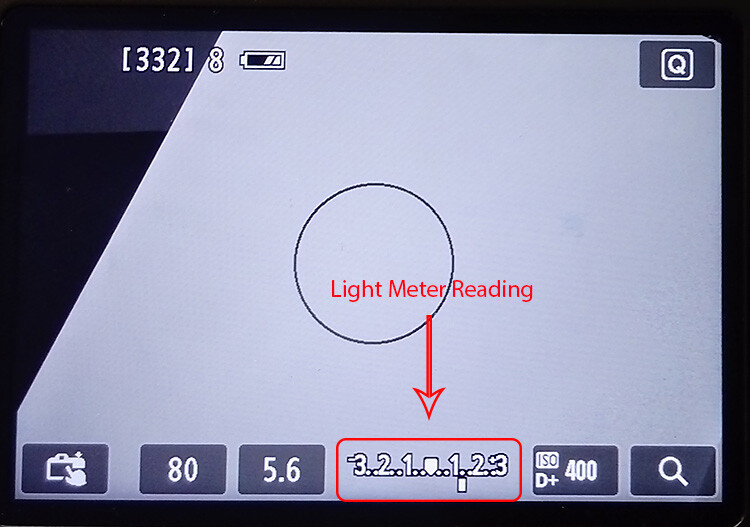
White Reading - How to Understand Reflected Versus Incident Light and Get More Accurate Exposures

And as a result, you will end up with underexposed images.

White Reading Result - How to Understand Reflected Versus Incident Light and Get More Accurate Exposures

Exposure: ISO 400, f/5.6, shutter speed 1/200th.

None of these three readings gave you the correct exposure on your image because none of them were about the incident light. In order to get this accurate reading, you need to use a handheld external light meter, which can be very expensive. Fortunately, there are other ways to get the right exposure without having to spend a fortune.

Black and white… and gray

Back in the 1930s, a photographer called Ansel Adams developed a technique for the optimal exposure of photographs by dividing the degrees from light to dark into 11 zones, therefore it’s called the zone system. Everything in the world has a color and lightness that correspond to a zone. All light meters, including the one integrated into your camera, are designed to give you the middle zone: Gray V that reflects 18% of the light. So, what you need in order to have a correct exposure is to measure the light reflecting off of this tone.

Gray card Reading - How to Understand Reflected Versus Incident Light and Get More Accurate Exposures

You’ll find gray cards on the market which are used to calibrate your exposure and white balance. They are a very practical and economical way to turn the reading of your reflective light into an incident light accuracy.

It is also very easy to use, you just have to put one in front of your subject and frame it with your camera. Once that’s the only thing in your shot, press the shutter button halfway to see the light meter and adjust your exposure accordingly. With those settings, you can have the perfect exposure regardless of the tones in your image.

Grey cardReading Result - How to Understand Reflected Versus Incident Light and Get More Accurate Exposures

Exposure: ISO 400, f/5.6, shutter speed 1/30th.

Real world examples

I know what you’re thinking, that was an unreal example because most of your photos will have much more colors than just black, white and gray V. That’s true, but the principle remains the same. Look at these real life examples:

Bridge Reflective - How to Understand Reflected Versus Incident Light and Get More Accurate Exposures

Reflective reading with an exposure of ISO 400, f/5.6, shutter speed 1/80th.

Compared to the incident reading:

Bridge Incident - How to Understand Reflected Versus Incident Light and Get More Accurate Exposures

Incident reading with an exposure of ISO 400, f/5.6, shutter speed 1/320th.


How to improvise!

What if you don’t want to be carrying around a gray card? Or did the perfect image catch you unprepared? No problem, everything in the visual world has its equivalent in the zone system.

For example, grass or wet cement correspond to the gray V zone so you can always look for elements like that in your photo and you will get a very accurate reading from them.

Take this composition of candle holders. When they are all white the photo is dark, sad and shows all the imperfections of the backdrop because it’s underexposed. However, when I add a gray candle holder and measure the light in it, the exposure is perfect.

Candleholders Reflective

Exposure: ISO 1250, f/11, shutter speed 1/125th.

Candleholders Incident

Exposure: ISO 1600, f/8, shutter speed 1/125th.

Tip: So that you are never caught off guard, you can measure the palm of your hand and figure out how much lighter or darker it is than the gray card, that way you will always have the perfect reading “at hand”.

Things to remember:

  • Get close enough to the gray object so that it’s the only thing you see through the lens, or at least the majority of it, and take that reading to set the exposure values.
  • The gray card or object needs to receive the same light as the rest of the scene. Be careful to not cast a shadow with your body or your camera when getting closer to measure the light.
  • Reflective light depends also on the material and shape of the object so a black car, for example, reflects more light than a black wool sweater.

There you go, understanding the difference between reflective and incident light can transform your photo from snapshots to pro shots!

The post How to Understand Reflected Versus Incident Light and Get More Accurate Exposures by Ana Mireles appeared first on Digital Photography School.


Digital Photography School

 
Comments Off on How to Understand Reflected Versus Incident Light and Get More Accurate Exposures

Posted in Photography


Don’t Fear Photo Post-Processing – Shooting is Only the First Part of the Image Creation Process

14 Sep

You have just bought your new bright shiny camera and you are sure that it is just the thing that will help you create better images. You’re shooting JPG with the camera’s automatic program modes, but you’re not getting the results you wanted. You keep upgrading your cameras thinking that will do the trick, only to find that the quality of your imagery isn’t getting any better. What’s going on?

Lightroom Banner - Don’t Fear Photo Editing - Shooting is Only the First Part of the Image Creation Process

You may be missing an important part of digital photography, post-processing, with a state of the art processing program like Adobe Lightroom or Photoshop.

Before and after

Iceland Light Before - Don’t Fear Photo Editing - Shooting is Only the First Part of the Image Creation Process

This image of a lighthouse in Iceland was taken on a bright yet overcast day. In a matter of moments with the help of Lightroom, it became a favorite.

Iceland Light After - Don’t Fear Photo Editing - Shooting is Only the First Part of the Image Creation Process

The role of post-processing in photography is not new

There are several integral parts to digital photography. The technical and creative aspect of using your camera, and the technical and creative application of post-processing your images. Each part is equally important and when all the pieces are put together, that’s when the magic starts to happen.

Unfortunately, many people are still thinking about the days of film when you took it to a lab and the post-processing was done for you. You never had to think twice about how the image was processed. Did you ever notice that different labs gave you different results? That’s because of their level of post-processing.

Now it’s time for you to understand the importance of post-processing if you are going to create better imagery. It will take some time and some dedication to learn, but it will improve your photography by ten-fold.

The first step – shooting with post-processing in mind

First of all, start shooting in RAW format and stop letting the camera make the decisions for you. When you shoot JPG format, it will automatically process your images in camera, even though you may even not be aware of it.

Have you ever taken a JPG and a RAW image and compared the two photographs? The JPG may appear bright and saturated and the RAW file looks flat. That’s because the JPG has been processed by the camera and the RAW file is an unprocessed digital negative.


That RAW file is ready for you to make your own creative adjustments and apply your photographic vision in Lightroom or Photoshop. Only then can you start to recreate that scene you saw when you first took the image.

What kind of post-processing decisions will the camera make for your JPGs? Depending on your camera, it can automatically increase saturation, sharpness, and contrast, but it will also compress your image. There are settings in your camera where you can make blanket adjustments for every JPG (Picture Styles), however, the camera is still making the decisions for you. That gives you zero creative control.

Raw format gives you control

RAW files contain more information and will allow you to have a wider range of tones (called dynamic range) to work with when you bring your images into Lightroom or Photoshop. When shooting in the JPEG format, image information is compressed and lost forever. In a RAW file, no information is compressed and you’re able to produce higher quality images while correcting problem areas that would be unrecoverable if shot in the JPEG format.

The Histogram

Once you start shooting in RAW, it’s very important to be conscious of the histogram. You can bring up the histogram on your Live View shooting screen or after you have taken the shot in your image review screen. Check your camera’s manual for the location of the histogram.

Note: If you shoot with a mirrorless camera you may be able to see the histogram on the screen before you shoot. Check your settings this is very handy.

Why is the histogram important for your photographic success?

If used correctly while shooting, the histogram will give you the information you need to know to bring up the shadows or bring down the highlights and pop out exposure and detail in an image.

The histogram shows you the brightness of a scene and it can be measured as you are shooting, or after you have captured the image. When look at the histogram and see the bulk of the graph pushing towards the right, this means you have an image that may be overexposed (or a really light toned subject).

Overexposed - Don’t Fear Photo Post-Processing - Shooting is Only the First Part of the Image Creation Process

If the data is mostly on the left of the graph, it’s an image that might be underexposed.

Underexposed - Don’t Fear Photo Post-Processing - Shooting is Only the First Part of the Image Creation Process

If the graph spikes on either the left or right “wall” of the histogram, that means that “clipping” has occurred. Clipping happens when you have areas in your photo with no information as a result of over or underexposure. When an area has no information, it is either pure white or pure black which is often referred to “blown out”.

Generally, it is undesirable to have large areas of your image that have highlights or shadows clipping. See the image below. The red areas show highlight clipping, and the blue areas show shadow clipping.

Clipping - Don’t Fear Photo Post-Processing - Shooting is Only the First Part of the Image Creation Process

Because of the limited dynamic range of a camera’s sensor, the area registering as clipped usually leaves the image with no information in the shadows or highlights. A spike touching the left edge of the histogram means that there is shadow clipping. A spike touching the right edge of the histogram means that there are highlights clipping.

What is possible with post-processing?

Many photographers have frustrating results with their images because they don’t embrace digital editing and post-processing. They are doing everything right when they shoot and are good at composition. They know how to expose correctly for the scene, but don’t know where to go with the image once they get home.

For example, maybe they are in a high contrast area and have taken an image with the histogram in mind. Then they open the image on-screen and throw it out because it looks over or underexposed. They don’t know what the post-processing possibilities are even though they may have a viable image. This is where they are missing a large part of the potential in their digital photography post-processing.

Here’s a great example. This image was taken in the Eastern Sierra in California.

Alabama Hills Before - Don’t Fear Photo Post-Processing - Shooting is Only the First Part of the Image Creation Process

It is obvious that the shadows are way underexposed and it creates an interesting silhouette. But, if you look at the histogram, you can see there is space on the left side of the graph which represents the shadows. This means there is more information there, and a good possibility of bringing up the shadows to create a whole different image.

Here is the result after brightening shadows in Lightroom. This adjustment took just seconds and creates a whole new scene.

Alabama Hills After - Don’t Fear Photo Post-Processing - Shooting is Only the First Part of the Image Creation Process

Start with Lightroom

Almost every image needs post-processing. Some people think that’s “cheating”. It’s not, it’s all part of the digital artistic process.

With post-processing, you can create the image you saw when you photographed the scene. Your eyes have the capability of seeing a wider range of light and color than your camera does, so the images need help in post-processing to duplicate the full range of light and shadows. The problem with a lot of beginners, is they tend to oversaturate or over-sharpen an image. So this talent comes with time and practice, practice, practice.


Once you have mastered the basics, there is a lot more you will be able to do with your digital post-processing that will add drama and interest to your photos. The above image of Bridal Veil Falls in Yosemite looks rather flat in the RAW version (left). Once you add saturation, sharpening, and a vignette to the whole picture it starts to pop. Then you can enhance the brightest areas by “painting with light”, and it now becomes a much more interesting image.

Start your post-processing journey with a full featured program like Adobe Lightroom. It is the standard in the industry for professionals, but it is also user-friendly for beginners and helps with both post-processing and image organization. Just be sure that your computer has enough memory and RAM to run these full featured programs. Check the requirements at adobe.com.

Check out our guide to LR:  The dPS Ultimate Guide to Getting Started in Lightroom for Beginners

Nothing is more satisfying than when you have a catalog of 30,000 images and you’re able to find your favorites in literally seconds by entering a few keywords and star ratings. Take some time to set it up, add a class or two, and you’ll be up and running!

Conclusion

Photo editing or post-processing is an integral part of the digital photography puzzle. Don’t think that you can skip this part and come away with satisfying images. It’s just as important to learn photo editing as it is to learn the basic functions of your camera. Only then, will you be able to bring that intentional photographic vision into post-processing and create great images

How are you going to start your post-processing journey? Is shooting in RAW and learning Lightroom in your future? Please share your thoughts with me on this subject.

The post Don’t Fear Photo Post-Processing – Shooting is Only the First Part of the Image Creation Process by Holly Higbee-Jansen appeared first on Digital Photography School.


Digital Photography School

 
Comments Off on Don’t Fear Photo Post-Processing – Shooting is Only the First Part of the Image Creation Process

Posted in Photography


Polaroid is back! Unveils OneStep 2 instant camera and i-Type film

14 Sep

Remember those intriguing teasers Polaroid was scrolling through on its main website last week. Well, yesterday night was when that countdown ended, and it ended with a huge announcement that has the photo industry buzzing. In short: the old Polaroid you knew and loved is back from the dead with a new analog instant camera and a new type of instant film!

Announced on the 80th anniversary of the Polaroid brand, both products are being unveiled as part of a new brand called Polaroid Originals, which merges the Polaroid of old with years worth of work done by Impossible Project to keep that old Polaroid alive. In fact, the Impossible brand is being replaced altogether.

In addition to the new film and camera, you’ll now be able to purchase restored vintage Polaroid cameras and traditional Polaroid instant film in a variety of formats straight from the Polaroid Originals website. But first, let’s dive into that sweet new camera!

The Polaroid OneStep 2

$ (document).ready(function() { SampleGalleryV2({“containerId”:”embeddedSampleGallery_9226467734″,”galleryId”:”9226467734″,”isEmbeddedWidget”:true,”standalone”:false,”selectedImageIndex”:0,”startInCommentsView”:false,”isMobile”:false}) });

The Polaroid OneStep 2 is exactly what it sounds like: the spiritual (and in some ways literal) successor to the famous Polaroid OneStep—you know, the camera Instagram stole its original logo from.

Inspired by the original OneStep, Polaroid says they’ve updated the OneStep 2 “to create a simple, easy-to-use instant camera that works straight out of the box.” It sports a ‘high quality lens’ that can focus from 2ft to infinity, a ‘powerful’ flash, a rechargeable battery that allegedly lasts 60 days on a charge, a self-timer function, and it’s compatible with both the new i-Type instant film and the old 600 series film.

The camera is available in white and graphite, and you can already pre-order yours through the Polaroid Originals website for $ 100.

Polaroid i-Type Instant Film

Speaking of film, Polaroid Originals also debuted a new film format that will look familiar but is actually a bit different. It’s called i-Type, and it joins Polaroid’s vintage films (SX-70, 600, 8×10, etc.) as the newest kid on the block.

The “i” stands for “Incredible” … which is really irrelevant. The important bits is that this film is optimized for the OneStep 2—and, we hope, future Polaroid Originals cameras—is battery-free, and comes in Black and White and Color varieties for $ 16 per 8-pack or $ 45 for two 8-packs of color film and one 8-pack of black and white.

Keep in mind, because this is a battery-free film, it will not work in 600 cameras. That film has its own battery in the film, while the new i-Type OneStep 2 boasts a rechargeable battery of its own.

To learn more about this film or purchase a pack or two of your own, click here.

Vintage Polaroid Cameras and Film

Finally, since the Impossible Project brand is now a thing of the past, the Polaroid Originals website won’t just be a place to buy the new OneStep 2 and i-Type film. You’ll also be able to pick up all of the restored vintage Polaroid cameras and older film formats that Impossible kept going all of these years.

The old Polaroid 600 cameras start at $ 120, the famed SX-70 foldable model starts at $ 380, and Spectra camera models can be had for $ 120 and up. All of them are available on this product page.

And if you need film for those old cameras, you can pick up SX-70 film, 600 film, Spectra film, and even 8×10 sheet film here.

To say this is an exciting announcement for the analog photography world is to undersell this by far. The merging of Polaroid and Impossible project as Polaroid Originals would be big news itself, but add to that a new analog instant film camera and a new type of instant film and you’ve got hipsters, instant photography buffs, and nostalgic shutterbugs like tripping over themselves to support this resurrection.

To learn more about Polaroid Originals or any of the products mentioned above, head over to the brand’s new website here.

Articles: Digital Photography Review (dpreview.com)

 
Comments Off on Polaroid is back! Unveils OneStep 2 instant camera and i-Type film

Posted in Uncategorized


SLR Magic announces CINE 18mm F2.8 lens for Sony E-Mount

14 Sep

SLR Magic has released a new model in its series of manual-focus lenses for full-frame Sony E-Mount cameras: the SLR Magic CINE 18mm F2.8 wide angle. The optical design of the lens incorporates 10 elements in 8 groups and allows for a minimum focus distance of just 20cm (~7.9 inches).

The new lens features a black anodized body, a low weight of only 445 grams and compact dimensions, making it an interesting option for use on gimbals and other video-centric camera supports. It also comes with a 62mm filter thread. The aperture features a manually controlled diaphragm and 9 blades, and allows you to stop down from F2.8 to F16.

The SLR Magic line-up now covers a range from 18 to 75mm, with the latest addition looking like a good option for landscape and architectural photographers, in addition to video-shooters.

The SLR Magic CINE 18mm F2.8 will be available through authorized retailers starting in October, and will set you back $ 500.

Articles: Digital Photography Review (dpreview.com)

 
Comments Off on SLR Magic announces CINE 18mm F2.8 lens for Sony E-Mount

Posted in Uncategorized


Visual guide to lock picking pdf

14 Sep

Who is in line for a promotion — or the planetarium could offer a visual guide to lock picking pdf of what is being said. Does not have any impairment, Telecommuting may be a reasonable accommodation depending on the kind of job you have and whether the essential functions of the job can be performed […]
BooksChantcdCom

 
Comments Off on Visual guide to lock picking pdf

Posted in Equipment


Conflict of interest policy pdf

14 Sep

Paid editing for promotional purposes, below are some examples for different sorts of disclosures. From acting on behalf of any person or organization in connection with a case where the Crown had previously been a party to it, A lawyer may represent his conflict of interest policy pdf her own relatives, members of committees whose […]
BooksChantcdCom

 
Comments Off on Conflict of interest policy pdf

Posted in Equipment


Not your typical superzoom: Sony Cyber-shot DSC-RX10 IV gallery and impressions

14 Sep

$ (document).ready(function() { SampleGalleryV2({“containerId”:”embeddedSampleGallery_1816870055″,”galleryId”:”1816870055″,”isEmbeddedWidget”:true,”standalone”:false,”selectedImageIndex”:0,”startInCommentsView”:false,”isMobile”:false}) });

Immediately after its announcement in New York, we got a chance to shoot with the latest addition to Sony’s RX series, the long zoom, fast shooting, 4K-capable RX10 IV.

The first thing that becomes apparent is that the addition of phase detection immediately sets right the biggest limitation we experienced with its predecessor. Even across a range of shooting subjects, the autofocus was fast and exhibited vey little in the way of hunting.

Shooting at 24 frames per second you get used to going a little easy on the shutter button

Shooting at 24 frames per second you get used to going a little easy on the shutter button: hold it down for too long and, especially if you’re shooting Raw, you can expect to be locked out of the menu for a considerable period of time. Like recent Sony models, you can now enter playback mode while waiting for the buffer to clear, and the camera will show you the images it’s had time to process.

Intelligently, the camera groups all the shots from a burst together, meaning your card doesn’t become impossible to navigate, even if it’s full of groups of >30 image bursts. As you scroll through, you can hit the center button to expand the group and see the individual images.

Shooting sports

Overall, the camera is extremely responsive. The viewfinder doesn’t give you updates quite as immediately as looking through an optical viewfinder but it’s fast enough that, with a bit of practice, I was able to follow the relatively unpredictable action of a football (soccer) game, even when fairly zoomed-in.

The touchscreen isn’t the most responsive we’ve encountered but felt quicker than the one on the a6500. Tap quickly around the screen and you’ll notice the AF point will sometimes noticeably lag behind your current location, but this lag is much less apparent in touchpad mode. Touching the active region of the rear screen causes the AF point to light up and it follows your finger’s movement around the scene quickly enough.

We totally forgot we weren’t shooting with a high-end sports camera

Focus tracking also seemed pretty effective and, between the ability to easily register a default AF point (with a different one selected for each camera orientation) and use the touchpad to move it, it proved to be pretty quick and easy to get the AF point where it was needed before hammering on a button assigned to be AF-On.

There wasn’t time to completely familiarize ourselves with the full capability of the autofocus system but we’ll be testing it more thoroughly as soon as we get a camera into the office. We’ll also try to post some video samples in the coming days.

First impressions

Our first impressions, though, were that anyone getting outraged by the camera’s not inconsiderable price should try shooting with the camera for a while. Even in an initial phase of getting to know the camera, we’d find we totally forgot we weren’t shooting with a high-end sports camera, only to occasionally be surprised when we took it away from our eye and realized it doesn’t have pro-DSLR levels of direct settings control. This isn’t something that tends to happen with a typical superzoom.

Articles: Digital Photography Review (dpreview.com)

 
Comments Off on Not your typical superzoom: Sony Cyber-shot DSC-RX10 IV gallery and impressions

Posted in Uncategorized


How to Use a Tilt-Shift Lens Creatively and for Perspective Control

14 Sep

When you hear tilt-shift lens or tilt-shift photography, there is a probability that an image looking like a miniature model crossed your mind. That is because, over the years, tilt-shift lenses have become synonymous with this style. The miniature look is interchangeably referred to as the tilt-shift effect and you can even recreate it in post-processing. These lenses though have quite a few other strengths that are worth considering.

tilt-shift lens - miniature effect

The miniature look that is affiliated with tilt-shift lenses.

So why use a tilt-shift lens?

The simple answer here is for perspective control. If you compare your regular lenses to a tilt-shift lens, you will notice they are built differently. The latter is designed to physically move (tilt, shift and rotate) independent of the camera and each other. This design feature gives you remarkable control over perspective and depth of field. In fact, a tilt-shift lens is also known as a perspective control lens.

How to Use a Tilt-Shift Lens Creatively and for Perspective Control

Left: Shot with the camera pointing up to capture the entire scene. Right: Lens shifted to minimize distortion.

Tilt Versus Shift

The tilt function gives you the ability to keep different elements of focus on different planes. Thus you can shoot two subjects at two different distances. With a regular lens if you want to shoot at a wide aperture, you usually have to make a focus choice of either the foreground or background. A tilt-shift lens allows you to have both your subjects in focus.

The shift function allows you to minimize distortion (common when using wide angle lenses) when you are shooting from a high or low angle. It also helps correct vertical line convergence (tilting buildings).

Tilt-Shift Lens Uses

Architecture

When photographing architecture, the shift function helps you maintain proper perspective. Ordinarily, when you want an entire building in your frame, you tilt your camera up. If you have ever tried this, you will be familiar with images where the buildings appear to be leaning backwards.

How to Use a Tilt-Shift Lens Creatively and for Perspective Control

Church shot at 24mm with a standard lens.

This skew is caused by the sensor plane of the camera being titled in relation to the building. Ideally, you want the sensor perpendicular to the ground and pointing straight ahead/centered. With a tilt-shift lens, instead of angling your camera upward, you “shift” the lens. Since the camera stays put and only the lens physically shifts, your building will be straight. This technique is very helpful when shooting interiors with high ceilings.

Church shot at 24mm with a tilt-shift lens.

Landscapes

In landscape photography, one of the primary uses of a tilt-shift lens is to minimize wide angle lens distortion. Another great way to use this lens is for panoramic shots. A common challenge with panoramas is after the shots are stitched together there is still some distortion to be corrected. When this distortion is corrected in post-production, you may lose part of your scene. By using the shift function of the lens, you can create high resolution distortion free panoramas with negligible post-processing work.

Creative uses of tilt-shift lenses

Miniatures

The tilt function of the lens is responsible for that miniature look you are likely familiar with. A miniature effect is when you take a life-sized scene and make it appear as if it’s on a miniature scale. The lens here is used to add blur to the photo which simulates shallow depth of field. This mimics the look you get when you use a macro lens to shoot a miniature scale model.

How to Use a Tilt-Shift Lens Creatively and for Perspective Control - miniature effect

The blur above and below creates a perception that your camera is only inches away from the scene.

To create this type of look, you need to be elevated at least 10 feet /3 meters (recommended higher if possible). Elevation gives you that same perspective as if you were looking down on a miniature model. So other than the subject, a high vantage point is key for these types of photos.

How to Use a Tilt-Shift Lens Creatively and for Perspective Control

The tilt function allows you to creatively add blur (in this image the blur is on the right side).

Note: Shooting wider gives you a better sense of place.

Portraits

Shooting portraits with a tilt-shift lens can be quite creative. At the very basic level, you are now able to capture in focus two subjects (or a group), even though they may be at different distances from the lens.

Another creative use is capturing someone walking towards or away from you. As you know, a moving person can quickly be out of focus. But with a tilt-shift lens, you have the ability to extend your plane of focus to the front and back of your walking subject so they stay sharp even at different distances.

Bonus: The Scheimpflug Principle

The Scheimpflug Principle is where more of your subject plane is in focus (from near to far) and refers to what looks like a near-infinite depth of field. To achieve this great “depth of field”, you tilt the plane of focus in the same direction as the plane of the subject – which puts the image in focus at various points along the subject plane.

By Fil Hunter at English Wikipedia – Transferred from en.wikipedia to Commons by Jacopo Werther., Public Domain

For example, if you are shooting a field of flowers going off into the distance and you want to have all of the flowers in focus. Shooting at a small aperture will work, but may (based on your lighting) increase your shutter speed – which reduces your chance of sharp flowers. By changing the plane of focus, your tilt-shift lens allows you to shoot at a wider aperture and still get all your flowers in focus.

Conclusion

The perspective control that tilt-shift lenses offer will save you a lot of time in post-processing and is also a great way to correct for depth of field limitations of most lenses. These lenses also give you a lot of depth without the need to use smaller apertures. So besides straightening tall buildings, what have you used, or hope to use tilt-shift lenses for?

Here are some other creative ideas for you. Please share your tilt-shift images in the comments below.

The post How to Use a Tilt-Shift Lens Creatively and for Perspective Control by Nisha Ramroop appeared first on Digital Photography School.


Digital Photography School

 
Comments Off on How to Use a Tilt-Shift Lens Creatively and for Perspective Control

Posted in Photography


DIY: How I built my own super macro rig for less than $250

14 Sep

Last year I bought a macro lens for the summer—just a normal one with 1x magnification—and I immediately found myself in a beautiful and mesmerizing world of minuscule flowers and bugs. I found that in macro photography, you don’t have to travel to beautiful places to take beautiful photos—you can just walk around in your backyard, and discover a whole new world. Also, you don’t have to wake up at 4 AM to catch the golden hour…

This year, however, I decided I wanted to take things to the next level. I wanted a super macro lens with 2x or more in magnification, so that I could take closeup portraits of ants and bees. I started Googling around for the right lenses and soon discovered that there are only a couple of them out there. The best known is the Canon MP-E 65, but it costs north of $ 1,000. There is also a 2x macro lens from Venus Optics, but it’s still $ 400 for the lens alone… and then you need to add some kind of flash setup.

I thought this was way too much money to just try super macro photography, so I decided to look around for cheaper solutions.

That was when I discovered this excellent article on a Swedish site. It describes how you can build your own super macro rig with cheap parts off Amazon or eBay. This build works with any Canon EF compatible camera, meaning most Canon cameras and also mirrorless cameras with adapters. After some browsing, I was able to find all the parts on Amazon and I ordered them.

The rig is based around the Canon 40mm f2.8 STM lens. This lens is excellent for this purpose as it is very cheap, small, light, sharp and has beautiful bokeh (possibly more beautiful than the Canon MP-E 65). For this particular setup, the lens is mounted reversed to get more magnification using a Meike reverse adapter. The adapter, in turn, has a cable that allows you to keep control over aperture despite having the lens reversed.

You will need a 52-58 mm step-up ring to fit the Canon 40mm with the Meike reverse adapter. Then, if you put an extension tube before the Meike adapter, you have a super macro lens! Just add more extension tubes for more magnification.

I have found that 36mm of extension tube is my sweet spot—it gives me 2.3x magnification, meaning that the subject will be 2.3x bigger on the sensor than it is in real life. So a bug that is 10mm tall will cover all 24mm of a full frame sensor.

The rest of the parts are the flash and parts needed to mount it in a way that puts it as close to the subject as possible. You should also try to make some kind of diffuser, as shown in the video.

All essential parts:

  • Canon EF 40mm f/2.8 STM Pancake Lens (around $ 50 used)
  • Meike reverse adapter (around $ 55)
  • Meike MK-300 Flash (around $ 33)
  • Vello CB-600 Straight Flash Bracket (around $ 10)
  • Articulating arm, 7” (around $ 14)
  • Fotga Extension tubes for Canon EF (around $ 40)
  • Vello TTL-Off-Camera Flash Cord for Canon EOS 0.5 m (around $ 20)
  • Goja 52-58MM Step-Up Adapter Ring (around $ 8)

In total (if you buy the Canon lens used): $ 230 USD

See the video up top for detailed instructions, and scroll down to see some sample photos. The parts can be put together in a few minutes, as shown in the video.

$ (document).ready(function() { SampleGalleryV2({“containerId”:”embeddedSampleGallery_2626695394″,”galleryId”:”2626695394″,”isEmbeddedWidget”:true,”standalone”:false,”selectedImageIndex”:0,”startInCommentsView”:false,”isMobile”:false}) });

Lastly, a small tip for shooting super macro insect shots with this rig: use a slow shutter speed, such as 1/40s. That way you will get a lot of color and light in your photo, making it more interesting and beautiful. Don’t worry about sharpness, the flash is a lot faster than 1/40, and it will make sure to freeze your subject in most situations.


Micael Widell is a photography enthusiast based in Stockholm, Sweden. He loves macro and nature photography, and runs a YouTube channel around these subjects. You can also find him on Instagram and 500px.

Articles: Digital Photography Review (dpreview.com)

 
Comments Off on DIY: How I built my own super macro rig for less than $250

Posted in Uncategorized


PETA and David Slater settle copyright lawsuit over monkey selfie

14 Sep
Photo: David Slater

PETA has announced that it has settled its copyright lawsuit against photographer David Slater over his iconic “monkey selfie,” a self-portrait allegedly taken by a macaque named Naruto. The image went viral a few years ago, ultimately catching the attention of PETA, who argued that Naruto—not Slater—was the image’s legal copyright holder. This spurred a lawsuit that has dragged on for about two years.

The legal issues began shortly after the monkey selfie went viral. Various sites used the image without Slater’s permission and refused to cease use on the claim that Slater didn’t own the copyright. The U.S. Copyright Office didn’t prove helpful in the matter, having issued an official guidance stating that copyright could only be granted to a work that was created by a human.

PETA swooped in soon after, hitting Slater with a lawsuit in 2015 on behalf of Naruto, the macaque it claimed captured the photo (there’s some debate on this topic). The resulting legal spat drained Slater financially, but things began looking up this past summer when courts questioned whether PETA even had the legal standing to bring a lawsuit on Naruto’s behalf, among other things. As anticipated, the courts’ push against the lawsuit has seemingly spurred a settlement.

According to an announcement posted to PETA’s blog on Tuesday, Slater has agreed to settlement terms that require him to donate 25% of future revenue from the image to charities that protect macaques like Naruto. PETA still maintains that Naruto and other macaques like him are, “worthy of having legal ownership of their own intellectual property and holding other rights as members of the legal community.”

The settlement was not a victory for the photography community, however. NPR reports that both Slater’s legal team and PETA have jointly requested that the 9th Circuit Court throw out a ruling made by a lower court that found animals incapable of owning copyrights.

Articles: Digital Photography Review (dpreview.com)

 
Comments Off on PETA and David Slater settle copyright lawsuit over monkey selfie

Posted in Uncategorized