RSS
 

Archive for September, 2017

Video: The pros and cons of natural light vs off-camera flash

15 Sep

Photographer Manny Ortiz took to the woods with his wife and model Diana during golden hour to film a comparison video that many amateur photographers on up will find useful: natural light vs off-camera flash. What are the pros of each setup, why would you choose one over the other, and how can off-camera flash make natural light photos look even better? Manny dives into all of this while performing a live shooting demo.

The video starts with a quick demo where Manny alternates between shooting natural light and off-camera flash to illustrate how each style changes his settings and the final product. Then, once he’s finished, he breaks down the pros and cons of each style.

Here are a couple of before and after pictures Manny shared with us from his demonstration, so you can see the difference between his natural light only portraits and the ones augmented by off-camera flash:

$ (document).ready(function() { SampleGalleryV2({“containerId”:”embeddedSampleGallery_9493248343″,”galleryId”:”9493248343″,”isEmbeddedWidget”:true,”standalone”:false,”selectedImageIndex”:0,”startInCommentsView”:false,”isMobile”:false}) });

After the demo Manny discusses the reasons he shoots both natural light and off-camera flash, and when he chooses to shoot which style.

Traditionally a flash photographer, shooting natural light only is ‘liberating’ for Manny. He also appreciates the ability to stay mostly incognito when shooting on-location in a popular area—nobody wants to draw a crowd or unwanted attention during a portrait shoot.

On the other hand, flash photography gives Manny the option to create his own light when mother nature doesn’t cooperate or the time of day isn’t ideal. And since so many portrait photographers start out shooting natural light, properly using off-camera flash can help you to stand out from the crowd.

To hear more of Manny’s thoughts or see him in action, check out the full video above. And if you want to see more of his work, don’t forget to follow him on Instagram where he’s most active.

Articles: Digital Photography Review (dpreview.com)

 
Comments Off on Video: The pros and cons of natural light vs off-camera flash

Posted in Uncategorized


Godox announces affordable XPRO-C wireless flash trigger for Canon users

15 Sep

$ (document).ready(function() { SampleGalleryV2({“containerId”:”embeddedSampleGallery_7481608220″,”galleryId”:”7481608220″,”isEmbeddedWidget”:true,”standalone”:false,”selectedImageIndex”:0,”startInCommentsView”:false,”isMobile”:false}) });

Godox has unveiled the new XPRO-C, an affordable wireless flash trigger compatible with all of the company’s X1-series 2.4GH lamps and flashes, and built specifically for Canon cameras. The new trigger seems to be competing with both Canon and Nissin, whose Air 10s trigger features some similar features at a steeper price.

The XPRO-C supports manual, high-speed sync, and TTL control alongside TTL-Convert-Manual (TCM) functionality. The TCM function enables users to meter flashes in TTL and then switch to manual mode; the settings are auto-adjusted to maintain an equivalent output.

User control is simplified via a large dot matrix LCD able to display five groups alongside five physical group buttons. Selecting a specific group pulls up additional information on the LCD, according to Godox, and there’s support for multiple custom functions. High-speed sync ranges up to 1/8000, manual flash power from 1/1 – 1/256, and there’s support for X1/R2 receiver flashes in up to 16 groups.

The XPRO-C (also called Flashpoint R2 Pro in the US) has a retail price of $ 80 and is already available for pre-order online.

Articles: Digital Photography Review (dpreview.com)

 
Comments Off on Godox announces affordable XPRO-C wireless flash trigger for Canon users

Posted in Uncategorized


Nikon Asia accused of sexism over D850 promotion that featured 32 men and 0 women

15 Sep
32 photographers featured… all of the men.

Nikon Asia is taking some serious heat today after a Nikon D850 promotion featuring 32 photographers caught the eye of the blog Fstoppers. The issue with this so-called “awe-inspiring” promotion? It featured 32 men, and 0 women, a realization that has led to wide-spread criticism of the promotion and of Nikon as a whole.

The original article didn’t hold back, claiming that “Nikon thinks [the D850] is too much for women to handle,” since the company didn’t select a single woman photographer for this particular promotion. Responses online were equally harsh, with some users asking Nikon when the female version of the D850 would come out… and if it would be pink:

Others implied they would be taking their business elsewhere:

The controversy has gotten so much attention online, in fact, that CNN Money picked up the story.

For its part Nikon Asia did respond on Twitter, thanking users for “challenging us to do more” to support its female photographers. According to that statement, Nikon Asia did invite women to be part of the promotion (no word on how many) but none were able to participate. Here is the full statement:

All in all, it’s been a very bad 24 hours for Nikon. But inflammatory as the original story is and obviously unacceptable as this all-male promotion was, it’s worth pointing out that this doesn’t seem to reflect Nikon’s philosophy as a brand, and particularly not Nikon USA.

The D850 has been promoted like mad, and one of the main photographers spreading the word around the United States is Dixie Dixon. When we reached out to Nikon for comment on this story, the company was adamant about its support for all photographers, sending us the following statement just a few minutes ago:

At Nikon, we champion all passionate photographers. Women are an integral part of the photography community and we are dedicated to celebrating any talented storyteller and their work. We appreciate you raising this concern and we will continue to support the immense creative talent of female photographers in the US and globally.

Nikon—and more specifically Nikon Asia—certainly made a big mistake with this promotion. And given the attention this story has gotten (and will continue to get) it’s safe to say they’ll never host an all-male event or promotion again, nor should they. But to say “Nikon thinks [the D850] is too much for women to handle” is a stomach-churning extrapolation to make… albeit a very click-y one.

Articles: Digital Photography Review (dpreview.com)

 
Comments Off on Nikon Asia accused of sexism over D850 promotion that featured 32 men and 0 women

Posted in Uncategorized


Lastolite unveils two new ‘stone effect’ panoramic backgrounds for portrait photographers

15 Sep

Studio accessories manufacturer Lastolite has introduced a pair of new stone effects to its panoramic background range. Granite and Limestone are the first textured materials to join the range that currently just includes white, black and Chromakey Green plain finishes.

The Lastolite Panoramic Background system consists of a three-part collapsible frame that is self-supporting once erected. Plain or patterned covers stretch over the frame to form a 4×2.3m/13×7.5ft backdrop suitable for shooting groups, and once packed away the kit measures just 100cmx30cmx35cm/39x12x14in.

The new patterns will be available with or without the panoramic frame, and will cost £306 on their own or £600 with the frame (US prices still to be released). For more information see the Manfrotto website.

Press Release

Lastolite by Manfrotto presents new Granite and Limestone panoramic backgrounds to the collection

Lastolite By Manfrotto, the world’s leading manufacturer of backgrounds and lighting control systems has announced the launch of the new Panoramic Background in Granite and Limestone.

The Panoramic Background has quickly become the go to background for busy photographers needing a 4m wide, seamless, crease free, collapsible solution. Built around a three-panel collapsible lightweight aluminium framework, the Panoramic background is completely self-supporting so there is no need for additional stands and crossbars. The Panoramic Background is assembled in a matter of minutes and, once assembled, is simply clipped onto the framework. The stretchable cover fabric ensures a flat, crease free surface at all times. Unlike other large seamless background solutions, the Panoramic collapses down to an impressive 100cm x 30cm x 35cm size, making it very easy to transport. The Panoramic Background is perfect for shooting larger groups, shooting with props or creating the negative space in a photograph that agencies so often request.

The new themed covers now bring textured surfaces to the range and perfectly complement the existing black, white and Chromakey Green solid colour surfaces. There are two new covers available – Granite and Limestone. Granite offers a stone texture effect with a full range of grey tones and a dark vignette around the edges, whilst Limestone is much lighter, offering a subtle range of mid to light greys giving the effect of a Limestone surface.

The Granite and Limestone Panoramic background includes the framework and the cover. For existing Panoramic background users the new covers are also available separately.

Click here to see a video of the new Panoramic Background in action https://vimeo.com/230936776

The Granite and Limestone Panoramic Background has an RRP of £600.
The Granite and Limestone Panoramic Background covers have an RRP of £306.

For more information, please visit www.manfrotto.co.uk/lastolite

Articles: Digital Photography Review (dpreview.com)

 
Comments Off on Lastolite unveils two new ‘stone effect’ panoramic backgrounds for portrait photographers

Posted in Uncategorized


How To Retouch Old Photos In Photoshop

15 Sep

Family photos can be incredibly precious keepsakes. Most of us have in our possession old pictures of our parents, our grandparents, or ourselves, but unfortunately, as a result of time and poor protection, these photos often become scratched or torn, or lose their original spark. Thanks to Photoshop, we can easily restore our old photos in a fun and creative Continue Reading

The post How To Retouch Old Photos In Photoshop appeared first on Photodoto.


Photodoto

 
Comments Off on How To Retouch Old Photos In Photoshop

Posted in Photography


Photo of GoPro Hero6 leaked, will be able to shoot 4K at 60 fps

15 Sep

We’ve already knew the GoPro Hero6 was on the way thanks to company CEO Nick Woodman, who revealed the camera’s existence back in February. But a newly leaked photo of the Hero6 reveals one very exciting feature we didn’t know about: the little camera will allegedly be able to shoot 4K at 60fps.

The leaked photo was sent to Photo Rumors by a reader of theirs, and as with any unofficial leak, it’s worth taking the image with a grain of salt. But if it is legitimate, this is what the GoPro Hero6 will look like in its final packaging:

If the packaging is legitimate, we can see that the Hero6 is waterproof to 10m, takes 12MP photographs, and can shoot video at 4K and 60fps. The current Hero5 maxes out at 4K 30fps, which puts it at a disadvantage when you compare it to cheaper action cameras like the Yi 4K, which shoots 4K 60fps and costs just $ 340.

The Hero6 will very likely cost more than this—even the Hero5 still goes for $ 400—but with more accessories to choose from and a brand name people recognize, it might just convince some Yi fans to return to the mothership.

Articles: Digital Photography Review (dpreview.com)

 
Comments Off on Photo of GoPro Hero6 leaked, will be able to shoot 4K at 60 fps

Posted in Uncategorized


Cooling Cities: L.A. is Painting Streets White to Combat Heat Island Effects

15 Sep

[ By WebUrbanist in Architecture & Cities & Urbanism. ]

Thanks in part to heat-absorbing materials and colors, cities tend to be warmer than their natural surroundings, and in hot places with lots of dark roads like Los Angeles that can prove a serious public health hazard.The mayor has pledged to reduce temperatures in the city by 3 degrees over the next 20 years, in part by dealing with urban heat island effects in new and different ways.

As part of this promise to help make bring down temperatures for its millions of residents, LA is trying something that could dramatically change its urban landscape: repainting roads in white. The aim is to reflect rather than absorb heat and so far the results are extremely promising.

“We found that on average the area covered in CoolSeal is 10 degrees cooler than black asphalt on the same parking lot,” said Greg Spotts, the assistant director of the Bureau of Street Services for San Fernando Valley, an area with particularly severe heat problems.

It’s not just about open public spaces either: reducing exterior temperatures has impacts on adjacent interiors. Heat reductions outside and mean cooler spaces inside area homes and businesses. In turn, this can help residents and owners save on cooling costs. It also isn’t just a daytime problem: heat captured during the day is released into the night air, keeping things hotter around the clock.

The process doesn’t come cheap, however: each coat lasts for around seven years but prices out around $ 40,000 per linear mile. If it works, though, the cost could be offset in part by savings on other fronts, in addition to making for a more healthy metropolis all around. Meanwhile, other strategies are also in play — the city is looking to make roofs brighter, for instance, and bring more green into the mix. (via Inhabitat and L.A. Times, images by Greg Spotts and Giuseppe Milo).

Share on Facebook


[ By WebUrbanist in Architecture & Cities & Urbanism. ]

[ WebUrbanist | Archives | Galleries | Privacy | TOS ]


WebUrbanist

 
Comments Off on Cooling Cities: L.A. is Painting Streets White to Combat Heat Island Effects

Posted in Creativity


Tips for Minimalist Photography in an Urban Environment

15 Sep

Minimalism gained traction in America in the 1960s with links to the Japanese traditional culture of Zen Philosophy. As a reaction against the whims of abstract expressionism, artists like Sol LeWitt, Frank Stella, and Mark Rothko experimented with stripped back processes and imagery, exposing the bare bones of visual art.

The history of the minimalist photography movement is not dissimilar to that of their contemporaries. The scientific photography of Bernice Abbott is referred to as a marked pivot towards minimalism. Photographers like Robert Adams and Lewis Baltz also used reductionist techniques to explore composition in the natural and urban landscape.

Tips for Minimalist Photography in an Urban Environment

Like all visual art, minimalism is founded on the basic elements of design; line, shape, color, texture, form, and composition. The scope of interpretation within minimalist art is vast, with its proponents yielding a diversity of results and reasoning. Overall, however, minimalist art can be surmised within a single principle, the old adage of “keep it simple”.

Keeping it simple

Minimalism is about how little you can say without compromising meaning. Minimalist photography is a great opportunity to slow down and reevaluate your photographic process. Before taking a shot, take a breath. Think about your desired outcome. How does your knowledge of composition apply to the subject at hand? How would you like to approach exposure? Minimalism is a very meditative process, sort of like yoga, but for your photography.

Composing minimalist photography in an urban landscape

Often, the utilitarian components that make up an urban landscape are the same that serve as the best minimalist subjects. Minimalist depictions of nature tend to rely on the soft flow of organic structures. However, urban minimalist photography capitalizes on the bold lines of old buildings, fresh apartments, and upturned car parks.

Intermixed with bolts of color, texture, and juxtaposition, minimalist photography can be both subtle and loud at the same time. Photographers of minimalism capitalize on strong, stripped back elements to create both subtle and high-impact imagery. That’s why moving forward in minimalist photography often requires you to steep yourself in the very basics of photographic composition first.

Rule of thirds

The rule of thirds is a trick to help determine the overall composition of a photograph. Mentally divide an image up evenly into thirds both horizontally and vertically. The lines that intersect around the central rectangle indicate the points that capture the majority of a viewer’s attention. By offsetting important points in a photograph from the center rectangle, an image will feel more naturally appealing to your audience.

Minimalist photography relies equally on what has been included and excluded from an image. Composing a visually harmonious photograph with tools like the rule of thirds maximizes the short time a viewer has to engage with a photograph.

Tips for Minimalist Photography in an Urban Environment

This image is sectioned off into 9 even rectangles. The four central intersecting points indicate the focal points of the photograph.

Tips for Minimalist Photography in an Urban Environment

This image is an example of the rule-of-thirds in practice. No single component of the photograph lies directly within the center, guiding the viewer’s eye around the image rather directly to the center.
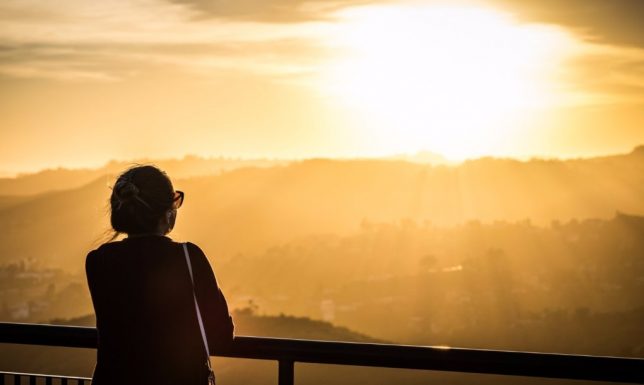
Color

Color has a language that establishes the atmosphere and emotional range of an image. Where traditional black and white highlights the form of an image, two or three highly contrasting colors can bring the facade of the urban environment to life.

Blocks of color convey vitality and hardness in an image, whereas a gradient is softer and more accommodating. Pastel color schemes depicted by many contemporary minimalist photographers deliver a surreal, dream-like quality to a photograph, while also alluding to childhood, disassociation and new-media aesthetics.

Tips for Minimalist Photography in an Urban Environment - color

Tips for Minimalist Photography in an Urban Environment

Isolated colors can add depth to an image and draw attention to details often overlooked in the urban landscape.
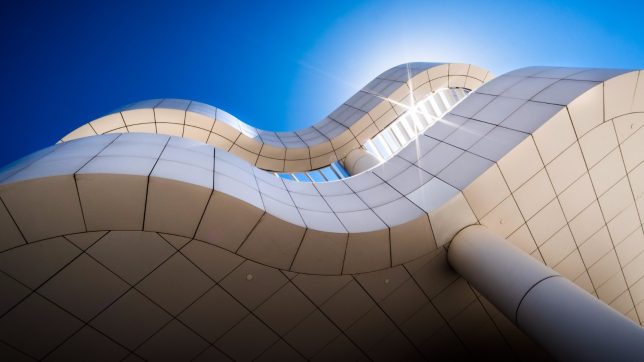
Tips for Minimalist Photography in an Urban Environment

Lines

Strong lines in minimalist photography carry the integrity of an image. Conveying depth and presence, bold lines leading in from the perimeter of an image grab a viewer’s attention and guide their eye through the artwork. Lines delineate the boundaries of different bodies within a space and can denote unrest at sharp angles or quiet emotion with organic ripples.

Horizontal lines are used as a device to indicate the horizon, perspective, or to completely upend a viewer’s sense of space altogether! When composing an image, follow each line through with your eyes. Adjusting the integrity of a line later in post-production can be extremely time-consuming. And the success of a minimalist photograph could (and probably will) count on it being exact.

Tips for Minimalist Photography in an Urban Environment

Leading lines reach the perimeter of the physical photograph and provide the viewer with a visual trail to follow into the interior of the image.

Shape

The compositional elements of line and shape often cross over in a visual plane. For example, the perimeter of a shape can be defined by its outer line, sectioning the interior of the shape off from the background of the image.

Sharp, inorganic shapes create unrest and action in an image, whereas smooth, organic shapes create a scene of peace, nature, and evenness. The urban environment consists of an inexhaustible array of sharp and smooth lines. Trying to bring the two spectra together creates a dynamic juxtaposition of design and emotion.

Tips for Minimalist Photography in an Urban Environment

Pattern and texture

Pattern and texture lift the image from the page. Texture is the physicality of an image, which engages with an audience by appealing to their sense of touch. Pattern, often combined with texture, adds detail to a photograph, revealing beauty the repetition of otherwise unobserved subject matter.

Minimalism and pattern can combine to emphasize size and number, delivering a feeling of sensory overload simply by the repetition of a single design. When limited to concentrated areas in an image, a pattern can serve as a disruption to the remaining landscape or as a contrast to emphasize negative space.

Tips for Minimalist Photography in an Urban Environment - texture

Textural images often depict the wear and tear of the urban environment in delightfully intricate detail.

Negative space

Negative space is what is not there which can be kind of confusing. It lends breathing room to an image. It allows the immediate subject matter to exist with little or no intrusion elsewhere in the frame.

As an example, an image of a single cloud, framed by blue sky neither intrudes nor detracts from the other, but the two exchange meaning nonetheless. The sharp contrast between vacant and overflowing environments means that urban landscapes are great for incorporating negative space into minimalist photography.

Tips for Minimalist Photography in an Urban Environment - negative space

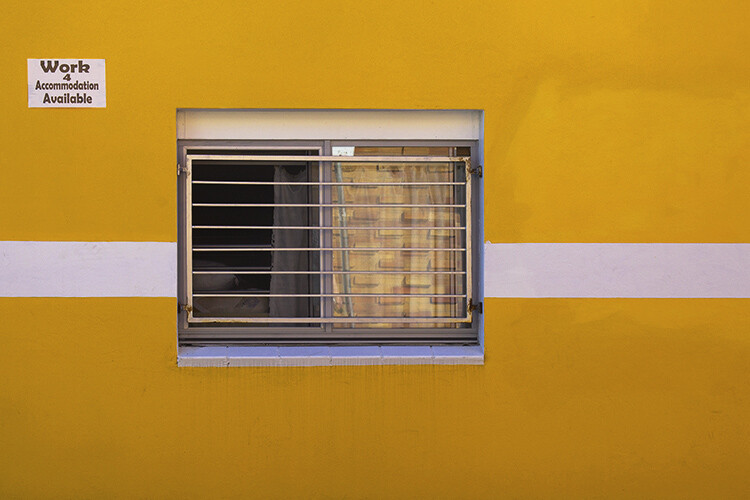
The geometric pattern on the right of this image is offset by the negative space on the left. The relationship balances out the image overall and enhances the bold yellow streak down the middle.

Tips for Minimalist Photography in an Urban Environment

Conclusion

Minimalism has seen a considerable resurgence in recent years, especially in interior design and photography. A wealth of online curatorship means that tags like #minimal and #minimal_perfection unearth fresh, reductionist imagery by the second. Although the overwhelming volume of images may seem contrary to the principals of minimalism itself, the evolution of the modern landscape continues to create a wealth of opportunity for photographic artists looking to branch out or hone their skills in composition.

How do you use minimalist photography with your images? Please share in the comments below.

The post Tips for Minimalist Photography in an Urban Environment by Megan Kennedy appeared first on Digital Photography School.


Digital Photography School

 
Comments Off on Tips for Minimalist Photography in an Urban Environment

Posted in Photography


How to do Clamshell Lighting: A Reliable Two Light Setup

15 Sep

When it comes to lighting, there is an infinite choice on how you can light your portrait subjects. That’s great and it’s addicting, but when you are starting out it can also be overwhelming. To counter the inevitable information overload that you will get researching lighting, it is a good idea to know a few basic setups that you can fall back on should you be pressed for time or should you need a backup. This article will introduce you to a basic two light setup often called clamshell lighting.

It will provide you with a beautiful soft light with faint shadows and glorious catchlights. Clamshell lighting works very well and it is very flattering for men and women of all ages and it could be a very useful technique in your toolkit.
How to do Clamshell Lighting: A Reliable Two Light Setup

What is clamshell lighting?

In a nutshell, clamshell lighting is a configuration where two lights are placed facing toward your subject at a 45-degree angle. Your key light is facing downwards at a 45-degree angle and your fill light is a facing upwards at a 45-degree angle. The resulting appearance of your lights from the side somewhat resembles an open clamshell (imagination may be required).

How to do Clamshell Lighting: A Reliable Two Light Set-Up

Apologies for my stick figure skills, but here you can see just how easy clamshell lighting is to do.

If you start with your main light on axis (directly in front of your subject), raised up and pointed downward, you have a basic butterfly lighting set-up. Adding the second light from below serves as fill and eliminates any heavy shadows caused by the key light. This combination results in soft, flattering light that works well with almost any subject.

What you need

How to do Clamshell Lighting: A Reliable Two Light Set-Up
To create a clamshell lighting setup, you need two light sources. If you have modifiers to soften your light, all the better, but as long as you have two light sources you can get started with clamshell lighting.

I do recommend starting with a pair of softboxes roughly the same size. Once you’ve mastered that, you can then start experimenting with other modifiers such as beauty dishes and strip boxes.

Setting it up

How to do Clamshell Lighting: A Reliable Two Light Setup
Start with your key light (your main light source) and place it in front of your subject. Go closer for softer light and faster light fall off, or further away for a harder light. Place it above your subject, pointed directly at their nose. Meter for your desired aperture (we’ll use a hypothetical f/11 from this point) and take a test shot.

If everything is setup correctly you should have a decently lit image with deep shadows under your subject’s nose and chin.

How to do Clamshell Lighting: A Reliable Two Light Setup

Now, take your fill light and place it directly underneath your key light. Point it upwards toward your subject at 45-degrees and meter this light for two stops below your preferred aperture, which would result in f/5.6 for our hypothetical aperture of f/11. If the effect is too strong and your fill light is obliterating the shadows, turn the power down. If it isn’t doing enough, turn it up. The main thing to look out for is that you need to ensure that your fill light is not overpowering your key light. This would result in your image being lit from below with your shadows being filled in from above. This is not a good look to go for.

How to do Clamshell Lighting: A Reliable Two Light Setup

What to watch out for

The main thing to look out for is that you need to ensure that your fill light is not overpowering your key light. This would result in your image being lit from below with your shadows being filled in from above. This is not a good look.

Now that you have two lights sharing the same vertical space, stand behind them and shoot through the gap. If there isn’t much of a gap, raise and/or lower both of your lights (change the angle of each and take another meter reading if you need to) until you have enough room to work in the middle.

That’s all there is to it. Clamshell lighting is really is easy to set up and with a bit of practice you will be able to get it up and running in a couple of minutes.

How to do Clamshell Lighting: A Reliable Two Light Setup

Note: The softbox at camera left is NOT on so isn’t doing anything.

Alterations

Although I suggested using two evenly sized softboxes, to begin with, that is by no means a restriction of any kind. Feel free to use any kind of modifier you want and experiment liberally. Have a pair of strip boxes you want to use? Go for it. Do you want to use a beauty dish as your key light and an umbrella as fill? Sure. How about a snoot and a small soft box? Absolutely. Use what you have at hand.>

Also, you are not limited to just using two lights from the front. Feel free to add rim and hair lights and a background light as your images require.

Examples


How to do Clamshell Lighting: A Reliable Two Light Setup

How to do Clamshell Lighting: A Reliable Two Light Setup

How to do Clamshell Lighting: A Reliable Two Light Setup

How to do Clamshell Lighting: A Reliable Two Light Setup

This image included a third light serving as a background light.

How to do Clamshell Lighting: A Reliable Two Light Setup

How to do Clamshell Lighting: A Reliable Two Light Setup

Conclusion

If you’ve made it this far, hopefully, you can see how useful a basic clamshell lighting setup is, and how it might serve you. It’s easy, fairly compact and produces lovely, flattering light. If you’re still not sure, I urge you to try it for yourself. You may very well fall in love with it.

The post How to do Clamshell Lighting: A Reliable Two Light Setup by John McIntire appeared first on Digital Photography School.


Digital Photography School

 
Comments Off on How to do Clamshell Lighting: A Reliable Two Light Setup

Posted in Photography


Nissin announces Super Light Stand LC-50c: The world’s lightest light stand

15 Sep

Nissin has released a new light stand that it claims is the lightest in the world. The Super Light Stand LS-50C uses carbon fibre for its central column to keep its total weight down to just 575g/1.2lb. But even at that featherweight, it can still hold 1.5kg/3.3lb and extends to a maximum height of 200cm/79in.

Packed away, it stores at a minimum length of 48.5cm/19in.

As these stands are generally static, the idea of using carbon fibre to make them lightweight is mainly to reduce the weight of the photographer’s kit when traveling, but also to make assistant’s work a little easier—whether carrying to and from a shoot, or holding during one.

The centre column uses a collar-style rotary locking mechanism more often seen on tripods, which the company says makes tightening easier and more effective than standard locking nuts and handles. Nissin has also come up with an interesting design for the leg clamps that allows them to be extended to a flat position on the ground for added stability.

The Nissin LS-50C will go in sale in the next couple of days priced 13,500 yen plus tax (approx. $ 130). For more information see this translated version of the Nissin product page.

Articles: Digital Photography Review (dpreview.com)

 
Comments Off on Nissin announces Super Light Stand LC-50c: The world’s lightest light stand

Posted in Uncategorized