RSS
 

Archive for September, 2017

Report: Samsung is developing a 1,000fps mobile image sensor

20 Sep

According to sources who spoke to Korean publication ETNews, Samsung is planning to kick its mobile camera technology up a notch with a 1,000fps smartphone camera sensor that will compete directly with Sony’s similar sensor. This technology is called a “3-layered image sensor,” and Samsung has reportedly ordered special equipment necessary to start producing the hardware in November. Smartphones featuring this technology, like the Sony Xperia XZ, can record super-slow-motion video.

ETNews, which has a good track record in relation to Samsung leaks, claims that this 3-layered image sensor is comprised of TSV stacking technology alongside a DRAM chip and system semiconductor. Pilot production of the image sensors will start in October, the sources claim, followed by mass production in November. By comparison, Samsung currently uses 2-layered image sensors in its newest flagship smartphones.

It is the DRAM chip for temporary data storage that will enable the mobile image technology to capture at 1,000fps, and as we mentioned earlier, Samsung won’t be the first company to develop this technology for mobile devices. Sony was the first to bring this 3-layered image sensor tech to commercial devices, though the sources say Samsung will use TSV stacking rather than thermal compression to avoid the costs that come with licensing other companies’ patents.

Questions remain about which Samsung smartphones will receive the new 3-layered image sensors. Assuming mass production does start this November, it is reasonable to assume we’ll see the sensors implemented into the next batch of Galaxy smartphones the company will unveil in 2018.

Articles: Digital Photography Review (dpreview.com)

 
Comments Off on Report: Samsung is developing a 1,000fps mobile image sensor

Posted in Uncategorized


Zenit’s full-frame mirrorless camera will use components made by Leica

20 Sep

Following an announcement last month that camera maker Zenit would launch a full-frame camera in 2018, USSRPhoto claims the new Zenit model will be based on the Leica SL full-frame camera. Leica will reportedly make components for the Zenit based on the ones found in its Leica SL camera, but will tailor them specifically for the upcoming Zenit model.

Little is known about Zenit’s plans at this time. In mid-August, an announcement that Zenit would return with a new camera was reportedly made on Moscow Region Radio 1. No camera specifications were provided aside from the fact that it will be a full-frame mirrorless model with a brand-recognizable design and an anticipated 2018 launch date.

We know that the reborn Zenit company won’t try to compete with the industry’s biggest camera makers, and it was stated at the time that a “leading photographic equipment company” would be used to produce some of the new model’s components. That company wasn’t revealed, but assuming USSRPhoto’s leak is correct, it will be Leica.

However, and in speaking to PetaPixel, USSRPhoto said the KMZ Zenit factory in Russia will itself produce the new lenses for this upcoming model, and that work on this project has already started. Though the factory isn’t capable of producing electronic components for the camera (hence Leica’s involvement) it does have the equipment necessary to make its own optics.

Additional information—such as cost, specs, and a more specific release date—still haven’t been revealed.

Articles: Digital Photography Review (dpreview.com)

 
Comments Off on Zenit’s full-frame mirrorless camera will use components made by Leica

Posted in Uncategorized


Review: Nikon D7500 with 18-140mm Kit Lens

20 Sep

The 7000 series of cameras from Nikon have been very popular since they were first introduced in 2010. It is a mid-range camera in their lineup but sits at the top end of the amateur level cameras. As with many of these cameras the new one in this series, the Nikon D7500 can also be purchased with a kit lens, this one came with the 18-140mm lens.

Review: Nikon D7500 with 18-140mm Kit Lens

The Nikon D7500 with the 18-140mm kit lens. Image courtesy Nikon Australia.

The new D7500 is in the DX format or crop sensor camera. It has a 20.9 megapixel CMOS sensor and is said to be “equipped with a high-performance EXPEED 5 image-processing engine.” Nikon also claims that it is a good camera for video and that it supports 4K UHD. For more technical information please go to the Nikon website.

Nikon D7500 out of the box

When you first get the camera out you’ll notice it’s surprisingly light. I use a D800, so most cameras are light compared to that. However, the D7500 is a good size and feels nice in the hands. There is some weight to it, but it’s comfortable. When you have the camera, with the kit lens attached, hanging around your neck the weight doesn’t hurt you.

They have made the grip deeper so it is easier to hold onto, and also more comfortable to hold. With some models, it feels like you are digging your nails into the camera, but that hasn’t happened with this one.

Review: Nikon D7500 with 18-140mm Kit Lens

Holding the Nikon D7500. Image courtesy Nikon Australia.

Easy to use

When it comes down to it, what you really want from a camera is one that is easy to understand and use. There is no doubt that you will find both of those with the Nikon D7500. In previous models you had to go into the menu to change some settings, a lot of them are now buttons on the camera. ISO is changed with one up near the shutter button. You can change aperture with the scroll wheel at the front and the shutter with the one at the back. It is easy for your fingers to find everything you need.

ISO

It has a high range and will go up to 51200 and the slowest speed is 100. It has enough of a range that would suit most people who want to take photos in both low light and on sunny days.

With images taken at 12800 during a night show at Sovereign Hill you can see noise in the images, which is to be expected, but the amount isn’t that bad that the images are not useable. When compared with what older cameras did at ISO 3200, this camera takes a good image at the higher ISOs with much less noise as on other models. It fits in with many of Nikon’s cameras for using in low light.

leannecole-nikon-d7500-review-66

The Winter Wonderland at Sovereign Hill was dark and to get images the ISO was put up to 12800.

Autofocus

Nikon has worked on the autofocus features with the D7500 and it is fast. You can track subjects and get fast focusing to get sharp images of whatever you are trying to capture. It doesn’t take long to get any subject in focus. It means you can work quickly, especially if you like doing street photography or something else where fast autofocus is needed.

Touch screen

Like most new cameras it does come with a touch screen which makes accessing sections in the menu easier and faster. You can just click on what you need. You can also use your fingers to scroll through the images you have taken. It turns the menu into a series of buttons, so you can move around it much faster and find what you need to make any necessary adjustments.

Review: Nikon D7500 with 18-140mm Kit Lens

Another night image that was hand held and taken with ISO 128000.

LCD screen

The screen at the back is tiltable (it’s not full articulating) so you can change it when you want to use Live View. This is especially good for places where you have strange camera angle, for example, when you are photographing something that is close to the ground. You can put the camera in Live View mode, and then tilt the screen so you can see what you are shooting without having to get down on the ground as well.

Live View is really good, though you always need to be careful with how quickly it can drain the battery. Without a doubt, you will use the battery faster if you use this mode all the time. If you use the viewfinder instead the battery will last a lot longer and you will get plenty of photos.

Review: Nikon D7500 with 18-140mm Kit Lens

This image was taken at Abbotsford Convent.

DoF preview button

It has been pointed out that the current model, the D7500, does not have a depth of field preview button (shows you what your image will look like with your selected aperture). Though it seems that many cameras are now removing this feature. It is not something that I either use or have looked for in a camera, but if it is an important aspect in your photography then it may be a problem for you.

Long exposure photography

You can use any DSLR camera for long exposures, and this one is no different. The images come out very sharp and you get the great effects that you would normally expect. One part that was surprising to me was using Live View with an ND filter on the camera, I could still see the scene. Many Nikon cameras do not do that. When the filter is on you can’t see anything, and you need to remove it to refocus and recompose. This is a great added advantage and makes taking long exposure images that much easier.

Review: Nikon D7500 with 18-140mm Kit Lens

Long exposure taken at Banyule Flats using the D7500 and the 18-140mm kit lens.

Snapbridge

The camera has wifi, Bluetooth and Snapbridge. You can now connect your camera to your phone and get photos to instantly publish on social media. In other cameras the Snapbridge hasn’t worked well with Android phones, but with the D7500 I had no trouble getting my phone to find it and download images. It worked really well, and so far the best experience I’ve had with this app.

The 18-140mm kit lens

This is an interesting lens to include in a kit and many people would be really interested in it. The usual 18-55mm has been replaced with this one. It is a good choice for most people who are starting out with photography.

It has an aperture of f/3.5 at 18mm and when you zoom to 140mm the aperture range starts at f/5.6. It is much the same as other lenses of this type. For most photography, you are not going to want to go wider than those. It is a kit lens and you aren’t going to get something really amazing. If you want higher quality you need to buy the body separately and then get a lens separately.

Review: Nikon D7500 with 18-140mm Kit Lens

The kit lens takes pretty good images of flowers up close. Not quite as close a macro lens, but fairly good.

Most lenses for cropped sensors are of a similar quality. The images from this lens appear sharp and the quality is good. While testing this camera and lens the combination was used for night photography, long exposures, walking around, and some macro. It performed well in all circumstances.

The lens does have Nikon’s Vibration Reduction or VR, which a lot of users now want. Though you can choose to turn it off, which you should do if you are using the camera on a tripod. You also don’t have to use this function.

I tend to turn VR off on my lenses so I don’t leave it turned on when using my tripod. I haven’t found it a problem, but if find that your images have some movement, or you have trouble holding the camera very still then you may find it easier to keep it turned on.

Review: Nikon D7500 with 18-140mm Kit Lens

This image was taken as walking around the city.

Who would buy this camera and lens?

The Nikon D7500 is the top level amateur or non-professional camera that Nikon makes. It is for serious amateurs who want to get the best out of their photography, but can’t quite justify the extra expense of a full frame camera.

It would suit someone looking for a second camera after learning how to take photos with one of the entry level Nikon cameras, like one of the D3000 series models. It is a good step up and there are many features that the D7500 is capable of that the others aren’t.

There is no reason why someone who is new to photography shouldn’t purchase it either. It would be an ideal camera to learn and experiment with as you grow into the camera. The kit lens will also give you a lot of room to advance as well.

Review: Nikon D7500 with 18-140mm Kit Lens

Another long exposure that was taken with the D7500 and the 18-140mm lens

Price

Amazon has the Nikon D7500 body listed at $ 1246.95, and if you want to buy the kit with the 18-140mm you can get it for $ 1546.95.

Conclusion

Overall, the Nikon D7500 would suit someone who is fairly serious about their photography and wants to get the most out of their camera. Someone who wants to take a lot of photos and also wants a model that is capable of doing many different types of photography. It is a camera that will do everything you want it to and you won’t be disappointed.

The post Review: Nikon D7500 with 18-140mm Kit Lens by Leanne Cole appeared first on Digital Photography School.


Digital Photography School

 
Comments Off on Review: Nikon D7500 with 18-140mm Kit Lens

Posted in Photography


Instagram is testing a four-photo grid, and some users are freaking out

20 Sep

Facebook-owned image sharing behemoth Instagram (heard of ’em?) is testing a new change to its app, and the internet is collectively freaking out about it. According to some users, Instagram is already rolling out a new 4-across profile grid to replace the current 3-across setup that people know and (apparently) love.

Not a huge deal, you might think, but many photographers and casual users alike use that 3-across grid to create interesting mosaics that help their profile stand out. And those people are not reacting well to news of the test:

Of course, by now Instagram is used to these kinds of reactions—it seems like every change they make is met by a deluge of fear, anxiety and threats of abandonment. The algorithmic feed has been a boon for the company, but it set the community into a panic; and even smaller changes like the ability to block comments automatically or by keyword are usually met with at least some skepticism.

But for those photographers who have built their Instagram ‘brand’ in part by making creative use of the 3-across grid on their profile, this change would represent a swift kick to the mosaic.

Articles: Digital Photography Review (dpreview.com)

 
Comments Off on Instagram is testing a four-photo grid, and some users are freaking out

Posted in Uncategorized


Zero-Carbon, All Bamboo Sports Hall Features Organic 50-Foot Trusses

19 Sep

[ By WebUrbanist in Architecture & Public & Institutional. ]

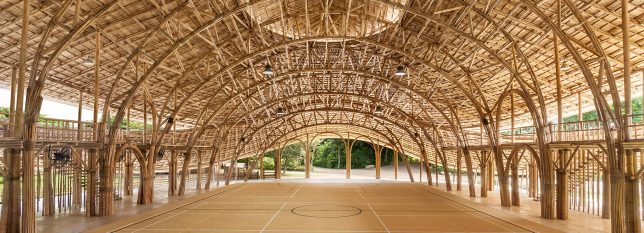
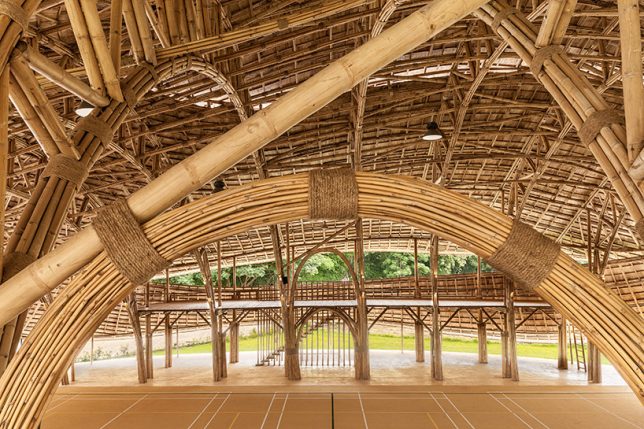
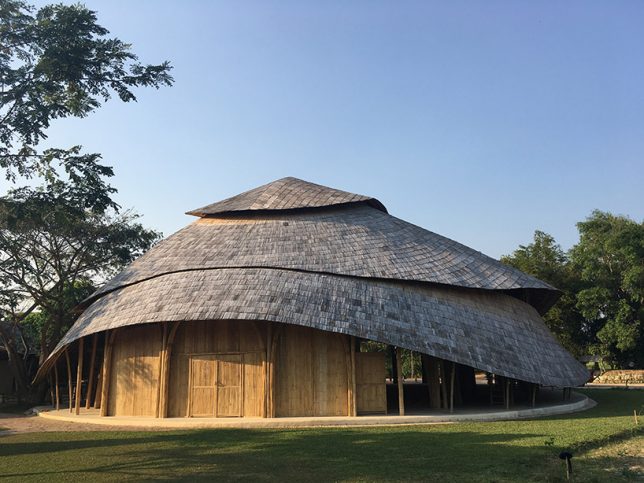
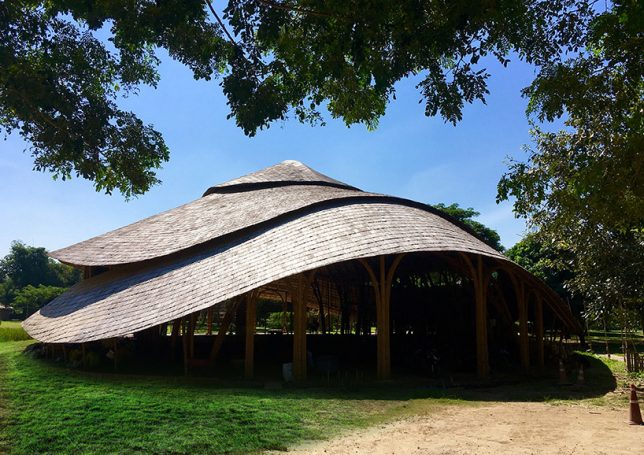
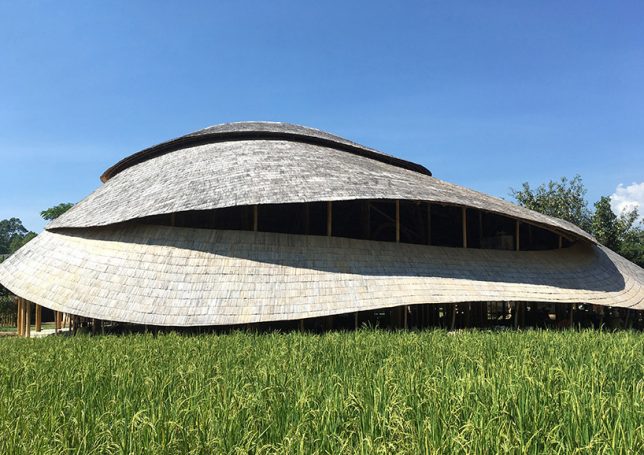
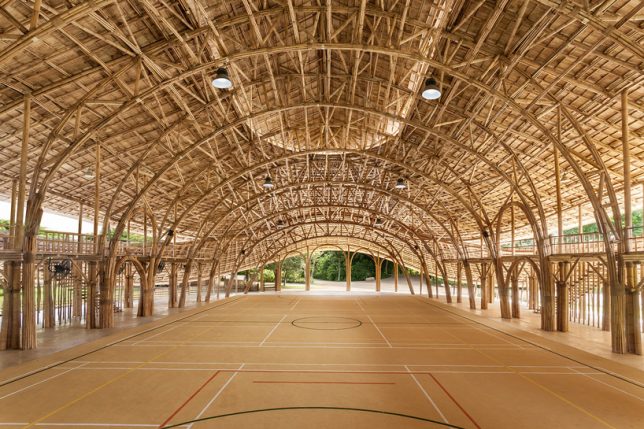
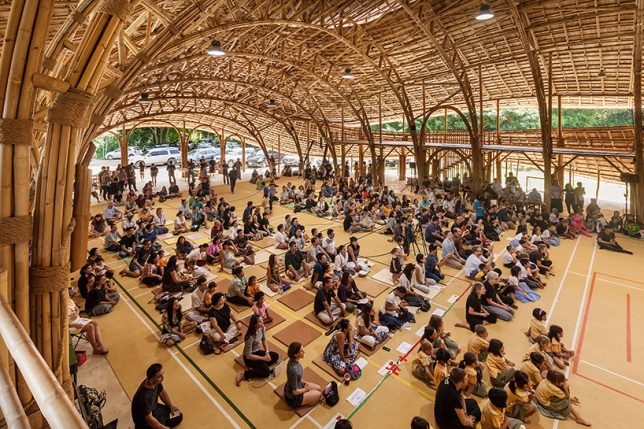
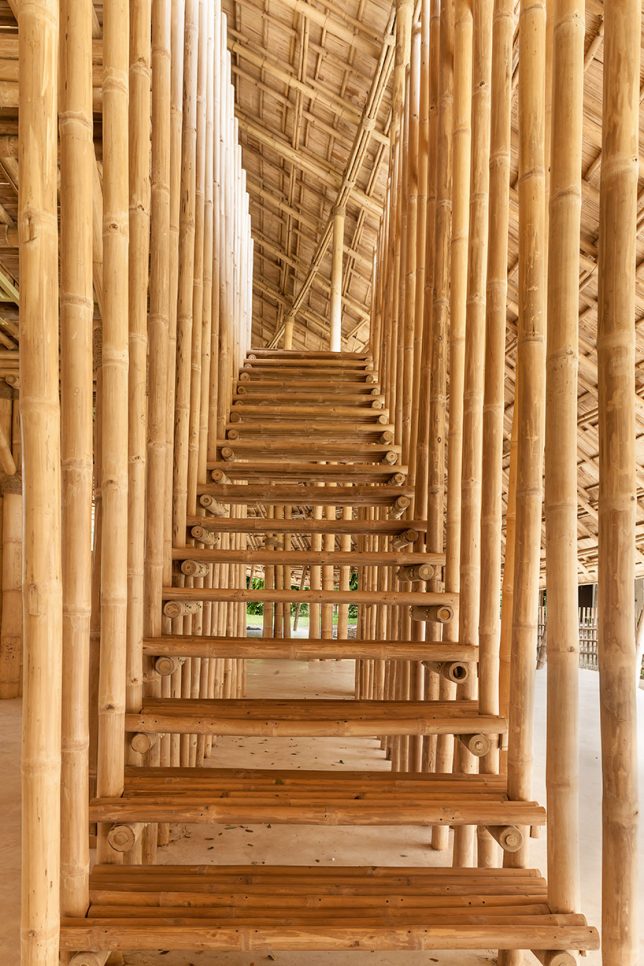
A new sports hall in Thailand highlights the aesthetic power and physical strength of bamboo, a flexible and fast-growing natural material. In total, more carbon is captured in the bamboo than was used to treat, transport and use it for construction, rendering its carbon footprint neutral.

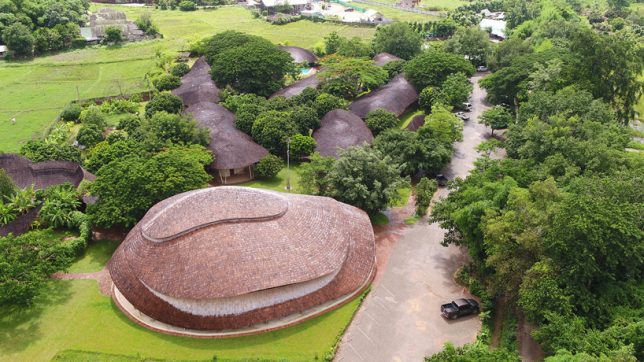
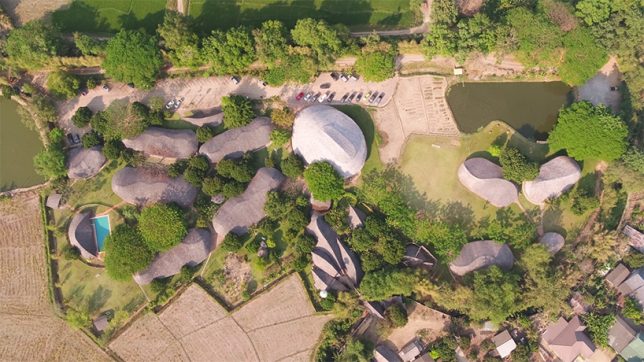
Located at the Panyaden International School in the Chiang Mai province, the new building was designed by Chiangmai Life Architects, a firm specializing in natural materials like bamboo and rammed earth.

The symbolic design was inspired by the lotus, an important Buddhist and Thai symbol. Its natural materials tie it to scenic surroundings while open sides allow for passive ventilation for cooling purposes.

Despite its organic appearance, the structure is engineered to resist earthquakes, high-speed winds and other forces of nature.

The complex is able to accommodate 300 students, spanning over 8,000 square feet, and is used to host games of basketball and futsal, a variation on soccer that takes place in a court. It can also be used for student gatherings and visiting speakers.

Like wood, bamboo is becoming an increasingly appealing material for architectural construction thanks to its rapid growth rate and ability to sequester carbon — the natural look and feel are a nice touch, too.

Share on Facebook


[ By WebUrbanist in Architecture & Public & Institutional. ]

[ WebUrbanist | Archives | Galleries | Privacy | TOS ]


WebUrbanist

 
Comments Off on Zero-Carbon, All Bamboo Sports Hall Features Organic 50-Foot Trusses

Posted in Creativity


Video: 10 Hot Tips for Better Landscape Photography

19 Sep

Do you enjoy landscape photography and want to take your work to the next level? Here are 10 hot tips to help you do that.

10 Landscape Photography Tips

Recap of the tips

  1. Planning is key – How to Find the Best Locations for Landscape Photography
  2. Location – arrive early to be prepared.
  3. Composition – try the rule of thirds or advanced techniques.
  4. Use a tripod.
  5. Prepare your camera gear – take care of it when on location.
  6. Focus using the hyperfocal distance.
  7. Set your exposure – use the histogram, exposure compensation, or even bracket if necessary.
  8. Aperture – set it to get a wide depth of field.
  9. Avoid camera shake by using a remote or the self-timer in your camera.
  10. Filters – using a polarizer and/or ND graduated filters can enhance your landscape photography.

Do you have any other landscape tips you could add to this list for any newbies? Please share in the comments below.

The post Video: 10 Hot Tips for Better Landscape Photography by Darlene Hildebrandt appeared first on Digital Photography School.


Digital Photography School

 
Comments Off on Video: 10 Hot Tips for Better Landscape Photography

Posted in Photography


Weekly Photography Challenge – Landscape

19 Sep
photography, tips, apps, landscape, iOS, Android, Pete DeMarco

Landscape image by  © Pete DeMarco

Weekly Photography Challenge – Landscape

Landscape is one of the most popular genres of photography. So it should be easy to participate in this week’s photography challenge. Show us your favorite landscape photos, use all your skills and techniques to make the best images possible.

Here are links to a few articles if you need help:

  • 6 of the Best Smartphone Apps for Travel and Landscape Photography
  • 5 Composition Tips for Landscape Photography
  • The dPS Ultimate Guide to Landscape Photography
  • Tips for Processing Landscape Photos – from Basic Edits to Artistic Interpretation
  • How to Process a Black and White Landscape Photo Using Lightroom

Share your images below:

Simply upload your shot into the comment field (look for the little camera icon in the Disqus comments section) and they’ll get embedded for us all to see or if you’d prefer, upload them to your favorite photo-sharing site and leave the link to them. Show me your best images in this week’s challenge. Sometimes it takes a while for an image to appear so be patient and try not to post the same image twice.

Photo by Rob Bates on Unsplash

Share in the dPS Facebook Group

You can also share your images on the dPS Facebook group as the challenge is posted there each week as well.

The post Weekly Photography Challenge – Landscape by Darlene Hildebrandt appeared first on Digital Photography School.


Digital Photography School

 
Comments Off on Weekly Photography Challenge – Landscape

Posted in Photography


Canon EOS Rebel SL2 / EOS 200D Review

19 Sep

The EOS Rebel SL2 (known as the EOS 200D outside of North America) is Canon’s second-generation ultra-compact digital SLR. It’s largely packed with Canon’s latest tech, including Dual Pixel AF, a DIGIC 7 processor, Wi-Fi with NFC and Bluetooth, and a new user interface for beginners.

While its small size may lead one to believe that it’s an entry-level model, similar to Nikon’s D3400, the SL2 actually sits above the bottom-end Rebel T6 (EOS 1300D), which costs $ 150 less.

The SL2’s main competitor is the aforementioned Nikon D3400, which is just a tad larger and heavier. The SL2s’ other peers are all mirrorless and include (in our opinion) the Canon EOS M5, Panasonic DMC-GX85 and the Sony a6000 which, after 3+ years on the market, is still competitive.

Key Features

  • 24.2MP APS-C CMOS sensor
  • Dual Pixel autofocus (for live view and video)
  • 9-point autofocus (through the viewfinder)
  • DIGIC 7 processor
  • 3″ fully articulating touchscreen LCD
  • 5 fps burst shooting (3.5 fps with continuous AF)
  • 1080/60p video
  • External mic input
  • Wi-Fi with NFC and Bluetooth
  • Available ‘Feature Assistant’ user interface

Just about everything in that list is Canon’s latest and greatest, and the external microphone input is a nice extra. The one feature that’s not new is the 9-point autofocus system that you’ll use when shooting through the viewfinder – it’s identical to what’s found the original SL1, which is over four years old. You’ll get a much better focusing experience by shooting in live view, which uses Canon’s excellent Dual Pixel AF technology.

Compared to…

The SL2 (left) is the mini-me to the still-small Rebel T7i.

First, let’s take a look at how the SL2/200D compares to the step-up model, the Rebel T7i (EOS 800D). Here’s what you get for another $ 200 (with kit lenses for both models):

  • 45-point AF versus 9-pt AF
  • 7500-segment RGB+IR metering versus 63-segment (from which we’d expect better subject tracking)
  • 6 fps versus 5 fps bursts with S-AF
  • 4.5 fps versus 3.5 fps bursts with C-AF
  • Significantly larger buffer
  • Color tracking for AF in Single AF as well as Continuous AF
  • Semi-transparent LCD in viewfinder that can overlay grids, different AF points, an electronic level, and more
  • Built-in flash can trigger wireless strobes

Does the average point-and-shoot user need any of that? Probably not. If you plan on gaining more experience in the world of digital photography or want a more robust autofocus system, though, the extra $ 200 might be worth it.

Now, let’s take a look at how the specs compare between the the SL2 and the peers mentioned a few paragraphs earlier.

Canon SL2 Nikon D3400 Canon M5 Panasonic GX85 Sony a6000
Resolution 24MP 24MP 24MP 16MP 24MP
Sensor size APS-C APS-C APS-C Four Thirds APS-C
Lens mount EF F EF-M Micro 4/3 E
Image stab. Lens-based Lens-based Lens-based In-camera Lens-based
AF system (live view) Dual Pixel Contrast-detect Hybrid
(Dual Pixel)
Contrast-detect Hybrid
AF system (viewfinder) 9-point 11-point N/A N/A N/A
LCD 3″ fully articulating 3″ fixed 3.2″ tilting 3″ tilting 3″ tilting
Touchscreen Yes No Yes Yes No
Viewfinder type/mag. OVF / 0.54x OVF / 0.57x EVF / N/A EVF / 0.7x EVF / 0.7x
# control dials 1 1 2 2 2
Video 1080/60p 1080/60p 1080/60p UHD 4K/30p 1080/60p
Wireless Wi-Fi + NFC + BT BT Wi-Fi + NFC + BT Wi-Fi + NFC Wi-Fi + NFC
Battery life 650 (OVF)
260 (LV)
1200 (OVF)
N/A (LV)
295 (LV) 290 (LV) 360 (LV)
Dimensions (mm) 122x93x70 124x98x76 116x89x61 122x71x44 120x67x45
Weight 453 g 445 g 427 g 426 g 344 g

Strictly comparing the SL2 and D3400 you’ll see that they each have their own strengths and weaknesses. While there are ‘little things’ like the type of LCD, viewfinder size and wireless functionality, live view autofocus is the main differentiator. It’s simply no contest there with the SL2’s AF system blowing away the D3400 in live view and movie mode.

With the exception of the Sony a6000, the SL2 is close in weight, and not far off in size, to the three mirrorless cameras in the group. All three of the mirrorless cameras have an additional control dial, making exposure adjustment quick, and their EVFs are larger than the optical viewfinders on both DSLRs. None of the mirrorless models can compare to the DSLRs in terms of battery life, but only when you’re using the latter with their optical viewfinders.

Articles: Digital Photography Review (dpreview.com)

 
Comments Off on Canon EOS Rebel SL2 / EOS 200D Review

Posted in Uncategorized


Review of Macphun’s Aurora HDR 2018

19 Sep

HDR, or High Dynamic Range, photography is a technique that has been around for decades but really started making waves in the modern digital imaging scene around 2005. It involves combining multiple exposures of a picture, usually taken with a technique known as bracketing, to create one final single image with bright parts that are not overexposed and dark parts that are not underexposed.

Review of Macphun's Aurora HDR 2018

In recent years the software required to do this has gotten more powerful, less expensive, and so much easier to use. With just a few clicks anyone can make beautiful HDR images. Aurora HDR 2018 is the latest arrival in this category, created by Macphun, a developer rooted in photography and digital image manipulation. It’s a program that caters to casual users who want a fun creative outlet while also meeting the demands of professionals who make their living from designing beautiful works of photographic art.

If you want a single program that can handle all your HDR needs no matter your skill level, Aurora HDR 2018 may be just the tool for you.

What is HDR photography?

HDR photography is all about getting the best of both worlds when taking photos, particularly of static subjects like landscapes or architecture. If you’re taking a picture with extraordinary bright spots like a sunrise or sunset, you can expose for the highlights (i.e. the bright spots) which mean the dark parts get really dark and underexposed.

Alternatively, you can expose for the shadows (i.e. the dark spots) which leave the bright parts extra bright and overexposed. HDR photos are created when a photographer takes multiple shots, usually three or more, of the same scene: one underexposed, one properly exposed, and one overexposed. Then software such as Lightroom, Photoshop, Photomatix, and others can be used to combine all the images into a single picture that has detail in both the highlights and the shadows.

Before and after image showing what is possible with HDR.

How Aurora HDR is different

Compared to other offerings on the market, Aurora HDR’s brilliance lies in its simplicity. It’s far easier to use and just as capable as other HDR applications, and also very competitive in terms of its pricing. (Unlike some other apps, it’s available as a one-time purchase instead of with a monthly subscription.) When you open the program you are greeted with one large button that lets you load a single image or multiple exposures of the same image, which is all you need to do to get started. If you dig just a bit deeper you will notice two additional options: Batch Processing and Load Sample Images.

The former is useful if you want to quickly apply specific HDR processes and presets to many images at one time. While this can be useful if you have several images to go through I don’t recommend it for beginning users.

Aurora HDR 2018’s bread and butter is the incredible degree of control it gives you over the entire process of creating a High Dynamic Range image. This is where most people will get the maximum value out of the software.

What’s New in Aurora HDR 2018

Whether you are new to the world of creating HDR images with Aurora or are a longtime user of this software, many of the changes in the 2018 version will bring significant improvements to your workflow. The program has been rewritten from the ground up to focus on things like speed improvements, better RAW image handling, and a more user-friendly interface.

There is now a History panel which lets you see all the edits you have made to an image, and functions very much like the same option in programs such as Lightroom, which many photographers already use. The 2018 version also adds a Lens Corrections Tool and a host of other minor but noticeable tweaks while keeping the bedrock foundation of powerful yet easy-to-use HDR tools for professionals and beginners alike.

The lens correction tool is a welcome addition to the 2018 version.

These types of improvements mean a lot to me as a longtime Aurora HDR user since it sends the message that Macphun is committed to developing its apps. I’ve been burned before by companies that stop iterating on software I have come to rely on, such as Apple’s Aperture editing program, but it’s clear that Macphun is not going to leave photographers high and dry.

They have been making software for over a decade and are now even releasing some of their more popular programs for Windows users as well, including Aurora HDR 2018. It’s nice to see this commitment to continual improvement from developers, and it’s one of the reasons I enjoy using Macphun software so much.

Aurora HDR 2018 is open for pre-ordering now and will be available for purchase September 28th. Get more info here.

Other new features in Aurora HDR 2018 include:

  • A Transform Tool
  • Dodge & Burn Filter
  • Image flip and rotate
  • HDR Details Boost Tool
  • Rewritten tone-map engine to deliver more natural initial results
  • HDR Enhancer
  • Improved HDR Structure
  • Additional Blend modes

Getting started with Aurora HDR

If you are new to HDR processing and don’t know where to begin, click on Load Sample Images and you’re off to the races. The program will show you thumbnail previews of three separate pictures: one underexposed by two stops, one properly exposed, and one overexposed by two stops. When the program combines all three it will essentially give you a stunning HDR photo that you can then tweak and edit to your liking using a myriad of controls, filters, and effects.

Using your own JPEGs instead of the sample images results in a similar process, with Aurora HDR 2018 loading thumbnails of your images before you confirm that you want to proceed with combining them.

While using a tripod is ideal for creating perfect bracketed photos, sometimes horizon lines and other elements within the picture may be slightly misaligned. Click the Alignment button to have the program automatically correct for that. Additional Settings gives you options such as removing chromatic aberration and moving objects that might have changed position between each shot.

Keen dPS readers might be wondering whether Aurora works with RAW files, and thankfully they are fully supported by the program as well. You can work with one properly-exposed RAW file or use multiple bracketed RAW files to get even more room to experiment when creating your HDR images. The 2018 version includes a complete retooling of the RAW handling engine which results in improved color rendition and accuracy, which is a welcome change from previous iterations of the software.

Tools and first impressions

Once you have your pictures loaded into the main interface, creating a stunning HDR image can be as simple or as complex as you’d like. This is another aspect of Aurora HDR that I really enjoy. I have used other programs and workflows to do the same basic task of combining multiple exposures into a single image, none are as simple and yet as powerful as this program.

The interface might seem overwhelming at first but after a few minutes, I felt right at home. The non-destructive nature of the editing meant that I soon felt free to experiment with all sorts of different presets, sliders, and options without ruining anything.


Workflow

From a workflow standpoint, Aurora HDR 2018 is designed to be quick, efficient, flexible, and familiar to those who have used other image editors.

When I edit photos in Lightroom I usually head straight for the sliders on the right-hand side to tweak parameters like white balance, exposure, clarity, and sharpness. Aurora HDR 2018 gives you many of those same options. However, I have found that it is more efficient to start with a preset and then edit from there, much in the same way that Lightroom allows you to click a preset such as Aged Photo, Bleach Bypass, or Antique Black and White.

Using these presets in Lightroom just applies pre-determined values to various sliders like saturation, grain, clarity, and color which you are then free to change as much as you want. Aurora HDR 2018 works in exactly the same way. Choosing a preset like Foggy Morning, Realistic Dreamy, or Sleepy Forest results in nothing more than changing the values of Tools sliders on the right-hand side of the screen which you are then free to alter as desired.

Review of Macphun's Aurora HDR 2017

Some of Aurora HDR presets previewed at the bottom of the screen inside the program.

Aurora plays nicely with most other image editors on the market including Lightroom and Photoshop. You can easily use it as a plug-in which means you can do all your normal work in Lightroom, then quickly send an image over to Aurora HDR for additional editing, and save it right back to Lightroom when you’re done.

Aurora HDR presets

If you have ever used Instagram’s photo filters you will feel right at home in Aurora HDR. In a way, you can think of the program like an extraordinarily powerful version of that rather basic social sharing app.

Once your photos are loaded you can click on a preset (each of which shows a small preview of how your final image will look) and then save your photo with no additional work or hassle required. The presets are even subdivided into categories like Basic, Dramatic, Landscape, and a few that were designed with input from professional photographers like Trey Ratcliff, Captain Kimo, and Serge Ramelli.

I must admit I don’t actually use Instagram filters because I find them to be distracting and unhelpful for my own style of photography, but I rather liked using Aurora HDR’s presets even though some were a bit too over-the-top for my taste.

You can take things one step further if you like, and create your own custom presets which can also be applied to any HDR image. This has come in handy for me on several occasions when I wanted to combine options from a few existing presets, tweak the values of a preset, or just create my own from scratch.

Simple interface

On the right side of the interface is a list of all the various tools used by Aurora HDR to control the parameters of your image. Some of them like Color, Tone Curve, and HSL will feel right at home if you have used Lightroom, Photoshop, or other image editors as these contain the same basic sliders you would expect.

When you click on a preset at the bottom of the screen the name of the tools used by that preset are highlighted in orange, which I found to be highly useful during the editing process. Since I knew immediately which values were being changed I could then use that as a starting point for my own experimentation which often led me down a rabbit hole of creativity that I didn’t expect but always enjoyed.

The only issue I had when experimenting with presets and sliders is that the program does tend to slow down when processing your changes, though this is much less noticeable in the 2018 version. While you still get a preview of what your edits will look like I did encounter several times when the “Image Processing…” alert would show up in the lower-left corner a bit more often than I would have liked.

Before and after mode

As you make changes, whether through presets or changing the values in individual Tools sliders, you can easily see how your work is progressing by using the Before/After view which I found to be handy. Clicking on this option gives you a vertical bar that you can slide back and forth to reveal the original image on one side and your changes on the other. You can also hold the \ key to quickly see the complete original and then release it to return to the current version with your edits.

Before and After slider in action showing how your edits are affecting the image.

It’s this sort of editor-centric workflow design that I really appreciated about Aurora HDR 2018. It makes the whole process of creating and editing an HDR image as straightforward as possible and easy to understand. I have used some programs where I felt hopelessly lost as if I had to change my own mindset and wrap my head around how the program wanted me to function.

With Aurora HDR it feels like the program was designed to meet my needs and my style. I never had one of those all-too-common moments of panic when I couldn’t remember where a critical button or tool was located or figure out how to replicate something I did a week ago.

Professional features and masking

Once you dig deeper into Aurora HDR 2018 you will find tools that appeal to even highly demanding artists who want precision control over their creations. A collection of edits such as applying a preset and then tweaking additional Tools sliders can be saved as a Layer, and then additional Layers can be added on top of it similar to Photoshop.

Masks

Masks can also be used on layers. You can even apply them with a brush tool which I found extraordinarily useful if there was a preset or set of edits that I just wanted to apply to a single portion of an image. If you want to get really specific with your editing you can even apply masks based on ten discrete levels of luminosity (luminosity mask), which means your adjustments will be implemented only on the brightest or darkest portions of the image instead.

Layer masks can also be applied as radial or linear gradients which can be very useful depending on the type of HDR image you are creating. And just like Photoshop and other image editors, your changes are non-destructive so you can revert back to any editing state any time you choose. You can also return to your edits if you save your file in the native Aurora HDR format before exporting to JPG, TIFF, or another file type.

Review of Macphun's Aurora HDR 2017

Blend modes

New in Aurora HDR 2018 you can also change the layer blend mode. Here it is applied to a layer that is applying selective darkening and lightening to specific areas of the image using the new Dodging and Burning Tool.

The Dodge and Burn Tool has been used to lighten the little cottage and bridge and part of the hill, and to darken the sky and parts of the reflection in the water.

Use the little Eye Icon to turn the effect on and off to see a Before and After.

New in Aurora HDR 2018 – Blend Modes! The default is Normal. Notice with this image the colors have become more saturated after dodging and burning.

By switching to Luminosity Blend Mode the colors are preserved and appear more natural.

Batch processing

One final arrow in Aurora HDR’s rather considerable quiver, which I briefly mentioned earlier, is the ability to quickly apply presets and other defined values to a batch of images. This saves you an enormous amount of time if you have dozens or even hundreds of photos that you want to edit at the same time, using the program’s built-in presets or your own custom ones.

I do wish the Batch Processing option allowed users to specify parameters on a tool-by-tool basis to combine presets with other options like Structure and HDR Denoise, but the workaround is to create your own custom preset and just apply that in Batch mode. Of course, this method doesn’t give you the sort of fine-grain control you would get from editing each HDR image individually, but the trade-off can be worth it in terms of overall time saved if you have a large number of images.

Conclusion and rating

During my time using Aurora HDR I was impressed with the simplicity of its interface as well as the sheer depth of HDR tools at my disposal. Macphun has clearly invested a great deal of time creating and refining Aurora HDR to appeal to demanding professionals and curious hobbyists alike. Having used previous versions of this program I found this iteration to be a welcome refinement in many areas.

In terms of value, it’s a phenomenal piece of software that doesn’t require a subscription and will serve HDR photographers very well. The one quibble I still have with Aurora HDR 2018 is that it’s a bit on the slow side when implementing some presets and manipulating certain sliders. But that was a minor issue with an otherwise stellar program.

Aurora HDR 2018 isn’t for everyone, and unless you specifically work with HDR images you might be frustrated that it doesn’t have features like Dehaze and Red-Eye Removal that you may be accustomed to using in other image editors. But then, it doesn’t claim to be an all-in-one editing program and instead abides by the age-old mantra of, “Do one thing, and do it well.” If HDR photography is what you’re into, then Aurora HDR will serve you very well indeed.

Disclaimer: Macphun is a dPS advertising partner.

The post Review of Macphun’s Aurora HDR 2018 by Simon Ringsmuth appeared first on Digital Photography School.


Digital Photography School

 
Comments Off on Review of Macphun’s Aurora HDR 2018

Posted in Photography


ImageRights expands copyright registration, adds new blockchain protections

19 Sep

Photo protection company ImageRights International, a Boston-based business with offices in Seattle and Berlin, has launched a new image copyright registration system that anyone can use, not just subscribers. The company offers both a Lightroom plugin and a website-based registration tool that streamlines registrations, including automatically checking for errors and filling in forms.

ImageRights’ new copyright registration option costs $ 100 on top of the US Copyright Office fee ($ 35 or higher). This is compared to ImageRights’ subscriber plans, which charge $ 69 for registering a single image and $ 89 for registering multiple images. On top of that, the company offers subscribers additional services such as assessing infringement claims, finding unauthorized uses of a registered photo, and more. But now you don’t need to subscribe to take advantage of their streamlined registration system.

In addition, ImageRights is taking a cue from Binded (formerly Blokai) by launching a Bitcoin blockchain record that uses the technology to save the ImageRights Deposit Copy Certificate of Warranty document it creates when someone uses its service to register a photo. Talking to PDN about this, ImageRights CEO Joe Naylor explained:

We make a hash of this [warranty] document and inscribe it into the Bitcoin Blockchain. This is a tool that helps us during an infringement settlement discussion when the other party questions whether or not an image was really covered by the USCO registration certificate that we say it is. We can show them the warranty where they can now see a visual representation of the image (the thumbnail) associated with the USCO Registration number. And to help prove that we didn’t just fabricate the document when they challenged us, we can show that from the blockchain inscription records that this document existed at that date.

ImageRights is one of multiple services that helps photographers register their image copyrights, though it says it is the only one with a fully automated registration system. Binded is a popular alternative, and it recently announced free one-click registrations.

Articles: Digital Photography Review (dpreview.com)

 
Comments Off on ImageRights expands copyright registration, adds new blockchain protections

Posted in Uncategorized