RSS
 

Archive for May, 2017

Beyond Human Vision – Seeing More With Photography

20 May

Have you ever been frustrated because you don’t seem to be able to photograph a scene the way it looks to you, with your vision? Maybe you can’t get a sharp image even though the scene is perfectly clear, or perhaps the camera fails to capture the beautiful variety of light in a landscape.

It’s possible that you’re having technical trouble in getting the most from your camera, but it might also be because the human eye and the camera aren’t the same, despite their compelling similarities. For instance, our eyes have a much broader dynamic range than any sensor or film, and our binocular vision gives us amazing depth perception.

But have you ever thought of the ways in which cameras can outperform the vision of your eyes? These aspects of your favorite tool are not obscure quirks, but commonly used techniques that broaden your perception of the world around you.

So let’s dive into the mysteries of the camera! Maybe realizing how photography expands your worldview will make you look at photography (and reality) in a slightly different way.

1. Capturing time

With the camera, you can capture time in different units than your eye does. This, of course, is done by choosing a shutter speed. There isn’t a direct counterpart to shutter speed in human vision, but that doesn’t mean we can’t take advantage of the camera’s ability to observe the passage of time beyond our own vision.

Beyond vision 01

A long shutter speed of several seconds lets you see movement that isn’t discernible at all or in the same way by vision alone. Exposure: 1/3rd of a second, f/14.0, ISO 100.

Beyond vision 02

Controlling shutter speed is also what makes light painting possible. Exposure: 134 seconds, f/5.6, ISO 100.

Beyond vision 03

Using a really fast shutter speed lets you transform continuous motion that you see as a blur into a frozen instant. I thought I was photographing a bird sitting on a snowy branch, but all I got was a miniature snow flurry. Exposure: 1/500th, f/2.8, ISO 800.

2. Capturing light

Even though your eyes are better than cameras at distinguishing a wide range of light levels in the same frame, the camera can extend your observation of very dark and very light scenes. You can accomplish this by carefully balancing shutter speed, aperture, and ISO. Modern cameras allow for ever higher ISO levels, which increase the light sensitivity and allow you to capture images in really dark scenes.

Beyond vision 04

If you’re lucky, you can see The Milky Way with your naked eye. Capturing it with a camera, though, allows you to see even more details of our galaxy. Exposure: 35 seconds, f/4.0, ISO 1600.

3. Field of view

The human field of view is static, about 190 degrees depending on the anatomy of your face. By using lenses, you can vary that field of view from slightly larger to much smaller.

Beyond vision 05

A wide field of view, but still not as wide as that of most humans. Exposure: 1/13th, f/7.1, ISO 400.

Beyond vision 06

A very small (narrow) field of view. This close-up, or macro, shows the tiny details of a fungus growing. Exposure: 1/25th, f/6.3, ISO 100.

4. Depth of field

Although you can’t control it, your eyes do have a changeable aperture called the pupil. It’s difficult to find information on exactly what kind of apertures the human eye can pull off. But whether the camera can do more or less, the effects of a small or large depth of field differ between eyes and cameras.

Examples of this are bokeh, which is achieved by a large aperture (small depth of field), and the starburst effects caused by a very small aperture (large depth of field).

Beyond vision 07

Snow and ice crystals creating bokeh. Exposure: 1/100th, f/4.0, ISO 160.

Beyond vision 08

Starburst over a snowy sea. Exposure: 1/500th, f/20.0, ISO 100.

5. Color

Although cameras have been designed to capture the same colors that we see, some can detect color in a very different way, including sensors used mainly by scientists to detect ultra-violet, infrared, or other parts of the non-visible spectrum.

The ability of some film to capture black and white offers us a new way to see the world, focusing on tones rather than colors. You can also make black and white photographs with a digital camera, though this is almost always a conversion from color to monochrome, either in-camera or in post-processing (there are a couple of monochrome digital cameras available on the market, but they are neither common nor cheap).

Beyond vision 09

A monochrome vision – this photo was taken as a color image, then converted to black and white in post-processing. Exposure: 1/80th, f/4.0, ISO 1250.

Conclusion

Can you come up with more things that the camera can do but you can’t? Do you think your camera helps extend your vision – both literally and metaphorically? I’d love to hear from you and see some of your creations in the comments section below.

The post Beyond Human Vision – Seeing More With Photography by Hannele Luhtasela-el Showk appeared first on Digital Photography School.


Digital Photography School

 
Comments Off on Beyond Human Vision – Seeing More With Photography

Posted in Photography


Analog gems: 10 excellent, affordable film cameras

20 May

Affordable analog

Battles rage over whether digital or analog is the better medium. But those shouting on both sides are missing out on the simple truth that the two compliment each other beautifully.

With digital photography, there is an ability and sometimes a desire to achieve something precise, while happy surprises can be a big part of the analog draw. Keen photographers realize that shooting with both mediums keeps one creatively-focused and balanced: aware that perfection exists, but open to creative serendipity. Moreover, film gives the user a chance to slow down and be decisive, and digital allows the user to quickly see results and learn.

Of course, many of the readers of our site are digital diehards. But let’s pretend for a moment that we’ve convinced you to dabble a bit in analog. What would be a good camera to run a roll through? What follows is a list of 10 cameras, all of which are easy to find, technically capable, and reasonably priced. These are cameras known for holding up mechanically and don’t require obscure or discontinued batteries, like mercury cells.

Of course, this list is far from complete – there are many excellent film cameras available that fit our criteria. Which is why we’ll be looking to add more periodically. So if there are any you feel particularly strongly about, let us know in the comments. Happy shooting!

Canon AE-1

History: The Canon AE-1 was produced from 1976-1984 and in that time more than a million units were sold. One of the first affordable SLRs on the market to feature TTL auto exposure metering, the AE-1 was also the first SLR to use a microprocessor. It is constructed mostly of injection molded plastic to keep costs down. However, this leads to a comparably lighter body than most metal SLRs of the day.

‘From 1976-1984…more than a million units were sold.’

Why we like it: This camera is a solid choice for beginners, offering both a shutter priority and a manual mode (though sadly no aperture priority mode). Metering tends to be accurate and the camera can be powered by a variety of common drugstore batteries. Canon FD lenses are cheap and readily available for the system.

Buy one: These cameras are extremely easy to come across in working order for under $ 100. If buying on eBay, you can often pick up an AE-1 with a bunch of FD lenses and other accessories for about the same price as the body.

Also consider: The Canon AE-1 Program (shown above). The Program was released in 1981 is the follow up to the original AE-1. It is largely the same camera, except for the inclusion of a Program auto exposure mode that sets both shutter speed and aperture.

Pentax K1000

History: The Pentax K1000 first debuted in 1976 (same year as the Canon AE-1) and was manufactured continuously for just over two decades. The body is made mostly of metal and the camera is fully mechanical in operation (there is no auto mode). The K1000 has a built-in light meter that runs on generic drugstore camera batteries. Just remember to put the lens cap on to avoid draining the charge!

Why we like it: The K1000 represents a very different approach to the amateur SLR market than the Canon AE-1. Both are great cameras with redeeming qualities, but we really appreciate the Pentax’s mechanical design, which means it can be operated without batteries (unlike the Canon). And due to its metal build, K1000’s tend to stand the test of time quite well. In short, these cameras have a reputation for being simple, but reliable – great for beginners or purists. And there is also a ton of great glass to be had for the system.

‘We really appreciate the Pentax’s mechanical design, which means it can be operated without batteries.’

Buy one: Not only are these cameras built to last, they were made non-stop for 21 years! So it comes as no surprise that they are easy to find used. Expect to pay between $ 50-$ 175 for one on eBay, depending on the condition. Snagging a deal that includes the body and some Pentax glass is not super likely, but also not impossible. Some collectors claim the bodies with “Asahi” on the prism are more reliable – as they are older and supposedly use fewer plastic components internally – something to keep in mind.

Photo credit: John Kratz

Olympus XA

History:  The Olympus XA is one of the smallest 35mm rangefinder cameras ever made. Sold from 1979 to 1985, this camera manages to tuck a very sharp Zuiko 35mm F2.8 lens (with a 4-blade aperture) behind a protective sliding door. The camera is aperture priority-only, however there is a +1.5 Exp. comp. lever on the bottom of the body. The camera itself is built mostly of plastic, but still feels dense in hand.

Why we like it: There’s a lot to like about this tiny rangefinder: It’s incredibly quiet, the lens is sharp and the metering is good. It also represents one of the most unusual camera designs of its time. The focusing lever is admittedly a bit small and fiddly, but the focus depth scale makes things a bit easier.

‘The Olympus XA is one of the smallest 35mm rangefinder cameras ever made.’

Buy one: It’s pretty easy to find this camera sold alongside its original accessory flash (which mounts on the side of the body). Expect to pay between $ 50-150 for one in working order, with or without the flash. A note of caution: sometimes these turn up in seemingly working order, but with a dead light meter (bad news for an aperture priority-only camera).

Also consider: The Olympus XA2. It is essentially a simplified version of the XA, but with a 35mm F3.5 lens and zone focusing. Some people find the XA2 easier for casual pointing and shooting.

Mamiya M645

History: The Mamiya M645 was the company’s first 6 x 4.5 format SLR-style camera and was manufactured from 1975-1987. It uses an electronic focal plane shutter and features an interchangeable finder and focus screen, but not interchangeable film backs. The camera uses a generic 6 volt camera battery. There are several different versions available including the M645 1000 and the budget-friendly M645J.

Why we like it: These are beautiful cameras both to hold and to operate. Not only that, they are also mechanically reliable. And while there are more feature-packed 6 x 4.5 cameras on the market (including many from Mamiya), few are as affordable as the original M645.

‘There are more feature-packed 6 x 4.5 cameras on the market, but few are as affordable or reliable as the original M645.’

Buy one: These cameras are easy to find in working order. You can expect to pick one up on eBay, with a lens, for between $ 250-350. Note: the M645J model (shown in the image above) is a stripped down version of the M645 for slightly less cash (it has a limited shutter speed range, no mirror lock-up, and one shutter release as opposed to two).

Nikon L35AF

History: Introduced in 1983, the L35AF was Nikon’s first compact with autofocus capability. Its sharp 35mm F2.8 lens and simple design led it to become a marketplace hit. The camera is fully automatic, but does have a +2EV exposure compensation lever on the front of the body. The metering cell is located directly below the lens and the camera can accept filters. It also has a built-in pop-up flash.

Why we like it: At first glance, the L35AF looks like a cheap, plastic camera. But looks are deceiving. This camera is in fact a gem (the body is actually metal with a plastic shell). As mentioned, the lens is sharp, and metering is accurate. AF is also surprisingly accurate. Plus, the camera is powered by two generic AA batteries. Technically-speaking, this is an outstanding film point and shoot. The only down side is the camera is a tad chunky.

‘The L35AF looks like a cheap, plastic camera. But looks are deceiving because this camera is in fact a gem.’

Buy one: You can expect to pay between $ 60-150 for one of these cameras, in working order, on eBay. However the L35AF often turns up in thrift store bins and at rummage sales. Spend a little time hunting and you might find one for under $ 10. There is also the Nikon L35AD, which is the same camera as the L35AF, but with an autodate function.

Minolta Hi-Matic AF2

History: The Minolta Hi-Matic AF2 first debuted in 1981 and is a fully-automatic fixed lens compact, with the exception of its manual film advanced/rewind (weird, we know). The camera has a fairly sharp 38mm F2.8 lens. And like the Nikon L35AF, the camera’s meter is located directly below the front element, which also accepts filters. The camera runs on two AA batteries and offers a pop-up flash.

Why we like it: There are affordable film cameras, and there is the Hi-Matic AF2. In terms of lens sharpness-to-price ratio, this camera is hard to beat. And while there is no exposure compensation lever as you’ll find on other fixed lens compacts of its time, the camera will warn you if there is not enough light or if a subject is too close. It does this by emitting an irritating beep. It’s plasticky, light weight and a lot of fun to shoot with.

‘There are affordable film cameras, and there is the Hi-Matic AF2. In terms of lens sharpness to price ratio, this camera is hard to beat.’

Buy one: These camera can be purchased in working order for between $ 10-35 on eBay. And if you are really turned off by the manual film advanced, consider the Minolta Hi-Matic AF2-M instead. It’s the same camera, but with a motorized film advanced.

Photo credit: Jonathan Mauer

Olympus Stylus Epic

History: The Stylus Epic or Mju II, as it was called in European and Asian markets, is a fully automatic, weatherproof compact camera that debuted in 1997. Like the Olympus XA, the Stylus Epic features a sliding door to protect the lens – it also doubles as an on/off switch. These cameras are revered for their sharp 35mm F2.8 lens, good autofocus and compact design. Plus the camera is powered by a long-lasting and easily obtainable lithium battery.

Why we like it: There’s a lot to like about the Olympus Stylus Epic. While not everyone is a fan of the camera’s odd, rounded design, this writer finds it fits perfectly in a back pocket. This, plus its weather-sealing make it a great take-everywhere-camera. Also, the flash starts charging as soon as the cover is opened, meaning it should be ready to go when it comes time to photograph a decisive moment.

‘These cameras are revered for their sharp 35mm F2.8 lens, good autofocus and compact design.’

Buy one: These cameras are a cult classic and can be a tad tricky to acquire. This is partly due to the fact that Olympus made numerous compacts under the ‘Stylus’ and ‘mju’ names. However the Stylus Epic/Mju II is optically the best and therefore the most coveted. You can generally find one for between $ 150 and $ 250 on eBay – not bad for a camera originally marketed as a budget compact.

Nikon N90s

History: The N90s, also know as the Nikon F90x in Europe, first debuted in 1994 and was manufactured until 2001. Geared toward advanced amateurs, this camera sounds quite advanced on paper, for a film SLR. Features like 3D Matrix metering, a top plate LCD, 4.1 fps continuous shooting in AF-C and a 1/8000 sec max shutter speed sound like digital camera specs. But don’t get too ahead of yourself, it has only a single AF point and AF performance does not compare to that of modern DSLRs. Still the camera is quite capable. And it runs on four ubiquitous AA batteries, which is a plus.

Why we like it: The turn of the century was an interesting time for camera makers: as consumers slowly began to shift from film to digital, a lot of advanced film cameras debuted at a time when the market was drying up. In a sense, the N90s offers nearly the same feel and handling of a modern Nikon DSLR in a film SLR body. If you’re a Nikon digital shooter, there’s simply no reason not to pick one of these up just to try. They are fantastic. 

‘The N90s offers nearly the same feel and handling of a modern Nikon DSLR, in a film SLR body.’

Buy one: It’s kind of crazy how cheap these cameras can be had. On eBay, expect to pay between $ 40-$ 120. Plus, they are easy to find in working order because of how recently they were manufactured. Just don’t expect to find a sweet deal on one with with a lens included. Oh and be aware, the rubberized coating on the body can become unpleasantly sticky with age, especially if the camera was stored in a warm environment.

Photo credit: Amydet at English Wikipedia

Minolta X-700

History: At the time of its release in 1981, the X700 was Minolta’s top tier manual focus camera. A market success, it was manufactured continually until 1999 and was also the final manual focus SLR the company made.  Stand-out features include TTL flash metering, a bright viewfinder and multiple auto exposure modes. Like the Canon AE-1, the body is made mostly of plastic, which keeps the weight (and manufacturing cost) down. It uses generic drugstore camera batteries.

Why we like it: The X-700 offers both Program auto exposure and Aperture Priority modes as well as full manual mode, making it a good choice for those learning. Plus, Minolta glass is fairly easy to come by on the cheap for this system.

‘The X-700 offers both Program auto exposure…as well as full manual mode, making it a good choice for those learning.’

Buy one: You can expect to pay between $ 75 – $ 150 on eBay for one of these cameras with a lens. And like the Canon AE-1, it’s pretty easy to come across a bundle with camera, extra glass and accessories for around the same price as a single camera and lens. 

Photo credit: Retired Electrician

Canon EOS 5

History: The Canon EOS 5, also sold as the EOS A2 in some markets, is a semi-professional SLR manufactured starting in 1992 and discontinued around the turn of the century. It uses Canon’s latest EF mount, first introduced in 1987. The camera features 16 zone evaluative metering and offers a top burst rate with AF, of 3 fps (5 fps in one shot mode). Other standout features include 5 selectable autofocus points as well as the very first iteration of Canon’s infamous eye-controlled focus. The body is powered by a single 2CR5 lithium battery. These batteries can be a tad pricey, but they’re easy enough to find online. 

Why we like it: High and mid-range SLRs from the 90’s are strange beasts: retro in format, while offering some modern-DSLR features. The EOS 5 is a great example of this: it’s highly capable despite its lack of a sensor. Canon diehards can learn a lot about of the lineage of their modern DSLRs by spending some time with the EOS 5.

‘Canon diehards can learn a lot about of the lineage of their modern DSLRs by spending some time with the EOS 5.’

Buy one: No need to break the bank. You can pick up one of these cameras body-only for between $ 30 – $ 100 on eBay. But because they use the modern Canon EF mount, picking one up with a decent lens is going to set you back considerably more.

What cameras should we add?

Is there a camera you feel strongly should be added to this list? Is it affordable, readily available and technically capable? Let us know in the comments!

Articles: Digital Photography Review (dpreview.com)

 
Comments Off on Analog gems: 10 excellent, affordable film cameras

Posted in Uncategorized


Impossible Project launches special edition Two-Tone B&W Polaroid 600 camera

20 May

Impossible Project has announced the launch of a ‘strictly limited edition’ Two-Tone Black and White Polaroid 600 camera. This camera is a refurbished original Polaroid 600 redesigned with a custom two-tone paint job, according to the company, and it is exclusively available via the Impossible Project website.

In describing its new Polaroid 600 special edition camera, Impossible Project explains, ‘The new camera celebrates the work of the photographers and artists who have perfected the monochrome palettes – names like Robert Longo, Ansel Adams and Eva Rothschild.’ The new model is priced at $ 179; it isn’t clear how many units are available.

Via: PhotographyBLOG

Articles: Digital Photography Review (dpreview.com)

 
Comments Off on Impossible Project launches special edition Two-Tone B&W Polaroid 600 camera

Posted in Uncategorized


How to Photograph Your Museum Visits – Turn Limitations Into Creative Challenges

20 May

Do you feel frustrated that you are not allowed to make selfies in museums? Did a light reflection ruin the photo of your favorite artwork? Are the other visitors always in the way of your perfect shot? Then this article is for you, to help you photograph your next museum visit!

Museums are a great place to get inspiration, however, the great teams behind every exhibition have to be more concerned with the preservation of the artworks than about your photo. Therefore, photographing in a museum poses two big challenges.

First, the multiple rules that you have to follow, remember to always be respectful of them because they exist for a reason. Second, the fact that you can’t alter the conditions in which you have to shoot. But this doesn’t mean that you can’t make great photos, actually, you can turn it around and use these limitations to take your photography to the next level.

Every museum has different rules so I’ll cover some of the most common:

NO SELFIE-STICK

Many museums of the world like the Palace Museum in Beijing, the Van Gogh Museum in Amsterdam, the Metropolitan Museum of Art in New York, and many others have banned the selfie-stick. Not to worry, this shouldn’t stop you from making a memory of yourself with your favorite artwork.

Whether it’s in a frame or a display case, most objects in museums are protected by glass. So, you can use your reflection on the glass to make a selfie. You can also use mirrors and other reflective surfaces you can find.

How to Photograph Your Museum Visits - Turn Limitations Into Creative Challenges

Crystals, Teylers Museum, Haarlem, The Netherlands.

How to Photograph Your Museum Visits - Turn Limitations Into Creative Challenges

Albergo Diurno Venezia, during the exhibition Senso 80 by Flavio Favelli, Art Week Milan 2017, Milan, Italy.

In order to work with reflections, you need to understand how light works. Without going into a complicated physics lesson, what you need to know is that light travels in straight lines.

Light Diagram How to Photograph Your Museum Visits - Turn Limitations Into Creative Challenges

Which is also why you can get those annoying light flares that can ruin your photos. So you need to be very aware of all the other objects in the room to avoid unwanted reflections.

Reflection Mistakes - museum

Me As Mapplethorpe, 2009. Gillian Wearing RA, (based upon the Robert Mapplethorpe work: Self Portrait, 1988) exhibited at Gemeente Museum, The Hague, the Netherlands.

Now that you know how it works, you know how to move around the space in order to control your reflection. A few tips to consider though:

  • The darker the background, the better you will see the reflection. For example, if you are doing the selfie in front of a black and white photo, position yourself in a way that you will be reflected in the darkest part of the photo, so you will stand out more. If you are wearing white or a light color shirt that’s even better.
  • Try different positions so that you are not blocking an important part of the artwork. You can even try interacting with it.
  • If there is a metallic surface or a mirror in the piece, use it to your advantage, and acknowledge your presence (smile, wave, etc.) so that it doesn’t look like a mistake.
  • Locate the light source and then position yourself in a way that the bouncing trajectory doesn’t hit the lens of your camera, but it does hit any objects you want to reflect.

NO FLASH

This is one of the most universal rules in museums. This is because the hundreds of thousands of visitors that some artworks attract would sum to a great amount of light that some materials cannot take without damage. So you’ll have to make the best with the lighting of the museum that is designed to either preserve the delicate artworks, or to set a mood that complements a whole concept of the exhibition.

In other words, more often than not it will be very dark. This is where the settings of your camera (and even some smartphones) come in.

Since this article is not about exposure I won’t go into a lot of detail, but I will give you a quick guide to adjust it to better photograph in low light. The correct exposure depends on three things:

ISO

In photography this stands for International Standard Organization just like every other ISO that you’ve heard about. What it standardizes in this case is a scale for measuring sensitivity to light. The higher the ISO number you choose, the higher sensitivity your device will have. A lot of people are afraid to go very high because there is the risk of getting noise in your image, which is like the grain that used to be in film photography.

Nowadays most cameras can keep the quality even at higher numbers, so try all the settings out to determine which one is the highest you can go with your own equipment. However, in my experience, you get less noise from a high ISO than going lower and then trying to correct the underexposure in Photoshop later. Here is an example:

ISO 320 museums

This image was taken at ISO 320.

Versus . . .

ISO 3200 museums low light

This image was taken with an ISO of 3200.

Aperture (f-number)

The simplest explanation I can offer is that the aperture is the hole in your lens that lets in light. Therefore the bigger the hole, the more light will enter.

But here is the tricky part, the aperture reference scale is inversely proportional. So, contrary to what you might think, a smaller number means a bigger hole and therefore more light. For example, a photograph taken with f/8 will be lighter than the photo taken with f/11.

This setting also controls the depth of field of your image (the area that will be in focus). So be careful moving this one because you might loose some sharpness in areas that are farther away from your point of focus if you use smaller f-numbers. Notice in the image below how the objects are loosing focus towards the back.

Depth of field museums

Crystals, Teylers Museum, Haarlem, The Netherlands.

Shutter Speed

This setting controls how much time you expose the sensor to light. Since the sensor (or film) is accumulative, the more time you expose it, the lighter your image will be. Shutter speed is very straightforward and it could be your best choice, except that anything moving will look like a blur if you go too slow.

Even if everything is still, if you are not using a tripod, YOU are the one moving. So don’t let it stay opened too long. In some museums you’re allowed to use a tripod if you pay an extra fee, so feel free to ask.

It is also useful to know that telephoto lenses need a faster shutter speed to avoid blur than the wide angle lenses. So you can also consider re-framing your image like the next example.

Shutter speed 1/8th, f/5.6, ISO 800, focal length 55mm.

Shutter speed 1/8th, f/5.6, ISO 800, focal length 22mm.

You can also use this setting in a creative way. For this photo I wanted the tram passing in between the two pieces of the sculpture to leave a blurry line to have a more dynamic result and also show more context on how the sculpture was meant to interact with the space.

Shutter speed 1/2 second, f/11, ISO 400; focal length 18mm.

Shutter speed 1.3 seconds, f/11, ISO 400; focal length 18mm.

Now that you know what each setting does, you can adjust them to your needs. Keep in mind that they are interrelated, so if you move one you need to correct the others accordingly. For example, if you close your aperture because you want more depth of field, remember to compensate it by leaving the shutter open for a longer time, or by making your ISO more sensitive (higher number). Always keep an eye on your exposure meter!

NO TOUCH

Given that you can’t change your surroundings or rearrange the artworks, you will have to be extra creative and flexible.

Take care of composition.

When photographing an artwork in a museum, don’t try to just reproduce it. To do that it’s always better to buy the postcard or the catalog. What you do want is to capture what it’s transmitting to you. Use the architecture of the gallery, make it interact with the other pieces of the exhibition, try to capture the ambiance. In other words, make it your own. Notice how in this example I didn’t photograph any specific artwork, just the space and the atmosphere.

Composition museums

Rijksmuseum van Oudheden, Leiden, the Netherlands.

Change your position.

Retaking the topic from the No Selfie-stick, if you need to avoid reflections and you can’t move the artwork or the lighting, then reposition yourself. Do this also to play with perspective, to include or exclude objects from your frame, and just try as many angles as you can.

For this next image, I was playing with perspective and the position of the circular lamps in order to make them look like the aura of the statue.

Position museums

Rijksmuseum, Amsterdam, the Netherlands.

Be aware of other visitors.

It will be very difficult for you to have the museum to yourself, so try to be respectful of others and don’t get in the way. Don’t be afraid to include people in your photo as well, just be sure to wait until the right moment so that they complement your image.

Mirrors museums

Het Dolhys, Haarlem, the Netherlands.

Silhouette museums

Museo de la luz, Mexico City, Mexico.

COPYRIGHT

Last but not least, there is one rule that you won’t see on the museum signs, but it exists and it’s very important – the issue of copyright.

While getting inspiration from other artists it’s great, remember that you are photographing the work of a fellow artist so it is covered by copyright. This can apply from the artwork being exhibited to the architecture of the museum so it can be a very complicated issue to understand.

I advise you inform yourself about it in more depth. A general rule of thumb that you can always follow is that you can’t use the image for commercial purposes without permission and/or retribution from the creator. And in any other context for educational purposes (e.g. this tutorial or giving a conference) you should always give the credits. Let’s be respectful of one another.

Next time you go to a museum you can both get inspired and creative. Enjoy and share your photos!

The post How to Photograph Your Museum Visits – Turn Limitations Into Creative Challenges by Ana Mireles appeared first on Digital Photography School.


Digital Photography School

 
Comments Off on How to Photograph Your Museum Visits – Turn Limitations Into Creative Challenges

Posted in Photography


How to Merge and Combine Images in Photoshop

20 May

The ability to combine images together is a very useful skill for photographers. Although most want to get the image right directly in the camera, there are instances where merging images together prove useful (and necessary). As well as this, the image we have in our mind may not always be physically possible to produce during the shoot, and merging multiple photographs together can bring that vision to life!

There are many different ways to merge images together. Of the hundreds of approaches to this task, the best one is the method that works for you. This tutorial will showcase my personal, manual preference of merging images. There are ways to automate image merging in software, but it is better to know the manual method before doing so (as they say, learn the hard way to be able to use the easy way!). The manual method also offers significantly more control.

Before we begin with the tutorial, there are several key concepts to keep in mind:

  • Make sure that the images are the same resolution. If one image is 300 dpi (or dots-per-inch), and the other is 72 dpi, you will need to convert one of them to match the other.
  • Try to pick images with a similar light source. Although you can add artificial shadows and highlights, it is quite difficult to ensure that these simulated sources look natural (although absolutely possible). It is far more convincing to find images that already have a very similar lighting situation.
  • Try not to over-complicate the merge. Attempting to add elements that are extremely convoluted (due to having very fine outline details or other types of intricacies) can be frustrating to blend realistically.

How to Combine Images

I can think of many instances in which a photo shoot could be better enhanced by combining different images together. When merging from the same location, the benefit is that, presumably, the lighting and shooting settings are the same (or similar). As well as this, the location being the same makes for an easier merge. If you are merging images from a different location, try to pair elements that can blend in well together! Burning edges can be a great way to blending images together.

On to the steps:

Begin by planning what elements of the individual photographs you will want to combine together (see two images below).

How to Merge and Combine Images in Photoshop

Source image #1.

How to Merge and Combine Images in Photoshop

Source image #2.

Make a selection – then copy and paste

Secondly, take the lasso tool in Photoshop and draw around the object, model, or animal you want to add to your base image. You can also utilize the selection tool or quick selection tool to do this. In this particular image, because the colors and tones are all very similar to one another, I found the lasso tool to be a much faster way of selecting the part of the image I need. Other photo editing software will likely have very similar tools.

Note: You cannot do this kind of work inside Lightroom. A program that utilizes layers is needed, and that is a function which Lightroom does not offer.

How to Merge and Combine Images in Photoshop

Image with a selection made around the part to copy to the other image.

Next, paste the image into the spot it belongs in the other image. I like to lower the opacity when placing so that I can see exactly where the subject should be positioned. You can then raise the opacity back up.

How to Merge and Combine Images in Photoshop

Pasted area at lowered opacity to aid in placement.

Blend using a layer mask

Fourthly, to blend the image into its rightful place, I utilize layer masks and the brush tool. The benefit to these two tools used in unison is that if you accidentally erase a part of the layer that you want to keep, you can always undo your mistake. Likewise, if you find later that you would like a certain part of the first layer to show, you can do that without issue.

All you need to do is select the top layer, click “add layer mask”, and then select the brush tool. When utilizing the brush tool, the black color will act as an eraser and remove the top layer, while the white color will bring the top layer back. Make sure that the brush is very soft, as that helps blend. Change to a harder edged brush for straight edges.

Note: Make sure you paint on the mask not on the actual layer!

How to Merge and Combine Images in Photoshop

Paint on the layer mask to blend the two images smoothly.

Keep blending until the image looks to be a natural part of the frame.

How to Merge and Combine Images in Photoshop

The final blended image – two combined into one.

Repeat the steps as many time as necessary.

How to Merge and Combine Images in Photoshop

Adding or Changing a Background

Adding a new background is quite possibly the most common use of the image merging skill. Whether you shoot your subject in a studio or just a snap out in nature, changing the background can add an entirely different feel to the photograph.

The same steps apply to this type of merging as with the aforementioned. If you’re working with hair or fur, a tip is to try to pick backgrounds whose light and dark areas match with the original background, as that allows you to not have to work around those very fine details (and can leave them untouched). In the photo example here, the new background elements were matched to the dark parts of the photograph, which allowed me to not have to select the fine fur details (see the ear and snout fur).

How to Merge and Combine Images in Photoshop

Original image.

How to Merge and Combine Images in Photoshop

Edited image with a new background.

Changing Animal Heads

Animals are notorious for not sitting still, blinking, looking away at an inopportune moment, or otherwise being uncooperative for photographs. A very common practice in animal photography is to swap the heads out.

Similarly to the aforementioned merging methods, follow all of the same steps. Make sure you pay attention to how the fur flows, and use that to your advantage when blending! In the photo example case here, the wolf’s neck and head were placed onto the body of the base image. After some basic additional retouching (cloning out the leash and lightening the eyes), I got the finished result.

How to Merge and Combine Images in Photoshop

Original image.

How to Merge and Combine Images in Photoshop

Second source image for left wolf’s head.

How to Merge and Combine Images in Photoshop

Final image of the two combined.

Swapping Human Heads

Like animal photography, sometimes it is necessary to take a head from one image and put it on the body of another. Occasionally, you will like the model’s pose but not her facial expression, or like the model’s expression but not her pose. The key is to make sure you align the neck correctly, or else your model will look disfigured.

How to Merge and Combine Images in Photoshop

Image #1 – I used her face from this shot.

How to Merge and Combine Images in Photoshop

Image #2 – combined with her body from this shot.

How to Merge and Combine Images in Photoshop

To make this final image.

For a more detailed look at head swapping check out: How to do a Head Swap using Photoshop

Conclusion

There is a good overview of how to merge and combine images in Photoshop. If you didn’t know that the final images in the article had been altered could you tell they weren’t shot that way?

What other applications can you think of to use this technique? Please share your ideas in the comments below.

The post How to Merge and Combine Images in Photoshop by Anabel DFlux appeared first on Digital Photography School.


Digital Photography School

 
Comments Off on How to Merge and Combine Images in Photoshop

Posted in Photography


2017 Roundup: Semi-Pro Interchangeable Lens Cameras

20 May

What do we mean by Semi-Pro?

Within this category, you’ll find some of the most capable cameras the industry has to offer. The Semi-Pro name doesn’t indicate that they’re below the consideration of professionals, though. Quite the opposite: it means that their price and performance makes them attractive to a range of enthusiasts, photographers who make some money from their shoots and professionals who earn their livelihood with their camera.

Due to the fuzzy line between semi-pro and pro, we’ve made the decision to not include very high-end full-frame (e.g. Nikon D5, Canon 1D X Mark II, Sony a9) and medium format (e.g. Pentax 645Z and Fujifilm GFX 50S) cameras in this roundup.

All of the cameras in this price range use full-frame sensors. And while most of them are DSLRs, there are also several mirrorless options as well. Simply put, there is something here to satisfy just about everyone who is willing to pony up the requisite funds. Read through to see what makes this segment so cut-throat, and what innovations are driving this tier forwards at a remarkable pace.

The models covered in this roundup are:

    • Canon EOS 5D Mark IV
    • Canon EOS 5DS / 5DS R
    • Leica M10
    • Leica SL
    • Nikon D750
    • Nikon D810
    • Sony Alpha a7R II
    • Sony Alpha a7S II
    • Sony Alpha a99 II

Read on to see which cameras we chose as best-in-class!

Articles: Digital Photography Review (dpreview.com)

 
Comments Off on 2017 Roundup: Semi-Pro Interchangeable Lens Cameras

Posted in Uncategorized


Review of the Interfit Fluorescent Ring Light INT812

20 May

What is a ring light?

Interfit Fluorescent Ring Light

Even if you don’t know what a ring light is, it is probable that you have seen photos made using them. As the name suggest, they are a light source in the shape of a ring, often, your camera is mounted on the light so the lens points through it. This on-axis lighting provides even, shadowless illumination on the front of your subject. It is a very distinct style most often seen in fashion photography.

In the past, ring lights were expensive or required a solid set of DIY skills to build your own.

The effect is not to everyone’s taste, and that’s fair enough. Sometimes, the light can appear flat and lifeless, which puts some people off. Also, a lot of photographers don’t like the distinctive ring-shaped catch-lights. That is also fair. If, however, you do like what can be achieved with a ring light, but you’ve been put off by price in the past, then the Interfit Fluorescent Ring Light may just be for you.

Pros of the Interfit Fluorescent Ring Light

Interfit Fluorescent Ring Light

There are a lot of things to love about the Interfit Flourescent Ring Light. In no particular order, they are:

Cost

At $ 100, the Interfit Fluorescent Ring Light is cheap. No, it’s not a strobe, but when you compare it to, say, Bowens’ dedicated Ringflash Pro (listed for $ 2021 on B&H), the Interfit is close to $ 2000 cheaper. This makes ring lights accessible to almost every photographer who wants to use one.

Weight

The unit itself is quite large, but at 1.3 kg it’s light enough to carry anywhere without much trouble. If you often shoot in a studio or space that isn’t your own, throwing the Interfit ring light in the back of your car is not going to be a logistical issue.

Size

Interfit Fluorescent Ring Light

The ring light itself is rather large. But because you are not attaching the lens to the light, it gives you a lot of space to move around with the camera while still being able to see your subject through the light’s aperture. It also means that you can use a longer lens, such as 200mm while keeping the light really close to your subject.

Continuous

Interfit Fluorescent Ring Light

With the Interfit INT812 being a continuous light source, you gain a few advantages. The first of these being that replacement bulbs are cheap, despite the size, they are only around $ 14 each.

Another is that after being on for about an hour, the bulb never gets particularly hot. This is great if you’re photographing people as you don’t have to worry about that aspect of your subject’s comfort.

Finally, there’s the matter of your subject’s pupils. With strobe lighting, you are usually in dark environments with periodic bursts of bright light. As we all know, our eyes adjust to the dark and our pupils dilate to allow us to see. In bright light, such as this ring light offers, it’s the reverse and your subject’s pupils contract, revealing more of the color in their eyes.

Bendable arm

Thanks to a bendable arm, the Interfit INT812 is able to be put in almost any position, making it a very versatile light.

The real beauty of this light is the bendable arm that it is mounted on. This arm, combined with the fact that the light is not mounted to your camera, means that you are not limited to using it as a traditional ring light. You can use and position it as you would any other light source. It’s also possible to point it straight down, a feat usually reserved for boom arms.

At one point I found myself using it as a hair light, alongside a softbox fitted to a strobe as my key light. The versatility all of this provides is more than worth the price tag, even if you never use it on-axis as a traditional ring light.

Interfit NG-65c ring light

Placed at a 45-degree angle, the narrow edge creates interestingly shaped highlight and shadow areas.

Interfit NG-65c ring light

Positioned straight down and a few inches above, the Interfit Ringlight provided some much-needed fill on an all black subject.

Cons of the Interfit Fluorescent Ring Light

As much as I like this light, it does have a few problems as outlined below.

Build quality

As I’ve mentioned already, the Interfit Fluorescent Ring Light is not an expensive piece of equipment. In terms of build quality, it’s reasonable to not expect too much from it. The entire casing is made out of lightweight plastic and does feel a bit flimsy at the best of times. That said, both the bulb and the bendable arm seem to be of good quality. So far, I’ve used it about a dozen times and I have yet to have an issue.

Low intensity

Because this is a continuous light at the cheaper end of the market, the intensity of the light isn’t exactly the brightest. Because of this, you will be limited to working with large apertures and high ISO settings. Depth of field is unforgiving at apertures like f/1.8, so I would encourage using a tripod and taking your time focusing.

At the other end of the scale, it is very bright to look directly into from less than a foot away. This may be uncomfortable for your subjects if you have them in front of it for a long period of time.

If you’re used to using high powered strobes, you need to keep an eye out for other light sources that may affect your images. As the ring light isn’t very high powered, any ambient light around will add unwanted color casts to your images.

Chromatic aberration

When used on axis, chromatic aberration appears around the catch-lights in almost every photo. This isn’t much of a problem as Lightroom will make short work of the aberrations, but it is important to know about.

Chromatic aberration appears around the catchlight from the Interfit INT812; however, this easily fixed in Lightroom.

Color temperature

In terms of mixing multiple light sources, The Interfit INT812 does pose a few problems. It is not daylight balanced, nor does it match the fluorescent light balance preset in camera or in Lightroom. If this is the only light source present, you can eyeball the sliders in Lightroom or use a simple grey card to solve the problem.

Interfit Fluorescent Ring Light

The Interfit Right Light works well as a fill/hair light, although it does take some time to fix the resulting color casts.

However, when you’re mixing light sources, for example, if you use the ring light in combination with studio strobes, you will have to overcome unwelcome color casts. With the white balance set to flash, the color from the ring light is an unpleasant green. It’s an easy fix with all of the color correction tools in Photoshop and Lightroom, but it’s a problem easily avoided if you’d rather not spend the time correcting it. Of course, you could just use this as an excuse to shoot in black and white.

Interfit Fluorescent Ring Light

Extra equipment

So far, I have only come across one real problem while using the Interfit ring light. Because it is so light, I was happy to put it on one of my cheaper light stands. When I started using the bendable arm to put the light at weird angles, it became top-heavy and off balance and started to fall over. Putting it on a heavy duty light stand solved the problem. However, watching one of your lights start on its way to the floor is not an experience that I recommend anyone replicating.

The problem here is that good quality, heavy-duty light stands can start at around half the price of the ring light. If you don’t already have a good light stand before you consider purchasing the Interfit INT812, please be sure to include that into your pricing considerations.

Overall Impressions

Interfit Fluorescent Ring Light

For $ 100, I love this thing. No, it isn’t perfect, but it does add an awful lot of versatility to my toolkit. I like it so much, that as long as there’s a place to plug it in, I will be going out of my way to take it with me from now on.

It might be obvious, but I do like the ring light effect a lot. However, even if you hate ring lights, the Interfit Fluorescent Ring Light INT812 brings a lot to the table and does so in a price range that doesn’t make it cost prohibitive to give it a try.

The post Review of the Interfit Fluorescent Ring Light INT812 by John McIntire appeared first on Digital Photography School.


Digital Photography School

 
Comments Off on Review of the Interfit Fluorescent Ring Light INT812

Posted in Photography


Canon EOS 7D Mark II firmware 1.1.1 removed over communication bug

20 May

Canon has revoked firmware version 1.1.1 for the EOS 7D Mark II, citing a communication bug that appears when using Wi-Fi Adapter W-E1. The firmware was released on April 27 and brought with it a couple of enhancements and bug fixes, including improved communications reliability with the Wireless File Transmitter WFT-E7 B. Unfortunately, 7D cameras updated with the latest firmware from v1.0.5 or earlier aren’t able to shoot remotely with the related Camera Connect App.

According to Canon, there are two exceptions to the issue, with the first being that cameras updated from firmware 1.1.0 to 1.1.1 won’t experience the bug, nor will cameras that were sold with firmware 1.1.1 already installed. Other cameras, however, must be rolled back to firmware 1.1.0 to remove the bug until a corrected update is released in early June. Canon has re-released firmware 1.1.0 for download.

Via: CanonRumors

Articles: Digital Photography Review (dpreview.com)

 
Comments Off on Canon EOS 7D Mark II firmware 1.1.1 removed over communication bug

Posted in Uncategorized


Ghostly Garden: Classical Wire Mesh Architecture Haunts Abu Dhabi

20 May

[ By SA Rogers in Art & Sculpture & Craft. ]

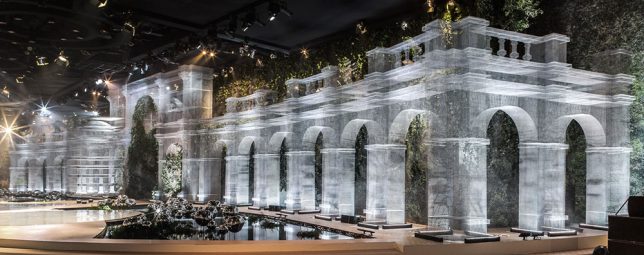
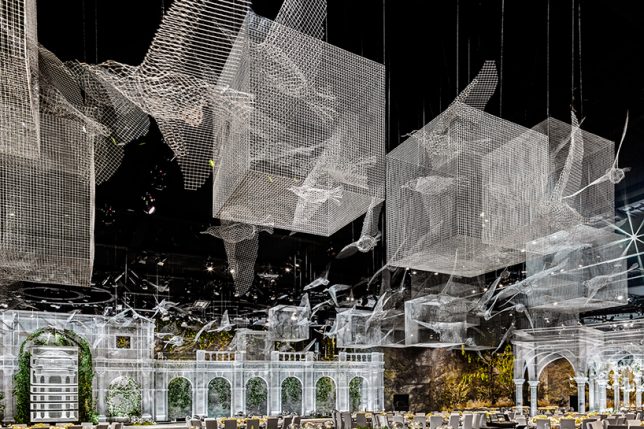
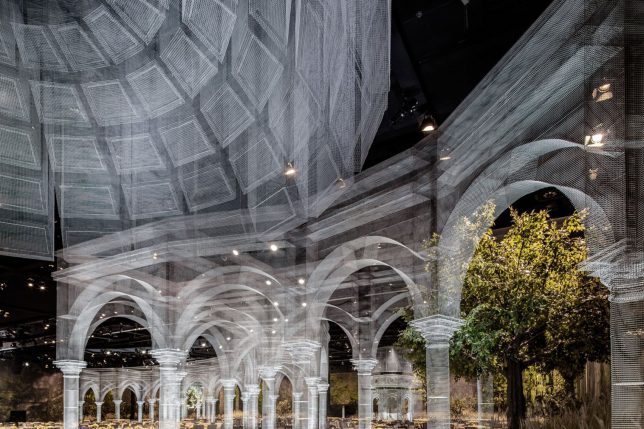
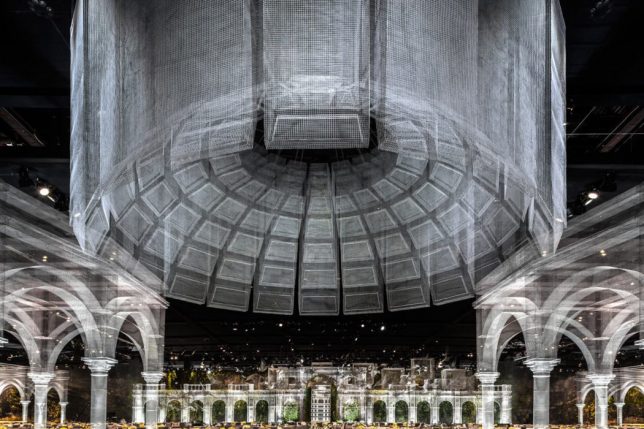
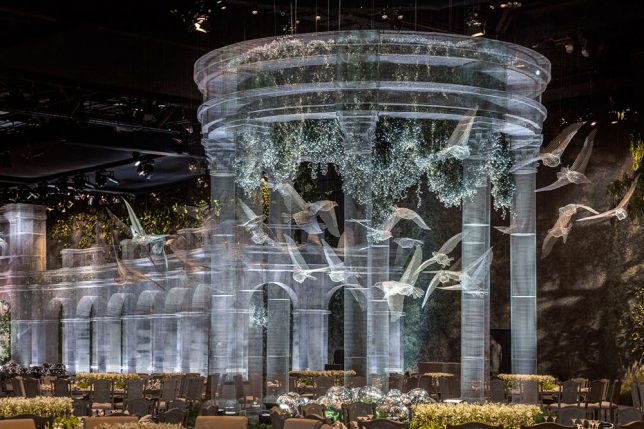
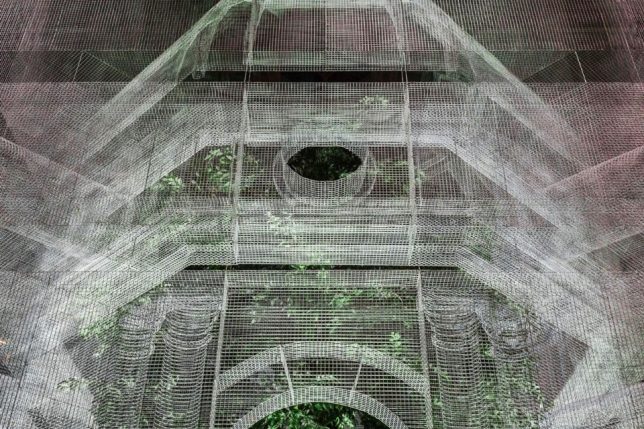
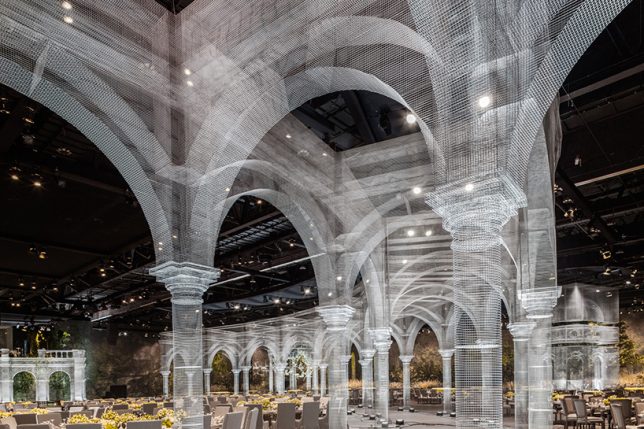
Seeming like a ghostly image of structures long gone overlaid onto the current reality, these wire mesh architectural creations arch over 75,000 square feet of event space in Abu Dhabi. The way the mesh shifts between transparency and opacity depending on how it’s layered, paired with its grid pattern, gives it the look of a light-based projection, yet it’s physical and three-dimensional, crafted in full-scale skeletal form to suggest structures rather than bring them to fruition.

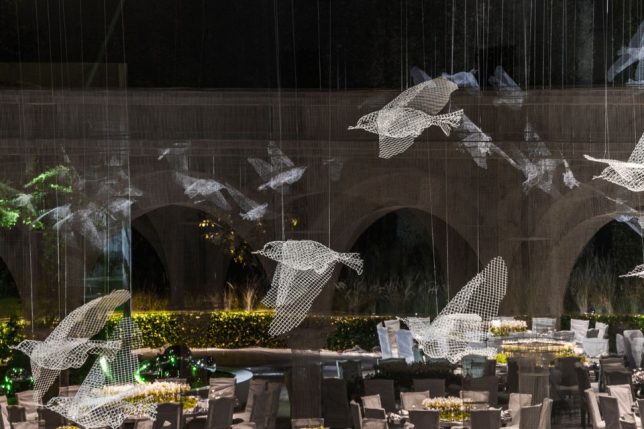
Artist Edoardo Tresoldi previously resurrected an ancient church in Puglia, Italy that had been destroyed by earthquakes in the 13th century right where it once stood, allowing visitors to get a sense of how the structure interacts with the site before and after its demise. This time, Tresoldi sculpts a whole series of architectural sculptures, along with flying birds and cubes that hang suspended in midair.

The Abu Dhabi installation acts as a decorative tableau for a royal event attended by 1,900 guests from all over the Middle East, and took three months to complete, representing the artist’s first time creating a large installation for an indoor space. After the event, some of the structures will be moved and reassembled in public places across the UAE capital, including museums, parks and universities.

Many of these forms are reminiscent of previous Tresoldi works, including an archway used on a fashion runway, and a caged bird. Tresoldi creates figurative wire mesh sculptures, as well. You can see the evolution of his process at his Behance profile.

Share on Facebook


[ By SA Rogers in Art & Sculpture & Craft. ]

[ WebUrbanist | Archives | Galleries | Privacy | TOS ]


WebUrbanist

 
Comments Off on Ghostly Garden: Classical Wire Mesh Architecture Haunts Abu Dhabi

Posted in Creativity


How to Improve your Photography in 21 Days

19 May

The web is saturated with top ten lists of how to be a better photographer. Heck, I’ve even written a number of them myself. Yet, one has to wonder, how much better can someone really become after reading just one article? Wouldn’t a larger transformation involving several weeks or months be necessary?

Depending on your current amount of personal bandwidth, you may not like the answer. There are some shortcuts, but ultimately you are looking at a minimum of 21 days to really make an impact.

Better photographer 21 days 02

For an even deeper understanding of how it all works, you need to dedicate a little bit of time every day for three weeks. It’s a big commitment, I know, but at the end of this period you will be shooting with the best of them. In the grand scheme of things, it’s actually not that long. Just 21 days is all it will take. Let’s get started with the essentials.

Week 1

Day #1 – Believe in Yourself

I know it’s only day one, but this first step is a critical part of your growth as a photographer. It’s where you tune-out your inner critic and start thinking positively. The transformation your thoughts can make is truly remarkable. Be careful though, negative patterns will try to creep back in. Squash them as they arise and replace them with something positive about yourself. This tip is first because it’s the foundation that everything else is built upon. Without it, you’re building a house on sand.

“Believe in yourself! Have faith in your abilities! Without a humble but reasonable confidence in your own powers you cannot be successful or happy.” – Author, Normal Vincent Peale.

Better photographer 21 days 10

Day #2 – Get a Library Card

Amazon is convenient, but the library has its own charm. It’s where you’ll find treasures you didn’t realize you were looking for. It’s in those long aisles full of books that you’ll find a heaping dose of inspiration. Flip through the pages, study how the masters composed and created their shots. Look for titles by Ernst Haas, Eliot Porter, Garry Winogrand, Robert Frank, Ansel Adams, and more.

Don’t stop there, however. Take the time to learn about photographers you’ve never heard of. Read about what inspired them to get started and any tips they may offer. One of my favorites is the Nature Photography Field Guide by John Shaw. He has the simplest way of teaching the most complex topics, including manual metering.

“Everything you need for better future and success has already been written. And guess what? All you have to do is go to the library.” – Henri Frederic Amiel.

Day #3 – Face Your Fears

If there is some type of photography that really freaks you out, make a concerted effort to schedule time for it. Perhaps you only shoot landscapes and nature. If so, now is the time to try your hand at portraiture or street photography.

Better photographer 21 days 06

I talk to many photographers who never use flash and claim that they only use natural light. That sounds reasonable, but deep down you know it’s just an excuse to avoid learning about guide numbers, slave units, TTL, etc. Don’t avoid this step as it will come back to haunt you later on. The more educated you are, the more jobs you’ll be able to accept. This will make all the difference in your potential earnings, should you choose to go pro.

“Inaction breeds doubt and fear. Action breeds confidence and courage. If you want to conquer fear, do not sit home and think about it. Go out and get busy.” – Dale Carnegie.

Day #4 – Reach Out for Help

Okay, so you’ve identified your weakness, but you have no idea where to turn for guidance. This is where you get to wave the flag and ask for help from a professional. Sure you can visit a photography forum, but you may get poor advice from amateurs or those who think they know it all. A better option is to find a local mentor or one who offers online training and Skype calls. Many sites offer this type of service for a reasonable fee.

Better photographer 21 days 05

Regardless of who you use, be sure to check out their work, and read any testimonials from past students. With a trusted advocate by your side, you can speed up the learning process. If you’re hesitant about seeking guidance, consider this; asking for assistance proves your strength, not your weakness.

Day #5 – Learn a New Camera Feature

Cameras have never been so sophisticated. Unlike the cameras of old, they are essentially mini computers. With such features like live view, autofocus tracking, electronic viewfinders, histograms, and white balance. It can seem daunting at times. Yet if you don’t get ahead of technology, you risk being left behind.

That’s why I recommend upgrading your camera every few years. It doesn’t mean your current camera is no longer relevant, but consider using it as a backup to your new model. If purchasing isn’t a viable option right now, then I’d recommend renting a camera for a week or so.

Better photographer 21 days 07

If you’ve only used DSLRs, then a mirrorless camera would be an eye-opening experience. Another educational experience is to really dig into the camera menu. Mess with every button and play with every feature. Keep the camera manual nearby to cross reference anything you’re not sure of, and learn it.

Day #6 – Start a Website

There is no excuse for a Facebook page being used as a website (especially if you want to do this as a business). Your web presence is the first impression people will have of your work, and you know what they say about first impressions. When someone is viewing your images for the first time, send them to a professional website with big bold images, a contact page, and perhaps a short bio.

Today there are totally free options like Wix and Weebly which are perfect for slick portfolio pages. If you want a more powerful platform, check out Squarespace with their photography templates and e-commerce integration.

“First impressions matter. Experts say we size up new people in somewhere between 30 seconds and two minutes.” – Elliott Abrams.

Day #7 – Create a Savings Plan to Buy Good Gear

Better photographer 21 days 11

Lenses are a long-term investment, and as such, they are usually quite expensive. Still, a good lens will absolutely make a big impact on your work. For example, a professional quality lens will typically be sharper, faster to focus, easier to create a shallow depth of field with, and have a tougher build for all-weather conditions.

I would go as far as saying that the lens will make more of a difference than the camera. For this reason, it makes sense to build your kit with quality glass. Rather than starting off in photography with debt, start a savings fund for photography gear. Anytime you make extra money (from your photography or otherwise), save a portion of it. If you’re working a day job, try to squirrel away a little each paycheck.

When you do eventually purchase your lens, be sure to pick up a quality UV filter to protect the glass. I once saw a rented 300mm lens smash to the cement. The filter was shattered in hundreds of little pieces while the lens itself was 100% intact.

Better photographer 21 days 14

Week 2

Day #8 – Accept Your Faults

Whether you’re a reclusive introvert or an over-the-top outgoing type A, there is a type of photography for you. The trick is to work with your faults, not against them. If you’re not a people person, perhaps wedding photography isn’t the best role for you. Instead, consider a more solitary pursuit such as travel or wildlife photography. For those with the gift of gab, portraiture might be a perfect fit.

“The learner always begins by finding fault, but the scholar sees the positive merit in everything.” – Georg Wilhelm Friedrich Hegel.

Day #9 – Embrace Success

It sounds counter-intuitive but many people are actually afraid to succeed. Similar to the fear of failure, this can hold one back from fulfilling their dreams. Because success is heavy, it carries a responsibility. It is much easier to procrastinate and live on the “someday I’ll do it” philosophy. Don’t sabotage yourself! Stay focused on all of the good things success can bring.

Better photographer 21 days 19

The writer Denis Waitley says – “People procrastinate because they are afraid of the success that they know will result if they move ahead now.”

Day #10 – Commit to Waking Up an Hour Earlier

I’m not talking about catching sunrise every day, but simply using the extra hour towards your passion for photography. This could be blogging, working on your website, studying, networking, or editing photos. There are endless ways to use the time. Of course, it’s also the best time to take photos as well. Besides there being no one around to spoil your composition, the light is spectacular at dawn and sunrise. It’s also when wildlife and birds are most active.

The coach, George Allen, Sr. said – “Work hard, stay positive, and get up early. It’s the best part of the day.”

Day #11 – Build an “I Quit” Fund

Imagine handing your boss a resignation letter to pursue your career in photography. It happened to me, and it can be your reality as well. Ideally, you want about six months of reserve funds, you can probably get by with three. I know this sounds like a tall order, but it all starts with a single step.

Better photographer 21 days 13

Start a special savings account and add to it every month with funds from your day job. Need help raising the cash? Raid your chest of photo gear and sell anything you haven’t used in at least a year. If you need more, get a part-time job for a while. Eventually, you’ll have enough to leave behind a job you are unhappy with and begin your new career as a photographer.

Day #12 – Meet People in Real Life

Social networks are terrific, but face to face meetings are even more valuable. You may be wondering where to find these like-minded people. Start by joining a local camera club, or visiting a nearby art gallery. Perhaps you can take a photography class at a community college in your area. Bring your business cards to popular photography spots and talk to fellow photographers. You can exchange tips, geek out over gear talk, and share favorite locations.

As another perk, they may recommend you for a job they aren’t interested in. You can potentially get work and experience by simply being cordial. Hey, you may even make some friends along the way. The photo industry is small, so it pays to stick together.

Better photographer 21 days 04

Day #13 – Listen to Your Heart

I know, it’s the title of a song by the 80s band, Roxette. That’s not the point. What is important is to find your passion.

When you look around the web it’s easy to slip into a nasty funk. Don’t compare yourself to what others are doing, even if they’re successful. Follow your gut and do the type of photography that makes you happy. Some people may tell you that being a jack of all trades is not wise. However, if you feel like photographing all kinds of subjects, don’t let anyone stand in your way.

“Your work is going to fill a large part of your life, and the only way to be truly satisfied is to do what you believe is great work. And the only way to do great work is to love what you do. If you haven’t found it yet, keep looking. Don’t settle. As with all matters of the heart, you’ll know when you find it.” – Steve Jobs.

Day #14 – Ask for More Work

It sounds painful, I know, but seeking out more photography work could be one of the best decisions you make. Go on Craigslist, offer to be a second shooter at a wedding. Ask to assist on a portrait shoot, or offer your editing help to a local studio. You have to create your own opportunities as jobs will rarely fall in your lap. As you gain more experience, you’ll also enjoy more exposure.

Better photographer 21 days 20

“There exist limitless opportunities in every industry. Where there is an open mind, there will always be a frontier.” – Charles Kettering.

Week 3

Day #15 – Invest in Your Mind

Invest in yourself, as there is nothing more valuable than your future. As Benjamin Franklin said, “An investment in knowledge pays the best interest.”

For photographers, this can be done in a number of ways. Group workshop are a terrific way to expedite the learning curve. If you prefer one-on-one training, you can take private photography lessons. Of course, not all of your efforts have to be paid options. Watching free online tutorials and reading articles (like those here on dPS!) will cost nothing but your time.

Day #16 – Take a Sick Day

You know those extra hours you’ve been saving up at work? Use one day for a photography outing. There are rarely awards for perfect attendance, so what’s the point? There’s nothing quite like an impromptu road trip to lift your spirits and break you out of a creative rut.

Better photographer 21 days 16

Everyone deserves a day to pursue their passion, plus, you’ll be more productive when you return to work. Recharging your batteries is a necessary way to strike a balance between work and play. This is an essential step, so don’t skip it.

Day #17 – Do Volunteer Work

Not only will this make you feel good, but you are using your skills to make the world a kinder place. Coincidentally, my entire business started by volunteering a single print to a non-profit organization’s fundraiser. The winner was an amateur photographer in a nearby town. She reached out to see if I did private lessons. Fast forward nearly 10 years, and I now teach photography full-time.

Although it’s a hotly debated topic, it can absolutely pay to work for free on occasion. Bare in mind, I’m not talking about shooting a wedding for free. The idea is to find an organization you can back, and donate your time or services to them for an afternoon.

“Research has shown that people who volunteer often live longer.” – Allen Klein.

Better photographer 21 days 12

Day #18 – Forget the Haters

When people are hateful, remember this quote by author Shannon L. Adler, “You will face your greatest opposition when you are closest to your biggest miracle.”

Let’s face it, some people will just not be happy when you’re on the verge of something great. Don’t take it personally, as it’s their issue, not yours. Perhaps the most common place for haters to lurk is online, especially in blog post comments or on photography forums. There are even “trolls” who look to instigate trouble under anonymous names. They want you to engage and waste your time. Don’t take the bait, expend your energy, or let them limit your success. They don’t deserve your attention which can be used for much more positive things.

Day #19 – Cut Out Bad Habits

Do you leave your camera on automatic and just fire away? If so, you are doing yourself a disservice. Work to break these bad habits once and for all. Put the camera into manual mode and learn how to properly expose by using the shutter speed, aperture, and ISO. This is one area where there are no shortcuts. Without it, it’s like you are driving blindfolded.

Better photographer 21 days 09

Bad habits aren’t formed overnight. Similarly, it will require considerable effort to break them. In photography, you need to be your own coach. This requires that you be honest with yourself. If you catch yourself cheating, replace the bad habit with the proper steps immediately.

“People try to change too much at once and it becomes overwhelming, and they end up falling off the program. So gradually changing bad habits makes much more of a difference than trying to change them all at once.” – Ian K. Smith.

Day #20 – Plan the Night Before

Laying out your clothes the night before is always helpful, but what about taking it a step further. Imagine how much more productive you could be if you planned the entire next day before hitting the sack. This is especially important when you want to spend time doing photography. It involves charging all batteries, formatting memory cards, packing your gear, getting the tripod ready, and gassing up the car. Don’t leave these things for the last minute or you’ll end procrastinating.

Better photographer 21 days 03

It may also help to write down your five most important goals for the next day. Block out the time, add them to your calendar and get ready to have a terrific adventure. If you need caffeine to get going, be sure to set the coffee pot to automatically brew the next morning.

“Productivity is never an accident. It is always the result of a commitment to excellence, intelligent planning, and focused effort.” – Paul J. Meyer.

Day #21 – Start a Journal

You don’t need to write like Anais Nin to keep a journal. For photographers, a simple notebook with sketches and ideas can have a number of benefits. For one, you’ll retain more information by writing it down. You can even spark your creativity by capturing your thoughts in a daydream.

Dr. James Pennebaker, author of Writing to Heal says, “When we translate an experience into language we essentially make the experience graspable.” This means that complex topics can be worked out on paper in a way that’s easy to digest. Mistakes can be documented as well as solutions. When you look back at it, you can see just how far you’ve come. This ushers in a feeling of accomplishment and encourages you to keep going.

Better photographer 21 days 08

Conclusion

So is it possible to improve your photography in three weeks? I believe it is, and the keys to do so are listed above.

Granted, it’s going to be hard work, but you’ve read this far so you must be hungry for change. In addition to transforming your photography, some of these items can improve the quality of your life. Of course, it doesn’t all happen at once and will require patience. Stick with the program for 21 days, however, and you’ll see the impact.

Consider this my personal guarantee to you. If you really try the steps in this article, I promise you’ll not only be a better photographer but a happier person as well. Leave me a note in the comments to let me know about your progress.

The post How to Improve your Photography in 21 Days by Chris Corradino appeared first on Digital Photography School.


Digital Photography School

 
Comments Off on How to Improve your Photography in 21 Days

Posted in Photography