RSS
 

Archive for March, 2017

Switching from LEE to NiSi Filters: Was it a Mistake?

17 Mar

Filters are rapidly becoming an essential piece of equipment in most photographer’s camera bag. However, as the demand grows so does the number of suppliers; Lee, NiSi, Formatt-Hitech, Wine Country Camera, and more.

Switching from LEE to NiSi Filters: Was it a Mistake?

Choosing the right filters isn’t as easy as it sounds. High-quality filters are rarely cheap and many of us can’t afford to spend hundreds of dollars on a product that doesn’t meet our expectations. The price of ND Filters varies from $ 10-200+ which means that you don’t need to buy the most expensive (even though the price in many cases does also reflect the quality).

About one year ago I was contacted by a Chinese brand named NiSi and invited to test their products. Initially, I was a bit skeptical as I knew little about them and I haven’t had a great experience with Chinese equipment previously (unfortunately). This is my experience with their filter system and filters one year later.

First Impression

The NiSi Filter System provides a positive impression straight out of the box. The filter holder is contained in a beautiful leather box, just like the filter pouch.

I won’t spend too much time talking about the packaging, as I believe the filter quality is more important. Still, it is worth mentioning that the presentation is beautiful and it looks exclusive right away. The only drawback to these beautiful leather boxes is that they are a bit large and they take up a lot of space in your backpack compared to smaller pouches such as LEE’s. However, if it takes too much space you can just remove the holder and leave the box at home.

NiSi Filters

The NiSi Filter Holder and Circular Polarizer Box

The Filter Holder

During the first couple of weeks using the NiSi Filters, I wasn’t quite sure whether I preferred their filter holder or the one made by LEE (which I had been using for more than two years). The NiSi holder is made of metal compared to LEE’s which is made of plastic, but it also seemed slightly less stable. Since the clips are so small I was afraid that the filter holder would fall off the adapter.

After having used the system for nearly one year, however, I’m no longer in any doubt that the NiSi holder is better. I’ve had no problems with neither the V5 Holder (standard for most lenses) or the larger holder for my Nikon 14-24mm.

NiSi Filters

NiSi Filters on my Nikon 16-35mm f/4

Also, the NiSi Filter Holder has one of my all-time favorite features. It has the possibility of having a Circular Polarizer behind the Graduated Neutral Density (GND) or ND Filters, and it is easily adjustable using a small wheel.

I’ve always found it hard to combine a Polarizer and Graduated or regular ND Filters. Either you need to screw the Polarizer on the lens and attach the holder outside, which usually results in vignetting. Or you need to purchase an adapter and a huge Polarizer to place in front of the lens (which also often leads to vignetting). NiSi has completely removed this problem and it’s never been easier to combine these filters. I’ll come back to the NiSi CPL in a bit.

It’s also worth mentioning that you are able to use other brands’ filters in the NiSi holder. I’ve tested with both Singh-Ray and LEE filters and it works perfectly fine, though it can be a little tight to insert them.

The Filters (ND, GND, CPL)

So, the filter holder proved to be of high quality but what about the actual filters?

NiSi filters

NiSi 6-Stop Neutral Density Filter on the Nikon 14-24mm Holder

When I evaluate filters there are two main things I look for; colorcast and quality of the glass. This was my biggest worry in the beginning since, as I mentioned, I was already pleased with my current system.

NiSi Neutral Density Filters

One of my biggest frustrations with the majority of filters I’ve tested so far is the color cast. Worst of them all, despite being a great filter otherwise, is LEE Filters. I had used LEE Filters for years and had gotten used to the heavy blue color cast. Even though it’s fairly quick to fix in Adobe Lightroom or Camera RAW, it feels unnecessary to repeat this step each time you bring out a six or 10-stop ND filter.

NiSi filter 10-stop ND

To the left: No filter – to the right: NiSi 10-stop ND filter.

Even though I initially had no intent of switching from LEE. But I would consider it if I found the color cast to be significantly less and the quality of the glass to be no less. My biggest surprise when taking the first image with my new NiSi 10-Stop ND Filter was that there was absolutely no color cast. Nothing. Nada. I honestly had to rub my eyes a few times to make sure I saw it correctly. No heavy blue color cast, no bright yellow. Nothing.

This is a big reason why today, more or less, I only have NiSi Filters in my camera bag.

Another benefit of the NiSi filters is that the filters are of glass, not resin. This makes them more durable, harder to scratch and (most importantly…) easier to clean! All the ND Filters (regardless of strength) have a soft foam/sponge on the back to avoid any light leaks. This is similar to LEE’s Big Stopper and Little Stopper but NiSi also has it on their lighter ND Filters.

NiSi Graduated Neutral Density Filters

The NiSi Graduated Neutral Density Filters have a slightly warmer color cast compared to LEE. However, the color cast is so little that it’s hardly worth mentioning. The same goes for LEE; the GND color cast is hardly noticeable at all.

Again, the NiSi filters are glass, not resin, which makes them harder to scratch and damage. This is great for outdoor photographers who often find themselves in less than ideal situations. After a year of using these filters regularly, I still haven’t got any scratches besides the few on the edges as a result of being placed in and out of the filter holder. These scratches aren’t visible on images, though, and are completely normal for any brand.

While I do like the NiSi GND Filters, my only issue is that the color cast of the 175mm (for my Nikon 14-24mm) is more visible than on the V5 holder. I only recently received this filter so I haven’t been able to do extensive tests on it yet. But at the first glance, it was a yellowish cast in the upper part of the filter.

NiSi Circular Polarizer

As I mentioned in the introduction, the NiSi Filter Holder has one of my all-time favorite features of a filter system; the possibility of placing a Circular Polarizer inside the holder.

Compared to most other brands, NiSi’s Circular Polarizer is extremely slim. I was actually surprised by how thin it was when I first saw it and, honestly, that gave me a negative first impression.

NiSi filters

NiSi Polariser inside the V5 Holder

Being able to insert the CPL within the holder and adjust it by turning a tiny wheel is a brilliant solution, though. Despite the fact that I felt like the filter was a bit too thin and perhaps not as high-quality as the other filters, it’s a more convenient solution than stacking a huge CPL outside of the other filters (and a more affordable option as well).

After testing the CPL for a while I concluded that the quality is in fact as good as my current B+W CPL and the color cast is, again, not a problem.

The biggest drawback is that you’re not able to use only the CPL without the Filter Holder. Since the CPL is placed in a special thread inside the holder you can’t place it on the lens without the holder. I often prefer to keep my CPL on the lens when walking around a city or going on a hike. This isn’t a good option with the NiSi CPL, unfortunately, so I still bring my B+W filter with me.

Besides the fact that it’s not as portable as other options the quality meets my demands. Therefore, I hope that they make an extra option where it’s easy to leave it on the lens at any given time.

Was it a mistake switching from LEE? 

It’s been almost a year since I got my first NiSi Filters now and every week I’m asked what I think about their filters and if it’s worth switching systems.

I think it’s important to state that I never considered switching from LEE and I was very satisfied with their filters and I still believe that they are among the best available on the market. However, I do not regret switching and I love using filters that have little-to-none color cast, while still being of a high quality.

The post Switching from LEE to NiSi Filters: Was it a Mistake? by Christian Hoiberg appeared first on Digital Photography School.
Digital Photography School

 
Comments Off on Switching from LEE to NiSi Filters: Was it a Mistake?

Posted in Photography


Geotagger World Atlas: Most Scenic City Routes Mapped Using Photo Data

16 Mar

[ By WebUrbanist in Destinations & Sights & Travel. ]

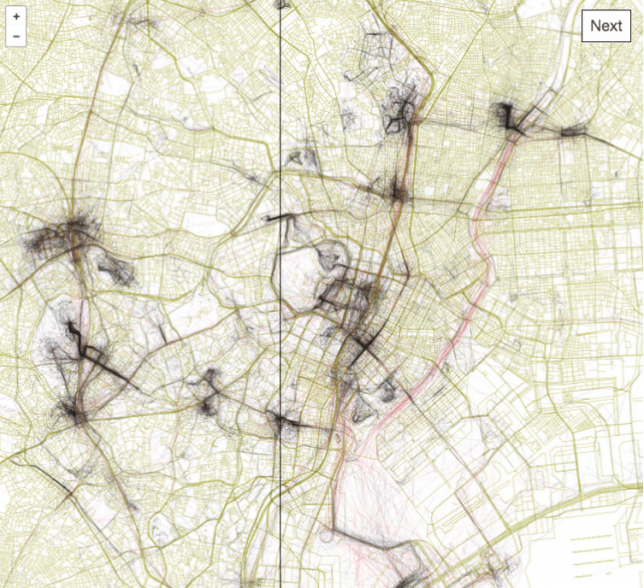
tokyo

Tapping into geo-tagging data and the collective wisdom of photographers, you can use this interactive tool to follow in the footsteps of those who have mapped out the most beautiful routes through cities. Click to pan and zoom through London below:

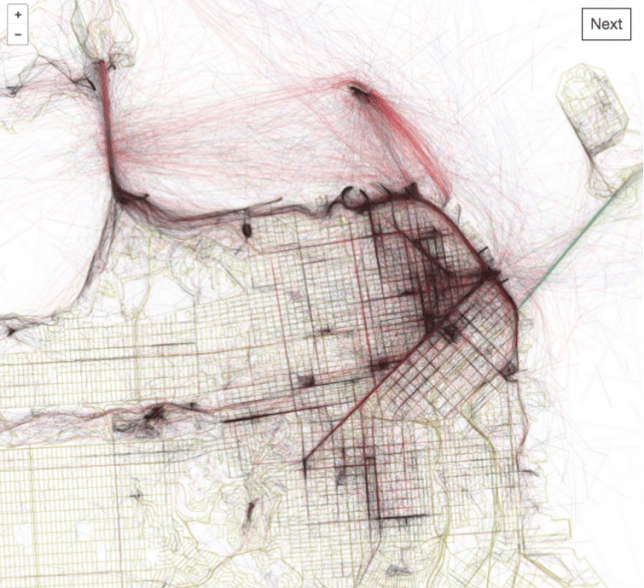
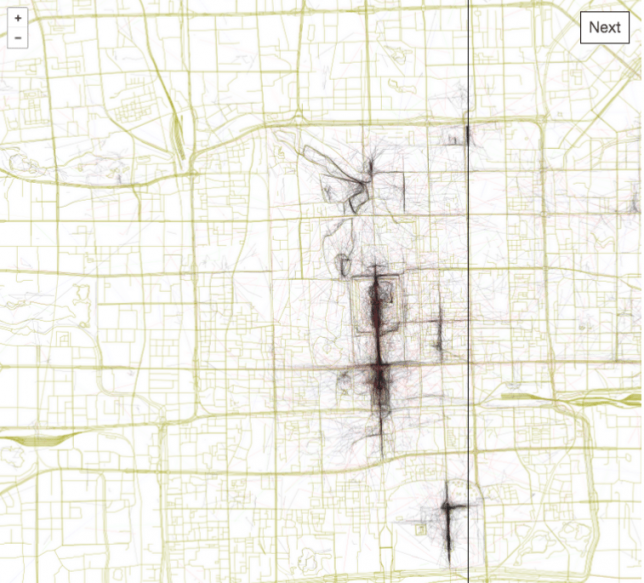
Eric Fisher of Mapbox has spent years compiling data from Flickr users, turning their sequential geo-located uploads into paths through urban environments including San Francisco, Beijing, Istanbul and Tokyo.

san francisco

The result is the Geotaggers’ World Atlas, a data-driven compendium of paths to take through cities. It is more than just a connection of dots — Fisher’s interactive guides specifically highlight trajectories from one image to the next.

beijing

“It signifies that people went there in the first place,” he says, and “saw something worth taking a picture of, and put the extra effort into posting it online for others to appreciate. And a sequence of photos along a route is even more significant, because it indicates that someone sustained their interest over distance and time rather than taking one picture and turning back.”

istanbul

The results are predictable in some cases, tracing lines between major landmarks, but often show side routes off of beaten tourist paths where keen photographers have found fascinating architecture and landscapes worth documenting along their way.

Share on Facebook


[ By WebUrbanist in Destinations & Sights & Travel. ]

[ WebUrbanist | Archives | Galleries | Privacy | TOS ]


WebUrbanist

 
Comments Off on Geotagger World Atlas: Most Scenic City Routes Mapped Using Photo Data

Posted in Creativity


Lighting 103: When Not to Gel Your Flash

16 Mar

Abstract: Don't bother gelling a scene that is completely lit by a single flash. But if a second light is involved—even ambient light—it's always better to control color at the source.

PIctured above is Midwest Camera President Moishe Appelbaum. He wandered into a lighting class I was teaching at Midwest last fall, so we pulled him aside and shot him. He's lit by a single LP180 speedlight, fired through a white bed sheet.

(Pro tip: A speedlight fired through a bed sheet will rival the light of the most expensive octabanks in the world—in quality if not in quantity. It all comes down to square inches in the light source. And a bed sheet has a crap ton of square inches.)

After our previous lesson, you might think that this photo is an ideal candidate for a warming gel: caucasian skin, warm background, warm-colored clothing. Why not unify this with a little added warmth?Read more »
Strobist

 
Comments Off on Lighting 103: When Not to Gel Your Flash

Posted in Photography


Wedding Portraits – 5 Tips for Getting Out of a Creative Rut

16 Mar

As a professional photographer, it is normal to take a fair amount of pride in your work. In an ideal world, everyone would take pride in their work; but photographers in particular are usually people who own their business, who are doing something they love and who are creative by nature.

It can be particularly frustrating when you feel that you aren’t doing your very best work. Even if the customer is happy, you want to keep doing your best and you want to keep growing and learning in your craft. Getting compliments or rave reviews are great, but that feeling when you take your latest and best image is unforgettable.

Wedding portraits creative rut 03

Wedding portraits is something that is particularly challenging in this regard. Your job is to capture the newlywed couple on the happiest day of their lives, which usually means photographing them face-on while they grin into the camera. Maybe you’ll ask them to embrace, to hold hands, or to stand in front of one another. But ultimately, you’re essentially doing the same thing in every photo. There is less freedom to be creative and to have a vision; which makes it easy to get into a creative rut.

How can you grow and expand when all these photos are essentially the same thing? As they say, the devil is in the details. Actually, it is precisely the limitations that this type of photography places on you that will allow you to challenge yourself to become even more creative.

Wedding portraits creative rut 08

Here are five pointers that will help you get out of that creative rut and take some truly memorable wedding portraits.

#1 – Look for Inspiration

Wedding portraits creative rut 09

Tip number one is to look for inspiration on the web. Social media like Instagram and Pinterest are excellent for this. Just take a look at the ways in which other photographers have handled their wedding portraits and see if there is anything you can learn or borrow from them.

As Steve Jobs famously said, “Good artists copy, great artists steal.” Don’t be afraid to try and improve on what has come before you. Save some screenshots on your phone, or print out a list or shots you’d like to go for. Trying something brand new usually means failing a few times, but that’s what makes it an adventure!

#2 – Get a Second Shooter

Our second tip is to find a second shooter. If you feel that your creative juices are running a little dry, then how about inviting another cameraman along for the day? Get them to have a go at the same shots and you might find that they give you some fresh ideas that you can try. Even if you don’t end up taking their advice directly, this will help you to step out of your comfort zone and that’s when new ideas start flowing!

Wedding portraits creative rut 04

Ask your second shooter for some advice on locations. Try and find someone familiar with the venue, or maybe a photographer that has some ideas about great locations to shoot. Let him take the lead, and if you see him start something, see if you have a finishing flourish to take your portraits to the next level.

#3 – Remember the Basics

When you’ve been doing this gig for a long time, it’s easy to forget the most basic aspects; things like composition, framing, and lighting. Our third tip encourages you to bring it back to basics and remember some of the tips you learned when you were first starting out. You’ll often find you can inject fresh inspiration into your shoots.

Wedding portraits creative rut 01

Try going for a classic or timeless look. Forget the props, crazy locations, special effects, and confetti canons. Try and see what you can do with your best lens, and most basic posing. You may find yourself asking why you’re trying to take the same photo that’s been taken by every wedding photographer before you. And the answer may just astound you!

#4 – Work With Your Resources

For our fourth tip, let’s talk about your environment. Every wedding is different, whether that is because of the weather, the dress code, color scheme, or the crowd around you. Don’t fight it – work with it! Rain or clouds can be a dramatic backdrop for a photoshoot for example. A big crowd of onlookers can make for an interesting new perspective.

Wedding portraits creative rut 11

But the biggest resource you have at your disposal during your wedding sessions is the couple! No doubt they have a lot of ideas and suggestions for their photos – after all, they’re the ones paying the bills. Don’t be the snobbish professional who knows best. Listen to your customers and you may just find they can teach you something. At the very least, it may bring some fresh new ideas to the table.

#5 – Leave Your Ego at the Door

This final tip is really the point you need to focus on here; your job is to make the subjects of your photos happy. You might be tired of taking the same old shots over and over again but if that’s what the couple wants, then it doesn’t really matter.

Wedding portraits creative rut 05

It’s an easy mistake to think that you need to be more creative and dramatic with your photography, while forgetting that the customer actually just wants a nice picture that will look good on their bedside table.

Your creativity here should serve a purpose, and that purpose is to make your customers happy. Forget about showing off what an original and inventive photographer you are – at least for the portraits. If you want to be creative, then you can always get in a few artsy shots of the bride’s shoes and the wedding rings. Letting go, and giving the client what they want should always come first.

Wedding portraits creative rut 02

Wedding portraits creative rut 07

Closing Comments

So there you have it – five tips that can help you rediscover the fun and creativity for your wedding portraits; look for inspiration, get a second shooter, get back to basics, use what you have, and focus on the customer. Let us know in the comments below what you do when you find your creative juices are running dry.

The post Wedding Portraits – 5 Tips for Getting Out of a Creative Rut by Michael David Reichmann appeared first on Digital Photography School.


Digital Photography School

 
Comments Off on Wedding Portraits – 5 Tips for Getting Out of a Creative Rut

Posted in Photography


Prime Lenses: Can you really zoom with your feet?

16 Mar

There’s a common maxim touted in photographic circles, especially in online forums and message boards. It states that some of the limitations of shooting with a prime lens can be overcome by simply moving your body around. The idea of “zoom with your feet” or SneakerZoom, as it’s sometimes called, is often used as a panacea for those who think prime lenses are limiting in terms of what they can do compared to their zooming counterparts.

To a certain extent this is true. If you want to get closer to your subject you can just physically move your body if you don’t have a zoom lens, but doing so results in images that are not at all the same as using a zoom lens. Zooming with your feet is somewhat of a misnomer because zooming implies a change of focal length. But when you move around with a prime lens you are not changing the focal length at all. Instead, you are recomposing with your feet. In this article I’ll explore why this is a simple but significant difference using a few examples below.

Prime Lenses: Can you really zoom with your feet?

How lenses work

To understand how lenses work it’s important to know a few things. The focal length is a measurement of the distance between the optical center of the lens (the point at which incoming light converges) and the image sensor of the camera to which it is attached.

Many cameras come with what’s known as a kit lens. Most of those cover a relatively modest range of focal lengths, with the most common being about 18mm to roughly 55mm. At 18mm, the lens bends light in such a way that the incoming light converges on a point 18mm in front of the image sensor. This results in a field of view that is about 76 degrees wide. (Assuming you are shooting with a crop-sensor camera like a Canon Rebel or Nikon D3300. On a full-frame camera like a Canon 5D Mark IV or Nikon D810 it would be about 90 degrees.)

At 50mm, the angle of view changes to roughly 31 degrees. The practical implications for this are that you can simply fit more in the frame when shooting at a wider focal length versus a longer one. Take the example of photographing a tree, as you can see in the following illustration.

Prime Lenses: Can you really zoom with your feet?

Angle of view versus moving your feet

Shooting at 18mm would allow the photographer in this example to fit the whole tree in the frame, but unfortunately this photographer is using a 50mm prime lens that does not zoom in and out. At this point, you might be thinking, “No problem, just walk backwards to get the whole tree in the frame”.  My good friend Bob Slydell from the movie Office Space would respond, “Just a second there, professor.” While it’s true the photographer could walk backwards and reposition himself such that he could fit the entire tree in the picture, there are two problems with this solution:

  1. There is a pond filled with crocodiles right behind him
  2. He would still have a 31 degree viewing angle

No matter how far backward, forward, or sideways the photographer in this example repositions himself, the angle of view with the 50mm lens will still be the same. Theoretically, he could construct a raft and float across the pond in order to fit the entire tree in the frame. But doing so would result in a dramatically different picture than if he just uses a wider lens to begin with. Zooming with his feet, or in this case with a boat, will work to get a picture of the tree, but doing so will alter the other compositional elements of the photo.

An example

To see how this works, here’s a revised version of the image above wherein the photographer has retreated far enough to get the entire tree in the frame. In this example, there are five pinwheels behind the tree that are well contained in the wide-angle shot. While moving backward has solved the issue of getting the tree in the frame, the narrow viewing angle means that not all the pinwheels fit in the shot.

Prime Lenses: Can you really zoom with your feet?

The only way to solve this problem using a Zoom With Your Feet solution would be for the photographer to move way back such that the tree and all the pinwheels could fit in the frame. At which point the original subject (the tree) would be so diminished that the image wouldn’t be the same at all.

Real life examples

Of course, this is a theoretical example, but watch what happens when the same type of scenario is replicated in the real world. I shot the following three images using my 70-200mm lens. Watch what happens as the focal length, as well as the distance to the subject, changes.

Shot #1 – 70mm, from far away

Prime Lenses: Can you really zoom with your feet?

70mm, f/4, ISO 100

Can you tell what the subject is in this picture? It’s supposed to be the artwork in the middle–a boy fishing with his dog, carved from the trunk of a fallen cypress tree. The angle of view in this picture is about 34 degrees (I shot this on my full-frame Nikon D750), which is enough to capture lots of scenery in the frame. Notice how in addition to the boy and his dog you can also see trees, a building, and even some foreground elements such as a pond and grass.

Shot #2 – 200mm, from far away

Prime Lenses: Can you really zoom with your feet?

200mm, f/4, ISO 100

Standing in the exact same spot as before but zooming into 200mm has had a dramatic impact on the picture. Now the viewer’s attention is focused squarely on the carving, and the field of view is now limited to a much narrower 12 degrees. Note where the head of the carving is in relation to the building in this image: it is framed between two columns on the first floor above the ground, which is quite different from the next picture.

Shot #3 – 70mm, shot from close up

Prime Lenses: Can you really zoom with your feet?

70mm, f/4, ISO 100

This final photograph was made by zooming with my feet, I repositioned myself to be much closer to the tree carving. The resulting image is similar, in that the carving itself is roughly the same size as in the 200mm shot, but the field of view is 34 degrees because I shot this at 70mm. Even though the subjects are similar in shot #2 and shot #3, the pictures are entirely different!

The wider field of view in shot #3 resulted in an image with a lot of background elements that distract the viewer. The boy’s head is now positioned near the top of the building, despite the fact that my camera was the same distance above the ground. While the classic SneakerZoom technique has certainly worked to get my subject looking how I wanted, the end result is quite different from actually using a proper zoom lens.

Zooming with your feet is NOT the same

These examples show that while you certainly can zoom with your feet, doing so is not the same at all as zooming with a telephoto lens. When you move around you are not really zooming but recomposing. While this is not a bad thing, it is something to be aware of when choosing lenses or honing your photography technique.

As another example of this phenomenon, here are two pictures from a recent session I did with a local family. I shot the first one with my 70-200mm lens. It’s a traditional portrait-style image with a blurred out background with the focus squarely on the faces and upper bodies of both women.

Prime Lenses: Can you really zoom with your feet?

200mm, f/2.8, ISO 100

I then zoomed all the way out to 70mm in order to get a closer, more personal image of the two women. After changing to a 70mm focal length I had to walk much closer to the ladies, essentially zooming in with my feet, in order to get them to appear the right size in the frame. The resulting image feels entirely different, not just because they are sitting on the ground showing off their matching wrist tattoos, but because you can see that they are sitting in the middle of a green field strewn with autumn leaves.

70mm, f/4, ISO 100

Shooting at 200mm meant a highly compressed field of view with only a small slice of the trees and background visible. Whereas in the bottom picture you can once again see the effects of the wider viewing angle afforded by shooting at 70mm.

Different planes

One final example that’s necessary to illustrate this phenomenon, is when you and your subject are not on the same horizontal plane. In these situations, changing your focal length can bring you much closer to what you are trying to shoot, whereas walking around will significantly alter the scene, based on the foreground and background elements, as well as the angle from which you are viewing the subject.

Shot #1 – 70mm, from far away

Prime Lenses: Can you really zoom with your feet?

70mm, f/4, ISO 100

This image looks decent, but I didn’t like how the flags shared the frame with the building behind them, especially the chimney in the corner with the radio antenna. Since I shot this at 70mm I had a couple options to improve the shot; including zooming into 200mm or zooming with my feet to get closer to the flags. I started with the first option and was very happy with the result.

Shot #2 – 200mm, from far away

Prime Lenses: Can you really zoom with your feet?

200mm, f/4, ISO 100

Zooming with my lens gave me a much better picture. One that focuses entirely on the flag pole with no distracting background elements and a nice cloudy sky to help the flag pop out of the frame. One tradeoff is that the Oklahoma flag is no longer visible. I could have zoomed in only partially to 135mm if I wanted to include it, but I decided that the picture would be more impactful if it just had a single subject instead of two flags. After getting this shot I zoomed in with my feet to see if I could get a decent picture at 70mm by moving much closer to the subject.

Shot #3 – 70mm, shot close up

Look at how different this final image is compared to the 200mm version! While I was able to get the United States flag much larger in the frame, I ended up shooting from such a low angle that the flag pole itself draws almost as much attention as the banners it is holding. The Oklahoma flag is also visible in this version, which has the unfortunate side effect of creating an image that is unfocused and busy. There are now two subjects in the frame (three if you count the pole.) This leaves the viewer with a sense that the image is cluttered and unfocused. Zooming with my feet did allow me to get closer to the subject, but it altered the composition so significantly that the resulting image is unusable.

Conclusion

Hopefully, these examples will help you start to visualize why moving around is not at all the same as changing your focal length. Please understand that I’m not saying you should sell all your prime lenses and rush out to buy a zoom lens, though. I use prime lenses all the time, and by far my most-used lens is the Nikon 35mm f/1.8 for its size, weight, and sheer versatility.

My goal is simply to help you understand that when you are shooting with a prime lens you need to know that moving closer to, or farther away from, your subject does not have the same effect as actually changing the focal length. Once you understand that, you can start using this knowledge to your advantage. You can structure your photo techniques around this important limitation of prime lenses, and hopefully, take much better pictures as a result.

The post Prime Lenses: Can you really zoom with your feet? by Simon Ringsmuth appeared first on Digital Photography School.


Digital Photography School

 
Comments Off on Prime Lenses: Can you really zoom with your feet?

Posted in Photography


Throwback Thursday: Our first cameras

16 Mar

What was your first camera?

For this week’s Throwback Thursday, I asked fellow DPReview staffers to write a few paragraphs about their first cameras, film and digital. I’ll go first.

Jeff Keller

Unlike most of my colleagues, I wasn’t a huge film photographer. I recall owning one of those flat 110 cameras, followed by a standard-issue clamshell compact, which was promptly stolen by someone in the baggage department at London’s Heathrow airport. I ended up running to Harrods to pick up something similar. I probably paid way too much.

I was lucky enough to get my hands on digital cameras really early – like 1996 early. After toying around with early Kodak, Casio and Apple cameras, I finally bit the bullet and dropped $ 900 on the Olympus D-300L, also known as the Camedia C-800L. This powerhouse had an F2.8, 36mm-equivalent lens and a sensor with XGA resolution. 

My real pride and joy was the Olympus D-600L (Camedia C-1400L), which cost me $ 1300 in 1997. It had an unusual design, large-ish 2/3″ 1.4MP sensor, and a 36-110mm equivalent F2.8-3.9 lens. Its optical viewfinder had 95% coverage and was supplemented by a 1.8″ LCD. I don’t know what I did with it, but I wish I still had the D-600L in my possession!

Olympus C-800L photo by Erkaha

Allison Johnson

I’m counting my first camera as one that I used early on, and am now entrusted with, but isn’t strictly mine. I had some kind of point-and-shoot film camera of my own when I was young, and shared a Game Boy Camera with my sister, but Dad’s Nikkormat FT3 was the first ‘real camera’ I shot with. Let me tell you, that camera is built for the ages. It’s heavy and indestructible and as far as I can tell, still works like the day it was born. I take it out with me nowadays when I know I’ll be able to slow down and think about what I’m doing, and when I know I won’t be devastated if I screw it all up and come back with nothing. I haven’t been disappointed yet.

The very first digital camera I bought is slightly embarrassing: a Sony Cyber-shot DSC-T700. It was one of the super-slim Cyber-shots of the late 2000s that was all touchscreen. What can I say? I was taken in by its sleek looks and pocketability. It started up when you slid the front panel down to reveal the lens, and there was a real risk of the whole camera flying out of your hands every time you did that. It also had the world’s tiniest zoom lever in one corner on the top, which was pretty annoying to operate. The photos were fine in daylight, though I was just taking casual snapshots and didn’t exactly stress test it. I can confidently say my smartphone now does a fine job of everything that I was using this camera for. Therein lies the whole compact camera market, I guess.

Nikkormat FT3 photo by BastienM

Barney Britton

My first camera was a Pentax MX, inherited from my Dad (who is still very much alive), along with a 50mm F1.7 prime and a couple of Tamron Adaptall-2 zooms. It was the camera I learned photography with, and the only camera I took on a round-Europe rail trip when I was 18. I sold it when I went to university to fund a Canon EOS-3, and always regretted it. I found an MX in a junk shop last year, and I’m not going to sell this one.

My first digital camera was the Canon EOS 10D. I saved up for an entire year, working in a hotel restaurant during university holidays to pay for it (a story told in part, here) and it was my main camera for a couple of years.

The EOS 10D was the first ‘affordable’ DSLR that really stacked up against high-end film models in terms of build quality and functionality. Although its AF system was primitive compared to the EOS 3, it was extremely well-built, and very reliable. At the time, the 10D also offered the best image quality of any enthusiast DSLR (and arguably, the best image quality of any DSLR, period). Noise levels were low across its standard ISO range, and an extension setting of ISO 3200 offered filmlike grain, which looked great in black and white. I still see 10Ds ‘in the wild’ occasionally, and for a long time, we used an EOS 10D as our main studio camera at DPReview.

The EOS 10D had a magnesium-alloy body.

I shot my first published work on the EOS 10D, which felt like quite an achievement given how poorly its autofocus system performed in low light. If I’d never become a professional performance photographer, I might still have it. After the 10D I upgraded to an EOS-1D Mark II, when I started getting more serious about theatre and music photography.

Pentax MX photo by Alf Sigaro

Dale Baskin

I truly have no idea what my first camera was. When I go back and look at old family photos, even ones in which I’m barely a toddler, I always seem to have a camera in my hands, running the gamut from my Dad’s rangefinder to a free plastic camera someone chose over a toaster when opening a bank account. When I got serious about learning photography, however, there was one camera that appealed to me like no other: the Miranda Sensorex.

Why? Probably for the same reasons a lot of people started photography with a particular camera: it was available to me. I didn’t care that the camera was older than I was and heavier than a rock. It looked the way a camera was supposed to look, and it had the latest in sensor technology. (For the youngsters out there, this technology was called ‘film’, and my Dad insisted on the Kodachrome or Ektachrome varieties).

It was a great camera to learn on as there was no auto, no program and no aperture priority mode to fall back on. I recall reading somewhere that the Sensorex was the first 35mm SLR with TTL metering, and to this day I love the match-needle method of setting exposure. It may be a dinosaur by today’s standards, but it still works and will probably continue to do so for decades.

My first digital camera was the Canon PowerShot S300, a 2.1MP point and shoot. (Back then, that extra 0.1MP was important!). I agonized for weeks over whether or not I should spend literally hundreds of dollars more to get a 3MP camera, but in the end couldn’t justify the spend. I immediately fell in love with digital photography, especially the the ability for easy sharing on social networks. (Social network being defined as someone in your personal social network to whom you could snail-mail a CD-ROM of photos they were never going to look at anyway.)

As fun as digital was, it still didn’t give me the same quality as scanned slides, so I stuck with film for a few more years until the Canon EOS 20D came out, and the rest is history.

Carey Rose

The first camera I have any sort of memory of actually using (besides disposable cameras and my Grandpa’s Canon EOS 650 film camera, which was so cool) was a PowerShot A75. It was a hand-me-down from my dad, and the perfect ‘first digital camera’ for a socially awkward high-schooler. It was fairly small (though that didn’t stop me from wanting a camera phone as soon as such things became practical and available), ran on easy-to-find AA batteries, and the photo quality was great for the time.

It was also called ‘PowerShot,’ a brand name that, to this day, sounds way cooler than competing models like such as FinePix, Easyshare and Coolpix, all of which should have died out along with animated backgrounds and auto-play music on your favorite Geocities ‘links’ page. It even survived a tumble onto concrete for a while, though eventually it succumbed to the dreaded ‘lens error’ where the lens wouldn’t properly extend or contract.

It was superseded by a Samsung NV10, a camera which looked cooler, was a lot smaller and had a lot more megapixels (plus a funky Smart Touch control system with soft keys surrounding two sides of the display,) but I ended up preferring the overall ‘look’ of the PowerShot images I used to get. So when I left the NV10 on a train while traveling across Europe, I replaced it with another PowerShot, the S3 IS, and never looked back.

Sam Spencer

The first camera I used was probably the same as anyone born before 1990-something: a disposable point and shoot. Being six years old, I had no idea about focus, flash, or anything of the sort and tried to take a macro picture of a spider at less than six inches away….

A couple years later my father proudly came home one evening with a Ricoh RDC-2. I wasn’t allowed to get my prepubescent mitts on it until later when computer monitors grew to 1,024 pixels on the long side, making the VGA Ricoh obsolete. I remember using the AC adaptor for it almost exclusively since it ate through AA’s almost as often as its now-diminutive memory filled. I also seem to remember using its OVF more often than the (optional) flip-up screen on top. I mostly used it to try and capture various members of my remote control car collection airborne after launching off jumps I made out of tape and cardboard. Remember, I was about 8 or 9.

The Sony Cyber-shot DSC-S75 had a 3MP CCD, 34-102mm equiv. lens, a rear LCD info display and plenty of manual controls. Its lens, labeled ‘Carl Zeiss,’ could be found on numerous other cameras under different names (e.g. Canon, Epson).

That camera was replaced with a Sony Cyber-shot DSC-S75, which was the first time I had ever seen or heard the name ‘Zeiss’. That camera offered a bit more manual control (like focus!) than the Ricoh, was what got me truly enthusiastic about photography in Junior High, leading to signing up for darkroom photography my freshman year. Then I was handed a ‘real’ camera, a Minolta SRT200, which worked well until Nikon released the D50, a DSLR affordable enough to convince my generous father to help me purchase (he definitely paid for the majority).

Simon Joinson

The Fujica ST605N was an M42 screw-mount SLR made in the 70’s and 80’s. Photo by Alf Sigaro.

I have my father to blame for my lifelong love affair with photography. Not because he was a particularly accomplished or prolific photographer (based on the wallets of photos I have from my childhood I’d characterize his technique as a bit hit and miss, with a lot more ‘miss’ than ‘hit’), but because he gave me my first camera at age 12 or 13. I got this hand-me-down because he was replacing his camera – a Fujica ST 605N – with something a lot fancier (a Minolta X500, chosen after an excruciating amount of research including, much to my mother’s consternation, two visits to a camera show from which he returned with a roll full of pictures of semi-naked models on motorbikes).

Anyway, I didn’t care because I now had my own real camera, complete with 35mm, 55mm and 135mm lenses packed into an ancient gadget bag that released a heady aroma of moldy old leather and film every time I creaked open its lid, and whose numerous pockets were home to a fascinating collection of dusty accessories and starburst filters. It was the most amazing thing I had ever owned.

The Fujica ST605N was one of dozens of similar no-frills M42 screw mount SLRs made during the 70s and early 80s (although it appears that the mere fact you could see the currently selected shutter speed in the viewfinder was quite the selling point in 1978), but it was compact, nicely made and had a decent focus screen and a fast (at the time) silicon exposure meter.

And I loved it. And, like all photographers who started with a fully manual camera and a small selection of prime lenses that took about 10 minutes to change (thanks to the screw mount), I quickly learned the basics of photography (specifically apertures and shutter speeds), partly by reading but mostly through trial and error. 

I can still remember the first roll of I put through it, at the local zoo, and the thrill of getting the prints back only 5 days and 2 weeks’ worth of allowance later (on this point my father made it clear I would need to reign in my enthusiasm and that a 36-exposure roll normally lasted him for at least a few months).

After many years of enjoying his Fujica, Simon moved on to the Nikon F-301, known as the N2000 in the United States. Photo by John Nuttall.

I kept – and used – the Fujica all my teen years, adding an old flashgun that took 5 minutes of high-pitched wheezing to charge up, a slightly moldy 70-200mm Vivitar zoom I found in a junk shop, and a sizeable collection of blower brushes and cap-keepers that came free on the covers of photography magazines. My time with her only ended when I went to college – all students were required to arrive on the first day with a Nikon SLR, so I had to trade-in my trusty old ST605N for a Nikon F301 (aka N2000), which seemed like something out of Knight Rider by comparison. But that’s another story…

The Casio QV-10, with its low resolution CCD and rotating lens, was one of the world’s first consumer digital cameras.

My first digital camera? Well, the first I used was a Casio QV10, but since I started writing about digital cameras in 1995, I never really had to buy one (we had a house full of them), and I just borrowed what I wanted when I wasn’t shooting for work. I’m slightly embarrassed to admit that I didn’t actually buy a digital camera for myself until 2011 (funnily enough it too was a Fuji – a first generation X100).


So what was your first camera (film or digital – both are fair game)?  Let us know in the comments below! Suggestions for future Throwback Thursday articles are also welcome.

Articles: Digital Photography Review (dpreview.com)

 
Comments Off on Throwback Thursday: Our first cameras

Posted in Uncategorized


Updated: A look at the Panasonic DC-GH5’s autofocus system

16 Mar
Pushing forward – Panasonic’s improvements to the autofocus system on the GH5 are impressive, but a few quirks remain.
Out of camera JPEG cropped to taste | ISO 250 | 1/500 sec | F5.1
Photo by Carey Rose

Panasonic’s GH-series has always been a line of highly capable video-centric hybrid cameras, and the GH5 is no exception. Despite this, Panasonic’s work on the autofocus system has resulted in some impressive stills-shooting performance; the camera comes with with updated DFD technology, autofocus custom settings so you can tailor the camera to the movement of your subjects and 9fps shooting in Raw and JPEG with autofocus.

It sure sounds like a winning combination, but that doesn’t mean it’s perfect. Take a look at our updated first impressions review to learn more.

See how the Panasonic GH5 did in our autofocus tests

Check out the GH5 at a rugby match

Articles: Digital Photography Review (dpreview.com)

 
Comments Off on Updated: A look at the Panasonic DC-GH5’s autofocus system

Posted in Uncategorized


Review of the New Formatt Hitech Firecrest Filter Holder and Neutral Density Filters

16 Mar

This article is an overview of the Formatt Hitech Firecrest Filter Holder system and their neutral density filters.

Long exposure is one of those magical types of photography that once people start doing it, they nearly always fall in love with the technique. They then begin their quest for the right conditions to take those photos, along with the right gear. The filters you use are important and, so is the holder for them.

Overview of the Formatt Hitech Filter Holder and Neutral Density Filters

Sunset at St. Kilda Pier, this was taken with the Formatt Hitech Filter Holder and their 10-stop ND filter.

Long exposure photography is becoming so popular, but with it come lots of issues to deal with. The most important one is light and stopping any from getting into the camera that may ruin your images. Another one that you hear many complaining about is color casts caused by the filters they are using.

Have the right gear to get what you attempting is so important. Formatt Hitech has been listening to their users and has come up with a new holder system for their 100mm filters that addresses many of these problems.

Formatt Hitech Filter Holder

The new filter holder from Formatt Hitech is designed to completely enclose the filter so no light can get in around it once the filter is in place. It removes the need for the foam gasket on the back of the filter, as the holder has one on it to help seal the filter into place.

Formatt Hitech has put a great deal of thought into what you will need for long exposure photography, and along with the holder come some other surprises.

Overview of the Formatt Hitech Filter Holder and Neutral Density Filters

The Formatt Hitech filter holder in use at Docklands.

What’s in the box

This company does produce some of the loveliest packaging that I’ve seen. The boxes have a soft, almost suede feel. It is hard to throw them away, in fact, I haven’t been able to.

When the package arrives and you open the box you will see the holder, but you will also see an 82mm adaptor ring and a series of step-down rings. So often in the past when buying the adaptor rings you have had to make a choice about which lens you will fit it to and get the ring to fit that one. Formatt Hitech gives you the adaptor ring for the largest possible filter size and the step-down rings to fit other lenses.

Wrapped in paper, you will find a polarizer that fits into the adapter ring. This filter fits in the back of the holder system very neatly, and your neutral density filters then fit in front of it. There is a geared control wheel that allows you to turn the filter as needed.

The added benefit here is the ability to use the polarizer in the adapter ring on its own. You don’t have to attach the holder at all.

Formatt Hitech Filter holder and ND Filters

Everything that you get with the Formatt Hitech filter holder. Photo courtesy of Formatt Hitech

Using it for the first time

When you first open the box it can seem a bit overwhelming and when you try to use the system, it’s a little confusing. It feels like you will break it when you try to pull it apart, but it is designed for rough use.

If you still can’t work it out Formatt Hitech has a video which they recommend that you watch (see below). The brackets around the holder are often a little stiff to begin with, but they do get easier and loosen up with use. Watching the video will help you get past that.

Attaching the holder onto the adaptor ring can take some getting used to as well. It is bit fiddly, but with practice, you will get better at it, and faster. You can do it with one hand, it simply clicks onto the ring. It is quite durable and will take a lot of handling. The holder stays very firmly on the adaptor ring.

Formatt Hitech Filter holder and ND Filters

Using the filter to get a long exposure of Pyramid Rock.

Why is it good to have a filter holder like this?

If you looked at the old filter holder that was available, even with the foam gasket, you could see gaps where it was possible for light to get through. When you want to create a perfect long exposure you need to make sure that there are no leaks. The benefits of this particular filter holder system is that it removes the possibilities of those gaps and creates a more light tight cocoon around your filter.

Formatt Hitech Filter holder and ND Filters

City of Melbourne from across the river. Taken with the new Formatt Hitech Filter holder and their 16-stop ND filter.

Using it

Out in the field, the system does work well. But, having to remove both brackets around the holder just to the change filter, or add one, is a bit harder and takes more time. The benefits the brackets provide in other ways (light tightness) certainly make up for it, though.

There have been a couple of instances of vignetting, but it is very slight and only seems to happen when the lens is very wide, for example at 24mm.

When you first use the bracket it seems like you can’t use graduated filters in the holder. However, there are sections at the top and bottom that can be removed that will allow you to use 100x150mm filters. There are vented end caps that allow the filters to poke through, while at the same time helping to retain that light seal.

Formatt Hitech Filter holder and ND Filters

Wonky Pier at Sullivan Pier. Long exposure using the new holder and the Formatt Hitech Firecrest 13-stop ND Filter.

The Format Hitech filters

It is logical that if you are going to use the holder then you should also use the Formatt Hitech filters as well. Their Firecrest series are very neutral and have no color cast, even when underexposing.

They are made in the UK using high-quality optical glass that is bonded together, so the coating is sandwiched between them. This helps to protect the filters and also makes them much harder to scratch. If you do scratch them then you are just doing it to the outside and not the coating itself.

Formatt Hitech Filter holder and ND Filters

Tenby Point and tree with the tide coming in. Using the holder with the 10-stop ND filter.

Cost

Formatt Hitech filters aren’t cheap, with the filter holder retailing around $ 170 USD, but you do get quite a bit for your money. The filters are pricey, but if you love long exposure photography then it’s worth it. Plus, if you look after them, don’t drop them, you could have them forever.

They also sell kits, which can help you save money on the initial outlay. They all have the filter holder and various filters depending on what you are looking for.

Formatt Hitech Filter holder and ND Filters

Long exposure taken at Princes Pier using the new holder and the Formatt Hitech Firecrest 10-stop ND filter.

Conclusion

Long exposure photography is an addictive style and many who start can’t stop. If you love it and want to get the best possible photos, then you have to consider the new Firecrest Filter Holder from Formatt Hitech. A holder that stops light from entering through your lens is a great start. Combined with the filters, you are on your way to creating some magical images.

If you want to compare to other systems have a look at these as well:

  • Review of the Wine Country Camera Filter Holder System
  • Switching from LEE to NiSi Filters: Was it a Mistake?

The post Review of the New Formatt Hitech Firecrest Filter Holder and Neutral Density Filters by Leanne Cole appeared first on Digital Photography School.


Digital Photography School

 
Comments Off on Review of the New Formatt Hitech Firecrest Filter Holder and Neutral Density Filters

Posted in Photography


An Overview of Lightroom Web – What is it and who is it for?

16 Mar

Lightroom CC subscribers can access Lightroom in three places; on a computer using the desktop app, on a tablet or phone using Lightroom Mobile, or through an internet browser, using Lightroom Web (go to the url https://lightroom.adobe.com/ to check it out for yourself).

Lightroom web

Lightroom web is probably the least talked about of those three options. So I thought it would be interesting to take a closer look at it to see what it can do and who might find it useful.

But first, let’s talk about Smart Previews. A Smart Preview is a highly compressed DNG file that measures 2540 pixels along the longest edge. Smart Previews are a fraction of the size of Raw files (as little as 2%). If you get into the habit of building Smart Previews when you import your images into Lightroom you will enjoy the following benefits.

1. You can develop photos when Lightroom can’t find the originals

If you save your Raw files on an external hard drive (recommended, so they don’t clog up your internal drive) then without Smart Previews you can only develop those photos when the hard drive is connected to your computer.

When the hard drive isn’t connected Lightroom uses the Smart Previews. This is helpful if you’re a laptop user who likes to travel. You can work on your photos while away from home, wherever you are in the world, without access to your Raw files.

2. Smart Previews make the Develop module faster

Using Smart Previews in the Develop module helps Lightroom run faster. Lightroom works quicker with the smaller Smart Preview than it does with the full-size Develop module preview.

Lightroom now gives you the option to automatically use Smart Previews in the Develop module. Go to the Performance tab in Preferences and tick the Use Smart Previews instead of Originals for Image Editing box.

Lightroom web

This feature appeared in Lightroom CC 2015.7 and Lightroom 6.7.

3. Smart Previews enable Lightroom Mobile and Lightroom Web

Smart Previews are used by Adobe to enable Lightroom Mobile and Lightroom Web. When you sync a Collection, Lightroom uploads the Smart Previews for the images in that Collection to Adobe’s servers.

Lightroom web

Lightroom Mobile and Lightroom Web then pull those Smart Previews from the servers so you can access your photos on your mobile device or in a browser. Adobe calls this CreativeSync.

What can you do in Lightroom Web?

There’s a lot you can do in Lightroom Web:

1. You can view your photos

You can view any synced Collections in Lightroom Web as well as in Lightroom Mobile.

This is the Lightroom Web interface. Synchronized Collections are shown on the left. The photos in the selected Collection are displayed on the right. All of this is done using Smart Previews.

Lightroom web

2. You can share photos

You can create online galleries and share the link. If the viewer has an Adobe ID they can favorite photos and leave comments.

This gives you an easy way to show photos to friends or clients. You can disable the link whenever you like, giving you complete control. The links can also be shared on Facebook, Twitter, and Google +.

Lightroom web

3. You can flag and rate photos

In Lightroom Web you can flag and rate photos, but you can’t apply color labels.

Lightroom web

4. You can develop photos

Most of the developing tools available in Lightroom mobile are also available in Lightroom Web. You can see the histogram, crop images, apply Clarity, adjust exposure and White Balance, convert to black and white and apply a split tone. There are also 25 built-in Lightroom presets.

But there are limitations – you don’t have access to the HSL / Color / B&W tools, and you can’t make local adjustments.

I can make basic adjustments in Lightroom Web to this landscape photo, but I can’t apply a Graduated filter to darken the sky. You can, however, do this in Lightroom Mobile (iOS version only at the time of writing).

Lightroom web

5. You can create new Collections

You can also move photos around between Collections.

6. You can download photos

You can download a JPEG of any photo in Lightroom Web. The maximum size is 2540 pixels along the longest edge (the same dimension as the Smart Preview).

7. You can send photos to Behance and Adobe Portfolio

You can send up to 50 photos to Adobe Portfolio or Behance. Adobe Portfolio is a free service that lets you build a portfolio web gallery for your images.

Who is Lightroom Web for?

If you build Smart Previews for every photo in your Collection you can view those photos using Lightroom Web from anywhere in the world. All you need is a web browser and your Adobe password.

The question of who is Lightroom Web for is a little tricky to answer. If you are away from home and have a choice between using Lightroom Mobile on a tablet and Lightroom Web, then you should use Lightroom Mobile. It has more options, especially when it comes to developing photos. It is also quicker to use if you download the Smart Previews to your device.

Lightroom Web may be useful if you work on two computers, say a desktop and a laptop. You can do most of your work on the desktop, and view photos, apply flags or star ratings and do some developing in Lightroom Web on the laptop.

If you are away from home and don’t have a mobile device, or want to see your photos on a bigger screen, the ability to access your synchronized Collections using Lightroom Web may come in handy. It’s a good to way to show your photos to people. Professionals may find it handy for handling last-minute client requests while away from home.


If you enjoyed this article and would like to learn more about Lightroom then please check out my Mastering Lightroom ebooks.

The post An Overview of Lightroom Web – What is it and who is it for? by Andrew S. Gibson appeared first on Digital Photography School.


Digital Photography School

 
Comments Off on An Overview of Lightroom Web – What is it and who is it for?

Posted in Photography


NanGuang introduces flexible LED lighting mats

16 Mar

Chinese lighting manufacturer NanGuang has launched a new kit that consists of a pair of flexible LED light panels designed for studio or on-location still and video work. The two panels are effectively 30x60cm rubber mats with 288 embedded bi-color LEDs each, which can be adjusted to produce color temperatures anywhere between daylight and tungsten – 5600 to 3200K.

The mats can be bent to surround a still life subject or for a head shot to produce a wrap-around lighting effect, but they can also be mounted into supplied frames to behave like standard rigid panels. Diffuser sheets are supplied to soften the light and the panel brightness can be varied via a dimmer switch up to 3424lm when they are measured together. Panels can be powered by the supplied AC adapter or by an optional Sony V-mount or NP-F type battery. The company says the lights have a life of 50,000 hours and a CRI of 95.

The kit, including two stands, two panels a case and accessories, costs £679.98/$ 650. For more information about NanGuang you can visit the company website, but for information about the Flexible LED Light Panel Kit CNST288CX2 visit UK distributor Kenro.

Press Release

BEND THE RULES WITH NANGUANG’S NEW FLEXIBLE LED LIGHTING KIT FROM KENRO

Kenro Ltd, the specialist photo & video distributor for the UK and Ireland, has introduced an amazing new flexible lighting kit quite unlike any photo / video lighting system you’ve seen before.

NanGuang’s new Flexible LED Light Panel Kit (CNST288CX2) includes a set of two 30 x 60cm LED light panels that can be bent and shaped around the subject to offer unique lighting effects.

Also, should conventional flat panel lighting be required, they easily attach to a choice of two frames – a square one measuring 60 x 60cm, and a rectangular one measuring 30 x 120cm. This makes for a very adaptable, lightweight and portable lighting system that can be operated via 240V AC mains or Sony V-mount and NP-F batteries. Each frame has a matching fabric diffusor for extra soft lighting.

Each of the panels is 2mm thick, water and frost resistant, and contains 288 bi-colour LEDs (CRI 95) with stepless colour adjustment from 3200-5600K.

When used off the frames, the lightweight panels can be bent and shaped as desired, making them ideal for location photography, either indoors or out in a variety of environmental conditions.

Per panel, power is 28.2 Watts, with stepless dimmer adjustment, illumination 3424 LM. Average LED life: 50,000 hours. CRI 95.

The kit consists of two LED light panels, controllers and frames, as well as a lighting stand, square and rectangular diffusers, and a sturdy carry case. SRP is £679.98 including VAT.

Says Paul Kench, Kenro’s managing director: “Occasionally a new product comes along that stops you in your tracks and starts to make you think about uses you’ve never thought of before. These new flexible LED light panels are incredibly versatile – it’s very exciting to see the creative uses that photographers are coming up with for this new type of lighting.”

All quoted prices are SRP guide, including VAT.

For further details and to find your nearest stockist, please visit http://www.kenro.co.uk/where_to_buy/nanguang_stockist_list/

For full specifications, visit the NanGuang Flexible Lighting section of the Kenro website: http://www.kenro.co.uk/products/nanguang_flexible_lighting/nanguang_flexible_lighting_cnst288c2/

Articles: Digital Photography Review (dpreview.com)

 
Comments Off on NanGuang introduces flexible LED lighting mats

Posted in Uncategorized