RSS
 

Archive for March, 2017

15 Photography Ideas to Boost Your Creativity

21 Mar

Doing photography exercises brings forth new opportunities to improve your skills, hone in on your craft and who knows, even guide you in the direction of finding a new genre that you love more than anything in the world! Here are 15 creative ideas to take you out of your comfort zone, and guide you in your quest to boost your creativity.

Get out there and put your own spin to each of these prompts. Bonus points if you have never tried any of these before. When you push yourself to get comfortable being uncomfortable, to step outside your comfort zone, to try new things, and to give yourself the permission to fail – you also give yourself the chance to figure out who you want to be when you grow up!

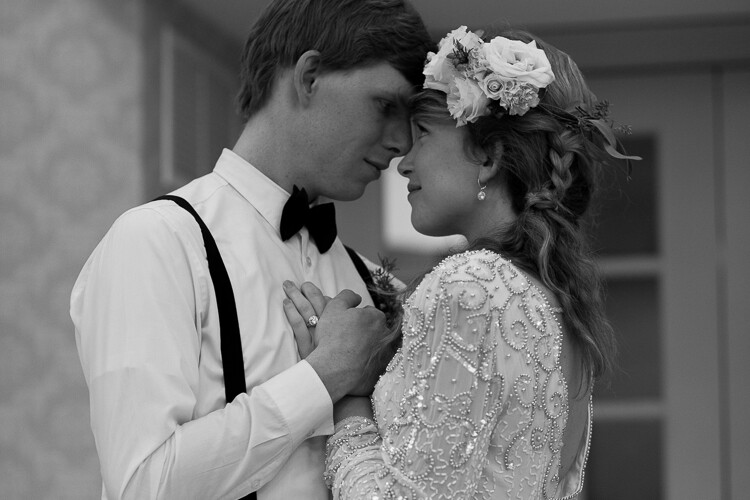
#1 – Add emotion to your images

15 Photography Exercises to Boost Your Creativity

I absolutely adore this image. There’s nothing like laughing with unabashed happiness on your wedding day!

Choose to evoke emotion in your images – either in the eyes of the beholder or in the eyes of the beheld (a.k.a your subjects). When you want emotion from your subjects, ask for it. There is nothing more uncomfortable for your clients than a photographer who is silent behind the camera while continuously clicking the shutter.

Most clients are not professional models and generally, they are quite camera shy and self-conscious. It is our responsibility as the photographer to direct, educate, and interact with our clients to make them comfortable in front of our lens.

If you are shooting landscapes or still lifes, aim to create emotion in your images that move your audience to feel something. Be it a serious case of wanderlust viewing a travel photo from an exotic locale, or insane hunger when looking at your food images!

15 Photography Exercises to Boost Your Creativity

Sometimes staged photos take a turn of their own and present opportunities for different perspectives!

#2 – Try some motion blur

There are many different ways to achieve motion blur. I associate motion blur with the effect of capturing movement in a frame. You can either capture movement in your subject or by moving yourself or the camera (e.g. panning). For me, the easiest way to achieve motion blur is to slow the shutter speed and show some movement of the subject. Motion blur adds an interesting artistic element in your images if done right. One tip, use a tripod for optimal effect.

15 Photography Exercises to Boost Your Creativity

When fog was our constant companion on a beach camping trip in the pacific northwest, I chose to use it to my advantage to create an eerie effect with motion blur – in the waves and the people walking along the beach!

15 Photography Exercises to Boost Your Creativity

Panning image courtesy of dPS Editor, Darlene.

googletag.cmd.push(function() {var gpt_slot = googletag.defineSlot( “/1005424/_dPSv5in-post-mobile(300×250)”, [300, 250], “pb-ruleset-mobile-ad-0” ).addService( googletag.pubads() );ruleset_mobile_slots.push( gpt_slot );});

googletag.cmd.push(function() {var gpt_slot = googletag.defineSlot( “/1005424/_dPSv5in-post-mobile(300×250)”, [300, 250], “pb-ruleset-desktop-ad-4” ).addService( googletag.pubads() );ruleset_desktop_slots.push( gpt_slot );});

#3 – Go macro

Traditionally macro photography has been associated with floral and fauna. But resist the urge to get out into the garden to find the smallest ant to photograph. Instead, think of macro as a great way to isolate details in an image.

15 Photography Exercises to Boost Your Creativity

As a wedding photographer, I love using my macro lens to capture unique ring shots for my couples. And of course, nothing like highlighting the snow (I live in Chicago!).

#4 – Find reflections

As the name suggests, try and find mirror images or reflections, either with mirrors or with water, of your subject and shoot creatively.

Reflections of people in water image - 15 Photography Exercises to Boost Your Creativity

It really helps if your subjects are great sports and willing to get into the water for a shot like this!!

#5 – Shoot out of focus

Whether it’s an unlucky accident or intentional, I love out of focus images. Remember these creative exercises are simply an attempt to create something you are proud of. There are no right or wrongs, they are all just ways to stimulate your creative juices.

#6 – Wabi-sabi – embracing imperfection

As per Wikipedia, wabi-sabi represents Japanese aesthetics and a Japanese world view centered on the acceptance of transience and imperfection. The aesthetic is sometimes described as one of beauty that is “imperfect, impermanent, and incomplete”.

There is something innately beautiful in imperfections. That feeling of being alive and being human and living life to the fullest, versus living in the proverbial glass house where nothing is out of order. The best way to think of wabi-sabi is to look for imperfections in your everyday.

15 Photography Exercises to Boost Your Creativity

I love everything old and vintage. They always tell me stories of a different, more interesting time and place!

15 Photography Exercises to Boost Your Creativity

#7 – Double exposures

Ding a double exposure is a carry-over from the old film days and it is a super creative way to take your images from boring to wow! In its simplest form, it is a way to superimpose two images onto a single frame. The good news is that you don’t need a film camera to create double exposures. Some of

Some newer DSLRs have a multiple exposure setting as a tool for creative photography. It takes a little bit of reading but once you get the hang of it, I promise, you will be hooked. We also have a great article in the DPS archives that talks about the techniques of multiple exposures How to do Multiple Exposures In-Camera.

15 Photography Exercises to Boost Your Creativity

googletag.cmd.push(function() {var gpt_slot = googletag.defineSlot( “/1005424/_dPSv5in-post-mobile(300×250)”, [300, 250], “pb-ruleset-mobile-ad-1” ).addService( googletag.pubads() );ruleset_mobile_slots.push( gpt_slot );});

googletag.cmd.push(function() {var gpt_slot = googletag.defineSlot( “/1005424/_dPSv5in-post-mobile(300×250)”, [300, 250], “pb-ruleset-desktop-ad-5” ).addService( googletag.pubads() );ruleset_desktop_slots.push( gpt_slot );});

#8 Diptych

A diptych is a concept of placing two images side by side so that they add context to each other and tell a complete story. When choosing images to form a diptych, pay close attention to light, tones, and exposures. Typically I compose my diptychs to include a big picture image and a detail shot of an element of that image.

15 Photography Exercises to Boost Your Creativity

My focus with dyptics is to dig deeper into my stories…focus on the details along with the big picture.

#9 – Triptych

Similar to diptych, a triptych is a concept of placing three images side by side so that they collectively tell a story.

15 Photography Exercises to Boost Your Creativity

Especially with tryptics, pay special attention to the order and orientation of the images. At times this might limit the placement of the images in a certain order.

#10 – Shooting through objects

I love shooting through objects, it adds an element of interest and depth in the foreground. You can really take this up a notch by using every day elements like leaves, branches, fabric pieces and ever glass to create some cool artistic effects in your images.

15 Photography Exercises to Boost Your Creativity

15 Photography Exercises to Boost Your Creativity

#11 – Different perspective

The next time you find yourself shooting the same subject the same way, take a step back and rethink your strategy. Are you a 100% vertical shooter like me? Then force yourself to take a horizontal frame. Are you always looking at details? Then use a wide-angle lens and force yourself to take in the big picture. Do you always shoot at a narrow aperture so as to get everything in focus? Then dial down your aperture and shoot at the widest possible setting (based on your lens) to focus in on one detail of the whole image.

15 Photography Exercises to Boost Your Creativity

Personally, I tend to shoot closeup and focus on the details a lot more than I do the big picture. So I have been forcing myself to do just that…and I love when I get diversity of 50-50 in my vertical and horizontal orientation shots! Bonus point to you if you can spot the subject here!!

#12 – Burst of color

It’s a beautiful, colorful world out there. Get out and photograph it. Don’t be afraid of the bold bright colors, but definitely be aware of which colors work and which ones don’t quite translate well in imagery. Train your mind to look for certain colors and patterns and before you know it, you will have a collection of colorful images that make you happy.

15 Photography Exercises to Boost Your Creativity

15 Photography Exercises to Boost Your Creativity

I just loved the pop of color from my husband’s red jacket as he walked along the lakeshore with the Olympic mountains in the background.

#13 – Monochromatic

This is the exact opposite of #12 where your challenge is to look for and shoot a black and white image. You can either convert the image to B&W in post-processing or change the setting on your camera (depending on the make and model) to shoot monochromatic in-camera.

googletag.cmd.push(function() {var gpt_slot = googletag.defineSlot( “/1005424/_dPSv5in-post-mobile(300×250)”, [300, 250], “pb-ruleset-mobile-ad-2” ).addService( googletag.pubads() );ruleset_mobile_slots.push( gpt_slot );});

googletag.cmd.push(function() {var gpt_slot = googletag.defineSlot( “/1005424/_dPSv5in-post-mobile(300×250)”, [300, 250], “pb-ruleset-desktop-ad-6” ).addService( googletag.pubads() );ruleset_desktop_slots.push( gpt_slot );});

The key here is to look for patterns and compositions that work well in black and white. A point to note is that processing is very subjective, as is black and white imagery. There are no right or wrong images, but here are a few articles to help you take great monochrome images.

  • How to Create Good Black and White Portraits
  • 6 Tips to Help You Make Better Black and White Landscape Photos
  • Avoid These 5 Common Mistakes in Black and White Photography
  • A Guide to Black and White Conversion in Photoshop
  • A Guide to Black and White Conversion in Lightroom
  • Improve Your Middle of the Day Photos By Doing Black and White

15 Photography Exercises to Boost Your Creativity

15 Photography Exercises to Boost Your Creativity

#14 – Pattern play

Take the time to look around and see if you are able to find any natural patterns around you. These can be either man-made or natural. Facades of buildings, windows, parking lots, and landscapes all provide many opportunities to capture repeating patterns. Capture them in an interesting way to highlight those patterns.

15 Photography Exercises to Boost Your Creativity

#15 – Shadow play

Shadow play is most prevalent in situations when the sun is high in the sky creating harsh shadows on the ground, on buildings and directly unto the subject. But magic with light also happens indoors. Learn to embrace this high contrast between shadow and sun and try to capture some creative angles.

Dramatic light Images Shadow play - 15 Photography Exercises to Boost Your Creativity

Conclusion

I hope these exercises have proven to you that there isn’t any lack of creativity prompts in and around you. You just have to look for them anytime you feel stuck or find yourself creating the same or similar images again and again. Keep these prompts in the back of your mind, use them, combine them, mix them up – the possibilities are endless!

googletag.cmd.push(function() {var gpt_slot = googletag.defineSlot( “/1005424/_dPSv5in-post-mobile(300×250)”, [300, 250], “pb-ruleset-mobile-ad-3” ).addService( googletag.pubads() );ruleset_mobile_slots.push( gpt_slot );});

googletag.cmd.push(function() {var gpt_slot = googletag.defineSlot( “/1005424/_dPSv5in-post-mobile(300×250)”, [300, 250], “pb-ruleset-desktop-ad-7” ).addService( googletag.pubads() );ruleset_desktop_slots.push( gpt_slot );});

The post 15 Photography Ideas to Boost Your Creativity by Karthika Gupta appeared first on Digital Photography School.


Digital Photography School

 
Comments Off on 15 Photography Ideas to Boost Your Creativity

Posted in Photography


Real 3D images of Mars make up this video of a simulated flight over the red planet

21 Mar

It took photographer and self-proclaimed space enthusiast Jan Fröjdman three months to produce a video turning NASA anaglyph images of Mars into a simulated flight over the planet. NASA’s high-resolution imagery offers depth information and comes from HiRISE, a camera on board the Mars Reconnaissance Orbiter. 

Fröjdman converted the still images into panning video clips using reference points – 33,000 of them – and color-graded the images. He describes it as an effort to visualize the planet in his own way, rather than as a strictly scientific endeavor. It’s certainly a mesmerizing way to spend 4 minutes.

Articles: Digital Photography Review (dpreview.com)

 
Comments Off on Real 3D images of Mars make up this video of a simulated flight over the red planet

Posted in Uncategorized


3 Ways to Get Honest Feedback on Your Work

21 Mar

Learning to evaluate your own work and getting good honest feedback is critical to improving as a photographer. Others will see things you don’t see. It will give you tips to help you improve. And it is peculiar to your work (not just general tips for everyone).

3 Ways to Get Honest Feedback on Your Work

The problem is that getting honest feedback on your work has always been difficult. Your choices boil down to:

  • Bothering friends and family in the hopes that they would risk hurting your feelings to give you honest feedback.
  • Hoping someone will chime in with actual constructive criticism on a picture you post online.
  • Paying a lot of money to attend a photography conference and have your work reviewed by an expert.

None of these is ideal. The first two don’t work, and the third is a rather large, expensive (not to mention scary) undertaking.

So what do you do? Fortunately, the world is changing in this area. There are additional tools to help you get feedback and also to help you objectively judge your own work as well. In this article, you’ll be introduced to a few of my favorites.

googletag.cmd.push(function() {var gpt_slot = googletag.defineSlot( “/1005424/_dPSv5in-post-mobile(300×250)”, [300, 250], “pb-ruleset-mobile-ad-0” ).addService( googletag.pubads() );ruleset_mobile_slots.push( gpt_slot );});

googletag.cmd.push(function() {var gpt_slot = googletag.defineSlot( “/1005424/_dPSv5in-post-mobile(300×250)”, [300, 250], “pb-ruleset-desktop-ad-4” ).addService( googletag.pubads() );ruleset_desktop_slots.push( gpt_slot );});

#1 – 500 px

You may already be familiar with 500px. You upload your pictures to the site and it provides you with a score for your photograph based on the number of likes and comments it receives from others. An obvious way to get feedback is through the score. Higher scores generally mean better pictures and you can judge your picture by the score it receives.

3 Ways to Get Honest Feedback on Your Work

500px.com

That said, the scoring of 500px can be somewhat unreliable. Sometimes you will upload pictures that you know are better than the score they get (but be careful about that, as sometimes we delude ourselves into thinking our photos are better than they are). Other times you will see pictures with really high scores that aren’t as good as their scores warrant. There are a lot of factors that might determine the number of people that are liking your photo at any particular time.

The score isn’t the only way that 500px helps you evaluate your own work, though. When you upload your picture to the site, you will see it in pools of pictures that 500px creates. All new pictures go into the Fresh pool of pictures, then if your photo reaches a score of 70 it goes into an Upcoming pool, and pictures that score over 80 are deemed Popular. When you look at your photo within these pools, you will see it surrounded by its peers.  You are essentially forced to compare your photo to the surrounding ones. Sometimes you will like what you see, sometimes you won’t.

3 Ways to Get Honest Feedback on Your Work

The Popular pool of photos on 500px.

Then, when you are ready for a little dose of humility, you can compare your photo to the most popular photos on the front page. These photos are almost always incredible shots. Be warned, this will bruise your ego. Once you get past that, you can look at what these photographers are doing to get those great shots. That will help show you things you could be doing.

#2 – Photographers via phone or Skype

Having your photos reviewed by an expert has always been an option, but it has historically been expensive. Usually, it involves going to a photography conference, where you are given the opportunity to sit face-to-face with someone reviewing your work. These opportunities are invaluable but are also expensive and time-consuming. The conferences usually aren’t cheap and there may be significant travel expenses involved as well.

googletag.cmd.push(function() {var gpt_slot = googletag.defineSlot( “/1005424/_dPSv5in-post-mobile(300×250)”, [300, 250], “pb-ruleset-mobile-ad-1” ).addService( googletag.pubads() );ruleset_mobile_slots.push( gpt_slot );});

googletag.cmd.push(function() {var gpt_slot = googletag.defineSlot( “/1005424/_dPSv5in-post-mobile(300×250)”, [300, 250], “pb-ruleset-desktop-ad-5” ).addService( googletag.pubads() );ruleset_desktop_slots.push( gpt_slot );});

Technology is starting to help change this situation, though. Now, if you poke around online, you can find photographers that will review your work virtually for a fraction of the cost. The occasions I have done this have cost me $ 50 or less.

What you do is upload some pictures to the photographer or service, and they review them. I’ve done it where I had a call with the reviewer, and where the reviewer sent me an audio/video file of them reviewing my work. Obviously, you only have interaction with them the first way, but the reality is that you are mostly doing this for their honest feedback your pictures, and not to ask questions or have them explain things. In any case, you get feedback on your work from an industry expert.

3 Ways to Get Honest Feedback on Your Work

An example of a photo review service.

Some photographers offer this as a service on their websites. Many others don’t, but I suspect they would welcome the opportunity to make a little extra cash if approached. If you have a favorite photographer, you might see if they are interested in reviewing your work for a fee. It will get you great feedback without the cost of traveling to a conference.

#3 – Pixoto

Another way I have seen to get good feedback on your work is a website called Pixoto.

3 Ways to Get Honest Feedback on Your Work

When you post a photo to Pixoto, it goes through a series of Image Duels, which are head-to-head competitions between your photo and another image. You will be asked to vote on Image Duels of photos submitted by others, and they will vote on yours. It is nameless and faceless. As a result of the wins and losses (and even the best photos have plenty of losses), Pixoto generates a score for your photo. It also tells you what percentage of photos yours placed above.

3 Ways to Get Honest Feedback on Your Work

Example of an Image Duel on Pixoto.

googletag.cmd.push(function() {var gpt_slot = googletag.defineSlot( “/1005424/_dPSv5in-post-mobile(300×250)”, [300, 250], “pb-ruleset-mobile-ad-2” ).addService( googletag.pubads() );ruleset_mobile_slots.push( gpt_slot );});

googletag.cmd.push(function() {var gpt_slot = googletag.defineSlot( “/1005424/_dPSv5in-post-mobile(300×250)”, [300, 250], “pb-ruleset-desktop-ad-6” ).addService( googletag.pubads() );ruleset_desktop_slots.push( gpt_slot );});

You won’t always agree with the results Pixoto gives you. Sometimes that will be because the Pixoto score is wrong, but more often it will be because you failed to properly evaluate your own work (which is very hard). In any case, this is another tool in your arsenal, and it is free.

Evaluating your own work

None of these tools is perfect, what’s more, they will sometimes conflict. You might have a photo that gets a really high score on 500px but does dismally on Pixoto. Or you might have a photo that gets lots of social media attention and is loved by a reviewer but goes nowhere on 500px or Pixoto. None of this replaces judgment and there is no accounting for taste. But they can give you good markers to help you critically evaluate your own work.

These tools will occasionally change your mind, and it can work in both directions. There will be photos you absolutely love, but you later realize aren’t as good as you thought after you’ve used these tools. At the same time, there will be photos that you didn’t think much of but that you realize might be a little better than you gave them credit for after seeing the reaction of others to them.

In any event, perhaps the greatest tool these can offer you is helping you learn to better evaluate your own work by yourself. After you have seen others do it, you’ll learn things. You’ll stop repeating mistakes. You’ll learn what is important to others. And you’ll learn to view your photos with a more critical eye.

googletag.cmd.push(function() {var gpt_slot = googletag.defineSlot( “/1005424/_dPSv5in-post-mobile(300×250)”, [300, 250], “pb-ruleset-mobile-ad-3” ).addService( googletag.pubads() );ruleset_mobile_slots.push( gpt_slot );});

googletag.cmd.push(function() {var gpt_slot = googletag.defineSlot( “/1005424/_dPSv5in-post-mobile(300×250)”, [300, 250], “pb-ruleset-desktop-ad-7” ).addService( googletag.pubads() );ruleset_desktop_slots.push( gpt_slot );});

The post 3 Ways to Get Honest Feedback on Your Work by Jim Hamel appeared first on Digital Photography School.


Digital Photography School

 
Comments Off on 3 Ways to Get Honest Feedback on Your Work

Posted in Photography


Just Pull Some Strings: 8 Easy Transforming Furniture Designs for Lazy People

21 Mar

[ By SA Rogers in Design & Furniture & Decor. ]

gesture controlled transforming furniture

When you’re lazy, even the most intuitive transforming furniture isn’t easy enough to operate unless it’s on the same level as clapping your lights on and off. Luckily for those of us who fall into this category, some furniture makers are creating multifunctional designs for small spaces that work their magic at the push of a button, the pull of a string, a flick of the wrist or even a mere gesture.

Retractible Ollie Chair by RockPaperRobot

ollie chair gif

ollie chair flat pack

ollie chair

ollie chair

You really have to watch the video of how this chair works to fully appreciate its brilliant simplicity. It starts as an entirely flat panel of slatted teak wood with a slight curve at the top. Pick it up, pull a string and the whole thing unfurls into a seat in a single fluid motion that’s very satisfying to watch, and it works the same way in reverse. The slats are affixed to a textile canvas to make the seating flexible, and the rest takes folding inspiration from origami.

A-Board Flat-Pack Shelf

a-board

a-board 2

This bookshelf starts as a flat piece of laser-cut plywood. Yang the orange ribbon on the back, and it will pull the shelves down perpendicular to the face so you can rest the whole thing against a wall and use it as a bookshelf. Designer Tomas Schön used a laser-cutting technique to bend the wood instead of hinges, and there’s no other hardware or even glue involved.

MIT Media Lab CityHome

MIT cityhome

MIT cityhome 2

MIT cityhome 3

Still not easy enough for you? How about commanding your bed to slide out with a gesture of your hands? MIT’s robotic ‘home in a box’ can pack a full, spacious-feeling apartment into 200 square feet of space, including a bed, workspace, dining table for dix, storage and a mini kitchen. The box uses built-in sensors, motors, LED lights and low-friction rollers to respond to your voice commands or gestures.

Ori Robotic Home Controlled via Smartphone App

ori robotic home

ori robotic home 2

ori robotic home 3

There are all sorts of complex transforming furniture systems designed to fit maximum function into small spaces, but how many of them are operated through a smartphone app? The Ori system (taking its name from the prefix of ‘origami’) runs on robotic technology, featuring an on-device user interface as well as an app for your handheld device so you can press a button to initiate various configurations, like the bed sliding out, the table folding down or the entire unit moving to tuck itself against a wall to open up the floor area.

Next Page – Click Below to Read More:
Just Pull Some Strings 8 Easy Transforming Furniture Designs For Lazy People

Share on Facebook


[ By SA Rogers in Design & Furniture & Decor. ]

[ WebUrbanist | Archives | Galleries | Privacy | TOS ]


WebUrbanist

 
Comments Off on Just Pull Some Strings: 8 Easy Transforming Furniture Designs for Lazy People

Posted in Creativity


What are the Best Street Photography Camera Settings and Why

21 Mar

Did you ever wonder how the photographers of the past did it? All they had were manual cameras and yet somehow they had a method that beats even the latest technology in autofocus! Wonder what it was? Let’s find out first what it was and discuss what most call the best street photography camera settings.

The best street photography settings

Now, before getting into this, let’s get something straight. If you are doing something in your street photography and it works for you, then by all means, you’ve found the settings that fit you best and you probably want to stick with them. What I am presenting here are the tried and true ways that not only past photographers used, but most street photographers prefer today. But it’s not magic by any means. With that being said, let’s start with focusing on street photography.

What are the Best Street Photography Camera Settings and Why
What’s faster than autofocus?

I know you are probably wondering how something can be faster than the latest autofocus, especially when every new camera wants you to believe they have the fastest AF in the world. The answer is – pre-focusing. What photographers of the past did was to pre-focus their camera onto a certain zone and simply shot, paying attention so that their subjects were within that area.

If you look at the example below, the photographer could either pre-focus on the blue or red area. Then anything or anyone that came within the blue or red area (depending which they chose) would be in focus.

What are the Best Street Photography Camera Settings and Why

Pre-focus zones.

Autofocus also comes with certain issues, because even if you have the fastest autofocus in the world, it can only guess WHERE you want it to focus. When you have people coming at you, it will most likely focus on the person that is closest to you. You could change your focus points, put if you wanted to shoot outside of that point, you would have to focus and recompose. That is not a luxury you often have in the street. Zones eliminate that problem. They are like a forcefield that you have in front of your camera, whoever enters that force field will be in focus. Those fields usually require smaller apertures, hence street photographers usually rely on f/5.6 or f/8.

Setting up your forcefield

In order to set up your own forcefield, you will need to know what kind of shots you want. Do you want to make images of your subjects up close, or further away? That will determine where you need to focus. Let’s say you want to take a few shots with your subject at less than one meter. All you need to do is to put your lens like so:

dof

My aperture is at f/16, so I would put the marking on the left to 0.7, and look at the other marking on the right. That would tell me that everything between 0.7 to 1.2 meters will be in focus. The way aperture works, the further away you are, the larger the depth of field, so putting it at one meter would have had a lot of space in focus.

But, “my lens doesn’t have those marks”, you say! That’s where a tool like DOFmaster comes in:

Say you have a Canon 7D, for example. Select it from the camera dropdown menu and put in the lens focal length (say 35mm). If you focus at one meter, everything from 0.89m to 1.14m will be in focus. But the tool also tells you how to get the greatest zone of all, it tells you what your hyperfocal distance is. So if you focus at 8.09m, everything from 4m to infinity would be in focus at f/8.

Most street photographers I know set it to the hyperfocal distance. But when the light starts dropping, if they want some part of the image not in focus, or if they want their subjects really close, they use smaller zones (and larger apertures) and switch between them.

But what if your camera doesn’t even tell you where you are focused? Then you just need an app for that. You can download EasyMeasure (iOS) or Smartmeasure (Android). Then stand in front of a wall to get your distance to it, go back and forth until you get your desired distance, then focus on the wall and voila your zone is set!

What are the Best Street Photography Camera Settings and Why
The other settings

Once you have your focus and aperture set, what about your other settings? You’ve got a few choices. First of all, you can leave them all on manual (shooting in Manual mode) and adjust them on the fly. Or you can put the shutter speed on automatic (camera in Aperture priority mode) and deal with ISO manually.

A good choice is to keep the shutter speed above 1/125th because stuff usually happens fast on the streets and below that there is risk of camera shake. Of course the same applies for when you are shooting manually too, better to not go below 1/125th, but that might be different for you if you shoot slowly.

The other setting that is left is ISO. You could also put it on auto-ISO, but put a cap on it. I think most modern cameras that are adjustable should be okay with a cap of 1600. But you’ll have to watch out, some cameras don’t have great auto ISO and will go to ISO 1600 in broad daylight.

What are the Best Street Photography Camera Settings and Why
The Semi-automatic Settings

The settings below will help you to focus on the image and only worry about if someone is in your focus zone or not:

  • Set your aperture to f/8
  • Focus at the hyperfocal distance
  • Auto shutter speed, do not go lower than 1/125th
  • Auto-ISO set to not go higher than 1600

One of the strengths of this system is that it accounts for transition time. Imagine you are walking out of a building, from which the inside was darker than outside, which is super sunny.

If you are in manual shooting mode for your ISO and shutter speed, you may have to adjust the exposure by three stops if an image suddenly appears in front of you. While you’re changing the shutter speed you might not have time to change the ISO and may mess up the exposure. However, if at least one of them was auto, this would have been done for you automatically.

What are the Best Street Photography Camera Settings and Why

Conclusion

There you have it, the street photography settings that the photographers of the past used (sans automatic modes of course) and that many street photographers still use today. But what’s most important is to find out what works best for you and your style of shooting. Try these out. They are tried and true, but nobody said you HAVE to use them. Do what works for you! Be yourself, stay focused, and keep on shooting.

The post What are the Best Street Photography Camera Settings and Why by Olivier Duong appeared first on Digital Photography School.


Digital Photography School

 
Comments Off on What are the Best Street Photography Camera Settings and Why

Posted in Photography


Review of the Sigma 85mm f/1.4 Art Lens

20 Mar
Review of the Sigma 85mm f/1.4 Art Lens

Portrait sample using the Sigma 85mm f/1.4 Art lens.

Last summer I had the opportunity to test out the Sigma 20mm f/1.4 Art lens and review it for dPS. I absolutely loved the lens, so when the opportunity arose to try Sigma’s 85mm f/1.4 Art lens, I jumped at the chance.

I continue to be excited by Sigma’s lineup of Art lenses, as they offer incredible image quality for a great price. Several of my photographer friends were singing this lens’s praises since it began shipping, so I was eager to see if it lived up to its reputation.

Review of the Sigma 85mm f/1.4 Art Lens

The Sigma 85mm F1.4 DG HSM A

First Impressions of the Sigma 85mm f/1.4 Art Lens

As a Nikon shooter, I tested the Sigma 85mm f/1.4 Art lens in a Nikon mount. The first thing I noticed about this lens is that it is an absolute beast. The lens is 3.7 inches wide by 5 inches long (94.7mm x 126.2mm), and weighs in at a whopping two and a half pounds (1113 g / 39.3 oz.)!  Compare this to Canon’s 85mm f/1.2L II lens, which weighs in at four ounces lighter and is more than an inch and a half shorter. The filter thread is 86mm, compared to 72mm for the Canon one. For another comparison, Nikon’s 85mm f/1.4G is also more than an inch and a half shorter and 2/10 of an inch slimmer, weighs more than a pound less than the Sigma at 595 g / 21oz.), and accepts a 77mm filter.

Specs

The Sigma 85mm f/1.4 Art lens consists of 14 elements in 12 groups, featuring two low dispersion SLD elements and an aspherical element to help reduce chromatic aberration. The construction of the lens feels as solid as other Sigma Art lenses I’ve used. The metal barrel has a nice finished look, the switches and focusing ring have a high quality feel to them and they are easily located when looking through the viewfinder. The ribbed rubber focusing ring takes up a large portion of the lens barrel and provides a long, smooth throw, perfect for manually focusing if you desire.

There is rubber sealing around the lens mount to protect against dust and moisture, as well as oil repellent coatings on the front and rear elements. Sigma also states that the lens’s hypersonic motor (HSM) has 1.3x more torque than its predecessor, allowing the lens to focus faster. Minimum focus distance is 33.3 inches, similar to competitors’ lenses.

Review of the Sigma 85mm f/1.4 Art Lens

The Sigma 85mm F1.4 DG HSM A

Fast glass

The fast maximum aperture of the Sigma 85mm f/1.4 Art makes this lens a workhorse for many applications. At f/1.4, you’re getting a lot of light through the lens and onto the imaging sensor, making it ideal for low light situations. In addition, that fast aperture allows for use of lower ISOs, helping to minimize noise. Finally, working at wider apertures such as f/1.4 mean you can force your viewer to look exactly where you want by creating images with extremely shallow depth of field.

Accessories

The lens ships with a high quality padded soft case, ideal for transporting the lens. Sigma also provides a sizable plastic hood, ideal for helping to eliminate lens flare off the sizable front element. The hood locks into place securely and offers good protection from impact as well.

The Sigma 85mm f/1.4 Art lens is compatible with Sigma’s USB dock, which helps facilitate the updating of firmware, lens calibration, or other customizations such as focus parameters. Unfortunately, I was not provided with the USB dock for this review. My first time shooting with the lens I found it to front focus quite a bit. This was corrected by using my Nikon D810’s AF Fine Tune feature, but in my 25 years in photography, that’s a feature I’ve never had to use before, so I was a little put off by the need to do so.

In Practical Use

Once the AF issues were corrected, the lens was awesome to use. The autofocus was fast and quiet and the lens was tack sharp. The beauty of a portrait lens at f/1.4 is the ability to blur the background way out of focus and have the sharp areas of the image really jump out at you. This made the initial front-focusing issues all the more of a problem because when you photograph using such shallow depth of field if you miss your focus, you really miss it! It’s imperative that you’re precise and that the lens can be counted on to focus where you tell it to.  See this article I wrote: Fast Glass: Tips for Working With Wide Aperture Lenses for more that.

The Sigma 85mm f/1.4 Art is an excellent portrait lens. The bokeh is buttery smooth and the contrast and sharpness make for a beautiful look to the image straight out of the camera. Repeatability of focus was a bit of an issue at times, and I occasionally had to refocus the lens when taking multiple shots at the same distance.  While for me it wasn’t a major problem, it’s worth noting when you may need to work under greater pressure than what I was facing in my test shoots.

Portrait sample with the Sigma 85mm f/1.4 art lens.

Portrait sample with the Sigma 85mm F1.4 Art lens.

Other applications

The lens does exhibit some focus breathing when changing focus from one distance to another. Focus breathing is where objects in the image become more or less magnified as the focus is changed. This won’t be a major problem for still shooters unless you are focus stacking, but for video shooters, this may be a slight cause for concern, especially when doing drastic focus pulls.

While I did not have a chance to use the lens under these circumstances, I was struck by how quickly the lens focused and thought it would have made an excellent lens for photographing sports such as basketball, back in my sports photography days. In addition, the excellent image quality and wide aperture mean the lens can be used in many other situations. Those include; landscape photography, when either a moderate telephoto focal length is needed, or when photographing a flower, tree, or another object when you want a shallow depth of field to blur the background or foreground.

Wildlife Example Using Sigma 85mm f/1.4 Art

Wildlife example shot with the Sigma 85mm f/1.4 Art lens. Photo courtesy Dennis Clark / dennisaclark.com

Pros

When properly calibrated, the lens is tack sharp and provides stellar image quality. Build quality is outstanding, and the lens felt good in my hands. The autofocus was fast and smooth, as well as quiet. Image quality was outstanding.

Price-wise, the Sigma 85mm f/1.4 Art lens is a bargain, comparatively speaking. The Nikon 85mm f/1.4G retails for $ 1599, while Canon’s 85mm f/1.2L lists for $ 1899 (at the time of writing this review). At $ 1199, the Sigma provides outstanding image quality at quite a bit less than its competitors. The lens is available in Nikon, Canon, or Sigma mounts.

Portrait sample using the Sigma 85mm f/1.4 Art lens

Portrait sample using the Sigma 85mm f/1.4 Art lens.

Cons

This lens is heavy. Combined with a pro body, you could be lifting almost 6 pounds every time you take a shot. For wedding and portrait photographers who might want to use this lens a good portion of their workday, that means a lot of heavy lifting and arm fatigue after a while.

Also, there is no image stabilization on the Sigma 85mm f/1.4 Art. While neither Nikon nor Canon offers image stabilization on their fast 85mm offerings, it should be noted that Tamron’s SP 85mm f/1.8 lens, while a stop slower, does have that feature. That allows the lens to be handheld at shutter speeds slower than could be achieved with the Sigma at 85mm f/1.4.


Summary

The Sigma 85mm f/1.4 Art lens is an outstanding value that provides incredible image quality at a good price. While I would prefer it to be a bit small and lighter, there’s no denying that the bottom line for image makers is image quality and the Sigma delivers that. Four stars.

Review of the Sigma 85mm f/1.4 Art Lens

Portrait example using the Sigma 85mm f/1.4 Art


Review of the Sigma 85mm f/1.4 Art Lens

Another portrait example using the Sigma 85mm f/1.4 Art

Review of the Sigma 85mm f/1.4 Art Lens

Portrait example using the Sigma 85mm f/1.4 Art lens.

Review of the Sigma 85mm f/1.4 Art Lens

Nature example using the Sigma 85mm f/1.4 Art. Photo courtesy Dennis Clark / dennisaclark.com

The post Review of the Sigma 85mm f/1.4 Art Lens by Rick Berk appeared first on Digital Photography School.


Digital Photography School

 
Comments Off on Review of the Sigma 85mm f/1.4 Art Lens

Posted in Photography


The home of the L-series: We tour Canon’s Utsunomiya factory

20 Mar

The home of the L-series: Inside Canon’s Utsunomiya lens factory

Recently, following the CP+ 2017 show in Yokohama, we were granted the enormous honor of a guided tour through Canon’s Utsunomiya lens factory. Canon has been making lenses in Utsunomiya since 1977, and we were the first journalists ever to be allowed to see the L-series assembly line.

Utunsomiya (indicated with the dropped pin) is the capital and largest city of Tochigi Prefecture, in the northern Kant? region of Japan – about 80 miles north of Tokyo.

On February 27th, we made our way from Yokohama to Utsunomiya in the company of several representatives from Canon Inc., and our friends Dave Etchells and William Brawley from Imaging Resource. Click through this slideshow to see what we found.

The home of the L-series: Inside Canon’s Utsunomiya lens factory

Plant Manager Kenichi Izuki introduces his team. Of the six ‘Master Craftsmen’ within Canon, two of them work at the Utsunomiya plant. 

The home of the L-series: Inside Canon’s Utsunomiya lens factory

Mr Izuki explains what the Utsunomiya plant does. As you can see, several different families of products are manufactured in Utsunomiya, from high-end broadcast and EF lenses to components for office equipment.

The 2-story plant itself employs around 1,700 people and covers an area of almost 80,000 square meters (roughly 20 acres). 

The home of the L-series: Inside Canon’s Utsunomiya lens factory

Painted yellow lines snake through the corridors of the Utsunomiya factory. These are ‘read’ by robotic carts that carry components to various parts of the plant on pre-programmed routes.

The home of the L-series: Inside Canon’s Utsunomiya lens factory

Why, here’s one of them now!

The home of the L-series: Inside Canon’s Utsunomiya lens factory

One of the two ‘Master Craftsmen’ at the Utsunomiya factory, Mr Saito explains the incredibly fine tolerances involved in the creation of 4/8K broadcast lenses. Canon claims a tolerance of +/-30 nanometers. As such, if one of the finished elements were scaled up to the size of an Olympic stadium, the surface variation would be no thicker than a plastic grocery bag. 

Yes, you read that correctly.

The home of the L-series: Inside Canon’s Utsunomiya lens factory

To make these lenses, first you must make the tools which shape them. In the foreground, on the left you’ll see a steel ‘prototype standard’. Every element in a broadcast lens was born here, from a prototype standard – effectively a ‘master’, rather like a shoemaker’s last, from which the element takes it essential shape. Canon stores thousands of them.

The home of the L-series: Inside Canon’s Utsunomiya lens factory

On the left is the diamond plate, which takes its shape precisely from the prototype standard. This is used to make the lens polishing tool. Each grey disk on the plate is a diamond grindstone. On the right is the polishing tool itself, with its array of polyurethane pads, which is used to polish a single side of each glass element.

Each surface of every element takes roughly 90 minutes to polish, and this is done by hand.

The home of the L-series: Inside Canon’s Utsunomiya lens factory

The grinding and polishing process of broadcast lens elements explained. 

The home of the L-series: Inside Canon’s Utsunomiya lens factory

A replica prototype standard, with a measurement tool on the right. The tool is incredibly accurate, and is used to check for surface inaccuracies. Even a divergence of 0.1 microns (1/10,000th of a millimeter) from design parameters would be considered unacceptable.

The home of the L-series: Inside Canon’s Utsunomiya lens factory

Mr Saito demonstrates how a diamond plate is shaped by hand, using a large (and very heavy) carborundum disk. 

The home of the L-series: Inside Canon’s Utsunomiya lens factory

With decades’ of experience, Master Craftsmen (or ‘Takumi’) can tell when to apply more or less pressure by feel alone. Some processes, like this one, are considered so critical that they must be performed by hand.

It typically takes between 25-30 years before a lens polishing technician attains the status of ‘Meister’, and their experience is essential to the production line. 

The home of the L-series: Inside Canon’s Utsunomiya lens factory

Here, an element is being smoothed. Afterwards it will be centered, and then polished. Every day, the manufacturing process uses 400 tonnes of water, which is purified and re-used continually in a ‘closed loop’ system.

The home of the L-series: Inside Canon’s Utsunomiya lens factory

Not everything is done by hand. When it comes to EF lenses, Canon is expanding its automated manufacturing capabilities. We were extremely privileged to be shown this lens element polishing machine, which processes glass elements from a raw ‘cake’ of glass right through to final polishing, without any human intervention. 

During our tour, this particular machine was processing elements for the new Canon EF 16-35mm F2.8L III USM. From a raw cake of unpolished glass to a finished element the process of grinding, polishing and centering takes about 30 minutes. If this were done in the traditional (non-automated) manner it would take about 3 days per element. 

The home of the L-series: Inside Canon’s Utsunomiya lens factory

Here’s a single element from the Canon EF 16-35mm F2.8L III USM at the beginning of its life, as a cake of raw glass. This is what gets fed into the polishing machine. A finished element emerges from the machine every two minutes, and we’re told that all of the non-aspherical elements in the new Canon EF 16-35mm F2.8L III USM are processed in this way. 

Aspherical elements are produced using a separate high-precision molding process, which happens elsewhere in the facility, behind closed doors. 

The home of the L-series: Inside Canon’s Utsunomiya lens factory

Canon is at pains to point out that machines like this can only be created as a result of the Master Craftsmen’s decades of experience. The machines themselves are made in-house too, by Canon’s Production Engineering Headquarters. 

Although there has been a factory on this site since 1977, Canon opened the current building in 2005. According to Masato Okada, Deputy Chief Executive of Image Communication Products Operations, this move provided an opportunity for Canon to completely revamp its lens production methodology.

The home of the L-series: Inside Canon’s Utsunomiya lens factory

After watching elements being polished, the next stage of the tour is lens assembly. Before we set foot in this area of the facility, we need to don coveralls and take a cool, refreshing ‘air shower’ to make sure we don’t accidentally contaminate the production line. Here’s Barney, trying not to brush against the (sticky) walls of the decontamination room. 

The home of the L-series: Inside Canon’s Utsunomiya lens factory

This area of the factory is where Canon’s high-end L-series lenses are assembled. Like the broadcast lenses, much of the assembly process for fast prime telephotos is still done by hand. 

The home of the L-series: Inside Canon’s Utsunomiya lens factory

Here, a Canon assembly line Meister (her badge tells us she’s been a Meister for 17 years) works on the front assembly of a telephoto prime lens. 

The home of the L-series: Inside Canon’s Utsunomiya lens factory

A finished EF 300mm f/2.8L IS II USM is checked by computer before its final housing is put on.

The home of the L-series: Inside Canon’s Utsunomiya lens factory

‘OK’ – this one passed! You can read up on Zernicke Polynomials here, if you like that sort of thing.

The home of the L-series: Inside Canon’s Utsunomiya lens factory

This finished lens is being checked on a computerized test rig, which measures the lens’s optical characteristics in three positions, across 48 points of a proprietary test chart (which we’re not allowed to show, sorry). The camera is a modified EOS 5D Mark III. We don’t know exactly how it’s been modified, but our guide mentioned some firmware and hardware differences compared to a stock model. 

Interestingly, information about the lens’s optical characteristics is saved to a chip inside the lens itself. This data can be read and updated by Canon if and when the lens comes back for service. This allows information to be gathered about the durability of certain components over time and allows Canon to learn about long-term wear patterns.

The home of the L-series: Inside Canon’s Utsunomiya lens factory

Although rarely-used now, some lenses are still occasionally tested partly by using the traditional ‘projection’ method. Here, in a darkened room off to one side of the assembly line a technician (just visible in the background, under the image of the chart) is inspecting the image projected through a telephoto prime lens.

The home of the L-series: Inside Canon’s Utsunomiya lens factory

Increasingly, Canon uses automated assembly processes for its L-series zooms, which have a comparably higher sales volume than telephoto primes and broadcast lenses.

Again, the new EF 16-35mm F2.8L III USM is at the forefront of developments in automation. Roughly 50% of the assembly process of this lens is automated and Canon tells us that, they’re aiming for 80% automation within a year.

The home of the L-series: Inside Canon’s Utsunomiya lens factory

Because the non-aspherical elements in the EF 16-35mm F2.8L III USM are polished automatically, and 50% of the assembly process is done by machines, the amount of people involved in the manufacture of the new EF 16-35mm F2.8L III USM is relatively small. Roughly 10% of the manpower required if it were manufactured entirely by hand, we’re told.

The home of the L-series: Inside Canon’s Utsunomiya lens factory

Here, the view from a tiny camera inside the assembly machine shows a technician what’s happening. A EF 16-35mm F2.8L III USM’s focus positioning brush switch is being installed – a highly delicate procedure which requires extremely precise positioning.

The home of the L-series: Inside Canon’s Utsunomiya lens factory

Here’s another one of those modified EOS 5D Mark III lens checking cameras, this time hooked up to a finished EF 16-35mm F2.8L III USM.

The home of the L-series: Inside Canon’s Utsunomiya lens factory

It passed! We get the impression that very few lenses don’t. From start to finish, it takes roughly 24 (non-continuous) hours to manufacture each 16-35mm.


Editors’ note:

It’s impossible to come away from Canon’s Utsunomiya plant without an appreciation for the vast amount of expertise employed by Canon in the manufacturing of its high-end lenses. One striking aspect of the assembly process of broadcast lenses is how many steps are deemed so critical that they must be accomplished by hand. In the broadcast lenses assembly line we were told repeatedly that ‘this process is too complex to be performed by a machine’.

One of the reasons that Canon’s broadcast lenses are so costly is that as we saw, each element is hand-polished – often by someone with a minimum of 30 years’ experience. Internally, assembling one of Canon’s high-end broadcast lenses is considered among the most difficult jobs in its entire production line.

Manufacturing high-volume EF lenses in this way would be impractical (the wait-times for new models would likely stretch into decades…) but even so, when it comes to fast telephoto primes, much of the process is still performed by hand.

‘anyone that fetishizes the words ‘made by hand’ should try shooting with the EF 16-35mm F2.8L III sometime.’

Perhaps most impressive though is the automation. Canon has clearly invested a lot of time and energy (not to mention money) in automated lens polishing and assembly. We’ve been lucky enough to visit several factories, run by several manufacturers, and Canon’s Utsunomiya plant is definitely the most advanced that we’ve seen. Automation of critical lens polishing and assembly processes makes perfect sense for mass-produced products, and anyone that still blindly fetishizes the words ‘made by hand’ should try shooting with the EF 16-35mm F2.8L III sometime.

Canon’s self-calibrating lens polishing machines (designed and manufactured in-house) are capable of incredible precision, and the data gathered by automated testing and eventual servicing can be used in any number of different ways, to improve quality control over time.

After watching the entire assembly process from lens element polishing to final QC checks, we’re most excited by the possibilities which emerge from Canon’s inclusion of a chip inside each recent lens, which saves data about its own specific optical characteristics.

‘This could allow for… a bespoke ‘lens profile’ to be applied automatically’

As well as data-gathering and long-term quality control improvement, this also opens up the possibility that at some point a lens’s specific optical characteristics might be made available to the camera to which it is attached. This could allow for automatic AF fine-tuning, or potentially even for a bespoke ‘lens profile’ to be applied automatically to correct for optical characteristics unique to that one lens. This isn’t possible right now, but we’re told that Canon is working on making it a reality.

What did you make of this tour through Canon’s Utsunomiya factory? Let us know in the comments. 

You might also like…

Behind the scenes at Fujifim’s Sendai factory (2016)

A tour of Sigma’s factory in Aizu (2015)

Articles: Digital Photography Review (dpreview.com)

 
Comments Off on The home of the L-series: We tour Canon’s Utsunomiya factory

Posted in Uncategorized


Tamron SP 70-200mm F2.8 Di VC USD G2 sample gallery

20 Mar

Like its predecessor, the Tamron SP 70-200mm F2.8 G2 offers moisture-resistance, and we couldn’t be more grateful. We put the updated telezoom to work in one of the rainiest months in recent Seattle history. With improvements to autofocus as well as image stabilization, it’s a substantial upgrade and, thankfully, a lens that’s not afraid of a few showers.

See our Tamron SP 70-200mm F2.8 Di VC USD G2 sample gallery

$ (document).ready(function() { SampleGalleryStripV2({“galleryId”:”0456329947″}) })

Sample photoSample photoSample photoSample photoSample photo

Articles: Digital Photography Review (dpreview.com)

 
Comments Off on Tamron SP 70-200mm F2.8 Di VC USD G2 sample gallery

Posted in Uncategorized


Why Wireless Tethering Will Improve Your Photography

20 Mar

As a photographer, shooting tethered is one of the best ways to improve your photography skills. Tethering helps you zoom into the details of your shots on a big screen so you can make adjustments as you go. It also encourages collaboration by keeping your photo subject or client engaged if they’re on location with you. In this article, I’ll explain what tethered shooting is and why wireless tethering with an app like CamRanger is the best choice.

What is tethering?

By definition, tethering is when a mobile device shares its internet connection with another device. This can be done through Wi-Fi, Bluetooth, or a physical connection cable (e.g. USB). Many mobile phones can tether to share their Wi-Fi with laptops or tablets. Similarly, cameras can tether as well. But in the case of tethered shooting with a camera, the purpose is to transmit images from the camera directly to another device such as a laptop computer or tablet.

CamRanger Wireless Tethering 11

The cheapest and most efficient way to shoot tethered is to use a wired connection. All you need is a standard USB cable that connects to your camera and tethering software such as Capture One, Adobe Lightroom, or DSLR Controller. Wired tethering is very cheap, and it’s extremely quick. There’s practically no delay between pressing the shutter on your camera and seeing the resulting image pop up on your screen. Get more info and a detailed step-by-step guide to wired tethering here.

What is wireless tethering?

However, the main disadvantage with wired tethering is the cable. It can easily get unplugged from your camera or laptop and mess up the tethered connection. The cable can also be a hazard on set, causing you or your photo subject to trip over it. This is where wireless tethering can come in handy. If you shoot on location and can’t be bothered with a cable limiting your movement, wireless tethering is an option you may want to explore.

When you tether wirelessly, you plug a device such as CamRanger into your camera and use it to create a wireless network. Any device such as a laptop or tablet can join that wireless network and your images are transmitted wirelessly every time you press the shutter button. You can even remotely control the camera from your tethered computer or tablet.

CamRanger Wireless Tethering 10

Why CamRanger is the Best Wireless Tethering Device

There are several wireless tethering devices available, and I tried many of them out in search of the one that would work best. My devices requiring connectivity included a Canon 5D Mark III, Canon 6D cameras, Android smartphone, and Apple laptop computer. Although it’s the most expensive, CamRanger is my wireless tethering device of choice. Here’s why:

1. Minimal stuff in the box

The contents in the CamRanger box are very minimal, consisting of just a few cables, a case, simple instructions, and the unit itself. I really loved the zippered case with a carabiner that easily fit all of the items. One thing that would be nice to have is the CamRanger hot shoe mounting device, which has to be purchased separately.

CamRanger Wireless Tethering

2. Intuitive setup

After unboxing CamRanger, setup is pretty simple. Begin by downloading the CamRanger app to your tethering device of choice. Currently, you can download the CamRanger app for iOS (iPhone and iPad), Android devices, Kindle Fire, and both Mac and Windows computers.

Next, switch on the CamRanger device so that it broadcasts a Wi-Fi signal. This might take a minute or two. Then connect your tethering device, with the app installed, to the CamRanger Wi-Fi network using the CamRanger’s serial number as the Wi-Fi password. Boom! You’re ready to shoot!

CamRanger Wireless Tethering 01

CamRanger desktop app allows for wireless tethering and remote camera control.

3. Compatible with Canon and Nikon

CamRanger will work with both Canon and Nikon DSLRs. For a full list of compatible cameras, check out their website.

How CamRanger actually works

Whenever you shoot tethered with CamRanger, the device stores image previews in a cache on your device. The actual files are still written to your camera’s CF or SD memory card like usual. While the wireless transfer of images can definitely be slow, this process can be sped up if you change your camera preferences to shoot in JPG only, or RAW + JPG. Transferring JPG images goes much faster than RAW images.

Another huge benefit of CamRanger is the option to switch the app into Client Mode. This allows you to hand your tethered device over to your client to preview images created in real time, without allowing them to remotely control your camera so you can keep shooting. It’s a clever feature that really adds value.

CamRanger Wireless Tethering 11

In practice, there are a few limitations of CamRanger to be aware of. First, note that wireless tethering still has a limited range of about 100-150 feet. If your camera and connected device drift outside of this range, you risk losing connectivity. Second, CamRanger does have a decent battery life of 5-6 hours by itself, but using it in conjunction with Live View on your camera can drain your camera batteries quickly.

CamRanger Positive Features

  • Very easy to setup and start using immediately
  • Built-in features include focus stacking, bracketing, and intervalometer
  • Minimal pieces, so it is easy to travel with
  • Lets clients easily see my images and give feedback
  • Reduces time in post-processing by making real-time adjustments when shooting
  • Eliminates the long, hazardous USB cable needed for wired tethering


What about built-in Wi-Fi?

If you have a camera with built-in Wi-Fi, you can probably remote control your camera and perform some tethering functions. As an example, I have the Canon 6D DSLR which has Wi-Fi connectivity. This is great for wirelessly transmitting images to my mobile phone and for doing some remote camera control via the Canon Camera Connect mobile phone app. However, no such app exists for my laptop, so I cannot wirelessly connect to my computer without using another device and USB cable. This is why I still use CamRanger to shoot tethered from my laptop, even with my Wi-Fi enabled camera.

CamRanger Alternatives

There are a couple of other popular CamRanger alternatives that also permit you to do wirelessly tethering. I tried both of these options out and found they weren’t nearly as comprehensive or reliable as CamRanger.

  • CamFi
  • Tether Tools Case Air

In Conclusion

Do you shoot tethered? What do you think about the pros and cons of wireless tethered shooting? Let me know in the comments below!

The post Why Wireless Tethering Will Improve Your Photography by Suzi Pratt appeared first on Digital Photography School.


Digital Photography School

 
Comments Off on Why Wireless Tethering Will Improve Your Photography

Posted in Photography


Fruitless: 10 Closed & Abandoned Apple Stores

20 Mar

[ By Steve in Abandoned Places & Architecture. ]

abandoned-apple-store-1a

Apple Stores and Apple authorized resellers are about as sure a thing as can be in business but even these b&m goldmines close shop and are left abandoned.

abandoned-apple-store-1d

There weren’t any official Apple Stores before May 19th of 2001, only authorized Apple resellers ranging from Mom & Pop computer shops to big box retailers like Best Buy and Circuit City. The sign above hales from the 1980s (the “rainbow” Apple logo was used from 1977 to 1998) and towers over the Roberts Court strip mall on Barrett Parkway in Kennesaw, Georgia. According to Rebrn.com, the sign advertised Rick’s Educational Products and although that store moved many years ago, the sign lingered on for decades. The images above date from April 8th of 2011 and April 10th of 2011 respectively.

abandoned-apple-store-1b

abandoned-apple-store-1c

Later that month, something – most likely a weather-related event – twisted the top of the sign 180-degrees and shattered the plastic on both sides. A Reddit user who lives nearby fortuitously picked up some of the pieces as seen above. Not sure what his plans for them are but we hear pretty much anything sells on eBay these days.

Dublin Down

abandoned-apple-store-2a

abandoned-apple-store-2b

The number of Mac authorized resellers dropped by almost half between 1997 and 2000. Around that time Tim Cook, Apple’s Senior Vice President for Worldwide Operations since 1998, announced the company would “cut some channel partners that may not be providing the buying experience (Apple expects). We’re not happy with everybody.” Perhaps the late and lamented Apple Centre on Kildare Street in Dublin, Ireland was one such partner that aroused Cook’s ire – no pun intended. Flickr user Fintan Palmer (fintanp) snapped the shuttered shop in October of 2008; fellow Flickrer twrbl noted no change in its abandoned status five months later.

Simply Closed

abandoned-apple-store-3a

abandoned-apple-store-3b

Simply Mac may have referred to itself as “the greatest Apple partner in North America” but according to a January 2017 announcement by the West Acres mall in Fargo, North Dakota, “Apple Corporation (is) ending its national agreement with Simply Mac to sell them Apple product, making it impossible for them to continue.” The Fargo store and the other depicted store in Billings, Montana are not the only Simply Mac stores closing and no doubt the signage pictured above will be coming down sooner than later.

Next Page – Click Below to Read More:
Fruitless 10 Closed Abandoned Apple Stores

Share on Facebook


[ By Steve in Abandoned Places & Architecture. ]

[ WebUrbanist | Archives | Galleries | Privacy | TOS ]


WebUrbanist

 
Comments Off on Fruitless: 10 Closed & Abandoned Apple Stores

Posted in Creativity