RSS
 

Archive for March, 2017

Oberwerth launches Donau line of leather lens pouches

21 Mar

German manufacturer Oberwerth, best known for its high-end leather camera accessories and bags, has launched its new Donau line of leather lens pouches. Like other Oberwerth products, the pouches are handmade in Germany from soft cowhide leather. A surface finish provides stain protection and should preserve the natural material’s shine for a long time to come. In the interior the pouches are lined with non-pilling wool felt to keep your valuable glass scratch-free. 

The Donau pouches come in sizes S, M, L and XL to accommodate lenses of various dimensions but at a width of 9.5 cm/3.74 in and a diameter of 9 cm/3.54 in even the biggest XL version seems more suitable for a large prime rather than fast tele-zooms lenses. The pouches are available now, starting at $ 150/€139 for the small size. The XL variant will set you back $ 214/€199. More information is available on the Oberwerth website.  

Articles: Digital Photography Review (dpreview.com)

 
Comments Off on Oberwerth launches Donau line of leather lens pouches

Posted in Uncategorized


Fujifilm X-T20 Review

21 Mar

The Fujifilm X-T20 is a midrange DSLR-style mirrorless camera that sits above the X-E2S and below the X-T2. The X-T20 replaces the X-T10 and offers a host of new features, including Fujifilm’s latest 24MP CMOS sensor and image processor, faster burst shooting, any improved autofocus system, 4K video capture and more. In many ways, it’s a smaller, less expensive ‘little brother’ to the X-T2, a camera that earned a Gold Award when we reviewed it last year.

The X-T20 finds itself in a competitive field of both ‘mirrored’ (DSLR) and mirrorless cameras. Buyers are likely to find themselves deciding between midrange DSLRs like the Nikon D5600 and Canon EOS 77D, as well as mirrorless models such as the Sony a6300, Panasonic GX850 and the Olympus E-M5 II.

Fujifilm X-T20 Key Features:

  • 24MP X-Trans CMOS III sensor
  • Up to 325 selectable AF points (169 of which offer phase detection)
  • 2.36M-dot OLED electronic viewfinder
  • 3″ 1.04M-dot tilting touchscreen LCD
  • 4K UHD video at up to 30 fps, with clean output over HDMI
  • 8 fps continuous shooting with AF, 5 fps with live view
  • 2.5mm jack for external microphone or wired remote control
  • Dials for exposure compensation, shutter speed and drive mode

The X-T20 is more about the overall package than one or two specs that standout. That said, the 24MP sensor has proven its worth on the X-Pro2 and X-T2, and the AF system has also been refined in a good way. The EVF is a pleasure to use, though the touch functions on the tilting LCD are limited. The burst rate hasn’t changed since the X-T10, but the buffer size has been dramatically increased. 4K video has also been added, helping to keep the X-T20 at an even level with the best of its peers.

And let’s not forget the design of the camera which has become a trademark of Fujifilm’s X-series models. The classic DSLR-style design isn’t getting old (at least for this reviewer) and the build quality is very good for a $ 900 body.

Compared to…

Below we’ll lay out the similarities and differences between the X-T20 and the Sony a6300 and OIympus E-M5 II mirrorless cameras, along with the Canon EOS 77D DSLR.

  Fujifilm X-T20 Sony a6300 Olympus E-M5 II Canon EOS 77D
MSRP (body) $ 899 $ 899 $ 1099 $ 899
Sensor 24MP APS-C 24MP APS-C 16MP Four Thirds 24MP APS-C
Color filter X-Trans Bayer Bayer Bayer
Lens mount Fujifilm X Sony E Micro Four Thirds Canon EF/EF-S
ISO range
(expanded)
100-51200 100-51200 100-25600 100-51200
Image stabilization Lens-based Lens-based In-body Lens-based
AF system Hybrid1 Hybrid1 Contrast-detect Phase Detect + Dual Pixel AF2
LCD type Tilting Tilting Fully articulating Fully articulating
Touchscreen Yes No Yes Yes
Viewfinder (magnification3) EVF (0.62x) EVF (0.7x) EVF (0.74x) OVF (0.51x)
Max shutter speed
(Electronic)
1/4000 sec (1/32,000) 1/4000 sec 1/8000 sec (1/16,000) 1/4000 sec
Built-in flash Yes Yes No
Clip-on, rotating/ bouncable included
Yes
Flash x-sync 1/180 sec 1/160 sec 1/250 sec 1/200 sec
Burst rate
(with AF)
8 fps 8 fps 5 fps 6 fps
Mic/headphone
jacks
Yes / No Yes / No Yes / No Yes / No
Video UHD 4K @ 30p UHD 4K @ 30p 1080/60p 1080/60p
Wireless Wi-Fi Wi-Fi w/NFC Wi-Fi Wi-Fi w/NFC
Weather-sealed No Yes Yes No
Battery life 350 shots 400 shots 310 shots 600 shots4
Dimensions 118 x 83 x 41mm 120 x 67 x 49mm 124 x 85 x 45mm 131 x 100 x 76mm
Weight 383 g 404 g 469 g 540 g

1. Hybrid denotes contrast and on-sensor phase detection.
2. Dual Pixel AF is a variation of on-sensor phase detection that has left/right-looking diodes on every pixel, rather than masked-out pixels on traditional PDAF systems.
3. 35mm equivalent
4. Live view battery life rated at 270 shots.

Lots to talk about before we really dive further into the X-T20. The X-T20 is remarkably competitive with its peers: sometimes an equal and other times surpassing the other cameras. The only area in which it falls a bit short is with regard to its electronic viewfinder, which is smaller than the other two mirrorless cameras (though it’s larger than what you’ll find on the EOS 77D). It’s not weather-sealed like the a6300 and E-M5 II, so if you want that on a Fujifilm you’ll need to step up to the X-T2, which is nearly double the price. 

Articles: Digital Photography Review (dpreview.com)

 
Comments Off on Fujifilm X-T20 Review

Posted in Uncategorized


Weekly Photography Challenge – Music

21 Mar

Sing, play that funky music, listen and look at these 21 images of all things music.

Weekly Photography Challenge – Music

Think of all the things you can photograph related to music:

  • An individual instrument
  • Musician with this instrument
  • Full band
  • A concert or show in a bar
  • An orchestra or quartette
  • A singer
  • A sheet of music
  • Speakers or a stereo

googletag.cmd.push(function() {var gpt_slot = googletag.defineSlot( “/1005424/_dPSv5in-post-mobile(300×250)”, [300, 250], “pb-ruleset-mobile-ad-0” ).addService( googletag.pubads() );ruleset_mobile_slots.push( gpt_slot );});

googletag.cmd.push(function() {var gpt_slot = googletag.defineSlot( “/1005424/_dPSv5in-post-mobile(300×250)”, [300, 250], “pb-ruleset-desktop-ad-4” ).addService( googletag.pubads() );ruleset_desktop_slots.push( gpt_slot );});

By Freaktography

By Gia Willow Alexa Annermarken

So get out and find something musical to photograph this week for the dPS challenge. Here are some tips to help you get started.

  • 5 Tips for Portraits of Musicians That Will Help You Hit All the Right Notes
  • 10 Must-Have Camera Settings for Concert Photography
  • Concert Photography: Choosing the Best Camera Settings
  • How to Shoot a Sequence of Photos That Capture a Story

googletag.cmd.push(function() {var gpt_slot = googletag.defineSlot( “/1005424/_dPSv5in-post-mobile(300×250)”, [300, 250], “pb-ruleset-mobile-ad-1” ).addService( googletag.pubads() );ruleset_mobile_slots.push( gpt_slot );});

googletag.cmd.push(function() {var gpt_slot = googletag.defineSlot( “/1005424/_dPSv5in-post-mobile(300×250)”, [300, 250], “pb-ruleset-desktop-ad-5” ).addService( googletag.pubads() );ruleset_desktop_slots.push( gpt_slot );});

By Geoffrey Froment

By Ignacio Bernal

By K ~ The Eternal Spirit

By kennysarmy

googletag.cmd.push(function() {var gpt_slot = googletag.defineSlot( “/1005424/_dPSv5in-post-mobile(300×250)”, [300, 250], “pb-ruleset-mobile-ad-2” ).addService( googletag.pubads() );ruleset_mobile_slots.push( gpt_slot );});

googletag.cmd.push(function() {var gpt_slot = googletag.defineSlot( “/1005424/_dPSv5in-post-mobile(300×250)”, [300, 250], “pb-ruleset-desktop-ad-6” ).addService( googletag.pubads() );ruleset_desktop_slots.push( gpt_slot );});

Share your images below:

Simply upload your shot into the comment field (look for the little camera icon in the Disqus comments section) and they’ll get embedded for us all to see or if you’d prefer, upload them to your favorite photo-sharing site and leave the link to them. Show me your best images in this week’s challenge. Sometimes it takes a while for an image to appear so be patient and try not to post the same image twice.

Share in the dPS Facebook Group

You can also share your images on the dPS Facebook group as the challenge is posted there each week as well.

googletag.cmd.push(function() {var gpt_slot = googletag.defineSlot( “/1005424/_dPSv5in-post-mobile(300×250)”, [300, 250], “pb-ruleset-mobile-ad-3” ).addService( googletag.pubads() );ruleset_mobile_slots.push( gpt_slot );});

googletag.cmd.push(function() {var gpt_slot = googletag.defineSlot( “/1005424/_dPSv5in-post-mobile(300×250)”, [300, 250], “pb-ruleset-desktop-ad-7” ).addService( googletag.pubads() );ruleset_desktop_slots.push( gpt_slot );});

The post Weekly Photography Challenge – Music by Darlene Hildebrandt appeared first on Digital Photography School.


Digital Photography School

 
Comments Off on Weekly Photography Challenge – Music

Posted in Photography


£10,000 of Sigma lenses up for grabs in Amateur Photographer of the Year competition

21 Mar

The UK’s Amateur Photographer magazine has launched its 2017 Amateur Photographer of the Year competition and is offering a total of £10,000 worth of Sigma lenses in prizes. 

The competition is run over the course of eight rounds with monthly closing dates from the end of April to the end of November. Each month has a different theme and winners are picked by the Amateur Photographer judging panel and through an online voting system run by Photocrowd. At the end of the year, an overall winner will be selected to win the top prize.

Anyone can enter, but AP points out that entrants who live outside the UK would need to pay any applicable import tax on their winnings.

Monthly prizes will amount to approximately £1000 of Sigma lenses, cameras and flash units each, while the final winner will take away £2000 worth of kit in the shape of Sigma’s 85mm F1.4 DG HSM Art and the 35mm F1.4 DG HSM Art, along with a Sigma USB Dock. Monthly winners of the Photocrowd vote get a year’s subscription to the magazine.

Weekly magazine Amateur Photographer has been running this competition for 26 years, but this is the first time entry has been allowed via an online system. For more information see the Amateur Photographer website and the competition’s Photocrowd page. Entry is free.

Monthly themes:

MARCH
Magical monochrome – Black & White
Sigma 50mm f/1.4 DG HSM | Art (£749.99) + Sigma EF-610 Super Flashgun (£259.99)
Total Prize Value: £1,009.98

APRIL
Hit the streets – Street Photography
SIGMA dp2 Quattro (£899.99) + VF-41 Viewfinder (£199.99)
Total Prize Value: £1,099.98

MAY
Small wonders – Macro
105mm f/2.8 EX DG HSM Macro (£649.99) + SIGMA EM-140 DG Macro Flash (£379.99)
Total Prize Value: £1029.98

JUNE
City clickers- Cityscapes / Architecture
SIGMA sd Quattro + 30mm F1.4 DC HSM Art (£1049.99)
Total Prize Value: £1,049.99

JULY
Into the wild – Wildlife
Sigma 150-600mm f/5-6.3 DG OS HSM | Contemporary (£999.99) + Sigma USB Dock (£39.99)
Total Prize Value: £1,039.98

AUGUST
Creative eye – Abstract Art
SIGMA 24-35mm f/2 DG HSM | Art (£949.99) + SIGMA 82mm WR CERAMIC PROTECTOR (£104.99)
Total Prize Value: £1,054.98

SEPTEMBER
Land lovers – Landscapes
SIGMA dp0 Quattro (£899.99) + VF-51 / Viewfinder (£199.99)
Total Prize Value: £1,099.98

OCTOBER
Face to face – Portraiture
SIGMA 85mm F1.4 DG HSM ART (£1,199.99)
Total Prize Value: £1,199.99

GRAND PRIZE
SIGMA 85mm F1.4 DG HSM Art (£1199.99) + SIGMA 35mm F1.4 DG HSM Art (799.99) + SIGMA USB Dock (£39.99)
Total Prize Value: £2,039.97

Overall Prize Value = £10,624.83

Articles: Digital Photography Review (dpreview.com)

 
Comments Off on £10,000 of Sigma lenses up for grabs in Amateur Photographer of the Year competition

Posted in Uncategorized


Thinking about buying a Fujifilm GFX 50S? Read this first

21 Mar

Fujifilm’s GFX 50S announcement has turned a lot of heads, and for good reason. We love Fujifilm cameras. It’s hard not to – they offer excellent ergonomics with a level of direct control that photographers itch for, and Fujifilm’s color science renders images that harken back to the days of film, while retaining all the advantages of digital. Meanwhile, the X-Trans color filter array (CFA) offers a number of advantages compared to traditional Bayer CFAs, showing decreased false color and a slight noise advantage due to a (relatively) greater proportion of green pixels.

Ultimately, though, the image quality of Fujifilm’s best cameras was limited by their APS-C sized sensors, which simply cannot capture as much light as similar silicon in larger sizes. And if you’ve kept up with our recent technical articles, you’ll know that the amount of total light you’ve captured is arguably the largest determinant of image quality.

‘Fujifilm skipped the arguably saturated full-frame market and went straight to medium format.’

That left many of us wondering when Fujifilm would step up to full-frame (35mm). But Fujifilm went one better – they skipped the arguably saturated full-frame market and went straight to medium format. In a rather compact, lightweight mirrorless form-factor at that. That made a lot of sense especially when you consider Fujifilm’s heritage in medium format film cameras, and its experience making medium-format lenses for other brands.

So, finally, here comes the GFX 50S: Fujifilm ergonomics and colors, but with all the advantages offered by larger sensors. But while heads turn, eyes widen, and colleagues fight over who gets to take the camera out for a shoot, personally I’m in need of a little convincing. And think you should be too, if you’re thinking about plopping down a fat wad of cash for this seemingly drool-worthy system.

But what’s not to like, you ask? Bear with me…

Theoretical advantages of larger sensors

The potential advantages of larger sensors can broadly be split into four areas: noise in low light, dynamic range, subject isolation (shallow depth-of-field), and resolution. But zoom into the following 36MP at 100% – are any of those lacking?

ISO 64 on a Nikon D810 gets me medium format-esque signal:noise ratio (image cleanliness), along with subject isolation I can’t get on medium format just yet, not at this focal length anyway (which would require a non-extant 44mm F2.5 MF lens. The incredible sharpness of this lens means I get good use out of those 36MP even wide open at F2. Photo: Rishi Sanyal (Nikon D810 | Sigma 24-35mm @ 35mm F2)

The question is: does the GFX 50S currently deliver on all, or any, of these advantages over what the best of full-frame has to offer? Let’s look at each separately.

Low light (noise) performance

For the same f-number and shutter speed (or ‘focal plane exposure’), a larger sensor is exposed to more total light. The same light per unit area is projected by the lens, but the larger sensor has more area available capturing it. An image made with more light has less relative photon shot noise (the noise that results from the fact that light arrives randomly at the imaging plane). The more light you capture, the more you ‘average’ out these fluctuations, leading to a cleaner image (that’s the laymen’s description of it anyway; read about it more in-depth here).

That’s why a full-frame camera generally gives you cleaner images than your smartphone.* So if more light means better images, that’s a clear win for the GFX 50S, right?

Not so fast…

No, literally, not so fast. The lenses available for the GFX format simply aren’t as fast as those offered by full-frame competitors. The fastest lens on Fujifilm’s GFX roadmap is F2, which in full-frame equivalent terms is F1.56** (the concept of equivalence is out of scope for this article, but you can read about it in-depth here; for now, just remember the GFX has a reverse crop factor, relative to full-frame, of 0.79x). And most of the current MF lenses hover around F2.8 of F4, or F2.2 and F3.2 equivalent, respectively. That means that if they had the exact same underlying silicon technology (or sensor performance), a full-frame camera with a F2.2 (or F3.2) lens should do just as well as the GFX 50S with its F2.8 (or F4) lens. Even if were were to think ahead to the MF 100MP sensor Sony provides in the Phase One cameras, its 0.64x crop factor at best yields a F1.3 full-frame equivalent lenses from the one F2 lens announced, still not beating out the Canon 85/1.2, and barely beating out the plethora of available F1.4 full-frame lenses. So even if the newly announced G-mount lenses cover the wider medium format image circle (which I’d sure hope they would), things still aren’t so exciting.

But full-frame can do better than that: F1.4 and F1.8 lenses are routinely available for full-frame cameras, typically for less money too. An F1.4 lens projects twice as much light per unit area than a F2 lens, and 4x as much as a F2.8 lens, amply making up for the 1.7x smaller sensor surface area of full-frame.

That means full-frame cameras can capture as much, or more, light as the GFX 50S simply by offering faster lenses. But wait, it there’s more…

$ (document).ready(function() { ImageComparisonWidget({“containerId”:”reviewImageComparisonWidget-32306977″,”widgetId”:489,”initialStateId”:3472}) })

Companies like Sony have poured a lot of R&D into their full-frame (and smaller) sensors, and the a7R II uses a backside-illuminated design that makes it more efficient than the sensor used in the 50S. It also offers a dual-gain architecture that flips the camera into a high gain mode at ISO 640, allowing it to effectively overcome any noise introduced by the camera’s own electronics. In other words, the a7R II’s sensor is better able to use the light projected onto it, relative to the MF sensor – ironically a sensor made by Sony itself – in the G50S (or Pentax 645Z, or Hasselblad X1D). This allows it to match the low light noise performance of the larger sensor Pentax 645Z even at the same shutter speed and f-number. See our studio scene comparison widget above.

‘The Sony a7R II’s sensor is better able to use the light projected onto it, relative to the MF sensor’

So if we start with parity, guess what happens when you open up that aperture on the a7R II to an f-number simply unavailable to any current medium format system? You guessed it: you get better low light performance on full-frame. Whoa.

Dynamic Range

Although the same f-number and shutter speed give a larger sensor more total light, they receive the same amount of light per unit area. Most sensors of a similar generation have broadly similar tolerance for light per unit area (technically: similar full well capacity per unit area). But a larger sensor devotes more sensor area to any scene element, so can tolerate more total light per scene element before clipping. That means that for the same focal plane exposure, despite clipping highlights at a similar point, a larger sensor will render shadows (whose noise levels define the other limit of dynamic range) from more total light. And the same logic that applies to low light noise applies here as well: more total light = less relative shot noise and less impact of any noise from camera electronics. That means cleaner shadows, and more dynamic range.

So another clear win for the larger sensor GFX, no? Well, no. Because someone poured a lot of R&D into the Nikon D810 sensor (noticing a trend here?), giving it higher full-well capacity per unit area than any other sensor we’ve measured to date: its ISO 64 mode. Each pixel can hold more total charge before clipping, relative to equally-sized pixels on any other sensor in a consumer camera. That means it can tolerate a longer exposure at ISO 64, longer enough (at least 2/3 EV, or 60% more light) to capture as much total light as the 68% larger sensor in the GFX 50S exposed at its base ISO (100). Don’t believe us? Check out our real-world dynamic range comparison of the Nikon D810 vs the Pentax 645Z, which ostensibly shares the same sensor as the GFX 50S:

$ (document).ready(function() { ImageComparisonWidget({“containerId”:”reviewImageComparisonWidget-36789467″,”widgetId”:479,”initialStateId”:3427}) })

In this shoot-out, we exposed each camera to the right as far as possible before clipping a significant chunk of pixels in the brightest portion of the Raw (in the orange sky just above the mountains). The D810, in this case, was able to tolerate a full stop longer exposure***, which allows its (pushed) shadows to remain as clean as the 645Z. That’s the (scientific, not baloney) reason we claimed the Nikon D810 to have medium format-like image quality. Because its dynamic range and overall signal:noise performance at ISO 64 rivals many current medium format cameras their base ISOs (though not the huge new 100MP MF Sony sensor in the new Phase One). Just look at its massive SNR advantage (read: image cleanliness) for all tones at ISO 64 over the Canon 5DS R at ISO 100 – we intend to plot the Fujifilm GFX 50S on the same graph, and don’t expect it to show any advantage to the D810. Because science.

Read about this all more in-depth in our D810 review here, and check out Bill Claff’s quantitative data that shows a 0.22 EV base ISO dynamic range difference between the D810 and 645Z – hardly noticeable, much less something to write home about.

‘OK but it’s not fair to compare ISO 64 to ISO 100!’

Fair enough, there’s a little more to the story. ISO 64 does require more exposure than ISO 100, either via a brighter lens, or longer exposure time. But one might argue that under circumstances where you care about dynamic range – i.e. high contrast scenes – you’re typically not light-limited to begin with, and can easily give the camera as much light as needed. Either because you’re shooting on a tripod, you’re using studio lights and can just crank them up, or because there’s so much light to begin with (it is a high contrast scene, right?) You’re working at or near base ISO anyway, so you shouldn’t have trouble adding 2/3 EV exposure by opening up the lens or lengthening the shutter speed a bit.

‘You’re working at or near base ISO anyway, so you shouldn’t have trouble adding 2/3 EV shutter speed’

But, yes, if you’re in a light-limited situation (i.e. you’re not shooting at base ISO) and it’s high enough contrast that you care about dynamic range (have to expose for highlights then push shadows), then the GFX 50S will have the upper hand here. But dare I say, that’s quite the niche use case: keep in mind that most situations demanding higher ISOs tend to be in lower light, where you care more about general noise performance, not dynamic range (since low light scenes tend to have lower contrast). And if that’s what you care about, there’s the a7R II which, although it may clip highlights a bit earlier, can give you as good, or better, low light noise performance… [link back to Noise section above].

But I’ll concede – if you want both the base ISO dynamic range of the D810, and the low light noise performance of an a7R II (albeit with F2 or slower lenses), then the GFX might be your ticket.

Shallow Depth-of-Field

As we calculated in our ‘Low light (noise) performance’ section above, the fastest lens on Fujifilm’s roadmap is ~F1.6 full-frame equivalent, with most current available lenses being F2.2 equivalent or slower. Since full-frame routinely has F1.4 (equivalent) lenses available, you actually get more subject isolation, and blurrier backgrounds, with full-frame than with medium format.

And, no, the ‘but larger formats have more compression because you use longer focal length lenses for the same field-of-view’ argument is false. Just say no to the compression myth. For equivalent focal lengths/apertures, there’s no extra compression. Compression is relative only to equivalent focal length and subject distance (or subject magnification), and its relative distance to the background. Not the format you’re shooting on. Don’t believe us, have a look for yourself:

46mm F2.8 on APS-C is roughly equivalent to 70mm F4.3 on full-frame – meaning the two shots above should be virtually identical. And they are, save for a tiny bit more DOF in the full-frame shot because F4.5 was the closest I could get to F4.3. Now, of course, you can get shallower DOF on full-frame, for example by shooting at F2.8. But that’s because those faster lenses are available for full-frame.

They’re not in Fujifilm’s lineup, which includes two F2.8 lenses, one F2 lens, and a few F4 lenses – which are equivalent to F2.2, F1.6, and F3.2 in full-frame terms, respectively.

Without brighter lenses, there’s just no reason to get excited about medium format for subject isolation and blurry backgrounds. If you’re a bokeh fanatic, full-frame’s arguably the sweet spot.

Resolution

OK, finally, some good news. Well, theoretically anyway.

If you have two differently sized sensors with the same pixel count, the smaller one will be more demanding on its lens (it samples the lens at more lines per mm for the same scene frequency). Manufacturing larger lenses is also slightly easier, since the same relative tolerance level can be achieved, despite a larger absolute variance.

So if you’re looking for true 50MP of detail across the frame, you’re more likely to get it with the GFX 50S than with a comparable 50MP full-frame sensor, simply because of the realities of lens design and tolerances. That said, we’ve been told that some of the newer full-frame lens designs were designed with 80 to 100MP in mind, on full-frame sensors. And with the eye-popping performance of some of the newest full-frame lenses we’ve seen, from varied manufacturers, we’re not inclined to disagree. We’ve seen some 50MP files from the 5DS R paired with truly stellar lenses where we simply can’t imagine anything better, resolution-wise. In fact, at ~F5.6-6.2 equivalent, I’m not seeing a major resolution advantage of the medium format cameras over the full-frame cameras in our studio scene comparison tool, and the 50MP full-frame image below isn’t exactly starved for resolution, is it?

50MP Canon 5DS R image, shot with a Sigma 24-35mm F2 lens at F2. At F2 full-frame equiv., this image would literally have been impossible to shoot on the Fujifilm GFX 50S, without a 44mm F2.5 lens, anyway, which doesn’t exist, nor is on the roadmap, for the Fujifilm. Photo: Rishi Sanyal

Put another way: if you’re seeing eye-popping resolution at F2 above and here and here (and even at F1.4 on some new lenses) when viewing a Canon 5DS R 50MP full-frame file at 100% (do click on the above image and view at 100%), do you want or need a truer 50MP? Or do you want even more than 50MP, particularly if it’ll come at the cost of more depth-of-field, since there are hardly any F2 equivalent lenses that’ll give you the subject isolation and background bokeh you see in the full-frame shot above?

Only you can answer that question, but it is true that physics being physics, larger sensors will always tend to out-resolve smaller sensors with equivalent glass. And so this is the area where we most expect to see an advantage to the Fujifilm system, especially over time as we approach 100MP, and beyond. It’s probably easier for a F1.8 prime paired with the GFX 50S to out-resolve a F1.4 prime on a 5DS R when both systems are shot wide open, but whether that will be the case (or if Fujifilm will even make a F1.8 or brighter prime for the system) remains to be seen. I certainly don’t think it would be a cheap combination.

Thanks, DPR, for saving me my money / killing my hopes and dreams

Still excited about the Fujifilm GFX 50S and Hasselblad X1D? Perhaps you still should be. You get Fujifilm ergonomics and color science in a body capable of far better image quality that Fujifilm’s APS-C offerings. But remember you can emulate much of that color science in Raw converters with proper profiles (we’re looking into a separate article on this). More importantly, remember that equivalence tells us that a F1.8 medium format prime is what the GFX 50S actually needs to at least match the performance from modern full-frames paired with F1.4 lenses, from the perspective of noise and shallow depth-of-field. And that’s before you consider the advanced silicon technologies we’ve seen in different full-frame (and smaller) sensors that we haven’t yet seen in any medium format sensor. These advances have, for example, allowed a Nikon D810 to catch up to the dynamic range of the Pentax 645Z at base ISO, and the BSI, dual-gain a7R II sensor to catch up to the GFX 50S in low light noise performance.

Still, as I’ve said, physics is physics. For equivalent apertures and final output resolutions, we do expect medium format to yield a slight resolution advantage, thanks to its lower demands on resolving power of lenses. But the extent of this advantage, especially given some of the tremendous progress we’ve seen in recent lens designs, remains to be seen: I’m not starving for eye-popping detail at 1:1 viewing of 50 and 42MP files when pairing a 5DS R or a7R II with stellar modern prime lenses.

‘as medium format evolves, the same gains we see in full-frame over smaller sensors might find their ways into the format.’

Of course, as medium format evolves, the same gains we see in full-frame over smaller sensors might find their ways into the format. But this will require both the silicon to keep up, and for the development of faster lenses. At least as fast as the fastest lenses full-frame offers. One thing does make us hopeful – recent conversations with our forum extraordinaire Jim Kasson have alerted us to the fact that certain full-frame lenses, like the Zeiss Otus primes, actually project an image circle large enough for Fujifilm’s new MF format. That would essentially get you high quality F1.1 equivalent glass on the GFX 50S. OK, that’s cool. If you can focus it, anyway 🙂 But if we see more and more fast full-frame lenses able to cover the image circle of the GFX G50S, then we’re more likely to actually experience the benefits of the larger sensor format.

Else, the potential advantages may be outweighed by the disadvantages: the extra weight, heft, price and severely lacking autofocus. And the GFX 50S has given up some of the noise and false color advantages their X-Trans cameras show…

For now, we hope that looking at the problem through the lens of equivalence at least gives you an idea of how big (or small) you can reasonably expect the differences to be. Maybe it even saves you a dime or two. Or makes you want to yell at us for bringing up equivalence, again.

But at the end of the day, equivalence has made me rather equivocal about the GFX 50S. What about you? Let us know in the comments below.


Footnotes:

* It’s also why ‘multi-shot’ modes yield cleaner images than single shots: these modes essentially capture more total light, averaging out shot noise. It’s also why brighter scenes generally look cleaner than low light scenes: more light = more photons captured = less relative shot noise = higher signal:noise ratio (SNR, or ‘cleanliness’ in laymen terms).

** The GFX 50S’ 44x33mm sensor has an effective 0.78x crop factor, so you can multiply the MF lens’ f-number by 0.78 to get the equivalent full-frame f-number.

*** We don’t control for T-stop, which could partially explain the drastic exposure difference. This doesn’t affect our experiment though, as we applied well-vetted ‘Expose to the Right’ (ETTR) principles for a fair comparison

Articles: Digital Photography Review (dpreview.com)

 
Comments Off on Thinking about buying a Fujifilm GFX 50S? Read this first

Posted in Uncategorized


Pentax KP sample gallery

21 Mar

The Pentax KP packs tons of features into one of their most petite bodies yet. It offers a new 5-axis SR II IBIS system, ISO expansion up to 819,200 and interchangeable grips. We like how the camera looks, but what about its pictures? Take a look at our sample gallery to see for yourself.

See our Pentax KP sample gallery

$ (document).ready(function() { SampleGalleryStripV2({“galleryId”:”9625050354″}) })

Sample photoSample photoSample photoSample photoSample photo

Articles: Digital Photography Review (dpreview.com)

 
Comments Off on Pentax KP sample gallery

Posted in Uncategorized


Abandoned Tobacco Factory Gets an Acid-Toned Makeover & a New Purpose

21 Mar

[ By SA Rogers in Art & Installation & Sound. ]

kalana

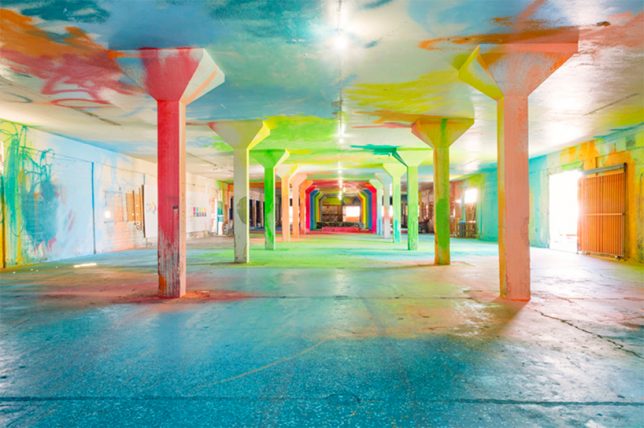
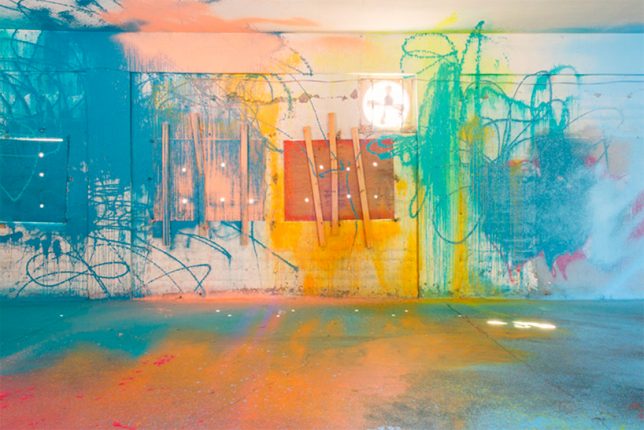
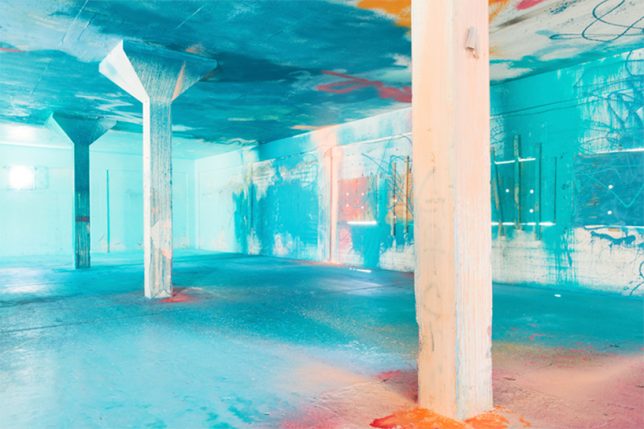
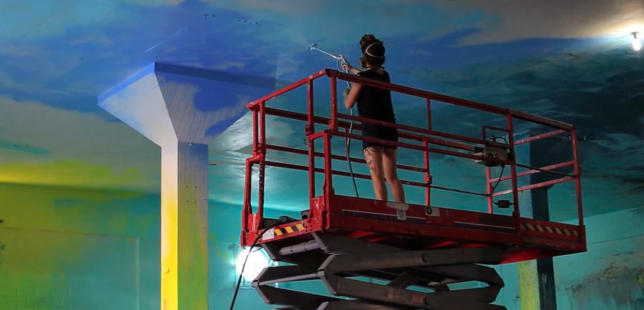
An abandoned, dark and dilapidated tobacco factory is ‘activated’ as a public meeting place to talk about revitalizing unused spaces through a cheerfully haphazard application of vivid, acid-toned paint. Puerto Rican artist Sofia Maldonado created ‘Kalaña’ as part of the series ‘Cromática: Caguas a Color,’ a collaboration with six other artists exploring the intersection of art, community and abandoned architecture.

kalana 2

kalana 6

You can take in the cavernous space while it’s empty and appreciate it for all its wild neon drips, sprays and strokes, taking in how much this simple application of paint has transformed the feel of the space, making it exponentially more welcoming. But Maldonado doesn’t consider the work complete until it’s buzzing with people, serving its ultimate purpose.

kalana 3

kalana 4

“My work is mainly inspired by colors and also by the Caribbean way of living; just experiencing light and color,” she says. “The project itself is not just painting an abandoned building. It’s also the idea of having an agenda. It’s a different format of how a public art piece can also become a creative and educational hub.”

kalana 5

kalana 7

Now, a circular bike ramp encourages playful interaction with the space, and there’s a small stage for speeches and performances. The space will host workshops, lectures, music, presentations and other events.

Screen Shot 2017-03-20 at 3.03.35 PM

Screen Shot 2017-03-20 at 3.02.27 PM

“This project was very challenging, but I think it’s exactly what I needed in order to create a new sort of dialogue that could place my work in a different context…” says Maldonado. “It allows me to bring my work into a bigger dimension and also to start a dialogue with the community and open a door for people to have a different perspective and intends to bring new meaning to what painting is, what public art could be, and also how can you integrate a community that surrounds it.”

Share on Facebook


[ By SA Rogers in Art & Installation & Sound. ]

[ WebUrbanist | Archives | Galleries | Privacy | TOS ]


WebUrbanist

 
Comments Off on Abandoned Tobacco Factory Gets an Acid-Toned Makeover & a New Purpose

Posted in Creativity


U.S. Supreme Court seeks permanent full-time photographer

21 Mar
Photo by Joe Ravi, used under CC-BY-SA 3.0 license

The United States Supreme Court is hiring a new full-time, permanent photographer who will be tasked with documenting a variety of things related to the Supreme Court, including employees, buildings and artwork the Court has in its collection. This individual will also be tasked with ‘managing public access’ to the Court’s Photographs Collection, per the job listing.

The job listing was posted on March 13, and it will be live until March 27 at 11:59PM EST. The chosen photographer will be located in Washington D.C. and will work with the Court’s Curator’s Office performing the above duties, as well as photographing various events. Those interested in the position must be a U.S. citizen, pass a security background check, and must meet the minimum qualifications.

According to the job listing, a qualified applicant will possess both 3-5 years of ‘progressively responsible [photography] experience’ as well as a Bachelor’s degree. In lieu of that experience, the applicant needs ‘any directly related experience that has demonstrated a thorough understanding of the principles, practices and techniques of photography, image processing and image management.’ The college degree requirement can be waived if the applicant has ‘at least four years of additional experience.’

As well, the job listing says the applicant must know how to operate Nikon and Hasselblad gear, including accessories, artificial lighting, and video cameras. The applicant also needs digital image processing skills, Digital Asset Management software experience, proficiency with Microsoft Word/Access/Excel and Adobe Creative Suite, and more.

Interested photographers can apply via the USA Jobs link below. Applications require a cover letter and resume, form OF-306, the completion of an online questionnaire, and a portfolio link with three examples of multiple types of photos, including special event photographs, individual portraits, and more.

Via: USAJobs.gov

Articles: Digital Photography Review (dpreview.com)

 
Comments Off on U.S. Supreme Court seeks permanent full-time photographer

Posted in Uncategorized


Creative Use of the Radial Filter in Lightroom

21 Mar

Back in 2013, which is about two thousand years as far as digital photography is concerned, the folks at Adobe introduced a brand new tool into the kit of Lightroom 5. That tool is the Radial Filter and it has become not only one of my favorite tools in Lightroom but is one of the most versatile and powerful mechanisms we have for selectively applying edits to our photographs.

The Radial Filter tool has evolved and changed to where we find it becoming more and more useful in the latest version of Lightroom CC. In this tutorial, I will show you just how strong the Radial Filter has become. Most importantly, you will learn some of the great things it can do for you and your work.

What is the Radial Filter?

The term “radial” implies that the tool is circular of course but it goes quite a bit further than that. The Radial Filter is best considered as a virtually infinitely manipulable ellipse; meaning that the user can change the size and shape of the filter up to (and even beyond) the view window of the Develop Module.

Creative Use of the Radial Filter in Lightroom

Access the Radial Filter by clicking it on the toolbar in the Develop Module (is the second from the right, next to the Adjustment Brush). You can also open it by using the keyboard shortcut (shown above) Shift+M or by going to Tools > Radial Filter from the menu at the top of Lightroom.

The edits that can be applied using the Radial Filter with the current version of Lightroom CC include virtually all the develop options from the Basic Panel plus the recent addition of the “dehaze” feature from the Effects Panel. So essentially the Radial Filter allows you to apply edits to specific areas of the frame where you need them. You can set the filter so that the edits are applied to either the inside or outside of the filter margins (more on inversion later.) You can even use multiple Radial Filters together in order to achieve some impressive effects.

Applying and Manipulating the Radial Filter

Of course, the shape and position of the Radial Filter are the largest parts of the usage pie. To apply the filter, drag the cursor while holding down the left mouse button. You will see the filter expanding as you drag. There will be a placement indicator in the form of an opaque circular dot. This dot represents the location of each Radial Filter within your image. You’ll notice that there are also four square shapes around the perimeter of the ellipse. These are points where you can change the shape of the filter as you please.

Creative Use of the Radial Filter in Lightroom

Grab any of these points to expand the Radial Filter in that direction.

The entire filter can also be rotated by placing your cursor around the edge until it turns into a curved double-headed arrow (shown below).

Creative Use of the Radial Filter in Lightroom

You can rotate the Radial Filter around the center point when you see this symbol.

Left click to change the position of the filter.

Seeing Red – the Mask Overlay

One of the great things Adobe has included for you is a way to see where your edits are being applied by its filters and brushes. When using the Radial Filter, hover your cursor over the center dot indicator for about a second and you will see a wonderful bit of magic. Wherever the radial filter has applied its edits will now be highlighted in red.

googletag.cmd.push(function() {var gpt_slot = googletag.defineSlot( “/1005424/_dPSv5in-post-mobile(300×250)”, [300, 250], “pb-ruleset-mobile-ad-0” ).addService( googletag.pubads() );ruleset_mobile_slots.push( gpt_slot );});

googletag.cmd.push(function() {var gpt_slot = googletag.defineSlot( “/1005424/_dPSv5in-post-mobile(300×250)”, [300, 250], “pb-ruleset-desktop-ad-4” ).addService( googletag.pubads() );ruleset_desktop_slots.push( gpt_slot );});

Well, it’s not exactly magic, but it sure is close.

Note: If you want this mask to show all the time just hit O on your keyboard. You can change its color, or you can rotate through white, black, green and red by pressing Shift+O. 

Feathering, Duplication, and Inversion

There are some other tips when it comes to applying the radial filter. The most basic of these is feathering, duplication, and inversion.

Feathering

Feathering determines how hard or soft the border around the radial filter is, and in turn how noticeable the transition will between the edits applied and the rest of the photo.

Here we have a very abrupt transition….

Creative Use of the Radial Filter in Lightroom

Feathering at 0 the transition is harsh and very obvious. There is a definite line where the filter ends, and the unedited images begins.

Now you can see the softening of the border brought about by maximum feathering (+100). Depending on your needs feathering can make all the difference.

Creative Use of the Radial Filter in Lightroom

Feathering at +100 the transition is very gradual and less obvious.

Duplication

Now, let’s say you find yourself in a situation where there is more than one area which needs a similar adjustment to one that you’ve already applied with a Radial Filter. This happens frequently when working with groups of people or in a scene that has multiple elements such as a landscape.

Take this image for example; a shot of two people with similar lighting. I want to brighten both of their faces and add a little sharpness.

Creative Use of the Radial Filter in Lightroom

I created a Radial Filter using some slight exposure and sharpness increases and applied it to the man’s face. Instead of starting from scratch and creating a separate Radial Filter for the woman, I simply duplicated the Radial Filter. To do this, simply right click on the locator dot in the middle of the filter, then select duplicate (as shown below).

Creative Use of the Radial Filter in Lightroom

What this will do is copy all the settings of your current filter into a brand new Radial Filter which you can then move about and change as you see fit. It saves a lot of time and ensures you have a great starting point for your next edit.

Creative Use of the Radial Filter in Lightroom

The duplicated Radial Filter moved into place over the woman’s face.

I also added a third radial filter to add a little more contrast to the couple.

Creative Use of the Radial Filter in Lightroom

googletag.cmd.push(function() {var gpt_slot = googletag.defineSlot( “/1005424/_dPSv5in-post-mobile(300×250)”, [300, 250], “pb-ruleset-mobile-ad-1” ).addService( googletag.pubads() );ruleset_mobile_slots.push( gpt_slot );});

googletag.cmd.push(function() {var gpt_slot = googletag.defineSlot( “/1005424/_dPSv5in-post-mobile(300×250)”, [300, 250], “pb-ruleset-desktop-ad-5” ).addService( googletag.pubads() );ruleset_desktop_slots.push( gpt_slot );});

Inversion

On the other hand, inversion is something very different than duplication because you’re still working with the same filter and the same edits but in a completely different way. You’ll find the Invert Mask checkbox at the bottom of the Radial Filter panel.

Creative Use of the Radial Filter in Lightroom

Click the Invert Mask checkbox to invert the Radial Filter.

When left unchecked, all your edits will be applied OUTSIDE the filter. This is great for applying brightening and sharpening to faces and small areas of a frame as well as creating sunspots. Conversely, when the invert mask box is checked all your edits will be applied INSIDE the filter. This is great for creating custom vignettes and bringing down bright skies or overexposed areas within the image.

Integration of the Brush Tool

A wonderful advancement that is now included with the Radial Filter is the ability to adjust the filter’s edits using the brush tool. While the brush tool has been a standby in Lightroom for some years it has only recently been included as an advanced edit option for the Radial Filter tool. What the brush tool allows you to do with the Radial Filter is to tailor its effects more than ever before. You are now able to use the brush to apply the settings of the Radial Filter free-handed to extend outside or inside of the filter.

Creative Use of the Radial Filter in Lightroom

Here I have painted in the same edit selections with the brush tool that I used in the radial filter.

Creative Use of the Radial Filter in Lightroom

Creative Use of the Radial Filter in Lightroom

You can still hover to better see your edits while in brush mode (or click O on your keyboard to show/hide the Mask Overlay).

Furthermore, the brush has all the functions of the dedicated Adjustment Brush tool which includes the ability to erase edits.  If you’re like me and find yourself saying, “Oops, I went too far with the brush!” all you need to do is select erase and paint over it again.

Creative Use of the Radial Filter in Lightroom

Erase switches the brush into erase mode. Now you can erase the edits you don’t want.

Pretty great!

A Few Tricks

Sunspots

I mentioned sunspots a little earlier. They are a great way to add depth and interest to an image. While creating a sunspot where no sun exists isn’t always a good idea, the Radial Filter tool really helps to enhance the brightness (or darken) and warmth of a preexisting sunrise or sunset.

Here are two examples of using the Radial Filter to increase the impact of sunspots: First without the Radial Filters…

Creative Use of the Radial Filter in Lightroom

Original before adding the Radial Filter.

And now with two radial filters applied for brightness and warmth.

Creative Use of the Radial Filter in Lightroom

One more.

googletag.cmd.push(function() {var gpt_slot = googletag.defineSlot( “/1005424/_dPSv5in-post-mobile(300×250)”, [300, 250], “pb-ruleset-mobile-ad-2” ).addService( googletag.pubads() );ruleset_mobile_slots.push( gpt_slot );});

googletag.cmd.push(function() {var gpt_slot = googletag.defineSlot( “/1005424/_dPSv5in-post-mobile(300×250)”, [300, 250], “pb-ruleset-desktop-ad-6” ).addService( googletag.pubads() );ruleset_desktop_slots.push( gpt_slot );});

Three radial filters were used here to brighten the branches and add warmth to the sun in the background.

Tame the Moon

Another nifty way to use the Radial Filter tool is for toning down an overly bright or dull moon. Here we have a before and after split-view of the moon after some sharpening and clarity was applied with a single Radial Filter.

Creative Use of the Radial Filter in Lightroom

I also brought ought the shadows by darkening the blacks and then cooled the image a bit.

Simulating Depth of Field

It doesn’t stop there. The radial filter can also be used to simulate extremely shallow depth of field. This works great if you want to give an image a very old-time tintype feel. This is the original image:

Here I have used multiple Radial Filters to blur out the background, along with some other edits to give the image an antique feel.

Some Final Thoughts

The Radial Filter tool has come a long way since its introduction. Now you have the power to use the virtually all of the basic edit tools in Lightroom very selectively. The integration of the brush option takes the possibilities even further by adding versatility like never before. With a little creativity, the Radial Filter can do so much more than simply adding vignettes to your images. After some practice, it will likely become your workflow’s best friend.

How do you use this tool with your images? Please share your thoughts and images below.

googletag.cmd.push(function() {var gpt_slot = googletag.defineSlot( “/1005424/_dPSv5in-post-mobile(300×250)”, [300, 250], “pb-ruleset-mobile-ad-3” ).addService( googletag.pubads() );ruleset_mobile_slots.push( gpt_slot );});

googletag.cmd.push(function() {var gpt_slot = googletag.defineSlot( “/1005424/_dPSv5in-post-mobile(300×250)”, [300, 250], “pb-ruleset-desktop-ad-7” ).addService( googletag.pubads() );ruleset_desktop_slots.push( gpt_slot );});

The post Creative Use of the Radial Filter in Lightroom by Adam Welch appeared first on Digital Photography School.


Digital Photography School

 
Comments Off on Creative Use of the Radial Filter in Lightroom

Posted in Photography


Lomo’Instant Automat Glass Magellan has a wide-angle glass lens

21 Mar

Lomography has introduced what it says is the first instant camera featuring a glass wide-angle lens: the Lomo’Instant Automat Glass Magellan. That lens uses a multi-coated surface to reduce glare, as well as an F4.5 aperture and three zone focusing settings: 0.3m, 0.6m and 1m to infinite. Those who pre-order will also get four color filter gels.

This is the latest version of the camera Lomography first launched on Kickstarter back in August. The Lomo’Instant Automat automatically adjusts the aperture, shutter speed and flash, and offers other high-tech features such as a lens cap that doubles as a remote shutter release and an LED film counter. The model uses Fujifilm Instax Mini film and is powered by a pair of CR2 batteries.

Lomography is currently offering the Glass Magellan model on its website for pre-order at $ 189. Deliveries to those who pre-order is estimated to start in the middle of April.

Via: Lomography

Articles: Digital Photography Review (dpreview.com)

 
Comments Off on Lomo’Instant Automat Glass Magellan has a wide-angle glass lens

Posted in Uncategorized