RSS
 

Archive for October, 2016

Hasselblad introduces keystone and local highlight recovery in Phocus 3.1

21 Oct
A before and after example in which the highlight recovery tool has been applied via a mask over the sky in the right-hand image

Hasselblad has released the latest version of its Phocus software that is designed to manipulate images from its H and X series cameras, and the CFV digital back. The 3.1 version adds a new perspective control palette that allows both vertical and horizontal corrections against grid-pattern guide lines, which is something users have been requesting for some time. This should make life easier for those shooting architectural subjects, flat coping and product photographers, among others.

A second new feature is a highlight recovery tool that can be used via a selection on an adjustment layer. A mask is painted over the area that needs drawing back and a slider control pulls in the over-bright detail.

The company has also added a pair of new settings for its Reproduction menu that governs color and contrast settings in the display. Reproduction Low Gain creates a lower contrast image while Negative inverts colors and tones – which will be useful for creating film negatives for other processes.

Version 3.1 of Phocus is available for download on the Hasselblad website.

Manufacturer information:

Phocus 3.1

The eagerly awaited update to our rich image processing software has just been released, bringing with it additional features and benefits.

Keystone Perspective Correction
The new Keystone tool enables you to perform high quality perspective corrections directly in Phocus. This can be done both via a simple guideline interface or via manual slider adjustments. Additionally, the dual-axis correction capability is extremely useful when copying flat artwork.

Local adjustment of highlight recovery
Highlight recovery has now been added to the palette of local adjustment tools, allowing for quick and precise correction without the need for manual masking.

Viewer background and margin options
It’s now possible to configure both margin and background color options for the viewer. This can be done separately for both the normal and a newly added proof mode.

Added camera response options
In the reproduction tool you now have the choice of 2 additional response modes. Reproduction Low Gain enables an even higher quality linear response. The new Negative response is suitable for reproduction of black and white negative film.

Phocus tutorials now available
We have partnered with UK professional photographer Karl Taylor to produce a series of Phocus Tutorial videos. They can be accessed through the Phocus product page and you will need to log in to view them.

Articles: Digital Photography Review (dpreview.com)

 
Comments Off on Hasselblad introduces keystone and local highlight recovery in Phocus 3.1

Posted in Uncategorized


Hot set: Benjamin Von Wong’s latest shoot features a model on lava flows

21 Oct

$ (document).ready(function() { SampleGalleryV2({“containerId”:”embeddedSampleGallery_4250438260″,”galleryId”:”4250438260″,”isEmbeddedWidget”:true,”standalone”:false,”selectedImageIndex”:0,”startInCommentsView”:false,”isMobile”:false}) });

Photographer Benjamin Von Wong, never one to shy away from extreme conditions to get a shot, has released a new set of images and behind the scenes information from his most recent shoot among the lava flows of Hawaii’s Big Island. Setting out at midnight, he and his crew trekked several miles through rough terrain to reach the glowing lava, where they set up to capture a model backlit with a battery-powered monolight. Using a Sony a7R II and FE 16-35mm F4, Von Wong worked quickly – the intense temperatures meant his model could only stand in position near the lava for very short periods of time. 

You can see some of the resulting images above. For more behind-the-scenes info, head to Von Wong’s blog. Images from the shoot are for sale, with profits benefiting victims of Hurricane Matthew. 

See Benjamin Von Wong’s PIX 2015 talk

Articles: Digital Photography Review (dpreview.com)

 
Comments Off on Hot set: Benjamin Von Wong’s latest shoot features a model on lava flows

Posted in Uncategorized


Kodak-branded Ektra smartphone embraces the company’s roots

21 Oct

The Bullitt Group, one of the companies licensing the Kodak brand name, has launched the Kodak Ektra smartphone. Named after Kodak’s 1941 Ektra rangefinder, the phone’s design attempts to mimic the look of a vintage analog camera. The back of the device features a small camera grip and is covered in leatherette. There is also a two-stage shutter-button and optional accessories include a range of retro-style leather pouches and cases.

Despite the camera-centric exterior, underneath the hood the Ektra is smartphone business as usual. The camera comes with a 21MP sensor, F2.0 aperture and optical image stabilization. A 26.5mm equivalent lens is offered, as is PDAF, 4K video and a dual-tone flash. A 13MP camera can be found at the front. The camera app features manual control over most shooting parameters and a wide range of filter effects for both videos and still images.

Other specifications include a 5” 1080p screen, Helio X20 chipset, 3GB of RAM and 32GB of internal storage that is expandable via a microSD slot. The 3000mAh battery should provide more than enough juice for a day of shooting. Overall the Kodak Ektra comes with a good mid-range smartphone specification but is mostly about the vintage camera looks. It will be available in the UK this December for £450 (approximately $ 550). There are also plans to make the device available in the US in early 2017.

KODAK EKTRA Smartphone is Designed for Photographers – from Enthusiasts to Experts

Photography-led smartphone features powerful imaging and editing capabilities

Rochester, NY, Thursday, October 20, 2016

Eastman Kodak Company and Bullitt Group today unveiled the KODAK EKTRA Smartphone, a photography-led smartphone designed for those with a passion for photography, from enthusiasts to experts. The KODAK EKTRA Smartphone fuses the best of Kodak’s rich history in imaging with the latest innovations in smartphone photography. Launching soon across Europe, the KODAK EKTRA Smartphone lets keen photographers capture exceptional images, whatever the environment, with an incredibly fast smartphone, tuned for the best in image quality and media management.

Jeff Clarke, Kodak Chief Executive, said: “Kodak has a rich history in imaging technology and the launch of the KODAK Smartphone today demonstrates our ongoing commitment to bringing the latest advances in photography to consumers. The original KODAK EKTRA Camera was launched in 1941 and in its latest reincarnation, opens up a world of creative opportunities to all who care about photography.”

At the heart of the KODAK EKTRA Smartphone is a 21-megapixel fast focus camera sensor with f2.0 aperture, and an industry leading 13-megapixel front-facing camera with Phase Detection Auto Focus PDAF and f2.2 aperture. The custom built camera app is controlled by an intuitive haptic touch, SLR-style Scene Selection Dial, where adjustments are made in real time via a range of settings including HDR, Landscape, Portrait, Macro, Sport, Night-time, Panorama and Bokeh, alongside a Smart Auto mode which auto-selects the best conditions for your photographs. In Manual mode, more advanced users can adjust exposure, ISO, focus, white balance and shutter speed, with the results being visible on the screen as changes are made.

The KODAK EKTRA Smartphone has an ergonomically weighted and high quality industrial design, underlining its camera styling and featuring a dedicated dual press shutter button in the horizontal style of traditional cameras. The device also features a Super 8 app, providing professional effects reminiscent of Kodak’s iconic Super 8 film stocks.A lightning-fast HELIO X20 Decacore processor powers the ANDROID Marshmallow smartphone.

The KODAK EKTRA Smartphone includes editing software from SNAPSEED, providing exceptional tools to edit images on-the-go, without having to download any additional apps. This enables users to transform images with professional results similar to many popular desktop image editors. Sharing the results in real time is also easy with integrated social media apps and the Prints app is a simple way to select your best shots to be professionally printed.

“It has been a joy to work with Kodak, their clear brand direction and photography knowledge, combined with our customer and technology insight has culminated in the beautiful and powerful KODAK EKTRA Smartphone,” said Peter Stephens, CEO Bullitt Group, mobile device licensee for Kodak. “We are excited to reach out to this dynamic and engaged photography category and look forward to getting this camera phone into people’s hands.”

KODAK EKTRA Smartphone key features:

  • ANDROID 6.0 (Marshmallow)
  • Professional results from a 21MP fast focus camera sensor with F2.0, PDAF, OIS, Dual LED Flash
  • 13MP phase detection auto focus front-facing camera with F2.2 PDAF
  • Helio X20 2.3GHz Decacore processor with 3GB RAM
  • 32GB memory, expandable with MicroSD cards
  • Advanced Manual Mode – adjustable on Exposure, ISO, Focal Length (Manual/Auto), White Balance, Shutter Speed, Aperture (fixed f2.0 main camera)
  • Familiar scene selection dial experience – includes scene modes Smart Auto, Portrait, Manual, Sports, Bokeh, Night-time, HDR, Panorama, Macro, Landscape, Film / Video
  • Integrated high quality printing app
  • Super 8 Video Recorder
  • Integrated social media sharing
  • 3000mAh, with USB 3.0 Type C fast charger

The KODAK EKTRA Smartphone will be priced at £449 and available across Europe later this year.

To find out more visit; www.kodak.com/go/ektra
Register for updates on www.kodakphones.com

Articles: Digital Photography Review (dpreview.com)

 
Comments Off on Kodak-branded Ektra smartphone embraces the company’s roots

Posted in Uncategorized


An Introduction to Photoshop Layers Possibilities and Properties

21 Oct

When Photoshop was first introduced to the world in 1990 it could only do the most basic of image editing tasks such as clone a selection, crop a picture, and work with some filters such as Blur, High Pass, and Sharpen. However, for its time it was incredibly advanced and the ability to work with digital pictures in this manner was practically unheard of for desktop computers, most of which were still using black and white screens. It wasn’t until late in 1994 when version 3 hit store shelves that the program included a key feature which continues to be the foundation for nearly all image editing programs to this day – layers.

Understanding how layers work is essential for anyone who wants to upgrade from a program like Apple Photos or Microsoft Pain. But learning how to use them with all the hundreds of icons, buttons, and menu options competing for your attention in Photoshop, can seem completely overwhelming. Getting the hang of a few basic concepts will set you on your way to image editing success, and help you figure out many of the other options Photoshop has to offer as well.

photoshop-layers-couple

Basic concept of layers

To wrap your head around the concept of layers, think back to when you were in grade school and your teacher worked out math problems on an overhead projector. She probably started with a sheet of transparent plastic that had equations printed on it and then used a washable marker to perform the required multiplication, division, or other operations to solve it. The bottom layer, the transparency itself, never changed but the teacher was free to alter what students saw on the projector screen by writing on top of the acetate layer.

You could even stack transparencies on top of one another and end up with a background layer and a few plastic sheets stacked on top of it. Each layer could be drawn or written on which would alter the final image shown to the students on the projector screen. But the layers existed separately from one another and could be edited individually without affecting the actual content of the underlying or overlying layers. Layers in Photoshop function in much the same way.

First layer – Background

photoshop-layers-background-only

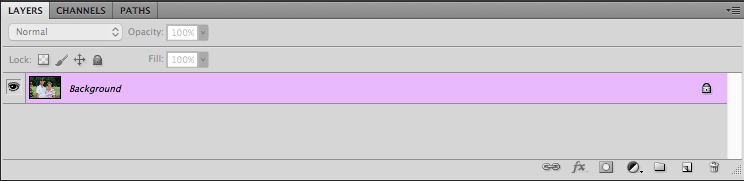
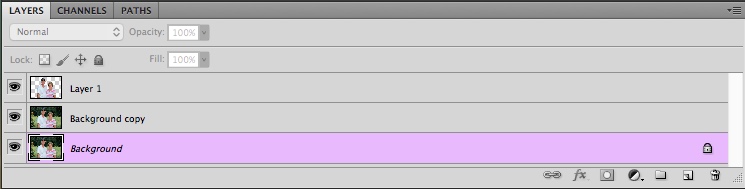
When you open a picture in Photoshop the first thing you will see in the Layers panel is a background layer with a small thumbnail of your image on it. It’s always given the label “Background” and on the right-hand side of the panel is an image of a padlock. Photoshop uses this icon this to indicate that the image is to be the foundation on which all future edits are built but the picture itself is not to be altered.

It is the transparency sheet that your math teacher would write on; the edits and other operations you can perform on it are stacked one on top of the next, but the bottom layer is sacrosanct and never to be changed. Icons that let you adjust opacity, fill, blending mode, etc., are grayed out so you might be wondering just how to actually edit the picture. One place to start is by right-clicking on the background layer and choosing the “Duplicate Layer” option.

photoshop-layers-background-and-duplicate

Duplicate layers

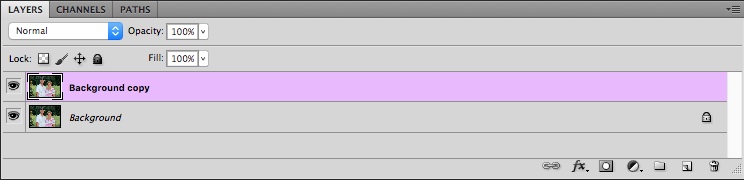
As soon as you create a copy of the Background layer a whole new world of creative possibility opens up. You now have access to tools like Opacity and Fill, you can change the Blend Mode, add Layer Masks, and hundreds of other options as well. The choices are staggering, and it’s important to remember that there is no one correct way of using layers in Photoshop. Each photographer has his or her own approach, and what works well for you may not be good for someone else. So don’t get caught up thinking you have to use a certain process when working with layers or anything else in Photoshop. The important thing is to find a solution that works for you.

How layers work

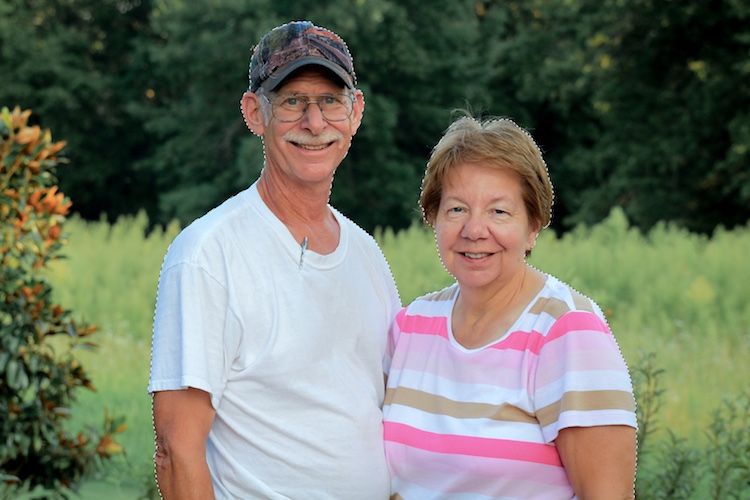
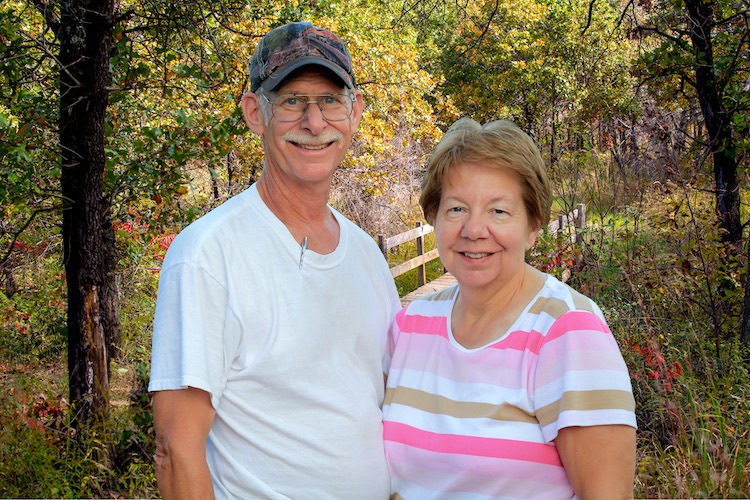
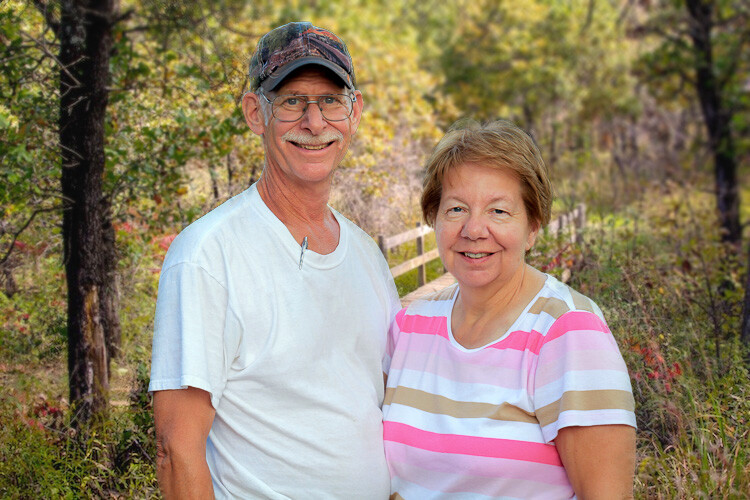
To dive a little deeper into the concept of layers and illustrate how they work, I’m going to start with the image of the husband and wife above. I’ll remove them from the garden in which they were photographed, and insert them into another location (new background). The first issue when doing any type of edit like this is that your computer doesn’t know that the people are separate from the background. It treats everything as one cohesive image but you can use layers in Photoshop to separate, remove, add, and otherwise edit the various parts of the picture.

quick-selection-tool-3
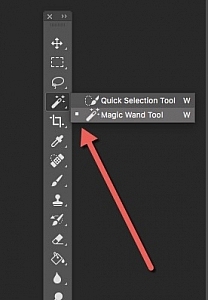
In the image above, the subjects are clearly distinct from the background with highly contrasting colors so an operation like this is pretty straightforward. But if your subjects blend in a little more with the foreground or background it can get a little tricky. Press the “W” key to access the Magic Wand tool. Then click [shift]+w until you end up with the Quick Selection tool (or you can access it on the toolbar see the screenshot to locate it). Now click and drag the Quick Selection tool around your subjects until they are outlined with a cycling dotted line that looks like black and white ants marching in a loop.

photoshop-layers-couple-selected

Refine the selection

If you try this operation and you aren’t quite getting your subjects selected how you want, you can use the Refine Edge (Select > Refine Edge in older versions, Select > Select and Mask in the newest Photoshop CC 2015.5) option to get your selection precisely how you need it. Once you are satisfied with your selection, choose Layer > New > Layer via Copy (you can also use the keyboard shortcut Cmd/Cntrl+J) and you will now see a third layer on the layer panel consisting of just the subjects and nothing else.

photoshop-layers-couple-no-background

Now the real fun begins! Click the eyeball icon to the left of all the layers except the new one with just your subjects and you will see everything else disappear.

photoshop-layers-couple-blank-background

How Photoshop sees layers

Pause for a moment and consider what is happening here. Your computer now sees the image not as one cohesive whole, with two people in front of a meadow, but as two distinct layers. One is a layer with just the people and the other layer below that is the background (the meadow). Technically there is a third layer, the locked background layer, but we’re ignoring that since we don’t do anything with it.

Add a new image as a new layer

To move the people to a different location all you have to do is insert an image as a new layer and place it below the layer with just the people. For this example, I’m going to put the couple in front of a photo I took with some trees and a bridge crossing a stream.

photoshop-layers-bridge

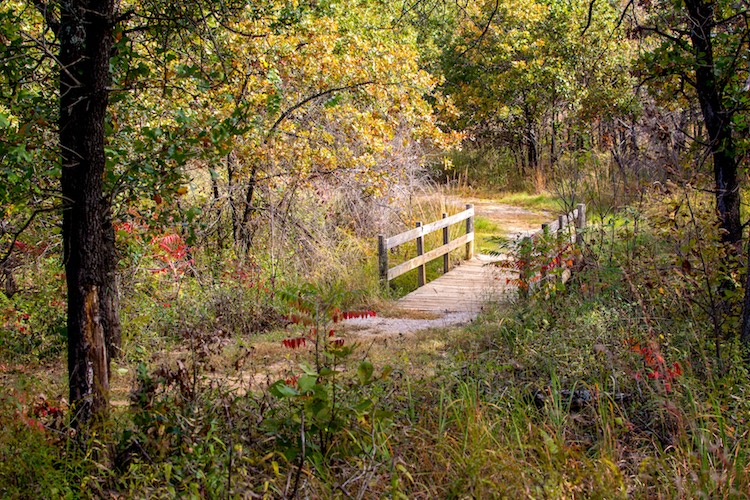
In Photoshop you can drag and drop images directly into your composition or use the “File > Place” command. When I insert the image of the bridge into the document with the couple I now have a new layer that I can manipulate like all the rest. You can also start to see the vertical structure of layers and how they are mixed together.

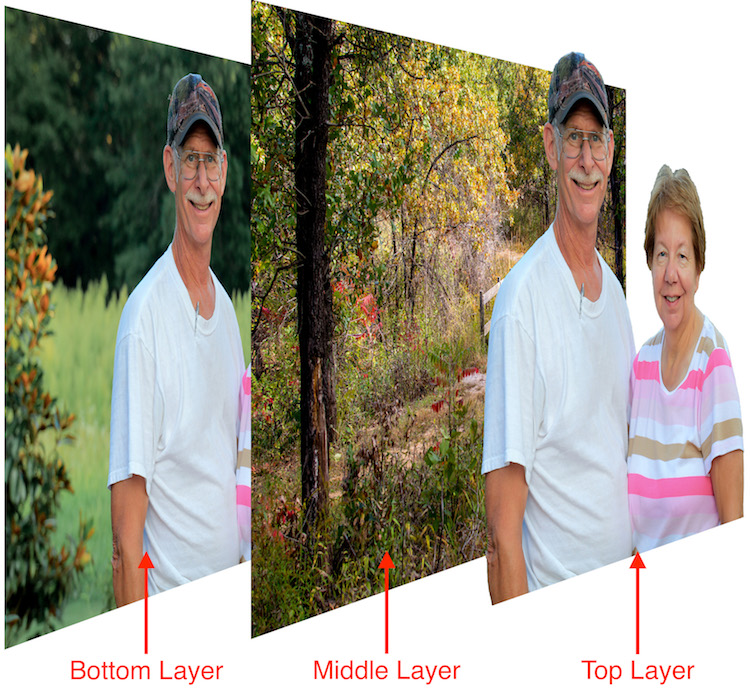
The Layers panel functions from a top-down perspective in that whatever layer is at the top of the panel is literally the top-most layer in the entire composition. Layers below it are arranged in descending order. In this example, it’s essential that the layer with the two people appears as the top-most layer in the Layer panel itself, followed immediately by the new background.

photoshop-layers-couple-bridge

Voila! The couple now appears in an entirely different location, all with just a few mouse clicks in Photoshop. If you are still trying to wrap your head around the concept of layers, here’s an extruded view of what you are seeing in the above image.

photoshop-layers-3d-breakdown

Cover your bases, keep all layers

I could remove the bottom layer entirely but I left it in place because I don’t like to delete any layers when making a composite image like this. You never know when you might need to go fetch an errant strand of hair that you overlooked from the original layer, or use it for a bit of color correction later on down the line. If I want I can add more pieces to this image just by using layers and stacking things on top of each other, and using layer masks to refine and edit things even more.

You can also edit the new background separately from the people such as adding a blur effect or desaturating it slightly. If you convert to a Smart Object any editing you do on that layer can be altered or changed later. But if you apply it directly to the layer it cannot. Make sure to match color balance when combining images for a more realistic look.

layers-photoshop

Additional adjustment layers have been applied to the background to shift the color, blur it in some areas, and darken the edges.

Conclusion

This type of switch-out-the-background edit is just a small taste of what you can do when using layers in Photoshop. Add empty layers by going to “Layer > New > Layer” and then using the Brush or other tools to start creating in them. You can re-order layers by clicking and dragging them up and down in the Layers panel. You can show and hide layers, adjust the opacity of a given layer, choose how one blends with the layers below it, and even create special Adjustment Layers that you can use to edit colors and add effects to other layers.

I have only scratched the surface of what layers are capable of doing. Hopefully this gives you a basic understanding of what this powerful feature is all about. Do you have any tips or tricks for using layers that I missed? Please share them in the comments section below.

googletag.cmd.push(function() {
tablet_slots.push( googletag.defineSlot( “/1005424/_dPSv4_tab-all-article-bottom_(300×250)”, [300, 250], “pb-ad-78623” ).addService( googletag.pubads() ) ); } );

googletag.cmd.push(function() {
mobile_slots.push( googletag.defineSlot( “/1005424/_dPSv4_mob-all-article-bottom_(300×250)”, [300, 250], “pb-ad-78158” ).addService( googletag.pubads() ) ); } );

The post An Introduction to Photoshop Layers Possibilities and Properties by Simon Ringsmuth appeared first on Digital Photography School.


Digital Photography School

 
Comments Off on An Introduction to Photoshop Layers Possibilities and Properties

Posted in Photography


Remote Shutter Release Versus the Built-In Delayed Shutter

21 Oct

It’s no secret that being a photographer, amateur or professional, can be quite expensive. We both travel and we want the latest and best equipment but we can’t always afford it all. Being selective with the equipment we choose to purchase can be wise as it’s better to spend a few dollars extra purchasing something of quality. A lot of the gear we have isn’t essential and can easily be done inside the camera itself. Let’s look at using a remote shutter release versus the delayed timer built into the camera.

SelfieVoringsfossen

A self portrait captured by using a remote shutter

A remote shutter is something you may have heard repeatedly that you need to purchase, especially if you’re into landscape photography. One of the main uses of a remote shutter is to minimize the vibration when taking a image to get a sharper result. What you also may know is that your camera has a delayed shutter function, typically of 2 and 10 seconds. So do you really need to purchase a remote shutter when you can do it in the camera? Let’s look at some pros and cons of using each – a remote shutter release and delayed shutter.

Delayed Shutter

Most digital cameras have a Delayed Shutter function. In fact, even smartphones have it.

Since I was close to the camera I could use a delayed shutter

Since I was close to the camera I could use a delayed shutter

A delayed shutter is, in simple words, a function that tells the camera to wait a few seconds after you push the shutter before it takes the picture. This allows you to either run in front of the camera and take a selfie or reduce the amount of vibration. This function is especially useful when you’re using a slow shutter speed and have your camera mounted on a tripod. If you use a shutter speed of 0.5 seconds and press the shutter you’ll see that the image will come out less sharp than if you use a delayed shutter.

Pros of the Delayed Shutter:

  • It’s a standard function in most digital cameras and smartphones.
  • It’s free.
  • It reduces vibration and leads to a sharper image.
  • You can choose between a short delay or a longer delay.
  • You have the time to position yourself in the image after pressing the shutter.

Cons of the Delayed Shutter:

  • It’s not flexible.
  • If you’re photographing something with motion it’s hard to time the shutter release perfectly and you might miss the shot.
  • In some cameras, the function is found deep in the menu.

Remote Shutter Release

Remote shutter release can vary in form, shape, and price. Some are tiny and inexpensive, while others are larger, with more options but also a less attractive price tag.

I used a remote shutter and interval timer to photograph myself on the edge

I used a remote shutter and interval timer to photograph myself on the edge.

Choosing the right remote shutter release can be a hassle sometimes as you may not know your needs. You may only need a simple one to avoid any motion when taking the image, or may need something more advanced that lets you do interval timing or perhaps something that has a “Bulb lockup”.

Once your needs are established, you have to sort out if you want a cable release or wireless. I won’t get into the topic of which is better, but again you need to consider your needs for a remote.

remote-timer-nikon

Pros of remote shutter releases

  • Wireless remotes allow you to stand far away from the camera and take pictures.
  • Advanced models have many options such as interval timers.
  • You can use “Bulb Mode” without having to hold the camera’s release button and cause vibration.
  • Many models have LCD screens with a timer.
  • Take a picture at the exact moment you need.
Freezing the exact moment with a cable release

Freezing the exact moment with a cable release

Cons of remote shutter releases

  • More advanced models can be very pricey.
  • It takes extra space in your bag.
  • It might be hard to choose the right model.
  • Cables break quickly on low-end cable releases.
  • Small, wireless remote shutters are easy to loose.

What is best?

To be honest with you, they both have their advantages. It would be wrong to say that one is better than the other in any case.

That being said, as a landscape photographer, I am dependent on my remote shutter. A lot of the time I can’t wait the extra two or three seconds before the image is taken, as the moment is gone by then. When I’m photographing rushing waves I need to capture the image at the exact moment I want, ergo I need a remote shutter. If I’m in the woods and not photographing anything that might move, I don’t need the remote shutter (even though I use it by habit).

Shutter speeds over 30 seconds requires a remote shutter

Shutter speeds over 30 seconds require a remote shutter

If you only photograph still landscapes and you don’t need a shutter speed of more than 30 seconds, I don’t see a reason to purchase a remote shutter. If you photograph anything with motion or need a shutter speed of more than 30 seconds I recommend you to purchase one.

googletag.cmd.push(function() {
tablet_slots.push( googletag.defineSlot( “/1005424/_dPSv4_tab-all-article-bottom_(300×250)”, [300, 250], “pb-ad-78623” ).addService( googletag.pubads() ) ); } );

googletag.cmd.push(function() {
mobile_slots.push( googletag.defineSlot( “/1005424/_dPSv4_mob-all-article-bottom_(300×250)”, [300, 250], “pb-ad-78158” ).addService( googletag.pubads() ) ); } );

The post Remote Shutter Release Versus the Built-In Delayed Shutter by Christian Hoiberg appeared first on Digital Photography School.


Digital Photography School

 
Comments Off on Remote Shutter Release Versus the Built-In Delayed Shutter

Posted in Photography


Entaniya 250 Micro Four Thirds fisheye lenses feature 250-degree FOV

21 Oct

Tokyo-based maker of VR lens accessories Entapano is working on the Entaniya Fisheye 250 MFT lens, a model with a 250-degree field of view that it aims to make available in three varieties: 2.3mm F2.8, 3.0mm F2.8, and 3.6mm F4.0. All three lenses feature 18 elements in 12 groups with four extra-low dispersion lenses and a 1.6kg / 3.5lb weight without front or rear caps. The company cautions these specs are ‘subject to change,’ however, as the lens is still in development.

Entaniya Fisheye 250 MFT 3.6 sample image taken with Olympus Pen F, provided by Entaniya

The company details the Entaniya Fisheye as being suitable for producing different types of VR content depending on which lens version is used. The lenses are made in Japan, where the company estimates its price at ¥388,000 / $ 3,730 / €3400. Entapano has the released date scheduled for ‘end of 2016.’

Articles: Digital Photography Review (dpreview.com)

 
Comments Off on Entaniya 250 Micro Four Thirds fisheye lenses feature 250-degree FOV

Posted in Uncategorized


Invisible Solar: Panels Camouflaged as Wood, Clay, Stone & Concrete

21 Oct

[ By WebUrbanist in Design & Products & Packaging. ]

solar-shingle-design

Overcoming the awkward aesthetic factor typically faced by home solar technology, these disguised panels look like ordinary building materials you would expect to spot along the sides, steps or roof of a house.

solar-camouflaged-disguised

Dyaqua, an Italian company, has developed their Invisible Solar series to look like concrete bricks, slate shingles and wooden boards, allowing them to blend into ordinary built environments. A thin top layer mimics desired materials while allowing the sun’s rays through to the photovoltaic cells beneath.

solar-material-cover

From the company: “The Invisible Solar modules are composed of a non-toxic and recyclable polymeric compound, within which are incorporated the monocrystalline silicon cells. A special surface, opaque at the sight and transparent to the sun rays, covers the cells by hiding them without prevent their operation.”

invisible-solar-panel

Instead of adding semi-reflective, black-and-grey accents to a traditional wood or masonry structure, these fixtures are designed to fit any abode, historic or modern. The company has begun production with the Rooftile, which resembles a typical reddish-brown terracotta shingle.

solar-wood-block

secret-solar-panels

From there, they aim to create blocks and boards that can be used on walls (cladding) or walkways (pavement) sure to please even the toughest community design standards boards. They are also built for strength and durability, able to “withstand high static load, tolerates chemical solvents and atmospheric agents.”

Share on Facebook


[ By WebUrbanist in Design & Products & Packaging. ]

[ WebUrbanist | Archives | Galleries | Privacy | TOS ]


WebUrbanist

 
Comments Off on Invisible Solar: Panels Camouflaged as Wood, Clay, Stone & Concrete

Posted in Creativity


Sigma announces pricing for 18-35mm T2 and 50-100mm T2 Cine lenses

20 Oct

Sigma announced its new line of cinema lenses back in September. Today it announced that the first two lenses in that line to go on sale, the 18-35mm T2 and 50-100 T2, will both ship on December 9, 2016 for $ 4000 each. Both will be available in EF, E and PL mounts.

These weatherproof lenses are completely mechanical and designed for use with ultra high resolution cameras, including those capable of 6 and 8K capture. And another five lenses are slated to join the new cinema line over the course of 2017 including a 24-35 F2.2 and a 20mm, 24mm, 35mm, 50mm and 80mm set of T1.5 primes.

Press release:

Sigma Announces Cine High Speed Zoom Lens Pricing and Availability

Cine High Speed Zoom 18-35mm T2 and 50-100mm T2 lenses begin shipping on December 9 for a retail price of $ 3999.00 USD

New York, NY – October 20, 2016 – Sigma Corporation of America, a leading DSLR lens, camera, flash and accessory manufacturer, announced today that the Cine High Speed Zoom 18-35mm T2 and 50-100mm T2 lenses will begin shipping on December 9, 2016 for a retail price of $ 3999.00 USD. Born from the new Sigma Cine family of products, the High Speed Zoom lenses leverage the outstanding optical design of the company’s world-renowned Global Vision still photography lenses. Combined with the 100% new mechanical lens body design, the Cine lenses meet needs of advanced 6k and 8k cinema production with the core optical quality DNA that has defined the Sigma benchmark of imaging excellence.

See the Sigma Cine Family of Products at PDN/PPE 2016 Expo
Demonstrated for the first time to the public in the United States, attendees to the 2016 PDN PhotoPlus International Conference + Expo (PPE), held at the Javits Convention Center in New York City from October 20-22, 2016, can see first-hand the new Sigma Cine family of lenses:

Cine High Speed Zoom Line – 18-35mm T2 and 50-100mm T2
The high speed zoom line, which is compatible with the Super35 image size standard, offers the constant aperture of T2 throughout the zoom range with superior optical performance that is capable of high-resolution 6K-8K shooting. Delivering the highest image quality in its class, the High Speed Zoom is ergonomically compact and designed for E, EF and PL camera system mounts.

Cine FF Zoom Line – 24-35mm T2.2 FF
Compatible with a full-frame image sensor, the FF Zoom’s outstanding optical performance also supports 6K-8K shooting. Because so few lenses cater to the requirements of the latest digital cinema cameras’ image sensors, this line provides a rare option for cinematographers. The FF Zoom is designed for E and EF camera system mounts.

Cine FF High Speed Prime Line – 20mm T1.5 FF, 24mm T1.5 FF, 35mm T1.5 FF, 50mm T1.5 FF and 85mm T1.5 FF
The Cine High Speed Prime lineup features lenses ranging from 20mm to 85mm, with all five touting an aperture of T1.5. Highly compact and compatible with full-frame sensors, these lenses offer superior resolution. They bring a consistent level of light to the production, offering greater consistency to any film’s color, contrast and overall look before it enters post-production. The FF High Speed Prime line is designed for E, EF and PL camera system mounts.

For more information on the Sigma Cine Lenses, please visit https://www.sigmaphoto.com/cinema-lenses/?link=Sept-M-cine.

About Sigma Corporation
Craftsmanship. Precision. Dedication. Since 1961, Sigma has been devoted the pursuit of advancing photographic technology. Unique to the industry, the family-owned business produces its high-quality, award-winning camera lenses, DSLR cameras, flashes, filters and accessories from its state-of-the-art manufacturing facility located in Aizu, Japan.

In 2012, the company introduced the Sigma Global Vision with three distinct lens lines: Art, Contemporary and Sport. Designed for industry camera mount systems including Canon, Nikon, Olympus, Pentax, Sony and Sigma, each lens is handcrafted and tested in Japan to ensure a high-performance, premium product that is purpose-built to last.

Sigma continues its tradition of imaging excellence with the mirrorless sd Quattro, sd Quattro H and the compact dp Quattro camera line. Leveraging the ultra-high resolution Foveon sensor, the Sigma Quattro cameras are designed to produce the highest quality image with every shot.

Articles: Digital Photography Review (dpreview.com)

 
Comments Off on Sigma announces pricing for 18-35mm T2 and 50-100mm T2 Cine lenses

Posted in Uncategorized


Throwback Thursday: the Kodak DC265, a user-programmable compact

20 Oct

Throwback Thursday: Kodak DC265

When you think of unique cameras, the Kodak DC265 (announced in 1999 for $ 899) probably doesn’t come to mind. The first thing you probably notice is its unusual shape and ‘foot’ to keep it from tipping over. But what really made it unique is that it ran Flashpoint’s Digita OS, which was fully scriptable (the company and OS did not last long.) In other words, developers could add new features by writing some code and putting it onto a memory card. Several Kodak models at the time supported Digita, as did those from HP, Konica Minolta and Epson.

Before we get to that, here’s a quick overview of the DC265. It had an F3.0-4.7, 38-115mm equivalent lens, which is so loud when it’s extending that it made my coworkers in other cubicles wonder what on earth was going on. It had a whopping 1.6 Megapixel CCD, an external autofocus sensor (that we think involves infrared light) and an optical viewfinder that isn’t nearly as large as it appears from this view.

Throwback Thursday: Kodak DC265

While the DC265 had a ‘regular’ menu system (more on that in a minute), you could also use the LCD info display and a pair of buttons to quickly adjust settings. In 1999 this was a pretty advanced camera, offering burst shooting (at a whopping 3 fps, with live view disabled), time lapse and manual focus. It takes the camera and absurd amount of time to save a burst of photos to its memory card; we’re talking like 90 seconds.

While it looks like the DC265 doesn’t have much of a grip, it’s actually quite comfortable in the hand. The thumb rest is on the lower-right side of the back panel and works in conjunction with the ‘foot’ shown earlier, making this unusually shaped camera easy to hang on to.

Throwback Thursday: Kodak DC265

The DC265 was loaded with I/O ports. You’ve got your 8-pin Mini-DIN port for connecting to a Mac or PC, A/V out and DC-in. And what’s hiding under that last port? A flash sync port! There’s a dedicated volume button, a feature which didn’t really catch on.

You can see that the previous owners – a school in Bellevue, WA – etched their name onto the side of the camera for all eternity.

Throwback Thursday: Kodak DC265

The DC265 had two doors on its right side. One holds 4 AA batteries, while the other is where you’ll put that CompactFlash card. I had to dig through my collection of ancient memory cards to find one that the camera could read (96MB in this case). 

The battery life on the DC265 is terrible, which is why NiMH rechargeables were so popular in those days.

Throwback Thursday: Kodak DC265

There are lots of exciting things on the back of the camera which, as you can see, has had a rough life. You’ve got a tiny viewfinder, a mic and speaker, that nice rear thumb rest, plus the zoom controller at the top right.

The mode dial (around the four-way controller) switches between record, playback, connect (to a PC or printer) and ‘info’ mode (which just listed the firmware version, copyright info and a link to Flashpoint’s website.)

Then there’s the LCD, which is truly awful. It’s average-sized for that time period (2″) and the resolution was competitive. However, once you pan the camera or anything moves, everything turns blue and red and the refresh rate is around 3-4 fps (per Phil Askey’s original review.)

To make matters worse: the menus are all in Comic Sans (or something that closely resembles it.)

Throwback Thursday: Kodak DC265

And that leads us to the Kodak DC265’s pièce de résistance: Digita. This scripting language, developed by the now-defunct Flashpoint, was easy for anyone with basic programming experience to learn. Kodak itself offered several scripts for Digita, including one for bracketing that you can see parts of above.

There was also a pretty large home-brew community at the time, with scripts that could generate HTML galleries, have finer control over shutter speed or just play Tic Tac Toe. Scripting got more powerful on later DC-series models (notably the DC290), with the ability to create panoramas or embed GPS data. And while it couldn’t run Crysis, the DC290 could play Doom.

As you probably know by now, Digita didn’t take off. But for a brief moment in time, it let photographers add features to cameras themselves, rather than waiting for the next model to come out.

Kodak deserves a lot of credit for bringing something new to digital photography, whether it was the unique design of the DC265 (and its successor, the DC290) or putting users in control over camera features with Digita. 

For more on the Kodak DC265, check out Phil Askey’s review here on DPR.

Articles: Digital Photography Review (dpreview.com)

 
Comments Off on Throwback Thursday: the Kodak DC265, a user-programmable compact

Posted in Uncategorized


Attack of the Giant Spider! Watch This Optical Illusion Mural Come to Life

20 Oct

[ By SA Rogers in Art & Street Art & Graffiti. ]

spider-mural-1

A nightmarishly oversized spider emerges from a gaping hole in a wall in this anamorphic optical illusion mural by French street artist Denys Pasco, better known as Densoner. Known for his highly detailed graffiti style as well as oversized murals frequently featuring creatures of the wild, Densoner created a creepy effect with the massive arachnid’s legs stretching out toward the viewer.

resized

The process of creating ‘Eat Me’ is captured on video and sped up so you can watch the spider come alive in the hands of the artist. Denoner starts off by painting a photorealistic black hole on a tattered urban wall, with the edges painted in shadow to make it appear 3D.

densoner-spider-mural-1

densoner-spider-mural-2

densoner-spider-mural-3

densoner-spider-mural-4

Then, with a few strokes of white, the spider begins to appear, becoming more and more threatening as the artist works. Watch the video all the way to the end for a fun surprise.

Share on Facebook


[ By SA Rogers in Art & Street Art & Graffiti. ]

[ WebUrbanist | Archives | Galleries | Privacy | TOS ]


WebUrbanist

 
Comments Off on Attack of the Giant Spider! Watch This Optical Illusion Mural Come to Life

Posted in Creativity