RSS
 

Archive for July, 2016

A Beginner’s Guide to Minimalist Photography

24 Jul

Minimalism is splitting the world in two. Love it or hate it, it’s a style with a very defined outline, one that has its roots in in the painted arts of the 20th century and that continued to branch out in other domains. These days, minimalism is especially present in design, fashion, and photography. A simple scout around websites such Continue Reading

The post A Beginner’s Guide to Minimalist Photography appeared first on Photodoto.


Photodoto

 
Comments Off on A Beginner’s Guide to Minimalist Photography

Posted in Photography


Top tips for composing great landscapes

23 Jul

In this article I’ll try to outline a handful of the key elements that I look for when composing a photo in the field. The process of composing a photo can be daunting at times, but I hope that some of these tips will help you to lay the groundwork for developing an eye for composition in landscape photography.

Compositional Visualization: See the ball, be the ball

Developing an eye for composition in landscape photography is something that takes a great deal of time and practice in the field. Practice, persistence and due diligence do pay off and over time you will find yourself becoming more comfortable behind the lens.

The Mossy Grotto in the Columbia River Gorge in Oregon is incredibly difficult to shoot due to the limited compositional choices. I hiked around for almost 30 minutes before I settled on this composition which had a lot of layering and some nice diagonal leading lines to help to lead the eye to the focal point.

Mossy Grotto, Columbia River Gorge, OR

Sony a7R, Canon 16-35mm F2.8, 16mm- multiple exposures used for focus stacking and water movement. 

One thing that I’ve learned over time is that you absolutely have to pre-visualize your shot. This process starts with four key elements – the direction of the light, the focal point, the foreground and the leading line(s).

The focal point is often the first thing that your eye gravitates toward. It could be a waterfall, a mountain or even a stand of trees. If your eye gravitates toward it chances are it may serve as a good focal point to build your composition around. The next step in the process is to look for a leading line that guides your eye through the scene to your focal point.

I decided to use the river you see in this image as the leading line in this composition because it was able to the lead the viewer to the main focal point without detracting interest from it. I also enjoyed how the light in the composition added layers and depth to the image as well.

Glacier National Park, MT

Sony a7R, Canon 16-35mm F2.8, 16mm, F11, 1/15sec, ISO 160, single exposure

The ‘line’ is figurative of course. It can be a rock formation, a river, a series of interesting trees, vegetation or foliage, flowers, or even a trail. Choosing the correct leading line can have a large impact on your image. It is important to note though that the leading line may not work depending upon the direction of the light in the scene.

Let the light guide your eye to the focal point in the image

All of the elements need to work together to form a pleasing composition. Let the light guide your eye to the focal point in the image. Shadows and light play a huge role in guiding your eye through the scene and, when used correctly, can add a great deal of depth and interest to your photo.

I chose the Lupine you see here as my foreground because I felt the colors complimented the sky well (blue/purple and yellows tend to work well together) and the light play in the flowers also helped to guide your eye through the scene to the focal point at the back of the image.

Sony a7R, Canon 16-35mm F2.8L II, 16mm, F10, 1/50sec, ISO 100, multiple exposures for focus stacking and sunstar.

Choosing the correct foreground can have a large impact on the success of your image. I always try to choose a foreground that offers a complementary color palette to the other elements in the scene such as the sky or mountains. I also tend to look for elements that add depth and interest to the overall image without overwhelming the viewer- it’s a bit of a balancing act in regard to keeping the image dynamic yet visually pleasing. I also try to choose a foreground that offers a color palette that helps to ‘connect’ the overall image. When colors work well together they can really help to solidify an already aesthetically pleasing image.

Ted Gore recently published an excellent article on color theory that complements this article nicely. Using groups of colors that work in harmony and flow nicely can help to solidify an already robust composition and can add a whole new ‘layer’ of interest to the photo.

Articles: Digital Photography Review (dpreview.com)

 
Comments Off on Top tips for composing great landscapes

Posted in Uncategorized


Why Off-Camera Flash Isn’t as Scary as you Think

23 Jul

Flash

The word alone has the potential to cause dread, even among experienced photographers, bringing to mind images of overexposed faces and red eyes. Because of this, many photographers avoid flash altogether, keeping a safe distance at all times. I think that’s too bad.

It’s a missed opportunity. Sure, flash may not always be applicable to your situation – but it’s very helpful to have another tool in your bag of tricks if and when it is needed.

Portrait

Off-camera flash gives you an incredible amount of control. Yes, understanding natural light is an important part of being a photographer – but working with off-camera flash lets you create your own lighting conditions. You can even mimic the elusive golden hour.

This guide will explain off-camera flash in its simplest components, giving you the knowledge to begin to experiment, and to explore how it could help your photography.

What you need to start

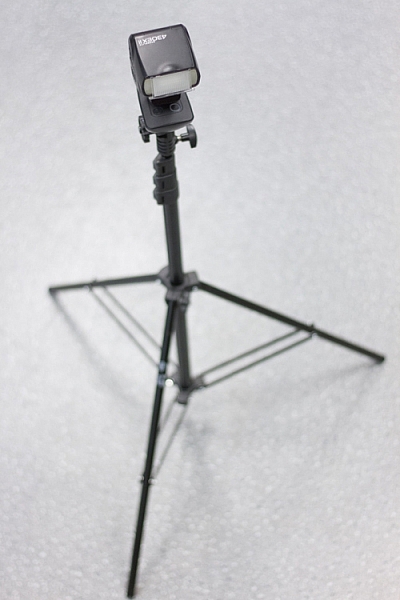
When I talk about off-camera flash, you might be picturing something like this:
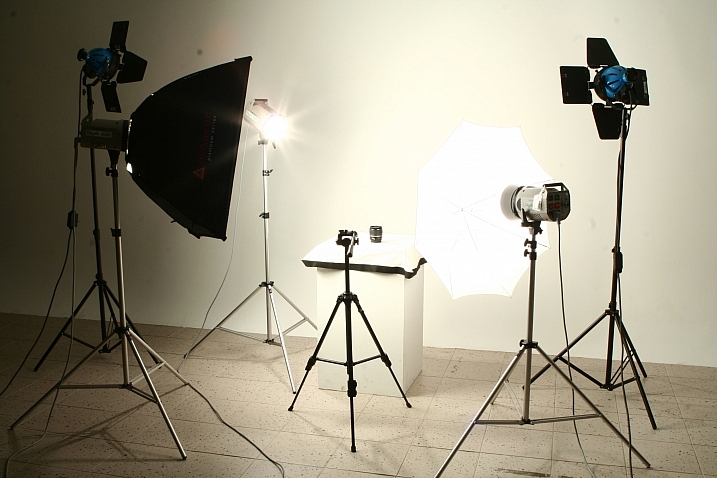
? ?? / Chris Lim

By ? ?? / Chris Lim

If that’s the case, I don’t blame you for being a bit nervous. In reality, all you need to get started with off-camera flash photography is:

  • A camera
  • An independent flash unit
  • A way to make them fire simultaneously
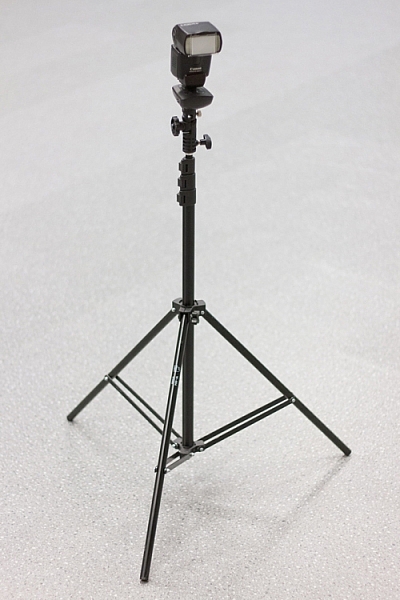
  • Something to hold your flash, like a light stand or a friend
light-stand-1 light-stand-2

Once you take your flash unit off of the camera, it won’t know that it is supposed to fire when you hit the shutter button. Fortunately, there are several ways that you can sync your flash.

Built-In Flash Control: Some cameras have a built-in setting that uses the pop-up flash to tell your off-camera flash to fire. Most flash units have a sensor on the front that recognizes the sudden burst of light (optical sensor), and fires accordingly.

pop-up-flash

Flash Sync Cord: This is a cord that runs from your camera to the flash. Think of it like an extension cord. These are useful and reliable, but it also limits how far away the flash can be from your camera.

Wireless Radio Transmitters: The preferred option, radio transmitters can sync your flash to your shutter even if they are at a significant distance away.

bts-6855-edit

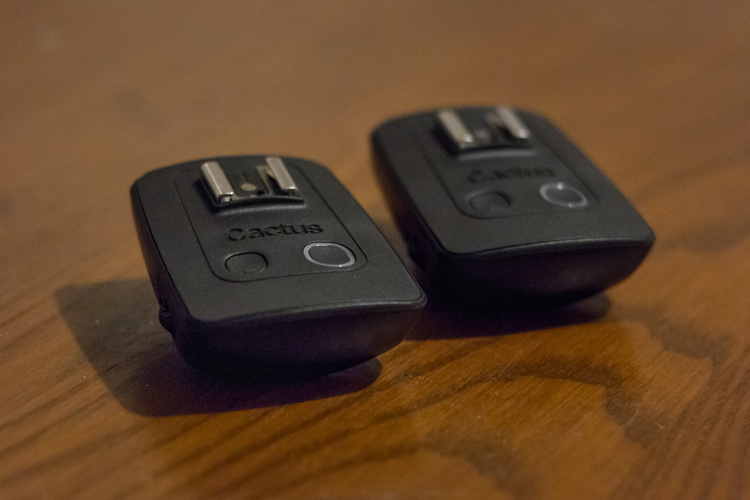
Cactus brand remote triggers

bts-6859-edit

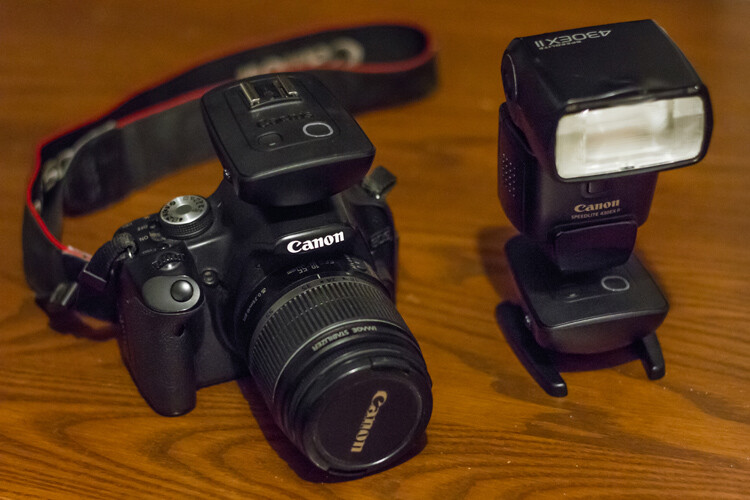
One remote goes on the camera, the other attaches to the flash. When the camera fires the one on the camera sends a signal to the other remote to fire the flash.

Editor’s note: for more great tips read, A Beginner’s Guide to Working With Flash Off-Camera

The basics – controlling your off-camera flash

When you use a flash on-camera, it can determine the correct power settings and fire accordingly (TTL). Once you take the flash off the camera, however, you’re going to need to tell both the camera and the flash what to do manually.

bts-6851-edit

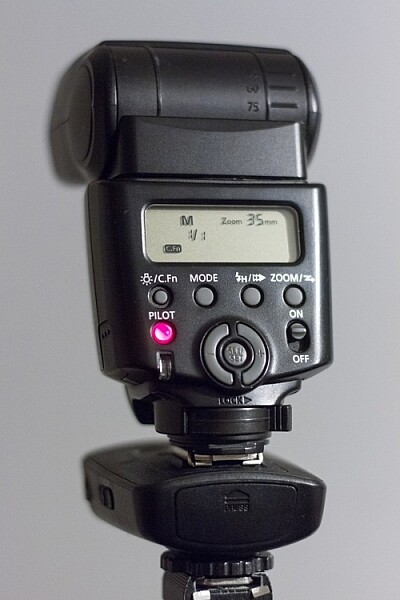
M is Manual mode, and 1/1 is full power. Zoom level shows 35mm. Read the user manual for your flash to see how to adjust these items.

If that sounds scary, just take a deep breath – we’ll get through this together.

Fortunately, controlling flashes is quite simple. In manual mode (on the flash), you choose the amount of power at which the flash fires. This is expressed as a fraction: 1/1 means the flash is firing at full power, ¼ means the flash is firing at a quarter of its total power, and so on. Easy, right?

Alright, so now we know how to control the flash. What about the settings on your camera?

This is the cool part. You can control the effects of the flash using your ISO and aperture. Adjusting these two settings controls how sensitive your camera sensor is, and how much light it can collect.

So here are the four ways to make the flash in your image stronger (more flash):

  • Turn up the flash power
  • Move the flash closer to your subject
  • Turn up the ISO
  • Make the aperture wider (smaller f-stop number)

Piece of cake! Is your flash in your picture too strong? Well, simply do the opposite of one of the criteria mentioned above (turn the flash down, move it away from the subject, turn the ISO down, use a smaller aperture).

You’ll notice that I haven’t mentioned shutter speed yet. That’s because your shutter speed doesn’t affect flash at all.

Well, almost not at all. Every camera has a flash sync-speed. This is because if the shutter speed goes too fast, it won’t sync perfectly with the flash (the shutter will open and close before the flash goes off). As a result, part of your picture won’t see the effects of the flash – resulting in a black bar across part of the shot. For most consumer cameras, your maximum flash sync speed will be around 1/200 or 1/250. Keep your shutter speed under that (slower like 1/125th or 1/60th) and you’ll be fine.

flash-sync-1

Correct sync speed used the flash lights the entire image

flash-sync-2

If your shutter speed is too fast (higher than the sync speed) you will get something like this, where part of the image is not lit by the flash and is dark, or even black.

Two exposures: Ambient and flash

This is the key to understanding off-camera flash photography.

Think of every picture taken with flash as being two exposures, overlapped on top of each other. The way you decide to balance the ambient lighting and the flash, sets the tone for the image. Let’s take it one layer at a time, and you’ll see how easy it can be to build an image using off-camera flash.

THE FIRST LAYER: AMBIENT LIGHTING

Ambient light is that which is already available in the area from the sun, window light, street lights, etc. At certain times of the day, your ambient light is going to be quite nice, like at Golden Hour. Other times, you may not be so lucky.

Sunsets, for example, are especially tricky. This is because in order to bring out the colour and texture of a sunset, you need to keep the exposure dark – and as a result, your subject will be completely silhouetted.

Here’s the first step for taking your off-camera flash picture – ignore your flash altogether. Turn it off.

Find the normal, correct exposure for the existing (ambient or available) light, and then adjust your settings to intentionally make your image too dark. The darker your ambient exposure, the more dramatic the light from your flash will be.

1 ambient

Here is my exposure for the ambient light (above). We’re off to a good start! For this shot, I want to keep the dark, dramatic sky in the background, and I will rely on my flash to light up the tennis player.

THE SECOND LAYER: FLASH

Alright, now turn on your flash. By using flash to light my subject, I can get the best of both worlds – my sky remains dark and dramatic while my subject is well-lit.

It will probably take a few shots to get your lighting right. That’s perfectly normal! Use the tips mentioned in the previous section to add more or less power to your flash.

1 flash

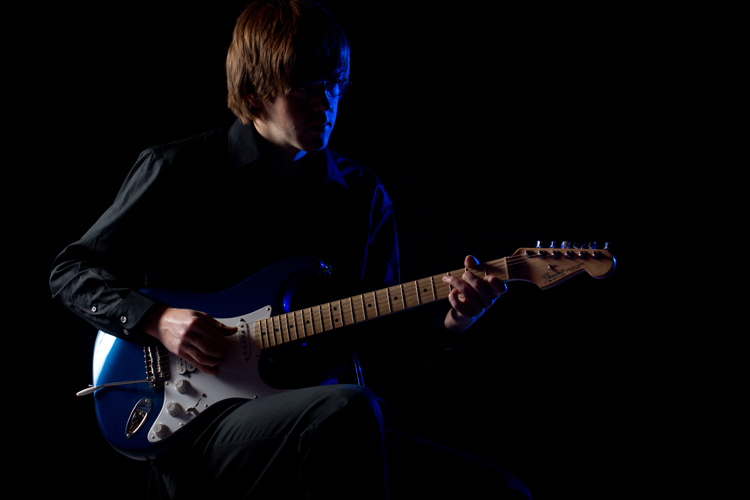
When we add the flashes, we get to keep the dramatic background, with the benefit of crisp lighting on our subject. This shot simply isn’t possible without flash.

You can use what you know about ambient and flash lighting to set the tone of the image.

If you keep your ambient light levels high, the flash will add just a kiss of light. If you start with a very dark ambient image (like the one above), your flash will sculpt and define the image much more strongly.

1 behind the scenes

Here’s the behind-the-scenes of our setup. Since the light is hitting the subject from an angle, it is dramatic and shows shape much more effectively than if the flash had been on the camera. One flash is to camera right, bouncing into an umbrella to soften it, the other is to camera left (and behind the subject) to add an accent light.

Putting it into Practice

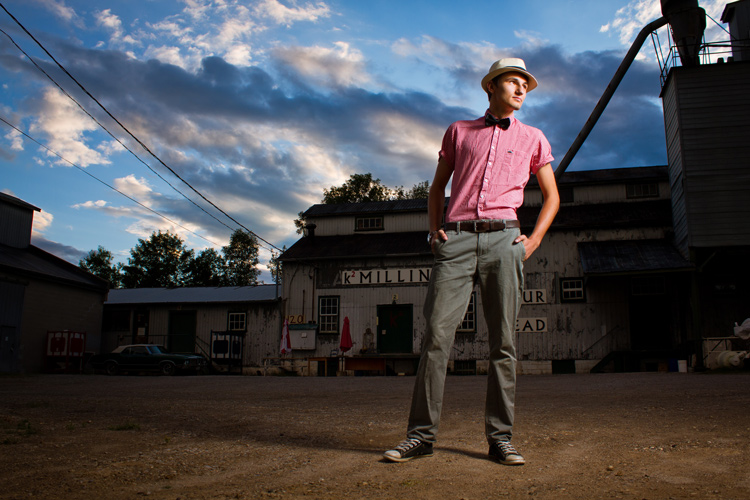
Here’s another example, this time using flash to give a simple kick, to a liven up a portrait.

2 natural

This was shot with no flash, exposed for the skin tones.

2 ambient

Ambient light only, darkened for the background.

The first step was to push the “correct” exposure down, making the overall image darker, so that we could use flash to highlight the subject.

2 flash 2 double flash

In the image above (left), the flash is coming from just left of the camera. It brightens the subject up (compared to the background), and makes the image seem more three dimensional. The background also pops more than it did with the “correct” exposure.

If we want to, we can play around with the effects of a second flash (above right), maybe letting it aim directly toward the camera to create some lens flare?

2 behind the scenes

Here’s the simple setup.

Shaping and modifying your light

Well done! You’ve made it through the basics of off-camera flash photography. Next, you can push your newfound skill to a whole new level by learning how to modify the light.

If you’re familiar with how the light on a cloudy day is softer than the light on a sunny day, then you already know nearly everything you need to know about flash modifiers.

The basic rule is this: the larger the light source, the softer the light.

A flash unit is a small light source that creates harsh shadows. That isn’t always so flattering.

The purpose of umbrellas, soft boxes, and other light modifiers, is to make the source of light larger. This softens the light, which is especially useful for portraits.

flash-3

Learning how to modify light lets you build a style that matches your image.

Looking for a gritty photo? Shoot with a bare flash (no modifiers) and get sharp shadows. Looking for softer, more flattering light? Use a softbox.

Practice, practice, practice

Once you’ve got a feel for how to use your flash off-camera, you’ll have a whole new world of photography to explore. Try it. The worst thing that can possibly happen is that you’ll learn something.

Using digital equipment gives you the ability to try things without any financial repercussions. Learning flash photography through trial and error was probably pretty expensive back in the days of film; today you can fire as many shots as you need in order to learn, without breaking the bank.

Nobody ever got off-camera flash right on their first try – experiment and stick with it, and you’ll add a valuable new tool to your bag of tricks.

flash-2

More articles for you to read on dPS about off-camera flash:

  • How to Create Compelling Wide-Angle Portraits Using One Off-Camera Flash
  • 9 Steps to Get Over Your Fear of Off-Camera Flash
  • Supporting Your Off-Camera Flash – Tripods, Monopods or Light Stands?
  • Beginners Guide to Using TTL Off-Camera Flash
  • How to Get Started with Off-Camera Flash Photography – Start With One!
  • Getting Started with Off-Camera Flash
  • How to Balance Off-Camera Flash and Ambient Light on Location
  • A Beginner’s Guide to Working With Flash Off-Camera
  • The Ultimate Flash Photography Guide FAST FLASH FOR PORTRAIT PERFECTION a dPS ebook

googletag.cmd.push(function() {
tablet_slots.push( googletag.defineSlot( “/1005424/_dPSv4_tab-all-article-bottom_(300×250)”, [300, 250], “pb-ad-78623” ).addService( googletag.pubads() ) ); } );

googletag.cmd.push(function() {
mobile_slots.push( googletag.defineSlot( “/1005424/_dPSv4_mob-all-article-bottom_(300×250)”, [300, 250], “pb-ad-78158” ).addService( googletag.pubads() ) ); } );

The post Why Off-Camera Flash Isn’t as Scary as you Think by Frank Myrland appeared first on Digital Photography School.


Digital Photography School

 
Comments Off on Why Off-Camera Flash Isn’t as Scary as you Think

Posted in Photography


Deconstructed: 25 Famous Floor Plans as Architectural Labyrinths

23 Jul

[ By WebUrbanist in Art & Drawing & Digital. ]


libeskind

The most fundamental blueprint of a building is its floor plan, which organizes the spaces to be occupied, creating a footprint to be extruded into three dimensions. In his ARCHIPLAN series, Federico Babina splits the difference, pulling elements up high enough to form mazes for exploration.

corbusier

wright

gehry

His set of 25 compositions includes works by Le Corbusier, Mies van der Rohe, Louis Kahn, Zaha Hadid, Frank Gehry and other famous architects both past and present. In each case, a critical classic work is selected then, its plan extrapolated upward and its spaces filled in with roaming characters.

sanna

kahn

ban

In some cases, the cutaways are particularly revealing – the work of Shigeru Ban, for instance, represents experimentation with various materials like paper and bamboo, reflected in the hollows in the sliced drawing.

koolhaas

rossi

meiere

Solids and voids are shown through shading, shadows and light. These visual distinctions highlight straight and curved surfaces, walls and columns, while also revealing something about the stylistic approach of each designer.

zumthor

aalto

niemeyer

Other architects highlighted in the series include: Ando, Rossi, Niemeyer, Ando, Ito, Zumthor, Wright, Sanaa, Libeskind and Koolhaas, representing a range of Modernists, Postmodernists and Deconstructivists of the 20th Century.

ando

ito

mies

In other artistic sets, Babina has explored built phenomena in different ways, developing a series of architectural movie posters and re-imagining famous art as architecture.

Share on Facebook


[ By WebUrbanist in Art & Drawing & Digital. ]

[ WebUrbanist | Archives | Galleries | Privacy | TOS ]


WebUrbanist

 
Comments Off on Deconstructed: 25 Famous Floor Plans as Architectural Labyrinths

Posted in Creativity


Blincam is a wearable camera that takes a photo when you wink

23 Jul

A Tokyo-based startup has successfully crowdfunded a wearable camera concept called Blincam. Much the way Google Glass works, Blincam would attach to a pair of glasses and snap photos when the wearer winks or blinks. According to the team behind the product, the final product will be compatible with a mobile app that immediately provides access to photos taken with the camera.

Blincam is said to feature a patent-pending Eye Movement Sensor that detects when the wearer blinks, as well as an integrated speaker for playing a shutter sound, an LED battery indicator light, Bluetooth connectivity, microUSB, 32GB of internal storage and an ‘HD CMOS’ camera sensor. 

Blincam Co Ltd, the company behind the campaign, claims to have already developed an alpha version of Blincam, and that it has worked out most of the technical issues. The crowdfunding campaign is intended to raise part of the funds needed to launch the camera. The company anticipates starting deliveries to backers this coming December; as with other crowdfunding projects, however, it is possible the device will never come to fruition.

Articles: Digital Photography Review (dpreview.com)

 
Comments Off on Blincam is a wearable camera that takes a photo when you wink

Posted in Uncategorized


5 Tips for Taking Better Portraits in Nature

23 Jul

I can’t get enough of being outside in nature.

I often go out on trail runs with my friends, and we spend most of the run grinning from ear to ear, exclaiming how lucky we are to be here on this earth, and how beautiful every single thing is. I love to go camping with my family, where we set up hammocks in the trees, listen to the birds singing, and the leafy wind sounds as we gaze up into the sky.

900

So it makes perfect sense to me to take photos of people in the great outdoors. Nature elevates the whole photo to something much more interesting than a simple studio backdrop. People are my favorite subjects, and nature is my favorite setting, so I’d love to share a few ideas to help your nature portraits be even more exciting.

1 – Nature’s Colors Can Complement Perfectly

300

Sometimes you may notice that your subject’s hair, eyes, lips, or clothing matches some floral blooms, leaves, sky, or rocks perfectly. Photographing your subject with colors in mind can bring out some of those things beautifully, and make a gorgeous photo. Sometimes the colors may match exactly, or they may be opposite on the color wheel, and make your subject just pop.

For example, if your subject is wearing purple, keep an eye out for yellow leaves. If you are doing your photographs in a place with lots of green, pops of red can really stand out. If your subject has startling blue eyes, use water or the sky to bring out that blue even more. Start paying attention to the colors in your photos, along with composition, light, etc., and your photos will have a whole new dimension to them.

700

2 – Focus on Nature and Let the People Blur into the Background

600

For a new perspective, try focusing your camera on nature in the foreground, and letting the people in the background be out of focus. This is especially effective for photos that feel like you’re getting a glimpse of something private, like a kiss, or a mother with her newborn baby.

You can do this by setting your aperture wide (a low number, for example, between f/1.8 and f/2.8), setting your camera to let you choose the focus point, then making sure your focus point is on the flowers, leaves, or rocks in the foreground. Make sure your subjects are standing far enough behind your foreground, so they will definitely be out of focus. You want it to look like it was done purposely, not like you accidentally missed the focus on your subjects.

3 – Be Playful and Interact With Nature

400

Nature is full of props to make your photos even more fun. You can use logs, rocks, and branches to perch on. You can use leaves or snow for your subject to blow on, or throw, in the air. You can have them walk through a stream, or throw rocks from the bank. Use a flower to tuck in the hair, or to smell. The ideas are endless, and if your subjects are really outdoorsy and they interact with nature regularly, make sure to capture that during your photo session with them.

Be kind to nature around you, though, and try to leave everything the same or better than you found it. Remember that if everyone broke branches, picked a bouquet of wildflowers, or stomped on untouched fragile foliage, there would be nothing left for any of us to enjoy. Tread lightly, pick up any trash, and don’t leave a trace.

200

4 – Dress Mother Nature up a Little Bit

800

You can create a whimsical, unexpected photo, with a few unlikely props. Carefully hanging a chandelier from a tree, or a bench or couch in a field, can be a lot of fun. Try props like a retro typewriter in the middle of a forest, or balloons at the beach. It’s hard to look at a photo with something so playful and fanciful, without smiling.

5 – Make Nature the Star of the Show

100

I love images of beautiful scenes in nature, but I love a photo of a person IN a beautiful scene in nature even more. It shows scale, and adds so much interest to the photo. Your human in the photo may almost be an afterthought, maybe even almost blending in to the scene.

Look for beautiful scenes that would make pretty photos alone, then add your person into the shot. These types of photos work perfectly to print up gigantic and hang up on the wall. Close up photos are fantastic, but sometimes pulling way back, and getting more scenery than person in a photo, is the perfect thing to do.

1000

Summary

I hope these tips give you some ideas to get out and take some portraits in nature.

How have you used nature to enhance your portraits? I’d love to see your nature portrait photos in the comments if you’d like to share.

500

googletag.cmd.push(function() {
tablet_slots.push( googletag.defineSlot( “/1005424/_dPSv4_tab-all-article-bottom_(300×250)”, [300, 250], “pb-ad-78623” ).addService( googletag.pubads() ) ); } );

googletag.cmd.push(function() {
mobile_slots.push( googletag.defineSlot( “/1005424/_dPSv4_mob-all-article-bottom_(300×250)”, [300, 250], “pb-ad-78158” ).addService( googletag.pubads() ) ); } );

The post 5 Tips for Taking Better Portraits in Nature by Melinda Smith appeared first on Digital Photography School.


Digital Photography School

 
Comments Off on 5 Tips for Taking Better Portraits in Nature

Posted in Photography


Mood Boards: Communicate Your Ideas To Your Creative Team

23 Jul

This is the time to hear out others opinions (if you’re open to them, which


Fashion Photography Blog

 
Comments Off on Mood Boards: Communicate Your Ideas To Your Creative Team

Posted in Uncategorized


24 Fantastic Photos of our Fine Feathered Friends – Birds

23 Jul

As we just wrapped up a week of nature photography related articles I wanted to round it out with a few images of our feathered friends, the birds.

Birds are incredibly hard to photograph when in motion, luckily some stick to the ground or are slower than others. Let’s see some fantastic examples of bird photography (I’ll even throw in a few of my images) – enjoy!

Irene Mei

By Irene Mei

Darlene Hildebrandt

By Darlene Hildebrandt

Darlene Hildebrandt

By Darlene Hildebrandt

Deven Dadbhawala

By Deven Dadbhawala

Amro

By Amro

Glasseyes View

By glasseyes view

Carolyn Lehrke

By Carolyn Lehrke

Sadie Hart

By Sadie Hart

Susanne Nilsson

By Susanne Nilsson

Ken Mattison

By Ken Mattison

Vikramdeep Sidhu

By Vikramdeep Sidhu

Alessandro Caproni

By Alessandro Caproni

Bee Thalin

By Bee Thalin

Rosanne Haaland

By Rosanne Haaland

Zach Stern

By Zach Stern

Christopher Michel

By Christopher Michel

Ian McMorran

By Ian McMorran

Teddy Llovet

By Teddy Llovet

Irene Mei

By Irene Mei

Smudge 9000

By Smudge 9000

Jon Dunne

By Jon Dunne

Matt Knoth

By matt knoth

RayMorris1

By RayMorris1

Daniel Schiersner

By Daniel Schiersner

googletag.cmd.push(function() {
tablet_slots.push( googletag.defineSlot( “/1005424/_dPSv4_tab-all-article-bottom_(300×250)”, [300, 250], “pb-ad-78623” ).addService( googletag.pubads() ) ); } );

googletag.cmd.push(function() {
mobile_slots.push( googletag.defineSlot( “/1005424/_dPSv4_mob-all-article-bottom_(300×250)”, [300, 250], “pb-ad-78158” ).addService( googletag.pubads() ) ); } );

The post 24 Fantastic Photos of our Fine Feathered Friends – Birds by Darlene Hildebrandt appeared first on Digital Photography School.


Digital Photography School

 
Comments Off on 24 Fantastic Photos of our Fine Feathered Friends – Birds

Posted in Photography


Double-Helix Bridge Design for Beijing Based on Abstracted Olympic Symbol

23 Jul

[ By SA Rogers in Architecture & Public & Institutional. ]

double helix bridge 1

The Olympic symbol consisting of five interlinked circles is stretched out and rotated until the links create a three-dimensional double helix formation in this bridge design, which is scheduled to become reality in Beijing in time for the Olympic Winter Games in 2022. China has already made it clear that it’s willing to go big when it comes to Olympic architecture, filling Beijing with a series of massive structures for the 2008 Summer Olympics, and it aims to make its next turn hosting just as memorable. The San Shan Bridge (3 Mountains Bridge) by architecture firm Penda will connect Beijing with the city of Zhangjiakou, where most of the outdoor events for the Games will take place.

double helix bridge 8

160612_SanShanBridge_structure diagram


double helix bridge 5

bridge 2

Spanning China’s Gui River, the San Shan Bridge is supported by the double-helix structure made up of three sets of undulating steel arches that cross above and below the road surface, dipping into the water. The deck is suspended from the higher arches using high-strength steel cables in a woven pattern. Four vehicular lanes are edged with greenery, which separates the cars from pedestrian paths on either side. Using up to 5 times less steel than a conventional box girder bridge, the design is slim and lightweight in appearance despite its big visual impact.

bridge 1

double helix bridge 7

double helix bridge 2

The region surrounding the bridge is a popular recreation spot for locals and tourists alike, with booming growth leading to a need for more infrastructure. The bridge will not only provide a crucial (and highly memorable) artery from the city to the Olympic events, it’ll be a central component of the Beijing Expansion Masterplan. Nearly 1500 feet long, the bridge will take a few years to construct, but should be done by the time the Beijing Horticultural Expo 2019 rolls around.

Share on Facebook


[ By SA Rogers in Architecture & Public & Institutional. ]

[ WebUrbanist | Archives | Galleries | Privacy | TOS ]


WebUrbanist

 
Comments Off on Double-Helix Bridge Design for Beijing Based on Abstracted Olympic Symbol

Posted in Creativity


11 Amazing Photos Pokémon Go Characters Fit Perfectly In

23 Jul

While Pokémon Go is quickly becoming a new fitness, it’s no wonder that Pokémon characters are now among the most popular photography subjects. Well, most of such photos are just screenshots meant to show the Pokémon rather than carry any photographic appeal. However, the game is just a few days old (right, days!), so it’s probably won’t be too long Continue Reading

The post 11 Amazing Photos Pokémon Go Characters Fit Perfectly In appeared first on Photodoto.


Photodoto

 
Comments Off on 11 Amazing Photos Pokémon Go Characters Fit Perfectly In

Posted in Photography