 I remember seeing a poster on the wall of my fourth grade elementary school class that said, “What’s right isn’t always popular, and what’s popular isn’t always right.” The quote is attributed to Albert Einstein, and while he was most likely speaking with regard to issues of ethics, justice, and social equality, he might as well have been referencing the current state of image editing software.
The king of the hill when it comes to photo editing programs is Adobe, with their extensive suite of applications designed for creative professionals and hobbyists. But just because their software is widely used, does not mean it is the best. Corel, a software company based in Canada, has been making its own image and video editing programs for years, and is a stalwart in the ever-changing software industry with roots that go back to the early days of the personal computer revolution in the mid-1980’s.
The most recent version of their photo-editing software, AfterShot Pro 3 by Corel, may not have the sheer quantity of features offered by Lightroom or Photoshop, but it has a few tricks up its sleeve that make it a very attractive alternative to those looking for a solid solution outside of Adobe’s offerings.
The user interface is instantly familiar to anyone who has used Lightroom or other image editing programs.
Overview
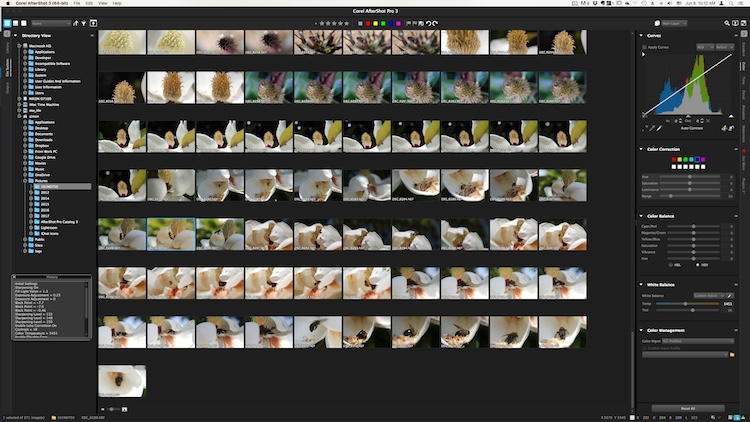
At its core, AfterShot Pro 3 is an end-to-end workflow solution that is designed to suit the needs of demanding photographers as well as casual hobbyists. It allows you to sort your images, edit them, and export them for print, sharing, or use in other programs. Its core features are centered on a robust set of tools that allow you to have a great deal of control over several parameters of your images, and adjust fairly basic elements like white balance, exposure, saturation, and contrast, while also giving you fine-grained control over settings like individual RGB color balance, hue/saturation/luminance, and tone curves.
Pixel peepers and image tweakers will find little to complain about here, though some of the tools are a bit lacking compared to those offered by Lightroom. Sharpening and noise removal work quite well, but don’t allow the same degree of control as in Adobe’s software, but there are some automatic “Perfectly Clear” options for noise removal and color adjustments that I have found to be quite useful.
You can of course edit metadata, use presets, and even insert watermarks or access a growing library of plugins, but a proper evaluation of this program isn’t necessarily about comparing features tit-for-tat to see how it stacks up to the competition. Anyone who is looking at sheer numbers of options and adjustment sliders, will likely find everything here that they could ask for. Rather, deciding if this is the right program for you will likely come down to whether it is suited to your own particular way of actually using the features it has.
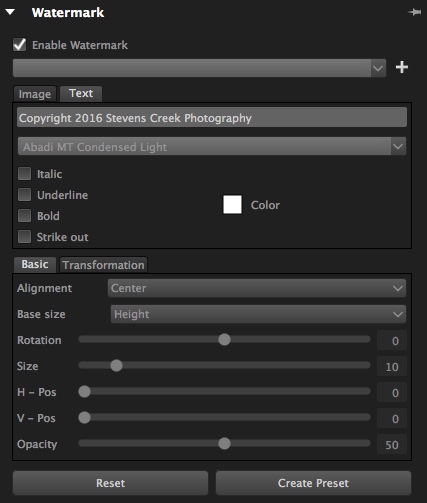
The built-in watermarking tool can accommodate text or allow you to insert a logo or other graphic.
Workflow
AfterShot Pro 3 has its own unique workflow, which does bear some resemblance to how Lightroom and other programs function. But, in order to make full use of the program’s capabilities you might need to learn how to do things in a way that seems strange at first, but will feel like second nature over time.
One of the most notable differences is that AfterShot Pro 3 does not import your pictures into a database, and does not store changes to files in one single master catalog like Lightroom. Instead, it works by leaving your pictures exactly where they are and does not copy them, even from a camera memory card. You must first save your images where you want them, and then as you make edits, a record of all the changes you have made to your image get stored in a unique XMP file.

Instead of keeping a master catalog file with all your edits, a single data file is created for every photo that you have changed. To let someone else edit a photo you have already started, give them the original and the XMP file.
This approach may seem counterproductive at first, because you end up with thousands of XMP files instead of one single all-encompassing catalog. However, it makes your editing much more portable and flexible, since you can transfer your photos and their editing instructions across devices, and share them with other users in a way that Lightroom simply does not offer. If I edit an image on my computer and want to hand it off to another team member to tweak even further, all I have to do is send her the original RAW or JPG file, along with the very small related XMP file. She can now open the image on her machine, make changes to any of my edits, and add alterations of her own. I can even edit an image right on my camera’s memory card without ever copying it to a hard drive, and then physically hand that card to someone else who can make further edits or go back and revise any changes I have made.
From this standpoint, AfterShot Pro 3 could be a boon to those who work in a collaborative or fast-paced environment, as well as casual or hobbyist photographers who want a little more flexibility.
Work space
AfterShot Pro 3 also operates in a single combined environment, as opposed to the discrete modular-based approach taken by Lightroom, where you use the Library module to organize and sort your images, the Develop module to make edits, the Print module when making prints, etc. In AfterShot Pro 3 everything happens from within a single module, from organizing your images, to editing them, to adding watermarks, and finally printing or sharing. Neither one is necessarily good or bad, and neither approach can be said to be objectively better than the other, but personally I have found the interface in AfterShot Pro 3 to be a refreshing change from Lightroom, where I am forced to switch between Library and Develop to do simple things, and even the function of quick keys changes depending on which module I am in at the time. Your mileage may vary, but it’s an important distinction to know if you are considering changing over to Corel’s program, or even just trying it out.
Use of Layers and Flexibility
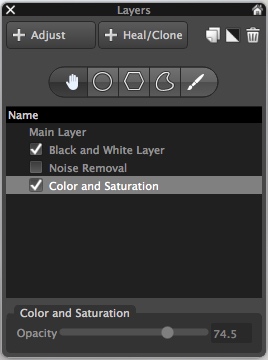
Layers contain a set of edits and can be made more or less opaque, and enabled or disabled at will.
One hugely useful aspect in AfterShot Pro 3, that really stands out from much of the competition, is its intuitive use of layers. You can apply any number of edits in terms of tint, hue, curves, etc., then stash them all into a single layer, which can then be set to anywhere between 100% and 0% opacity. This is an incredibly helpful way of stacking various types of edits on top of one another, and I’m surprised it is not available in Lightroom. For instance, you could easily create a layer wherein you convert your image to black and white, but then set that overall layer opacity to 25%, which would lend a subtle desaturated look to the actual image. You can use multiple layers of edits on a single picture, and even use layers specifically for cloning and healing adjustments as well. It’s a clever, and highly useful way of editing your images, and once you get used to it, you may not ever want to be without it again.
Is the software right for your needs
New in version 3 of the program, is a highlight recovery tool that allows you to coax a bit more out of your RAW files than before, along with other tweaks and improvements compared to earlier iterations. However, as I mentioned in the opening paragraph it’s not really a productive exercise to simply compare a list of features when deciding if an image editor is right for you, since nearly all of them have extensive options that will likely suit your needs.
What matters is whether the program suits your needs and your workflow, and in the case of AfterShot Pro 3 it is certainly worth considering if you are a casual user who wants something with much more power and flexibility, or are simply seeking a worthy (and far cheaper) alternative to one of the more popular editors like Lightroom.
One of my favorite parts of AfterShot Pro 3 is its speed, which honestly could be a make-or-break decision if you are comparing programs. Photos load almost instantly and switching between RAW files is as smooth as butter, which is a far cry from some other programs where you might as well go make some coffee while you wait for a picture to load.
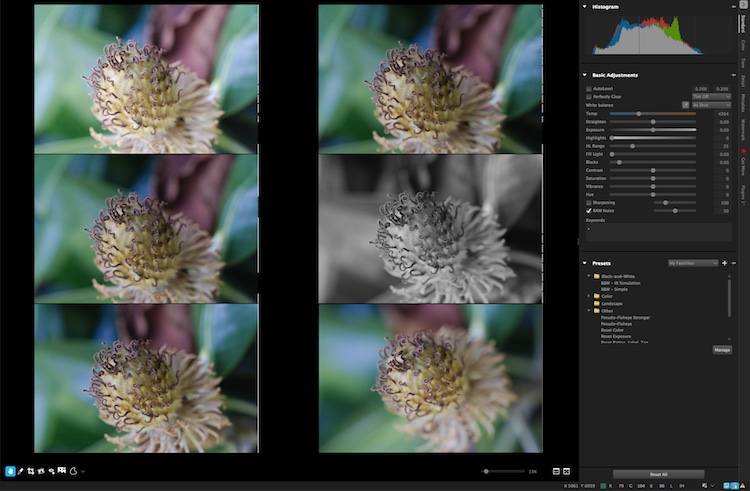
You can view up to six images at once and apply edits to individual photos while in multi-image view.
In the end, I found Corel’s latest entry into the image-editing fray a worthy competitor that can certainly hold its own against the competition. I especially like that it’s priced well under $ 100, which is a one-time purchase, as opposed to a monthly subscription.
I did find a few things to quibble over, like like its lack of a clarity slider (which can be mitigated by using a combination of other sliders) and a black and white conversion function, that is in my opinion, far behind Lightroom’s use of color filters to take fine-tune control over monochrome conversions. However it is a speedy and full-featured image editing program that is certainly worth checking out.

Editor’s note: if you want to check it out Corel has a free trial and you can enter to win a copy right here on dPS.
googletag.cmd.push(function() {
tablet_slots.push( googletag.defineSlot( “/1005424/_dPSv4_tab-all-article-bottom_(300×250)”, [300, 250], “pb-ad-78623” ).addService( googletag.pubads() ) ); } );
googletag.cmd.push(function() {
mobile_slots.push( googletag.defineSlot( “/1005424/_dPSv4_mob-all-article-bottom_(300×250)”, [300, 250], “pb-ad-78158” ).addService( googletag.pubads() ) ); } );
The post Software Review: AfterShot Pro 3 by Corel by Simon Ringsmuth appeared first on Digital Photography School.

Digital Photography School


You must be logged in to post a comment.