ISO is one of the three critical elements of exposure, and yet among the people I have talked to it seems to cause the most confusion. Aperture can be physically represented by simply making a circle with your fingers to represent the size of the opening in your camera lens, and shutter speed can be mimicked by closing your eyes, opening them briefly, and then shutting them. Neither one is a perfect comparison but it helps get the point across, especially to those who are new to photography.
ISO, in my experience, is a bit trickier to explain, and yet it can make or break a picture, even if you have the other two elements set just right. Or…it could make or break a picture in days gone by.
We have reached somewhat of a unique time in the history of photography in that ISO is, to some degree, no longer relevant in the same way that aperture and shutter speed still are. While I certainly would not let my camera choose the aperture and shutter speed for most of my shots, I have all but abandoned my misgivings about Auto ISO, and now almost always let the camera choose for me. As a photographer it has not been an easy leap for me to make, but it has been incredibly liberating, and I think it could be for you too.

A tack-sharp picture I shot at ISO 4000 with minimal digital noise.
My first real digital camera, not counting a few point-and-shoot models I had in the early part of the previous decade, was a Nikon D200. It was a beast of a camera, with some features that outclassed even most modern models, like a maximum shutter speed of 1/8000 second and a weather-sealed body. One thing it did not do so well was high ISO values, specifically anything past 400. I could shoot at 800 in a pinch, but going all the way up to 1600 resulted in pictures that were a muddy mess and 3200, its maximum possible value, was an unmitigated disaster. This trained me to use the following thought process in virtually all shooting situations:
- Shoot in Aperture Priority (I set the aperture and let my camera set the shutter speed)
- Set the ISO to 100, 200, or 400 depending on the lighting
- Select an aperture that would give me the depth of field or overall image sharpness I wanted
- Hope the shutter speed wasn’t too slow so I didn’t get a blurry picture
- If the shutter speed was too slow, raise the ISO to no more than 800
- If the shutter speed was still too slow, compromise my artistic vision by opening up the aperture
Even my old D200 could produce some fine images, though things quickly went south above ISO 400.
It was a process that worked somewhat successfully, but often resulted in images that were compromised in one way or another. When I finally upgraded to a much newer camera, a Nikon D7100, I still had the same mindset when it came to setting the ISO. I wanted to do it myself, lest my camera make some kind of silly decision on its own, that resulted in a picture with way too much noise for my taste. For a while I used the same thought process as shooting with my D200, even though the D7100 had vastly superior high ISO capabilities (which have since been surpassed by nearly every modern camera on the market today including its own successor, the D7200).
At first I used the old rule that had been burned in my mind regarding anything higher than ISO 400, which was to avoid it at all costs. Despite the evidence right in front of my eyes I was still used to the old way of doing things, and mentally set my maximum threshold at ISO 800, which I told myself, could only be exceeded in the most dire of circumstances. It took me far too long to discard this line of thinking, and I’m hoping you won’t have to make the same mistakes I did to get there.

Shot on my D200 at ISO 400.
A Brief History Lesson
The term ISO is somewhat of a holdover from the days of analogue film, when you would go to a camera store and buy an entire roll of film with an ASA value of 100, 200, or 400. ASA 200 was twice as sensitive to light as 100, 400 was twice as sensitive as 200 (which made it four times as sensitive as 100), and so on. Once the film was loaded in your camera you could not simply change your mind and use a different value; you had to shoot the entire roll before changing to another ASA for different lighting conditions.
ASA 100 film was great for outdoor situations or other scenarios where there was a lot of light, just like shooting at ISO 100 on a digital camera. ASA 400 was better for indoor situations when you needed film that was more sensitive to light, if there was simply not much to work with. If you looked hard enough you could get film that went up to ASA 800 or 1000, but anything beyond that was about as common as a polycephalous bos taurus (two-headed cow).
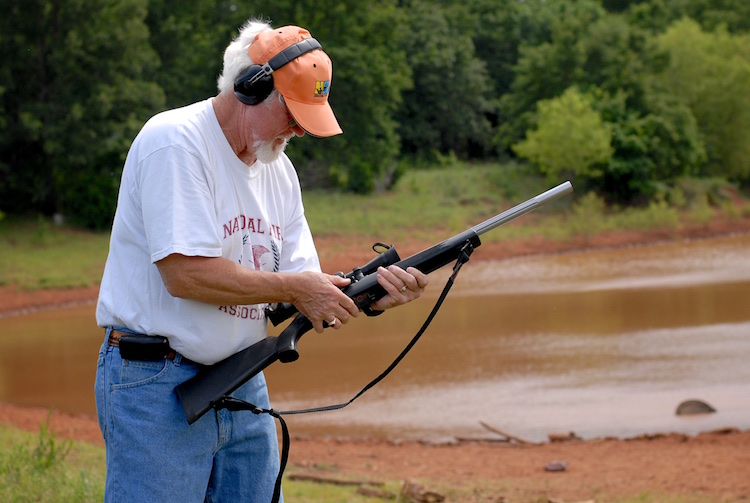
I took this photo of a champion marksman on my old D200 at ISO 400. If you look super close at the trees you will see some noise in the image, but doing that kind of misses the point of the photo.
Early digital cameras, not unlike my world-weary Nikon D200, did not offer much in the way of low-light shooting capabilities that their film-based counterparts didn’t already have. Even as recently as a decade ago if you wanted to shoot in a low-light situation you might as well just grab a roll of high-ASA film, since most digital cameras just weren’t very good at their (roughly) equivalent high ISO values. (ISO and ASA are not directly 1:1 equivalent, but the measurements can be treated as fairly similar for the purposes of comparison.)
However, all this started to change rapidly as digital sensor technology advanced over the years, and now we are at the point where virtually any consumer camera can shoot up to ISO 3200 or even 6400 (a value that was unheard of with analog film) without much of a penalty in terms of overall color and luminance noise. In fact, most digital cameras are so good they can set the ISO automatically (hence the term Auto ISO), essentially removing a critical element of the exposure equation altogether, and freeing you so you only have to think about aperture and shutter speed.
Why I Use Auto ISO
This line of thinking was what used to stop me dead in my tracks as a photographer. The whole reason I learned to shoot in Manual mode was so I could have more control over my photos! Why on earth would I want to give control back to my camera, as if it knows better than I do what settings I want? The answer, I discovered over several years of shooting, is not as black and white as I once thought.
In most situations, the primary element of exposure that concerns me is the aperture, since it dramatically affects things such as depth of field and image sharpness. Of course I also have to pay attention to the shutter speed, since I generally don’t want motion blur, which then leaves the question of ISO. After shooting with my D7100, and subsequently my full-frame D750, I have realized that in most cases, I’m happy to let my camera decide the ISO for me, because I simply don’t care about it anymore. This might sound a bit extreme, but I humbly submit that perhaps you shouldn’t either.
Shot at ISO 2000 on a three-year-old Canon SL1 (EOS 100D)
Some photographers are prone to pixel-peeping, and I must admit I am certainly one of them. Zooming in on a picture to 100% magnification, in order to take note of barely-visible imperfections is a great way to compare various aspects of cameras, lenses, and even similar photographs. Shooting at high ISO values will often reveal noisy blemishes that stick out like a sore thumb when viewed up close. However, what I have come to realize, even when shooting with my D7100 which is over three years old, is that I simply don’t need to view my photos at ultra-close range to enjoy them, and for the most part don’t care about the noise that shows up when I see those ISO values skyrocketing. If I have to choose between a blurry picture and a noisy picture, I’ll take the latter every time, and twice on Sunday.
How to Use Auto ISO
The exact mechanics of enabling Auto ISO vary from one camera to the next, but on most models from major manufacturers like Canon, Nikon, Sony, Fuji, Olympus and their peers, there is usually an option in one of the menus that allows you to do a few things:
- Enable Auto ISO
- Choose a maximum ISO value
- Choose a minimum shutter speed
Once you learn to find your comfort zone with these settings, you might find yourself thinking less about ISO, and more about things like framing and composition. On my D7100 I’m comfortable shooting up to ISO 3200, so I set that as the maximum value. I have the minimum shutter speed set to 1/(2x lens focal length). This means if I’m using a 50mm lens and shooting in Aperture Priority, my camera will lower the shutter speed to no less than 1/100th in order to get a properly-exposed picture, and if that still doesn’t do the trick it will then automatically raise the ISO clear up to 3200.
Learning to relinquish this amount of control has been incredibly freeing, so much so that for a while it actually felt like I was cheating because I was not manually selecting the ISO for every single shot. On my D750 I use similar settings but set the maximum value at 6400.
As you play around with this on your gear you are going to have to find a solution that works for your individual needs and photographic taste. Some cameras only let you specify one single value for the minimum shutter speed (as opposed to calculating it based on the focal length of your lens) and your mileage for how effective this technique is may vary, but if you can learn to embrace Auto ISO and let your camera do some of this heavy lifting, you might find yourself getting a lot more keepers on your memory card.

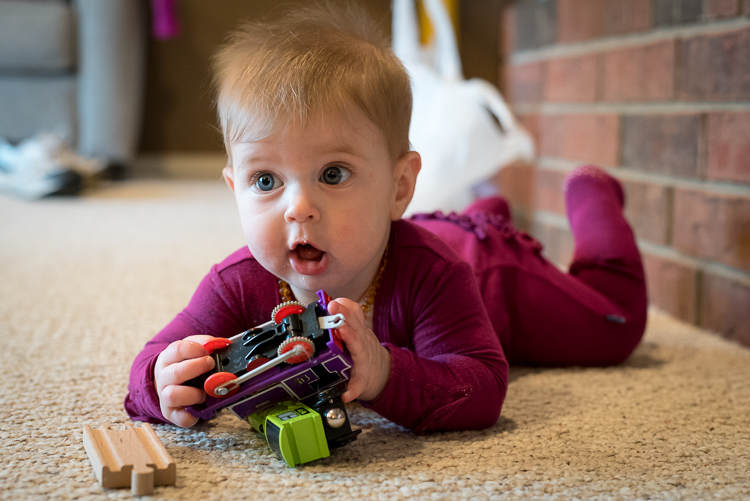
For this impromptu Easter photo I set the aperture at f/3.3 and let my camera do the rest. It chose a shutter speed of 1/100 and then raised the ISO as high as it needed to (2800) in order to get a good exposure.
I would be remiss if I did not mention some of the downsides of Auto ISO as well, as not all is bright and sunny, and warm and fuzzy on this side of the fence.
One of the most significant limitations of shooting at high ISO values is the lack of dynamic range – basically, how much data your image sensor is able to capture in a given picture. If you have a RAW file that was shot at ISO 5000, and you need to use Lightroom to recover detail from the shadows, or raise the exposure of the whole image, you will find you have much less room to work with than if you shot the photo at ISO 100.
Also, depending on your camera, you may also find cases of severe banding, or ugly horizontal lines, that show up when you try to recover shadow detail at high ISO values. Finally, all things being equal a picture shot at ISO 4000 will generally have less vibrant colors, and skin tones will seem a little more artificial and false, than a similar picture shot at ISO 400.
Selecting the ISO was the last thing on my mind when I made this image. I used an aperture of f/4 and a minimum shutter speed of 1/100, my camera selected an ISO of 5000, and I could not be more pleased with the result. A year ago I would have never gone that high, and would have had a blurry photo instead.
Despite these limitations, shooting with Auto ISO has been a huge boon for me, and I think it could be for you too. If you have never tried Auto ISO, I recommend giving it a chance and see how you like the results. For me it was a little like enabling back-button focus, in that I was highly skeptical at first, but after a few weeks I was hooked and now I don’t think I could ever go back.
Do you use Auto ISO? Share your thoughts in the comments below, and I’d love to see some of your favorite high-ISO images as well. Cameras today really are incredible imaging machines, and it’s fun to see what they can do if we push them a little bit.
googletag.cmd.push(function() {
tablet_slots.push( googletag.defineSlot( “/1005424/_dPSv4_tab-all-article-bottom_(300×250)”, [300, 250], “pb-ad-78623” ).addService( googletag.pubads() ) ); } );
googletag.cmd.push(function() {
mobile_slots.push( googletag.defineSlot( “/1005424/_dPSv4_mob-all-article-bottom_(300×250)”, [300, 250], “pb-ad-78158” ).addService( googletag.pubads() ) ); } );
The post How I Learned to Stop Worrying and Love Auto ISO by Simon Ringsmuth appeared first on Digital Photography School.


You must be logged in to post a comment.