RSS
 

Archive for May, 2016

How to Create Compelling Wide-Angle Portraits Using One Off-Camera Flash

11 May

What are your most memorable moments as a photographer? As a travel photographer, my short list of stand-out moments include wandering alone in Namibia’s dead tree forest, photographing sunbeams from the top of a cliff in China, and capturing the Aurora Borealis on the coast of Iceland.
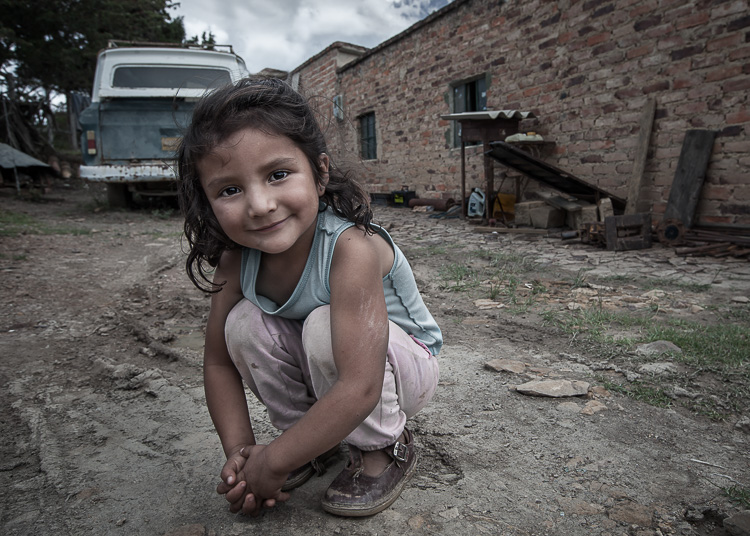
1 Colombian Girl

However, a year ago all of those amazing locations and moments were trumped by spending 30 minutes photographing a little girl outside her home near Villa de Leyva, Colombia (pictured above). This was the first time the girl had her portrait taken, let alone by a foreigner. With all the confidence of an experienced model, she literally stole the show that day. I believe the session is an important memory for her and instantly became my top moment photographing to date.

Ironically, two years ago I would not have even bothered taking this picture. I was focused on landscape and outdoor travel scenes. Also, if I’m honest with myself, I was somewhat intimidated by using artificial lighting and working with people as subjects. In April of 2014, I gave environmental portraiture a shot and have never looked back. It is now an important focus of my work.

This article will provide some guidance on how you can create images like the ones you see here, using a wide-angle lens and just one off-camera flash. But first, let me let you in on a little secret – it’s not that difficult.

Getting things right in camera is the important first step, which is the focus of this article. Processing your images is equally important, but I’ll cover that in a future article. So, let me start by providing you with the core techniques, then get into equipment and settings.
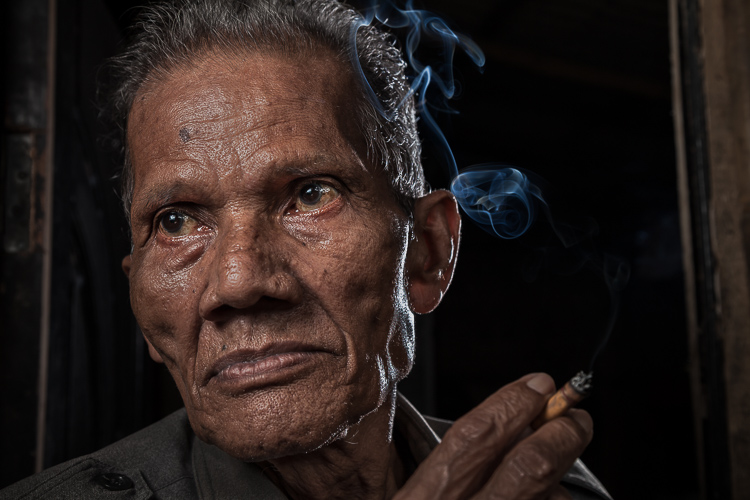
2 Smoking Guy

Use a (Relatively) Wide-Angle Lens

Lens choice is critically important in portraiture. Most portrait photographers reach for their 85mm or 105mm lens when heading out on a shoot. These focal lengths give a nice, realistic look to the subjects. However, I find myself drawn to portraits that have a surreal look to them, and include extra context that helps tell a story. Also, wide-angle lenses require you to shoot close to your subject, which also brings your viewer into the scene.

So, the first step is to leave your 85mm or 105mm in the bag, and grab a wide-angle lens. Most of the portraits you see here were created at 24mm using a full frame camera (use a 16mm for the same view if your camera has a cropped sensor). For me, this focal length is the perfect blend of reality and distortion. If you shoot much wider, elements closer to the lens, such as arms and hands, look too big or elongated. Also, wider focal lengths mean a much bigger background, which is usually not desirable.
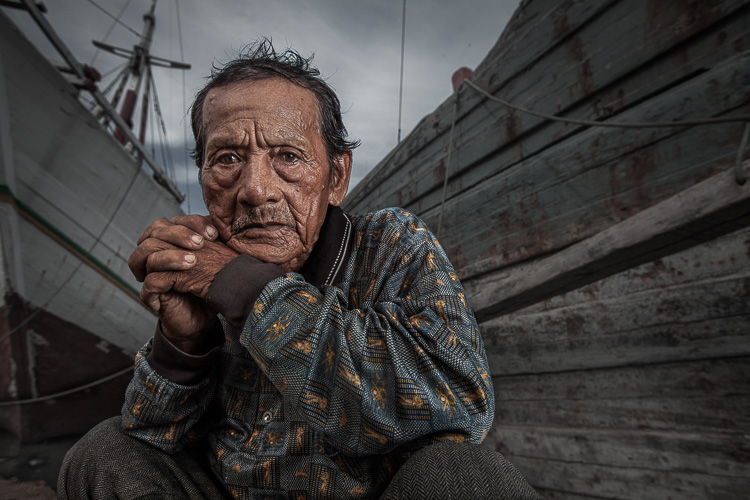
3 Dockworker Ships

Choose a Compelling Subject

Your subject is paramount. The Indonesian dockworker above is amazing. I spent 20 minutes photographing this guy and really had a difficult time choosing the best image. On the other hand, you could spend all day photographing me on the same dock, in front of the same ships, and have nothing but tossers at the end of the day.

I look for people that have experienced life. The ideal subject has a particular interesting quality about him or her, that makes them stand out from the rest. However, my subjects also have an everyday person quality about them. Finding subjects can be challenging, especially if you live in the suburbs of Chicago, like I do. I am a travel photographer and usually find my subjects in rural areas overseas. However, there are great subjects everywhere.

Clothing is critically important. If your 90-year old rural villager is wearing a hat that says, “I Love New York”, then you will want to politely ask him to take it off, or at least turn it around for the picture. The point is, don’t let out-of-context clothing ruin or weaken your shot.
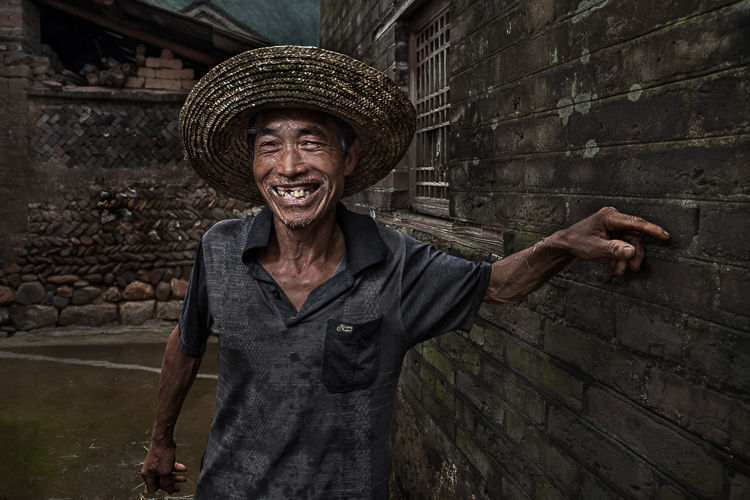
4 Smiley Guy

Choose a Complementary Background

Your image is only as strong as the weakest part of it, which is often the background. This is because, as photographer Jim Zuckerman puts it, “The world is a compositional mess”. There are two important qualities you want out of your background:

First, at the very least, your background must be non-distracting. Although you can easily isolate your subject with a longer focal length, the background becomes a major consideration with wide-angle portraits. Beginner, and even intermediate photographers, can overlook even some obvious distractions in the background. You have probably seen them before: trees that look like they are growing out of the subject’s head, patchy spots of bright light in the scene, colorful objects, straight lines and geometric shapes. You essentially don’t want anything that competes with your subject for attention.

The image of the Indonesian dockworker below is non-distracting, but not much more. He is essentially standing in front of a shipping container, so this image won’t win any awards for its background. Nevertheless, it is still a good picture because of the strength of the subject.
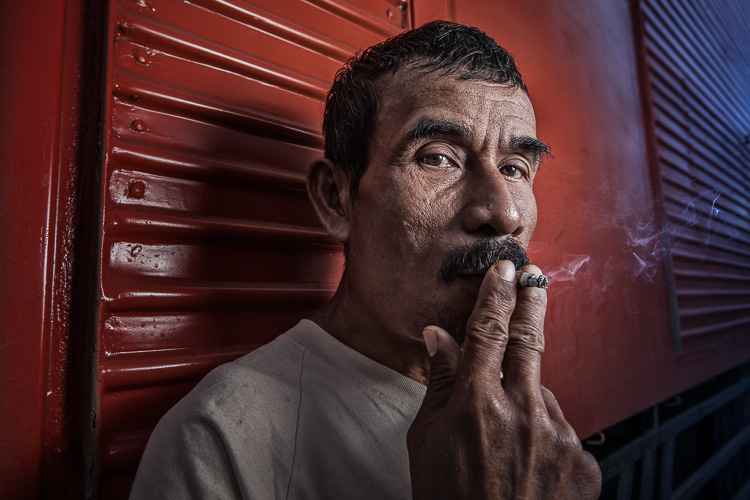
5 Dockworker Container

Second, whenever possible, include a background that complements your subject by providing a context. I’ve shot many images with simple non-distracting backgrounds. But, my favorite pictures are those with a background that tells a story about the subject. This is why I love shooting in places like rural China and Indonesia. These countries have many ancient villages that provide opportunities for amazing backgrounds, such as in the image below.
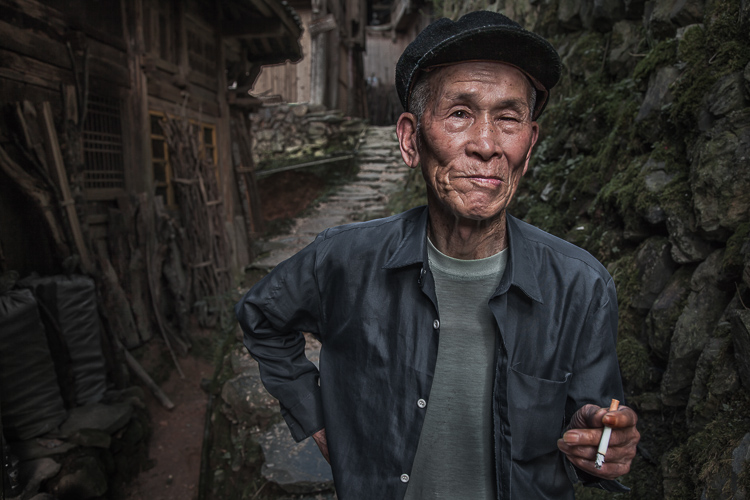
6 Chinese Guy Hat

I like to keep all evidence of modernity out of the background. I don’t like plastic stuff in my pictures. I don’t include modern looking buildings or cars. Instead, I prefer rural areas with weather-beaten buildings. Of course, this all depends on what you are after. The important thing is that the background complements the subject and does not distract from it.

Shoot in the Right Lighting Conditions

Because the majority of the background is not lit by the flash, many of the same outdoor photography lighting principles hold true, even if a flash is being used. Try shooting either early or late in the day (when the sun is low in the sky) or in overcast conditions. I actually prefer overcast conditions, but still shoot relatively early or late in the day.

Put Your Subjects at Ease

I don’t hire models, so some subjects work well and others not as well. What you want to avoid is a picture of your subject standing flat-footed, straight up and down, and holding a fake smile.

To help avoid this, it is a good idea to start your session by gaining their interest and confidence. If you have some images you’ve shot and processed, show them to give him or her an idea of what you are looking for, and hopefully peak their interest. This should communicate immediately that you are not looking for them to just stand there and smile. It should also show that the posing expectations will be basic.
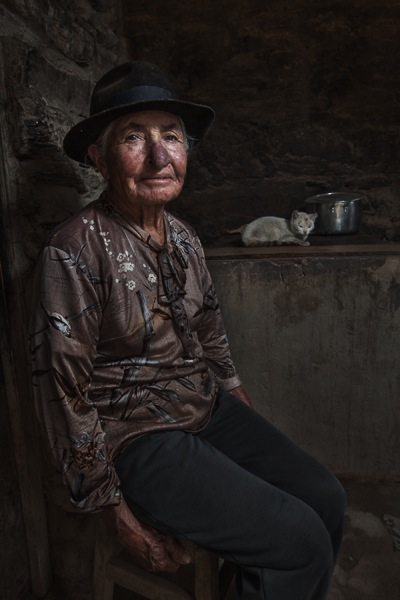
7 Colombian Lady Cat

Posing and Composition

Because I am shooting wide, I get quite close to my subjects and warn them ahead of time about this. For me, the eyes are a critically important part of the picture and must be very sharp. I focus on the closest eye, and re-focus frequently as I move around the subject slightly.

I generally ask him or her to look directly at the camera and not to smile, although not always. I then start moving slightly left or right, asking them to keep their head still and just follow the camera with their eyes. I usually shoot from slightly below eye level. I have them stand or sit at an angle to the camera. If the subject is standing, I have them put their weight on the back foot.

I like to include the subject’s hands in the composition. With a wide-angle lens, their hands in the foreground will look large, so try to strike a balance with the hands being prominent, but not too large. You can do this by simply positioning the hands closer to or farther away from the lens relative to their body.
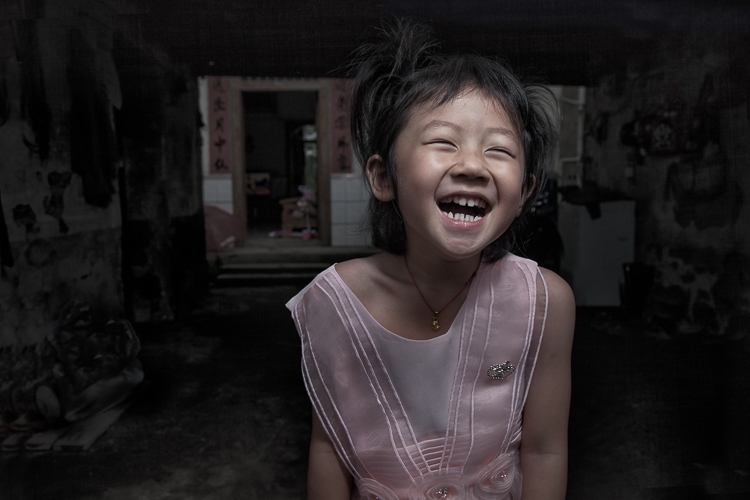
8 Chinese Girl Laughing

Equipment and Settings

The Camera

Your camera should be equipped with an internal or external flash trigger to control your off-camera flash. Here is how I set things up:

  • Start by leaving your flash or trigger initially turned off.
  • Set your camera to manual mode.
  • If the session is outdoors, I try for settings of ISO 100, f/7.1 and a shutter speed of around 1/160. You can adjust your f-stop and shutter speed to your preference, but keep in mind that you cannot go faster than your camera’s maximum flash sync speed.
  • Make the necessary adjustments to slightly underexpose the background by 1/3 to 2/3 stop. I usually start by adjusting shutter speed, but go no slower than 1/60 and no faster than 1/160. If necessary, I will then adjust my f-stop to f/5.6 at the widest. Then, and only then, will I start bumping up the ISO.
  • If you are indoors, you need to start with a higher ISO as a first step, and then make your adjustments to shutter speed and f-stop in the same manner.
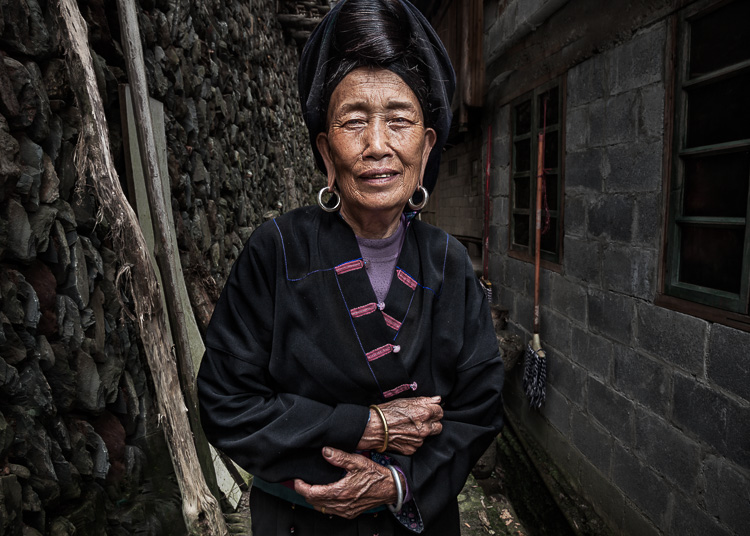
9 Chinese Woman

Lighting

For 90% of my portraits, I use a single off-camera flash, diffused with an umbrella or softbox. The most important rule with flash is “don’t ruin your shot,” which is usually done by putting too much flash on your subject. Instead, you want to get a decent balance of natural and artificial light, so that the flash is undetectable to the untrained eye, but lights your subject brighter than the underexposed background.

Now, turn your flash and trigger on:

  • Set your off-camera flash to manual mode.
  • I typically position the flash at a 45-degree angle to the subject, about 2-3 feet (slightly less than a meter) away, higher than their head, angled downward.
  • I usually start with 1/16 flash power when outdoors, and adjust from there until the subject stands out from the background, but does not look like they have been blasted with flash.

Post-Processing

You need to get things right in camera first. But, you will need to use a variety of post-processing techniques to get the effect you see in these images. I’ll coverthe techniques I use to process environmental portraits in a future article.

Thank you for reading, please share your wide-angle portraits and questions in the comments below.

googletag.cmd.push(function() {
tablet_slots.push( googletag.defineSlot( “/1005424/_dPSv4_tab-all-article-bottom_(300×250)”, [300, 250], “pb-ad-78623” ).addService( googletag.pubads() ) ); } );

googletag.cmd.push(function() {
mobile_slots.push( googletag.defineSlot( “/1005424/_dPSv4_mob-all-article-bottom_(300×250)”, [300, 250], “pb-ad-78158” ).addService( googletag.pubads() ) ); } );

The post How to Create Compelling Wide-Angle Portraits Using One Off-Camera Flash by Ken Koskela appeared first on Digital Photography School.

Digital Photography School

 
Comments Off on How to Create Compelling Wide-Angle Portraits Using One Off-Camera Flash

Posted in Photography


4 Tips for Pre-Visualizing – Look Before You Shoot

11 May

For a limited time only at Snapndeals, May 10-24th only get 33% OFF Timeless Portraits & Natural Light Black & White Portraiture, a 2-eBook Bundle by Wayne Radford.

Pre-visualizing is an art form, that I believe, is not taught enough these days. It is the foundation for an artist or photographer to establish lighting, background, foreground elements, composition, and harmony. You need to establish all this before lifting a camera to your eye. Let’s look at some techniques and tips for pre-visualizing.

1 – BACKGROUND

Are there any distracting elements behind the subject that draw your eye away, e.g., bright hotspots such as sun coming through trees, strong geometric shapes, or bright colours. If these are a problem, move the subject or camera position around to avoid or minimize their effect.

PHOTO 1

2 – FOREGROUND

Can you use any foreground elements to help create framing – examples would be rocks or foliage. Even getting down very low to blur the foreground will create a framing effect.

3 – COMPOSITION

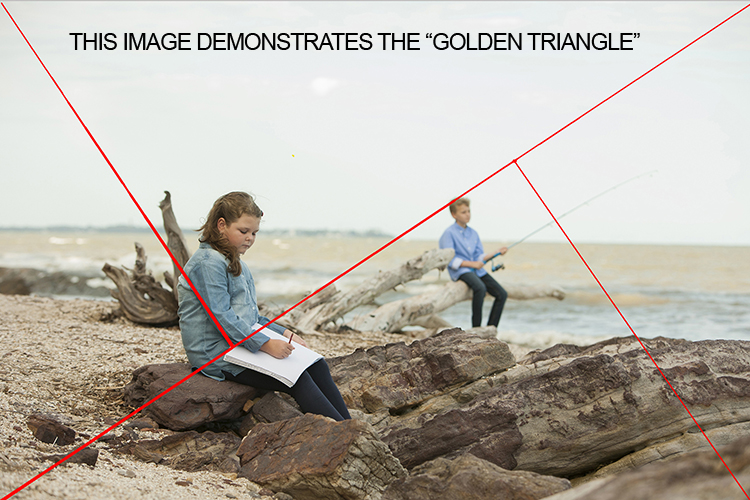
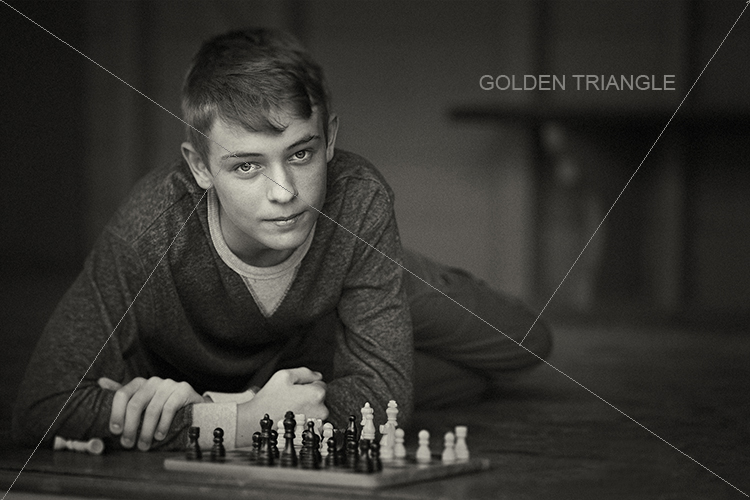
Look around for shapes and perspectives that create more interest and lead your viewer around the scene. Example: I like to use the Golden Triangle instead of the Rule of Thirds, so I’m looking for elements that balance with that in mind. There is a sample below and you can read: Divine Composition With Fibonacci’s Ratio (The Rule of Thirds on Steroids) for more comprehensive information. Of course, it’s built-in as part of the cropping tools of Photoshop CS6 (and LR) and later, but I suggest learning to see this way before post-production adjustments.

4 – HARMONY

This one is the most overlooked aspects of composition. I want my subject’s face to stand out, so I generally choose backgrounds that are complimentary to their clothing for colour, and depth of tone for black and white. Also, try minimizing any additional colours in the background that clash with the subject. Yes it sounds complex, so I’ve added some study examples to make it easier. (clothing colour selection is also important, but that’s a subject of its own for another day). Next time you watch a movie, look at the colour coordination of clothing and scenes.

PHOTO 1

I chose an old painted door as the background for these two girls as it had the same hues (colour tones) as their clothing and skin. Look at your subject’s clothing colours, and then find a background tone that will compliment it. This will make them stand out from the background and not create a distracting colour contrast. An example would be if the background were green or blue.

The simpler, less cluttered backgrounds work best, especially when the colour tones harmonize. Keep the subject at least a meter or more away from the background, and use a wide aperture of f/1.2-2.8 to create a shallow depth of field.

PHOTO 2

Be careful that the subject doesn’t blend into the background. In this study I first looked for the light direction, then looked at the background colour and tone. It was a yellow painted wall which normally would record brighter than his face, but as it was undercover in shade, it rendered quite dark. Looking at his clothing colours I knew that there would be separation that could be controlled in Photoshop without any problem, if necessary. Again distance from subject to background, combined with an f/2.8 aperture setting, creates a lot of background blur which allows the subject to pop. Note, there are no distracting background elements.

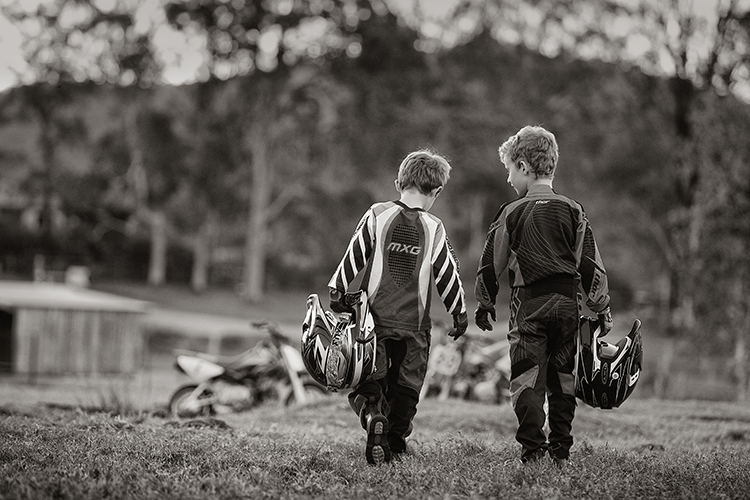
PHOTO 3

When searching for suitable locations, you may find lots of distracting objects and textures that will make your image busy. This is when pre-visualizing where the camera and subject should be placed, and what you want to be included in the background should be used.

In this image of the two boys, I noted that the trees and shed were too cluttered and distracting. By placing the boys a good distance from the shed and trees, and again setting the lens to create a shallow depth of field, (f/2.8 70-200mm lens) I was able to achieve good subject to background separation. The bikes were important to the story, so I placed them in the background to give the boys a direction to walk. Also, note the rim lighting on their hair gives extra separation.

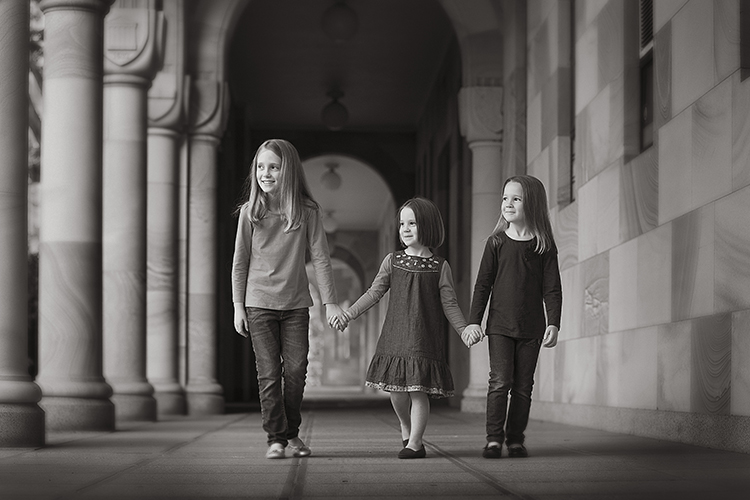
PHOTO 4

Pre- visualizing this scene is an easy one for a trained eye – find the light, look at the background. Here you can see the light wrapping around the columns, creating graduated shadows, and a diminishing background that gives depth to the overall image. In this study, the light is cross-lighting them at 90 degrees to their bodies, so turning their faces to the light creates modelling on their faces, which adds shape to their faces.

The background almost has a 3D look in the way it diminishes. Column over column, and arches layering over each other, creates great depth.

The following study is an example of how I try to pre-visualize a portrait session

When I found this beach location (below), I was overloaded with ideas on how I was going to use it. This is the opposite to writers block, where you become void of ideas. Instead, you can be over excited with creative ideas and forget the basics that make a portrait work.

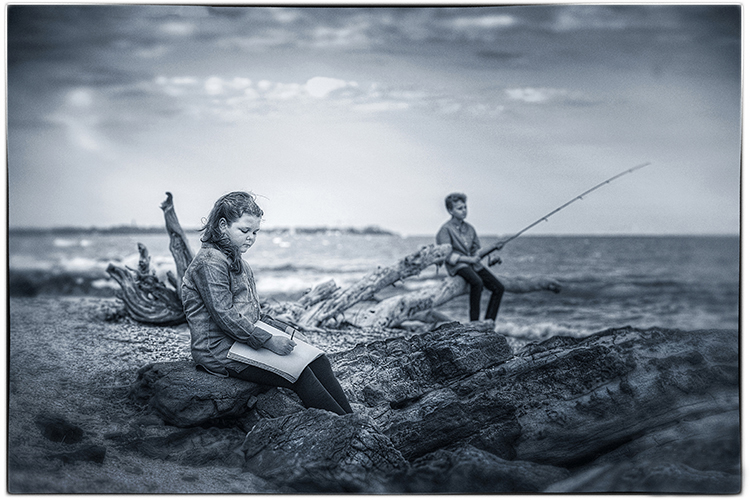
The first consideration was the direction and quality of light. In this study the open sky (right hand side of the photo, over the ocean) was the main light. Note the sun was setting over a hill behind the children, so I am using the soft light provided by the open sky. While it is a fairly flat light and very soft, it provides enough cross lighting to enhance texture and shape in the clothing and rocks. Notice the small specular light, rim lighting her legs, and the shadows in her clothing. These are helpful indicators to the direction of light when it is flat.

PHOTO 5

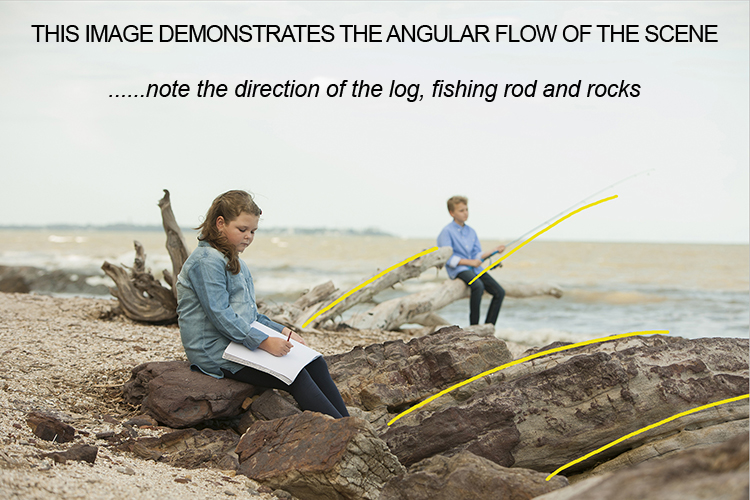
The next consideration is the placement of the subjects in relationship to the light, and the natural props such as the rocks and driftwood. Those props are the things that get photographers excited, the challenge is how to use them creatively. Remember this is all done before lifting the camera to your eye – the art of pre-visualizing. I also noticed the angular shape in the rocks curving towards the ocean, this matched the angle of the driftwood.

PHOTO 6

The girl was placed on the most distant rock (also the flattest one for comfort) so the light was coming from her front left-hand side, creating some modelling to her clothes and face. It also allowed the image to read from left to right.

The boy was placed on the driftwood, with his rod angled to match the driftwood branch beside him. It’s also a similar angle to the diagonal line running from top right to bottom left in the image. My only disappointment was the horizon line running through the girl’s head. It wasn’t possible to move the camera any lower, and raising the camera higher would have placed the boy’s head near the horizon line. Moving the girl wasn’t an option either due to the awkward shapes of the rocks. I was happy to leave it that way, as the shallow depth of field had created enough background blur to allow her to separate from the background.

PHOTO 7

Canon 5D + 70-200 f/2.8 IS lens – F4 @1/800th – ISO 400
Hand-held at ground level
Photoshop CS6 – Alien Skin Exposure 7

When you learn the art of pre-visualizing, you will look at your work with greater satisfaction. You will know that you alone created the image to the best of your ability, using all the artistry skills of light and composition before even raising the camera to your eye. Not everything is created in the computer, I believe pre-visualizing is another tool in the journey of craftsmanship.

For a limited time only at Snapndeals, May 10-24th only get 33% OFF Timeless Portraits & Natural Light Black & White Portraiture, a 2-eBook Bundle by Wayne Radford.

googletag.cmd.push(function() {
tablet_slots.push( googletag.defineSlot( “/1005424/_dPSv4_tab-all-article-bottom_(300×250)”, [300, 250], “pb-ad-78623” ).addService( googletag.pubads() ) ); } );

googletag.cmd.push(function() {
mobile_slots.push( googletag.defineSlot( “/1005424/_dPSv4_mob-all-article-bottom_(300×250)”, [300, 250], “pb-ad-78158” ).addService( googletag.pubads() ) ); } );

The post 4 Tips for Pre-Visualizing – Look Before You Shoot by Wayne Radford appeared first on Digital Photography School.

Digital Photography School

 
Comments Off on 4 Tips for Pre-Visualizing – Look Before You Shoot

Posted in Photography


1/4 World Trade Center: Tulsa’s Half-Sized, Untwinned Tower

11 May

[ By WebUrbanist in Architecture & Offices & Commercial. ]

untwineed

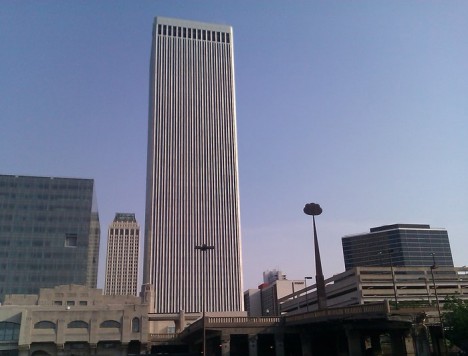
The BOK Tower in Tulsa, Oklahoma, looks uncannily like the vanished Twin Towers of the New York City skyline and this is neither accidental nor coincidental. This skyscraper was constructed just a few years after its distant cousins in NYC, was designed by the same architect as the World Trade Center buildings, and explicitly intended to be a replica.

Indeed, it looks nearly identical, from its sleek vertical facade slits right down to its bi-level lobby, marble walls, hanging textiles and other interior design elements. It is a close copy in nearly every significant way, except … it is just half the size.

New York City Skyline - World Trade Center

It all started with CEO John Williams, who was so impressed by the Twin Towers in New York that he hired the same architect, Minoru Yamasaki, to build four quarter-scale replicas of the towers in Tulsa. This quatruple-tower schemed faced a cost issue: four sets of elevators for four quarter-sized structures.

As the story goes, Williams then took the architectural model, grabbed one of the towers, put it on top of another, and decided to go with one half-height copy instead. The result is in essence a one-quarter copy: the building is half the height of one twinned tower, or a fourth of the combined height (image below by Caleb Long).

bok towers

Initially called One Williams Center, the single quarter-footprint, half-as-high replica stands 667 feet tall and was the tallest building not just in Tulsa but in all of the Plains States when it was built. It was completed in 1976, just three years after the World Trade Center towers in New York.

downtown tulsa

One might be left wondering, however: why does the tower not get more recognition as a close relation of two iconic, beloved and now-fallen buildings in the Big Apple? For one thing, it is a rather minimalist Modernist skyscraper, much like many others found in cities around the United States (and the world) from the mid-Century period.

Perhaps most importantly, though, it lacks the most defining characteristic of its cousins, an essential quality, as noted by French philosopher Baudrillard, of ‘double-ness’ that truly defined the Twin Towers. In many ways, that characteristic of ‘being twinned’ is what made them internationally iconic, standing out against more decorative (but singular) structures in the skyline.

one world trade center

Today, One World Trade Center stands as a symbol of unity, looking almost like two intersected towers rotated around a central axis then fused. This single structure manages, in a way, to capture the twinned aspect of the former towers, now memorialized on the pavement below.

Share on Facebook


[ By WebUrbanist in Architecture & Offices & Commercial. ]

[ WebUrbanist | Archives | Galleries | Privacy | TOS ]


WebUrbanist

 
Comments Off on 1/4 World Trade Center: Tulsa’s Half-Sized, Untwinned Tower

Posted in Creativity


Manfrotto launches secure backpack with concealed rear opening

11 May

$ (document).ready(function() { SampleGalleryV2({“containerId”:”embeddedSampleGallery_8063110177″,”galleryId”:”8063110177″,”isEmbeddedWidget”:true,”standalone”:false,”selectedImageIndex”:0,”startInCommentsView”:false,”isMobile”:false}) });

Accessory manufacturer Manfrotto has launched a new backpack that hides the opening of its main camera compartment between the bag and the person carrying it. The Advanced Rear backpack’s main compartment zipper is between the shoulder straps on the back side of the bag, so that when it is being carried no one can open it from behind.

Manfrotto says that the lower part of the bag is big enough for a professional DSLR along with three wide aperture zooms as well as accessories such as flash units. The camera compartment in this lower section is removable and comes with its own zipped cover so items can be stored when the rest of the bag is being used for something else.  The top section can be used for more accessories or personal belongings.

An additional pocket is suitable for a 13in laptop, a tablet and documents up to A4 in size. A tripod can be attached via the tripod pocket, and a cover is built-in to protect against rain and dust. The company says that the pack is a suitable size to carry as hand luggage on most airlines.

The Manfrotto Advanced Rear backpack costs $ 159.99/£119.95. For more information visit the Manfrotto website.


Press release:

MANFROTTO PRESENTS: Manfrotto Advanced Rear Backpack

Manfrotto, world leader in the photography, imaging equipment and accessories industry, announces the launch of the new Manfrotto Advanced Rear Backpack.
The Advanced Rear Backpack can be used as a camera backpack, a laptop backpack, or just as a protective camera case.

Protective for photographers
Featuring the Manfrotto Protection System, the lower part of the bag is dedicated to holding photographic equipment, and will safely hold a professional DSLR camera body with up to 3 lenses. The zip for the camera compartment is hidden on the back of the bag, giving maximum security to your equipment. The camera compartment is completely removable, meaning the bag can be transformed into a spacious daypack.

Practical for travellers
The new Manfrotto Advanced Rear Backpack features plenty of space for personal belongings when you are travelling. The front pocket can store a 13” laptop, A4 documents, 10” tablet and small book and can be opened separately without affecting your camera equipment. The side pocket is suitable for a notebook and water bottle and the upper compartment can contain other documents and personal items. The zips can also be locked for further security.

The bag comes with a dedicated tripod compartment, a side pocket perfect for a small tripod and a branded rain cover to keep equipment protected in all weather conditions.

Articles: Digital Photography Review (dpreview.com)

 
Comments Off on Manfrotto launches secure backpack with concealed rear opening

Posted in Uncategorized


Keeping the faith: Pentax K-1 video overview

10 May

Pentax shooters have waited a long time to join the full frame club, and with the release of the K-1 DSLR that wait is finally over. But thanks to its 36MP sensor, some innovative features, and a very aggressive price point, the K-1 will likely appeal to photographers outside the Pentax sphere as well. We take a look at what makes this camera unique.

Articles: Digital Photography Review (dpreview.com)

 
Comments Off on Keeping the faith: Pentax K-1 video overview

Posted in Uncategorized


The ultimate hiking partner? Sony’s RX10 III goes the distance

10 May
Mount Rainier, captured from the trail up Mount Teneriffe, near North Bend in Washington State. ~200mm (equivalent), ISO 800. Still another 2 miles to go until lunch, and another 400mm to go before the RX10 III’s maximum telephoto setting.

Sony’s new Cyber-shot RX10 III might look a lot like the older RX10 II, but its lens is really something else. With an effective focal range of 24-600mm, the RX10 III is one of the most versatile cameras we’ve ever used. But focal range is only part of the story – it’s optical quality that impresses us most. And boy, are we impressed.

Hiking with the Sony Cyber-shot RX10 III

A very short shooting experience by Barnaby Britton

Caveat: This is not a review, nor is it sponsored content. This is a shooting experience based largely on a single day of picture-taking, during a hike. Four miles up a mountain in the sunshine, four miles down in the dark. One memory card half-filled, one battery half-emptied. All shots were processed ‘to taste’ from Raw and all are un-cropped. Your mileage (both literal and figurative) may vary.

I’ve been searching for the ideal hiking camera for years. Since I moved to the Pacific Northwest I’ve tried and rejected DSLRs, fixed-lens primes, travel zooms, super-zooms and several iPhones. Recently, I’ve been packing my Ricoh GR II for its small size and sharp lens, but the lack of a viewfinder really limits its usefulness in some conditions.

The last time I brought a DSLR on a mountain hike I almost left it tucked under a rock on the trail, rather than drag it all the way up (that was the old, famously brutal Mailbox Peak trail, for any PNW natives reading this…).

Pretty good flare performance, considering the complex lens. This shot was slightly adjusted in ACR to bring out a little detail in the shadows. 24mm equivalent, ISO 100.

It’s been a few years since I experimented with a superzoom compact camera, after a couple of bad experiences with sub-par lens performance. I’ve always liked the idea of them, but all too often I’ve been disappointed by the results in practice. These days, though, as my colleague Jeff likes to remind me, the good ones are actually pretty good.

OK, sure, but ‘pretty good’ for a super zoom is only ‘OK, ish’ by the standards of a shorter-lens compact or interchangeable lens camera, right? Well, that’s what I thought, too. Until…

We knew the sensor is good from our experience of using the RX100 IV, but the Sony Cyber-shot RX10 III’s major selling point is its lens. And the lens in the RX10 III is, as far as I can tell, made of magic. I genuinely have no idea how Sony’s engineers packed a 24-600mm equivalent lens of such high quality into a camera this small. It defies all reason. From wide-angle all the way to extreme telephoto, the RX10 III’s lens delivers impressive results. Weirdly impressive.

As well as distant details, the RX10 III is capable of capturing sharp images of tiny things, very close to the camera. Like these wildflowers. 24mm equivalent, ISO 100.

Now, obviously I could take technically better shots with a DSLR and a fast zoom, or for that matter a prime lens compact like the GR II. Portraits with shallower depth of field, landscapes with critically better edge-to-edge sharpness and all the rest. But this past weekend a DSLR was out of the question. If I’m hiking up a mountain in 80+ degree weather, I’m traveling as light as possible. Most of the weight on my back this weekend was drinking water, and although it’s a fairly chunky camera, the RX10 III was light enough to clip onto the shoulder strap of my backpack with one of these.

Mount Teneriffe on a hot day is a pretty demanding hike, but the view from the top makes it worthwhile. 40mm equivalent, at ISO 100.

The Ricoh GR II is lovely, but I knew that from Mount Teneriffe I’d be looking at three peaks – Mount Rainier, Mount Baker, and Glacier Peak, as well as Mount Si and Mailbox, a little closer at hand. So 28mm just wasn’t going to do the job. We timed our hike so that the sun would be go down shortly after we summited, and I knew that I wanted a nice, closeup (ish) shot of Mount Rainier’s famous purple glow (see the picture at the top of this page).

Exposed for the highlights, it was easy to brighten shadow areas in this shot using Adobe Camera Raw. 24mm, ISO 100.

You can’t really see here, but just where the blade of grass meets the horizon to the right of my subject, is Seattle’s distinctive skyline. See below for a shot taken from the same vantage point at 600mm.  

A lot of the prejudice about long zoom compact cameras comes from a misunderstanding of how to interpret their lens performance, especially at the long end. Atmospheric distortion and haze from moisture, pollen and pollutants will reduce the sharpness of any telephoto lens, especially on warm days.

So if your telephoto shots look like they were taken through a frosted bathroom window, the lens might not be the culprit. On the other hand, if everything in your pictures looks like someone went over the edges with a magenta highlighter pen – well, that’s the lens.

Seattle at sunset, from almost 40 miles away. 600mm equivalent, at ISO 100. Moderate ‘dehaze’ applied in Adobe Camera Raw. 

I had no such issues with the RX10 III (which was reassuring, since it costs $ 1500) but as always, I was shooting Raw, so what little fringing I did see in my images was easy to correct. Likewise, Photoshop’s ‘dehaze’ control in Camera Raw came in very useful to bring back some clarity to images taken at the telephoto end of the RX10 III’s lens. 

Mount Baker, seen through more than 90 miles of pollen-laden air, just before sunset. This shot didn’t require quite so much dehazing as the last one. 600mm equivalent, ISO 250.

During a day’s shooting during which my hiking partner and I walked a roundtrip of about 13 miles up and down a 4500ft peak, the RX10 III nailed virtually every shot. And that’s everything from a knee-level picture of some tiny wildflowers a few centimeters away from the lens, to a 600mm capture of Mount Baker, 90 miles away from my vantage point and half lost in haze (above).

We hiked about half of the trail back to the car in the dark. For the last half mile we were accompanied by an owl. This grab shot was taken at ISO 12,800, by the light of our headlamps. At 95mm equivalent, there’s no motion blur at 1/15sec.

From these sunset landscapes to ISO 12,800 snapshots of an owl that followed us back to our car at the trailhead, every time I looked at something and went ‘oooh’ and tried to take a picture of it, the RX10 III – and its insanely wide-ranging lens – got me the shot that I wanted. 

Hiking through the forest just before sunset. 50mm equivalent at ISO 6400.

We’re working on a more scientific assessment of the RX10 III’s lens right now, but in the meantime, I hope you enjoy our updated samples gallery (now with Raw files!).

I’ve only been using the RX10 III for a few days, and there are plenty of things I don’t like about it (confusing menus, clunky ergonomics, no touchscreen, laggy GUI, the aluminum lens and focus rings scratch the minute you look at them) but somehow, despite all that, I’m already planning next week’s hike.

$ (document).ready(function() { SampleGalleryV2({“containerId”:”embeddedSampleGallery_0737303360″,”galleryId”:”0737303360″,”isEmbeddedWidget”:true,”standalone”:false,”selectedImageIndex”:0,”startInCommentsView”:false,”isMobile”:false}) });
Articles: Digital Photography Review (dpreview.com)

 
Comments Off on The ultimate hiking partner? Sony’s RX10 III goes the distance

Posted in Uncategorized


Pigeons on Patrol: Birds with Backpacks Monitor London Air Pollution

10 May

[ By Steph in Gadgets & Geekery & Technology. ]

Screen Shot 2016-05-09 at 5.31.38 PM

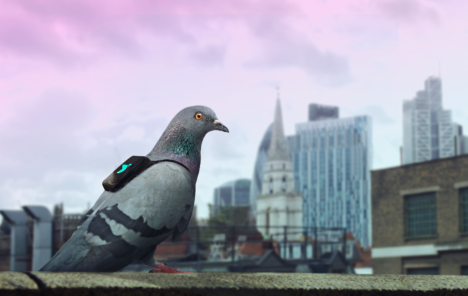
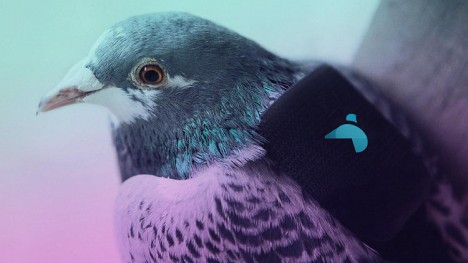
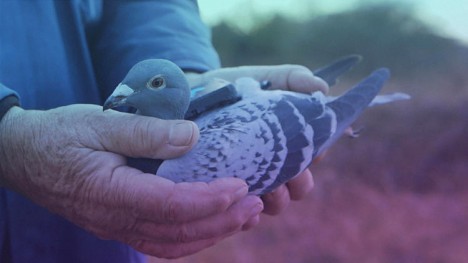
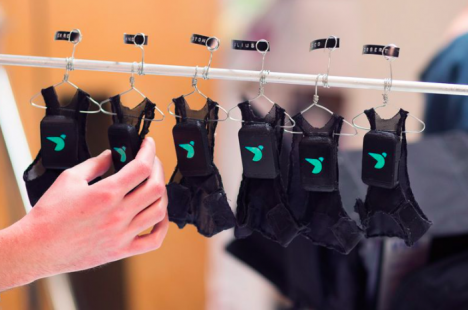
Not all pigeons are rats with wings. Some of them actually strap on tiny backpacks and go to their jobs every day, just like the rest of us. In fact, a flock of pigeons in London play a central role in monitoring the air pollution in the city, their little black fashion accessories equipped with lightweight sensors that test the levels of nitrogen dioxide and ozone gases, reporting the results on Twitter. Londoners who tweet their locations to @PigeonAir get an instant response from one of the pigeons with the level of air pollution in their area.

pigeon patrol 2

pigeon patrol 4

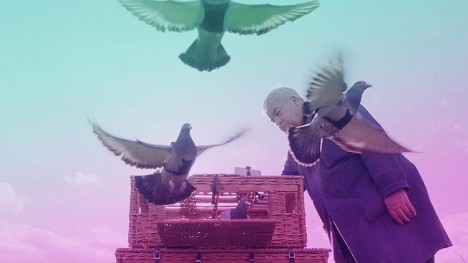
Paris-based tech company Plume Labs developed an app that gives residents access to information and advice about pollution in the city, and an interactive live map on the project’s website provides more neighborhood-specific details. A well-known pigeon expert named Brian Woodhouse provided a flock of racing pigeons, which are healthier and hardier than street pigeons, for the mission.

pigeon patrol 3

pigeon patrol 5

The project was only in action for three days during March, and the pigeons are now taking a break, but the novelty of the miniature backpacks got thousands of city residents talking about air pollution, which kills nearly 9,500 Londoners each year. Now, Plume Labs has turned to human Londoners for assistance, asking them to wear their own sensors to crowdsource detailed readings of air pollution in virtually every corner of the city.

Screen Shot 2016-05-09 at 5.34.45 PM

You have to admit, no matter what you think of the pesky birds, the sight of those tiny mesh suits on tiny hangers labeled with each pigeon’s name are ridiculously cute.

Share on Facebook


[ By Steph in Gadgets & Geekery & Technology. ]

[ WebUrbanist | Archives | Galleries | Privacy | TOS ]


WebUrbanist

 
Comments Off on Pigeons on Patrol: Birds with Backpacks Monitor London Air Pollution

Posted in Creativity


Pentax K-1’s Pixel Shift challenges medium-format dynamic range

10 May

The Pentax K-1 has produced one of the best dynamic range performances we’ve yet seen. As our testing of the camera continues, we’ve been looking through the results of our Raw dynamic range test and we’ve been very impressed. And that’s before we looked at the benefits brought by Pixel Shift Resolution mode.

Raw Dynamic Range

Exposure Latitude

In this test we look to see how tolerant of pushing exposure the Pentax K-1’s Raw files are. We’ve done this by exposing our scene with increasingly lower exposures, then pushed them back to the correct brightness using Adobe Camera Raw. Examining what happens in the shadows allows you to assess the exposure latitude (essentially the dynamic range) of the Raw files.

Because the changes in this test noise are primarily caused by shot noise and this is mainly determined by the amount of light the camera has had access to, the results are only directly comparable between cameras of the same sensor size. However, this will also be the case in real-world shooting if you’re limited by what shutter speed you can keep steady, so this test gives you an idea of the amount of processing latitude different formats give.

$ (document).ready(function() { ImageComparisonWidget({“containerId”:”reviewImageComparisonWidget-34744790″,”widgetId”:357,”initialStateId”:null}) })

Compared with the Nikon D810, the Pentax does a great job. There’s less chroma noise visible after a 5 and 6EV push, suggesting the Pentax is adding even less noise to its images than the already very good Nikon. It’s a similar story when compared with the Nikon D750$ (document).ready(function() { $ (“#imageComparisonLink2463”).click(function() { ImageComparisonWidgetLink(2463); }); }). The difference compared to the Sony a7R II$ (document).ready(function() { $ (“#imageComparisonLink2464”).click(function() { ImageComparisonWidgetLink(2464); }); }) is even greater, marking the K-1 as one of the best results we’ve ever seen.

The picture is slightly muddied by the D810 offering an ISO 64 mode$ (document).ready(function() { $ (“#imageComparisonLink2467”).click(function() { ImageComparisonWidgetLink(2467); }); }), which can tolerate around 2/3EV more exposure before clipping, allowing longer shutter speeds that provide a shot noise benefit commensurate with that. This allows the D810 to pull almost imperceptibly ahead in brighter, shot-noise limited tones$ (document).ready(function() { $ (“#imageComparisonLink2468”).click(function() { ImageComparisonWidgetLink(2468); }); }), but doesn’t stop the K-1’s result (from a camera with a list price roughly half as much) from being hugely impressive.

The difference is even bigger in Pixel Shift Resolution mode. Because it samples the scene multiple times, it effectively collects more total light, which means less shot noise. As you might expect, the result from the four 1/320 sec exposures used to create the 1/320 + 6EV image$ (document).ready(function() { $ (“#imageComparisonLink2465”).click(function() { ImageComparisonWidgetLink(2465); }); }) show similar levels of noise to the 1/80th second exposure shot in single image mode (a 2EV advantage), only with the greater sharpness that Pixel Shift mode brings. This lower noise means you can push the files to a tremendous degree – far beyond what the Nikon D810’s ISO 64 mode allows$ (document).ready(function() { $ (“#imageComparisonLink2466”).click(function() { ImageComparisonWidgetLink(2466); }); }).

ISO Invariance

A camera with a very low noise floor is able to capture a large amount of dynamic range, since it add very little noise to the detail captured in the shadow regions of the image. This has an interesting implication: it minimizes the need to amplify the sensor’s signal in order to keep it above that noise floor (which is what ISO amplification conventionally does). This provides an alternate way of working in situations that would traditionally demand higher ISO settings.

Here we’ve done something that may seem counter-intuitive: we’ve used the same aperture and shutter speed at different ISO settings to see how much difference there is between shooting at a particular ISO setting (and using hardware amplification) vs. digitally correcting the brightness, later. This has the advantage that all the shots should exhibit the same shot noise and any differences must have been contributed by the camera’s circuitry.

$ (document).ready(function() { ImageComparisonWidget({“containerId”:”reviewImageComparisonWidget-50200048″,”widgetId”:355,”initialStateId”:null}) })

You can see all the K-1’s full ISO Invariance results here and its pixel shift results here. The K-1 is as close to being ISO Invariant as we’ve seen, meaning there’s no cost to shooting at ISO 100 and pushing the files later, rather than using a higher ISO. This means you can keep the ISO down and protect multiple stops worth of highlight information that would otherwise be pushed to clipping by the hardware amplification.

ISO invariance isn’t an end in itself: there are cameras such as the Sony a7R II that are ISO variant because their higher ISO results are so good, not because their low ISO DR is deficient. However, a look at our standard test scene shows its high ISOs are extremely good, so you’re not losing much in comparison with these dual-mode sensors. The K-1’s files have a very high level of flexibility when it comes to processing.

Conclusion

In conclusion, the K-1 gives one of the best Raw dynamic range results we’ve ever seen, when shooting in single shot mode and absolutely outstanding results in circumstances where you can use the pixel shift mode. The multiple sampling of the same scene effectively gives a 2EV dynamic range boost, meaning it out-performs both the D810 and the 645Z by a comfortable margin. Less noise (though multiple captures) and multiple 14-bit values at every pixel mean it can give outstanding levels of DR for static scenes where you can use the Pixel Shift mode.

Articles: Digital Photography Review (dpreview.com)

 
Comments Off on Pentax K-1’s Pixel Shift challenges medium-format dynamic range

Posted in Uncategorized


JPEGmini Photoshop extension aims to top Adobe’s ‘save for web’

10 May

Beamr, the software company behind the content-aware JPEGmini image compression application, has introduced an extension for Adobe Photoshop. Dubbing it the ‘The Save For Web button Adobe should’ve made’, the company claims the extension will save users time and produce better results than Adobe’s default Save For Web settings.

JPEGmini is an image compression package that analyzes individual sectors of an image and applies different degrees of compression to each sector according to its content. The designers claim that its compression results in no visible degradation of the image, but that it can reduce file sizes by up to 80% while ‘preserving their full resolution and quality.’ The smaller files save space on a hard drive and are also lighter for emailing and web hosting, according to the company.

The Photoshop extension comes as part of the JPEGmini Pro bundle, along with a plug-in for Lightroom, which costs $ 99. Photoshop CC 2015.1 is required to use the extension. For more information visit the JPEGmini website and read our test of a previous version of the software. 

Articles: Digital Photography Review (dpreview.com)

 
Comments Off on JPEGmini Photoshop extension aims to top Adobe’s ‘save for web’

Posted in Uncategorized


How to Add a Reflection in Photoshop

10 May

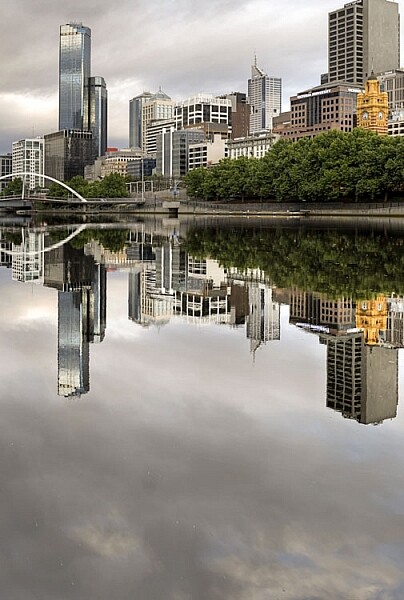
There is one thing in photography that seems to be universally loved – reflections. They aren’t always easy to get, especially if water is involved. The wind only has to be blowing slightly to create ripples in the water, and you will lose the chance of a reflection.

Take the following image, a real reflection taken one morning just before it started raining on the Yarra River in Melbourne. It was almost perfect, but after repeated efforts to get something similar it has never happened again, well not for me.

LeanneCole-reflections-18

One of those magical times when the river was so still the reflection just happened.

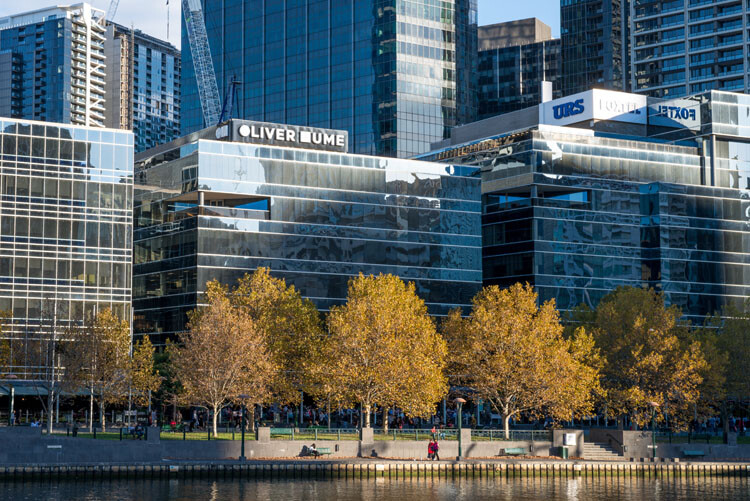
If you love that look, then there are ways to do it without having to wait for the perfect conditions. You can fake it in Photoshop, with the right image. Finding the right image is hard, especially when you start, but as you get more experienced at doing it you will find it easier to put reflections in other images.

Find an image that is straight on, like the following one.

LeanneCole-reflections-14

The basic image.

Adding a reflection layer

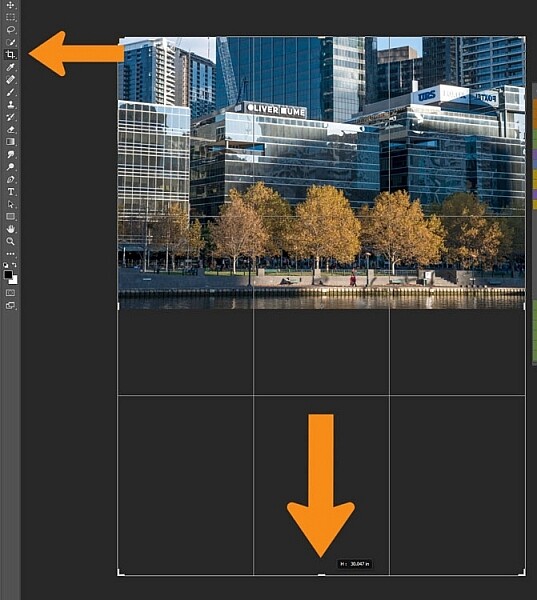
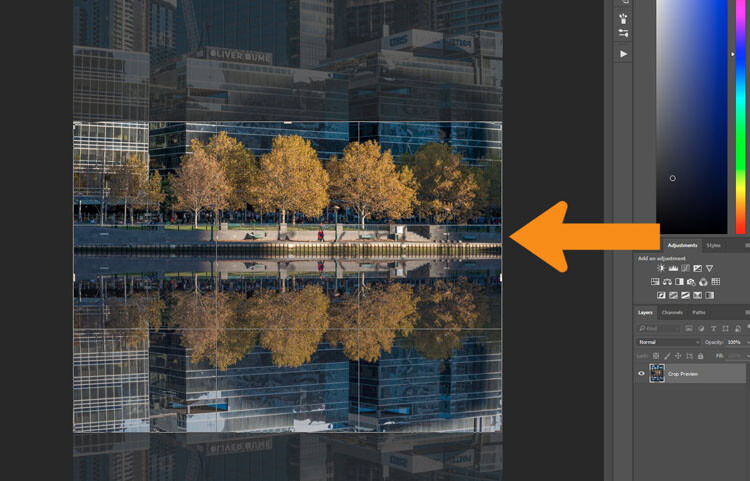
Open the image in Adobe Photoshop, or any program that will allow you to work in layers. You could use Adobe Photoshop Elements or even GIMP to do this tutorial. Once the image has been opened in Photoshop, you will need to make it bigger to fit the reflection. You can do this by using the Crop tool.

LeanneCole-reflections-1

Extend the area of the image with the Crop Tool

You can double the size of the original image, simply by dragging down the point at the bottom of the image using the Crop tool. If the overall size is too big, you can always crop it down once you are finished with the photo.

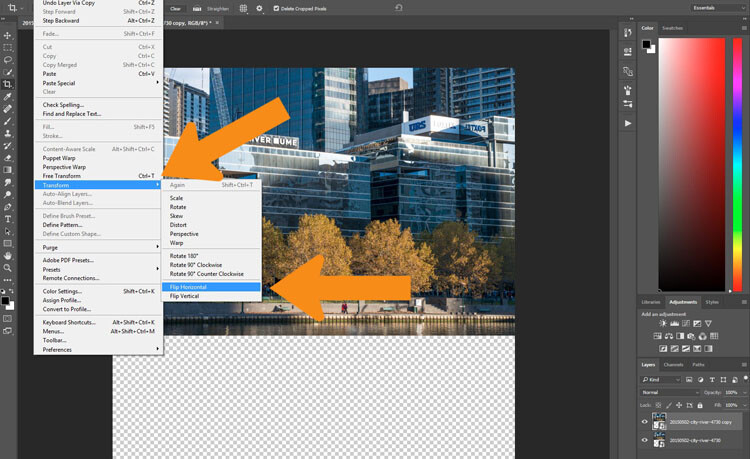
Press Ctrl J to duplicate the original image to new layer, or go to the main menu at the top, to Layer > Duplicate. Go to Edit > Transform > Flip Vertical.

LeanneCole-reflections-2

Flip the duplicate image.

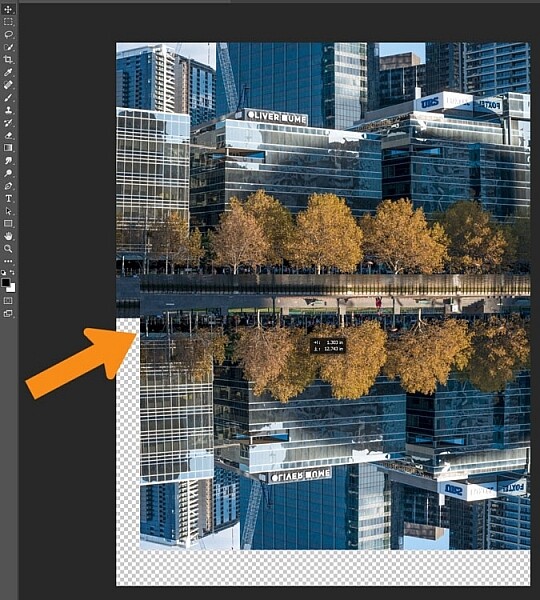
If you do the vertical flip in the Image menu you will flip all layers, and for this you only want to flip the one layer. Select the Move tool, the first one in the tool bar on the left, the cross shape (keyboard shortcut is V). Click on the duplicate layer and move the image down, as in the following.

LeanneCole-reflections-3

Move the flipped vertical image down to where the reflection will begin.

You will need to figure out where the image finishes, and the reflection will start. In the example image for this tutorial, the river edge has a wooden panel which seemed to be the perfect place to start the reflection. However, to do this you will need to erase or delete the water in the image.

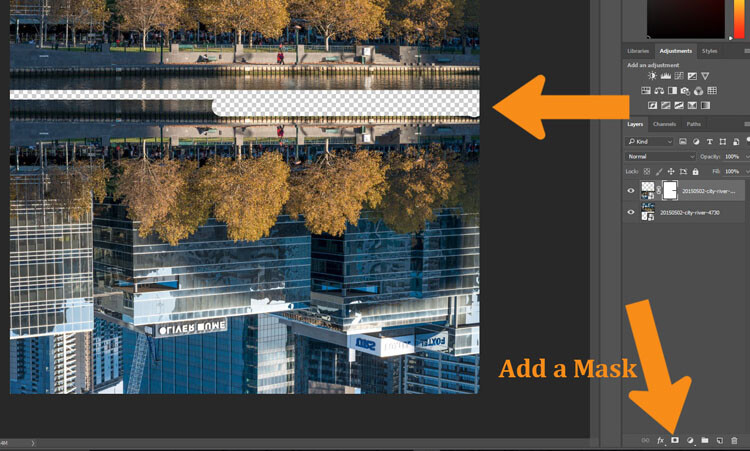
You will need to add a mask to the flipped layer and click on the brush tool so you remove some of the image. You can add a mask by using the icon at the bottom of the layers panel or go to the Main Menu > Layer > Layer Mask > Reveal all.

LeanneCole-reflections-4

Remove or mask out part of the image that won’t be needed.

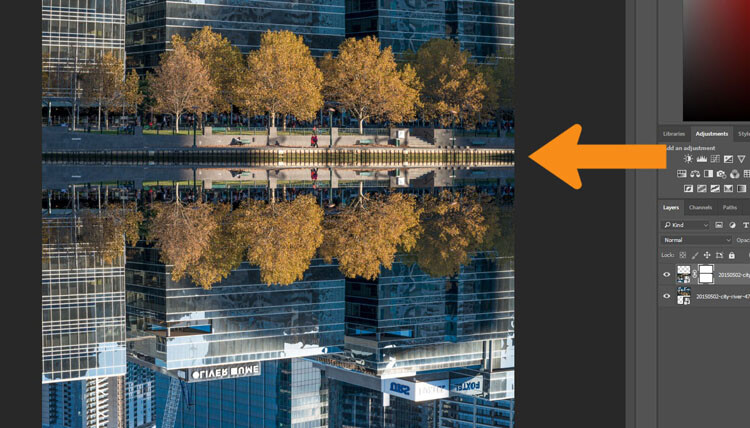
Using the Move tool, shift your image up to meet the original, at the line between the image and the reflection.

LeanneCole-reflections-5

See where the reflection will begin.

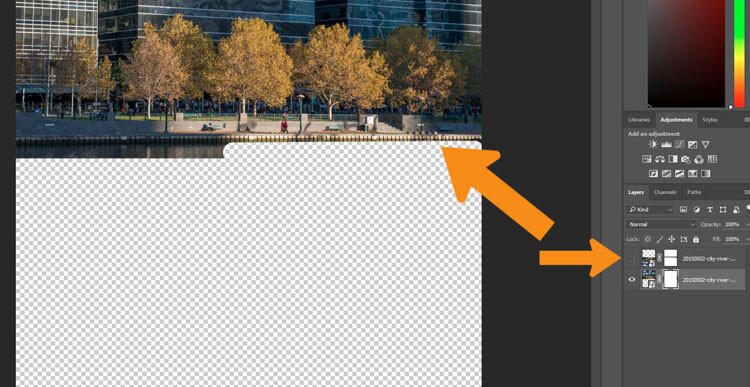
You will need to remove the water, or the area underneath the reflection. To do this click the Eye next to the reflection layer so that you can no longer see it (turn off that layer). Add a layer mask to the original image and using your brush, hide those areas away as you did on the duplicate layer.

LeanneCole-reflections-6

On the original image, hide the area that is covered by the second photo.

Turn the reflection layer on again. Now you will have a basic reflection, but you can take it a lot further than that.

Refining your reflection

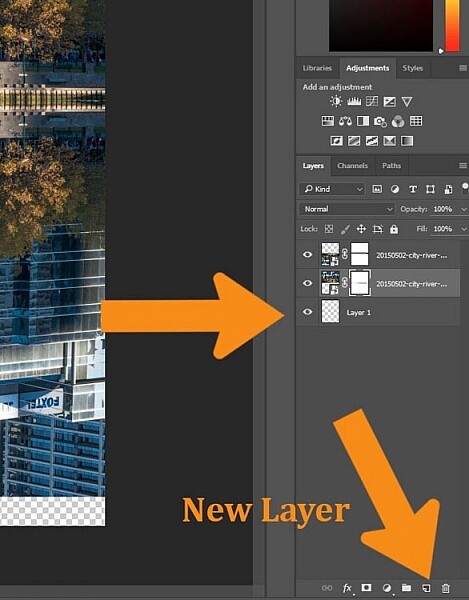
Add a blank layer to your image, then drag it down to be the bottom layer. If you are unable to do that, it may be because the original image layer is locked and called the Background layer. To remove that, double click on the word Background, you should be able to change the name to something else. This will allow you to move the new blank layer to the bottom.

LeanneCole-reflections-7

Add the new layer at the bottom.

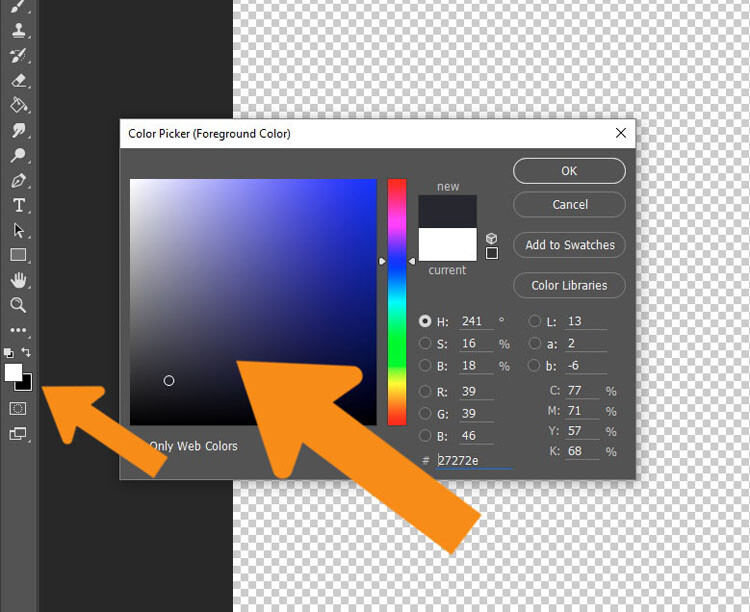
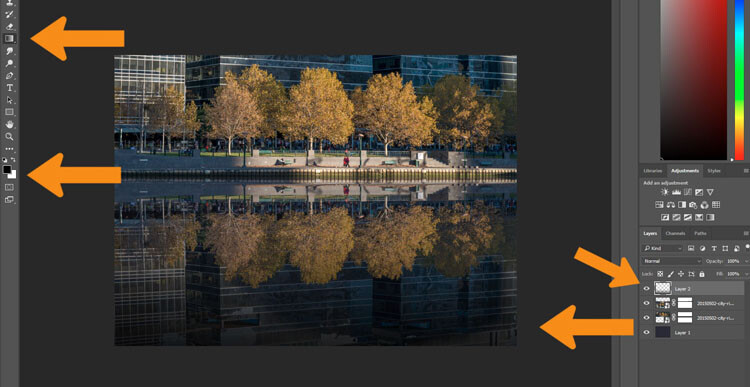
Turn off two image layers so they disappear (click the eyeballs on each). Select the Paint Bucket Tool, it is with the gradient tool, right click and you will see the bucket tool.

LeanneCole-reflections-8

Select the Paint Bucket Tool and click on the foreground color.

Click on the foreground and background color selectors and a window will pop up for you to select the background colour of your reflection. It is good to go with something dark, and a similar colour to your image.

LeanneCole-reflections-9

Select the color to go under the image.

When you have chosen your color, fill the layer with it and turn the other two layers back on.

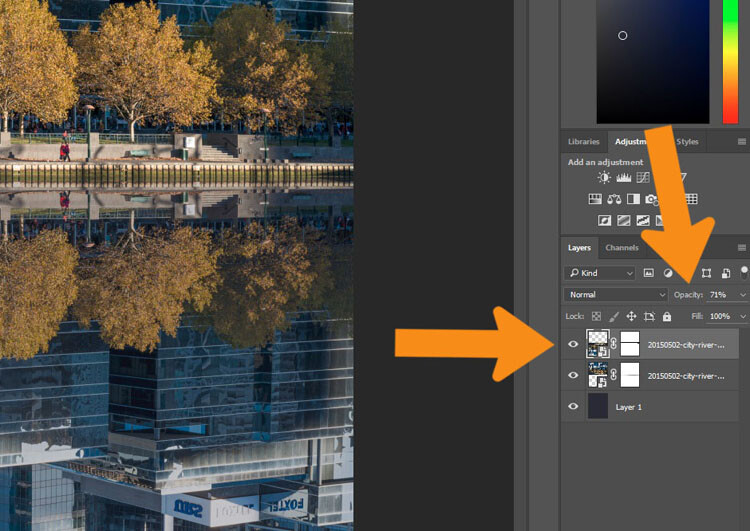
Select the layer that is the reflection and go up to the Opacity Slider which is just above the layers panel. Turn the reflection layer opacity down a little. Just make it slightly less bright than the original. For this tutorial it was turned down to 71%.

LeanneCole-reflections-10

Change the opacity of the reflection.

Select the Crop tool so you can remove any part that is now no longer needed. You may also want to crop the image so it is doesn’t look like there is just one image on top of another.

LeanneCole-reflections-11

Select the crop tool to get the final image.

Fade the reflection

For the final part, add one more blank layer, then select the gradient tool. Make sure that black is the foreground colour. Add some Gradient to the bottom of the image to help it blend in. If you are not getting the gradient to work so that you are getting the foreground to transparent, you will need to select that option in the tool options bar at the top under the main menu. You may also want to change the opacity of the tool to around 50%.

LeanneCole-reflections-12

Add a gradient to the bottom.

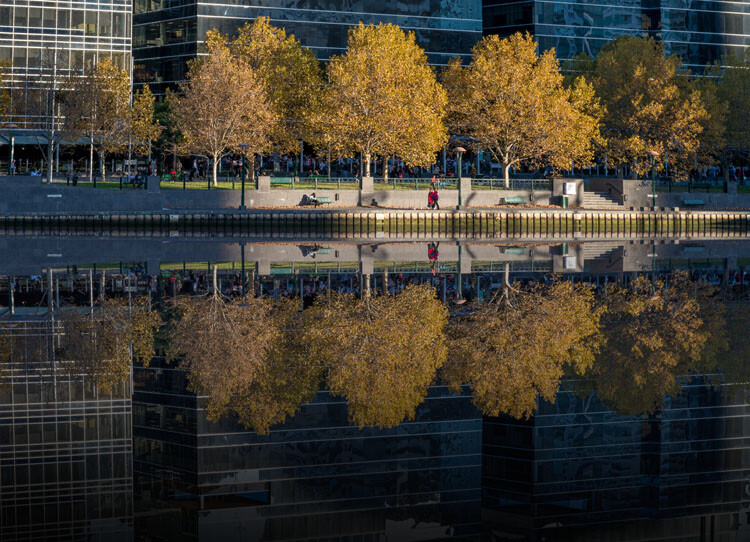
Here is the final image.

LeanneCole-reflections-13

The final image

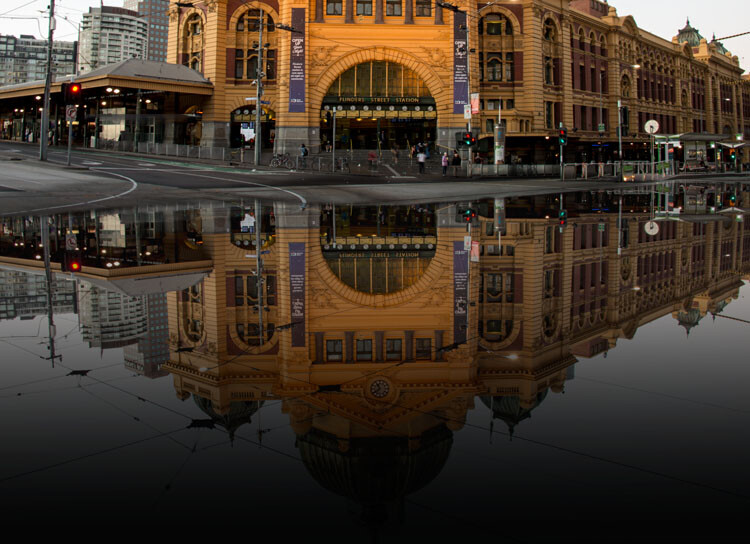
This can be done for many things and you don’t have to have a body of water to do it. Here is an image of a train station in Melbourne where I have tried to make it look like the street is flooded.

LeanneCole-reflections-16

Flinders Street Station as though the street in front were flooding.

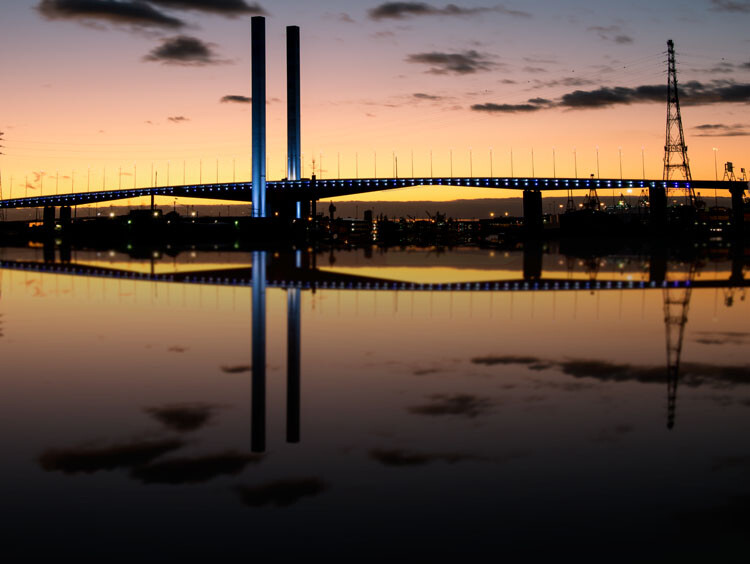
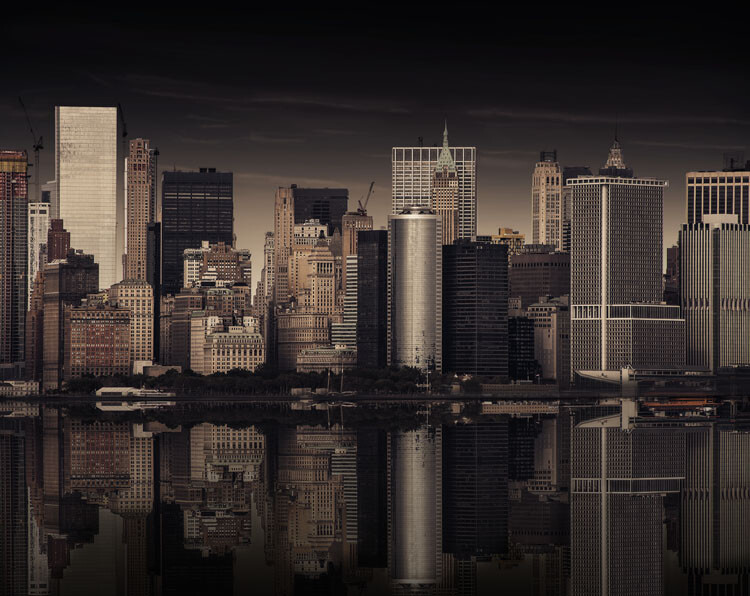
Here are a couple of other images in different situations for you to look at and give you inspiration. Let your imagination go wild and see how else you can use this technique.

LeanneCole-reflections-17

Bolte Bridge at sunset with a reflection in the harbour.

LeanneCole-reflections-15

The New York skyline with reflection in the water.

googletag.cmd.push(function() {
tablet_slots.push( googletag.defineSlot( “/1005424/_dPSv4_tab-all-article-bottom_(300×250)”, [300, 250], “pb-ad-78623” ).addService( googletag.pubads() ) ); } );

googletag.cmd.push(function() {
mobile_slots.push( googletag.defineSlot( “/1005424/_dPSv4_mob-all-article-bottom_(300×250)”, [300, 250], “pb-ad-78158” ).addService( googletag.pubads() ) ); } );

The post How to Add a Reflection in Photoshop by Leanne Cole appeared first on Digital Photography School.

Digital Photography School

 
Comments Off on How to Add a Reflection in Photoshop

Posted in Photography