RSS
 

Archive for May, 2016

Go wide or go home: Voigtlander 15mm Super-Wide-Heliar lens gallery

18 May

Sony shooters took note in October when Voigtlander announced it would release three ultra-wide-angle primes for full-frame E-mount cameras. When we managed to borrow a 15mm F4.5 Super-Wide-Heliar for a few days, we handed it right over to DPR staffer and veteran landscape photographer Chris Williams. Read some quick impressions on the lens and take a look at a small selection of his images.


As a professional landscape photographer I’ve shot a number of wide-angle lenses and to say that I was impressed by the Voigtlander 15mm prime is a bit of an understatement. The lens excels in sharpness throughout the frame and maintains a high level of performance across nearly every aperture. Being that it is a super wide prime, it does suffer from barrel distortion (as most ultra and super wides do) but the amount of lens that you get for the money is impressive.

Chromatic aberration really only becomes apparent wide open where the corners also tend to soften up a bit. Overall the lens performed very well, so well in fact that I may pick one up for myself at some point.

The other really nice thing about the Voigtlander 15mm is that it accepts traditional screw on filters. The Tokina 16-28mm F2.8, Nikon 14-24mm F2.8 and the Canon 11-24mm F4L all require external filter systems like those designed by Fotodiox. The Voigtlander accepts standard 58mm threaded filters, which is rare for a prime (or even a zoom) this wide.

Articles: Digital Photography Review (dpreview.com)

 
Comments Off on Go wide or go home: Voigtlander 15mm Super-Wide-Heliar lens gallery

Posted in Uncategorized


Fast machines: Shooting motocross with the Nikon D5 and Canon 1D X II

18 May

Introduction

Big cameras. Big performance.

The Nikon D5 and Canon EOS-1D X Mark II are purpose-built machines. Firing at 12 and 14 frames per second respectively, they are designed for speed and durability to help you make sure you get the shot no matter what conditions you find yourself in. Conditions like those at the Evergreen Speedway in Monroe, Washington recently, where DPR staffers Dan Bracaglia and Carey Rose went to get some preliminary findings on the cameras’ AF systems.

Bear in mind we’re camera reviewers, and not pro sports photographers – we’re actively working to get the Nikon and Canon cameras into the hands of working pros to get some real-world opinions on them. But for now, we thought there was some value in sending Dan out to get some early findings from the 1D X Mark II, which had arrived only recently into our offices, and Carey out with the D5, the review of which is fully under way. Since these cameras are likely to be shot alongside each other at many a major sporting event, we figured we’d try our best to do the same and compare our results.

The Nikon D5

by Carey Rose

Flyin’ high. Photographed in Auto Area AF. Nikon 24-70 F2.8E VR @ 38mm | F11 | 1/250 sec | ISO 100

For someone as interested in motorcycles as I am, it’s almost embarrassing to admit that this was my first time watching motocross in person, much less photographing it. And even though we were shooting a Sunday ‘practice’ session, it proved a good test for Nikon’s flagship sports shooting machine. As riders brapped and blipped their engines, rocketing around the track at over 40 mph, I snapped and clacked the D5 away at 12 fps nearly the whole time. You just don’t realize how nice all those frames per second are until you really – truly – need them.

But before we get to the burst rate and the photos, let’s dig into the D5’s autofocus system a bit. The continuous autofocus modes I chose to try out were 3D Tracking, single-point, Group Area AF and Auto Area AF. Here’s what all those modes mean, how they behave and some common use cases.

  • 3D Tracking utilizes the D5’s phase-detection autofocus module for distance information and combines that with color readings from the RGB metering sensor to effectively track subjects around the frame with a single point. Put another way, place your chosen AF point over your subject, initiate autofocus, and the point should stick to that subject whether you or your subject move. Frankly, it’s worked so well in my experience that I default to this mode almost all the time for general shooting.
  • Single-point AF utilizes depth tracking from the phase-detection module to effectively track an object that is moving towards or away from the camera, so long as you keep the point over that subject. Despite how good 3D Tracking performs, it can still sometimes be fooled. If you know your subject’s trajectory and can comfortably follow that subject with the AF point over it, this mode also comes with a high degree of precision.
  • Group Area AF works very similarly to the single-point method, but uses a tight group of 5 AF points instead of one. With a larger ‘zone’ of focus coverage, it should be easier to follow unpredictable subjects in this mode, and it’s commonly used for photographing birds in flight.
  • Auto Area AF works basically by letting the camera take over entirely. Like 3D Tracking, this mode uses the camera’s PDAF module and metering sensor in tandem to intelligently discern what it should be focusing on. It will usually bias to objects closer to the camera, so watch your foregrounds, but it should also intelligently be able to read colors, and in Nikon’s newest models, faces and eyes. This is a good mode for photographing people at events, or if you don’t have time to react and just need to get a photograph, there’s a chance Auto Area AF will get you what you need.

It goes without saying that all of these modes, despite how computationally intensive they may be for the D5, work perfectly well at its full burst rate (not mirror lock-up mode).  And as someone who is used to 5fps bodies, the higher frame rate is something to behold. 

12 fps

After some quick and informal testing, I soon started to take 12 fps for granted. Slowing down the D5 in ‘Continuous Low’ mode to 6 fps to simulate a less sports-oriented body was torturous. Predictably, instead of getting a solid six-to-eight shots of a rider flying past me with wide-ish framing, I’d get maybe two or three. I was often left wanting an additional shot in-between the few that I managed to get, and because of this, I ended up trying to get just a single shot at the right moment and hoping that my timing worked out. It often didn’t. Back to 12 fps mode for me.

A high frame rate gives you more compositional options in situations such as this, where two riders are constantly changing their positions relative to each other. Nikon 70-200 F2.8G VR II @ 200mm | F5.6 | 1/1250 sec | ISO 400

Following and focusing with single-point AF

But of course, 12 fps is useless if you can’t see what you’re shooting. The good news is that the viewfinder blackout is so short on the D5 even at 12 fps that I was able to pan and follow a fast-moving rider at a very close distance with ease. Nikon’s 3D Tracking worked well (more on that later), but because I could see so clearly in ‘real time’, using single-point continuous autofocus and just keeping a point over my subject was a completely viable option when panning and this approach netted a high number of ‘keepers.’ What’s more, the frame coverage of the D5’s autofocus array is so generous that I rarely felt compositionally constrained by picking a single point to keep over my subject.

Of course, for the sake of some variety, sometimes it’s best not to follow the action and just let it pass you by. Nikon 300m F4 PF | F5.6 | 1/500 sec | ISO 100

Group AF

Group AF on the D5 works similarly to single-point, but with the idea that a tight group of points will give you greater precision than just one point alone. The idea is great in principle and it usually worked well, but there were a handful of times where I let a part of the group stray off the rider, and the camera quickly readjusted to focus on the background. Part of this is probably due to to the fact that I had the AF system set up for ‘erratic’ subjects since 3D tracking and single-point worked so well in this mode, but in any case I tended to avoid Group AF for the rest of this shoot. 

Motorcycles in flight. Nikon AF-S 300mm F4 PF | F4 | 1/1600 sec | ISO 100

3D Tracking

One of the most exciting autofocus developments for DSLRs in recent years, Nikon’s 3D Tracking, worked as well as I have come to expect with only a single exception. When at wider focal lengths and attempting to initiate tracking on a rider at a distance, the D5 would usually just not be able to find my subject. The user manual reflects this though, saying that the camera collects color information from focus points surrounding the one you’ve chosen, storing that information and using it to initiate tracking.

So with a distant rider, the D5 was seeing mostly the dirt color, despite the bright colored clothing of my intended subject. In any case, if I let the subject get a little closer, or if I used longer lenses that produce inherently shallower depth-of-field, 3D Tracking proved itself to be pretty magical, constantly re-focusing and re-positioning the autofocus point in the viewfinder even when I was shooting at 12fps.  

Nikon’s 3D Tracking did a great job of tracking this rider with a single AF point pegged to his riding suit. Nikon AF-S 300mm F4 PF | F4 | 1/1000 sec | ISO 100

Auto Area AF

The last mode I experimented with was Auto Area AF, which is usually a mode that I tell people to avoid using. The D5 might just change my mind on that one. The camera was able to find a moving subject and hit it with anywhere from one to nine AF points almost every single time.

1 2 3 4 5

In the above series of (unedited) images, Auto Area actually directed the camera to focus on the background first. But then in the middle of that 12 fps burst, focus snapped to the rider flying through the air in front of me within two frames. I generally prefer a higher degree of control than Auto offers, but I can see this mode being genuinely helpful if you have milliseconds to get a shot and you don’t have time to place an autofocus point manually.

All those buttons

One of the best parts of the new D5 (and its sister model, the D500) is the level of button customization regarding autofocus modes. I am a back-button AF shooter, as I do sometimes like to pre-focus and wait for a subject to enter the frame without having to switch into manual focus. But even with the shutter button decoupled from any autofocus functionality whatsoever, I can assign AF-ON to be 3D Tracking, then assign the FN1 button on the front of the camera (under my ring finger) to switch to single-point continuous autofocus, and then also assign a full press of the AF joystick to switch into Auto Area mode.

So without even shifting my grip, I’ve got three different autofocus modes at my fingertips. This is incredibly handy as I often found myself changing AF modes depending on my lens, my position and the riders’ movement.

Having watched this rider come around this corner a number of times, I wanted to focus on just how much dirt he kicked up as he plowed through the scene. Having de-coupled autofocus and my shutter button, I pre-focused just behind where his rear tire is, shot a burst as he entered and exited the viewfinder with the tight framing I wanted and I didn’t have to worry about the focus shifting or missing (an admittedly minor concern with the D5). Nikon 300mm F4 PF | F4 | 1/2000 sec | ISO 200

So, now that we’ve seen how the Nikon D5 performed, let’s move on to Canon’s EOS-1D X Mark II.

Articles: Digital Photography Review (dpreview.com)

 
Comments Off on Fast machines: Shooting motocross with the Nikon D5 and Canon 1D X II

Posted in Uncategorized


Broncolor launches battery-powered Siros studio heads for location photographers

18 May

$ (document).ready(function() { SampleGalleryV2({“containerId”:”embeddedSampleGallery_0756565408″,”galleryId”:”0756565408″,”isEmbeddedWidget”:true,”standalone”:false,”selectedImageIndex”:0,”startInCommentsView”:false,”isMobile”:false}) });

Swiss lighting manufacturer bronocolor has announced the Siros 400 L and 800 L, a pair of battery-powered studio heads. Both models use an interchangeable lithium-ion cell that the company says is powerful enough to provide 440 full-power bursts from a single charge in the 400L, and 200 in the 800L. The cells recharge from flat in 75 minutes.

The new heads use the same modifiers as the current Siros range, and the 25-watt LED modeling light matches the color temperature of the bulbs used in the company’s mains-powered heads. The Siros 800 L has a maximum output of 800 joules, while the smaller 400 L head manages half of that. Both can produce flash durations as short as 1/19,000sec, and both can be controlled via Wi-Fi and the broncolor bronControl app for iOS and Android devices. To help the user identify which light is being adjusted from the app, it is possible to color code each head using the LEDs built into the body of the head’s housing.

These new Siros L heads can only be powered via their batteries, which fit inside the head rather than acting as external packs connected by a cable. Spare batteries will cost £215 plus tax. The heads will be available sooner than the press release states.

  • Siros 400 L Head – £1,515 + VAT
  • Siros 800 L Head – £1,755 + VAT
  • Siros 400 Outdoor Kit 2 (Two head kit) – £2,995 + VAT
  • Siros 800 Outdoor Kit 2 (Two head kit) – £3,495 + VAT

For more information visit the broncolor website.


Press release:

broncolor presents its new compact device – battery-powered studio quality

With the Siros 800 L, we have succeeded in producing one of the most powerful compact devices currently available on the market. The Siros 800 L is, like the somewhat smaller version, the Siros 400 L, a true genius in offering discerning photographers optimum lighting both indoors and outdoors.

Siros L – optimum lighting, compact and mobile
The Siros L is broncolor’s new battery-powered compact device, which provides ambitious professional photographers with the opportunity to enjoy the perfect lighting, be this in a mobile form in the studio, or for external shots – offering both very fast, and also long, flash durations.

The device has the most up-to-date lithium ion batteries – thanks to this, the device can achieve 440 flashes at full power; and the lower the power, even more flashes are available. The battery-pack can be used over a very wide temperature range from -10° to 60°C (14° to 140°F). Once its power has been used up, it can be completely recharged in only 75 minutes, allowing just two batteries to be switched and recharged during a shoot if there is a power supply available.

The Siros L uses the Swiss manufacturer’s ECTC technology, which has already been used in the well-known Scoro and Move generators – thus, Siros L has flash durations of up to 1/19’000 s (t0.5) and, of course, a guaranteed constant colour temperature over the entire control range.

All the Siros L’s functions are easily and remotely controlled by the “bronControl” app, which establishes its own WiFi network; this then allows the control of several devices by means of a smartphone or tablet. In order to ensure that the photographer knows which device he is currently addressing, the devices all have different LED colour codes – this ensures that the Siros L is easy to use, both indoors and outdoors.

Thanks to its compact size and battery-operation, the Siros L is absolutely ideal for outdoor use. It can, of course, also be used in the studio where it can be easily integrated into existing broncolor studio equipment.

The 25-watt LED modules offer a bright modelling light with a colour temperature of 3000 K, matching the colour temperature of the halogen modelling lamps of the Siros mains powered units.

In addition to the 800 J version for photographers who refuse to compromise in respect of power, there is the Siros 400 L version which is somewhat smaller and lighter and thus offers about 50% of the energy of its bigger brother.

The Siros L can be used with the entire broncolor light-shaper range. Many light-shapers, such as softboxes, open reflectors and especially Paras, are parabolic and can only guarantee an optimum light output and quality if the light source is placed as close as possible to the focal point in the interior of the reflector. This is why, with the Siros L, broncolor has deliberately opted for an external flash tube, providing perfect lighting.

The Siros L will be available in shops from 1st July 2016.
Would you like to know more? Please visit broncolor’s website at www.broncolor.com

Articles: Digital Photography Review (dpreview.com)

 
Comments Off on Broncolor launches battery-powered Siros studio heads for location photographers

Posted in Uncategorized


Lenovo’s Moto G Plus comes with 1/2.4-inch sensor and fingerprint reader

18 May

$ (document).ready(function() { SampleGalleryV2({“containerId”:”embeddedSampleGallery_3124387172″,”galleryId”:”3124387172″,”isEmbeddedWidget”:true,”standalone”:false,”selectedImageIndex”:0,”startInCommentsView”:false,”isMobile”:false}) });

Motorola’s Moto G series has always been one of the best options for smartphone users looking for top performance at mid-range pricing. Now, the first new G model has been launched since Motorola became a Lenovo company. True to form, the Moto G Plus offers several features we are used to seeing on high-end devices and a promising-looking camera specification.

An Omnivsion OV16860 1/2.4-inch 16MP sensor with a large pixel size of 1.34um is paired with a fast F2.0 aperture, on-sensor phase detection and laser-assisted AF. There is also a dual-LED flash and a 5MP front camera with F2.2 aperture. On the software side of things a new Pro mode allows for manual control over shutter speed and other essential shooting parameters.

Like all recent Moto devices, the Moto G Plus comes with a ‘pure’ version of Android 6.0, without any manufacturer-specific add-ons, to keep things as responsive and smooth as possible. Google Photos is the default photos app and includes two years of free storage at original image quality for Moto G buyers.

The OS and other software is powered by a 1.5 GHz Qualcomm Snapdragon 617 chipset with octa-core CPU and 550 MHz Adreno 405 GPU. There are 2GB of RAM and microSD-expandable storage options ranging from 16 to 64GB. Images can be viewed and composed on a 5.5-inch 1080p display that is covered with Corning Gorilla Glass 3 for protection. 

The 3000 mAh battery features Motorola’s TurboPower charging which can provide approximately 6 hours worth of power in 15 minutes of charging. A fingerprint reader at the front increases security and provides a convenient way of unlocking the device. The Lenovo Moto G Plus has first been launched in India where it will be exclusive to Amazon.in and start at approximately $ 200 for the base 16GB version. Pricing for other regions has not been revealed yet. With the Moto G Plus Lenovo has also launched the 4th generation of the standard Moto G model which comes with identical processor specifications but has to make do without the fingerprint reader and, with a 13MP Sony IMX214 image sensor, offers a very similar camera specification to last year’s Moto G. 

Key specifications:

  • Omnivsion OV16860 1/2.4-inch 16MP sensor
  • F2.0 aperture
  • On-sensor phase detection and laser-assisted AF
  • 1080p video
  • 520p slow-motion video
  • Dual-LED flash
  • Manual control over shutter speed
  • 5MP / F2.2 front camera
  • Android 6.0
  • 5.5-inch 1080p display (401 ppi)
  • 1.5 GHz Qualcomm Snapdragon 617 chipset with octa-core CPU 
  • 2GB RAM / 16, 32 or 64GB storage
  • MicroSD support up to 128GB
  • 3000 mAh battery with quick charging
  • Fingerprint reader

Articles: Digital Photography Review (dpreview.com)

 
Comments Off on Lenovo’s Moto G Plus comes with 1/2.4-inch sensor and fingerprint reader

Posted in Uncategorized


Primer: What is VR, and why should photographers care?

18 May
VR was everywhere at NAB, and at CES this year.

Virtual reality is an immersive experience that involves multiple senses, and, most importantly, responds to the intentional interaction of the viewer. From the earliest days of synchronized film and sound playback, the illusion of being in a different place or time, and generating an emotional response to the experience, has been the goal of most modern communication and entertainment mediums.

In VR, this illusion is referred to as ‘presence,’ where not only the sights and sounds (and other sensory input) are believable, but the ‘show’ itself reacts to the participant’s actions in a plausible way.

It isn’t hard to imagine how different the experience of browsing through a gallery of images can be when they are not just thumbnails on a tight grid, but rather ‘virtually’ hung by the artist in a spacious VR room that mimics a physical gallery space. VR video adds the active immersion of being in the middle of a busy plaza, or riding inside a rally car during a nighttime ice race. The opportunities to share even simple, daily events become less about what was in the frame at the time, and more about what the whole location felt like.

VR differs from flat, 2D photos by requiring at least a seamless 360-degree view, and eventually full freedom of 3D motion.

Semantics

First, let’s get some semantics out of the way. ‘Virtual reality,’ or VR, has generally been applied to 3D computer-generated graphics. There are some who say that anything that starts with a camera pointed at the real world is not VR. This ignores some of the history of VR (see below), as well as the coincidence that interactive panoramic images and videos on the web are displayed as textures on the inside of a 3D cube (or sphere, in some cases). There are also ways to create realistic 3D data from photographs, and from spherical panoramas in particular, both of which currently offer greater realism than 3D graphics created without the aid of photography.

While we could separate photography from 3D graphics by dogmatically referring to 360 x 180-degree images as ‘spherical panoramas,’ and try to demarcate 2D/3D hybrid technologies as ‘not photography,’ this would be unfair. Therefore, this article will still refer to VR as both an immersive experience, and something that a camera can capture. 

This primer will touch on the various technologies and companies involved in VR, but the underlying theme is on how conventional photography and cinematography influence VR, and how VR will influenced them in return. 

History of VR

(Clockwise from upper left) Sensorama, Battlezone, Virtuality arcade, USAF virtual cockpit, UIC CAVE, Telepresence HMD.

The term ‘virtual reality’ was originally coined (in French) by Antonin Artaud in his 1938 essays on the nature of theatrical performances, so it’s rather fitting that the first functional VR experience, Sensorama, was conceived and patented (in 1957) by cinematographer Morton Heilig. In 1961, Heilig also patented a head-mounted, stereoscopic display system. While these inventions relied on pre-recorded films with very limited interaction, they introduced the concept of a viewer being immersed in a different environment; including the sights, sounds, smells and even windspeed of the environment being represented.

Though the entirely analog Sensorama never really took off, the concept of immersion was a core aim for early computer-generated 3D graphics. Most pioneering modern VR development was focused on military and aerospace training, where it is much safer, easier, and ultimately cheaper, to teach someone how to react to difficult situations in a virtual environment. The first 3D VR displays showed only glowing wireframes against a black screen (a la Battlezone), while the physical surroundings mimicked a real cockpit or driver’s seat, complete with hydraulics to pitch the cabin during the experience.

In the 1980’s and early 90’s, the increasing visual fidelity of real-time computer graphics (driven both by industrial and entertainment uses) promised more realistic virtual environments, and the first wave of hype for consumer VR built up, entering popular culture with arcade entertainment like the Virtuality systems, and creative works like Neuromancer and The Lawnmower Man.

Recent times

Once this wave of hype broke on the shores of limited computing power, minimal content, and vaporware consumer displays (anyone remember SegaVR?), the relevant technology continued to advance in a consistent, but much quieter, fashion. Real-time 3D computer graphics progressed from plasticky representations on expensive workstations, to the increasing visual realism of PC and console games. In 1994, Apple introduced QuickTime VR as a very simple, portable way to display panoramic content with the freedom to look around, and this extension of QuickTime quickly became known for real estate ‘virtual tours’ and other early forms of photography-based VR on a computer.

Loading…

This content requires HTML5 with CSS3 3D Transforms or WebGL.

//

HTML5 static 360 VR sample – click this link for the VR headset version. (Made with Pano2VR)

In 2003, Linden Labs created Second Life, an entirely virtual ‘social world’ in which users could interact using human-looking avatars within an entirely synthetic, and user expandable, 3D world. Connecting people via the internet was not new, nor did Second Life initially support VR headsets with stereoscopic rendering, but this remains a good example of a successful shared ‘virtual reality’, in the original theatrical sense.

The 2007 introduction of Google Street View democratized the idea of spherical panoramic imagery (360 x 180 degrees of coverage) to immerse a viewer in various locations in the real world. This blending of photographic content with geographic data has broadened consumer acceptance of photographic VR, while the 2014 introduction of Google Cardboard (an inexpensive way to turn a modern smartphone into a VR headset) allows this vast amount of panoramic data to be viewed in a more natural, immersive way. 

The new hype of modern VR

Recent advancements in consumer electronics have reinvigorated virtual reality and given it new vigor, as well as inspiring new generations of researchers, entrepreneurs, and content creators. The ever-increasing computing power and screen resolutions of smartphones, combined with their built-in gyroscopes and accelerometers (useful for head tracking), have made these ubiquitous devices almost ideal for repurposing as a viewer for VR games, images, and video. 

Combining a phone with the simple mechanics of a Google Cardboard-type viewer, VR photos, apps and games (as well as New York Times articles)  means that VR content can be appreciated by a wider audience.

Google Cardboard – a $ 15 immersive display for anyone to try out.

Prior to Cardboard, most attempts at making a smartphone into a viewing platform were limited to stereographic toys, without enough software and hardware polish to make it a good experience. Samsung changed this by partnering with Oculus to produce the (currently $ 99) Gear VR headset, which is more than just a pair of lenses and a phone holder. Gear VR has its own accelerometers and gyroscope, as well as a USB connected control-pad, while Oculus provides a content store and software to enhance the experience. All of this pushes accessibility up from the bottom.

The same technology from smartphones has driven down the component cost of higher-end systems for virtual reality and augmented reality (AR), leading to consumer-level, dedicated, head-mounted displays like the Oculus Rift and HTC Vive, and extensions to game consoles like Playstation VR. While the initial adoption of these systems may be mainly with hard-core gamers and technophiles, the experiences and content being developed for these systems can be more ambitious and immersive, which in turn will draw more users to the hardware. The VR ecosystem is spreading rapidly, and spherical VR photos and videos are frequently the first experience most consumers will have.

Follow the money

Recent years have seen explosive growth in terms of business investments into VR, from the display systems (Facebook buying Oculus for $ 2 billion in 2014), to content creation (Nikon and Samsung have recently announced consumer 360 cameras, and Ricoh is on v.3 of theirs), while various VR startups raised over $ 658 million in funding just in the past year. The established games industry has already spent millions of dollars preparing for the 3D VR gaming revolution, which many analysts now say is no longer an ‘if’ proposition, but rather a ‘when.’

Consulting and auditing firm Deloitte has predicted that the VR market (for content and devices) will hit $ 1 billion in sales during 2016 alone. Meanwhile, the games and VR consulting firm Digi-Capital goes even further to say that by 2020, the virtual reality and augmented reality markets will be worth around $ 120 billion. These market predictions are not based on advances in research labs and high-end applications, but rather from the groundswell of video game and mobile technology, along with increasingly diverse content.

As Alexandre Jenny, the Senior Director of Immersive Media at GoPro, puts it; “We are no longer wondering ‘will VR change the world,’ we are in the stage of ‘how will VR change the world?’ VR is certainly the best way to give someone an immersive experience, and that fact is really disruptive in many industries.”

Commercial applications

Aside from research and purely artistic uses of VR (both of which have a long and fruitful history), there are numerous commercial applications for virtual reality, and many more are being developed as the tech progresses. Below are just a few examples.

$ (document).ready(function() { SampleGalleryV2({“containerId”:”embeddedSampleGallery_1396140511″,”galleryId”:”1396140511″,”isEmbeddedWidget”:true,”standalone”:false,”selectedImageIndex”:0,”startInCommentsView”:false,”isMobile”:false}) });
Articles: Digital Photography Review (dpreview.com)

 
Comments Off on Primer: What is VR, and why should photographers care?

Posted in Uncategorized


Samsung offers NX1 and NX500 firmware updates

18 May

Samsung has released firmware updates for the NX1 and the NX500, bringing the NX1 up to firmware version 1.41 and the NX500 to firmware version 1.12. Both updates fix a Bluetooth issue that arises when pairing the cameras with smartphones running Android 6.0 Marshmallow. The NX500 update changelog advises users to update the camera firmware together with the Samsung Camera Manager App.

Samsung has all but backed out of the digital camera market. Its flagship NX1 was discontinued late last year, though the NX500 remains in stock for the time being. While a question mark remains over exactly what long term support for Samsung camera owners looks like, at least for now the manufacturer will continue to support the latest version of Android’s OS.

The NX1 firmware update is available here, and the NX500 is available here.

Articles: Digital Photography Review (dpreview.com)

 
Comments Off on Samsung offers NX1 and NX500 firmware updates

Posted in Uncategorized


Using a Wide-angle Lens with Wildlife for a New Perspective

18 May

With more and more budget telephoto lenses hitting the market, wildlife photography is becoming increasingly accessible. Consequently, you don’t have to look very far to see beautiful wildlife portraits, shot with a clean bokeh using a long lens. Close-ups like this definitely have their place, but this traditional form of wildlife photography is perhaps harder to achieve stand-out photos within nowadays.

But who said you had to use a telephoto lens for captivating wildlife photos? In nature photography, wide-angle lenses are traditionally associated with landscape photography. But by using a wide-angle lens with wildlife, you can incorporate the environment, and habitat of a species, into your photo. This is will add an entirely new perspective to your images, and it’s a really enjoyable technique to play with.

How Do You Do

Equipment you’ll need

While you can do wide-angle shots of wildlife using a camera trap system, I’m going to be looking at firing the shutter manually. So here are some pieces of equipment you’ll want to get hold of.

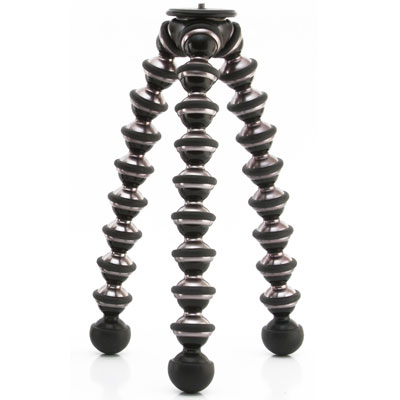
Joby Gorillapod

These three bendy tripods are extremely versatile, and allow you to position your camera in all sorts of places, whether that be wrapped around a tree, or precariously positioned on a rocky beach. This will help you to position your camera low to the ground, in the ideal position. Tripods rarely let you go to ground level, as they often have a neck or centre column. Plus, they’re very large when spread out to the ground. But make sure you buy the more heavy-duty of Joby’s offerings, as the cheaper versions will not cope with the weight of a DSLR.

Joby

Wireless release

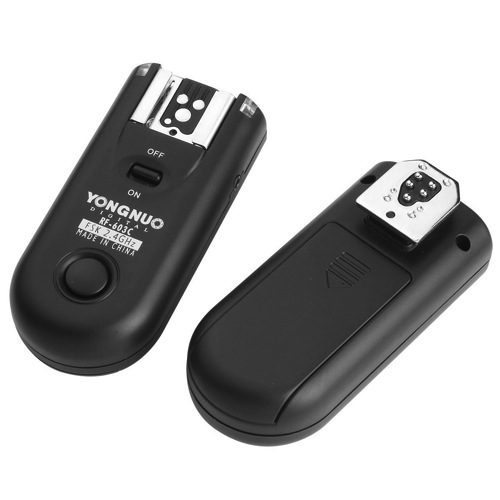
You’ll definitely need some form of wireless trigger for your camera. You can’t press the shutter directly, as no animal will come near your camera if you’re sitting right behind it. Instead, get hold of some wireless releases from YongNuo. They are about $ 40 and work perfectly well. They are a radio based system, which do not require line of sight, and have they a range of up to 100 meters (supposedly).

Yongnuo

Setting up for the shot

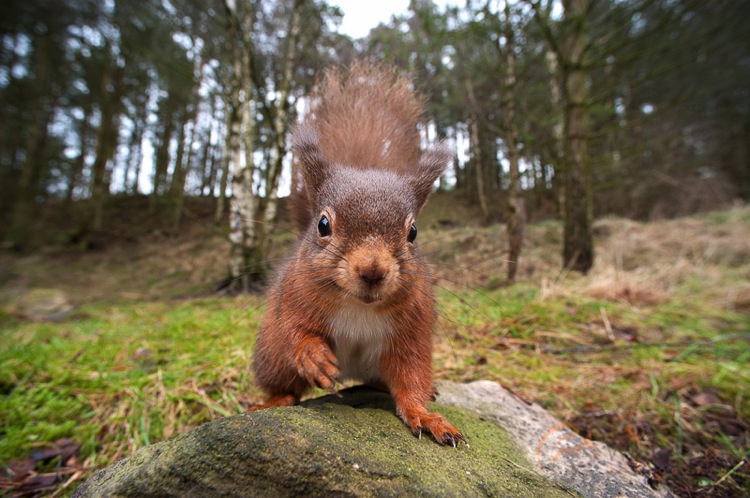
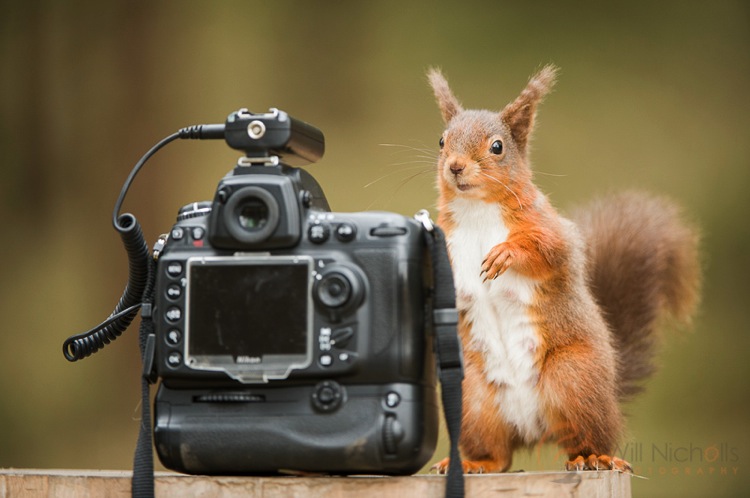
You need to think about what you’re trying to convey in your photo. The best part about a wide-angle lens is the ability to include the habitat of your subject, so think about what are its key features. For me, red squirrels are a great subject for wide-angle photography. They live in British woodlands, so the obvious backdrop is a collection of trees.

Remotesquirrel2

Position the camera as low to the ground as possible; you want to make sure you are at or below eye-level of the animal. This really shifts the perspective of the shot. Remember that because you’re shooting wide (perhaps even as wide as 14mm), you’ll need to ensure your subject comes close enough to the lens, or it will appear too small.

To do this, you can use some form of bait. I will stress right away that live baiting is seen as extremely unethical in wildlife photography, and I strongly suggest you do not take this approach in any form of wildlife photography. If your subject is a carnivore, then you can collect road kill or other already dead animals to use as bait. But for me, squirrels are omnivores and they are very happy with a few hazelnuts to bring them close to the camera.

Remote High

Put your camera into aperture priority mode. Make sure you have your exposure compensation set to expose the scene properly, and any changes in light should be adjusted for by the camera automatically. Set your focus manually, predicting where the animal will turn up, and make sure to switch the camera’s autofocus off (otherwise it will attempt to refocus when you fire the shutter).

Now you can sit back and wait. Make sure you’re in range, but stay hidden. You can use a pop-up photography blind for this, and just be patient. Once an animal begins to approach, fire a test shot while it is still at a distance. This will help the animal get used to the sound of the shutter. For some animals a test shot won’t be appropriate, such as with birds that may fly away. If you’re lucky, your subject will realize that the camera means no harm, and happily sit and pose for your shot.

Things to be aware of

You should never put your photograph before the welfare of an animal. Period. There are no exceptions here, and to do otherwise is strongly condemned in the wildlife photography field. It therefore goes without saying that you should not perform this type of photography at the breeding site of an animal. If you shove a camera outside a bird’s nest, it will likely abandon it, and any chick in the nest will die. Disturbance like this never ends well.

Wide-angle photography handheld

There are some situations where you can hand-hold your camera and take wide-angle shots of wildlife. This is often the case for seabirds which nest on islands and cliff tops. These usually reside in wildlife reserves, and it is the case in the UK that you can walk around these reserves. Consequently, the animals are used to people and are completely unafraid. It’s therefore possible to get close enough. As long as your subject doesn’t show any signs of stress, then you are probably okay to approach.

Juvenile Shags

In conclusion

Wide-angle photography is great fun with wildlife. It feels just like Christmas, not knowing what you’re going to get until you go back and check the camera. Sometimes you’ll be bitterly disappointed at an out-of-focus image that had potential, but eventually you’ll come away with something you can be proud of.

googletag.cmd.push(function() {
tablet_slots.push( googletag.defineSlot( “/1005424/_dPSv4_tab-all-article-bottom_(300×250)”, [300, 250], “pb-ad-78623” ).addService( googletag.pubads() ) ); } );

googletag.cmd.push(function() {
mobile_slots.push( googletag.defineSlot( “/1005424/_dPSv4_mob-all-article-bottom_(300×250)”, [300, 250], “pb-ad-78158” ).addService( googletag.pubads() ) ); } );

The post Using a Wide-angle Lens with Wildlife for a New Perspective by Will Nicholls appeared first on Digital Photography School.


Digital Photography School

 
Comments Off on Using a Wide-angle Lens with Wildlife for a New Perspective

Posted in Photography


5 Tips for Going from Pixels to Print Quality

18 May

Whatever level of photographer, you are sure to have gathered a stockpile of pixels.

It’s just the way it is nowadays. Whether you are the kind of person that clogs up their hard drive, gradually slowing your Mac or PC down until you are forced to do something about it. Or perhaps you are already super organized having kept negatives, CDs, DVDs, hard drives, a raid system or even the cloud?

Indeed whatever storage method you choose you need to catalogue the files by name, event, and year, so you may retrieve without having a complete breakdown while searching for your favorite file. After all photography should be fun, not pain.

Many photographers use Lightroom, which is a great program, not only for editing but also for organizing your ever-increasing pile of pixels. But then what? What do you do with them then? I think you would agree we all spend too much time in front of screens? So why would you keep your masterpieces locked away in digital format?

To create that killer slideshow you will amaze your friends with is a lot of fun, especially if you have a large TV or digital projector. However, be careful of the content of your slideshow. Nothing worse than visiting a friend, only to be subjected to look through every snap taken on their holiday. Slideshows really should not be much more than ten minutes long or people generally loose interest. Keep them simple also, not too many whizzy effects, that just makes your viewer feel queasy!

PIC 10 simonjohn co uk

So you have this catalogue full of great images, what next? I would say enjoy them. Have your favorites printed and framed. Photography is personal, just like any other art form. By printing your special images, and hanging them in your home, you are not only enjoying the fruits of your labour, but also creating personalized wall art. This shows friends your talents, without the need for a longwinded slideshow.

You may find as time goes by, the framed photographs mean more or less to you. This is quite natural as we grow, and our taste and habits change also. Not to worry, you can always replace them with fresh images. It’s not like the old days when the portrait your parents had remained in the given spot forevermore. In fact, it is refreshing to change your images from time to time. Just like wallpaper or any other interior design things, move on. Only when you can look back at a photograph you made perhaps 10, 20, or 30 years ago, and still love it, will you know it’s a keeper!

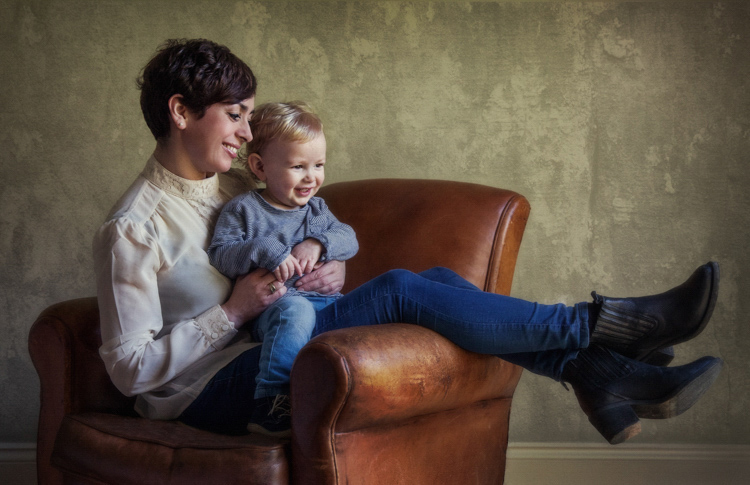
My background is a portrait and wedding specialist. Lets take a look at an image from my portfolio. I will describe the process from capture through editing, and finally the framed piece for the wall (above).

#1 – Get it right in-camera
Pic 1 simonjohn co uk

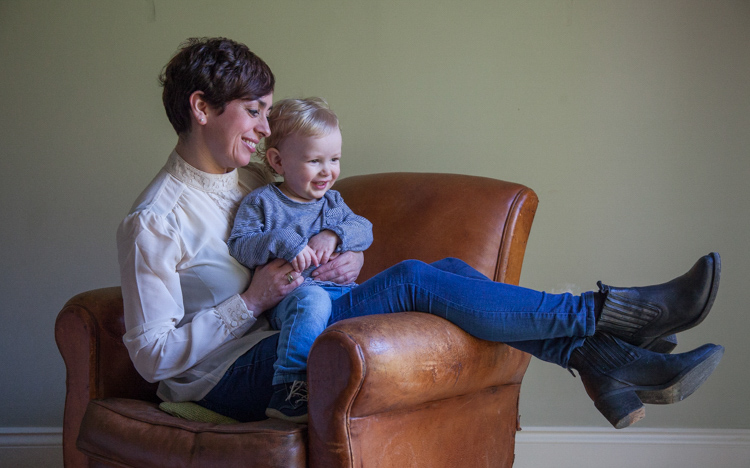
As you can see the old chair, and soft natural light, was perfect for the basis of this portrait. I positioned the mother in the first third of the image, placing her legs over the arm of the chair for a more relaxed contemporary look. My directions to her were simply to get close, and look at your beautiful boy. All I had to do then was to get the toddler to look in the right direction, with the expression to fit. A squeaky toy often saves the day!

The mother is in profile, while the toddler is in three quarter face, adding interest and different angles to the image. The lighting was a large window (not with hard sunlight) off to the right. I also placed a reflector just below the mum’s boots, to bring light back into the eyes and softly wrap around into the shadows. The exposure was 1/250th (freezing the toddler) with an aperture of f/5.6, using a 70mm focal length, as my back was pressed against the far wall of the room.

So to summarize; I feel the expressions are captured well. The lighting is fitting, being soft and directional. The image has style, and is well balanced compositionally. But it just needs something more. The capture stage is so important to get right. Photoshop should not be regarded as a fixer. The great Ansel Adams talked about “printing virtuosity” and just because we now craft our images on a screen, as opposed to in the darkroom, quality and finishing are still paramount.
So take a look at the edited image below.

Pic 2 simonjohn co uk

#2 Basic adjustments in Photoshop or Lightroom

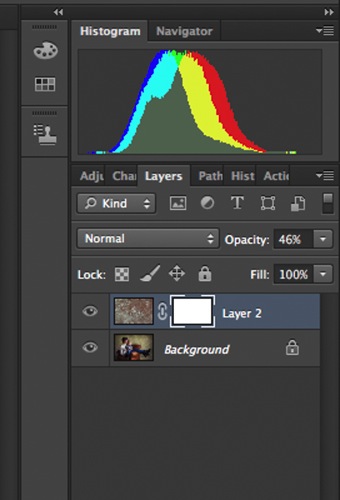
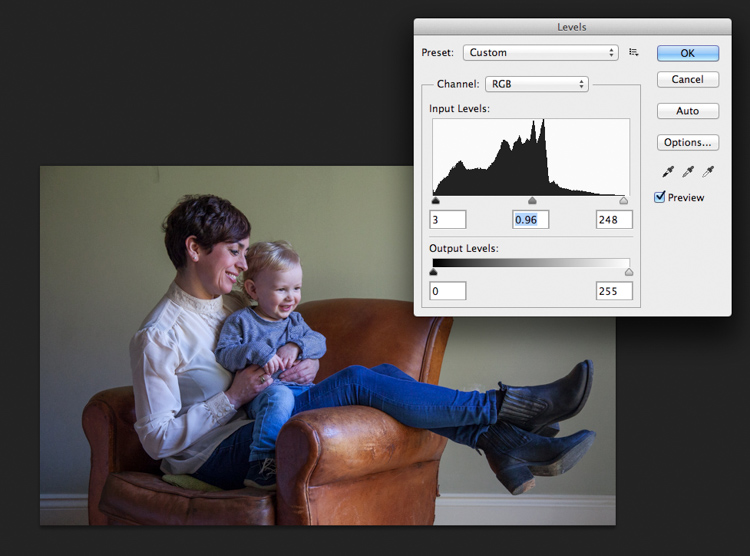
Firstly, you will need to level the image in Photoshop, bringing the sliders in to just clip the histogram at both ends. This ensures depth in the blacks and good clean whites. The mid-tone is really your X factor, but just be aware that you have detail throughout all tones if that is the look you are after. Be careful if you make it too light, the image could appear milky. While if you make the mid-tones too dark the image could appear muddy.
Screen Shot 2016-04-27 at 21.12.41-untitled

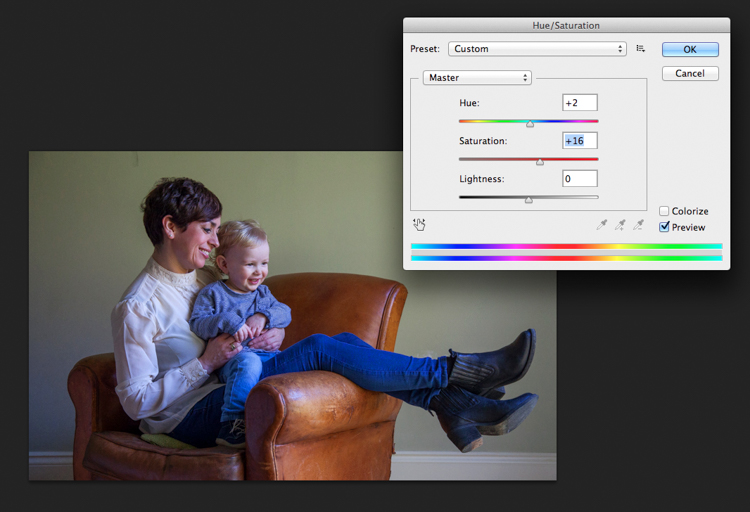
Secondly, I have adjusted the Saturation and the hue of the image to achieve the color pallet I require. Often you can go between the levels and saturation, and make small tweaks as the image takes shape.
Screen Shot 2016-04-27 at 21.13.20-untitled

#3 – Add a texture overlay (optional)

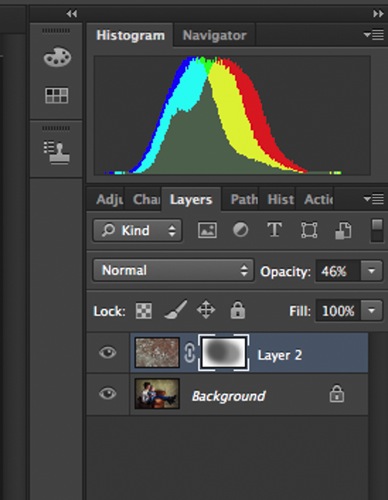
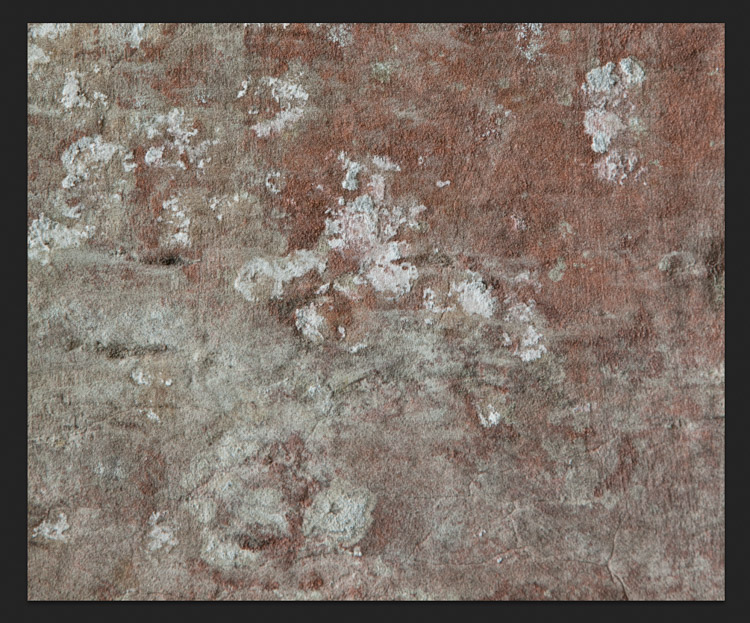
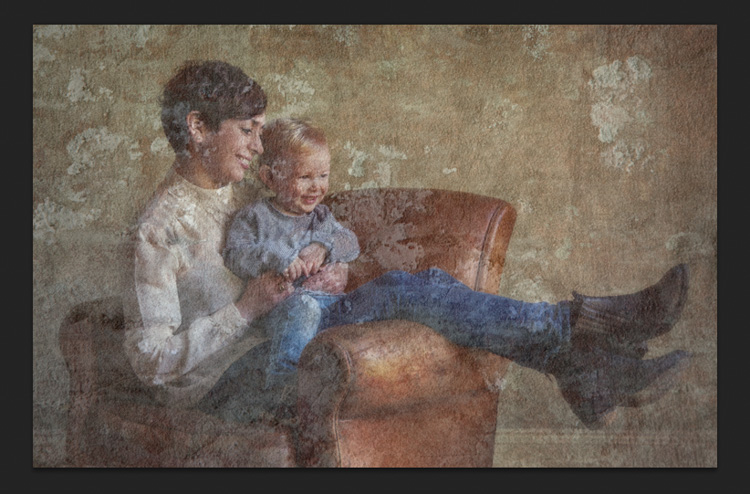
Next you could do as I have here, added a texture overlay. I felt it complimented the chair in its shabby chic style. I photographed a piece of wall, then blended the two images using opacity in the layers pallet. I added a layer mask, then rubbed through with a soft brush to create the subtle look you see here. I then added a soft Gaussian blur from the PS filters, blending the two layers together.
PIC 5 simonjohn co uk

PIC 6 simonjohn co uk

Pic 2-simonjohn.co.uk-untitled

PIC 8 simonjohn co uk PIC 9 simonjohn co uk

#4 – Local tone control

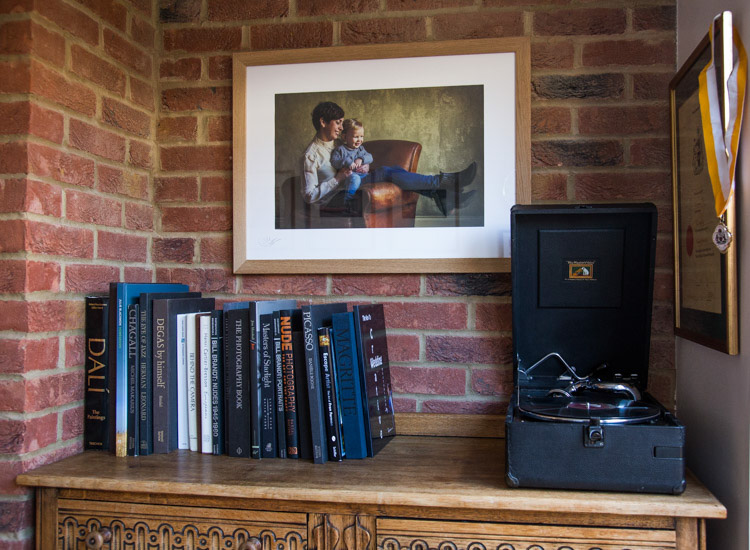
Finally to complete my image I needed to Dodge and Burn. As you can see this really is a subtle finishing skill, and should not be left to a Photoshop filter. In a future article I will explain exactly how to dodge and burn your images like a professional, directing the eye of your viewer to the important parts of the image. But for now, let’s see the final piece as it was hung on my gallery wall.
PIC 10 simonjohn co uk

#5 – Print it

I have printed the image on Fuji fine art 300mgs rough texture paper, which I love. The paper is not only excellent for color rendition but has a wonderful tooth to it, adding texture and depth. I have framed the portrait in a simple natural oak and white acid free mount. I have chosen clear glass. Although there is much talk about non-reflective glass, this simply flattens and dulls the image; I would not recommend it. The finished portrait compliments its surroundings, and fits well into the décor and given space.

As I said at the start of the article, it’s important to display your favorite images rather than hide them away on a computer. I am happy to share with you, that I have done just that here. This is my girlfriend Yvonne and my son Miles.

Some photographers prefer to print their own images. This can be a very good way of speeding up workflow and achieving exactly the right colors you require. In recent years printers have became smaller, and inks and paper more archival. I will perhaps invest this year simply for ease of use, and meeting clients deadlines. Perhaps one issue, according to friends who print their own, is you tend to have a fair amount of wastage profiling papers and inks. If you are not particularly a high volume, large output photographer, ink wells can get clogged up causing spattering of pigment. However I think both these problems are now almost eradicated as technology improves year after year.

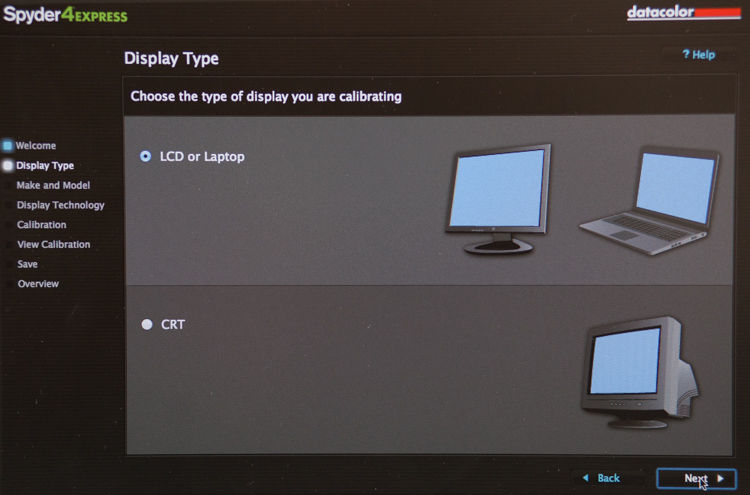
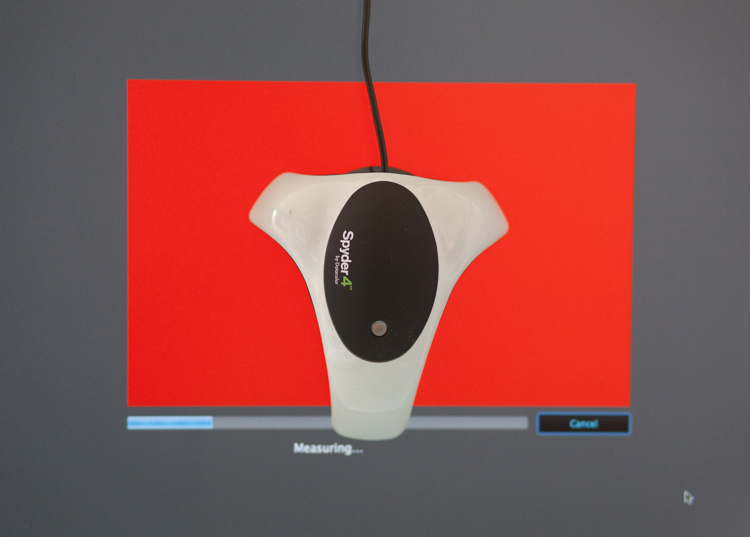
If you choose, as many professional photographers do, to use a pro lab you have to close the color loop from the start. I use a Spyder 4, as seen in the screenshots below, and my lab use the Epson 9900 and 4900 for printing the Giclee fine art papers I require.
 

2

4
It is attached via USB to your monitor, and simple to follow with onscreen instructions. Basically it brings the colors back in line within the colors space you use. Until recently most labs suggested sRGB, as the colors seen on your screen were pretty much what could be printed. The other often used space is Adobe 98, but not all printing machines can produce such subtleties in color. Progress moves on and there are machines that can print Adobe 98, but my advice for now would be stick with sRGB (ask your lab if you want to know which they use).

Because you are working in a given color space the lab can set its own monitors accordingly, and with a skilled technician the loop should be closed. Sometimes you may find a print is slightly too dark or light. This may be due to the ambient light in yours or your printer’s room being marginally different. A good working relationship is what is needed when using a lab. When asked to reprint an image they should work with you, and offer tips and help if needed; its in everyone’s interest. I rarely have a print that is off, but if I do my lab simply reprints without charge.

So how should you prepare your files? Follow this checklist below for ease of use:

  • Always shoot in raw. Much more detail recorded through highlight to shadow.
  • Save the raw file but create a working tiff.
  • Once you are happy with the finished tiff export as a jpg if sending to a lab.
  • Export or print always at 300dpi for best quality.
  • Check your prints against your monitor and if adjustments are needed, make sure you talk to your lab first.
  • Never compromise composition for print size, i.e. if your image looks better 10×5.5 rather than 10×8, make it that way and drop it on the nearest paper size available. Simply have a mat made to fit your masterpiece.

Do not hang your finished prints in direct sunlight. Like anything that has natural fibers and dyes they will fade. Hung correctly, ink jet prints are now considered very stable, and a alternative to traditional lab chemistry for environmental reasons, but also better quality colors and increased tonal range.

Please share photos of prints you make and hang up on your walls in the comments below. Ask any questions you may have about the process as well and I will try and help you out.

googletag.cmd.push(function() {
tablet_slots.push( googletag.defineSlot( “/1005424/_dPSv4_tab-all-article-bottom_(300×250)”, [300, 250], “pb-ad-78623” ).addService( googletag.pubads() ) ); } );

googletag.cmd.push(function() {
mobile_slots.push( googletag.defineSlot( “/1005424/_dPSv4_mob-all-article-bottom_(300×250)”, [300, 250], “pb-ad-78158” ).addService( googletag.pubads() ) ); } );

The post 5 Tips for Going from Pixels to Print Quality by Simon John appeared first on Digital Photography School.


Digital Photography School

 
Comments Off on 5 Tips for Going from Pixels to Print Quality

Posted in Photography


Drawn Together: The Evolution of Architectural Scale Figures

18 May

[ By WebUrbanist in Art & Drawing & Digital. ]

architectural selfies

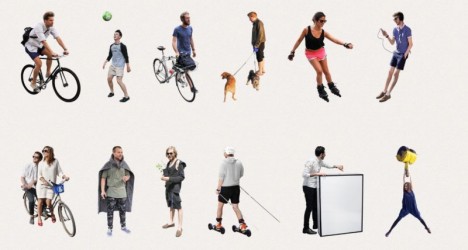
As they evolved, illustrated figures in architecture (sometimes called ‘scalies‘) have grown to have more personality, color and life, serving as more than a means to measure relative distances, heights and widths in renderings.

architectural scalies figure void

abstract scales

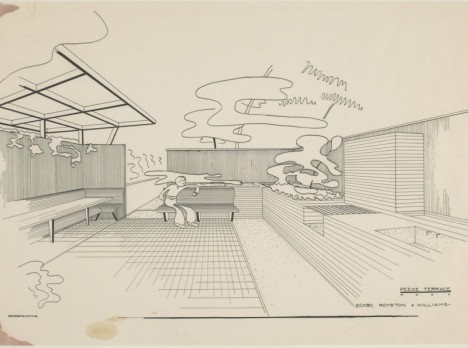
Historically, architectural drawings rarely featured people and, when they did, these were simplified constructs, often just outlines or silhouettes, designed simply to give the viewer a sense of scale.

scalies from gizmodo

scalies

Over time, start to see figures sitting in furniture, holding books (or recently: mobile devices), groups interacting and other strategies to bring these two-dimensional people to life, and the architectural scenes they inhabit along with them.

scalies in new rednerings

Their evolution is not accidental: scalies are often used with very explicit aims, from trying to give people a sense of the use that will take place in a finished building or space to conveying a broader vision of its popularity. Developers, for instance, may want to sell investors on how well their project will do financially, and thus pack drawings with figures to create that impression.

loitering scalies

On the flip side, architectural students may take things to opposite extremes, setting lewd, crude or generally absurd scenes for shock value and collegial entertainment.

scalies package

While some architects simply photo-edit their own scalies out of various images, there are professional makers as well, who take pictures against green screens and sell them in bundles, like “100 Business People” or “100 Casual People.” With the rise of 3D modeling, some companies are starting to capture and sell three-dimensional figures as well.

scalies in extreme environmen ts

sad keanu architecture rendering

Increasingly, other ‘support’ objects have coming into play, from cars to carried accessories. Some designers go out of their way to make scalies stand out, using scantily-clad models, impossible characters (like dinosaurs) or famous figures (like a sad Keanu).

scalies example

Taking the larger view, scalies show us a great deal about times, places and cultural norms; in the mid-1900s, you find men golfing and women in kitchens, dressed (of course) in period attire. Today is no different, but we notice the cultural cues less since these are now our times and places (Images via Gizmodo, Curbed, The New York Times and DesignObserver).

Share on Facebook


[ By WebUrbanist in Art & Drawing & Digital. ]

[ WebUrbanist | Archives | Galleries | Privacy | TOS ]


WebUrbanist

 
Comments Off on Drawn Together: The Evolution of Architectural Scale Figures

Posted in Creativity


DxOMark Mobile Report: Lenovo Moto G Plus

17 May

DxOMark Mobile Report: Lenovo Moto G Plus

Summary

The Moto G Plus is the newest arrival in the Moto G series of mid-range smartphones. With a 1/2.4-inch Omnivsion OV16860 16MP sensor with a large pixel size of 1.34um, F2.0 aperture, on-sensor phase detection and laser-assisted AF the camera specification would look right at home on a high-end device. You can read our first impressions review of the Moto G Plus here.

In its DxOMark test the Moto G Plus scores 84 points, which puts it on the same level as current flagship phones, such as the Apple iPhone 6s Plus, Google Nexus 6P or Motorola/Lenovo’s own Droid Turbo 2/Moto X Force. When shooting still images the testers liked the “very good detail preservation” in bright light, the “fast and accurate autofocus” and “good noise reduction in outdoor conditions”. They also noted the colors, which are “vivid and pleasant” in daylight and the good white balance in low and artificial light. On the downside, outdoor images show “some loss of detail in the shadow areas”, a “slightly bluish cast is sometimes visible in outdoor scenes” and “some irregularities in HDR activation and white balance are visible”. Some outdoor images also showed a “cyan shift close to sky saturation”.

In video mode the DxOMark team liked the “good stabilization both in bright light and indoor conditions, good color rendering and white balance, fast autofocus convergence and good noise reduction in outdoor conditions”. However, they also found that “from macro to infinity, some steps during the autofocus convergence are visible” and saw “occasional autofocus inaccuracies in low light”. “In low light some detail is lost and luminance noise is visible” and there are “visible steps in exposure adaptation”.

Still Photography

Color, Exposure and Contrast

The DxOMark team found the Lenovo Moto G Plus images to show “vivid and pleasant color”, with good white balance and without any color shading. Target exposure is generally good. However, in difficult light situations highlights are occasionally clipped, “some irregularities in HDR activation are visible” and a “slightly bluish cast” sometimes appears in daylight images. In low light “very slight color shading is visible.”

Overall DxOMark awarded the Lenovo Moto G Plus scores of:

  • 4.4 out of 5 for Exposure
  • 4.5 out of 5 for White Balance accuracy
  • 3.9 out of 5 for Color shading in low light*
  • 4.5 out of 5 for Color shading in bright light*
  • 3.0 out of 5 for Color Rendering in low light
  • 4.5 out of 5 for Color Rendering in bright light

*Color Shading is the nasty habit cellphone cameras have of rendering different areas of the frame with different color shifts, resulting in pictures with, for example, pinkish centers and greenish corners.

Noise and Details

DxOMark’s engineers reported that the Lenovo Moto G Plus images show “very good detail and good noise reduction in outdoor conditions”. However, there is also “some luminance noise and some loss of detail in low light”.

Texture Acutance

Texture acutance is a way of measuring the ability of a camera to capture images that preserve fine details, particularly the kind of low contrast detail (such as fine foliage, hair or fur) that can be blurred away by noise reduction or obliterated by excessive sharpening.

Sharpness is an important part of the quality of an image, but while it’s easy to look at an image and decide visually whether it’s sharp or not, the objective measurement of sharpness is less straightforward.

An image can be defined as ‘sharp’ if edges are sharp and if fine details are visible. In-camera processing means that it’s possible to have one of these (sharp edges) but not the other (fine details). Conventional MTF measurements tell us how sharp an edge is, but have drawbacks when it comes to measuring fine detail preservation. Image processing algorithms can detect edges and enhance their sharpness, but they can also find homogeneous areas and smooth them out to reduce noise.

Texture acutance, on the other hand, can qualify sharpness in terms of preservation of fine details, without being fooled by edge enhancement algorithms.

A dead leaf pattern is designed to measure texture acutance. It’s obtained by drawing random shapes that occlude each other in the plane, like dead leaves falling from a tree. The statistics of this model follow the distribution statistics in natural images.

In this example from a DSLR without edge enhancement, sharpness seems equal on edge and on texture. Many details are visible in the texture.

In this second example, edges have been digitally enhanced, and the edge looks over sharp, with visible processing halos (‘ringing’). On the texture part, many details have disappeared.

At first sight, the images from these two cameras may appear equally sharp. A sharpness measurement on edges will indeed confirm this impression, and will even show that the second camera is sharper. But a closer examination of low contrasted textures shows that the first camera has better preservation of fine details than the second. The purpose of the texture acutance measurement is to qualify this difference.

Note: Acutance is a single value metric calculated from a MTF result. Acutance is used to assess the sharpness of an image as viewed by the human visual system, and is dependent on the viewing conditions (size of image, size of screen or print, viewing distance). Only the values of texture acutance are given here. The measurements are expressed as a percentage of the theoretical maximum for the chosen viewing condition. The higher the score, the more details can be seen in an image. 
 
For all DxOMark Mobile data presented on connect.dpreview.com we’re only showing 8MP equivalent values, which gives us a level playing field for comparison between smartphone cameras with different megapixel values by normalizing all to 8MP (suitable for fairly large prints). DxOMark also offers this data for lower resolution use-cases (web and onscreen). For more information on DxOMark’s testing methodology and acutance measurements please visit the website at www.dxomark.com.
 Texture acutance is a touch higher under daylight than tungsten light. 
In bright light the Moto G Plus is up with the best but drops off a little at lower light levels.

Edge Acutance

Edge acutance is a measure of edge sharpness in images captured by the phone’s camera. Again we’re only looking at the most demanding of the three viewing conditions that DxOMark reports on – the 8MP equivalent.
 In terms of edge acutance the Moto G Plus is performing on flagship level. 
 Edge acutance is very consistent across all light levels. 

Visual Noise

Visual noise is a value designed to assess the noise in an image as perceived by the human visual system, depending on the viewing condition (size of image, size of screen or print, viewing distance). The measurements have no units and can be simply viewed as the weighted average of noise standard deviation for each channel in the CIE L*a*b* color space. The lower the measurement, the less noise in the image.

 The Moto G Plus noise levels compare well to the competition at all light levels
 Measured noise levels only increase moderately in lower light.

Noise and Detail Perceptual scoring

DxOMark engineers don’t just point camera phones at charts, they also take and analyze plenty of real-world shots and score them accordingly. Their findings for the Lenovo Moto G Plus are:

Natural scene

  • Texture (bright light): 4.8 out of 5
  • Texture (low light): 3.7 out of 5
  • Noise (bright light): 4.1 out of 5
  • Noise (low light) 3.9 out of 5
 Bright light sample shot
 100% crop: good noise reduction  100% crop: good detail preservation
 Low light (20 Lux) studio shot
100% crop: some luminance noise in areas of plain color 100% crop: some very fine detail is being lost

Artifacts

Phone cameras, like entry-level compact cameras, tend to suffer from artifacts such as sharpening halos, color fringing, vignetting (shading) and distortion, which can have an impact on the visual appeal of the end result. DxOMark engineers measure and analyze a range of artifacts. Their findings after testing the Lenovo Moto G Plus are shown below:

  • Cyan shift close to sky saturation visible in outdoor shots
  • Some color fringing noticeable in backlit scenes
  • Moiré is occasionally visible

Perceptual Scores

  • Sharpness 4.5 out of 5
  • Color fringing 3.6 out of 5

Measured findings

  • Ringing center 7.6%
  • Ringing corner 4.9%
  • Max geometric distortion -0.4%
  • Luminance shading 9.4%

Distortion and Chromatic Aberrations

The graph shows the magnification from center to edge (with the center normalized to 1). The Lenovo Moto G Plus shows a very slight pincushion distortion, which you are not going to notice in normal photography.
 Chromatic aberrations are well under control.

Autofocus

DxOMark also tests autofocus accuracy and reliability by measuring how much the acutance – or sharpness – varies with each shot over a series of 30 exposures (defocusing then using the autofocus for each one). As with other tests these results are dependent on the viewing conditions (a little bit out of focus matters a lot less with a small web image than a full 8MP shot viewed at 100%). Using the 8MP equivalent setting, the Lenovo Moto G Plus performs very well in all light conditions. The overall score is 95/100 in bright light and 87/100 in low light.

Pros: 

  • Accurate and repeatable autofocus in all conditions

Cons:

  • Strong instabilities and overshoots in preview mode, particularly in low light
  • Slow convergence, particularly in low light
Autofocus repeatability – average acutance difference with best focus: low light 3.26%, bright light 1.63%

Flash

The Lenovo Moto G Plus offers a dual-LED flash for illumination in very low light. DxOMark scored the camera a 77/100 overall for its flash performance. 

Pros: 

  • Good exposure and vivid colors
  • Pleasant colors when flash is mixed with tungsten light

Cons:

  • Some focus and exposure irregularities
  • Noticeable hue non-uniformity in the field
  • Noise and attenuation visible in the corners

Overall DxOMark Mobile Score for Photo: 84 / 100


Video Capture

DxOMark engineers put phone cameras through a similarly grueling set of video tests, and you can read their full findings on the DxOMark website here. Overall, DxOMark found the Lenovo Moto G Plus video mode to perform very well, with fast autofocus, good stabilization and good color. On the downside, some stepping can be visible when the AF is adjusting and luminance noise is visible in low light footage.

Pros: 

  • Good stabilization
  • Good color rendering and white balance
  • Fast autofocus convergence
  • Good noise reduction in outdoor conditions

Cons: 

  • Some steps are visible during autofocus convergence in bright light
  • Occasional autofocus inaccuracies in low light
  • In low light some detail is lost and luminance noise is visible
  • Visible steps in exposure adaptation

Overall DxOMark Mobile Score for Video: 81 / 100

DXOMark Mobile Score
84

DXOMark Image Quality Assessment

With a DxOMark Mobile score of 84 the Lenovo Moto G Plus performs on the same level as flagship models, such as the Apple iPhone 6s Plus, Google Nexus 6P or Motorola’s own Moto X Force / Droid Turbo 2, in the DxOMark smartphone rankings.  The test team liked the good detail in bright light, good color, low noise levels and reliable AF in bright light. However, they also found some loss of detail in the shadows and an occasional slightly cool color cast.  

In video mode the Moto G Plus has efficient stabilization, good color and very decent noise reduction in bright light. However, testers also found some AF inaccuracies and luminance noise in low light. For a more detailed analysis, visit www.dxomark.com.

Photo Mobile Score 85   Video Mobile Score 81
Exposure and Contrast 84   Exposure and Contrast 84
Color 85   Color 81
Autofocus 91   Autofocus 75
Texture 85   Texture 83
Noise 86   Noise 85
Photo Artifacts 85   Video Artifacts 80
Flash 77   Stabilization 81

Articles: Digital Photography Review (dpreview.com)

 
Comments Off on DxOMark Mobile Report: Lenovo Moto G Plus

Posted in Uncategorized