RSS
 

Archive for May, 2016

Which Filters Should You Use for Landscape Photography

19 May

Which filter should you use – if any – for Landscape Photography? It’s a question we hear all the time and one we’ve written about in our archives (we’ll link to some of our posts below) but today we came across this short video from Joshua Cripps where he tackles the question and shows some shots of images taken with the filters – to show what impact they have.

Find more from Joshua at his site here.

Further Reading on How to Use Filters in Your Landscape Photography

  • How to do Dreamy Landscape Photography with a Neutral Density Filter
  • Beginner’s Guide to Buying Filters
  • Polarizing and Neutral Density Filters: Essentials for Landscape Photography
  • Using Graduated Neutral Density filters for Landscape Photography
  • How to Use a 10 Stop Neutral Density Filter to add Drama to the Sky

Check out our Brand New Landscape Lightroom Presets

NewImage

googletag.cmd.push(function() {
tablet_slots.push( googletag.defineSlot( “/1005424/_dPSv4_tab-all-article-bottom_(300×250)”, [300, 250], “pb-ad-78623” ).addService( googletag.pubads() ) ); } );

googletag.cmd.push(function() {
mobile_slots.push( googletag.defineSlot( “/1005424/_dPSv4_mob-all-article-bottom_(300×250)”, [300, 250], “pb-ad-78158” ).addService( googletag.pubads() ) ); } );

The post Which Filters Should You Use for Landscape Photography by Darren Rowse appeared first on Digital Photography School.


Digital Photography School

 
Comments Off on Which Filters Should You Use for Landscape Photography

Posted in Photography


Weather-resistant Fujifilm 2x teleconverter brings 1219mm focal length to X-Series

19 May

$ (document).ready(function() { SampleGalleryV2({“containerId”:”embeddedSampleGallery_9762657470″,”galleryId”:”9762657470″,”isEmbeddedWidget”:true,”standalone”:false,”selectedImageIndex”:0,”startInCommentsView”:false,”isMobile”:false}) });

Fujifilm X-Series users will soon be able to purchase a 2x teleconverter compatible with two of the company’s telephoto zoom lenses, delivering a maximum equivalent focal length of 1219mm for its interchangeable lens compact system. The XF2X TC WR teleconverter will be weather and dust-resistant when used with the X-T1 and X-Pro2 camera bodies combined with the XF50-140mm F2.8 R LM OIS WR and XF100-400mm F4.5-5.6R LM OIS WR lenses.

Fujifilm says that the teleconverter will deliver an angle of view equivalent to that of a 1219mm lens on a full frame camera when it is used with the 100-400mm lens, once the crop factor of the APS-C format is taken into account.

The converter consists of nine elements in five groups and adds 30.2mm to the physical length of the camera/lens set-up. With the 2-stop light loss, the AF system of the X-cameras will revert to contrast detection with the 100-400mm F4.5-5.6 lens, but phase detection will still work with the 50-140mm F2.8. Both lenses will need a firmware update in order to operate with the new teleconverter so that adjusted aperture and focal length values can be recorded in the EXIF data and displayed on-screen.

Fuji suggests that the converter will be compatible with other lenses in the X-Series range, and has set up a website on which it promises to post information about future lens compatibility.

The Fujifilm XF2X TC WR teleconverter will be available in June priced £349. For more information visit the Fujifilm website.


Press release:

Fujifilm announces the FUJINON XF2X TC WR Teleconverter

High-performance weather and dust resistant teleconverter with excellent optical design to be added to the X-Series interchangeable lens line-up in June

FUJIFILM Corporation (President: Shigehiro Nakajima) is proud to announce that the new FUJINON TELECONVERTER XF2X TC WR, a teleconverter extending the telephoto area of some X Mount lenses*1, will be added to the mirrorless digital camera X-Series interchangeable lens line-up in June 2016.

The FUJINON TELECONVERTER XF2X TC WR is a high-performance teleconverter, capable of multiplying the focal length of mounted lenses*1 by two. It features excellent optical design with a construction of 9 elements in 5 groups to maintain the optical performance of the original lens.

In addition, thanks to the unified design when mounted to a compatible lens*1, the teleconverter is weather and dust-resistant and operates at temperatures as low as -10°C. This makes it possible to be used with confidence outdoors when used with the weather and dust-resistant X-T1 and X-Pro2 camera bodies, and the XF50-140mmF2.8 R LM OIS WR and XF100-400mmF4.5-5.6 R LM OIS WR lenses.

*1 Compatible lens (As of May 19, 2016)
XF50-140mmF2.8 R LM OIS WR = 100-280mmF5.6 with teleconverter mounted (Equivalent to 152-427mm on a 35mm format)
XF100-400mmF4.5-5.6 R LM OIS WR = 200-800mmF9-11 with teleconverter mounted (Equivalent to 305-1,219mm on a 35mm format)

1. Main Features

(1) High image quality design which maintains the optical performance of the original lens

  • Construction of 9 elements in 5 groups maintains the optical performance of the original lens.
  • By using the optimal image quality parameters for the overall characteristics of the original lens and 2x teleconverter, excellent imaging performance with great aberration suppression is still achieved.
  • The aperture becomes two f-stops higher when the teleconverter is mounted, and the camera displays and records information reflecting the change in aperture and focal length.

(2) Autofocus performance

  • Phase detection AF is still available when using the XF50-140mmF2.8 R LM OIS WR with the 2x teleconverter mounted.
  • Contrast Detection AF is still available when using the XF100-400mmF4.5-5.6 R LM OIS WR with the 2x teleconverter mounted.
  • Accurate focusing at super-telephoto focal lengths with shallow depth of field is possible thanks to the AF performed by the image sensor, thanks to the ‘Live View’ feature on the cameras.

(3) The optical image stabilization performance

  • The camera’s optical image stabilization performance*2 is unaffected by the addition of the teleconverter

*2CIPA guidelines, at telephoto end.

(4) Weather and dust-resistant and -10°C low-temperature operation

  • Using the teleconverter with a weather-resistant camera, such as the FUJIFILM X-T1 or X-Pro2 mirrorless digital camera and the FUJINON XF50-140mmF2.8 R LM OIS WR or FUJINON XF100-400mmF4.5-5.6 R LM OIS WR lens does not affect the weather resistance of the system.

(5) High-grade subtle appearance

  • The teleconverter’s high grade metal exterior has been designed with the X system in mind. When attached to a compatible FUJINON lens, the two products appear as one single lens.

2. Main Specification

Type FUJINON LENS XF2X TC WR 
Lens construction 9 elements 5 groups
Focal length 2x that of original lens
Max. aperture 2 additional stop
Min. aperture 2 additional stop 
Focus range Approx. same as that of original lens
Max. magnification 2x that of original lens 

External dimensions: Diameter x Length (distance from camera lens mount flange)

 
Approx. ?58mm x 30.2mm
Weight
(excluding lens caps)
 
Approx.170g

4. Support Information

A firmware update is required for the FUJINON XF50-140mm F2.8 R LM OIS WR and FUJINON XF100-400mm F4.5-5.6 R LM OIS WR lenses in order to provide full compatibility. This firmware is planned to be available at the beginning of June 2016. Please note that when updating firmware, make sure to update the latest camera firmware before updating the lens.

Please refer to the following website for information on how to confirm your firmware version and its update methods. http://www.fujifilm.com/support/digital_cameras/software/fw_table.html
Please be sure to check the following website as we will continue to update it with information regarding mountable lenses. http://fujifilm.com/products/digital_cameras/x/fujinon_lens_xf2x_tc_wr/

Articles: Digital Photography Review (dpreview.com)

 
Comments Off on Weather-resistant Fujifilm 2x teleconverter brings 1219mm focal length to X-Series

Posted in Uncategorized


Superblocks to the Rescue! Barcelona Reclaims Its Streets

19 May

[ By SA Rogers in Architecture & Cities & Urbanism. ]

superblocks

Could ‘superblocks’ help Barcelona return to its late-19th-century vision of urban utopia, clearing out the snarled streets so mini neighborhood blocks can literally breathe? The rapidly expanding Catalan city was suffocating within its medieval walls before engineer Ildefons Cerdá came up with his controversial plan to tear them down and build a gridded district called Eixample way back in the 1870s. This orderly block-based approach met with a lot of resistance when it was proposed, yet ultimately became a model for urbanization before the burgeoning density of the industrial era choked it with cars and filled its air with pollution.

barcelona

The plan was for the population to be spread out equally, with green spaces, schools, markets and other necessary neighborhood functions easily accessible from every block. While it did help make Barcelona healthier at the time, each of those tiny streets has been invaded by too many cars for the city to handle, and apartment blocks have sprouted up where parks used to be. Eixample has just 1.85 meters of green space per inhabitant, compared to Amsterdam’s 87.5, and the air quality and sedentary lifestyle are leading causes of death.

barcelona car free

Barcelona’s urban planning committee wants to reverse that with ‘superilles,’ or superblocks. First, traffic would routed to larger roads on the perimeters, with cars, trucks and scooters only allowed within each block if they belong to residents. 186 new miles of cycling lanes throughout the city will encourage biking, and an orthogonal bus network keeps public transit on main thoroughfares. Each superblock would become like its own little city, with its own character.

superblock 2

This new city structure would free up 160 intersections for foot traffic, events, gatherings and other community-based purposes. The process is being conducted through gradual changes utilizing existing infrastructure, starting with nine areas. Sant Martí, a district that already hosts car-free days, will act as one of the main guinea pigs in a series of trial and error experiments the councillors call “tactical urbanism.”

“We have, as a base [for the plan], Cerdá’s Eixample, which was undermined by greed,” says Salvador Rueda, director of Barcelona’s urban ecology agency. “What was green in the plan was slowly overtaken and built on. And then, when cars arrived, they slowly overtook more and more space… We want to reclaim those green spaces and that can only be done through a drastic mobility change.”

Images via The Guardian + Mobilitat

Share on Facebook


[ By SA Rogers in Architecture & Cities & Urbanism. ]

[ WebUrbanist | Archives | Galleries | Privacy | TOS ]


WebUrbanist

 
Comments Off on Superblocks to the Rescue! Barcelona Reclaims Its Streets

Posted in Creativity


How Making Horrible Photos Will Lead to More Keepers

19 May

I make a lot of really, really, horrible photos. It’s an odd thing to say isn’t it? But I do. Thousands of them every year, and that is totally okay with me.

I know that most (even all) of those really terrible, poorly composed, exposed, or focused shots, are just practice. They are practice for the next image, and the next, and the next, each building until I find that one keeper in a long string of wasted pixels, and more keepers overall at the end of the day.

As I scrolled through my Lightroom catalog looking for images to accompany this piece, I found in my unedited photos many near-lookalikes. As I edit, I scroll through them one at time. Some get deleted right away because they are soft (out of focus), or the exposure is too far off the mark. Others get deleted because the composition was clearly wrong, unbalanced, or awkward. I often wonder, “What was I thinking?”

Chiloesketch

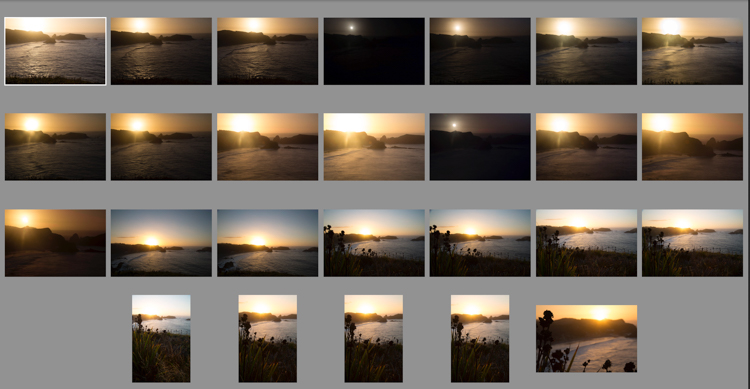
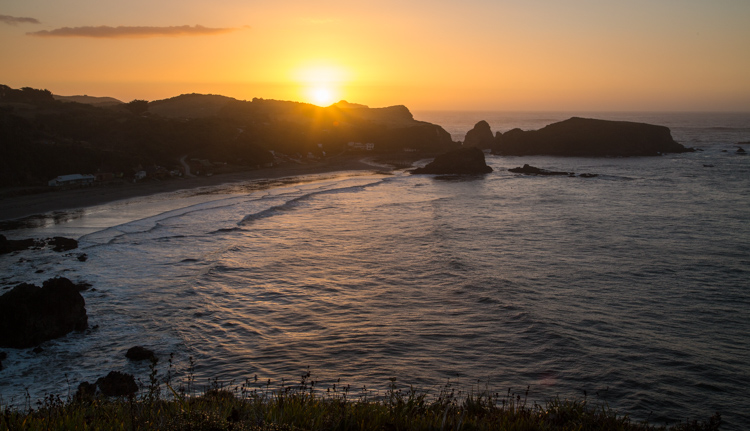
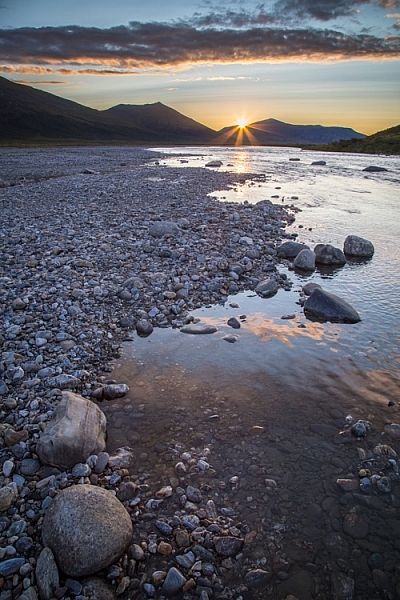
Sometimes, it takes a lot of shots to find the one you are looking for. I was shooting the sunset on Chiloe Island, Chile, and eventually I found two that made the final cut (below).

Chile-Chiloe-Pinihuil-103085-57

Chile-Chiloe-Pinihuil-103085-61

Most of the time the answer to that question, is that I wasn’t thinking at all. I had found a subject that intrigued me, and I started making photos, and thought had not yet worked its way into the equation. Scroll a few images further into the series, and things start to come together. The distracting elements, one at a time, disappear from the image. The exposure and focus are corrected, and by the time the last shot in the series appears, it’s technically decent, and maybe even a good photograph.

aerial sketch

AK-KatmaiCoast-AW-1075-660

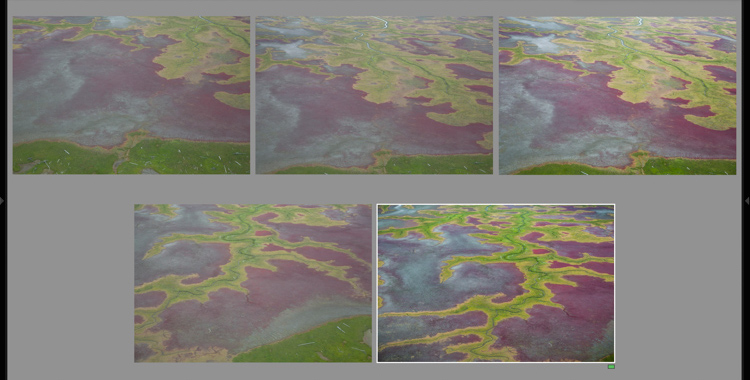
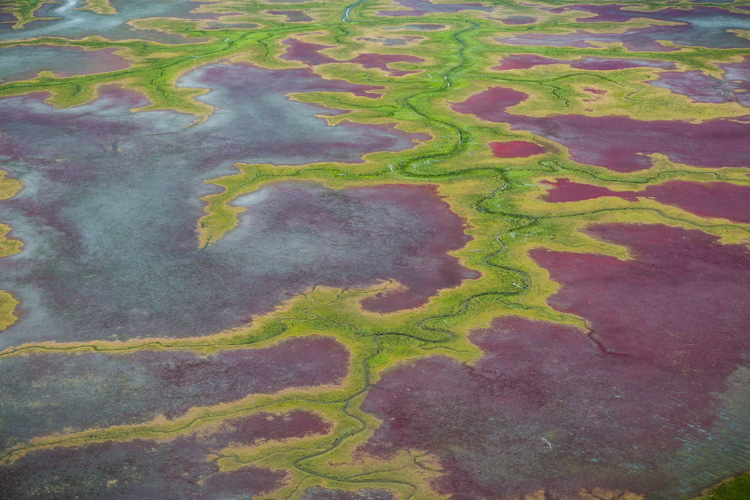
Shooting out of the window of a small airplane flying low over the coastal mudflats of Cook Inlet, Alaska made exploring a single view difficult. But as I shot the first few images, I got a sense for what I was looking for, and when it appeared a few moments later in my viewfinder, I was ready for it.

Those first shots are sketches, and they happen when my mind is still at play, too immature to recognize the scene for what it should be. Eventually, as I settle into the moment, the scene evolves and matures, as I begin to recognize what should and should not belong in the image.

The Freedom of Digital

With digital cameras, there is no harm in playing with a scene this way. Pixels are free, and we can shoot and shoot until our fingers are sore, or we get the right photo. When I’m shooting film however, (which believe it or not, I still do occasionally), there is no such luxury. Every time I release the shutter it’s a few bucks in film, processing, and scanning fees. If I shot with my film camera the way I do with digital, I’d be broke inside of a month.

brookswintersketch

AK-Wiseman-Sukukpak-104025-23

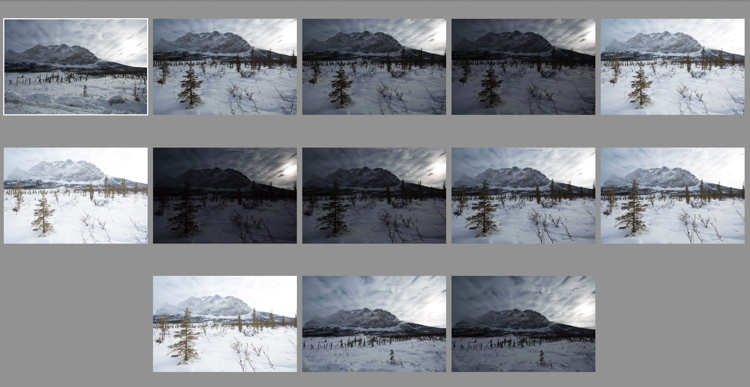
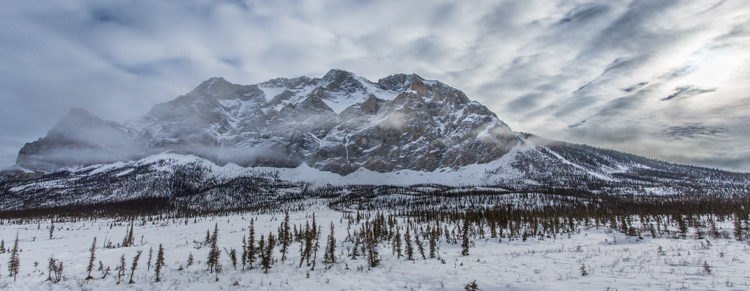
This contrasty Brooks Range scene, made finding both the proper exposure and composition a challenge. Many images later, I settled on this one. I still think I could have done better.

Instead, when shooting film, I’m forced to make those sketch images in my head, and in my viewfinder. I adjust tripod heights, I inch forward and backward, I focus and refocus, and I watch my light meter like a hawk. Then, once I’m sure I’ve got what I need, I click the shutter, and cross my fingers that I’ve got it right.

antlersketch

AK-ANWR-Kongakut-108094-1065

Above are just a small number of the preliminary images this final shot required. At one point I even hiked off from the scene, thinking that I’d captured it. When I realized 10 minutes later that it could still be improved, I ran back, found the spot again, and made the image I should have made the first time around. My clients were less than pleased. (Arctic National Wildlife Refuge, Alaska).

Whether you make the sketch images as a digital file, or as a mental one, the result is the same. Those preliminary frames, are just that, preparatory. Embrace them, but most importantly don’t stop at the first, or second, or even third shot. Keep exploring your subject, and you may find something you weren’t expecting.

Patagoniasketch

Chile-Patagonia-landscape-103125-7

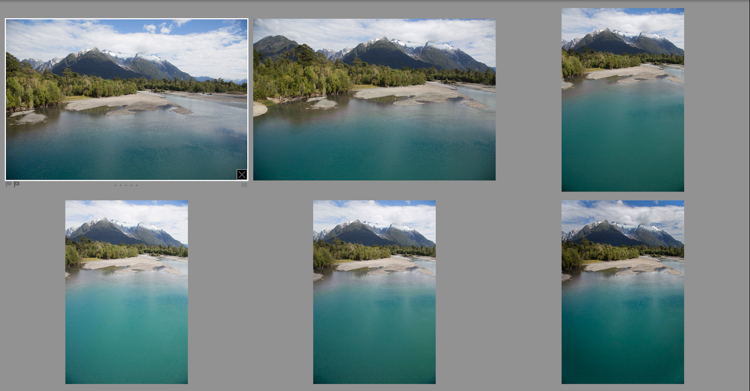
I often find myself playing with both vertical and horizontal compositions as I sketch my way to a final composition. In this case, a horizontal one. (Chilean Patagonia).

Exploring

A few years ago, I was approaching the end of a ten day wilderness canoe trip in Gates of the Arctic National Park in the Brooks Range of northern Alaska. I was guiding, and so I was mostly concerned about keeping my clients safe, warm, well fed, and helping them make their own photos. My photography took a back seat. But after dinner, as my clients were heading off to their own tents on the tundra, I would often wander off with my camera and tripod. On that evening, as the trip was coming to its end, I ambled up the gravel bar away from camp. It was mid-August, and for the first time in months, the sun, for an hour or two each night, was actually dropping below the mountains that surrounded us.

The river flowed past in a gentle riffle, washing over the stones with a shushing sound, that hushed my thoughts as quickly as librarian with a finger to her lips. As the sun made its long low dive toward the mountains, the light grew sweeter, illuminating the tundra and mountains in light so beautiful I could hardly bear to look at it.

noataksketches

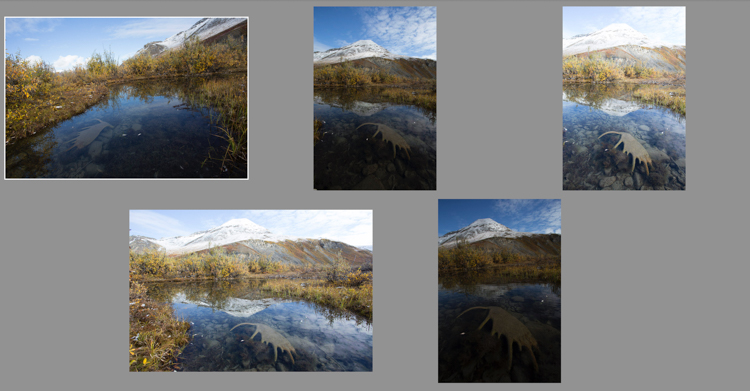
Though several of the images I made as the evening progressed are good, they more importantly allowed me to get comfortable with, and involved in the changing scenery.

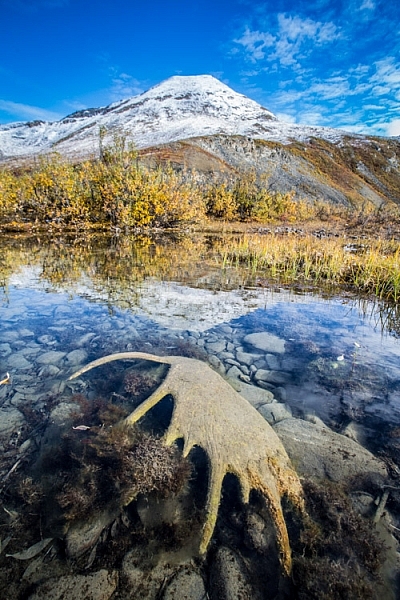
Slowly, and it took a long time, I started making images. For a while, I let my myself play with the landscape, making photos here and there, pointing this way and that. I made images of a tributary river flowing over the rocks, the winding cut gravel banks, bear tracks, and sedges growing along quiet shores. Some of those images are decent, even good, but they were still leading me somewhere. Eventually I found myself by the main stem of the river when the sun was about to disappear behind the silhouetted mountains. There, after an hour or more of play, I found the image that I had ventured away from camp to make.

AK-GAAR-Alatna-Noatak-1083-890

Be There-There

I got it right, because I was there-there. I wasn’t just existing with a camera in my hand, worried about f-stops and ISOs. I was present, because all those previous images over the past hours allowed me to put aside the technical worries, and permitted me to focus on the scene at hand – the way it felt, the way the breeze moved the surface of a quiet backwater, the sound of the water hushing over stone, and the way the river’s edge wandered away toward the setting sun.

All those sketch images not only gave me permission to focus on the scene the way it needed to be, they gave me access to the moment when I needed it.

As you can see, perfecting exposure and focus is just one part of what it means to work through your practice photos. These preliminary images allow your mind to get away from all that other stuff, and concentrate on what matters. Like me, you’ll end up with lot of really horrible photos, but occasionally, they will lead up to something meaningful. 

googletag.cmd.push(function() {
tablet_slots.push( googletag.defineSlot( “/1005424/_dPSv4_tab-all-article-bottom_(300×250)”, [300, 250], “pb-ad-78623” ).addService( googletag.pubads() ) ); } );

googletag.cmd.push(function() {
mobile_slots.push( googletag.defineSlot( “/1005424/_dPSv4_mob-all-article-bottom_(300×250)”, [300, 250], “pb-ad-78158” ).addService( googletag.pubads() ) ); } );

The post How Making Horrible Photos Will Lead to More Keepers by David Shaw appeared first on Digital Photography School.


Digital Photography School

 
Comments Off on How Making Horrible Photos Will Lead to More Keepers

Posted in Photography


Sony Xperia XA Ultra comes with 16MP OIS front cam

19 May

Sony first announced its new Xperia X line of smartphones at MWC earlier this year. Now the Japanese manufacturer has added another model to the line in the shape of the Xperia XA Ultra. As the ‘Ultra’ moniker suggests the new device is larger than the standard XA model. The XA Ultra display measures 6 inches instead of 5 but retains the 1080p resolution and overall design. 

That said, the XA Ultra’s headline feature is its front camera. It comes with a 16MP Exmor R sensor, optical image stabilization and a front flash, making it a significant upgrade to the original XA’s front camera, which at 8MP is no slouch either. The wide 88 degree viewing angle should allow for group self-portraits without selfie-sticks or similar contraptions.  The main camera has been upgraded as well and features a 21.5MP Exmor RS sensor with Hybrid-AF, which sounds similar to the camera specification of the Xperia Z3+.

The rest of the specification arguably puts the XA Ultra into the mid-range bracket of the market. The Android 6.0 operating system is powered by a MediaTek MT6755 chipset and 3GB of RAM. 16GB of storage can be expanded via a microSD slot and Sony says the 2700 mAh battery is good for two days of use. Given the large screen, we’d take that statement with a pinch of salt though. The Sony Xperia XA Ultra will be available from July but no detail on pricing and regional availability has been released yet.

Articles: Digital Photography Review (dpreview.com)

 
Comments Off on Sony Xperia XA Ultra comes with 16MP OIS front cam

Posted in Uncategorized


VR / Action cameras forum just launched

19 May
Be like these guys.

Are you excited about VR but frustrated that we don’t have a clearly demarcated area in our forums for you to talk about it? You’re not alone, probably. But we’re pleased to announce that your nightmare is over, with the launch of our dedicated VR and action cameras forum!

Moderated by DPR contributor and VR enthusiast Mark Banas, this is the place to discuss VR capture, action cameras and related technologies.

Articles: Digital Photography Review (dpreview.com)

 
Comments Off on VR / Action cameras forum just launched

Posted in Uncategorized


How to Create Catch Lights in Your Natural Light Portraits

19 May

What is a catch light, and why you should have it in your portraits?

A very popular technique in portraiture – a catch light is a spark of light in your subject’s eyes. This spark will help you to draw your viewer’s attention to your subject’s eyes, making them full of life and, well, sparkling.

04
For this portrait, I made recently in Cienfuegos, Cuba, I used the light from the setting sun to create a catch light, even without having the subject looking up.

How to create a catch light in portraits?

To create a catch light, all you need is a source of bright light to reflect in your subject’s eyes. This source can be artificial, like a flash, or natural, like sunlight. In this article, I will focus on creating catch light in portraits using natural light.

Creating a catch light – indoor

To create a catch light in an indoor location, all you need to do is to make sure there is a visible source of light, which will be reflected in your subject’s eyes.

Position your subject near an open window or door, during daylight, and make sure there is a direct line between the source of light and the subject, without blocking objects like furniture. Your subject does not have to look directly into the source, as it might be too dazzling or uncomfortable. The important thing is that the light source must be visible as a reflection in the subject’s eyes.

01

I met the lovely Nagina at her home in a small village of Roma people, outside Bukhara, Uzbekistan. Although she was only 10; she was very busy caring for her small brothers, along with few other neighbors’ children. She asked me to take her photo, and I was drawn to her gaze right away, choosing to go for a close-up portrait. The house was completely dark, except a large window, which was position at a 45-degree angle to her face, which created that catch light in her eyes.

Good to know: The closer your subject is to the light source (open window or door) the larger and more dominant the spark of catch light will seem.

Taking it to the next level: Think carefully about the location of your subject to the light source, as that will not only affect the size and visibility of the catchlight in the subject’s eyes, it will also control the entire Illumination of the subject’s face. To read more about how the direction of light will affect your portrait, check out: Understanding Natural Light Part 3: Direction of Light.

Creating a catch light – outdoors

For achieving the best results in an outdoor shooting, all you need to do is aim your subject to look at the largest light source – the sky. DO NOT instruct the subject to gaze at the sun, even for a brief moment, as it can lead to pain and damage to his or her eyes.

If you do not want to stage your subject, or if there is a language barrier, a great technique of aiming your subject’s gaze up, is by simply positioning yourself a bit above your subject. While they gaze it your lens, the sky (behind you) will reflect in their eyes. This is why I photograph many of my outdoor portraits at an angle, which is a bit higher than my subject.

Mordecai is Jewish Orthodox, from the old city of Jerusalem. I was very surprised that he agreed to be photographed, even with joy. To give a spark to those amazing eyes I told him to look into my lens, while I positioned myself slightly higher than him, and the lovely skies of holy Jerusalem were reflected in his eyes.

02

Good to know: On a sunny day, I recommend positioning your subject in the shade, as gazing at sunny skies might be uncomfortable.

Taking it to the next level: If you want it or not, it is almost sure that apart from that spark of light, your own image (the photographer) will also be visible in the subject’s eyes. You can turn this fact into a creative portrait (of your subject) and a self-portrait (of yourself) in the same frame. Just do not forget to move the camera a bit, to let your face be visible. You can also use this technique for less narcissistic reasons, as with really tight close-up, as almost anything in front of your subject’s face will be reflected in his eyes. It is a wonderful technique for making a landscape shot, or an image of an iconic place, with a twist.

Creating a catch light – while using a reflector

Using reflectors in portrait photography is a wonderful technique (a more in-depth explanation about using reflectors in portrait photography, in this article: Reflectors: Your Secret Weapon for Amazing Portrait Photography), that can help you to create catch lights in almost any situation, indoor or outdoor, sunny or cloudy.

Not only do reflectors allow you to create that spark of catch light almost anywhere; but they will allow you much more control, over the intensity, color, and direction of that spark.

A pocket size silver reflector was the best tool for the job for this portrait, photographed in a very hot afternoon in Armenia.

03

Good to know: Reflectors come in many sizes and colors. For the best results, use a small pocket-sized silver reflector. Why? Because you do not need anything larger or heavier. Those small reflectors are the perfect weapon of choice, for creating a catch light in close-up portraits. Position the reflector just under the chin of your subject. You can hold the reflector with your left hand, or ask the subject to hold it.

Taking it to the next level: Although using a silver reflector will give you the most notable catch light, you can add warmth to the portrait by using a golden one, which will result in a golden catch light.

A mix of shade, slightly higher camera angle, and gaze upward toward the sky, helped create the catch light in these portraits photographed in India and Israel.

05

See how the eyes are alive in their portraits? The catch lights help add the sparkle you see there, and without them the portraits wouldn’t feel as alive, vibrant.

Now it’s your turn, show me your portraits with great catchlights. Please share in the comments below.

googletag.cmd.push(function() {
tablet_slots.push( googletag.defineSlot( “/1005424/_dPSv4_tab-all-article-bottom_(300×250)”, [300, 250], “pb-ad-78623” ).addService( googletag.pubads() ) ); } );

googletag.cmd.push(function() {
mobile_slots.push( googletag.defineSlot( “/1005424/_dPSv4_mob-all-article-bottom_(300×250)”, [300, 250], “pb-ad-78158” ).addService( googletag.pubads() ) ); } );

The post How to Create Catch Lights in Your Natural Light Portraits by Oded Wagenstein appeared first on Digital Photography School.


Digital Photography School

 
Comments Off on How to Create Catch Lights in Your Natural Light Portraits

Posted in Photography


Google Art Camera uses robotic system to take gigapixel photos of museum paintings

19 May

The Google Cultural Institute, an online virtual museum with high-quality digitizations of artifacts from across the globe, recently added more than 1,000 ultra-high-resolution images of classic paintings and other artwork by Monet, Van Gogh and many others. A new robotic camera system Google has developed called ‘Art Camera’ has made it possible for the organization to add digitizations faster than ever before.

Previously, Google’s collection included only about 200 digitizations, accumulated over approximately five years. Art Camera, after being calibrated to the edges of a painting or document by its operator, automatically takes close-up photos of paintings one section at a time, using a laser and sonar to precisely adjust the focus. This process results in hundreds of images that are then sent to Google, where they’re stitched together to produce a single gigapixel-resolution photo.

Instead of taking the better part of a day to photograph an item, as the old technology did, Art Camera can complete the process in less than an hour; speaking to The Verge, Cultural Institute’s Marzia Niccolai said a 1m x 1m painting can be processed in half an hour. Google has built 20 Art Cameras and is shipping them to museums around the world for free, enabling the organizations to digitize their artwork and documents. The resulting gigapixel images can be viewed here.

Via: Google Official Blog
 

Articles: Digital Photography Review (dpreview.com)

 
Comments Off on Google Art Camera uses robotic system to take gigapixel photos of museum paintings

Posted in Uncategorized


Pipe Dreams: 15 Totally Tubular Scaffolding Creations

18 May

[ By Steph in Architecture & Cities & Urbanism. ]

scaffold stairs `

Though typically seen as eyesores obscuring architecture and blocking sidewalks, scaffolding is more than its most basic function, with its modular network of pipes reclaimed for parasitic architecture, temporary pavilions, retail displays and sculptures. In fact, repurposed scaffolding is practically free, easy to assemble and surprisingly versatile, and it’s been used for everything from transforming an abandoned fountain into a spa to growing fresh edible plants in the middle of the city.

Monumental Scaffolding Stairs by MVRDV
scaffold stairs 2

scaffold stairs 3

scaffold stairs 4

Large enough for hundreds of people to access at once, this crazy-high staircase is made almost entirely from scaffolding, offering visitors direct access to the roof of the Groot Handelsgebouw in Rotterdam. Designed by MVRDV, the installation references the city’s spirited rebuilding efforts after World War II and aims to encourage “a new, much more interactive, three dimensional and denser urban topography for the next city generation.” The 180 steps lead to a temporary observation deck and rooftop cinema, and will be open through June 12, 2016.

Bow-House Parasitic Home
scaffold parasitic 1

scaffold parasitic 2

scaffold parasitic 3

scaffold parasitic 4

In another example of parasitic architecture, the Bow-House is a scaffolding framework covered in reclaimed doors and windows, perched on a windowless brick wall in Heerlen, The Netherlands. French architect Stéphane Malka erected the guerrilla structure as a free open shelter where anyone can temporarily live. Based on a flexible system, it can be adapted for any public space with an empty wall, and it’s made from free, reclaimed and easy-to-assemble components.

Pop-Up Urban Spa at an Abandoned Fountain
scaffold spa 1

scaffold spa 2

scaffold spa 3

Add a scaffolding structure and a pallet deck around an abandoned public fountain and you’ve got a fun urban spa where kids and their families can escape the heat of Chihuahua, Mexico. PKMN Architectures reclaimed nearly all of the materials used for this revitalization project in Urueta Park, where the central fountain has been broken for years. It took just two weeks to design and build the pop-up creation, and the scaffolding towers that surround it support hammocks, resting platforms and textile shades.

Open-Air Scaffolding Residence for Artists
scaffold skyscraper `

scaffold skyscraper 2

scaffold skyscraper 3

Playing on the concept of an artist residency for muralists while also making commentary on the availability of affordable housing in urban districts, this installation by Milan-based artist Fra.Biancoshock is less than private, and that’s the point. ’24/7’ highlights the difference in working conditions between street artists and studio artists, and the often impoverished living conditions of nearly all visual artists, with a four-story open-air scaffolding residence.

Pavilion Humanidade 2012
scaffold pavilion 1

scaffold pavilion 2

scaffold pavilion 3

scaffold pavilion 4

While it’s not unusual for events to make use of scaffolding for temporary structures, the Pavilion Humanidade exceeds just about all of them in scale and complexity. Created for Rio+20, the UN conference on sustainability in Rio de Janeiro, the pavilion won its architect Carla Juaçaba the 2012 arcVision prize for women in architecture. Layered and translucent, it’s almost completely constructed from previously used scaffolding and fully recyclable, erected on the site of an old fort overlooking the Copacabana and Ipanema beaches.

Next Page – Click Below to Read More:
Pipe Dreams 15 Totally Tubular Scaffolding Creations

Share on Facebook


[ By Steph in Architecture & Cities & Urbanism. ]

[ WebUrbanist | Archives | Galleries | Privacy | TOS ]


WebUrbanist

 
Comments Off on Pipe Dreams: 15 Totally Tubular Scaffolding Creations

Posted in Creativity


Nikon D500: First impressions review

18 May

The Nikon D500 is a 20MP APS-C DSLR capable of shooting at up to 10 frames per second and featuring an autofocus system derived from the one in the D5. In other words, it’s exactly the kind of high-end DX format body that appeared to have become extinct with the D300S.

The six-and-a-half years that have passed since the D300S’ launch have seen the camera market move on considerably but the D500 does much to reclaim the position as one of the pre-eminent APS-C camera on the market.

As you might expect, much of the improved capability of the camera centers around sports and high-speed shooting, with significant upgrades to the shooting rate and autofocus system, but there are also major upgrades to the viewfinder, video capabilities and connectivity options which expand its utility beyond one particular niche.

Key Features

  • 20.7 MP APS-C (DX Format) sensor
  • 153 point AF module with 99 cross-type points
  • 180,000 pixel RGB sensor for metering and subject recognition
  • AF point joystick
  • 10 fps shooting for up to 200 shots (lossless compressed 14-bit Raw to XQD card)
  • 4K (UHD) video from 1.5x crop of sensor
  • 100% coverage viewfinder with 1.0x magnification
  • 2.36m dot tilt up/down touchscreen
  • Wi-Fi and Bluetooth connectivity with NFC for setup
  • Mic and headphone sockets
  • USB 3.0 connector
  • Anti-flicker option for working under artificial lighting

A good sport

Much of the D500’s capability is built around the ability to focus and shoot very quickly. Its 153-point AF module offers near full-width coverage and is linked to a 180,000 pixel RGB metering sensor to further improve its AF tracking capabilities. Interestingly, and like the D5, the D500’s AF system now offers two parameters for fine-tuning the autofocus tracking behavior, letting the user specify the type of subject movement and the correct response to another object blocking the targeted subject. Existing Nikons only let you specify duration, suggesting Nikon is trying to expand the range of shooting situations for which the AF system can be optimized.

Only 55 of the camera’s AF points can be directly selected and the D500 gains both a joystick and a touchscreen to make it as fast as possible to select the point you want to use. Add to this the ability to shoot up to 200 Raw frames before slowing down (if you use an XQD card), and it becomes obvious that the D500 is intended as a high-speed pro/semi-pro camera in a way the D7000 series never was.

How’s that for coverage? The D500 doesn’t just boast a lot of autofocus points, it also offers them across most of the width of the frame, which is useful whether you’re manually selecting a point or letting the camera track your subject.

The D500 also gains an anti-flicker option designed to ensure the camera shoots in-sync with the brightest point in the flickering cycle of artificial lights. It’s a feature we first saw on the Canon EOS 7D Mark II and we’d expect it to be particularly valuable for shooting indoor sports such as basketball.

Another sign that this is a true high-end camera is the inclusion of a larger viewfinder. Like previous DX00 class cameras it has 100% coverage but it also offers 1.0x magnification, which is the largest optical viewfinder we can remember seeing in an APS-C camera (electronic viewfinders are a different matter, since size and brightness isn’t constrained by sensor/mirror size).

The D500 can also shoot 4K video and includes both an input for using an external mic and a headphone socket for audio monitoring. The camera also offers a flat picture profile to provide more post-processing flexibility, on-screen highlight warnings and power aperture control that allows you to select and change the aperture when in movie mode. There’s no focus peaking option, though, and you can’t zoom-in while you record to confirm or adjust focus as you record.

Connectivity

One of the other big features Nikon is touting is its Snapbridge system that uses Bluetooth LE (a low-power variant of Bluetooth also known as Bluetooth Smart), and Wi-Fi to maintain a connection between the camera and a smart device. This includes the ability to auto-transfer images from the camera, as well as initiating the Wi-Fi connection for remote shooting or manual image transfer.

Context

To show where the D500 sits in the lineup, here are the major feature differences between it and the less expensive D7200, along with a comparison back to the D300S – not because we expect anyone to be choosing between them, but to show how much of a step forward the camera represents.

   Nikon D500 Nikon D7200 Nikon D300S
Sensor Resolution 20MP 24MP 12MP
AF points 153 (99 cross type) 51 (15 cross-type) 51 (15 cross-type)
Max frame rate 10 fps
  • 6 fps
  • 7 fps in 1.3x crop mode
  • 7 fps
  • 8 fps with battery grip
Buffer depths 200 lossless compressed 14-bit Raw

~17 14-bit Raw
~28 12-bit Raw

30 lossless compressed 14-bit Raw
Shutter durability rating 200,000  150,000  150,000
Viewfinder
  • 1.0x magnification
  • 100% coverage
  • 0.94x mag
  • 100% coverage
  • 0.94x mag
  • 100% coverage
Rear screen
  • 2.36m dots 3.2″
  • Tilting
  • Touch sensitive
  • 1.23m dots 3.2″
  • Fixed
  • 920k dots 3.0″
  • Fixed
Video Resolution
  • UHD/30p
  • 1080/60p
  • 1080/60p
  •  720/24p
Mic/Headphone? Yes/Yes Yes/Yes Yes/No
Wi-Fi? Yes (and Bluetooth) Yes No
Built-in flash? No Yes Yes
AF-On Button? Yes No Yes
Body construction Magnesium Alloy + Carbon fiber composite Magnesium Alloy + Carbon fiber composite Magnesium Alloy
Battery Life (CIPA) 1240 shots/charge 1100 shots/charge 950 shots/charge
Weight (Body Only) 760g 675g

840g

Review History

Review History
26 April 2016 Studio scene and Raw dynamic range published.
16 May 2016 Introduction, Body and Handling, Operation and Controls, Wi-Fi and Connectivity and Video pages published

Articles: Digital Photography Review (dpreview.com)

 
Comments Off on Nikon D500: First impressions review

Posted in Uncategorized