RSS
 

Archive for April, 2016

Weekly Photography Challenge – Panning

09 Apr

If you want to see action and motion, check out these 30 moving panning images.

Panning is the technique of moving your camera to match the direction and speed of an object that is moving in front of you, while shooting at a slow shutter speed. The result will blur the background, and make the subject relatively sharp. The trick is to get your speed and timing just right – it takes a bit of practice so now is a good time to do just that!

Andreas Nilsen

By Andreas Nilsen

Weekly Photography Challenge – panning

If you need some help perfecting your technique check out these dPS articles:

  • Showing Speed: Using Panning When Shooting Action
  • Mastering Panning – Photographing Moving Subjects
  • The Art Of Panning
  • Intentional Blur- How to Create it and Why it’s Awesome
  • How to Create Better Photos by Adding a Sense of Motion
  • Using Slower Shutter Speeds to Show Motion in Your Images
Chaval Brasil

By Chaval Brasil

Eric Heupel

By Eric Heupel

Alcidesota@yahoo.com-OFF-For Several Months

By alcidesota@yahoo.com-OFF-For Several Months

Shinichi Higashi

By Shinichi Higashi

Brian

By brian

Share your images below:

Simply upload your shot into the comment field (look for the little camera icon in the Disqus comments section) and they’ll get embedded for us all to see or if you’d prefer upload them to your favourite photo sharing site and leave the link to them. Show me your best images in this week’s challenge. Sometimes it takes a while for an image to appear so be patient and try not to post the same image twice.

googletag.cmd.push(function() {
tablet_slots.push( googletag.defineSlot( “/1005424/_dPSv4_tab-all-article-bottom_(300×250)”, [300, 250], “pb-ad-78623” ).addService( googletag.pubads() ) ); } );

googletag.cmd.push(function() {
mobile_slots.push( googletag.defineSlot( “/1005424/_dPSv4_mob-all-article-bottom_(300×250)”, [300, 250], “pb-ad-78158” ).addService( googletag.pubads() ) ); } );

The post Weekly Photography Challenge – Panning by Darlene Hildebrandt appeared first on Digital Photography School.


Digital Photography School

 
Comments Off on Weekly Photography Challenge – Panning

Posted in Photography


Crossing the Bridge: Canon XC10 Review

09 Apr

Canon XC10 key features

  • 12 Megapixel 1″ CMOS sensor
  • DIGIC DV5 image processor
  • Fixed 10x (24 – 240mm equivalent) zoom lens with image stabilizer
  • Face Detection/Tracking auto-focus mode
  • Records 4K XF-AVC UHD (3840 x 2160) video to CFast 2.0 cards
  • 305Mbps video codec (4K)
  • Canon Log (12 stops of dynamic range)
  • Slow and Fast motion capture
  • 12 Megapixel stills (JPEG only, no Raw)

Hybrid cameras are those capable of capturing both high-quality stills and video. Although they have been around since the release of the Nikon D90 and Canon 5D Mark II, a professional mirrorless hybrid camera is a new category for Canon. When Canon announced the XC10 at NAB 2015, there was some confusion as to what kind of camera it was. Was it a system targeted towards Canon DSLR shooters or Vixia shooters? A drone camera? Or a micro ENG camera? The only thing that was certain was that Canon positioned the camera as one that could credibly be used for both video and still photography work.

The XC10 is an all-in-one compact hybrid camera that features both 4K and Full HD video capture as well as 12 Megapixel stills. It has great ergonomics for handheld shooting, is built around a 1″-type sensor, and includes the ability to record Canon Log, providing up to 12 stops of dynamic range. Optically, it uses a fixed zoom with a 2x Digital Teleconverter and Optical Image Stabilization, as well as a built-in ND filter.

The XC10’s lens gives you a focal range of 27.3-273mm equivalent for video capture and 24.1-241mm equiv. for stills. For monitoring, the camera features a touchscreen with Vari-Angle LCD monitor and an included loupe to mount to the LCD for viewing in bright environments. Unlike the 1080p EOS 5D Mark III, the XC10’s video workflow options should meet the standards for professional video shooters, offering H.264 4:2:2/8-bit MXF 4K UHD (3840 x 2160) files (up to 305Mbps) to internal CFast 2.0 cards, or Full HD (1920 x 1080) to SD cards.

Its form factor sets the XC10 apart from typical DSLR and compact mirrorless cameras like the Sony a7R II or Panasonic GH4. With its adjustable side grip and loupe attached for continuous run-and-gun video shooting, the XC10 slightly resembles Canon’s Cinema EOS cameras, such as the C300 Mark II and the C100 Mark II. With its side grip and adjustable LCD, you can comfortably shoot and monitor your shots at any angle.

Though probably intended for slightly different audiences, on paper the XC10 has a couple of competitors in this space: Sony RX10 II/III and Panasonic FZ1000. All three cameras contain 1″-type sensors and capture 4K video. The RX10 II/III also give you cinematic picture profiles, including S-Log2 which, like Canon Log, extends the cameras’ latitude. Unlike the RX10 II/III and FZ1000, which are aimed at stills photographers, the XC10 does not support Raw image capture. Also, the XC10 is by far the most expensive of the three with a retail price of $ 2,499 (though street prices hover around $ 1,999).

And if video is your primary format, the XC10 could well be a solid replacement for your DSLR, especially if you need to capture 4K. So the question becomes, can the XC10 be a credible stills camera for people who primarily shoot video but need high quality stills in certain situations? Let’s find out.

Articles: Digital Photography Review (dpreview.com)

 
Comments Off on Crossing the Bridge: Canon XC10 Review

Posted in Uncategorized


Macphun updates Tonality with batch processing and Raw support for more cameras

09 Apr

Software manufacturer Macphun has announced an update to its Tonality application that introduces batch processing, free preset packs, as well as Raw support for a wider range of cameras.

The black and white image manipulation package designed for the Mac platform already offers 160 ready-made manipulation and effects settings, but will now offer between one to three extra settings per month, created by a band of professional photographers. The company has four contributing professionals at the moment and will add a new one each month to enlarge the collection of settings users can download for free. Users can, of course, create their own presets using the tools and controls provided and can then share these amoung themselves. Further pre-sets are available to purchase.

The update also brings raw support for owners of Canon PowerShot G1 X Mark II, Fujifilm FinePix HS50 EXR, Leica Q (Typ 116), Leica SL (Typ 601), Leica M Monochrom (Typ 246), Nikon D300S, Panasonic DMC-G7, Sony DSLR-A700, Sony DSC-RX100M3 and Sony DSC-RX10M2 cameras.

The company has also added a link to the 500px image sharing website to smooth the uploading of pictures directly from the program, and has also made it easier to export files to Adobe’s Photoshop and Lightroom applications.

The program is available in three forms, as a standalone application that is priced £15 (though £7.99 until 14th April), as part of the Tonality Complete Kit you get the Pro Version for £48.99, or as part of Creative Kit 2016 with five other Macphun applications for £89.99.

For more information see the Macphun website.

New Tonality updates brings amateur photographers closer to professionals

Ability to add free preset packs created by worldfamous photographers, 500px export integration, batch processing, new cameras support, and special discounts at Mac App Store

Macphun Software, a leading innovative photography app developer with over 30 million users worldwide, have today launched a major update to Tonality, their awardwinning black and white photo editor for Mac.
To celebrate the update, Macphun are offering a 50% discount and a free batch processing in the MAS version of Tonality for one week only (7th14th April) .

What are the key highlights of the update to Tonality?

Preset Packs from WorldFamous Photographers

Tonality users will now have access to a free preset library, created by professional photographers from around the world. To access the library, users simply need to click “Get more presets” from inside the software.

Macphun have enlisted the expertise of professional photographers, including Serge Ramelli, John Batdorff, Dan Hughes, Andy Krucezk and others to create exciting new preset packs exclusive to Tonality, which can be found at macphun.com/tonalitypresets.

Statistics show that since August 2014 (when the software was launched) Tonality users have processed over 7 million images , and applied over 50 million presets to their photos. Current favourite preset packs include Portrait, Architecture, and Dramatic.

500px Support plus 3month FREE membership

Macphun have teamed up with 500px to allow users to easily export images directly from Tonality to the global online photography community. Macphun are also excited to offer a 3month 500px membership for free as a bonus to Tonality.

More cameras supported

RAW file support has been improved and extended so RAW image files can now be opened from a variety of new cameras: Canon PowerShot G1 X Mark II, Fujifilm FinePix HS50EXR 100, LEICA Q (Typ 116), LEICA SL (Typ 601), LEICA M MONOCHROM (Typ 246), NIKON D300S, Panasonic DMCG7, Sony DSLRA700,
Sony DSCRX100M3, Sony DSCRX10M2.

What other new features and improvements can be expected?

Other improvements include ability to export images from Tonality to Aurora HDR, improved Lightroom and Photoshop export, improved language translation quality, and improved stability.

Standard version of Tonality (available on the Mac App Store)
In addition to all the updates listed above, the Mac App Store version of Tonality now includes batch processing as an InApp purchase. The batch processing inapp will be available for free between 7th and 14th April. Batch in Tonality allows users to process, rename and resize dozens of photos at the same time.

What is Tonality?
Tonality is a compelling black and white photo editor. It combines the authenticity of the
monochrome analog era and the cuttingedge colour technologies of the digital age. Reimagine your monochrome image editing with hundreds of presets, layers, unique digital controls, authentic grain and more.

Pricing and Availability:

Tonality is available as a standard version through the Mac App Store, a standalone Pro version direct from https://macphun.com/tonality , or as part of Creative Kit 2016 at macphun.com/creativekit . The standard version of Tonality is available via the Mac App Store at the 50% discount: £7.99 from 7th-14th April: https://itunes.apple.com/gb/app/tonality/id892581529?mt=12

Tonality CK standalone is available direct from https://macphun.com/tonality at £48.99. Creative Kit 2016, featuring Tonality and five other incredible Macphun apps, is available direct from macphun.com/creativekit at £89.99.

Articles: Digital Photography Review (dpreview.com)

 
Comments Off on Macphun updates Tonality with batch processing and Raw support for more cameras

Posted in Uncategorized


Dr. Seuss Tower: Get a Look Inside Precariously Stacked Cabins

08 Apr

[ By Steph in Architecture & Houses & Residential. ]

Screen Shot 2016-04-08 at 11.43.12 AM

The mysterious eight-story stacked cabin house spotted among the trees in a remote area of Alaska is even cooler than previously thought, now that filmmakers have caught up to creator and self-described “frustrated architect” Phillip Weidner. In a two-minute documentary by Great Big Story called ‘We’re Not in Whoville Anymore,’ Weidner calls his Frankenstein creation ‘Goose Creek Tower,’ and reveals his motivation for building it, along with a few of its most notable features.

Screen Shot 2016-04-08 at 11.42.26 AM

Screen Shot 2016-04-08 at 11.42.43 AM

“I like building. I just designed it out of my head, we didn’t have blueprints. We drew it out on cardboard, plywood, just as we were going. I started to build a 40 by 40 scribed log cabin, and I realized I could put pillars on top and put another house on top of the house. And I just kept going. We got to 185 feet and we stopped because two hundred feet is federal airspace.”

Screen Shot 2016-04-08 at 11.57.29 AM

Screen Shot 2016-04-08 at 11.42.52 AM

Previously, we got a look at the outside of the structure overlooking Mount McKinley and the Denali National Park via Alaska Aerial Footage, which captured a dizzying video of its full height against the snowy landscape.

Screen Shot 2016-04-08 at 11.57.50 AM

Screen Shot 2016-04-08 at 11.57.41 AM

Screen Shot 2016-04-08 at 11.58.03 AM

The tower remains pretty bare-bones, with all of the framing complete but no windows or finished surfaces. There are even more levels than you can see from the outside, as the interior winds from one split-level platform to the next. Weiner, a former attorney, reveals that a hidden escape tunnel at the basement level leads to a safe room.

Screen Shot 2016-04-08 at 11.58.34 AM

Screen Shot 2016-04-08 at 11.58.57 AM

Screen Shot 2016-04-08 at 11.59.53 AM

“I wanted to be able to see,” says Weidner. “And that’s the reason I went up. You could see for at least three hundred miles. And of course when the northern lights are out, you can really see ‘em. I hope that Goose Creek Tower will inspire other people to do worthwhile things, not just in building but whatever they do with their life. And every time I go up there, it’s a different experience. It kind of gives you a sense of the enormity of the universe.”

Share on Facebook


[ By Steph in Architecture & Houses & Residential. ]

[ WebUrbanist | Archives | Galleries | Privacy | TOS ]


WebUrbanist

 
Comments Off on Dr. Seuss Tower: Get a Look Inside Precariously Stacked Cabins

Posted in Creativity


How to Critique Your Images Objectively: Ask for Other Points of View

08 Apr

What happens when you ask 150 people to look at the same photos and pick their favourites? The answer is simple: a pattern emerges. But which pattern emerges can be very surprising, as I found out recently.

Last year I decided to self-publish a photo book on Spain. I’d been wanting to do it for years. When the crowd-funding website Kickstarter announced it was opening up shop in Spain, where I live, I took it as a sign and made sure my project was uploaded the day they opened.

Alhambra palace ranked number 1

#1 ranked image by my crowd-fund book supporters.

But I wanted to do something different with the book. Then it hit me – I could get supporters to be a part of the process by choosing which photos would go in the book. I thought of it as crowd-funding meets crowdsourcing. I wanted everyone to play a role in my book. So I uploaded 240 images onto a private webpage, and gave everybody a password and a mission; chose your favourite 80 images. After the voting period was over, I tallied up the results and the top 80 images went into the book.

I was blown away by the results. Some of my personal favourites didn’t even make it in, and some other images that I didn’t think were particularly strong, ended up being extremely popular. It was very instructive. The one that stands out for me is of cows in a field beside a church in the mountains of northern Spain. I almost didn’t even include it in the original batch of 240 images. But not only did it make it into the top 80, it was the 6th most popular image!

Cows ranked 6

On the other hand, here’s a shot of a beach in the south of Spain that I quite like. But it didn’t make the cut – not even close. It ranked a mere 223rd. Fascinating!

Beach ranked 223

I think there are a number of things at play here. For one, the photographer often attaches a value to a photograph that the viewer doesn’t. If an image took repeated attempts to achieve, or was somehow difficult to get in another way — perhaps finding the right angle took hours, or maybe there was some fantastic luck involved that would be impossible for the viewer to appreciate — then it’s natural for the photographer to place a greater value on it. But the final image is what counts, and should be judged on its merits alone, which is sometimes hard for the photographer to do without bias.

Wild horse roundup ranked 133

Ranked #133

For instance, I particularly like this image of a church in the city of Salamanca. The strong graphic lines of the church’s shadow on itself, was not only dynamic because of its oblique orientation, but also offered a second yin-yang with the tourists, some in shade against the sunlight, the others in sunlight against the shade. But, it ranked only #208, again, not even close. But I find the fact it was not very popular more interesting, than disappointing. It wasn’t an obvious image to take, I had to see the opportunity first, then carefully compose, and wait for people to enter the light (and shade) at just the right time. I got it after almost an hour of waiting. Is that part of the reason I like it so much? I find that an interesting question.

Church shadows ranked 208

Of course the reverse also happens. The following image of the field of sunflowers was an easy photo to take, and much easier to spot as a photo-op, versus the church in Salamanca. Speaking as a photographer, I don’t think it’s one of my best images technically or creatively, but that doesn’t change the fact it’s a beautiful landscape. The people who look at your photos don’t (and shouldn’t) care about how hard or easy an image was to take. They either like it or they don’t. In this case, the field of sunflowers was very popular, ranking 4th overall.

Sunflowers ranked 4

Now, this doesn’t mean that you should only take photos that you think will be popular. But if you want to please a crowd with a slideshow, or a book, paying attention to what people like will make it more successful. It doesn’t matter how lucky you got, or how hard you worked to get a photo. The important thing is to try to look at it through other people’s eyes. If you enjoy sharing your images, it’s crucial to remove your own bias, and in the end it will make you a better photographer.

Editor’s note: How you can go about using this new knowledge without making a book? You can try posting a set of images as a collection on Facebook and ask people to rank their favorites. Or post a color and black and white of the same image and ask people which they prefer. Why not go ahead and try it here – post some photos in the comments below and rank each others images. How else can you look at your image objectively? 

googletag.cmd.push(function() {
tablet_slots.push( googletag.defineSlot( “/1005424/_dPSv4_tab-all-article-bottom_(300×250)”, [300, 250], “pb-ad-78623” ).addService( googletag.pubads() ) ); } );

googletag.cmd.push(function() {
mobile_slots.push( googletag.defineSlot( “/1005424/_dPSv4_mob-all-article-bottom_(300×250)”, [300, 250], “pb-ad-78158” ).addService( googletag.pubads() ) ); } );

The post How to Critique Your Images Objectively: Ask for Other Points of View by Mike Randolph appeared first on Digital Photography School.


Digital Photography School

 
Comments Off on How to Critique Your Images Objectively: Ask for Other Points of View

Posted in Photography


8 Tips for Food Photography Newbies

08 Apr

Making food look appetizing, is not quite as simple as photographing your plate. There are a number of tricks that you can use to really enhance the subject. By using your camera creatively, you can capture the scrumptious side of food. Whether it’s your favorite dessert, or a full meal, these tips will help take your food photography to the next level.

8 Tips for Food Photography Newbies

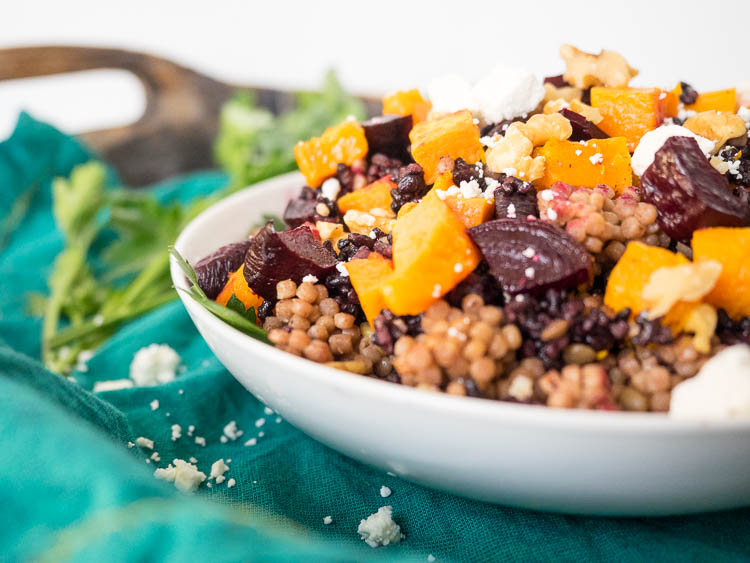
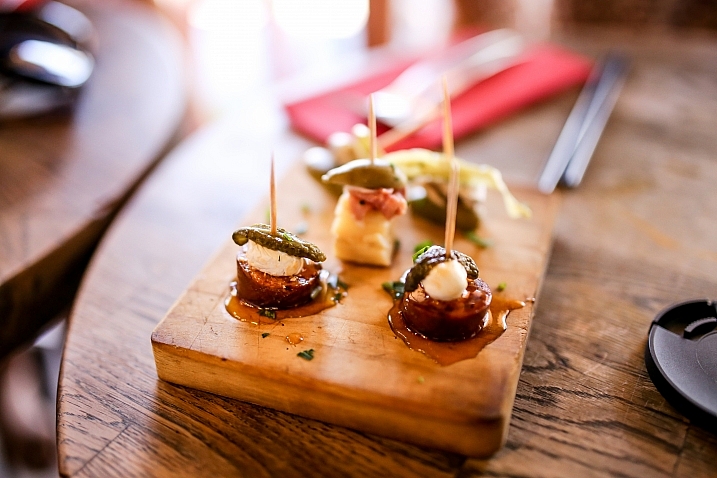
1) Use a very shallow depth of field

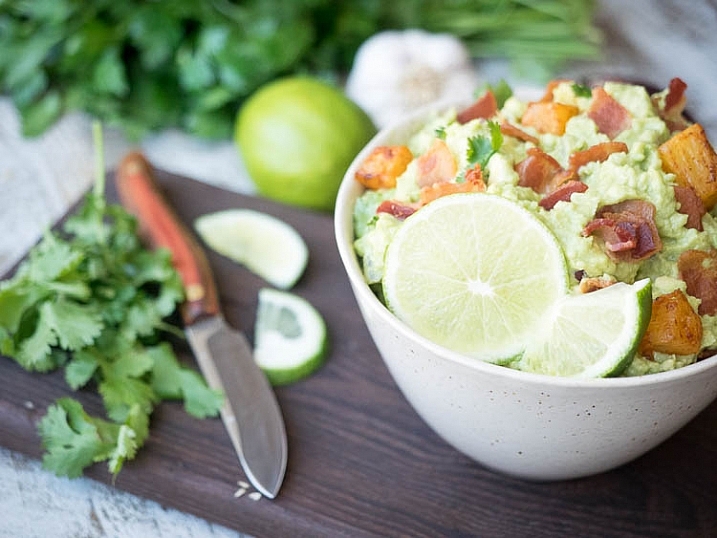
When you’re about to take a photo, the first technical question you want to ask is, “What kind of background would be best?” With food photography, you typically only want a sliver of the subject sharp, and the rest of the plate to be a soft blur. To do this, choose the widest aperture your lens allows. At f/2.8 the opening in your lens is physically wide open, creating what’s known as shallow depth of field. If you’re using a kit lens, the effect will be enhanced if you use your lens at a longer focal length, and get closer to the food.
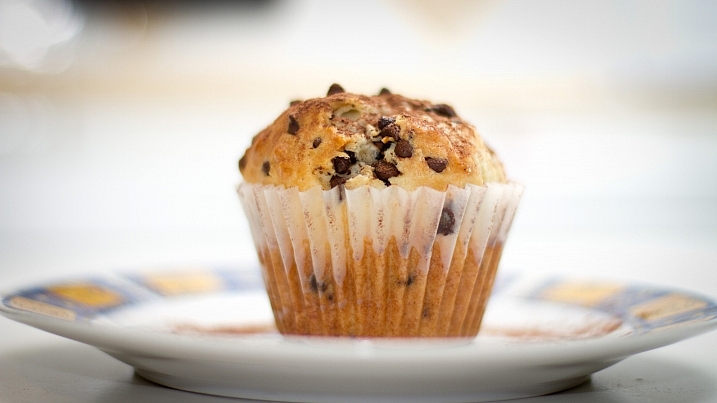
2) Less is more

N I C O L A

By N i c o l a

Irudayam?

By Irudayam?

While looking at the scene through your camera, ask yourself, “What’s really the subject here?” This simple question will help to shape your composition. While this may seem rudimentary at first, the impact is undeniable once applied. For a helpful reminder, consider taping a small note to the inside of your lens cap. Check all four corners of the frame carefully. Anything that does not work towards emphasizing the chosen subject should be eliminated. The goal is to create a clean frame as opposed to visual clutter.

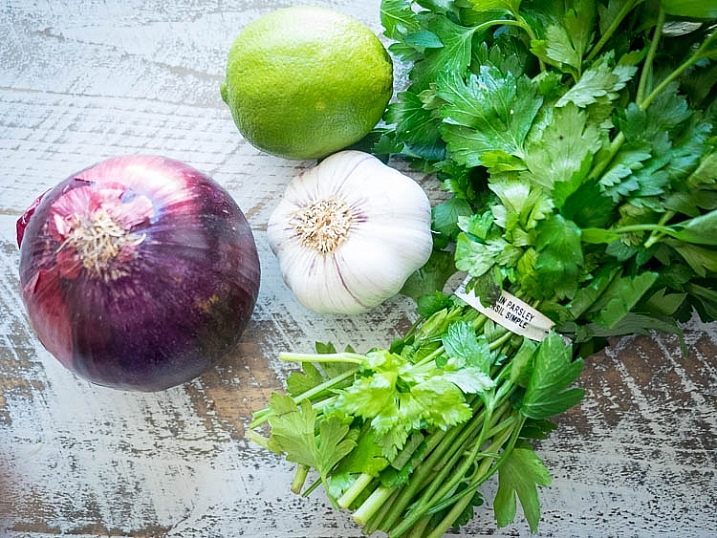
3) Design your composition

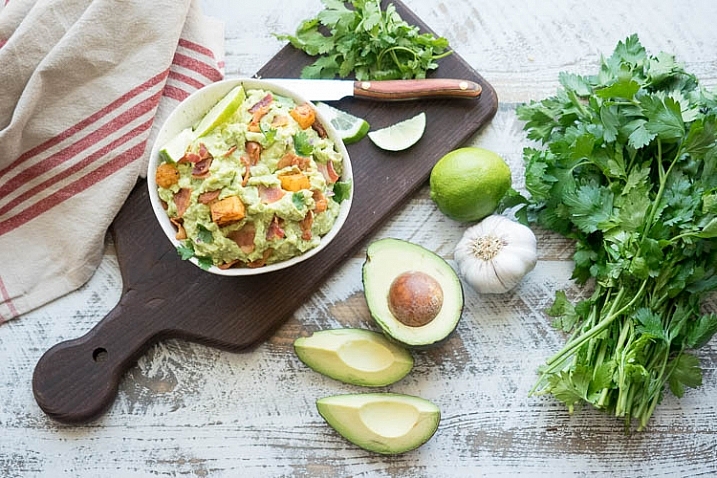
Think beyond the obvious subject, and consider shape and form when crafting your composition. Adding a knife for instance, can balance a composition if placed in the rule of thirds. By shooting from directly overhead you create an elegant frame. In the image above, the towel in the left hand corner adds a pop of color, while the parsley, lime and avocado all add various shades of green. To add more shine to your silverware or reflective objects, in this case the knife, use a reflector board to bounce in extra light.
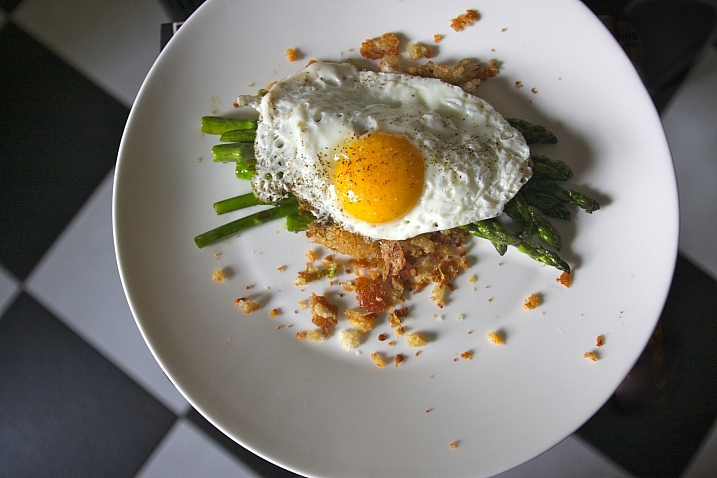
4) Get messy

Tracy Benjamin

By tracy benjamin

Stefano

By Stefano

To make your food photography look real and not staged, try adding crumbs to the set. This imperfection may seem odd at first, but it adds visual appeal. A bit of cheese sprinkled over the plate is an easy way to accomplish this. A little bit goes a long way here, so be subtle with your approach.

5) Use a high ISO

Simply put, the higher the ISO number is, the faster light can get into the camera. At ISO 800 you will get light into the camera faster than you would at ISO 100 or 200. When shooting food indoors you will often need to be at 1600 or even 3200. I generally do not recommend using ISO 6400 or higher as they will show an increased amount of digital noise, also known as grain. If noise is an issue for your camera, try using Lightroom’s noise reduction tool.

Editor’s note: as this article is aimed at newbies the author assumes you’ll be shooting handheld. If, however, you will be shooting with a tripod, it is recommended to use the lowest ISO possible to keep noise to a minimum and get the sharpest, crispest images possible.

6) Use natural light to your advantage

Felipe Neves

By Felipe Neves

Terence Lim

By Terence Lim

Rather than adding flash, or working with harsh artificial light, take advantage of the beautiful natural light available. This can give a food picture a feeling of bright airiness. Look for spaces where sunlight streams through a window to set up your shot. The morning is typically the best time of day for this, as the light is softer, with less contrast. You can keep shooting in the afternoon but you’ll want to move the food into an area with even light, to avoid harsh shadows.

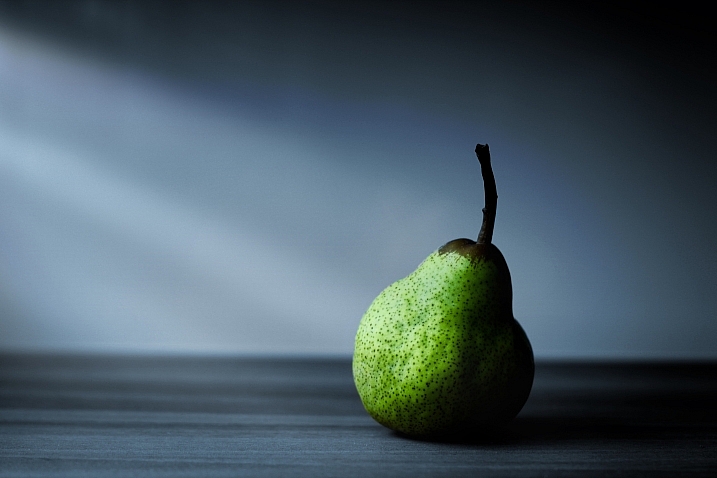
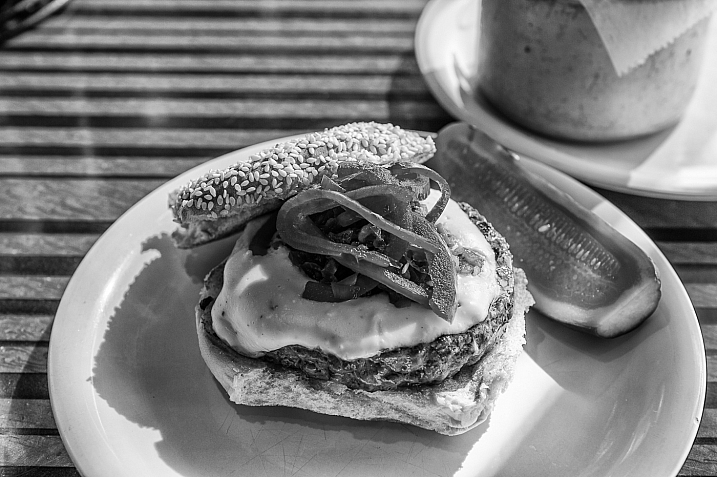
7) Try black and white

David Pacey

By david pacey

Jazz Guy

By Jazz Guy

Perhaps the most famous food photo of all time is Edward Weston’s “Pepper No. 30”. It was captured in black and white, and shows the shape and form of the subject beautifully. In your food photography, try shooting in monochrome from time to time. Not only does the lack of color simplify the shot, but it also works well to reveal contrast, highlight, and shadow. If shooting in RAW, convert the shot to black and white in post-production. One of my favorite tools to do this is Exposure X by Alien Skin, as they have a large array of creative options.
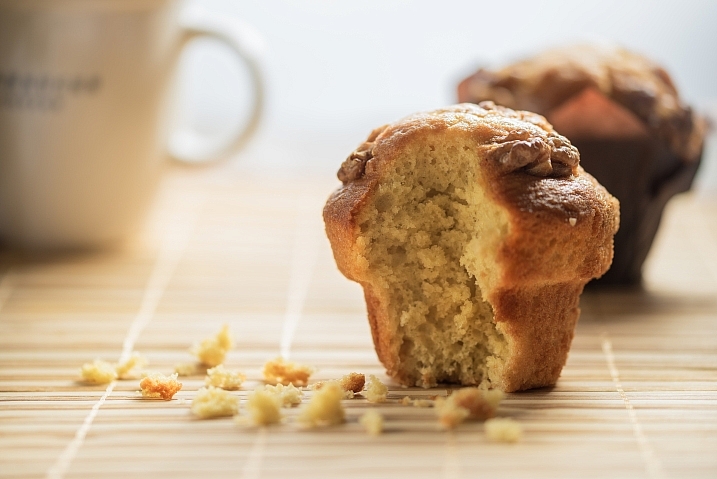
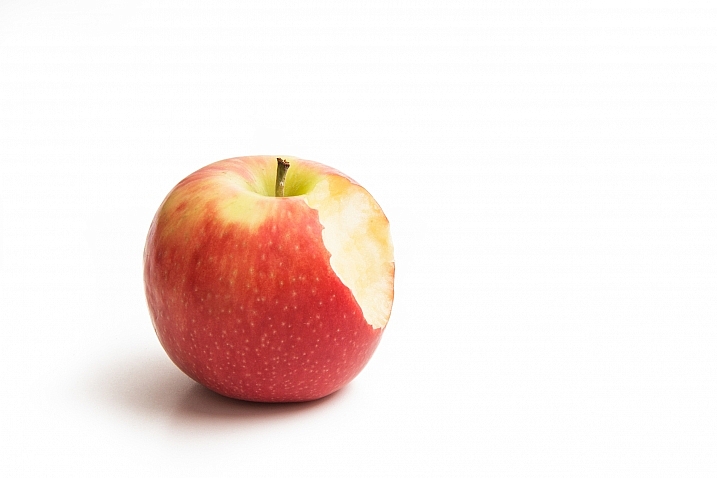
8) Take a bite

DLG Images

By DLG Images

Xsomnis

By xsomnis

Great food photography doesn’t need to be staged. Once you are done with your shoot, go ahead and take a bite. This photo adds a sense of authenticity to your shoot. If you’ve made the viewer want to take their own bite, you’ve succeeded in your goal of creating scrumptious food photographs.

googletag.cmd.push(function() {
tablet_slots.push( googletag.defineSlot( “/1005424/_dPSv4_tab-all-article-bottom_(300×250)”, [300, 250], “pb-ad-78623” ).addService( googletag.pubads() ) ); } );

googletag.cmd.push(function() {
mobile_slots.push( googletag.defineSlot( “/1005424/_dPSv4_mob-all-article-bottom_(300×250)”, [300, 250], “pb-ad-78158” ).addService( googletag.pubads() ) ); } );

The post 8 Tips for Food Photography Newbies by Chris Corradino appeared first on Digital Photography School.


Digital Photography School

 
Comments Off on 8 Tips for Food Photography Newbies

Posted in Photography


Lee announces very hard neutral density grads for seascapes

08 Apr
Before and after with the Lee Filters Very Hard ND graduated filter

Lee Filters has announced a new range of neutral density graduated filters that have an extra hard transition from dark to clear, making them suitable for shooting seascapes and scenes in which the horizon is very flat. Along with these new ‘very hard’ graduates, the company has launched another range that has a ‘medium’ strength transition that sits between the traditional ‘hard’ and ‘soft’ grades.

Both of the new grades are available in half-stop incremental strengths from one to four stops, and in sizes compatible with the Seven5, 100mm and SW150 systems.
For more information visit the Lee Filters website.

Pricing

Seven5 medium grad (single filter 0.3ND to 0.9ND) RRP £51.88 (excl VAT)
Seven5 medium grad (single filter 1.2 ND) RRP £77.82 (excl VAT)
Seven5 medium grad set (0.3ND, 0.6ND & 0.9ND) RRP £138.35 (excl VAT)
100mm very hard & medium grad (single filter 0.3ND to 0.9ND) RRP £71.86 (excl VAT)
100mm very hard & medium grad (single filter 1.2 ND) RRP £108.86 (excl VAT)
100mm very hard and medium grad sets (0.3ND, 0.6ND & 0.9ND) RRP £179.66 (excl VAT)
SW150 very hard & medium grad (single filter 0.3ND to 0.9ND) RRP £79.70 (excl VAT)
SW150 very hard & medium grad (single filter 1.2 ND) RRP £119.55 (excl VAT)
SW150 very hard & medium grad sets (0.3ND, 0.6ND & 0.9ND) RRP £215.00 (excl VAT)


Press release:

LEE Filters introduces very hard and medium neutral-density graduated filters to its systems

Traditionally, neutral-density graduated filters have been available exclusively in hard and soft versions. However, because all neutral-density grads in the LEE Filters range are made by hand, it is possible to be extremely precise with the depth of the transition between the coated and clear sections of the filter. As a result, LEE Filters has the capabilities to manufacture ND grads in medium and very hard versions. In the past, these were available exclusively as custom-made filters for professional photographers. Now, however, they have been made available to all those who use the Seven5, 100mm and SW150 systems.

The medium and very hard grads not only expand a photographer’s creative options, they also allow for even more exact control when balancing lighter and darker areas of the frame. The very hard grad (available for the 100mm & SW150 systems) is perfect for seascapes that feature a completely flat horizon line, while the medium grad (available for the Seven5, 100mm and SW150 systems) is that perfect ‘in-between’ strength that is ideal for any scene in which an element of the composition – a mountain or a building, for example – protrudes into the sky.

Both ND grads are available in 0.3ND (1 stop), 0.45ND (1½ stops), 0.6ND (2 stops), 0.75ND (2½ stops), 0.9ND (3 stops) and 1.2ND (4 stops) strengths.

For further information, contact LEE Filters on 01264 366245; sales@leefilters.com; www.leefilters.com

Articles: Digital Photography Review (dpreview.com)

 
Comments Off on Lee announces very hard neutral density grads for seascapes

Posted in Uncategorized


Urban Jungle: Dizzying Drone Photos of Hong Kong from Above

08 Apr

[ By WebUrbanist in Architecture & Cities & Urbanism. ]

drone photo hong kong

Hong Kong has inspired so many iconic images of urban density shot from the ground or horizontally across buildings, but seeing it from above via drone footage gives the city an entirely fresh dimension.

drone density china

drone repeating buildings

In this series of vertigo-inducing snapshots, photographer and unmanned aerial vehicle pilot Andy Yeung captures both the chaos and order, colorfulness and monotony, of one of the world’s most stunning urban centers.

drone aerial city

drone view above

Shot from hundreds of feet in the sky, the resulting views exceed even the relatively awesome ones attainable by tripping up to the top of the adjacent hillsides. An onlooker starts to get a sense of the combination of  rigorous order and organic evolution of the city.

Share on Facebook


[ By WebUrbanist in Architecture & Cities & Urbanism. ]

[ WebUrbanist | Archives | Galleries | Privacy | TOS ]


WebUrbanist

 
Comments Off on Urban Jungle: Dizzying Drone Photos of Hong Kong from Above

Posted in Creativity


Hasselblad announces 100MP H6D-100c capable of 4K, H6D-50c 50MP option

08 Apr

$ (document).ready(function() { SampleGalleryV2({“containerId”:”embeddedSampleGallery_7248304374″,”galleryId”:”7248304374″,”isEmbeddedWidget”:true,”standalone”:false,”selectedImageIndex”:0,”startInCommentsView”:false,”isMobile”:false}) });

Hasselblad has added the H6D range to its medium-format lineup, offering the H6D-100c with 100MP CMOS sensor and 4K video along with the H6D-50c with 50MP CMOS sensor. The H6D system offers a new, faster processor, a 3″ 920k-dot touchscreen monitor, dual card slots, built-in Wi-Fi and USB 3.0 connectivity. Both cameras offer 1080/30p HD shooting in the H.264 format, and include mini HDMI and audio I/O ports. Hasselblad has updated its H series of lenses to support a top 1/2000sec shutter speed when used with the H6D system.

The H6D-100c includes 4K/UHD video recording in a proprietary Hasselblad Raw format, which can be ingested and converted by Phocus 3.0. The 100MP variant also provides a higher ISO range up to 12800, continuous shooting at 1.5 fps and claims 15 stops of dynamic range. With 50MP the H6D-50c claims 14 stops of dynamic range and is capable of 2.5 fps continuous shooting. 

The Hasselblad H6D-50c will cost $ 25,995/€22,900; the H6D-100c is priced at $ 32,995/€28,900.


Press release:

Hasselblad launches an all new medium format camera

75 years at the forefront of imagery, Hasselblad continues to innovate

Hasselblad began its journey when founder, Victor Hasselblad, refused to simply copy an aerial surveillance camera at the request of the Swedish government who asked him if he had the skills to produce a camera identical to one that had been captured. He famously said: ‘No, but I can make a better one’. The camera maker has once again, followed Victor’s philosophy and applied it to the award winning H medium format camera – launching the all new H6D.

Rather than an improvement on the existing medium format H Cameras, the H6D range has been completely rebuilt with new technical components and an all new electronic platform. The pioneering range retains the modularity appreciated by medium format enthusiasts along with iconic design elements and Swedish handmade quality for which Hasselblad is renowned.

The H6D range introduces the H6D-100c with CMOS sensor, a 100MP option and the H6D-50c with a 50MP CMOS sensor. A wider range of shutter speeds from 60 minutes to 1/2000th of a second, increased ISO range and a faster shooting rate along with USB 3.0 Type-C connector that delivers exceptionally fast file transfer. The H lens range is fully compatible and, with the choice of a faster shutter speed, can be further leveraged than with previous ranges.

The H6D-100c brings 4K video capability to medium format. The high-definition rear touchscreen LCD delivers a pin sharp live view experience and Wi-Fi as standard, a HDMI connector, for external monitor connectivity, completes the tool set.

Built-in dual card slots allow enhanced media capability; a CFast slot allows for high-speed capture and an SD card slot enables maximum compatibility. The all new platform is capable of handling the largest file throughput with speed and ease using optimised algorithms for matchless quality les.

Hasselblad’s image processing software, Phocus, has been enhanced with the new 3.0 version delivering additional features that allow you to apply local adjustments in the image and a new graphical interface that improves work flow and user experience.

Commenting on the launch Perry Oosting, Hasselblad CEO noted: “The launch of the H6D range is the beginning of a year of celebration for Hasselblad. It’s fitting that we have returned to our pinnacle medium format camera to showcase the innovation and passion that have been present in every one of our first 75 years. Our obsessive approach to optical quality and precision hand building in Sweden is at the heart of this camera.

We have retained the best and introduced the most relevant – delivering a medium format camera which we believe the Hasselblad user will fall in love with all over again.”

Articles: Digital Photography Review (dpreview.com)

 
Comments Off on Hasselblad announces 100MP H6D-100c capable of 4K, H6D-50c 50MP option

Posted in Uncategorized


How to Critique Your Images Objectively: Ask for Other Points of View

07 Apr

What happens when you ask 150 people to look at the same photos and pick their favourites? The answer is simple: a pattern emerges. But which pattern emerges can be very surprising, as I found out recently.

Last year I decided to self-publish a photo book on Spain. I’d been wanting to do it for years. When the crowd-funding website Kickstarter announced it was opening up shop in Spain, where I live, I took it as a sign and made sure my project was uploaded the day they opened.

Alhambra palace ranked number 1

#1 ranked image by my crowd-fund book supporters.

But I wanted to do something different with the book. Then it hit me – I could get supporters to be a part of the process by choosing which photos would go in the book. I thought of it as crowd-funding meets crowdsourcing. I wanted everyone to play a role in my book. So I uploaded 240 images onto a private webpage, and gave everybody a password and a mission; chose your favourite 80 images. After the voting period was over, I tallied up the results and the top 80 images went into the book.

I was blown away by the results. Some of my personal favourites didn’t even make it in, and some other images that I didn’t think were particularly strong, ended up being extremely popular. It was very instructive. The one that stands out for me is of cows in a field beside a church in the mountains of northern Spain. I almost didn’t even include it in the original batch of 240 images. But not only did it make it into the top 80, it was the 6th most popular image!

Cows ranked 6

On the other hand, here’s a shot of a beach in the south of Spain that I quite like. But it didn’t make the cut – not even close. It ranked a mere 223rd. Fascinating!

Beach ranked 223

I think there are a number of things at play here. For one, the photographer often attaches a value to a photograph that the viewer doesn’t. If an image took repeated attempts to achieve, or was somehow difficult to get in another way — perhaps finding the right angle took hours, or maybe there was some fantastic luck involved that would be impossible for the viewer to appreciate — then it’s natural for the photographer to place a greater value on it. But the final image is what counts, and should be judged on its merits alone, which is sometimes hard for the photographer to do without bias.

Wild horse roundup ranked 133

Ranked #133

For instance, I particularly like this image of a church in the city of Salamanca. The strong graphic lines of the church’s shadow on itself, was not only dynamic because of its oblique orientation, but also offered a second yin-yang with the tourists, some in shade against the sunlight, the others in sunlight against the shade. But, it ranked only #208, again, not even close. But I find the fact it was not very popular more interesting, than disappointing. It wasn’t an obvious image to take, I had to see the opportunity first, then carefully compose, and wait for people to enter the light (and shade) at just the right time. I got it after almost an hour of waiting. Is that part of the reason I like it so much? I find that an interesting question.

Church shadows ranked 208

Of course the reverse also happens. The following image of the field of sunflowers was an easy photo to take, and much easier to spot as a photo-op, versus the church in Salamanca. Speaking as a photographer, I don’t think it’s one of my best images technically or creatively, but that doesn’t change the fact it’s a beautiful landscape. The people who look at your photos don’t (and shouldn’t) care about how hard or easy an image was to take. They either like it or they don’t. In this case, the field of sunflowers was very popular, ranking 4th overall.

Sunflowers ranked 4

Now, this doesn’t mean that you should only take photos that you think will be popular. But if you want to please a crowd with a slideshow, or a book, paying attention to what people like will make it more successful. It doesn’t matter how lucky you got, or how hard you worked to get a photo. The important thing is to try to look at it through other people’s eyes. If you enjoy sharing your images, it’s crucial to remove your own bias, and in the end it will make you a better photographer.

Editor’s note: How you can go about using this new knowledge without making a book? You can try posting a set of images as a collection on Facebook and ask people to rank their favorites. Or post a color and black and white of the same image and ask people which they prefer. Why not go ahead and try it here – post some photos in the comments below and rank each others images. How else can you look at your image objectively? 

googletag.cmd.push(function() {
tablet_slots.push( googletag.defineSlot( “/1005424/_dPSv4_tab-all-article-bottom_(300×250)”, [300, 250], “pb-ad-78623” ).addService( googletag.pubads() ) ); } );

googletag.cmd.push(function() {
mobile_slots.push( googletag.defineSlot( “/1005424/_dPSv4_mob-all-article-bottom_(300×250)”, [300, 250], “pb-ad-78158” ).addService( googletag.pubads() ) ); } );

The post How to Critique Your Images Objectively: Ask for Other Points of View by Mike Randolph appeared first on Digital Photography School.


Digital Photography School

 
Comments Off on How to Critique Your Images Objectively: Ask for Other Points of View

Posted in Photography