RSS
 

Archive for March, 2016

Fire Spinning with Steel Wool – A Special Effects Tutorial

17 Mar

Sometimes you can find ways of taking amazing pictures without spending much money at all, and one of the best examples of this is a technique called fire spinning. This usually involves just a couple of basic items, available at any hardware store and grocery market, and with a little creativity you can create some pictures that are downright otherworldly.

50mm, f/13, 30 seconds, ISO 200

50mm, f/13, 30 seconds, ISO 200

Safety warning – please abide:

Before I go into detail about what it takes to create an image like this, I need to make it abundantly clear that fire spinning is dangerous, not only to yourself, but the area around you, and even your camera equipment.Please follow these safety precautions:

  • Take care to only do this where you have plenty of open space, and nothing around you that will catch on fire.
  • Make sure that you wear thick clothing such as full-length pants, closed-toe shoes, a long-sleeved shirt, and something to cover your eyes (glasses or safety goggles) and hair.
  • Never do this in a field of grass or near a house, dry wood or brush, or near anything that could potentially catch on fire.
  • Also make sure to put plenty of distance between your camera and the sparks, as they fly farther than you might think!

The images you see in this article were all taken at night, on a deserted beach where nothing else could start burning, and my camera was far enough away from the subject to avoid any wayward flying sparks or smouldering embers.

What you will need

You may already have some of the items necessary for a fire spinning photo, but if not, you can easily find everything you need for only a few dollars. You can add additional things such as multiple chains and whisks to create different effects and styles, but for a basic fire spinning shoot you can start with the following trinkets:

A chain, wire wisk, connector, and steel wool are all you need to create amazing fire-spinning images.

A chain, wire whisk, a connector, and steel wool, are all you need to create amazing fire spinning images.

  • A few lumps of fine steel wool (thick stuff works okay, but the finer steel wool is better: 0-0000 grade)
  • A small chain, roughly half a meter in length (1.5′)
  • A wire whisk commonly used in baking
  • A small clasp or carabiner to faster the chain to the whisk
  • Something to light the steel wool on fire (cigarette lighter, grill lighter, etc.)

Other items necessary for the shoot include:

  • A tripod for your camera
  • A wide-angle lens (I shot the top picture at 50mm, but I would have preferred something wider like 35mm)
  • A flashlight, so you can see as you’re setting up your camera and planning the shoot
  • A friend who is willing to hold a spinning fiery object attached to a chain

Once you have all the things you need, preparing for your photos is fairly simple. Stuff a wad of steel wool into the whisk (fluff it up a bit so it gets some air), attach the whisk to the chain, and you’re all set. Fine steel wool is better (I used grade 00 for these images) because it will burn easier, and send more sparks flying around during your shoot. The basic idea involves lighting the steel wool, which will cause it to smoulder, then spinning it around in the air, which will cause sparks to shoot off in every direction.

While the steel wool won’t exactly burn like a piece of paper, twirling it in the air will cause sparks to fly all around. By using a long exposure on your camera, you essentially take a time-lapse image of the sparks, which results in an incredibly dynamic image not unlike something you might see during a fireworks display at an independence day celebration.

fire-spinning-single-spiral

50mm, f/9.5, 20 seconds, ISO 200

The fire-spinning method

After your chain, whisk, and steel wool are ready, you will need to find a location, and decide how to frame your shot, which is why it can be handy to have a friend help you out. You can do fire spinning photos by yourself, but it really helps to be able to direct someone else who’s doing the spinning, so you can get everything positioned exactly how you want in the shot. It helps to draw some lines in the sand or dirt so your helper knows precisely where to stand, and depending on how dark it is, you may need to use your flashlight to help get everything positioned just right.

The rest of the process is fairly simple, but it will probably take a great deal of trial and error to get the shots you want. Set your camera and tripod low on the ground, several meters away from your friend, and have him shine a flashlight on his body so you can lock focus (either use autofocus to lock, then switch it to manual – or try back button focusing). Large apertures should be avoided, since you want a very wide depth of field, and you don’t need to worry about gathering enough light because the sparks will be plenty bright to show up even with small apertures. Use a long exposure time of 20 or 30 seconds, and a low ISO of 100 or 200.

When you are ready to take the shot, have your friend hold the lighter under the steel wool until it starts glowing. That’s your cue to press the shutter button, then just stand back while your friend spins the chain and the sparks start flying. One final trick is to use your camera’s 2-second self-timer so your friend has a bit of time to light the steel wool on fire before the actual exposure begins.

fire-spinning-beach-sparks

35mm, f/10, 6 seconds, ISO 200

Once you get the hang of the basics the rest is all about finding a technique that works, to get the shots you want. You can try lots of variations to get different photos such as:

  • Stand in place and twirl the chain in a circle
  • Stand in place and twirl two chains, one on each side
  • Walk across the frame while spinning the chain to create a giant glowing tube
  • Have multiple people in the shot spinning multiple chains
  • Flash an off-camera speedlight on rocks or other background elements to add depth to the shot
50mm, f/13, 20 seconds, ISO 200

50mm, f/13, 20 seconds, ISO 200

With a little practice you can get some astounding results, and it’s always good to shoot in RAW so you can tweak the colors, and pull some details from the shadows later on if you want. If you search online for “fire spinning photos” (or steel wool spinning) you will find thousands of images, using all sorts of variations on this basic technique. I realize it’s somewhat cliché to say this, but the possibilities really are endless.

Have you ever tried fire spinning before? What are some of your favorite tips and tricks that others should know? Share your thoughts and any of your favorite photos in the comments section below!

This is the second of a series of articles we will be featuring this week on dPS all about special effects. Check out the last one: How to Photograph the Full Band of the Milky Way

googletag.cmd.push(function() {
tablet_slots.push( googletag.defineSlot( “/1005424/_dPSv4_tab-all-article-bottom_(300×250)”, [300, 250], “pb-ad-78623” ).addService( googletag.pubads() ) ); } );

googletag.cmd.push(function() {
mobile_slots.push( googletag.defineSlot( “/1005424/_dPSv4_mob-all-article-bottom_(300×250)”, [300, 250], “pb-ad-78158” ).addService( googletag.pubads() ) ); } );

The post Fire Spinning with Steel Wool – A Special Effects Tutorial by Simon Ringsmuth appeared first on Digital Photography School.


Digital Photography School

 
Comments Off on Fire Spinning with Steel Wool – A Special Effects Tutorial

Posted in Photography


Adobe Lightroom CC 2015.5 / 6.5 update brings bug fixes, new camera support

17 Mar

Adobe has launched Lightroom CC 2015.5 and Lightroom 6.5, bringing numerous bug fixes alongside new camera support and dozens of new lens profiles. The update fixes a few issues with the Panorama Merge feature, including bugs affecting Boundary Warp, as well as ‘a ton of sync errors’ and a couple missing features.

The new version of Lightroom takes care of dust spots in a smart way – remove spots from the first image, and the rest will be removed automatically as other images are merged. Additionally, bugs have been fixed that affected Boundary Warp, a tool that helps straighten curved edges of stitched panoramas.

Bug fixes unrelated to Panorama Merge include numerous unspecified syncing errors. Adobe also claims that syncing with the Android and iOS Lightroom apps is now faster. Mouse scrolling has been restored in Loupe view, and it has also reinstated scroll bars in the Book module for faster browsing. Finally, slideshows once again display images in high-resolution, whereas before a bug caused them to display at a ‘much lower res than expected.’

The following camera models are now supported:

  • Canon EOS-1D X Mark II
  • Canon EOS 80D
  • Canon EOS 1300D (Rebel T6, Kiss X80)
  • Nikon D5
  • Nikon D500
  • Olympus PEN-F
  • Olympus SH-3
  • Panasonic DMC-CM10
  • Panasonic DMC-GF8
  • Panasonic DMC-ZS100 (DMC-ZS110, DMC-TZ100, DMC-TZ101, DMC-TZ110, DMC-TX1)
  • Samsung NX3300
  • Sony Alpha a6300 (ILCE-6300)
  • Yuneec CGO4

Lastly, more than 70 lens profiles have been added for lenses from Canon, Fujifilm, Olympus, Panasonic, Pentax, Samsung, SIGMA, and Sony, and there’s support for the lens used by the Huawei Nexus 6P and LG Nexus 5X smartphones. The full list of newly supported lens profile is available here.

Articles: Digital Photography Review (dpreview.com)

 
Comments Off on Adobe Lightroom CC 2015.5 / 6.5 update brings bug fixes, new camera support

Posted in Uncategorized


How to Photograph the Full Band of the Milky Way

16 Mar

Get Grant’s three video instructional series Guide to Post-Processing Night Photos – currently available at 59% off through the SnapNDeals for a limited time only.

Pawnee Buttes

Our small blue planet is located on a spiral arm, far out from the center of the Milky Way Galaxy. When we look towards the galactic center, we can view one of the most spectacular sites imaginable. Thousands of stars are clustered together, to form a hazy band in the sky, known simply as the Milky Way.

If you enjoy photographing the Milky Way, the winter months can seem especially long. During this time, the Earth is pointing away from the center of the galaxy at night, and you can only see the fainter parts of the Milky Way. It can still be photographed, but the shots won’t likely be as dramatic as they are at other times of the year.

Fortunately, the bright galactic center becomes visible again in the spring. In March, it rises shortly before dawn in the Northern Hemisphere. So you will need to stay up all night or get up very early to photograph it. Every day, it rises a little earlier in the night, and by June it will be rising about the same time that the sun sets.

Determination Towers

The great thing about photographing the Milky Way in the spring and early summer months, is that you can capture the full band of the Milky Way arcing across the sky. By August, the Milky Way will appear too high in the sky, in the Northern Hemisphere, to capture the full arc.

If you’re shooting from the Southern Hemisphere, you will have a longer time frame to see the full band of the Milky Way. From about February to June, you can capture it in the southern part of the sky, just after the galactic center rises above the horizon. From about June to September, you can capture it just before it sets in the west.

Since the Milky Way spans such a large portion of the sky, you will need to stitch together multiple images to capture all of it in one photograph. I explain how to do this below.

EQUIPMENT

Rokinon35

The Rokinon 35mm f/1.4, all manual lens, works great for this kind of photography.

There is some specialized equipment you can use to capture stitched images of the Milky Way, such as a panoramic tripod head, a leveling base, and even a robotic camera mount. However, the majority of the time you won’t need any special equipment. Anyone with a good tripod and a DSLR can capture the full arc of the Milky Way.

You can use any lens from about 14mm to 50mm to capture your images. If you use a longer lens, like 50mm, you’ll need to take, and stitch, a lot more images together. This can be more time-consuming, but you will also capture much larger image files, with greater detail and less noise.

Ideally, you’ll want to use a lens with a very wide aperture, like f/1.4 or f/2.8. It is also helpful to have a tripod with a bubble level on top of its legs, and a tripod head that has a rotating base.

PLANNING YOUR SHOTS

You can pre-visualize how the Milky Way will appear at any time and location using a program called Stellarium. This program can be downloaded for free, it can also be purchased as an iTunes or Android app, or you can use other apps like PhotoPills or Sky Safari.

Stellarium

Stellarium

You will usually want to shoot images of the Milky Way under no moon. If the moon is out, it will obscure the stars, and the Milky Way will not look as impressive. One exception to that, is if you want the moon to illuminate the foreground. You can shoot with a waxing crescent moon that is about 20% illuminated. You’ll need the moon to be directly behind you so it obscures the stars as little as possible. The moon will be in a good position for this shortly after it gets dark on July 8-9th, 2016.

You will want to get far away from any city lights when shooting images of the Milky Way. Light pollution can create an unnatural color cast in the image and it can obscure the Milky Way. And, of course, you should check the weather forecast to make sure there will be clear skies.

COMPOSITION

Once you know how the Milky Way will appear, and have determined the best time to shoot it, you need to decide where to take your photograph. Although the full band of the Milky Way can be spectacular on its own, your images will be more compelling if you include an interesting foreground. If you’re in the Northern Hemisphere, you should find a composition facing east, since that is where the shallow arc of the Milky Way will be visible shortly after it rises. If possible, I recommend arriving before it gets dark to set up your shot. It’s much easier to determine the best composition, and focus your camera, when it’s still light out.

Milky Way Arches National Park

CAMERA SETTINGS

You can use the rule of 500 to calculate the exposure time for your images. Simply take 500, divided by the focal length of your lens, to get the number of seconds to expose the shot. For example, if you’re using a 50mm lens, take 500, divided by 50 = 10 seconds per exposure (this will give you long enough exposures to get good quality images at night without small star trails starting to appear in your shots).

You’ll typically want to use the widest aperture on your lens when shooting stitched images. You’ll also want to use the highest native ISO, that doesn’t cause any highlights to be blown out. As long as you don’t have any close foreground objects in the shot, you can focus at infinity.

You can do this by autofocusing on the moon if it is out, or by focusing on a very distant object before it gets dark. Switch to manual focus afterwards to make sure the focus stays set at infinity. Alternatively, if you have Live View on your camera, you can use it to zoom-in on a star on your LCD screen, then adjust the focus manually until the star appears as a small, sharp point of light.  Don’t rely solely on the infinity marker on your lens, as it isn’t always accurate.

I’ve found that a white balance of about 3800K works well at night with no moon out. However, as long as you’re shooting in RAW (or if you do not have the K setting on your camera), you can set it to Daylight and adjust the white balance later.

Turn off Long Exposure Noise Reduction, as it can take too long, causing the stars to move too much between the exposures, and making it difficult to stitch the images together seamlessly.

Calhan Paint Mines

TAKING THE PHOTOS

You will need to make sure that your camera is straight, using a bubble level or your camera’s built-in levelling feature. Ideally, you’ll also want to make sure your tripod head is mounted on a level surface by using a bubble level on top of your tripod legs, or a levelling head. This will ensure that your camera remains level as you turn it.

Before beginning the stitched image, I recommend taking a test shot. Point your camera towards the brightest part of the scene you will be photographing, and take an image using the camera settings you have chosen. Check the histogram to make sure you are not overexposing the image. If you are, lower the ISO until you are not clipping any of the highlights. You’ll also want to zoom in on your shot, and make sure everything is in sharp focus.

If everything looks okay, you can start taking your stitched image. I always recommend capturing a wider view of the scene than you want in your final image. You’ll have to crop the image afterwards, since the stitched images will never be perfectly rectangular. So it’s always better to capture too much of the scene, than too little.

Goblin Valley

Position your camera to take an image of the far, bottom left corner, of the scene you want to capture. After you take the first shot, you’ll need to quickly rotate your camera to the right before taking the second shot. Make sure and leave plenty of overlap (about one third of the scene) between the images to make it easier for the software to stitch the images.

Now, continue taking shots, and rotating the camera to the right, until you’ve captured the entire horizontal field of view that you want. To get the full band of the Milky Way, you’ll typically need to shoot a multi-row panorama. You can rotate the camera up and then shoot a second row of images. Keep doing this until you’ve captured the entire vertical field of view you want.

STITCHING WITH LIGHTROOM

Lightroom Preview

You can stitch images within Lightroom CC. Simply select all of the images you want to stitch, right-click on them, and select Photomerge > Panorama. Lightroom will then attempt to stitch the images. Occasionally, Lightroom will be unable to stitch them together. If this happens, I recommend trying a free program for PCs called Image Composite Editor.

Once the images are stitched, you can process them like any other image. I’ve provided detailed information on post-processing night photos in my instructional videos, which are currently available at 59% off through the SnapNDeals for a limited time only.


googletag.cmd.push(function() {
tablet_slots.push( googletag.defineSlot( “/1005424/_dPSv4_tab-all-article-bottom_(300×250)”, [300, 250], “pb-ad-78623” ).addService( googletag.pubads() ) ); } );

googletag.cmd.push(function() {
mobile_slots.push( googletag.defineSlot( “/1005424/_dPSv4_mob-all-article-bottom_(300×250)”, [300, 250], “pb-ad-78158” ).addService( googletag.pubads() ) ); } );

The post How to Photograph the Full Band of the Milky Way by Grant Collier appeared first on Digital Photography School.


Digital Photography School

 
Comments Off on How to Photograph the Full Band of the Milky Way

Posted in Photography


Interview with three-time Oscar winning cinematographer Emmanuel Lubezki

16 Mar

Cinematographer Emmanuel Lubezki films actor Forrest Goodluck in The Revenant, for which he won the 2016 Academy Award for Best Cinematography. Lubezki shot The Revenant entirely with natural light.

Photo: Kimberly French

On February 28 Emmanuel Lubezki won his third consecutive Oscar for Best Cinematography for The Revenant, starring Leonardo DiCaprio. That’s an impressive feat, but even more so when you consider that he also took home the Oscar in the same category in 2015 (for Birdman) and in 2014 (for Gravity), and has been nominated a total of eight times, making him the first cinematographer to win three Academy Awards in a row and establishing his place as one of the preeminent cinematographers of our day.

Lubezki is known for creating immersive, organic experiences that draw viewers into the story, often embracing wide angle lenses and long continuous shots to achieve this effect. His work has variously led audiences through sensory experiences that have evoked strong emotion, a sense of exploration and freedom, magic, beauty, authenticity and, at times, even discomfort.  Many will remember the twelve-minute opening scene in Gravity as well as the famous (and rather tense) uninterrupted four-minute car chase in Children of Men.

A few days before the Oscars, Lubezki, who also happens to be an enthusiastic photographer, joined DPReview editors Dale Baskin and Rishi Sanyal to share his thoughts on a variety of topics ranging from artistic to technical. Of particular interest to DPReview readers, he discusses the impact of digital technology on filmmaking, how he selects and tests his gear, and why he chose to shoot The Revenant entirely on digital cameras using only natural light. Additionally, he explains his excitement about InVisage QuantumFilm, a technology we’ve covered before, and why it excited him enough that in November of 2015 he joined InVisage’s Advisory Board to provide expert and artistic insight to help guide the company.

After our 2-page interview, be sure to visit page 3 for our Editor’s Note that dives deep into some of the technical ground covered. And to get a more personal view of Lubezki’s work you can follow him on Instagram @chivexp.


DPReview: Hi, Emmanuel. Thanks for taking some time to meet with us. Everyone here at DPReview is really excited about the chance to talk with you!

Emmanuel Lubezki: Sure! I know DPReview. Every time I’m going to buy a camera I check you guys out! I’m a photographer and I’ve been shooting movies for close to thirty years. I love shooting movies and taking still photos.

DPR: You’re an inspiration to many of us because of your artistic vision and your use of technology to achieve it. How do you choose the technology you use for your projects? 

EL: You know, one thing I can tell you is that I’m the worst geek in the world! Sometimes I don’t even know how to turn on the camera. [Laughs, obviously joking] But from an instinctive, craftsman point of view, whenever I’m going to start a movie or buy a camera or start a project, I do a lot of tests. All these test help inform me of how I want to shoot the movie, which equipment I’m going to use, how I’m going to mix equipment and so on. Like how my Nikon D810 works. After testing it and comparing it to other cameras I know what that camera can do for me as opposed to other cameras.

DPR: You definitely picked the right camera with the D810. It has the most dynamic range of any camera we’ve tested. 

EL: That’s exactly why I picked it. One of the most important characteristics for any equipment that I’m going to use is how well it can capture high dynamic range. I’m an old cinematographer, so I was used to the high dynamic range of film. If you consider the high dynamic range of Kodak [negative] film, especially in the latest years, to be like the 88 keys of a piano, that was what I needed to go out and capture the highlights, the sky, the shadows in the subject’s hair, and so on. 

Then suddenly film started to collapse and disappear. It happened too early and it happened too fast. It was a result of the studios and the exhibitors going into digital exhibition, so suddenly there was no business for printing. That was the biggest businesses for the labs, so the labs started to close down. It became very hard to shoot film. 

Unfortunately, the transition happened too early and the cameras weren’t ready. The digital cameras that came out in the beginning (around 15 years ago) were not even close to the high dynamic range of film. I worked with a few directors, including Michael Mann, to do tests with digital video imaging. For certain things, we liked and used it, but it was primitive and it wasn’t ready to take over and become the main technology for capturing images.

I think now we’re in a very good place where the digital cameras are allowing us to do many things we couldn’t do with film. But it’s still the dynamic range – the high dynamic range – where digital cameras, as amazing as they are at capturing shadows and not having any noise, don’t allow you to capture those 88 keys of the piano I was used to. And movies get hurt by that.  

For example, the last movie I did [we were shooting] in the forest, and when looking at the sky I wasn’t able to capture the little round ball of the sun and also capture the face of the actor. It’s stressful for a cinematographer. So the idea of new sensor technology, like what InVisage has demonstrated in their QuantumFilm technology, that will allow us to go back to 88 keys of dynamic range or more is incredibly exciting.

Shooting The Revenant in all natural light pushed the limits of dynamic range on the digital cameras used for the production.

Photo: Kimberly French

DPR: You’ve worked with InVisage, the company behind QuantumFilm, and seem very enthusiastic about what that technology can do for filmmakers and photographers. Why?

When InVisage approached me and showed me their sensor technology I got very, very excited. As people would say, it’s music to my ears. Actually, it’s music to my eyes what they are doing! What they’re attempting to do is everything I’ve been looking for, and that’s why I’m so excited to work with them.

The first thing I’m excited about is the high dynamic range of QuantumFilm, but the other thing that’s important is a camera that has a global shutter as opposed to a rolling shutter. That’s something that we suffered with a bit during Gravity. When you’re doing a lot of digital effects and stitching things together, not having global shutter can become a big issue, as you guys know.

DPR: You’ve mentioned the incredible dynamic range we’re starting to see with technologies like QuantumFilm and from cameras like the Nikon D810. How does digital fit into your workflow now? And have you found that you need to have a different method and philosophy for exposure when shooting with digital as compared to film?

EL: Absolutely. Very different. When I signed on to do The Revenant, I wanted to do all the day scenes on film, just because of the high dynamic range, and I wanted to do all the dusk and night scenes with a digital camera. That’s because the digital cameras are more sensitive to light. They can see more in the shadows, and you can push them a bit. For example, let’s say that Arri says their camera is ISO 800 native. You can shoot it at IS0 1600 and there’s still no noise. You’re able to shoot scenes at night with firelight, and you can capture the stars and the Aurora Borealis in the night sky – things that film couldn’t do.

I started doing a lot of tests while we were rehearsing the movie, and every time I went back to the lab to see the results, the images I was capturing with the digital cameras were more interesting to me because they had less noise or no noise at all. It was like opening a window for the audience to get them immersed in this world, whereas film still had that poetic or romantic look, and the grain and texture was making the world of The Revenant look more romanticized. It wasn’t really allowing me to get immersed into the world of these trappers the way the digital cameras did.

Little by little I realized that I didn’t want to shoot the movie on film. For a middle-aged cinematographer who’s been shooting for so many years – that’s a very hard call. It’s like suddenly saying to a musician “You know, forget about your incredible piano, you’re going to play this concert with a Minimoog.” It’s heart-breaking, but the images spoke for themselves. We sent all the film cameras and film back to Los Angeles and started shooting the rest of the tests with the digital cameras. What I learned really fast is that, as opposed to film, you expose differently. You can overexpose film, and for many years I overexposed film because I liked the way you could still see the highlights, and by overexposing I was able to bring up a little bit of information in the shadows.

DPR: Because the film rolls off in the highlights, you can give it that extra light?

EL: Yes, exactly, which would then give you a little bit of extra latitude in the shadows. You would add a little noise by doing this, or grain in the highlights, but it was just a little bit and it allowed me to capture the whole ’88 keys’ [of the piano].

DPR: With digital it’s a very different philosophy, right? Because digital clips highlights abruptly as a result of being a largely a linear capture medium, and there isn’t that roll off. 

EL: Yes, it’s very different. You have to underexpose.

DPR: One of the things we discuss on our site a lot is that with digital you need to expose for the highlights and brighten the shadows afterward because they’re so clean.

EL: That’s exactly what you find when you start to test. And that testing tells you how much you can underexpose before you start to lose the shadows.

Unfortunately, as I was telling you before, we’re at a moment where the cameras and the chips are just not ready enough. Let’s say they are ready, but they don’t have the high dynamic range that we would like to have. This was a very good movie to do this test because I wasn’t using extra light or artificial light, so I sometimes had to make a call and say “OK, do I lose Leo’s face or detail in his hair? Or do I lose a cloud that is front-lit and many, many stops brighter than what this camera could capture?”

So what I would do much of the time is go for Leo’s face, because he’s the star of the movie, and then I would do a second pass and capture the sky, hoping that later I could replace the sky in the scene. But obviously that’s very expensive and you can’t do it over and over. The camera is handheld and it’s moving, so tracking it [in post to overlay the two exposures] would become very hard. In still photography I do that a lot. You know, you take a portrait of somebody and if the background is way too overexposed you shoot a couple more shots.

Before filming The Revenant Lubezki did extensive tests with his cameras in order to understand the dynamic range they were capable of handling and taking advantage of clean shadow detail to expose for the highlights.

Photo: Kimberly French

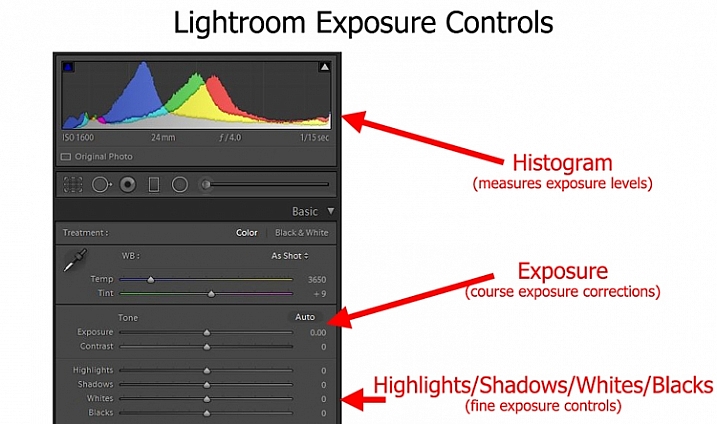
DPR: Of course, when you underexpose, the shadows in the image become really dark in the the electronic viewfinder or LCD screen. Have you found Log gamma modes help you with digital capture as you underexpose? 

EL: Yes. Not in still photography, but what I do when shooting cinema is I create lookup tables [LUTs] that allow me to see how much information I still have in the shadows if I’m underexposed. They’re very easy to create if you shoot tests and then make 2D or 3D LUTs in order to see the shadows. I haven’t been able to do it in still photography because I would probably need to get into the camera and mess with the monitor.

DPR: Would it be a bit like your D810 when using the ‘Flat’ Picture Control that raises the shadows and rolls off the highlights?

EL: Exactly. That gives you a little bit of an impression, but I’ve had a couple of hiccups where I think I still have enough detail, and then you open up the images in Photoshop and the shadows in the hair are already so underexposed that you don’t see detail. I take photos more like a hobbyist than a great professional that has an assistant with a laptop. I just have my camera and shoot.

DPR: It’s very interesting to hear all of this from someone who many people know as ‘a film guy’. 

EL: I was the ‘film guy’. What I gained by shooting digital makes me much happier. That’s why I sent the film cameras back to Los Angeles. The digital cameras were giving me something I could never have done on film – because of the sensitivity, because of the immediacy, and because Alejandro [Director Alejandro Iñárritu] was able to watch everything on large monitors. Sometimes when you have 400 extras you want to watch a playback and see what all those extras are doing and things like that. Things that film doesn’t give us.

On The Revenant I was shooting at high latitudes – we were in Canada, north of Calgary, in the winter. Shooting in that part of the world, the sun is very low to the horizon and goes behind the mountains very early. By shooting with digital cameras I was able to add one or two hours of shooting to our very short days. That’s a lot of extra time for a big production. It’s millions of dollars that you don’t lose by not being able to shoot. It was also during the time of day that’s very mysterious and magical [the ‘golden’ or ‘magic’ hour], and by having the digital cameras I was able to capture things I couldn’t do on film. 

DPR: Hearing you say that you’re mostly experiencing advantages when shooting digital is compelling. Where does film fit into the picture at this point?

EL: I’m not trying to tell young filmmakers or any director to not shoot film. The ideal world would be a world where we have all these different tools – where you have film, where you have QuantumFilm sensors, where you have tiny digital cameras that have very little latitude – where you have all these paintbrushes that allow you to communicate and allow you to express different things. 

It will be very sad to see film go away because we have 100+ years of film history and it would be a big loss if we couldn’t print these movies anymore. You know, movies like Carol, or a movie like the Coen Brothers movie that just came out that is an homage to filmmaking – it was a good call by the filmmakers to make these movies on film. So it would be great to still have film, and it’s fantastic to be able to combine things. But in general, I feel much more comfortable shooting digital.

At the start of production, Lubezki planned to shoot daylight scenes on film due to its high dynamic range, but after extensive testing sent all the film and film cameras back to Los Angeles and shot entirely on digital.

“It was like opening a window for the audience to get them immersed in this world, whereas film still had that poetic or romantic look… It wasn’t really allowing me to get immersed into the world of these trappers the way the digital cameras did.”

Photo: Kimberly French

DPR: Is that comfort partly because you’ve had this realization that the formats need to be exposed differently, using underexposure on digital and tone-mapping the footage later?

EL: Absolutely! 

DPR: Does everyone else in the industry understand that? 

EL: I think so. I think in general professional cinematographers working in the industry know that, and if not you learn it very fast. The first day of testing you realize that you’re gaining a lot information by doing that.

DPR: Many stills photographers may not appreciate the different approaches to exposing digital and film, but you guys are doing your own tests so it makes sense that you can take advantage of the formats by using them optimally.

EL: Right now we’re talking about professionals. But imagine – hopefully in the short future – if we had QuantumFilm in our phones, what amazing things we could do with them. How many millions or billions of photographs do we see everyday where the skies are clipped? Sometimes it doesn’t matter, but a lot of times it does because you’re losing a great amount of information about the environment or the highlights in somebody’s face.

DPR: One of the first things that struck us while watching The Revenant was the realism of the image – not only due to the lack of noise, but also because you can see everything from the blues in the sky, to the warm tones in your flares and sunstars, while still clearly seeing the subject’s face naturally, not artificially, lit. And the subject’s face isn’t noisy or a plugged shadow. It made for compelling imagery.

EL: I’m very happy to hear that because it’s something that I really wanted to show to the audience! Although you’re specialists and are able to see it like that, I think even people that don’t see it the way you’re seeing it… their subconscious is telling them “This is different,” and that it’s not artificially lit [to work around the capture medium’s limitations], and that it’s the real thing.

Using digital cameras allowed Lubezki, shooting in extreme northern latitudes in the winter, to add an hour or two of filming each day during the magic hours when the sun was low to the horizon.

Photo: Kimberly French

DPR: Is that why you choose to do long takes and wide angle perspectives? To enhance the realism and create an immersive experience?

EL: Yes. It’s exactly those two things. We wanted the movie to be as naturalistic and immersive as possible. The long takes, the digital equipment, and the way it was exposed… all these things together worked really well.

DPR: All this technical discussion brings up an interesting question. In the digital age does a cinematographer need to be as much of an expert on the science and technology of their imaging equipment as they are an artist in order to achieve their vision?

EL: I think you have to know a little bit about your equipment, at least in the way I do, in an intuitive way. You need to be able to test it and you need to know what you can do with it. I don’t know if you necessarily need to know that the chip is connected with 27 cables into… I don’t know if that’s imperative. I wish I could learn it. I haven’t had the time and the passion to open up a camera and go through exactly how it works, but I didn’t do that on film either. To me the results were more important. What was I getting and how was it connected to the story and mood, and what I was trying to tell the audience?

Articles: Digital Photography Review (dpreview.com)

 
Comments Off on Interview with three-time Oscar winning cinematographer Emmanuel Lubezki

Posted in Uncategorized


Essential Printing Tips & Best Printers for HDR Photography

16 Mar

Thanks to advances in camera and photo processing technology, even dedicated amateur photographers can shoot scenes that transcend reality. High Dynamic Range photography is one such technique which exploded in popularity over the course of the past several years largely due to the incredible range of tonal detail that result from combining exposures. If you’re putting time and effort into Continue Reading

The post Essential Printing Tips & Best Printers for HDR Photography appeared first on Photodoto.


Photodoto

 
Comments Off on Essential Printing Tips & Best Printers for HDR Photography

Posted in Photography


Panasonic Lumix GH4 firmware 2.5 brings Post Focus and 4K Photo Mode

16 Mar

Panasonic has announced a firmware update for the Lumix DMC-GH4, bringing Post Focus, 4K Photo Mode and burst shooting with flash to the video-centric mirrorless camera. The update will be available at the end of March, free of charge. 

Post Focus was first announced in July of last year. It captures a short clip of 4K footage while racking focus from one end to the other, allowing the user to select a frame in playback mode after capture with the desired focus point. The Lumix GX8, G7 and FZ300 were the first in line to get the feature via firmware update.

Also taking advantage of the GH4’s video capabilities is the newly added 4K Photo feature, which enables 4K burst, 4K Burst (Start/Stop) and 4K pre-burst. These modes optimize 4K shooting for still photo extraction, and aim to help photographers catch hard-to-get moments, like the elusive group shot with all eyes open. Firmware 2.5 also enables consecutive shooting with compatible Panasonic external flash units.

In the past, Panasonic has used Photokina to launch its DSLR-style mirrorless cameras, so it would make sense if we see an update to the GH-series come September. However, a significant firmware update in the meantime indicates that it’s still alive and kicking.

Check Panasonic’s support website at the end of March to download the update.


Press release:

DMC-GH4 Firmware Update Version 2.5

Newark, NJ (March 16, 2016) – Panasonic has today announced the new firmware update Version 2.5 for the DMC-GH4 to further enhance its performance at no charge. The new firmware Version 2.5 includes following functional updates:

-Post Focus
Post Focus is a special function that enables users to select an in-focus point after shooting. It has already been integrated in new LUMIX cameras such as the GX8. With this function, users can enjoy changing the perspective for greater photographic expression or to choose the best in-focus shot for macro shooting.

-4K PHOTO (4K Burst / 4K Burst (Start/Stop) / 4K Pre-burst)
With 4K PHOTO mode there are three dedicated modes – 4K Burst / 4K Burst (Start/Stop) / 4K Pre-burst – are all now available on LUMIX GH4*. The addition of these modes further enhances the usability of 4K PHOTO to capture fleeting photo opportunities at 30p. 

-External Flash Burst
Consecutive shooting with flash burst is available with an external flash that is capable of continuous emission.  This includes the following Panasonic models: DMW-FL580L, DMW-FL360L, DMW-FL500, DMW-FL360 and DMW-FL220.

The new DMC-GH4 firmware Version 2.5 is scheduled to be released at the end of March 2016 at the LUMIX Customer Support website: http://panasonic.jp/support/global/cs/dsc/

Articles: Digital Photography Review (dpreview.com)

 
Comments Off on Panasonic Lumix GH4 firmware 2.5 brings Post Focus and 4K Photo Mode

Posted in Uncategorized


Field Test: Canon PowerShot G5 X on the Olympic Peninsula

16 Mar

The Olympic Peninsula is a year-round destination, as its lakes, rivers and temperate rain forests attract hikers and wildlife enthusiasts even in the winter months. It’s just the kind of place you’d expect to find someone like Kyle Johnson, a freelance photographer and avid fly fisherman. Hoping to give the local Steelhead population a run for its money and to try out the Canon PowerShot G5 X in the wild, DPR staffer Carey Rose joined Kyle at Lake Quinalt for our latest field test. 


This is sponsored content, created with the support of Canon. What does this mean?

Articles: Digital Photography Review (dpreview.com)

 
Comments Off on Field Test: Canon PowerShot G5 X on the Olympic Peninsula

Posted in Uncategorized


Hasselblad drops 15% on lens prices until the end of March

16 Mar

Swedish medium-format camera manufacturer Hasselblad has announced it is dropping the price of all its H series lenses until the 31st March. The discount applies to all HC and HCD lenses, and gives buyers 15% off the usual prices.

The HC and HCD ranges include fixed and zoom lenses designed to be used on the Hasselblad H cameras, including the current H5D 50c Wi-Fi but also going back to the H1 film body. The savings mean the 35-90mm F4-5.6 HCD Aspherical zoom, which is the most expensive of the range will cost $ 6936 instead of $ 8160 – a discount of $ 1224 – while the standard 80mm F2.8 HC lens drops by $ 445.50, from $ 2970 to $ 2524.50.

It is hard to tell whether the offer really will finish at the end of the month as Hasselblad has a habit of announcing short-term discounts that then become the standard price. The new CEO Perry Oosting said recently that price is definitely an issue for the company and that introducing lower costs to ownership, such as the Christmas discount on the H5D 50c Wi-Fi, brings new customers to the brand.

For more information about the company’s lenses and to find a retailer visit the Hasselblad website.

Articles: Digital Photography Review (dpreview.com)

 
Comments Off on Hasselblad drops 15% on lens prices until the end of March

Posted in Uncategorized


Ribbon of Light: Replacing LA’s Most Iconic Historical Bridge

16 Mar

[ By WebUrbanist in Architecture & Cities & Urbanism. ]

bridge from above

Quite possibly the most filmed and photographed bridge in the world, the Sixth Street Viaduct, spanning the Los Angeles River, is a challenging icon to replace, but the Ribbon of Light aims to try.

sixth street viaduct original

The famous Art-Deco viaduct in question, built in 1932, has been featured in dozens of films, television shows, music videos and video games, including Grease, Gone in 60 Seconds, Terminators 2 and 3, Madonna’s ‘Borderline’ video and episodes of Lost and 24.

Some sequences show most recognizable part (directly over the LA river) being driven across, but many are shot from the river below. Unfortunately for fans, its was deemed seismically unstable thanks to compromised concrete supports, despite its historic landmark status with the city.

sixth street viaduct replacement

Architect Michael Maltzan, responsible for its replacement, has made his design an epic ode to its iconic curves, reprising and repeating them across a much longer portion of the new structure.

bridge at night

The new structure features arched trusses to be illuminated at night, suspended over a series of parks and paths being developed below and alongside it. A series of staircases and ramps will allow pedestrians and bikers to move up, down and across it as well.

new viaduct and park

The architects are clearly cognizant of the landmark they are replacing, and, in a way, are preserving its visibility through these repetitive forms, which actually extend much further out on either side than the original arches.

under bridge park

From the architects: “The project foresees a multi-modal future for the city, one that accommodates cars, incorporates significant new bicycle connections, and also increases connectivity for pedestrians to access the viaduct, not only at its endpoints, but along the entirety of the viaduct, linking the bridge, the Los Angeles River, and future urban landscapes in a more meaningful relationship.”

la river ribbon bridge

“These pairs of repeated concrete arches and cable-supported roadway deck are simultaneously elegant and efficient. The design approach unifies and optimizes the architecture of the viaduct through repetition, creating a unique configuration through the repeated use of arches, roadway and pier forms: an iconic structure.”

Share on Facebook


[ By WebUrbanist in Architecture & Cities & Urbanism. ]

[ WebUrbanist | Archives | Galleries | Privacy | TOS ]


WebUrbanist

 
Comments Off on Ribbon of Light: Replacing LA’s Most Iconic Historical Bridge

Posted in Creativity


Exposure: Get it Right in Camera or Fix it Later?

16 Mar

Recently, I received a very interesting question from a dPS reader about exposure. The question was, “How much does it matter about getting the exposure right when the photo is taken, as opposed to fixing it later in Lightroom?” It is a really interesting question, and it became even more interesting to me the more I thought about it.

Toledo-Overlook

Options for achieving the best exposure

Let’s start off by looking at the possibilities here. There a few different ways you can approach this, and they each have their advantages:

#1 Get it right in camera:

The first way is to make absolutely sure you get it right in camera, without resorting to post-processing software, unless you absolutely have to. Historically, this is the way it was done, largely because changing exposure levels was much more difficult than it is today with digital photography. Any professional photographer worth their weight in salt, would tell you to get it right in camera.

Even today, however, there is still a lot to recommend this strategy. If you don’t use post-processing software, then obviously this is the only answer for you. Further, if you are someone that takes a lot of pictures, and do not want to spend all your time editing them, then this approach still has merit as well. There is just something that feels right about getting it correct in camera. It also avoids surprises later.

#2 Rely on Lightroom:

At the opposite end of the spectrum, is the idea that you should not worry about exposure so much while shooting, and instead get it right in Lightroom. When I say “not worry about it so much,” of course I do not mean you should just haphazardly twist dials to any exposure setting and blast away. Obviously, you need to get the exposure somewhat close to what you want. In addition, you cannot let your highlights get blown out, or your shadows turn pure black. But programs like Lightroom and Photoshop give you a lot of flexibility to deal with exposure settings later. As long as you get it close when you are shooting, you can take your time in front of a computer and get it exactly right.

#3 Do both:

Then, of course, there is a median way.  You can try very hard to get the exposure exactly right in camera, and then tweak it later in Lightroom, when you are in front of your computer. In this approach, basically you are just always trying to get it right. You are taking advantage of all your tools. You may get it right in camera, which avoids time in front of the computer later, and avoids any surprises. If not, you can take your time and tweak it later.

LR-controls-Graphic

To me, as I thought about it, the median way seemed like the right answer, I expect it did to you too. Except the more I thought about it, the more I realized I don’t really do that.

My approach to exposure

Instead, I tend more toward the “don’t worry about exposure so much” end of the spectrum. I tend to just get it close, knowing that I am going to fix it later in Lightroom. Am I just being lazy in the field? Maybe, but I don’t think so.

It is just that when I am out shooting, I am usually trying to focus all my attention on composition. I think that is ultimately what matters in creating great photos. For me at least, that topic requires virtually all my mental energy. You have everything from your choice of subject, to how you will be placing things within the frame, to the perspective you want to use, to making everything balance, etc. That’s not to mention shape, leading lines, and other compositional elements. There is just so much to think about. Therefore, the more I can eliminate distractions from anything but composition, the better. I try to keep exposure from intruding on that process too much when I am out shooting.

Further, this approach toward exposure just lends itself to my way of shooting. I’m not someone that sets up on a tripod and stays in one place for a long time. It seems like I’m always on the move, chasing the next shot. My time spent on each shot is pretty limited. Further, while I take a lot of pictures, I edit very few of them, so I don’t mind spending whatever time is necessary, tweaking exposures in Lightroom. I often bracket my pictures as well, which gives me a little leeway for my exposure settings, and means I won’t have an unpleasant surprise later.

Sometimes you are set up on a tripod facing a static scene with unchanging light - which means you can spend all the time you want making sure you have the exposure the way you want it.

Sometimes you are set up on a tripod facing a static scene with unchanging light – which means you can spend all the time you want making sure you have the exposure the way you want it.

Anyway, thinking about how my approach toward photography as a whole affected how I approach exposure, made me realize that your particular method or style of photography probably has a lot to do with your approach to exposure.

Which should you do?

So, how should you approach exposure – by getting it right in camera, or relying more on Lightroom? There is no right answer here, as far as I can tell. As mentioned above, I believe it depends a lot on how you approach photography.

For example, a street shooter who is always on the move, trying to capture fleeting emotions, might not have time to devote toward getting the exposure exactly right. On the other hand, someone who spends a lot of time in one place may have the time. There are a lot of other factors as well.

. . . and other times you have only a second to get a shot before conditions change or your subject walks away - in which case you might spend very little time thinking about exposure and just tweak it in Lightroom.

Other times you have only a second to get a shot before conditions change or your subject walks away – in which case you might spend very little time thinking about exposure and can tweak it in Lightroom later.

Therefore, I’ve started a little list of factors that would tend to put you in one camp or the other. Check it out and see which apply to you:

Factors that lean toward getting it right in camera:

  • You often stay in one place, and have sufficient time in the field to tweak exposure settings.
  • Your subject is fairly static.
  • You do not have post-processing software or just do not like to use it.
  • You shoot in high volume and the time needed to tweak exposure settings would be too much.

Factors that lean toward increased reliance on Lightroom

  • You are a consistent user of post-processing software to enhance your pictures.
  • You bracket your pictures.
  • Your subject is moving or the moment fleeting.
  • You do not edit large volumes of pictures.

Did I miss some factors? Do you have a different take? If so, let me know in the comments below, and tell me – which camp are you in?

googletag.cmd.push(function() {
tablet_slots.push( googletag.defineSlot( “/1005424/_dPSv4_tab-all-article-bottom_(300×250)”, [300, 250], “pb-ad-78623” ).addService( googletag.pubads() ) ); } );

googletag.cmd.push(function() {
mobile_slots.push( googletag.defineSlot( “/1005424/_dPSv4_mob-all-article-bottom_(300×250)”, [300, 250], “pb-ad-78158” ).addService( googletag.pubads() ) ); } );

The post Exposure: Get it Right in Camera or Fix it Later? by Jim Hamel appeared first on Digital Photography School.


Digital Photography School

 
Comments Off on Exposure: Get it Right in Camera or Fix it Later?

Posted in Photography