RSS
 

Archive for March, 2016

REVL seeks funding for Arc 4K action camera with integrated gimbal

18 Mar

REVL, a San Francisco-based startup, has launched a crowdfunding campaign to produce REVL Arc, a 4K action camera with an integrated motorized gimbal. Arc, currently in prototype form, uses four sensors that track altitude and motion, as well as electronic image stabilization to provide smooth footage that automatically keeps level to the horizon, even when the camera operator isn’t. The sensor data is used with a mobile app to auto-edit footage for expedited sharing.

REVL Arc provides three video recording options: 4K at 30 fps, 1080p at 120/60/30 fps and 720p at 240/120/60 fps. The camera can take still images, as well, at a 12MP resolution with four burst mode options: 30 fps for 1 second, 10 fps for 3 seconds, 5 fps for 6 seconds, and 3 fps for 10 seconds. Live video previews are available in the REVL App and via Apple Watch.

Content is saved to an SD card (up to 128GB), while connectivity is available over Bluetooth 4.0 and 802.11n Wi-Fi. The integrated 1100mAh Li-ion battery offers up to 90 minutes of recording in 4K resolution with Wi-Fi disabled. Arc supports third-party devices, as well, including Bluetooth microphones, heart rate monitors and GPS units.

Backers can reserve a final production unit through Indiegogo for a pledge of $ 349. The company’s website says it plans to start shipping the camera this upcoming December, though the crowdfunding campaign lists an estimated worldwide delivery date of March 2017.

Articles: Digital Photography Review (dpreview.com)

 
Comments Off on REVL seeks funding for Arc 4K action camera with integrated gimbal

Posted in Uncategorized


Instagram is changing its feed to use algorithm

18 Mar

Instagram has confirmed in a blog post that it will change the way the photos and videos of your friends are displayed in its stream. Chronological sorting will be scrapped in favor of a new algorithm that sorts images based on ‘the likelihood that you’ll be interested in the content, your relationship with the person posting and the timeliness of the post.’ Read more

Articles: Digital Photography Review (dpreview.com)

 
Comments Off on Instagram is changing its feed to use algorithm

Posted in Uncategorized


Adobe Camera Raw 9.5 introduces new color scheme

18 Mar

Camera Raw gets a new look with version 9.5, available now. The update introduces a color scheme that brings Adobe’s Raw conversion software in line with Photoshop and Bridge. ACR 9.5 also extends support to a dozen new cameras, including the Nikon D5/D500 and Canon EOS 80D, fixes a handful of bugs and adds support for new lenses like the Sony FE 85mm F1.4 and 24-70mm F2.8 GM. Get the full details at Adobe’s Lightroom blog.


Bugs Fixed in Camera Raw 9.5

  • Fix crash/hang in Camera Raw and DNG Converter on some Mac systems when saving multiple images.
  • Fix corruption issue that would prevent DNG images originally created by Parrot Bebop Drone devices from being opened after metadata updates.
  • Pressing the Option/Alt key while click-dragging on a perimeter handle of a Radial Filter will adjust only that side of the filter. This change in behavior was made to match Lightroom’s behavior. Previously, Option/Alt-clicking on a Radial Filter in Camera Raw would delete that filter.
  • Camera Raw Filter now displays the histogram and RGB color readouts using the assigned color space of the corresponding Photoshop document. Previously, Camera Raw Filter always displayed its histogram and RGB color readouts using the ProPhoto color space.
  • Improve quality of Boundary Warp for some panoramas.
  • Fix bug where EXIF metadata for SIGMA 50mm f/1.4 ART lens on Canon was incorrectly identified as Zeiss Milvus 50mm f/1.4.

New Camera Support in Camera Raw 9.5

  • Canon EOS-1D X Mark II
  • Canon EOS 80D
  • Canon EOS 1300D (Rebel T6, Kiss X80)
  • Nikon D5
  • Nikon D500
  • Olympus PEN-F
  • Olympus SH-3
  • Panasonic DMC-CM10
  • Panasonic DMC-GF8
  • Panasonic DMC-ZS100 (DMC-ZS110, DMC-TZ100, DMC-TZ101, DMC-TZ110, DMC-TX1)
  • Samsung NX3300
  • Sony Alpha a6300 (ILCE-6300)
  • Yuneec CGO4

Articles: Digital Photography Review (dpreview.com)

 
Comments Off on Adobe Camera Raw 9.5 introduces new color scheme

Posted in Uncategorized


Stacking Light Trails for Night Photography Special Effects

18 Mar

In Melbourne there is an intersection that’s iconic for taking light trails phtos. It is the corner of Flinders Street and Swanston Street, in front of Flinders Street Station.

15-Leanne-Cole-Light-Trails

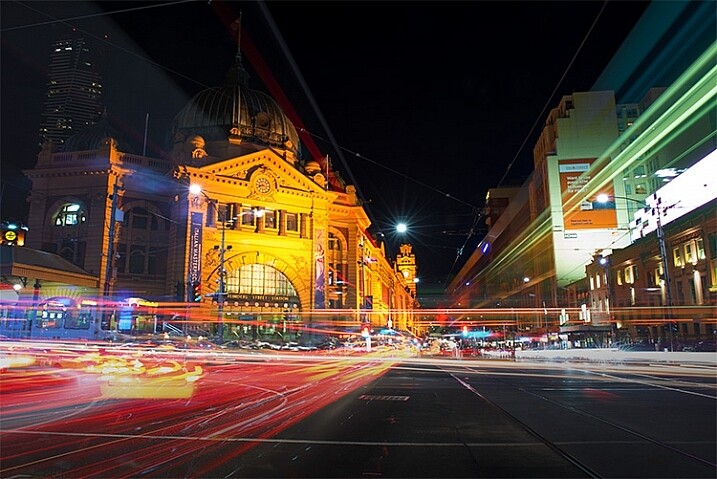
Light Trails in front of Flinders Street Station. There are 23 images in this stacked light trail.

It isn’t a hard image to take, you just need a camera and a tripod. To get a really good photo, you want to pick a time when there is going to be a lot of traffic. You want the traffic to be moving, as cars caught in a traffic jam will not give you the light trails you’re after. The cars need to be moving constantly, and not standing still for too long.

Pick a place that you think will give you the best advantage. Set the camera up on the tripod, and try to take as long of an exposure as you can. To get the trails, you need to have exposures for several seconds, up to 30. You could do them for longer, but you would need other equipment (like a neutral density filter to cut the light). Most of the images shot for this article had an exposure of around eight to 10 seconds.

Sounds fairly easy, but there are many things that can make it hard. The time of year can inhibit you, as daylight savings will affect when the best time for traffic is, and how busy the roads are. If you go to a place on the weekend, you might find there aren’t as many cars as there would be during the week.

To get the light trails in front of Flinders Street Station, you need to be there at dusk, or after the sun has gone down. In summer that means not many cars or trams. However, there are ways to get around that.

Stacking Light Trails

One of the best ways to get light trails, is to stack many images together.

From the intersection that was mentioned previously, the corner in front of St Paul’s Cathedral is the most popular. There are other places, but that seems to be the one that most use. You will have to work out a great place to photograph them where you live.

14-Leanne-Cole-Light-Trails

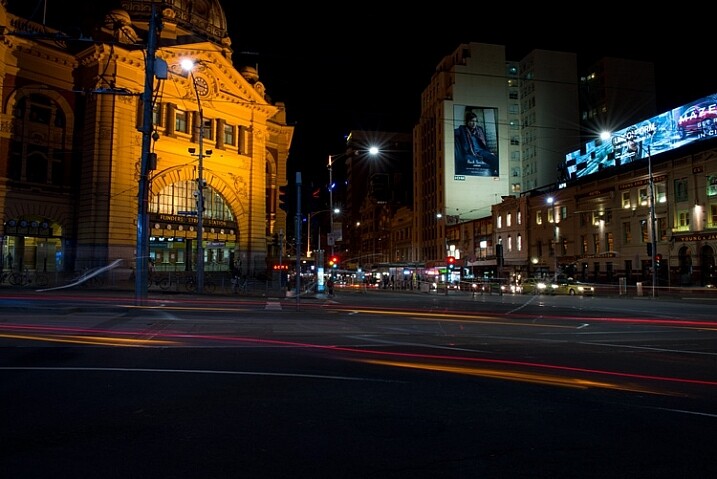
A single image, and as you can see there aren’t that many light trails.

Set your camera up on the tripod, this is necessary so you will get identical photos. Set the aperture to what you want. The ISO can be low, on 100 or 200, so you can get longer exposures. If you want longer, remember you can put your aperture to the smallest possible, like f/22.

Once you have a shutter speed that is several seconds, it is time to start taking your photos. Take one photo, then repeat until you have at least 10. You can do this with as many images as you like, however, Adobe Photoshop might not like you using too many. I’ve done it with four images, and as many as 23.

When you get home

Put all your photos onto your computer. You can use Lightroom to do this, but to do the actual stacking you will need Adobe Photoshop or any program that allows you to use layers.

Once you have all the images ready to use, select all the ones you want. If you are using Lightroom to begin with, go to: Photo > Edit in > Open as Layers in Photoshop. In Photoshop open Bridge and select the images you want to use.  Go up to Tools > Photoshop > Load files into Photoshop Layers.

01-Leanne-Cole-Light-Trails

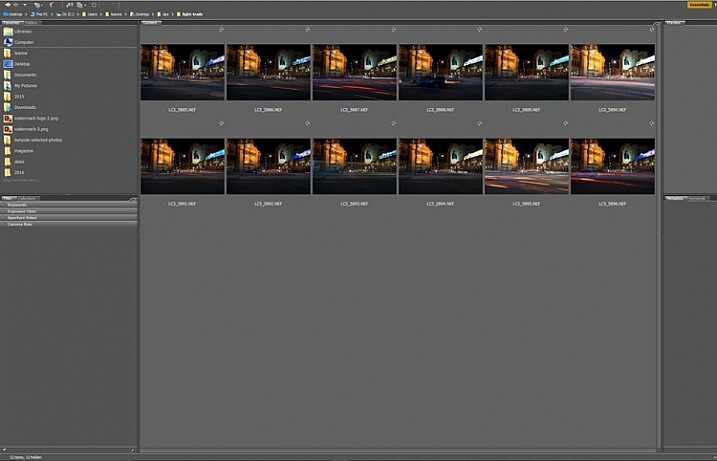
Select all the images you want to use for the light trails.

It can take some time for the layers to all open, especially if you are using raw files, and there are a lot of them.

02-Leanne-Cole-Light-Trails

All the layers are opened in Photoshop.

The magic happens

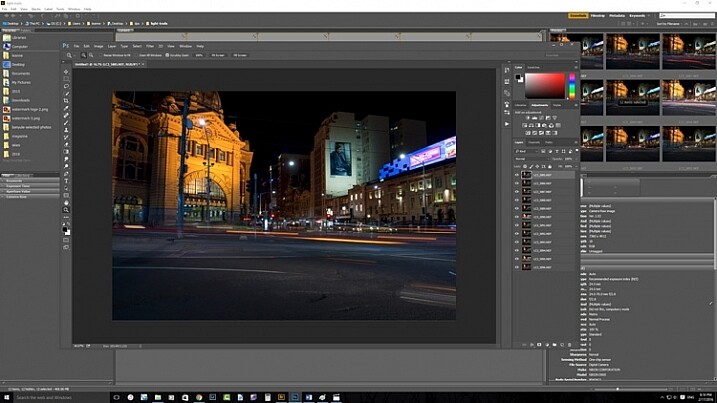
Once the layers are all loaded, you need to select them all. You can do this by selecting the bottom layer, then pressing the shift key and clicking on the top layer. This will select them all.

03-Leanne-Cole-Light-Trails

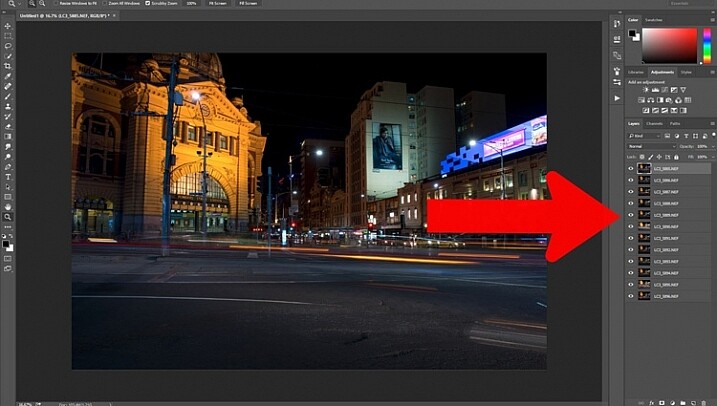
Select all the layers so they can be used.

Once selected, go to the Blending Mode Options in the Layers panel. The default setting is Normal. Click on it for the drop down menu, select Lighten, and click.

05-Leanne-Cole-Light-Trails

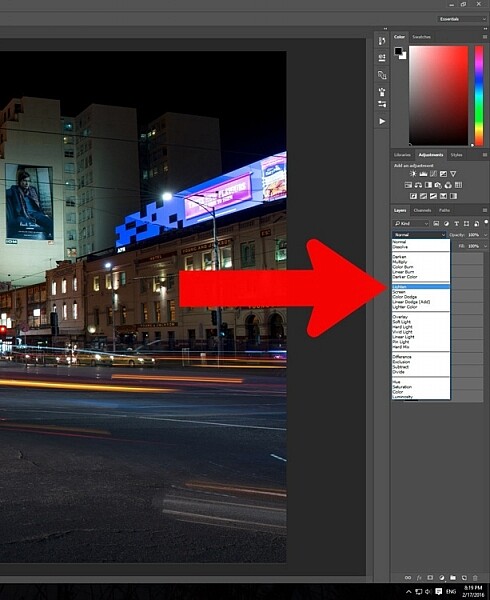
Select the lighten blend option.

You should notice that the image now has far more light trails. All the trails, from all of the images have come through now.

06-Leanne-Cole-Light-Trails

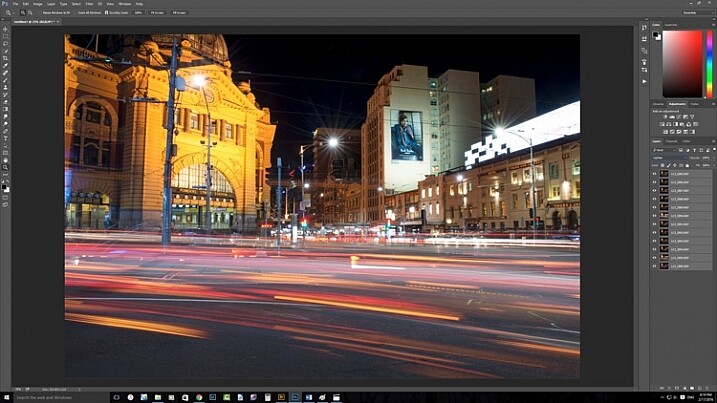
Lots more light trails apply.

You now have a stacked light trail image.

Getting rid of unwanted lights

Sometimes when you do this, it can change a lot more than just the light trails, it may lighten other buildings too much as well. You can correct this.

Select all the layers, except the bottom one, and put them into a group. You can do this by dragging them down to the group icon at the bottom of the panel, or right click on the select layers, and when the menu pops up click on Group from Layers.

07-Leanne-Cole-Light-Trails

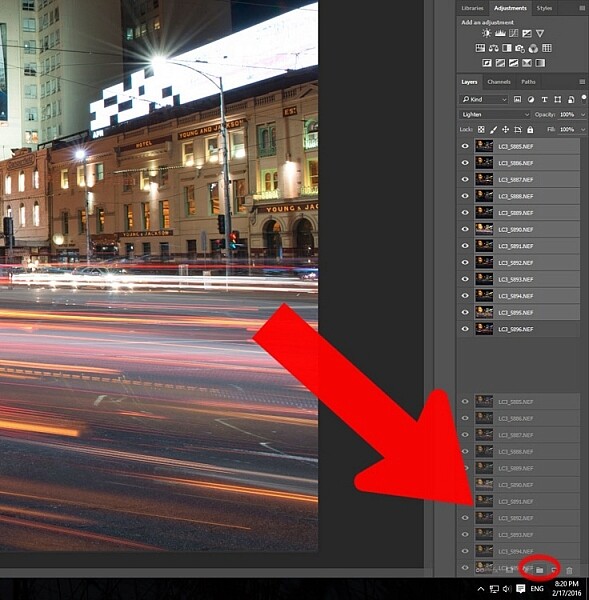
Put all the layers, except for the first one, into a group.

Add a mask to the group from the bottom of the Layers panel. Select the brush from the tools on the left, or press Ctrl b (just B on Mac). Make sure foreground colour is set to black. Making sure the mask is selected, paint over the areas where there is too much light to mask those areas.

08-Leanne-Cole-Light-Trails

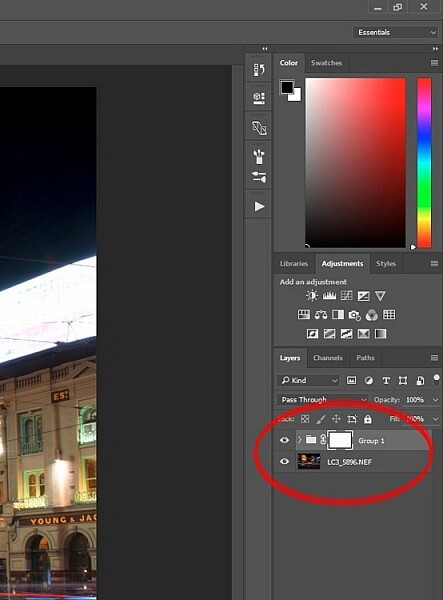
Once the mask is added you can use the brush to remove the unwanted lights.

10-Leanne-Cole-Light-Trails

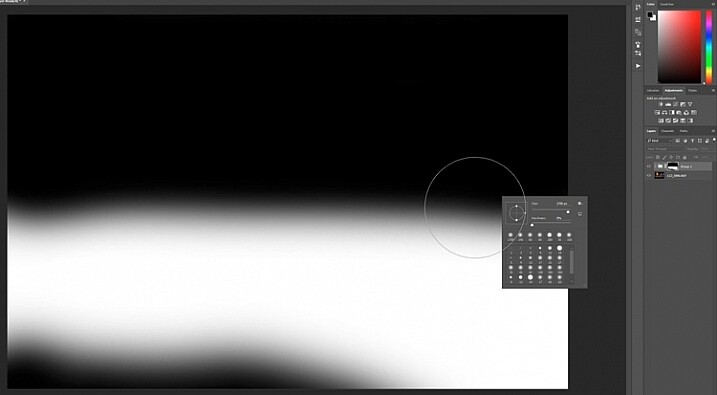
If you alt click on the mask you can see what you have done. The black is where you have removed the unwanted lights.

Finishing the image

The image is now completed, unless you want to do more to it. But, as far as the light trails go, you really don’t need to do any more.
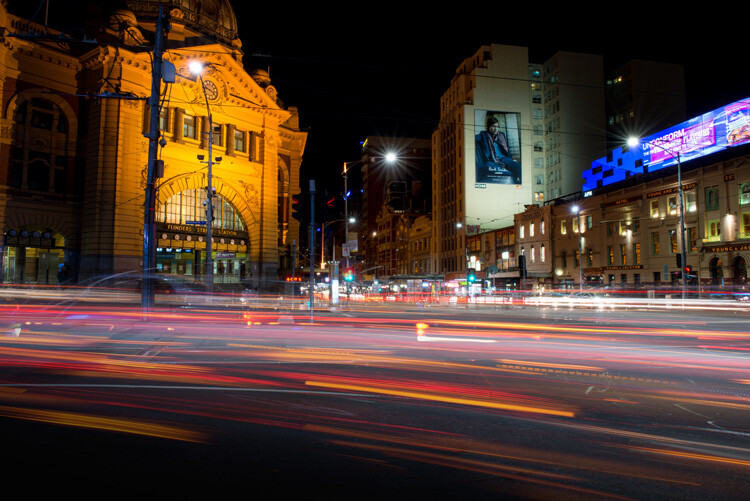
11-Leanne-Cole-Light-Trails

The final image.

This is a great technique which can be applied to many areas. You could use it for ships on the water, or trains going in and out of the city. It can also be used on waterfalls to make them seem fuller. Why don’t you try and see how else you can use this technique.

Here are some other images to give an idea of how to use this technique.

12-Leanne-Cole-Light-Trails

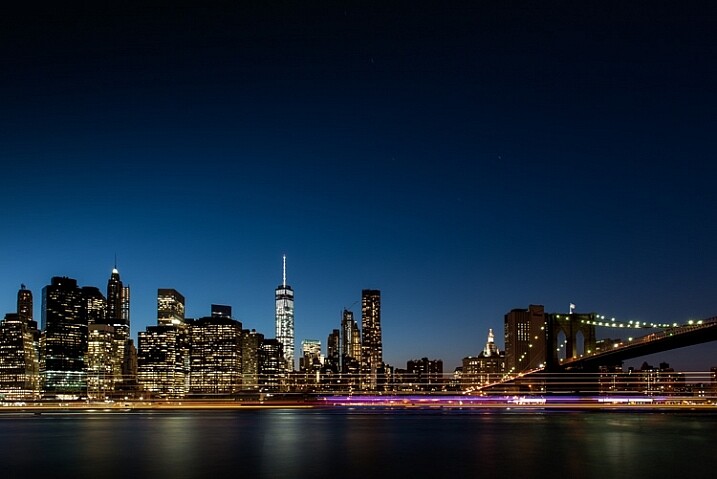
Boats on the water in the foreground of the Manhattan skyline. Four images.

13-Leanne-Cole-Light-Trails

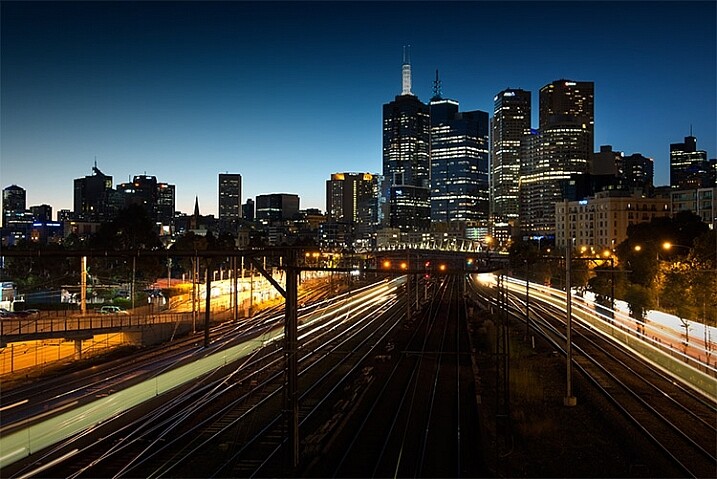
Trains coming into and out of the city. Three images.

This article is part of a series that we will be featuring this week on dPS all about special effects. Check out the others that have already been published here, and look for another new one every day:

  • How to Photograph the Full Band of the Milky Way
  • Fire Spinning with Steel Wool – A Special Effects Tutorial
  • Special Effect – How to Create Multiple Flash Exposures in a Single Frame

googletag.cmd.push(function() {
tablet_slots.push( googletag.defineSlot( “/1005424/_dPSv4_tab-all-article-bottom_(300×250)”, [300, 250], “pb-ad-78623” ).addService( googletag.pubads() ) ); } );

googletag.cmd.push(function() {
mobile_slots.push( googletag.defineSlot( “/1005424/_dPSv4_mob-all-article-bottom_(300×250)”, [300, 250], “pb-ad-78158” ).addService( googletag.pubads() ) ); } );

The post Stacking Light Trails for Night Photography Special Effects by Leanne Cole appeared first on Digital Photography School.


Digital Photography School

 
Comments Off on Stacking Light Trails for Night Photography Special Effects

Posted in Photography


Fractal Architecture: 14 Intricate Ceilings of Historical Iran

18 Mar

[ By WebUrbanist in Architecture & Public & Institutional. ]

inlaid iranian ancient architecture

Sharing his findings via Instagram, an architectural photographer in Iran has begun documenting schools, mosques and cultural centers around the country, with a focus on their most mesmerizing feature: the ceilings.

mosque intricate mosaic tile

mosque ceilings iran

mosque tile roof ceiling

mosque in qom

Mehrdad takes viewers on tours of significant cultural complexes, some of which have been standing for close to 1,000 years as part of one of the world’s oldest civilizations.

ceiling painted

star ceiling pattern iran

complex pattern school iran

more architecture iran

Modestly-decorated and architecturally-muted facades often give way to incredible complex mural works, colorfully-patterned reliefs and mosaics that must be meticulously maintained.

architecture complex paterns

architecture iran

mosque architecture stuff

mosque detail architecture

final mosque pic

Buildings pictured here include the Hazrat-Masoumeh mosque in Qom, the Chaharbagh School in Isfahan and the Shah-e-Cheragh mosque in Shiraz.

Share on Facebook


[ By WebUrbanist in Architecture & Public & Institutional. ]

[ WebUrbanist | Archives | Galleries | Privacy | TOS ]


WebUrbanist

 
Comments Off on Fractal Architecture: 14 Intricate Ceilings of Historical Iran

Posted in Creativity


Upwardly mobile: Sony a6300 First Impressions Review

17 Mar

The Sony a6300 is the company’s latest mid-range mirrorless camera. Like the a6000 it still offers 24MP resolution but the autofocus ability, video capability, build quality, viewfinder resolution and price have all been increased.

The most exciting change from our perspective is the a6300’s new sensor. Although the pixel count remains the same, the a6300’s sensor has a whopping 425 phase-detection AF points ranged across the sensor. The a6000 already offered one of the best AF systems in its class, when it comes to identifying and tracking subjects, so an upgrade in this area sounds extremely promising. The sensor is also built using newer fabrication processes that use copper wiring to help improve the sensor’s performance and possibly contributing to the camera’s slightly enhanced battery life.

The a6000 has been a huge success and has dominated its field to the extent that its combination of capability and price still looks impressive even as it enters the twilight of its career (Sony says it will live on, alongside the a6300*). That model represented a dip down-market for the series, with a drop in build-quality and spec relative to the NEX-6 that preceded it. The a6300 corrects that course, and sees the model regain the high-resolution viewfinder and magnesium alloy build offered by the older NEX-6.

Key features:

  • 24MP Exmor CMOS sensor
  • 425 phase detection points to give ‘4D Focus’ Hybrid AF
  • 4K (UHD) video – 25/24p from full width, 30p from smaller crop
  • 2.36m dot OLED finder with 120fps mode
  • Dust and moisture resisitant magnesium alloy body
  • Built-in Wi-Fi with NFC connection option
  • Built-in microphone socket

As with the previous 6-series E-mount cameras, the a6300 features a flip up/down 16:9 ratio screen. The shape of this screen hints at the 6300’s intended uses: video shooting as well as stills. The a6300’s movie features have been considerably uprated. It not only shoots 4K (UHD) at 24p or 25p from its full sensor width (or 30p from a tighter crop). It also gains a mic socket, the video-focused Picture Profile system (which includes the flat S-Log2 and S-Log3 gamma curves), and the ability to record time code.

This added emphasis on video makes absolute sense, since the camera’s stills performance is likely to be competitive with the best on the market but its video capabilities trounce most of its current rivals. The a6300 not only includes focus peaking and zebra stripes but, if its on-sensor phase detection works well, the ability to re-focus as you shoot with minimal risk of focus wobble and hunting, should make it easier to shoot great-looking footage.

All this makes it hard to overstate how promising the a6300 looks. A latest-generation sensor can only mean good things for the camera’s image quality and an autofocus system that moves beyond the performance of one of our benchmark cameras is an enticing prospect. Add to that excellent, well-supported video specifications, a better viewfinder and weather-sealed build, and it’s tempting to start planning for the camera’s coronation as King of the APS-C ILCs. Perhaps with only the price tag floating over proceedings, threatening just a little rain on that particular parade.

Specifications compared:

As well as comparing the a6300 with the a6000 as its predecessor/sister model, we’ll also look at what you get if you save up a bit more money and opt for full frame, rather than APS-C. We think at least some enthusiast users will find themselves making this decision, so are highlighting the differences.

  Sony a6000 Sony a6300 Sony a7 II
MSRP (Body Only) $ 650 $ 1000 $ 1700
Sensor size APS-C (23.5 x 15.6mm) APS-C (23.5 x 15.6mm) Full Frame (35.8 x 23.9 mm)
Pixel count 24MP 24MP 24MP
AF system Hybrid AF
(with 179 PDAF points)
Hybrid AF
(with 425 PDAF points)
Hybrid AF
(with 117 PDAF points)
Continuous shooting rate 11.0 fps 11.0 fps 5.0 fps
Screen 3″ tilting 921k dot LCD 3″ tilting 921k dot LCD 3″ tilting 1.23m dot LCD
Viewfinder OLED 1.44m dots OLED 2.36m dots 120fps refresh option OLED 2.36m dots
Movie Resolution 1920 x 1080 / 60p 4K 3840 x 2160 / 30p, 1920 x 1080 / 120p, 60p 1920 x 1080 / 60p
Image stabilization In-lens only In-lens only In-body 5-axis
Number of dials Two Two Three (plus Exp Comp.)
Maximum shutter speed 1/4000sec 1/4000sec 1/8000sec
Built-in flash  Yes Yes No
Hot shoe Yes Yes Yes
Flash sync speed 1/160sec 1/160sec 1/250sec
Battery life
(with EVF)
360 shots
(310 shots)
400 shots
(350 shots)
350 shots
(270 shots)
Weight (w/battery) 344 g (12.1 oz) 404 g (14.3 oz) 599 g (21.1 oz)
Dimensions 120 x 67 x 45 mm (4.7 x 2.6 x 1.8″) 120 x 67 x 49 mm (4.7 x 2.6 x 1.9″) 127 x 96 x 60 mm (5 x 3.8 x 2.4″)

A hit-for-six, slam-dunk, home-run?

If it’s successful in its attempts to step up from the performance of the a6000 then the a6300 could be sensational. However, there are three questions that we’d like to see addressed. The first relates to handling: why does a camera costing this much only have one dial that you can access without changing the position of your grip? The rear dial isn’t the worst we’ve encountered, but at this price point, we’d usually expect to find a dial under the forefinger and another under the thumb while maintaining a shooting grip.

The second relates to lenses. Sony is bundling the a6300 with the 16-50mm power zoom that’s far more notable for its convenience than its optical consistency, a move that’s likely to raise the question of what other lenses to fit. Sony offers a handful of reasonably-priced APS-C specific prime lenses as well as some more expensive FE-compatible full frame primes. However, in terms of standard zooms, you’re currently limited to the inexpensive 16-50mm or the considerably better 16-70mm F4 Zeiss that costs around the same amount as the camera again. The success of Sony’s full frame a7 cameras is only likely to improve third-party lens availability but there’s a risk that Sony’s focus will be on those full frame users for the foreseeable future.

Our final concern is the lack of joystick or touchscreen to reposition the AF point. This may be mitigated during stills shooting if the lock-on AF system works well enough (starting AF tracking and then recompose your shot in the knowledge that the AF point will stay where you want it), but it appears to be a real omission for refocusing while shooting video. We’ll see how significant all these concerns turn out to be, as the review unfolds.

Price and kit options

 The 16-50mm power zoom is far more notable for its convenience than its optical consistency.

The a6300 will sell for around $ 1000/£1000/€1,250, with a 16-50mm F3.5-5.6 power zoom kit commanding an MSRP of $ 1,150/£1,100/€1,400. This is a significant step up from the a6000’s $ 650/$ 800 launch price and even an increase compared to the similarly well-built NEX-6’s $ 750/$ 900 MSRP.

 Review History
17 March 2016 Intro, Specs, Body and Handling, Operations and Control and Studio Comparison published

*Unusually, the manufacturer’s claim that it’ll live on, alongside its apparent replacement model seems plausible. The differences in spec and price could allow them to sit fairly comfortably alongside one another, rather than the claim simply meaning ‘we’ll keep saying it’s a current model until most of the unsold stock has gone, to avoid angering retailers.’


If you're new to digital photography you may wish to read the Digital Photography Glossary before diving into this article (it may help you understand some of the terms used).

Conclusion / Recommendation / Ratings are based on the opinion of the reviewer, you should read the ENTIRE review before coming to your own conclusions.

We recommend to make the most of this review you should be able to see the difference (at least) between X, Y, and Z and ideally A, B, and C.

This article is Copyright 1998 – 2016 and may NOT in part or in whole be reproduced in any electronic or printed medium without prior permission from the author.

Articles: Digital Photography Review (dpreview.com)

 
Comments Off on Upwardly mobile: Sony a6300 First Impressions Review

Posted in Uncategorized


Phase One introduces second XF feature update and pair of Schneider Kreuznach lenses

17 Mar

The Phase One XF camera system received a significant update today, with improvements to its autofocus system and user interface along with additional shooting tools such as focus stacking and HDR. Two new ‘Blue Ring’ lenses have also been added, along with an update to the company’s Capture One software.

The update provides Phase One’s medium-format XF system with tools to help automate focus stacking and time-lapse capture, as well as a self timer and automated HDR bracketing. The system’s HoneyBee Autofocus Platform also gets an update, claiming increased accuracy in low light, better acquisition in low contrast scenes and ‘improved hand held success.’

In terms of hardware, the Schneider Kreuznach 110mm LS F2.8 and 240mm LS F4.5 join the system, manufactured ‘to Phase One’s highest standards’ with metal lens hoods and milled aluminum AF/MF selector rings.

Capture One Pro 9.1 gets an update geared mostly toward fashion and still life work, with new workflow and image editing tools, including tools to correct uneven skin tone.

The XF system firmware update is free and available now from Phase One. The Schneider Kreuznach 110mm LS F2.8 will cost $ 5390/£4490; the 240mm LS F4.5 will cost $ 6490/£5690.


Press release:

Phase One Releases XF Camera System Feature Update #2 

Adding New XF Tools, Lenses & Software

COPENHAGEN, March. 17, 2016 – Phase One, the world’s leading medium format camera system provider, today released a major XF Camera System update.  With new tools, hardware, and software solutions Phase One continues to help top photographers create incredible images. The Ultimate Camera System continues to improve.

Feature Update #2 includes the addition of two new ‘Blue Ring’ lenses, along with the release of Capture One Pro 9.1, an update to the software used by 8 out 10 of the world’s best photographers (see today’s related software announcement).

The Phase One XF Camera System stands out against all other camera systems in terms of its performance and philosophy. The XF Camera System offers unprecedented long-term value thanks to its emphasis on modular firmware implementation and integrated, modular hardware designs, all of which permit continual feature enhancements. 

Phase One’s XF Camera System Update #2 introduces: 

Integrated Sequence photography: 

— Focus Stack Tool provides automated camera focus control throughout a sequence of captured images; ?

— Time-lapse Tool offers automated capture sequence at user set intervals;

— HDR Sequence Tool enables an automated bracketing sequence with unique metadata tags for Capture One integration; 

— Self Timer Delay provides a quick and easy, fully customizable timer option from one half to sixty seconds. ?

Additional updates to the XF Camera System: 

— HoneyBee Autofocus Platform update: Improvements have been made to increase accuracy in low light conditions, improve focus in various low contrast scenarios, and to provide improved hand held success;

— New OneTouch UI: Improved design and integration for intuitive, seamless operation on or off the XF Camera System;

Phase One Adds Two new members to its “Blue Ring” Lens family: ?

— New Schneider Kreuznach 110mm LS f/2.8; a technical masterpiece and an artistic vision. The 110mm offers a ‘normal’ focal length view in stunning technical precision.

— New Schneider Kreuznach 240mm LS f/4.5; the essential Telephoto lens. The 240mm is a must for any lens lineup, offering the definitive telephoto look for any shot.

The new lenses feature a metal focusing ring and AF/MF selector ring of precision milled aluminum, as well as a metal lens hood with anti-skid rubber edging. The lenses are manufactured to Phase One’s highest standards, including improved quality assurance measures and tighter tolerances for better, more reliable lens performance. 

For all the details, please go to: www.phaseone.com/XF-Platform-Update or book a demo on: www.phaseone.com/demo 

Phase One Releases Capture One 9.1 with improved XF camera system integration ?   

Capture One 9 continues to grow alongside the XF Camera System.  The new tools available within the XF are well integrated to Capture One 9.1, providing excellent workflow advantages with proprietary image sequence tags.  For all the details, please see today’s related press release, “Phase One Releases Capture One Pro 9.1 for Photographers”

Availability and Pricing 

Firmware for the XF Camera System Feature Update #2 is free and available for download here: http://www.phaseone.com/Download/Camera-Firmware

New Schneider Kreuznach leaf shutter lenses are available through Phase One photography partners worldwide: www.phaseone.com/partners?

Prices for Schneider Kreuznach 110mm LS f/2.8 — 4.490 EUR / 5.390 USD Prices for Schneider Kreuznach 240mm LS f/4.5 IF – 5.690 EUR / 6.490 USD 

Optimized for use with the XF Camera System, Capture One is free when used with Phase One hardware. Capture One 9.1. is free for all current owners of Capture One 9. Owners of Capture One 7 and 8 can upgrade to Capture One 9.1 for 99 USD / 99 EUR.

Phase One Releases Capture One Pro 9.1

Boosting Workflow Performance for Pro Photographers

COPENHAGEN, March 17, 2016 — Phase One, the world’s leading medium format camera system and professional imaging software provider today released Capture One Pro 9.1. Focus for this release has been the fashion and still life photographer segment, with special attention to the demands of fast-paced work environments.  

Known by professionals for its excellent tethering abilities, color management, and intuitive, user-definable, interface, Capture One Pro is used by photographers that demand exceptional image quality.

Capture One Pro 9.1 builds on the design objectives for greater quality, power and precision introduced last year with version 9.0 — adding workflow accelerators and providing a superior integrated workflow. 

Capture One Pro 9.1 is free to existing 9 users. To see the Capture One Pro 9.1 feature set in action, visit: www.phaseone.com/nineone

Capture One Pro 9.1 highlights include:

New Workflow Tools

— ‘Copy from last’ has been re-designed for rotation, allowing for easier workflow when doing overhead shots; 

— ‘Copy from last’ has been re-designed to allow the inclusion of metadata, making shot-to-shot application of copyright and other metadata easier and more intuitive; 

— Rotatable Live View — live view can be orientated for still life work with next captures mirroring the live view orientation; 

— Improved Shortcuts — a number of extra shortcuts are added to aid the professional workflow – reset counters, layer controls, and “select by…” are added to help in all areas of the workflow. 

New Image Editing Tools

— New Skin Tone Uniformity Tool for saturation and lightness;

— New Color Editor Tools — the Color Editor Skin Tone Tool adds uniformity sliders for saturation and lightness, helping to correct for uneven skin tones.

Asset management tools

— Export/Output keyword restrictions — control and limit the keyword libraries output to final file;

— Sequence tool management for the XF Camera System (with Feature Update #2) — Images captured via the XF’s new Focus Stack, HDR Sequence and Time-lapse Tools are automatically tagged and can be automated in to collections easily  

“Capture One Pro 9.1 is about quality of life improvements for working photographers,” said James Johnson, Phase One Software Product Manager. “We’ve been listening to our core user base and made some valuable additions to the application, designed ultimately to help with efficiency. In the ever increasingly competitive marketplace, production value is all about better workflow and less work.” 

Articles: Digital Photography Review (dpreview.com)

 
Comments Off on Phase One introduces second XF feature update and pair of Schneider Kreuznach lenses

Posted in Uncategorized


Leica announces price and availability of 90-280mm F2.8-4 zoom for SL camera

17 Mar

Leica has announced the price of its second lens for the new SL system and says it will go on sale within the next couple of weeks. The Leica APO-Vario-Elmarit-SL 90-280mm F2.8-4 is set to cost £4650/$ 6395, and will join the existing Leica Vario-Elmarit-SL 24-90mm F2.8-4 ASPH standard zoom lens that was released with the SL body.

The 90-280mm F2.8-4 was announced at the same time the SL camera was launched, as was a Leica Summilux-SL 1:1, 4/50mm ASPH which is due for release at the end of this year – possibly around the time of the Photokina show in Germany.

This latest lens is claimed to offer very fast AF, as well as 3.5-stops of optical image stabilization. Sealed against the weather and dust, the lens features a closest focusing range of 0.6-1.4m and can manage a maximum reproduction ratio of 1:4.8, so Leica says it is suitable for close-up work as well as for shooting at normal distances.

Sales of the Leica APO-Vario-Elmarit-SL 90-280mm F2.8-4 will begin on 24th March. For more information see the Leica website.


Press release:

New telephoto zoom lens for the Leica SL-System:
LEICA APO-VARIO-ELMARIT-SL 90-280mm f/2.8-4 versatile zoom lens designed for a wide range of situations, from close-ups to travel to sports photography 

Leica Camera has today announced the latest addition to the Leica SL-System lens portfolio: the Leica APO-Vario-Elmarit-SL 90–280 mm f/2.8-4.
 
Available from 24 March 2016, this fast telephoto zoom lens offers a range of focal lengths that follows on directly from the Leica Vario-Elmarit-SL 24–90 mm f/2.8–4 ASPH., which launched with the SL camera at the end of last year. Together, these two lenses cover focal lengths spanning 24 to 280mm, providing the versatility to shoot a multitude of subjects and situations – from close-ups to travel and sports photography.
 
The Leica APO-Vario-Elmarit-SL 90–280 mm f/2.8-4 is characterised by its incredibly high speed and offers outstanding optical and mechanical precision. Its integrated optical image stabilisation (OIS) enables exposure times to be increased by up to 3.5 stops, and guarantees shake-free hand-held photography even at telephoto settings.
 
Furthermore, this exceptional zoom lens features an entirely new design, with dual internal focusing that ensures extremely fast and quiet autofocus, and delivers consistently impressive imaging performance at distances from infinity to its close focusing limit.
 
With a close focusing distance of 0.6 metres at 90mm and 1.4 metres at 280mm, and a reproduction ratio of 1:4.8 to 1:5, this versatile lens is particularly useful for close-up photography.
 
As with all Leica lenses, the Leica APO-Vario-Elmarit-SL 90–280 mm f/2.8-4 was designed and developed by Leica’s optical specialists in Wetzlar, Germany, combining outstanding optical expertise, cutting-edge technology and premium materials – guaranteeing the consistently high quality that Leica photographers have come to expect. The design of the Leica APO-Vario-Elmarit-SL 90–280 mm f/2.8-4 comprises 23 elements (in seven moving groups), seven of which are made from glass with anomalous partial dispersion, ensuring minimal chromatic aberration. The movement of the two focusing elements is provided by newly developed drive technology with linear positioning of the lenses by stepping motors.
 
This means the overall length of the lens does not change when either focusing or zooming. In addition, the lens hood supplied with the lens suppresses undesirable reflections and stray light, and prevents the risk of flare.
 
Furthermore, the Leica APO-Vario-Elmarit-SL 90–280 mm f/2.8-4 is sealed against dust and splash-proof, to protect it from the elements.
 
The Leica APO-Vario-Elmarit-SL 90–280 mm f/2.8-4 features a detachable tripod plate to connect the lens to a tripod for easier handling. Its ergonomic design makes the lens easier to carry by hand and also allows the attachment of a lens belt. A lockable rotating tripod collar ensures the lens can be fixed at any angle, and features detents every 90 degrees for rapid switching from landscape to portrait format.
 
The current Leica SL-System portfolio will be extended later this year with the addition of the Leica Summilux-SL 50 mm f/1.4 ASPH. prime lens (available in Q4 2016). Furthermore, the extensive compatibility of the Leica SL-System gives photographers access to the majority of Leica lenses ever produced. For example, all Leica T lenses can be mounted on the Leica SL without an adapter, while the M-Adapter T enables the use of almost all Leica M-Lenses constructed since 1954. In addition, Leica S-Lenses can be mounted with the S-Adapter L (available in May 2016), and the forthcoming R-Adapter (available Q3 2016) will allow Leica R-System lenses to be used with the SL camera.
 
Availability and pricing
 
The APO-Vario-Elmarit-SL 90–280 mm f/2.8-4 is scheduled to be available in the UK from authorised Leica stockists from 24 March 2016, at a suggested retail price of £4,650 including VAT.

Articles: Digital Photography Review (dpreview.com)

 
Comments Off on Leica announces price and availability of 90-280mm F2.8-4 zoom for SL camera

Posted in Uncategorized


Midcentury Grain Silo to Modern Home: Incredibly Cozy Conversion

17 Mar

[ By Steph in Architecture & Houses & Residential. ]

silo house 10

With an entirely custom-built interior, a nine-foot-wide sliding glass door and a warm modern aesthetic, this grain silo converted to a compact home seems worlds away from its humble farmyard origins. Architect Christoph Kaiser purchased the 1955 corrugated steel wall silo from a Kansas farmer and had it dismantled and shipped to downtown Phoenix, Arizona on the back of a pickup truck to begin the renovation process that would transform it into a beautiful, cozy and affordable two-story residence.

silo house 7

silo house 8

silo house 13

Once set in place in the up-and-coming Garfield Historic District, the silo began its dramatic makeover process. Large doors and windows were added to bring light into the previously darkened space, and the oculus at the top used to promote air circulation to the stored grain was turned into a skylight. Views of the Phoenix skyline are strategically framed, with the other windows looking out onto a spacious private garden.

silo house 4

silo house 8

silo house 5   silo house 16

With the silo’s tiny footprint, maximizing the interior space was a top priority. Kaiser designed a built-in, all-in-one solution that’s essentially one big piece of furniture to accommodate all of the residents’ daily living needs. Curved to match the line of the walls, the custom interior is clad mostly in reclaimed walnut flooring scored on Craigslist. Kaiser even designed a one-of-a-kind ceiling lamp with hooks for hanging pots and pans to save space. The Eames wire chairs are the only elements that weren’t custom-made for the home.

silo house 2

silo house 15

silo home 15

silo house 1

A spiraling staircase leads to the sleeping loft, which is equipped with a digital projector so the couple has their very own mini movie theater in their bedroom. The bathroom, finished in glossy floor-to-ceiling penny tile, boasts a rounded custom vanity and compact Duravit toilet. When the nine-foot window is opened to the garden in nice weather, the home seems to expand.

silo house 12

silo house 3

silo house 6

“It was love at first sight: an affordable, challenging prospect,” the architect tells World Architecture News. “The thought of assembling a kit of parts that fits in the bed of a truck, and ending up with a home for two was a tantalizing challenge, very appealing from a carbon-footprint, sustainability, and shall we say, ‘architectural rigor’ standpoint.”

Share on Facebook


[ By Steph in Architecture & Houses & Residential. ]

[ WebUrbanist | Archives | Galleries | Privacy | TOS ]


WebUrbanist

 
Comments Off on Midcentury Grain Silo to Modern Home: Incredibly Cozy Conversion

Posted in Creativity


DxO extends camera support with OpticsPro, FilmPack and ViewPoint updates

17 Mar

DxO has introduced updates for its OpticsPro, FilmPack and ViewPoint software that adds support for six new cameras, as well as 50 additional camera/lens modules to the DxO Optics Module library.

The updates add support for the following cameras:

  • Canon Powershot G5 X
  • Canon Powershot G9 X
  • Leica Q (typ 116)
  • Sony DSC-RX1R II
  • Canon EOS M10
  • Leica SL

DxO OpticsPro v10.5.4, DxO FilmPack v5.5.4 and DxO ViewPoint v2.5.13 are available for download now from DxO. Through March 31, new users can purchase DxO’s applications at a discount:

  • DxO OpticsPro 10 ESSENTIAL Edition: $ 64/£49 (instead of $ 129/£99)
  • DxO OpticsPro 10 ELITE Edition: $ 99/£79 (instead of $ 199/£159)
  • DxO FilmPack 5 ESSENTIAL Edition: $ 39/£29 (instead of $ 79/£59)
  • DxO FilmPack 5 ELITE Edition: $ 64/£49 (instead of $ 129/£99)
  • DxO ViewPoint 2: $ 39/£29 (instead of $ 79/£59)

Articles: Digital Photography Review (dpreview.com)

 
Comments Off on DxO extends camera support with OpticsPro, FilmPack and ViewPoint updates

Posted in Uncategorized