RSS
 

Archive for February, 2016

Review: Think Tank Turnstyle Sling Bag

09 Feb

From messenger bags to suitcases, camera bags today come in just about every shape and form. After spending years tinkering mainly with backpacks and belt packs, I decided to try out a relatively new type of camera bag: the Think Tank TurnStyle sling bag. With its unique body-conforming design, and the rugged durability that comes with all Think Tank products, the TurnStyle has quickly become my new favorite camera bag. Here’s why:

ThinkTank TurnStyle Sling Bag Review

Think Tank TurnStyle Sling Bag

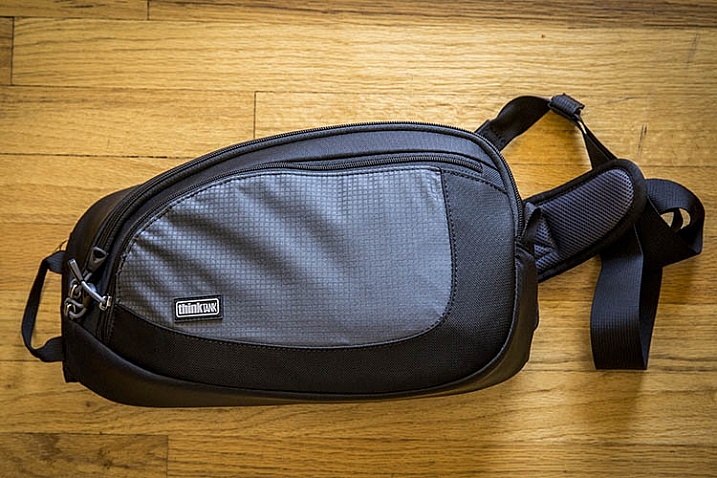
First off, it’s important to know that the TurnStyle bag comes in two colors (charcoal or slate blue) and three sizes. TurnStyle 5 is the smallest, meant to haul compact mirrorless camera systems, while TurnStyle 20 is the largest, capable of carrying a standard DSLR with a 70-200mm f/2.8 attached, plus another lens. Right in the middle of these two bags is the one I opted for: the TurnStyle 10, which could purportedly hold a standard DSLR with a 24-70mm f/2.8 attached. This is where I had a bit of a gripe with the bag off the bat.

ThinkTank TurnStyle Sling Bag Review

What Fits in the TurnStyle 10

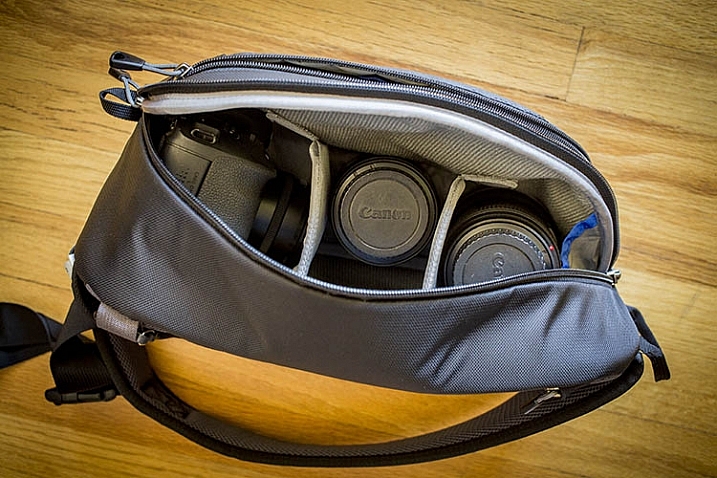
While the TurnStyle 10 is definitely a roomy bag, it couldn’t exactly hold my Canon 5D Mark III with a 24-70mm f/2.8 attached. The camera with lens does fit into the bag, but it won’t even come close to zipping up. (Note: I figured out I can make it fit if I take out all the dividers).

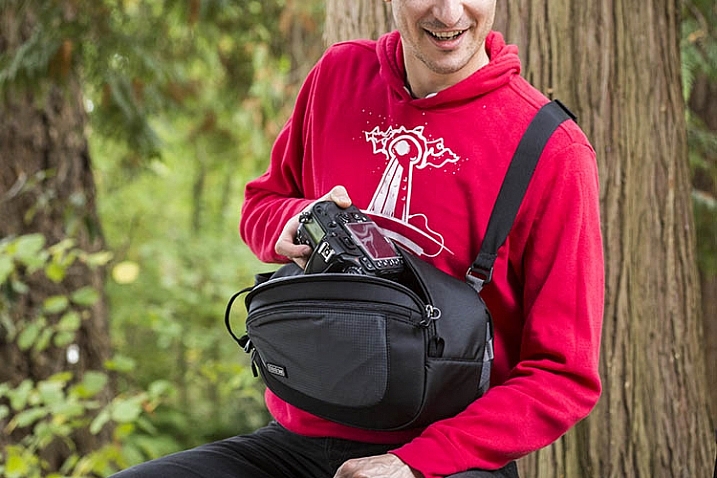
What does fit, albeit on the snug side, is my Canon 6D with the 24-70mm f/2.8 lens attached; in this setup, there are two more lens compartments open that can hold small or medium-sized lenses or a Canon Speedlite. In the above photo, the configuration shows a Canon 6D with 40mm f/2.8 pancake lens attached, a Canon 100mm f/2.8 macro lens, and a 24-70mm f/2.8 lens.

What definitely will not fit in this bag is a 70-200mm f/2.8 lens, unless it’s the only thing the bag is carrying. This makes the TurnStyle 10 a perfect travel photography camera bag, assuming you’re carrying a smaller DSLR body, and relatively few accessories. If you intend to carry a heavy-duty DSLR kit, the TurnStyle 20 will be a more accommodating size.

ThinkTank TurnStyle Sling Bag Review

Best Features

Body-Conforming Design

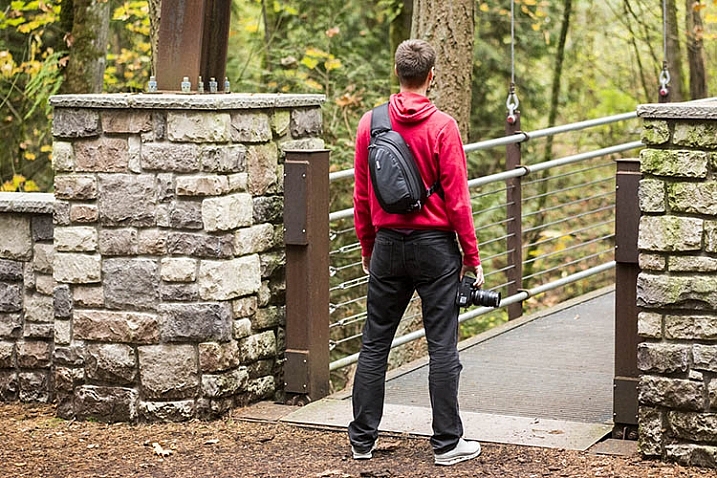
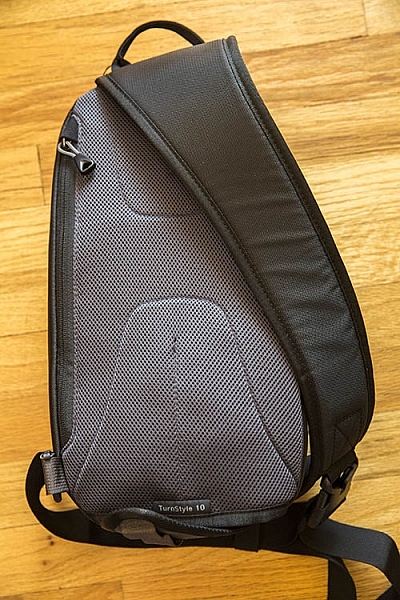
By far the best part of the TurnStyle bag series is its body-conforming design. Initially, the idea of the bag only having one strap may make it seem like you’ll end up carrying too much weight on one side of your body, but that is far from the case. The thickly padded single shoulder strap does indeed contour your body nicely, making even the heaviest gear bag feel relatively lightweight. This overall design makes the TurnStyle bag by far the most ergonomic camera bag I’ve ever used.

Suzi Pratt_Turnstyle 04

Converts into a Belt Pack

Another positive design feature is the ability to easily rotate the bag from your back to your chest, for quick access to your gear without having to take the bag off. You could even adjust the strap’s length, and turn the bag into a belt pack for better accessibility.

Made of Quality Materials

Similar to all other Think Tank products, the exterior components of the TurnStyle are highly durable and visually appealing. The bag’s exterior is made of rip-stop polyester with a water-repellant coating, and all zippers are abrasion-resistant. That is the say, this bag holds up even when you expose it to the elements, making it perfect for taking on your next photo safari vacation.

ThinkTank TurnStyle Sling Bag Review

Many Dedicated Pockets

The TurnStyle’s main compartment for holding your camera gear, comes with removable foam dividers so that you can customize the interior padding, based on what you’re carrying. There is also has a padded back pocket for holding a tablet or paperwork, and a larger zippered pocket on the front of the bag for holding essentials such as your wallet, cell phone, memory cards, etc. Finally, there is the signature component that accompanies all Think Tank bags: a dedicated rain cover that shields your bag from the elements.

Over to You

So is the Think Tank TurnStyle bag right for you? Honestly, it comes down to how much gear you want to carry with you. While you could combine this bag with a waist pack or shoulder bag to hold more gear, you experience the full benefits of the TurnStyle bag when carrying minimal gear. In this sense, it’s best suited for travel or street photographers, shooting with mirrorless or smaller DSLR cameras. If you plan to carry a longer telephoto lens, you’re probably better off with either the larger TurnStyle bag, or a different style altogether.

Have you tried out a sling-style camera bag? What were your thoughts on it? Do you have another favorite bag? Please share in the comments below.

googletag.cmd.push(function() {
tablet_slots.push( googletag.defineSlot( “/1005424/_dPSv4_tab-all-article-bottom_(300×250)”, [300, 250], “pb-ad-78623” ).addService( googletag.pubads() ) ); } );

googletag.cmd.push(function() {
mobile_slots.push( googletag.defineSlot( “/1005424/_dPSv4_mob-all-article-bottom_(300×250)”, [300, 250], “pb-ad-78158” ).addService( googletag.pubads() ) ); } );

The post Review: Think Tank Turnstyle Sling Bag by Suzi Pratt appeared first on Digital Photography School.


Digital Photography School

 
Comments Off on Review: Think Tank Turnstyle Sling Bag

Posted in Photography


Sony Xperia Z5 camera review

09 Feb

The Sony Xperia Z5 currently shares the top spot in DxoMark’s mobile rankings with the Samsung Galaxy S6 Edge Plus. With a 23MP BSI CMOS sensor, F2.0 lens and hybrid AF system it’s easy to understand how it might have ended up at the top of the rankings. Our full review digs into image quality as well as our experience using the Z5 for photography. Read more

Articles: Digital Photography Review (dpreview.com)

 
Comments Off on Sony Xperia Z5 camera review

Posted in Uncategorized


Roller Coaster for Cars: Steep Bridge in Japan is Almost Vertical

09 Feb

[ By Steph in Destinations & Sights & Travel. ]

steep bridge

You’d likely feel more than a little trepidation approaching this bridge head-on, wondering how in the world your car is going to drive straight up a nearly-vertical surface. Spanning Lake Nakaumi between Matsue and Sakaiminato in Japan, the Eshima Ohashi bridge has a gradient of 6.1 percent on one side and 5.1 on the other. The third largest rigid-frame bridge in the world, this intimidating structure is the nightmare of anyone with a bridge phobia, especially since it runs a full mile over the water.

steep bridge 2 steep bridge 3

When you see it from the side, it doesn’t look quite as dramatic, but the angle leading up to the apex is no joke. Its extraordinary height enables even the tallest of ships to pass under it without the need for a drawbridge, allowing traffic to continue between the two cities without interruption. It’s certainly not for the faint of heart.

steep bridge 5 steepb ridge 4

Surpassing it in height is France’s MIllau Viaduct, which bests even the Eiffel Tower at over 885 feet from the ground. Still, imagine trying to drive over this thing on a foggy night, in the rain, or even worse, when the roads are slick from snow and ice. It seems like cars would just slip and slide right back down, which probably wouldn’t be as much fun as it sounds.

Share on Facebook


[ By Steph in Destinations & Sights & Travel. ]

[ WebUrbanist | Archives | Galleries | Privacy | TOS ]


WebUrbanist

 
Comments Off on Roller Coaster for Cars: Steep Bridge in Japan is Almost Vertical

Posted in Creativity


Fujifilm X-Pro2 release moved to early March

09 Feb

Last month, Fujifilm unveiled the X-Pro2 mirrorless camera with a February 18 release date. Per a statement (in Japanese) issued on Friday, the camera maker has postponed the release until early March due to an unspecified production delay and higher than anticipated global orders. The postponement will ‘ensure a sufficient supply amount’ is available, according to Fujifilm. A specific release date will be revealed at a later time. This news follows last week’s Nikon D500 delay announcement, with Nikon also citing high demand as the reason. 

Via: FujiAddict

Articles: Digital Photography Review (dpreview.com)

 
Comments Off on Fujifilm X-Pro2 release moved to early March

Posted in Uncategorized


Phase One adds the IQ3 100MP back to its A-series system

09 Feb

$ (document).ready(function() { SampleGalleryV2({“containerId”:”embeddedSampleGallery_1625945477″,”galleryId”:”1625945477″,”isEmbeddedWidget”:true,”standalone”:false,”selectedImageIndex”:0,”startInCommentsView”:false,”isMobile”:false}) });

Danish camera manufacturer Phase One has expanded its range of A-Series offerings to include the new 100MP IQ3 digital back. The A-Series kits consist of an Alpa 12TC camera body with one of three lenses and a choice of IQ3 backs in 50-, 60-, 80- and 100-million-pixel resolutions. The A-Series is particularly interesting as the cameras have no mirror, so vibrations are kept to a minimum at the time of exposure.

Images have to be composed on the rear touchscreen using the 30 fps live view feature, though the Wi-Fi functionality of the back allows connection to Apple iPod and iPhone devices via the Capture Pilot app for remote viewing, control and capture. The IQ3 backs also offer USB 3 and HDMI ports for tethered shooting to a computer running the Capture One Pro 9 software application, or for streaming live view content to a TV or field monitor.

Each lens is calibrated with the body in the factory, so there should be no need for users to create custom color correction profiles themselves. The calibrations are stored in the IQ3 back, and users just have to select the matching menu item when changing lenses.

The IQ3 100MP back in the kits is the standard model, and can also be used with the Phase One XF DSLR camera.

The kits come with the Rodenstock ALPAR F4.0 35mm, but an ultra-wide Alpagon 23mm F5.6 and a ‘standard’ Alpagon 70mm F5.6 are also available. The A-series IQ3 100MP system is available now, and is priced at $ 56,000 with the 35mm lens. It comes with a 5-year warranty and personalized 24/7 support.

For more information visit the Phase One website.


Press release:

Phase One introduces the A-series 100MP camera system

COPENHAGEN, February 3, 2016 — Phase One today introduced the A-series IQ3 100MP medium format camera system. In collaboration with ALPA, Phase One is pleased to offer this highly-integrated and specialty calibrated, precision camera system – one created to meet the needs of the world’s most demanding fine art photographers.

The A-series IQ3 100MP joins existing Phase One A-series models (the A-series IQ3 50MP, A-series IQ3 60MP and A-series IQ3 80MP) offering both the precision integration with the ALPA platform and complete compatibility with the Phase One XF camera system.

Based on the ALPA 12TC mirrorless camera body, all specially calibrated Phase One medium format IQ3 A-series digital backs offer unprecedented quality and integration. Each model comes with the 35mm Rodenstock Alpar lens. Two optional lenses are available, including the ultra-wide 23mm, and the all-round 70mm, ALPA HR Alpagon – both offering perfect edge-to-edge sharpness and the ability to resolve full frame medium format sensors.

Exclusive to the Phase One A-series system are factory configured in-camera lens calibrations (FLC), making the need to create and apply color cast correction profiles (LCCs) optional. One can simply attach an A-series lens and start shooting.

Availability and Pricing
Shipping immediately, the A-series IQ3 100MP Camera System is available through Phase One photography partners worldwide: www.phaseone.com/partners.

The A-series IQ3 100MP Camera System comes with Phase One’s unique 5-year warranty and uptime guarantee including personalized 24/7 support and assistance.

The price of the Phase One A-series IQ3 100MP Camera System (with Rodenstock Alpar 35mm lens) is 56,000 USD.

For a demo of the Phase One A-series IQ3 100MP Camera System, please sign up here: www.phaseone.com/demo

Articles: Digital Photography Review (dpreview.com)

 
Comments Off on Phase One adds the IQ3 100MP back to its A-series system

Posted in Uncategorized


Pocketable APS-C: Fujifilm X70 real-world samples

09 Feb

Fujifilm’s new X70 compact camera puts the 16MP APS-C sensor from the X100T into a much smaller body, omitting an EVF but adding a 28mm equiv. F2.8 lens and articulating touch-sensitive screen. The X70 is certainly one of the nicest compact cameras to look at, and its specifications are pretty impressive, but what kind of images can it produce? We spent the weekend shooting with a production-quality camera.

Articles: Digital Photography Review (dpreview.com)

 
Comments Off on Pocketable APS-C: Fujifilm X70 real-world samples

Posted in Uncategorized


Find Love Through Your Lens: 3 Ideas for a Valentine Photo Shoot

09 Feb

Editor’s note: Valentine’s Day is a good opportunity for aspiring portrait photographers to practice love story and romantic / family photo shoots. Below you can find three practical tips and ideas for a Valentine photo shoot from our regular writer, a portrait photographer, Barbara Stitzer. *** Ahhh, Love. It can be giddy, maddening, complacent, jealous, warm and gooey, and downright Continue Reading

The post Find Love Through Your Lens: 3 Ideas for a Valentine Photo Shoot appeared first on Photodoto.


Photodoto

 
Comments Off on Find Love Through Your Lens: 3 Ideas for a Valentine Photo Shoot

Posted in Photography


Fujifilm X-E2 firmware 4.00 brings Classic Chrome and other X-E2S features

09 Feb
It may be over two years old, but that doesn’t mean Fujifilm has given up on the X-E2.

Fujifilm has released its promised firmware update for its X-E2 mid-range mirrorless camera. The firmware update adds a host of feature and operational improvements, including the Classic Chrome film simulation and AF upgrades from the recent X-T models, as well as a revised user interface and multiple Auto ISO settings.

The firmware update for the over two-year-old model continues Fujifilm’s habit of supporting existing users and brings the camera into line with most of the latest X-series models.

The changes are so significant that, rather than publishing an addendum, Fujifilm has released a new version of the camera’s owner’s manual.


Press Release:

Substantial firmware updates for the X-E2, delivering a new AF system for better capture of moving subjects among other improvements and function enhancements

[ Improvements and function enhancements with this firmware update ]

  1. New AF System

    (1) New AF system with Zone and Wide/Tracking modes for effortless capture of moving subjects
    (2) Improvement of AF accuracy
    (3) Eye Detection AF
    (4) Auto Macro mode
    (5) AF improvement in the Movie mode

  2. Function enhancements

    (6) High-speed electronic shutter with a maximum speed of 1/32000sec.*
    (7) White Balance Bracketing
    (8) Enhanced ISO Auto Setting to AUTO1/AUTO2/AUTO3
    (9) Exposure Compensation control in Manual.
    (10) Natural Live View function is just like the naked eye.
    (11) Finer lines on the framing grid enhances visibility
    (12) New Video Frame rates (50P / 25P / 24P)
    (13) Manual Shooting in Video mode
    (14) Phase detection AF support for Instant AF
    (15) Expansion of shutter speed in Program Shift mode

  3. Operability improvements

    (16) The new user interface
    (17) Improved Shutter Speed Dial operation
    (18) Name of Silent mode changed to avoid confusion
    (19) Direct selection of AF area
    (20) Unlocked AE-L / AF-L Buttons
    (21) Variable Focus Area during MF
    (22) Q. Menu customization
    (23) Interlocking of Metering and Focus areas
    (24) Movie Recording

  4. Other changes with the update

    (25) Supports focus limiter function for XF100-400mmF4.5-5.6 R LM OIS WR
    (26) “BACKGROUND COLOR” menu
    (27) The maximum number of images taken in the continuous shooting mode

Articles: Digital Photography Review (dpreview.com)

 
Comments Off on Fujifilm X-E2 firmware 4.00 brings Classic Chrome and other X-E2S features

Posted in Uncategorized


Quick Overview of How to do Macro Photography

09 Feb

In the photography domain, macro photography is defined as the art of magnification of subjects. It is a very interesting form of photography, which seems to have an application in almost every genre.

Memorable Jaunts Macro Photography Article for DPS 05

For wedding photographers, it’s a great way to highlight wedding details like rings, the invitation suite, certain aspects of the bridal bouquets, and boutonnières. For nature photographers, it is a great way to get up close and personal with many interesting subjects like bugs, insects, and small animals. For food photographers, a macro lens is one of the ultimate tools to highlight their craft because it’s such a great way to emphasize textures, patterns, and details. Even portrait photographers are known to favor the long focal length macro lens, as it gives them the flexibility of getting close details of their subjects, without invading a client’s personal space, especially when dealing with camera-shy children and adults.

Gear choice

There are several options in the marketplace in terms of gear choices for the macro photographer. Extension tubes, macro (or close-up) filters, as well as specific macro lenses are available for every budget. Based on the macro lens used, you can achieve magnification anywhere from around half to four or five times life-size, of the object being photographed.

Memorable Jaunts Macro Photography Article for DPS

Left image: 100mm f/2.8L IS Macro Lens
Middle: Canon 12mm Extension Tube
Right: Canon 5D MkII with 50mm lens and extension tube attached

  1. Speciality Lens – Macro lenses come in various focal lengths. Short macros are typically lenses in the 30-50mm range. Standard macro lenses are in the 60-105mm focal length range, and tele-macro lenses are in the 150mm-200mm range. These macro lenses tend to perform better than extension tubes and macro filters, since they are build specifically for close-up photography. They work great at short focal lengths as well as longer ones. The main disadvantage with these lenses tends to be the price point. Most of the dedicated macro lenses are upwards of $ 500 (or more) and that can be a limiting factor for someone just getting into macro photography.
  2. Extension tubes are hollow tubes that fit between your lens and your camera mount. They don’t have any glass elements within them, they simply move the actual lens further from the camera, and the front element of the lens closer to the subject, thus offering a certain amount of magnification to the subject. Extension tubes tend to be less expensive than traditional macro lenses and can be mounted on any lens. But they tend to work best with shorter focal lengths. The main disadvantage with extension tubes is that your lens looses the ability to focus on distant objects, since it works only on close-up magnifications. There is also some light loss, which can be compensated by increasing the ISO or by using a slower shutter speed. The camera sensor is also exposed to dust, and the external elements, every time you remove or add the extension tube to the front of your lens.
  3. Macro filters are similar to other types of filters that attach to the front of your lens. They come in different sizes, and different magnification ratios, so if you want to use them on various lenses, then you will need to invest in a variety of filters. They tend to be relatively inexpensive, and can be stacked one on top of one another, in order to get a variety of magnification factors for your subjects. Macro filters also tend to lose light, especially when used as a multiple stack. Hence these cannot be used very effectively with wide apertures. They work best when apertures are stopped down (higher f-stop number).

My initial choice for macro photography was the Canon extension tube EF12 II. As a wedding photographer, I wanted something small and inexpensive for photographing details and ring shots. Since then I have migrated to the Canon 100mm f/2.8 L-series macro lens, and find myself reaching for this beautiful lens more often than not. I have used it for portraits, food photos, as well as still life details.

Technical tips

The key thing to note in macro photography, is that depth of field (DOF) depends primarily on two factors: aperture value and magnification. For any given aperture value, the higher the magnification ratio, the smaller the DOF will be, hence the DOF tends to be very shallow for macro photography (higher f-stop).

Memorable Jaunts Macro Photography Article for DPS 04

Both images were shot at f6.3 – the one on the left is using the 50mm with extension tube, right image is with 100mm macro lens

Memorable Jaunts Macro Photography Article for DPS 02

The left image is a pull back using a 50mm lens
Middle is using the 50mm + extension tube
Right is using the 100mm macro lens (all other settings are fairly standard across all three images)

From an application perspective, focus on the main point of the subject that you want to target. If your camera supports live view, use it to zoom-in and ensure that the image is sharp. Set the aperture around f/11 (feel free to experiment to find the optimal setting for your lens, filter, extension tube combination). If you want a greater depth of field (more of the subject is in focus) use a smaller aperture like f/16 or f/22.

Another thing to note is that when photographing objects that tend to move suddenly, like bugs and insects, a higher shutter speed is advantageous to stop motion and freeze the subject. As a rule of thumb try not to drop below 1/400th or 1/500th shutter speed.

Memorable Jaunts Macro Photography Article for DPS 07

One of the most popular uses of macro lenses is in food photography. Left image using 50mm with extension tube, right image using 100mm macro lens. Both have shallow depth of field because I wanted to blur out the food in the background.

Mirror lock-up

Most DSLR cameras have a mirror inside, which allows you see the image in the viewfinder. The mirror flips out of the way when you press the shutter button, and this action itself can introduce camera shake, and cause your image to be blurry. You can reduce the chances of blurry images by turning “ON” the mirror lockup function (look for it in your camera’s manual). On most cameras that means you will press the shutter button once and it will flip up the mirror, pressing it again takes the exposure. If you have a mirrorless camera then this does not apply to you.

Diffraction

In Photography, diffraction is the bending of light as it passes by the small sharp edged blades, which form the aperture opening. The light gets squeezed together, or blends together. Diffraction is worse with smaller aperture settings like f/16 to f/22. This causes the image to be less sharp, especially at the edges, even more so in macro photography when you are often shooting at smaller apertures. You can avoid diffraction by not dropping below f/16, or by using selective focus over multiple images, and stacking (focus stacking) them together in post-production to get an overall sharp image.

Practical Applications

Contrary to popular belief, macro photography is not restrictive to images of bugs, leaves, flowers and food. They can be an effective tool to highlight any form of detail, texture and pattern. Specific macro lenses also double up as great portrait lenses, extending their use beyond just macro photography.

Memorable Jaunts Macro Photography Article for DPS 06

Memorable Jaunts Macro Photography Article for DPS 03

Left image is pull back of the ring
Middle is with 50mm + extension tube
Right is 100mm macro. F-stop was around f/9 and shutter speed was around 1/50 (I was loosing light very fast and had my ISO up to 2500).

So the next time you want a little boost of creativity, use macro photography to get a fresh, up close perspective on things!

googletag.cmd.push(function() {
tablet_slots.push( googletag.defineSlot( “/1005424/_dPSv4_tab-all-article-bottom_(300×250)”, [300, 250], “pb-ad-78623” ).addService( googletag.pubads() ) ); } );

googletag.cmd.push(function() {
mobile_slots.push( googletag.defineSlot( “/1005424/_dPSv4_mob-all-article-bottom_(300×250)”, [300, 250], “pb-ad-78158” ).addService( googletag.pubads() ) ); } );

The post Quick Overview of How to do Macro Photography by Karthika Gupta appeared first on Digital Photography School.


Digital Photography School

 
Comments Off on Quick Overview of How to do Macro Photography

Posted in Photography


Modern Japanese Architecture: Sunny Minimalism by Tomohiro Hata

08 Feb

[ By Steph in Architecture & Houses & Residential. ]

hata reslope 3

Expertly blending the minimalist aesthetics of traditional Japanese architecture with modern sensibilities to meet the needs of contemporary residents, architect Tomohiro Hata graces each of his cleverly-designed homes with his own distinctive style. Haha is particularly skilled at producing sunny, airy residences that feel luxurious, dynamic and fresh despite tight budgets, challenging sites and building regulations.

Re-Slope House
hata reslope 1

hata reslope 2

hata reslope 4

hata reslope 5

hata reslope 6

hata reslope 7

hata reslope 9

hata reslope 8

hata reslope 10

hata reslope 11
Modern Japanese architects have found creative ways to enable privacy in densely packed urban residential areas without cutting off access to sunlight, and to balance a cozy cave-like atmosphere in one part of the home with an airy, almost entirely open facade. In the case of Tomohiro Hata’s ‘Re-Slope House,’ the plot is set into a rocky Kobe hillside, cutting off access to light and air in the back half of the house.

Hata’s adaptive design is a wedge-shaped metal volume that follows the slope of the hill, placing oversized windows at the front and inserting wooden platforms inside for varying access to the light. Three open-plan terraced platforms mimic an oversized set of stairs, stepping from a sunny room adjacent to the windows down into the more private rooms. Skylights let the sun pierce through to the back of the home, and sliding glass doors offer access to a top-floor terrace and a set of metal scaffolding on the hillside for plants. The street-facing facade is windowless; nearly all of the glass looks out onto the landscape, blocking the interior from the view of neighbors.

Complex House
hata complex 1

hata complex 2

hata complex 3

hata complex 4

hata complex 5

hata complex 6

hata complex 7
The narrow profile of this plot of land in Nagoya created a challenge for Hata in designing a single-family residence that feels open and spacious, yet also private. The architect’s solution was to create a sharply angled, jagged silhouette pointing most of the windows up to the sky. The series of voids created by alternating pitched roofs brings sunlight in from all directions at various times of day as well as entirely walled-in courtyards.

The clever layout lets the occupants look out without providing passersby with a view into their home, creates a dynamic flow of foot traffic inside and has a far more interesting appearance from the curb than a simple box. The use of simple metal cladding keeps costs down and gives the home a minimalist, streamlined vibe.

Next Page – Click Below to Read More:
Modern Japanese Architecture Sunny Minimalism By Tomohiro Hata

Share on Facebook


[ By Steph in Architecture & Houses & Residential. ]

[ WebUrbanist | Archives | Galleries | Privacy | TOS ]


WebUrbanist

 
Comments Off on Modern Japanese Architecture: Sunny Minimalism by Tomohiro Hata

Posted in Creativity