RSS
 

Archive for January, 2016

8 Tips for Better Pet Photography

20 Jan

Pets have always been a big part of my life, and are important members of many of the families I photograph. I encourage my clients to include pets in their photo sessions wherever possible. Animals bring a whole new dynamic to a family photo shoot, providing a focus for the children, and a great icebreaker for all parties.

My interest in pet photography widened when a colleague invited me to join a group called Photographers for Animal Rescue. It is a group of professional photographers who, outside of their paid work, provide pro bono photographs to animal shelters. The theory behind it is that a good photograph greatly improves an animal’s chance of being re-homed, but few shelters have the budget for professional photography.

Image A

During my time with this group, I have been lucky enough to photograph dogs, cats, rabbits, and even pet rats. All of these animals have different characteristics and behaviour, and each needs to be approached differently by the photographer.

Tip #1: A word on safety

All pets, no matter how docile, have the capacity to bite or scratch. This is especially true of rescue pets, who may have experienced abuse by humans in the past, and can be mistrusting and unpredictable.

When photographing an animal for the first time, spend time getting to know each other. Allow the animal to sniff you, your clothing, and the camera. Offer treats, and gentle petting if the animal will allow you. Sudden movements or loud noises may startle a timid animal and cause it to retreat or attack.

Image ETip #2: Dogs

Humankind’s best friend is the most cooperative of all pets. Generally, dogs respond to verbal commands and treats, and can be physically positioned to take advantage of lighting and optimal shooting angles.

There is an entire article here on dPS devoted to photographing running dogs, so here I will share some tips for capturing other endearing expressions and moments.

Tip #3: My best friend

Dogs are very much part of the human families to which they belong. The most treasured photographs are often the ones in which dogs are interacting with family members. Consider when those moments of connection might occur, so that you can be ready to capture them. It may be in the moments when your child arrives home from school to a joyful canine greeting, or when your mother sits in her favourite chair with her dog on her lap.

Image B

As with human portraits, setting and lighting help to convey mood and emotion. The photo above, shot with an 85mm lens, illustrates the bond between my youngest daughter and a family dog. Light reflected off the pavement below them, and shallow depth-of-field achieved with an aperture of f/1.8, creates a soft dreamy image that evokes quiet trust and friendship.

This photo of a boy and his dog was part of a family photo shoot for a client, who lives by the beach. I wanted to capture the beach environment, but the afternoon sun was too harsh to shoot. I found shade behind a beach bathing-box, and positioned my subjects to use light reflected off the surrounding sand. Boy and dog are on different focal planes, so I selected an aperture of f/5.0, which allowed me to keep both in focus while softening the background.

Image C

Tip #4: The doggy smile

Dogs often smile during, or after, vigorous exercise. If you don’t want to photograph the dog in motion, you can throw a ball, or run around with him for a few minutes, before coaxing him into position. The image below shows our dog smiling as he cools off in the shade, following a manic ball-throwing session. The shade provides even lighting on the dog, and f/2.2 turns the leafy background into lovely bokeh.

Image D

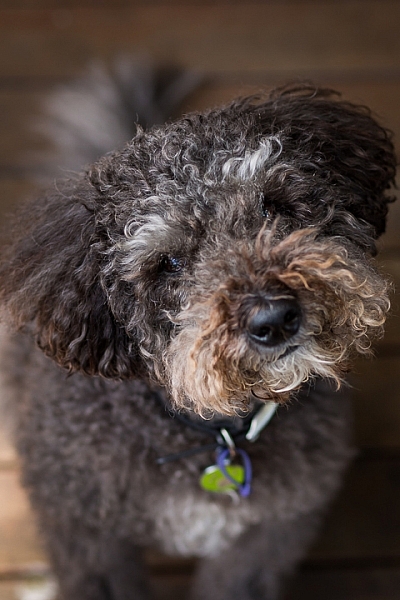
Tip #5: The tilted head

Have the dog sitting on the ground, so that you are shooting at a slight downward angle. Make whining sounds or cat noises – any sound that will pique the dog’s curiosity. Most dogs will cock their head to one side and look at you.

Image E head tilt

Tip #6: Cats

Cats, with their striking eyes and long whiskers, make rewarding photographic subjects. Unlike dogs, they won’t sit where they’re told, and will only favour you with eye contact when it suits them. Photographing cats requires patience and stealth!

Cats are natural predators, and even adults usually respond to a pom-pom, or toy dangled from a thread. Play peek-a-boo with the toy around corners, or furniture, to coax the cat into the position you want. If possible, confine the cat to a room where you can close the door.

Use your fingernails to make scratching sounds on carpet, walls, or even your camera body, and the cat will look in the direction of the sound.

The photos of the kittens below were shot in a small room, with one window. The cats were on a multi-level climbing post, which I pulled close to the window. I stood between the window and the climbing post, and coaxed the cats to look towards the window so that I could get catch-lights in their eyes. These images were shot using ISO 2000, at f/4.0 with a 35mm lens – my go-to lens when working in tight spaces.

Image G

Image I

Image F

Image H

Backlighting can also be effective in highlighting fur, which creates a halo effect and frames the cat’s face.

Image J

Tip #7: Rabbits

There are few things cuter than a rabbit washing its face. Rabbits love to be clean, and if you wait long enough, most will wash themselves without prompting. You can speed up this process by holding and petting the rabbit. When you put it down, it will usually be in a hurry to wash away the people smells you have left behind, so get down low and have your camera ready.

The photos below show Latte and Zeus, two rescue rabbits, photographed first in their default sitting position, and then washing their faces. Both are shot at f/4.0 using a 35mm lens.

Image K Image M
Image L Image N

Often when placed in a new environment (e.g. taken from inside the house, to an outside enclosure) rabbits will stand on their hind legs and check out their new surroundings. Be ready to start shooting as soon as you place the rabbit in the new area. In the photo below, Latte looks like he is begging to be taken home.

Image O

Tip #8: Small critters: mice, rats and hamsters

Even some of the most dedicated animal-lovers are squeamish about rodents. I love them! Most appealing are their long whiskers, and the way they hold food in their paws while they’re eating.

Small creatures move fast. The easiest way photograph these animals is to have someone hold them. Not only does a human hand keep the animal in place, it also conveys scale. Use a macro lens if you have one.

The photographs below show off the rat’s beautiful long whiskers. They also show how small and vulnerable they are, and that they are comfortable being handled.

Image P

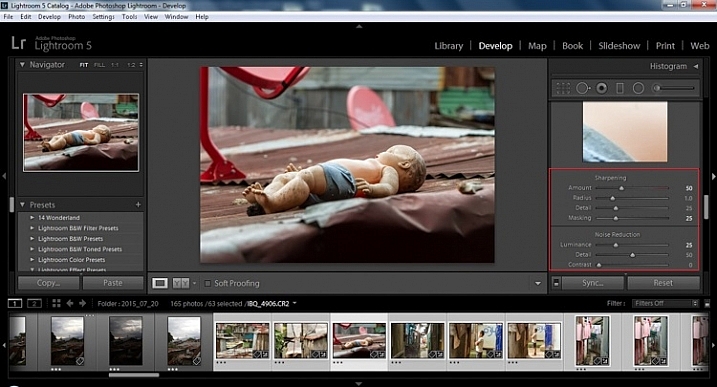
Like the kitten photos, these photos of pet rats were shot using only window light. It was a dull day and the light was poor, so we brought the rats as close as possible to the window, and used a very high ISO of 8000 to 10,000. Since the images were only going to be used online, the graininess (noise) was not a problem in this instance.

Image Q

Give the animal a treat, and she will sit still as she holds it in her paws to nibble.

Image R

I hope these tips have given you some ideas for photographing the pets in your life. Please share any other tips and your pet photos in the comments below.

googletag.cmd.push(function() {
tablet_slots.push( googletag.defineSlot( “/1005424/_dPSv4_tab-all-article-bottom_(300×250)”, [300, 250], “pb-ad-78623” ).addService( googletag.pubads() ) ); } );

googletag.cmd.push(function() {
mobile_slots.push( googletag.defineSlot( “/1005424/_dPSv4_mob-all-article-bottom_(300×250)”, [300, 250], “pb-ad-78158” ).addService( googletag.pubads() ) ); } );

The post 8 Tips for Better Pet Photography by Karen Quist appeared first on Digital Photography School.


Digital Photography School

 
Comments Off on 8 Tips for Better Pet Photography

Posted in Photography


5 of the Best Prosumer DSLRs for Budding Professional Photographers

20 Jan

Photography’s popularity is always growing. And photography’s accessibility is also growing as camera technology simultaneously advances and becomes more affordable. So it’s no big leap of faith to figure that more people are looking to photography as a means of generating income. However, even though camera technology is becoming more affordable, DSLRs still aren’t cheap. Professional-level DSLRs typically start off Continue Reading

The post 5 of the Best Prosumer DSLRs for Budding Professional Photographers appeared first on Photodoto.


Photodoto

 
Comments Off on 5 of the Best Prosumer DSLRs for Budding Professional Photographers

Posted in Photography


13 Steps for Editing Street Photography in Lightroom from Start to Finish

20 Jan

Favorite editing tools for street photography

I admit it, I take too many photos. I know it, and I have too many images to deal with, and unless I am getting paid to finish them and send them out to a client, they may never get processed. Are you in the same boat? Do you too have some images that have just been sitting there in your digital desk drawer?

With digital photography, and especially because of how cheap memory is (don’t forget to include web hosting sights and the cloud), more and more photos are just there and never used.  The best solution is to be more decisive, and just take fewer photos. But we all get out of hand, and sometimes just come home with more images than we know what to do with.

image

Final product after the simple steps followed below—a workflow that you can adjust to your own tastes too!

So the best thing to do is get to the grind and produce something. But it doesn’t need to be so much of a grindstone as you might think. I love taking photos more than processing and unless I am flying solo, I think I’ve got lots of people onboard with me. As you know, photography is not about broad strokes, and details are important. This set of instructions is specifically designed for street photography. But, are most of your photos from your travels? Well, streets (along with the convenient airplane) is maybe how you got there. Much of what we do as photographers crosses over into different genres of style and art. So have a go at the following tutorial, and you may find that with your own adjustments this is a recipe for more than just the street.

image

Final image of two young girls walking in the slums of San Jose Costa Rica, all editing was done following the steps below.

These instructions begin in the Library module of Lightroom, and then progress into the Develop module. There are countless modifications that can be made upon importing, categorizing them, giving them tags, etc. As the point of this tutorial is to streamline your workflow, the tips for editing will also be streamlined. So let’s get at it!

Library Module

Step 1 – Select images

Select a batch of images that are preferably in similar lighting conditions, and which have a similar theme. For example, choose a set of photos that were all shot outside over the course of a few hours, but not all night. Or a group of photos that were all shot in the rain. Lighting and theme conditions can vary, but greater variations will have potential greater variations in results.

Step 2 – White Balance

In the Quick Develop Panel (at the top of the right panel in the Library Module) Select White Balance and choose Auto. Before you turn away, let me assure you that there have been more Ph.D.s awarded, and dissertations given, in creating the algorithms behind this button. If you compound the interest in dollars that has been invested in this Auto algorithm it would sustain many third and fourth quarter GDP figures for entire nations.

image

Step 3 – Warm images

Next, push the single arrow pointing right under the temperature heading indicated by the Make Warmer hint that appears if you hover over it. The single arrow will increase your warmth tone by +5. If you want plus +10 push it twice, using the double arrow will increase it in increments of +15.

2015.09.25 Street Editing Tips Lightroom 002

Step 4 – Auto Tone

I know it is scary, and it does make me cringe sometimes too, but anything can be shifted, tweaked, and tuned later (and should be) to your liking. This will Auto Tone your exposure, highlights, shadows, whites, and blacks to each photo individually, so it is not the same as batch editing which will be covered later.

2015.09.25 Street Editing Tips Lightroom 003

Step 5 – Decrease exposure

Select the single arrow to the left, decreasing the exposure by a 1/3 of a stop. It is minor, but keeps your darker tones (especially things like black asphalt) a little darker. Note: this is assuming you have a correct exposure to begin with – if it’s a bit out you can adjust later on a per image basis as needed.

2015.09.25 Street Editing Tips Lightroom 004

Step 6 – Decrease Highlights

For the Highlights, use the double arrow to the left, decreasing the highlights, and select it once. Be patient, as depending on how many pictures you select and your computer speed, it may take more than a few seconds. This can be monitored by looking in the top left of the screen above the Navigator window (progress bar).

2015.09.25 Street Editing Tips Lightroom 005

Step 7 – Shadows

For the shadows, use the double arrow on the right, decreasing the shadows, and click it once.

Step 8 – Whites and Blacks

Increase the white clipping by +5, by clicking the single right arrow once. Decrease the black clipping by -5 by clicking the single left arrow once.

2015.09.25 Street Editing Tips Lightroom 007

Step 9 – Clarity

Increase the clarity by +20, by pressing the double arrow to the right once (for more information about clarity please look near the end of the article which describes it in more detail).

2015.09.25 Street Editing Tips Lightroom 009

Step 10 – Vibrance

The final step in the Library module is to increase the vibrance by pressing the double arrow to the right (for more detailed information about vibrance please see below).

Develop Module

Now we will be moving into the Develop module. To this point, all the changes that you’ve made, have been applied to all the photos in the group, which you originally selected. Looking at the image below, you can see that despite the simple clicks made in the Library module, many delicate changes have been made. Again, all of these changes can be fine-tuned to your liking later. There are hundreds of modifications that can be made, but let’s keep those for later.

2015.09.25 Street Editing Tips Lightroom 011

Notice the sliders have moved based on the changes you made in the Library Module Quick Develop panel.

Step 11 – Lens Corrections

This step requires you to scroll down to the Lens Corrections Panel, and select two checkboxes. The first is Enable Profile Corrections, and the second is Remove Chromatic Aberrations. Both of these will allow Lightroom to make changes to the photo based on the lens used, and the inherent flaws that exist in that lens. A variety of corrections may or may not be included like, barrel distortion, vignetting, and as the second suggests, green and purple colors that result from diffraction in the lens.

2015.09.25 Street Editing Tips Lightroom 012

Step 12 – Detail Panel

Next is to scroll up and go to sharpening, increase it to +50,  then increase your masking to +25. Finally you may or may not need to reduce noise. For this example, because the ISO was 640 the noise reduction was increased to +25. To understand, sharpening and masking in more detail and their relationship to noise reduction please read below.

2015.09.25 Street Editing Tips Lightroom 013

Are you still with me? Here is where you will thank some of those computer science majors for creating the AUTO button. This is why they get the big bucks, and it saves us large amounts of time. We don’t need to apply these changes individually.

Step 13 – Sync settings

At the bottom of the Develop module there is a rectangular button that says Sync. PUSH IT! Make sure all your images are still selected before you sync (highlighted in the thumbnail strip at the bottom).

2015.09.25 Street Editing Tips Lightroom 014 sync

When the Synchronize Setting window pops up, select Check None. This will ensure that no unwanted changes will be made to your previous adjustments.

2015.09.25 Street Editing Tips Lightroom 015 sync check none

Now check the boxes labeled Sharpening, Noise reduction (which will subsequently select both boxes below it), Lens Profile Corrections, Chromatic Aberration, and finally Process Version. Notice these are the same adjustments that you had made in steps 12 and 13.

2015.09.25 Street Editing Tips Lightroom 016 sync check which apply

Finally, press the “Synchronize” button.

2015.09.25 Street Editing Tips Lightroom 017 verify sync

Looking at the screenshot above, you can see that the all of the selected photos have had the changes made to them.  If I were to go back and make all the individual changes to the potentially tens, hundreds, or even in bizarre cases thousands of photos, it would have taken me time that I don’t have, and neither do you. Looking at the image below you can see that the exposure, shadows, lights, whites and blacks have remained unique to the individual photo.

2015.09.25 Street Editing Tips Lightroom 018 verify sync basic settings

Below are simple side by side comparisons. In the last one I actually made a few additional small adjustments, and added a -10 vignette. Other than that, it is ready for export, along with almost all of the other photos that were just individually and batch adjusted. It is a bit of mix and match magic that keeps your photos natural, and true to the street.

2015.09.25 Street Editing Tips Lightroom 019 compare

2015.09.25 Street Editing Tips Lightroom 021 compare

2015.09.25 Street Editing Tips Lightroom 020 compare

Clarity

Clarity increases the contrast where two different tonal values meet. It is like contrast but on a micro scale, makes the image seem to be sharper. The lights will get lighter and the darks darker, but only where the different tone values meet, not broadly across the whole tonal range of the image.

Vibrance

Vibrance increases the tone of colors that are not already saturated. It is like a balancing scale for color. Saturation on the other hand, increases the intensity of all spectrums of light. Thus, vibrancy helps to bring out subtleties in the colors. For street photography, it brings out richness, without creating an over-saturated look. Sometimes I pull the vibrance up, and push the saturation down, to maintain an urban feel but doing so without making it look over-worked.

Sharpness

Just as I said, clarity is like contrast on the micro scale, sharpness is like clarity on a micro scale. Thus, it is like micro-micro scale. So we are still dealing with tonal values, but in even more detail. So be careful how much you increase your sharpness. Never try to rescue camera shake or blur in the photo using sharpness. “The devil is in the detail,” and this is no truer than in the sharpness slider. Because what you gain in sharpness you also increase the amount of noise (not desirable). If you have a high ISO, sharpness is more of an enemy than a friend.

EXTRA

Final image all adjustments applied

Masking

Textures will become more enhanced, but smooth surfaces will not be affected, resulting in less excess noise being introduced. This will help the street photography mood, without giving it an overly grainy feeling, or your shadows having too much noise. So how much of this movement left and right on the Masking slider is helping or hurting all your hard work? Thanks to those “AUTO guys” the Alt key on windows (Opt on Mac) will give you a grayscale impression of exactly where, and how the sharpening is impacting your photo. White indicates the area on the photo where sharpening is being applied, and black shows where it is not. You will notice that the contrasts and textures deserve most of the sharpening, alleviating your smooth tones and surfaces from the ill effects of sharpness.

Summary

So hopefully that will give you some things to try out with your images to process your street photography faster and consistently. Do you have any other tricks and tips you use? Please share in the comments below.

googletag.cmd.push(function() {
tablet_slots.push( googletag.defineSlot( “/1005424/_dPSv4_tab-all-article-bottom_(300×250)”, [300, 250], “pb-ad-78623” ).addService( googletag.pubads() ) ); } );

googletag.cmd.push(function() {
mobile_slots.push( googletag.defineSlot( “/1005424/_dPSv4_mob-all-article-bottom_(300×250)”, [300, 250], “pb-ad-78158” ).addService( googletag.pubads() ) ); } );

The post 13 Steps for Editing Street Photography in Lightroom from Start to Finish by Branson Quenzer appeared first on Digital Photography School.


Digital Photography School

 
Comments Off on 13 Steps for Editing Street Photography in Lightroom from Start to Finish

Posted in Photography


Benjamin Von Wong’s Shark Shepherd photoshoot captures an underwater fantasy

20 Jan

Photo by Benjamin Von Wong

Photographer Benjamin Von Wong has released photos and a video from his new Shark Shepherd photo shoot, which features a model in a white dress in the sea as sharks swim nearby. The shoot took place in Fiji and aims to expose a less-often seen side of sharks as peaceful creatures. ‘I wanted to create a series of images that would help break those stereotypes and show that it is possible for us to co-exist together in perfect harmony,’ said Von Wong in a post on his blog.

In his PIX 2015 talk, Benjamin Von Wong discusses his journey from taking what he describes as ‘ordinary’ photos to creating ‘extraordinary’ imagery. Throughout his career, he’s made a name for his surreal images that blend practical elements, fantastic locations and post-processing. For Shark Shepherd, nothing has been added in post-processing – the photo shoot features model Amber Bourke, a champion free diver, with assistance provided by divers Steve Hathaway and Kris McBride. According to Von Wong, the shoot took place over three days with more than six hours of waiting for curious white tipped reef sharks to swim up close. The sharks were described as being like ‘squirrels at a park,’ getting close out of curiosity but darting away quickly when someone moved.

Articles: Digital Photography Review (dpreview.com)

 
Comments Off on Benjamin Von Wong’s Shark Shepherd photoshoot captures an underwater fantasy

Posted in Uncategorized


Panasonic to launch Lumix DMC-CM10 without phone functionality

20 Jan

Panasonic has announced that the next version of its Lumix DMC-CM1 smartphone will dispense with its phone functionality to concentrate on being a camera. The Lumix DMC-CM10 will initially only be available in Japan, and is very much the same as the original DMC-CM1, but while it will run on the Android 5.0 operating system it will not be equipped to make phone calls. It will, however, be equipped with LTE communication facilities, and will be able to send text messages and send and receive data via telephone networks with an appropriate SIM card in place. Panasonic will provide its own network access for users as part of its Wonderlink service, where CM1 and CM10 owners can get 3GB a month with 150Mbps download speeds for 1480 yen/£9/$ 12.50. 

The camera appears to have the same lens and sensor as the DMC-CM1, and exactly the same body and features. It will be available from 25 February in silver and only 500 will be made per month. While the price isn’t clear yet it appears from the Panasonic store in Japan that it will be around 100,000 yen/£600/$ 850. 

For more information see the Panasonic Japan website. 

Articles: Digital Photography Review (dpreview.com)

 
Comments Off on Panasonic to launch Lumix DMC-CM10 without phone functionality

Posted in Uncategorized


A classic reinvented? Domke Chronicle Review

20 Jan

Domke Chronicle Ruggedwear Review
$ 349/£296 | www.tiffen.com | Buy Now

Domke has a long history of making bags that to serve the needs of working photographers. From day one, Domke bags have been designed for accessibility, durability and style that intentionally avoids attracting attention, and have enjoyed popularity with generations of pro photographers. A few years ago, after gathering input from professionals and longtime customers (myself included), Domke introduced the Next Generation line, bringing modern updates to its classic bag.

For a little background, I’ve used a Domke J-2 (a ballistic nylon version of the F-2) as my standard DSLR working bag for almost 15 years. I don’t use it to carry every little thing. I don’t use it when I want to travel light and fast. I don’t use it when I’m going to be hiking up a mountain. But I use it when I know I’m going to be in and out of my bag all day long. Weddings, kids’ birthdays, family reunions and the like all require quick and easy access to bodies, lenses and accessories. The J-2 has served me well for years and despite its age, still looks and functions well enough that I could take it to a wedding tomorrow. 

As a long time user I was interested to see what the Next Generation bags had to offer. Since the Chronicle is the Domke Next Generation bag closest in size to my old J-2, I figured that was a good place to start. Domke even calls the Chronicle ‘The grandchild of the F-2.’

Specifications

  • Exterior: 15.75″ (L) x 7″ (W) x 10″ (H) (40 cm x 17.8 cm x 25.4 cm)
  • Interior: 12.25″ (L) x 6.5″ (W) x 9.25″ (H) (31.1 cm x 16.5 cm x 23.5 cm)
  • Weight: 4.2 lbs. (1.9 kg)
  • Fabric/color choices: RuggedWear Black, RuggedWear Military, Canvas Khaki/Black and Cordura Black
  • Fits a medium DSLR and 2-3 lenses plus accessories

In Use

In many ways, the Chronicle, and much of Domke’s Next Generation lineup, is very similar in design to its classic bags. That being said, there are a number of upgrades, some minor and some more significant. In use, the Chronicle will feel familiar to anyone who has used a Domke bag in the past. The Gripper Strap on your shoulder, side pockets for accessories, metal snap hooks to close the main compartment’s flap, and a removable grab handle strap are all there and just as useful as ever.

The Next Generation bags bring a new fabric to the Domke lineup, Ruggedwear. Ruggedwear is a waxed-canvas fabric that Domke claims combines toughness, water resistance, and a retro ‘well-worn’ look. In my book, it’s pretty good looking and seems as tough as my other Domke bags. The top access zipper makes grabbing your camera or changing a lens significantly quicker. This is a feature I highly value on my shoulder bags and feel that it is exactly the kind of functionality that other Domke bag users will value.

The expandable side and front pockets reduce overall size of the bag while still giving you options for tucking in that one last piece of equipment. A redesigned top flap and side rain hoods offer more reliable protection from the elements. The velcro ‘silencers’, small flaps that cover the velcro closures and keep them from making noise, are a neat idea, but I have to admit that I have yet to use them. The antique stainless hardware is a nice upgrade. Sadly, the plastic clips that attach the grab strap are a significant downgrade. They feel flimsy enough to break in the very near future. I wish Domke had used their traditional metal clips.

New plastic clip on the left, classic metal clip on the right.

Moving away from Domke’s standard 1/2/4 section inserts, the Next Generation system offers an extensive system of internal divider options. There are dozens, if not hundreds, of different ways you can set up the Chronicle. It comes with three dividers, two full width and one half width (along with one movable ‘pocket’). The dividers have velcro edges and stick to the sides or to each other in just about any position you choose. If those provided do not give you enough options, Domke sells additional dividers along with pockets, pouches, and padding that will help you set up your bag in just about any configuration. The Chronicle only comes with three of these dividers, which I feel is too few considering its price tag. I would have liked to see 1-2 more dividers included.

Like my Domke J-2, the Chronicle has a well padded and removable baseplate. Unlike most older Domke bags, the Chronicle has four padded ‘walls’ around the sides. This has the advantage of giving your gear an additional measure of protection that it wouldn’t have in a softer-sided traditional Domke bag. It also has the effect of giving the bag more boxy structure than the older bags. The Chronicle doesn’t form to your hip or back when carrying it. Sure, you could remove the walls, but unlike the J-2 with its inner lining of velcro or the F-2 with its inserts, the Next Generation divider system has nowhere to attach without the ‘walls.’ 

The gear capacity of the Chronicle is really dependent on how you set up the dividers. My default for shoulder bags is to have a large space on one side for a body+lens and then the lens dividers over to the other side. For me, this is the best compromise between maximizing space and still being able to quickly grab my camera. This was how I set up my old J-2 for every wedding I shot and it is how I set up the Chronicle. With this layout, I was pretty easily able to carry my 6D+ 24-70/2.8, 16-35/2.8, 70-200/2.8 a speedlight and assorted other small accessories.

By setting up the dividers so that things are a little more tightly packed, you should be able to also fit in a spare body or a couple of prime lenses pretty easily. A mirrorless kit is almost swallowed by a bag this size and generally I would suggest something smaller (perhaps the Domke Next Generation Herald). But depending on the body you use and the number of lenses you carry, the Chronicle could easily haul a lot of mirrorless gear and keep it accessible.

New vs Old

Compared to the old J-/F-2 designs, I really appreciate some of the new features. The expandable side pockets, the quick access zipper, and divider system top that list. In addition, the Chronicle’s new top flap and side ‘ears’ do a better job of protecting gear from the elements than the smaller J-2 flap.

Historically, I have thought I preferred the less structured shape of the J-2. It hugs my side better and feels as if I can move through crowds more easily. But in recent years I have come to realize a few things about shoulder bags. Past a specific size, a big shoulder bag is just a big bag no matter what. While a bag like the J-2 might protrude slightly less than the Chronicle, they are still pretty big. Furthermore, a more structured bag is a lot easier to actually use while working. The added stiffness aids in getting gear in and out; you aren’t fighting with the bag to get a lens back into its divider.

“For as much as I’ve always respected the world-weary photojournalist look of the older Domke bags, I think the Chronicle is just a little more classy looking”

Finally, the more rigid design of the Chronicle makes it unlikely to tip over when set down on the ground. Overall, I could work with either of these bags. The J-2 (and the F-2 before it) has had years of hard use proving its worth. However, the Chronicle has enough important improvements that I would choose it if I had to pick just one. To be honest, for as much as I’ve always respected the world-weary photojournalist look of the older Domke bags, I think the Chronicle is just a little more classy looking, particularly in the Ruggedwear fabric. 

What’s the Bottom Line?

The Domke Chronicle Ruggedwear is a solid, well-designed bag that should stand up to the abuse that serious photography can dish out. And let’s be honest, updating a classic can be difficult. Look at the historical joke that ‘New Coke’ has become. Domke, however, has stayed true to its soul with the Next Generation line and most specifically, with the Chronicle. Most all of the updated features are solid improvements with very few misses.

Yes, this is a premium bag at a price that starts to edge close to the truly high-end offerings out there. But this is not simply a fashion accessory either. At the end of the day, just like the old F-2, this is a bag one can work out of. It is a bag that should be as at home coming out of a staff photographer’s trunk as it is at a wedding or portrait session. Most everything you truly need out of a shoulder bag is here, and there’s very little that you don’t.

What we like:

  • An update of a classic functional design
  • Overall construction quality
  • Made in the USA
  • Top zipper access
  • Expandable side pockets
  • Velcro silencers
  • Extensive divider system

What we don’t like:

  • Premium price tag
  • Plastic clips on grab handle
  • Too few dividers included
  • Boxy shape

Final Rating: 

Articles: Digital Photography Review (dpreview.com)

 
Comments Off on A classic reinvented? Domke Chronicle Review

Posted in Uncategorized


Full of Hot Air: Clever Urban Monuments Conceal Exhaust Shafts

20 Jan

[ By WebUrbanist in Architecture & Public & Institutional. ]

exhaust building closeup

Fenced off or set back from streets and sidewalks and often raised on platforms as well, civic monuments are oddly ideal candidates for concealing a peculiar secondary function: the ventilation of subterranean spaces, from sewage systems to subway tunnels.

exhaust sewage monument australia

In Sydney, Australia, the Hyde Park Obelisk was built precisely for this purpose back in 1857. Modeled on Cleopatra’s Needle located on the banks of London’s River Thames, the 60-foot-tall tower was designed to allow noxious gases to escape upward from the sewers below. Today, the monument remains in place, but vents the city’s somewhat-less-smelly stormwater system instead.

fountain exhaust cover germany

Meanwhile, in Nuremberg, Germany, a controversial set of statues depicting the trials of married life was commissioned specifically to disguise the subway exhaust port located on the site.

marriage go round

The Ehekarussell (roughly translated: marriage-go-round) is critiqued not because of noxious fumes, but for featuring a sequence of scenes through its statuary: a young happy couple turning older and angrier before one spouse slays the other.

fake townhouse

Another approach that appears in many cities is more architectural, though no less monumental, using anything from small fake shell houses to huge multistory buildings as giant exhaust conduits.

ventilation house

In Burnaby, British Columbia, a boxy little house serves both to vent subway fumes but also acts as a mid-tunnel escape route for emergencies. Many of these structures not only act as exhaust pipes, but also contain bacterium-based odour removal plants so as to spew somewhat less obnoxious gasses.

exhaust hidden secret building

The Callahan Tunnel ventilation building in Boston is a relatively less-camouflaged and more-imposing affair built of bricks with vents where one would ordinarily expect to see windows. Many other American cities have similarly larger exhaust buildings, including New York City, where they vent infrastructure including the Holland Tunnel.

Share on Facebook


[ By WebUrbanist in Architecture & Public & Institutional. ]

[ WebUrbanist | Archives | Galleries | Privacy | TOS ]


WebUrbanist

 
Comments Off on Full of Hot Air: Clever Urban Monuments Conceal Exhaust Shafts

Posted in Creativity


Tips for Using Legacy Lenses and Shooting in Full Manual

19 Jan

Shooting Manually

Full manual. Two words. Ten letters. Yet those words can be some of the most discouraging for new photographers to ingest. There has long been a perceived over complication concerning shooting in Manual Mode. Personally, I always leave my camera set to manual. Granted, I dont shoot many fast-paced sporting events that require speedy autofocus, or many situations where there is constantly fluctuating light. Still, the idea of controlling the aperture, shutter speed, ISO, and focus, all independently of your camera’s computer, unsettles even experienced photographers at times. Happily though, not only is there a swelling community of photographerss who are embracing the somewhat challenging, but highly organic and rewarding, benefits of shooting manually…but also upping the ante by adapting completely analog legacy lenses for use with their cameras.

image

In this article, you will learn how to enjoy what might be considered a devolved methodology of making photographs using legacy lenses, and shooting in full manual mode. Full manual lenses, are generally built to exacting quality standards, but are relatively low-priced, which makes them great for beginners, and those shooting on a budget. Furthermore, adapters are available for virtually all mirrorless and digital SLR camera systems, so that you can start making great photographs using these low-tech lenses. Let’s jump right in.

What are Legacy Lenses?

Lenses that were geared for use with older film camera (35mm or medium/large format) systems are called legacy lenses. Glass of this type are non-motor driven, and operate autonomously of your camera. This means that the focus and aperture selection are all accomplished inside of the lens, which is controlled by you. There is no electronic communication between the lens and the camera. You must use the lens’s aperture, and focusing ring, to produce the desired depth of field and focus. Legacy lenses are generally made of metal, making them relatively heavy, but heartily constructed.

Which lenses are fully manual?

Full manual lenses does certainly not include all legacy lenses. Many manufacturers still make completely manual lenses, engineered specifically for the digital camera market. A lens is designated as being fully manual when there is no control being provided by the camera. However, there are quite a few fully manual lenses which have incorporated focus indicator chips into their design. While remaining fully manual, these types of lenses will communicate with your camera when focus has been achieved.

image

Adapting lenses to your camera

In a previous article on dPS we discussed how easy it really is to use legacy lenses (and other non-native glass) with your digital camera. The same holds true. All that is needed to enable the use of fully manual legacy lenses to be used with your modern digital camera body is a simple adapter.

image

These adapters vary in capability from simple adapter rings, to advanced electronic contraptions, with focus indicator chips of their own. Keep in mind though, there are a few things to consider before adapting any non-native lens to your camera. More on that shortly.

Using your camera in full manual mode with manual lenses

image

You’ve found an elegant legacy lens and located the appropriate adapter for your particular camera system. You’re excited and ready begin shooting completely manually, so now what? Well, take a breath and exhale a well deserved sigh of relief, because all of that was the hard part. Now all that’s left are a few quick steps. The first of those steps is to switch your camera into Manual Mode. This is almost always done by moving your selector wheel to M for manual mode. This will give you, the courageous photographer, complete control over all aspects of the shot. If you are using a completely manual lens, or a legacy lens, everything except the shutter speed will now be manipulated using the lens. The aperture will be controlled using the aperture selector ring, and so too will be the focusing.

This is a breakdown of the essential features found on an adapted, full manual legacy lens (in this case a Nikkor 50mm f/1.8).

image

Here are a few tips for using your camera in full manual mode, in conjunction with a fully manual or legacy lens:

Focus Peaking Function

Some cameras now incorporate a technology called focus peaking which visually outlines the edges of the most in-focus area of a scene,, before the shutter is ever released. The technology detects the area of the most contrast between pixels, thus determining what region is most in focus. Though not perfect, this a great option to aid with manual focusing.

Focus Magnifier

Not all camera bodies come equipped with the focus peaking feature, but most modern digital cameras are capable of focus magnification. This lets you digitally magnify the scene, and inspect areas for proper focus. I use focus magnification in all of my landscape work. It is a great way to achieve pin point focus on the areas where precision is a necessity. (Note: this is usually available in LiveView mode).

Shoot RAW

Yes, the old shoot RAW lecture again. Even though focus correction can’t be achieved, even in RAW format files, it will however give you much more room to work on contrast and clarity. This will sometimes help to salvage an image that may otherwise be culled.

Things to consider before using legacy lenses

Along with all the benefits of shooting manually with legacy and full manual lenses, there are also some things to remember before, and during shooting times.

Complete Autonomy of the Camera

There is of course no electronic communication between the lens and the camera, unless you have chosen an adapter or lens equipped with focus indicator technology. So there will be no way to use your shutter priority or aperture priority modes.

Physical Considerations

Some lenses will obstruct the mirror function of digital SLRs. This is one of those things that carries a little bit of buyer beware baggage. Make absolutely sure that the lens you are adapting to your camera does not physically occlude the operation of the mirror, this will damage your camera, possibly beyond repair. This becomes less of an issue with mirrorless camera systems.

Crop Factor

The crop factor of any lens is dependant on the size of the image sensor (or film) being used. Always be mindful of the interactions between your lens, and whatever size sensor you are using, be it full frame of APS-C (cropped). Most legacy lenses were intended for use with 35mm film. This will play a major role in your practical focal length, when shopping for lenses of the prime variety.

image

Fully manual and legacy lenses have a firm grasp on today’s digital world. Though viewed as antiquated by some, the essential elements of this type of photography can produce exceptional images. Shooting in Manual Mode gives you ultimate generalship over your work, and allows you to take every aspect of photo making into your own hands. Not only is the use of legacy and manual lenses a cost efficient way to make photographs, but it is also a reflection of a time when the buck stopped with the photographer, not the camera.

Newer isn’t always better. And even though manual shooting might not be the most effective course in some situations, there is no reason why it should be discounted in today’s modern era. Full manual shooting allows you to use lenses of extremely high quality to fully realize your creative vision, in ways you may not have otherwise been able to accommodate. Take your photography back to the future, and go beyond the realm of the automatic.

Do you have a favorite manual setup that you use regularly? Share it in the comments below!

googletag.cmd.push(function() {
tablet_slots.push( googletag.defineSlot( “/1005424/_dPSv4_tab-all-article-bottom_(300×250)”, [300, 250], “pb-ad-78623” ).addService( googletag.pubads() ) ); } );

googletag.cmd.push(function() {
mobile_slots.push( googletag.defineSlot( “/1005424/_dPSv4_mob-all-article-bottom_(300×250)”, [300, 250], “pb-ad-78158” ).addService( googletag.pubads() ) ); } );

The post Tips for Using Legacy Lenses and Shooting in Full Manual by Adam Welch appeared first on Digital Photography School.


Digital Photography School

 
Comments Off on Tips for Using Legacy Lenses and Shooting in Full Manual

Posted in Photography


Super-Deluxe Swim Platform: Rent This DIY Floating Sauna

19 Jan

[ By Steph in Destinations & Sights & Travel. ]

diy sauan 6

In Finland, where the tradition of sitting in steamy saunas is even more appealing in frigid winter, a group of enterprising DIYers has built their own multi-level floating spa, sun deck and dive platform out of recycled materials. The Saunalatta features a lower deck, a sauna cabin that transforms into sleeping bunks in the summer, and a second-story platform with a lookout, and it’s available for rent at the cost of about $ 410 per day.

diy sauna 2

diy sauna 3

In a nation that boasts roughly one sauna for every three residents – about two million in total – it’s not surprising that Finns come up with some creative variations. Up to fifteen people can cram into the sauna at a time, where the temperature can get as high as 194 degrees Fahrenheit. Then, they jump right into the icy waters of the lake before repeating the ritual.

diy sauna 1

diy sauna 4

diy sauna 5

In the summertime, the cabin offers sleeping space for five on simple platforms, with hammocks offering lounge space. On the roof terrace you’ll find a table and chairs, a BBQ and a 19-foot diving tower. Made of recycled and reclaimed materials, the simple shack-style houseboat also has a fridge, heated shower and a sound system wired throughout the vessel.

diy sauna 7

diy sauna 8

diy sauna 10

The Saunalatta Facebook page has lots of wistful-daydream-worthy photos that’ll appeal to water-lovers in either hemisphere, since it’s cozy and warm in the winter and the perfect home base for swimming in the summer, including some fun images of the creators testing out the boat’s durability with a trampoline.

Share on Facebook


[ By Steph in Destinations & Sights & Travel. ]

[ WebUrbanist | Archives | Galleries | Privacy | TOS ]


WebUrbanist

 
Comments Off on Super-Deluxe Swim Platform: Rent This DIY Floating Sauna

Posted in Creativity


Macphun Aurora HDR version 1.2 update released

19 Jan

Macphun has released Aurora HDR Pro version 1.2, adding a few new features and several improvements to its image editing software. The update includes support for .EXR and .HDR image files, compatibility with Leica M Monochrom (Typ 246) Raw files, and support for Photos for Mac editing extensions.

In addition to the new features, Aurora HDR 1.2 brings several improvements to the application. Macphun claims that the user interface has been improved for 11-inch and 13-inch laptop displays, chromatic aberration reduction has been improved, and the application’s overall performance has been boosted as tools like HDR Merging are now faster.

Improvements:

  • Better Raw file handling for images created by Panasonic, Olympus and Fuji
  • Updates to Adobe Lightroom and Photoshop plug-ins for enhanced support to keywords, metadata, and “F” Screen mode
  • Enhanced masking brush for better smoothing on edges
  • Improved clipping results for overall HDR effect in shadows and highlights
  • Chromatic aberration reduction has been significantly improved
  • Better UI support for 11″ and 13″ displays at multiple resolutions
  • Improved performance and various bug fixes. Faster HDR Merging, faster Deghosting, enhanced Chromatic Aberration Reduction

Existing Aurora HDR users can update to version 1.2 within the application for free, while new users will need to buy a license for $ 39.99 USD.

Via: Macphun Blog

Articles: Digital Photography Review (dpreview.com)

 
Comments Off on Macphun Aurora HDR version 1.2 update released

Posted in Uncategorized