RSS
 

Archive for September, 2015

How to Import Photos into Lightroom

27 Sep

If you are new to Lightroom, the first thing you need to do after installing the software, opening it up, and taking a look around is import some photos.

As Lightroom is a database you can’t open photos in it the same way you can in Photoshop – instead, you have to import your photos before you can view, or process them. The import process adds photos to the Lightroom Catalog (Adobe’s name for the database that the program uses) and generates a preview of the image for you to view. Once imported, images stay in the Lightroom Catalog forever (or until you remove them from the Catalog yourself).

The Lightroom modules

Lightroom is modular software, there are seven of them: Library, Develop, Map, Book, Slideshow, Print and Web. You can only work in one module at any one time, but you can move around between them as often as you want.

The Library module is the heart of the system. This is where you view photos, organize them into Collections and carry out searches. The Library module is your window to the Lightroom Catalog ,and all the information that it holds about your images.

Importing and viewing photos happens entirely within the Library module.

The Lightroom module layout

The screenshot below shows the Library module layout. If you haven’t imported any photos into the Lightroom Catalog yet this is what it will look like.
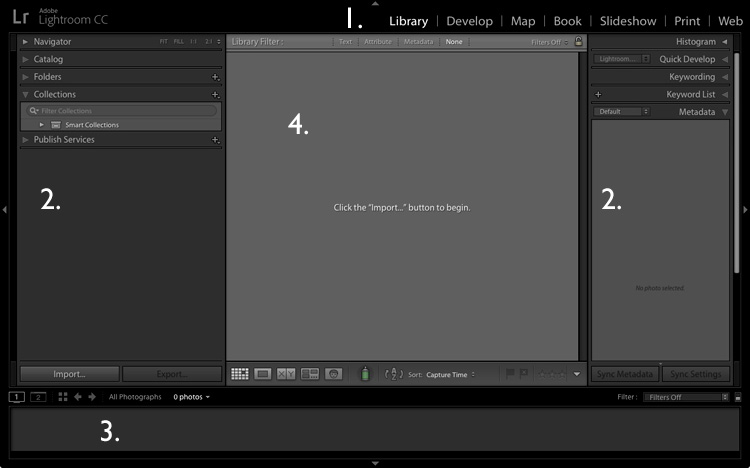
Importing photos into Lightroom

1. Module selector
2. Side panels
3. Filmstrip
4. Content area

The screen is divided into four areas.

1. The Module selector: This is the bar at the top that tells you which module you are in (in this case, the Library module). You can make it disappear by clicking the white arrow at the top of the screen, freeing up screen space.

2. The left- and right-hand panels: These contain all the Library module tools. You can click the arrow on either side to make them disappear and reappear.

3. The Filmstrip: Displays thumbnails in the currently selected Folders, Collections or search results. If there are no photos in your Catalog it will be blank. Click the white arrow at the bottom of the screen to show/hide it.

4. The Content window: This is the central display area. After you have imported some photos into Lightroom you can view them here. If you hide all four side panels (use the keyboard shortcut Shift+Tab) it will fill your screen.

Importing photos

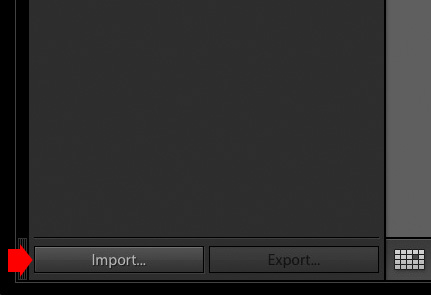
To get started, free up some screen space by hiding the Module Picker, Filmstrip and right-hand panels. Click the Import button in the bottom left-corner of the left-hand panel.

Importing photos into Lightroom

If this is your first import you are likely to be importing your photos from your hard drive, but you can also import them directly from a memory card, or connected camera.

It is best to import your photos one folder at a time, so you can organize them as you go along. It is more difficult if you import all your image files in one go. Plus, Lightroom will make you wait a long time while it carries out the import process!

The Import window

When you click the Import button Lightroom takes you straight to the Import window. It is divided into four sections (marked below).
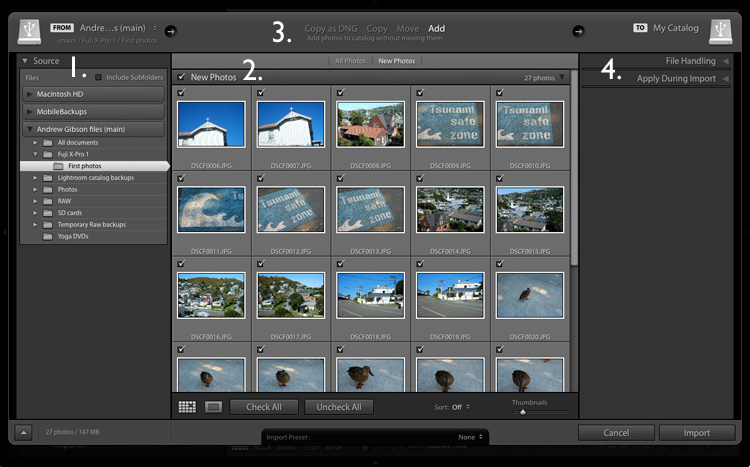
Importing photos into Lightroom

1. Source 
2. Photo thumbnails
3. Import options
4. Destination

1. Source (left panel): This is the folder(s) from which you are going to import the photos. You can navigate through all hard drives, cameras, or memory cards connected to your computer.

2. Photo thumbnails (middle section): Here Lightroom displays thumbnails of the photos in the selected source folder or folders. The photos are ticked to show that Lightroom will import them into the Catalog when you press the Import button (you can untick any that you don’t want to import).

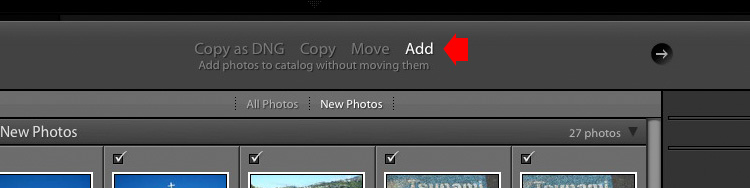
3. Four import options which tell Lightroom what to do with the photos (top middle): They are:

  • Copy as DNG: When you select this option Lightroom converts your Raw files to Adobe’s DNG format (non-Raw formats such as JPEG and TIFF are not converted). This is the most time consuming option as Lightroom has to first copy your photos then convert them to a new format. Make Lightroom Faster by Using DNG explains the advantages of the DNG format. If you’re new to Lightroom leave this option alone for the moment, as it’s for more advanced users.
  • Copy: Lightroom copies your files from their current location to a new one, without changing the file format. This is ideal for importing photos from a memory card, as it leaves the original files intact on the card.
  • Move: Lightroom moves your files from their current location to a new one, without changing the file format. However, it does delete the original files after they have been moved. This is ideal when you want to move photo files from one folder to another on a hard drive.
  • Add: Lightroom imports your photos into the Catalog, without moving or copying them from their current location. Select this option if you are importing photos from your hard drive and don’t want to change their location.

4. Destination (right panel): This is where you tell Lightroom what to do with the photos (and where to put them) during the import process. If you select the Add option you will see two panels here (File Handling and Apply During Import). If you select Copy as DNG, Copy, or Move, Lightroom also displays the File Renaming and Destination panels.

Putting it together

Ready to import your first photos into Lightroom? These are my recommended settings – you can start with these and adjust the workflow to suit your needs as you become more comfortable with Lightroom’s settings.

1. Navigate to the folder containing your photo files on the left and select the Add option from the top.

Importing photos into Lightroom

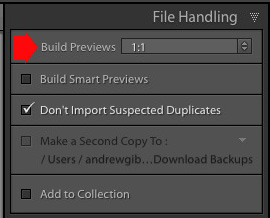
2. On the right open the File Handling panel (click on the heading to open and close panels) and set Build Previews to 1:1.

Importing photos into Lightroom

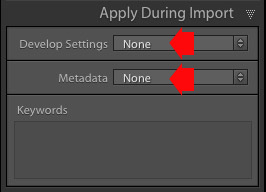
3. Open the Apply During Import panel and set Develop Settings and Metadata to None. The idea is to keep your first import simple – you can learn how to use Develop Presets and Metadata presets later (this article How to Create Your Own Lightroom Presets will get you started).

Importing photos into Lightroom

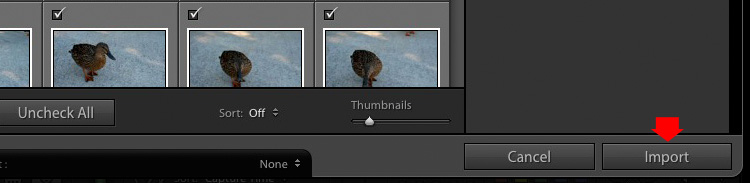
4. Click the Import button (bottom right). Lightroom returns to the Library module and starts the import process. It takes Lightroom a while to build the 1:1 previews, but the wait is worth it, as it makes viewing them in the Library module much quicker.

Importing photos into Lightroom

Once Lightroom has imported your photos, you can view them in the Library module. These articles Making Sense of Lightroom’s Grid View and The Hidden Secrets of Lightroom 5’s Loupe View (yes it applies to Lightroom 6 and Lightroom CC too) will get you started.

Importing photos from a memory card

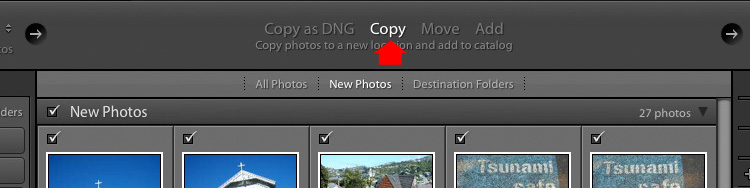
Once you’ve carried out your first import, at some stage you will want to import photos directly from a memory card into Lightroom. There are a couple of extra steps in this process. Start by selecting Copy (instead of Add) at the top of the Import window.

Importing photos into Lightroom

Set the File Handling and Apply During Import panel settings as above. Ignore the File Renaming panel (another advanced topic).

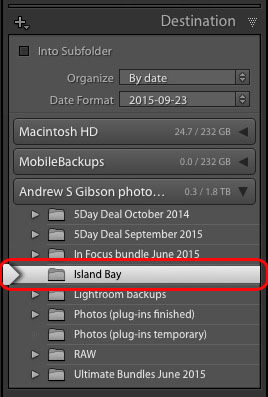
In the Destination panel, select the folder where you would like to save the imported images (you can create a new folder by right-clicking on an existing one and selecting Create New Folder). The selected destination folder is marked in white.

Importing photos into Lightroom

Click the Import button when you’re ready.

After the import

It’s important to understand that the import process doesn’t physically add your photo files to the Lightroom Catalog. The Catalog contains previews of your photos, plus information about them, including the location where they are saved. The photo files themselves remain on your hard drive.

The next task is to organize your newly imported photos. I’ll show you how to do that in a future article.

Do you have any questions regarding this process? Please let me know in the comments.


Mastering Lightroom Book One: The Library Module

Mastering Lightroom ebookMy latest ebook Mastering Lightroom Book One: The Library Module (second edition) is a complete guide to using Lightroom’s Library module to import, organise and search your photo files. You’ll learn how to tame your growing photo collection using Collections and Collection Sets, and how to save time so you can spend more time in the Develop module processing your photos.

googletag.cmd.push(function() {
tablet_slots.push( googletag.defineSlot( “/1005424/_dPSv4_tab-all-article-bottom_(300×250)”, [300, 250], “pb-ad-78623” ).addService( googletag.pubads() ) ); } );

googletag.cmd.push(function() {
mobile_slots.push( googletag.defineSlot( “/1005424/_dPSv4_mob-all-article-bottom_(300×250)”, [300, 250], “pb-ad-78158” ).addService( googletag.pubads() ) ); } );

The post How to Import Photos into Lightroom by Andrew S. Gibson appeared first on Digital Photography School.


Digital Photography School

 
Comments Off on How to Import Photos into Lightroom

Posted in Photography


SIBUTRAMINE FOR SALE – No Prescription DrugStore

27 Sep

landscape=photography

So you like to shoot landscapes. When the weekend rolls around you like nothing more than to pack up your camera and head to somewhere pretty and photogenic, a place filled with trees and dappled sunlight or snow and rocks. You probably already have a hard drive filled with beautiful photos of beautiful places. It would just be great if you could sell them.

You can sell them. It takes effort and planning. The sales won’t pile in overnight. But it is possible to turn a love of landscape photography into a revenue stream — and possibly even a career.

Read the rest of this entry »

 
Comments Off on SIBUTRAMINE FOR SALE – No Prescription DrugStore

Posted in Equipment


Review: Westcott Rapid Box 10×24? Strip Light

26 Sep

One of the best, and easiest ways, to modify your studio lighting is to use a soft box. There’s nothing like a soft box when it comes to providing soft, diffused light, for any style of photography. But among the chief concerns of soft boxes is their size, especially when shooting on location. Enter, Westcott!

The legendary lighting brand, probably best known for their solid Apollo Orb soft boxes, has a slimmed down lighting solution known as the Westcott Rapid Box series. Available as an octabox, strip light, or the mega 32″ octabox duo, the members of the Rapid Box series are solidly built, very compact, and compatible with most speedlight flash units. This particular review is of the Westcott Rapid Box 10×24″ strip light.

Westcott Rapid Box Strip Light product review

What’s in the Box

The Westcott Rapid Box 10×24″ Strip Light arrives in a beautifully packaged box and comes with:

  • A 10 x 24″ narrow rectangular Rapid Box modifier
  • A Height and depth adjustable aluminum hotshoe-mount tilt/swivel bracket
  • A diffusion panel
  • Compact carrying case with shoulder strap

All pieces of the product are constructed of durable, high-quality material, that is also very lightweight. The modifier opens and closes like an umbrella, and has a reflective silver interior. Even the one stop diffusion panel is made of the same high-quality material as all of Westcott’s other current soft boxes. You don’t need any extra rods or adapter rings to set up the Rapid Box. The only extra parts you’ll need are a light stand and hot-shoe mounted flash, and you’re good to go!

Westcott Rapid Box Strip Light product review

Gear Used

Since the speedlight mount is held in place by the adjustable bracket outside of the soft box, the Rapid Box is compatible with just about any hot-shoe flash and any speedlight radio triggers or sync cords. For this product review test, I used the Rapid Box 10×24″ Strip light, Manfrotto Nano light stand, Canon 430 EXII flash, and a Yongnuo RF-603 II wireless flash trigger. Everything was compatible, and was easy to assemble and sync.

Why a Strip Light?

Given the fact that Westcott offers both a 26″ and 20″ octabox, choosing the narrower strip light may seem like an odd choice. But with the Rapid Box Strip’s narrower 10 x 24″ frame, this modifier’s shape makes it a perfect for lighting subjects in tight spaces, such as food photography in a small restaurant. Speaking of food photos, the strip light’s long shape can also help create a long, elegant strip on objects with reflective surfaces such as wine bottles. When paired with other lights, the strip light also lends itself to use as a back light, hair light, or rim light to help separate the subject from the background.

Westcott Rapid Box Strip Light product review

Con: Semi-Complicated Setup

Unless you are already familiar with Rapid Boxes, the initial setup work might be slightly more complicated than expected. Despite the lack of moving parts, there may be some difficulty figuring out how to set up the aluminum bracket, which feels so solid and tight that it’s not intuitive how to adjust it to fit the hot-shoe mounted flash. The initial set up time took me about 45 minutes toying with all the pieces before understanding how they fit together. However, with practice, I found that setup could be completed in under five minutes.

Westcott Rapid Box Strip Light product review

Pro: Beautiful, Flexible Lighting

Once you get over the initial hurdle of figuring out how the Rapid Box functions, it starts to live up to its name and is a speedy, flexible, lighting modifier. Lightweight and especially compact as it is a strip box, this little 20-inch light performed particularly well for on-the-go portraits and on-location restaurant shoots, when shooting in notoriously tight dining room spaces. The image quality was superb, likely thanks to the Rapid Box’s solid silver interior which adds a bit more of a kick when the flash is fired.

Westcott Rapid Box Strip Light product review

IMG_9798-750px


Westcott Rapid Box strip light review

Conclusion

As an on-the-go photographer, I have yet to find a more compact lighting modifier than this handy Rapid Box strip box. Even though initial set up can be a pain, I wouldn’t hesitate to stick this strip box into any of my travel photography kits, and rely on it for shooting on the road or in tight spaces.

googletag.cmd.push(function() {
tablet_slots.push( googletag.defineSlot( “/1005424/_dPSv4_tab-all-article-bottom_(300×250)”, [300, 250], “pb-ad-78623” ).addService( googletag.pubads() ) ); } );

googletag.cmd.push(function() {
mobile_slots.push( googletag.defineSlot( “/1005424/_dPSv4_mob-all-article-bottom_(300×250)”, [300, 250], “pb-ad-78158” ).addService( googletag.pubads() ) ); } );

The post Review: Westcott Rapid Box 10×24″ Strip Light by Suzi Pratt appeared first on Digital Photography School.


Digital Photography School

 
Comments Off on Review: Westcott Rapid Box 10×24? Strip Light

Posted in Photography


Countdown to PIX 2015: Cristina Mittermeier and advocating for Earth

26 Sep

With a week and a half until PIX 2015, we’re taking the opportunity to introduce you to some of our talented re:FRAME speakers. Cristina Mittermeier’s resume is long, but it’s easy to see the trend. Over a 20 year career, she’s focused her energy on a number of conservation projects. Read more

Articles: Digital Photography Review (dpreview.com)

 
Comments Off on Countdown to PIX 2015: Cristina Mittermeier and advocating for Earth

Posted in Uncategorized


Synchronicity

26 Sep

“Synchronicities are expressions of the dreamlike nature of reality.” I’m learning that the world is not what I here-to-fore believed.  There are clues that have led me to this new […]

 
Comments Off on Synchronicity

Posted in Uncategorized


25. September 2015

26 Sep

Das Bild des Tages von: G. Speck

Creamy-Morning-©-G-Speck-21520417252

Im Ausblick: Polizisten fotografieren, Statistiken und Thomas Hoepker.
kwerfeldein – Fotografie Magazin | Fotocommunity

 
Comments Off on 25. September 2015

Posted in Equipment


Epson introduces quartet of SureColor large format printers, new extra-dense UltraChrome HDX ink-set

26 Sep

Epson has announced that it will be selling four new printers for the professional market starting in November this year. The 24″ and 44″ models are designed for photographers, artists and graphic designers, and offer extended color gamut via improved 8- and 10-ink systems. Read more

Articles: Digital Photography Review (dpreview.com)

 
Comments Off on Epson introduces quartet of SureColor large format printers, new extra-dense UltraChrome HDX ink-set

Posted in Uncategorized


Miniature Museum: Scaled Scenes with Jaw-Dropping Details

26 Sep

[ By Steph in Destinations & Sights & Travel. ]

miniature museum 1

Before special effects went digital with CGI, part of the magic of movie making included artists laboring over tiny scaled-down sets, creating little worlds that look totally real until a normal-sized human hand appears in the scene. One museum in France lets visitors explore over 100 such sets, each standing out for its incredible realism. At Musée Miniature & Cinéma in Lyon, you can gaze upon these miniatures as well as a collection of over 300 full-scale movie props.

miniature museum 11

miniature museum 8

miniature museum 2


miniature museum 13

Painstaking attention is paid to textures and weathering in the miniature scenes, like a kitchen with cooking implements smaller than sewing needles, peeling floor tiles and grimy windows. A thick layer of dust covers the floor of a brick-lined underground storage space.

miniature museum 5

miniature museum 3


miniature museum 6

miniature museum 4

A dimly-lit hair barber shop boasts photos of Elvis on the walls, with stained towels crumpled on the counters. The lighting is half of the magic, often coming in through windows or illuminating only one small section of a scene so the rest remains shadowy and mysterious.

miniature museum 14

miniature museum 12

miniature museum 10

miniature museum 9

Pick up a magnifying glass and examine the museum’s 1,000-piece collection of arts and crafts in miniature, including stringed instruments, origami, micro paper art and other tiny delicate creations. Then, move on to the Cinema Collection, which “unveils all the tricks that are used by cinema magicians” like masks, prop guns and robotic dinosaurs. Walk onto scaled sets that are somewhere between miniatures and full-size, which made train crashes and spaceship scenes a lot easier to film.

miniature museum 15

miniature museum 16

The Musée Miniature & Cinéma is owned and curated by Dan Ohlmann, himself a famed miniaturist responsible for many of the scenes that can be found within the museum. You can even go ‘backstage’ to watch him and other miniature artists work on commissioned pieces and restore artifacts from famous films, like the giant Alien Queen body from the movie Alien vs. Predator.

Share on Facebook


[ By Steph in Destinations & Sights & Travel. ]

[ WebUrbanist | Archives | Galleries | Privacy | TOS ]


WebUrbanist

 
Comments Off on Miniature Museum: Scaled Scenes with Jaw-Dropping Details

Posted in Creativity


RED unveils RAVEN, a lightweight and portable 4K camera

26 Sep

RED has launched its new RED RAVEN camera. The model offers 4K recording at 120fps and 2K recording at 240fps using an 8.8 megapixel RED DRAGON image sensor. The new model is one of RED’s smallest and lightest cameras at 3.5lbs, making it suitable for handheld and drone use. Read more

Articles: Digital Photography Review (dpreview.com)

 
Comments Off on RED unveils RAVEN, a lightweight and portable 4K camera

Posted in Uncategorized


Weekly Photography Challenge – Red

26 Sep

Color is a great tool in the art of composition. Using strong colors like red can make for powerful images, when done well.

Don2g

By don2g

Sebastian Rieger

By Sebastian Rieger

Weekly photography challenge – red

This week is your chance to find something red and create a composition around it.

Peter Kaminski

By Peter Kaminski

Gonzalo Iza

By Gonzalo Iza

HannaPritchett

By HannaPritchett

Share your images below:

Simply upload your shot into the comment field (look for the little camera icon in the Disqus comments section) and they’ll get embedded for us all to see or if you’d prefer upload them to your favourite photo sharing site and leave the link to them. Show me your best images in this week’s challenge. Sometimes it takes a while for an image to appear so be patient and try not to post the same image twice.

googletag.cmd.push(function() {
tablet_slots.push( googletag.defineSlot( “/1005424/_dPSv4_tab-all-article-bottom_(300×250)”, [300, 250], “pb-ad-78623” ).addService( googletag.pubads() ) ); } );

googletag.cmd.push(function() {
mobile_slots.push( googletag.defineSlot( “/1005424/_dPSv4_mob-all-article-bottom_(300×250)”, [300, 250], “pb-ad-78158” ).addService( googletag.pubads() ) ); } );

The post Weekly Photography Challenge – Red by Darlene Hildebrandt appeared first on Digital Photography School.


Digital Photography School

 
Comments Off on Weekly Photography Challenge – Red

Posted in Photography