RSS
 

Archive for August, 2015

How to Use Figure to Ground Art Theory in Photography

27 Aug
1 Light figure on a dark ground

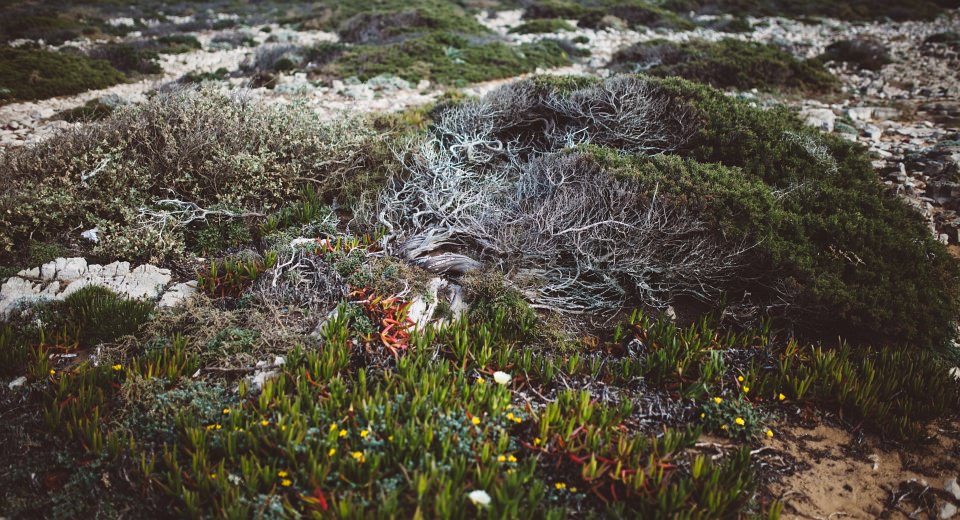
Light figure on a dark ground, Florence, Italy © Adam Marelli

What is figure to ground?

Why can you recognize an amazing photograph but struggle to produce one? Sure there are better cameras, advanced lighting techniques, and endless theories on composition, but very often the root of the problem lies in a simple concept that is often missed. In three words, we can sum up almost every cover of Vogue, National Geographic, and the New York Times – Figure to ground.

What is this term, what does it mean, and where does it come from? Figure to ground is one of the most important, and easily overlooked concepts, in photography. It’s not a rule, it’s not a law – it is a tool, and a very powerful tool at that. Once you learn it, it will become a part of every picture you take, no matter what type of camera you use.

If you were ever curious to see masterful use of figure to ground, try revisiting the photographers you already love like Steve McCurry, Richard Avedon, or Henri Cartier-Bresson. They all use it, some more elegantly than others. Figure to ground acts like an anchor in a photograph, holding the viewer’s eye inside the frame.

2 Dark figure on a light ground

Dark figure on a light ground, Florence, Italy © Adam Marelli

It goes by many names

Figure to ground has a multitude of names; subject to background, figure separation, foreground to background, and the list goes on. To simplify, figure to ground is the most descriptive and easiest to say, which is why artists have favored it for centuries.

3 Light figure on dark ground

Light figure on dark ground, Berlin, Germany © Adam Marelli

A starting point

When it comes to describing visual tools in the written language, firm definitions are always a problem. Consider the following definition a starting point, not an immovable scientific definition.

Figure to ground is the visual relationship between objects and the space they occupy. We live in a 3D world, but your photographs are a 2D translation. When the third dimension of depth disappears, you end up with a problem that has plagued artists since they started scrawling on cave walls, how do you create a picture of the 3D world with only two dimensions?

Figure to ground allows your brain to determine shapes, sizes, distance and other optical illusions that exist in photography (it also applies to drawing, painting, and other 2D arts, but for this article the focus is on photography and how you can use it successfully).

4 Dark figure on a light ground

Dark figure on a light ground. Berlin, Germany © Adam Marelli

Where did it come from?

The idea of figure to ground comes from drawing and painting. It forms the basic grammar of the visual language. Think about it, how can you see a shape on a piece of paper? It is visible because it is a black line on a white page. Seems obvious right, but what is that phenomenon called? It is called figure to ground. Imagine if we wrote in white ink on white paper – everything would be invisible.

The same thing applies to photographs. In order for your photograph to be legible, we must be able to see the object against the background. Artists have worked with this concept for centuries and developed elegant solutions to figure to ground as a deliberate, but subtle, technique for making pictures.

5 Light figure on a dark ground

Light figure on a dark ground, Matera, Italy © Adam Marelli

How to practice it

The first step in practicing figure to ground is to condition your eye by looking at good examples. If you want to be a great photographer, study master painters and how they use figure to ground. You can do this on the internet, in a book, or at a museum. Pick the one that is easiest for you.

TECHNIQUE 1: The Book

Pick up a book on a famous Renaissance artist, like DaVinci, Raphael, or Michelangelo. Setting aside whether you like their work or not, the way to use art to your advantage is to master the tools of successful artists, and apply them with your own unique touch. Lay a piece of tracing paper over the page and be sure to cover the whole picture. Can you still see the subject? If yes, there is good figure to ground. If the subject seems to disappear into the background then no, the figure to ground is weak.

TECHNIQUE 2: The Museum

If you wear glasses, this will be even easier. Go to a museum and find a painting. Following DaVinci’s advice on viewing distance, stand three times the height of the painting away from it (example: if the painting is five feet tall, stand 15 feet away). Now squint at the painting until it is all blurry, or simply remove your glasses. Can you still make out the major shapes in the painting. If yes, there is good figure to ground. If the subject seems to disappear into the background then no, the figure to ground is weak.

6 Light figure on a dark ground

Light figure on a dark ground. Kyoto, Japan © Adam Marelli-8

TECHNIQUE 3: The Computer

If you prefer to use technology, here is a technique you can do in Shotoshop. Pull a picture into Photoshop. Select Filter > Box Blur > set the pixels at 15 pts. You will end up with a blurry version of the picture. Can you still make out the major shapes in the painting? If yes, there is good figure to ground. If the subject seems to disappear into the background then no, the figure to ground is weak.

TECHNIQUE 4: Your Photography

Try any of the techniques above with your own photographs. If there is not strong figure to ground in your picture, play closer attention to the backgrounds when you shoot.

Camouflage

What if you never learn figure to ground, what will happen? Will it be impossible for you to ever make a good picture? No, of course not. But when you understand why some pictures work better than others, and what tools to use at the right time, you will enjoy photography much more. It relieves the anxiety of, “Will I get the shot?”. When you have a toolbox full of resources, it becomes easier to create consistently powerful pictures.

If you would like to know what the opposite of figure to ground is, look no further than camouflage. Camouflage is designed to obscure objects in space. It is the direct opposite of figure to ground. If the goal is to blend in, then use camouflage – if the goal is to pop out, use figure to ground. It is your choice.

7 Dark figure on a light ground

Dark figure on a light ground. Matera, Italy © Adam Marelli

Tools are not rules

Photography is an artistic expression. It might be your break from everyday life, the pressures of work, or the hidden talent you want to explore. Whatever role photography plays for you, the idea to take away is that photography is not a rule book. BUT – and this is a big BUT, there are tools involved. You can use a tool the way it was intended and achieve amazing things, or you can spend your life using a chisel as a fork and wonder why eating is so painful.

Think of your photography like a toolbox; it might have a hammer, a chisel, a screwdriver and a wrench. You might use more than one tool at a time, and all tools will not be used for every job. Your role as the photographer is to know how to use each tool at the appropriate time to reach the desired effect. Otherwise you might end up hammering screws and painting nails.

8 Dark figure on a light ground

Dark figure on a light ground. NYC, USA © Adam Marelli

Developing subtlety

Where do you go from here? Here’s an assignment that will be very helpful:

1. Find 20 examples of figure to ground in paintings
2. Find 20 examples of figure to ground in photography
3. Go take 10 pictures of light figures on a dark ground
4. Go take 10 pictures of dark figures on a light ground

Once you practice this enough it will become like a reflex. Please share your comments and images below.

googletag.cmd.push(function() {
tablet_slots.push( googletag.defineSlot( “/1005424/_dPSv4_tab-all-article-bottom_(300×250)”, [300, 250], “pb-ad-78623” ).addService( googletag.pubads() ) ); } );

googletag.cmd.push(function() {
mobile_slots.push( googletag.defineSlot( “/1005424/_dPSv4_mob-all-article-bottom_(300×250)”, [300, 250], “pb-ad-78158” ).addService( googletag.pubads() ) ); } );

The post How to Use Figure to Ground Art Theory in Photography by Adam Marelli appeared first on Digital Photography School.


Digital Photography School

 
Comments Off on How to Use Figure to Ground Art Theory in Photography

Posted in Photography


26. August 2015

27 Aug

Das Bild des Tages von: spcknmgnt

Details von bodennahen Pflanzen.

Im Ausblick: Heidenau, Obdachlose in London und Brustbügeln.
kwerfeldein – Fotografie Magazin | Fotocommunity

 
Comments Off on 26. August 2015

Posted in Equipment


Palette’s Cube sampler allows photographers to accurately match color

27 Aug

Australian company Palette has announced a sampling device that can read the color of items it is placed on, allowing photographers to match the exact chromatic values when processing images in Photoshop. Read more

Articles: Digital Photography Review (dpreview.com)

 
Comments Off on Palette’s Cube sampler allows photographers to accurately match color

Posted in Uncategorized


Why Every Photographer Should Use a Manual Focus Lens

27 Aug

Your camera is smart. It has processors that are able to run algorithms, for near instantaneous adjustments to compensate for lighting conditions and changing environments. I’m a professional lens reviewer, and tend to complain if a lens/camera combination takes more than a split second to achieve accurate autofocus. But the reality is that most modern camera/lens combinations achieve accurate autofocus remarkably fast. Modern DSLRs can pretty much see in the dark, and still focus reasonably well with a near absence of light, and their performance at extremely high ISO settings is phenomenal.

Yes, your camera is most certainly smarter than your father’s, but the question is, are you a smarter photographer than your father?

Dustin Abbott DPS MF 15

Could it be that the wizardry of modern processors, sensors, and autofocus motors (AF) cocoon modern photographers from what actually happens in the process of taking photos? And, in doing so keep us from having to learn some of the essential basics of photography that could make us better? Here is why I think every photographer should spend some time with a manual focus only lens.

Aperture

A press release for a modern lens will say something like, “Nine rounded aperture blades.” That means next to nothing to most modern photographers for one simple reason – they will never see those blades. All they will ever see is the glass within the barrel of their lens. The reason for this is simple: lenses with an automatic iris aperture (the camera sets the aperture electronically), focus with the lens wide open (aperture blades withdrawn), and only stop down to the chosen aperture in the split second when that the shot is taken. It is pretty amazing how quickly this all happens, when you stop and think about it.

Most lenses produced for Canon EF mounts (excluding Samyang/Rokinon lenses along with a few non-mainstream models) have an auto iris aperture control. Even Zeiss manual focus lenses in Canon (ZE) mounts have automatic irises, and Samyang/Rokinon is retooling many of their lenses with AE versions with auto aperture control. Put simply, very few modern lenses in a Canon mount have an actual aperture ring. Nikon shooters get a few lenses with manual aperture rings (for some reason Zeiss lenses include one on Nikon [ZF] mounts.)

Auto aperture iris control is great for convenience. Just twist the dial on your camera (often in third stop increments) and select the aperture you want, or even let the camera choose it for you in an auto mode. It’s quick and painless.

The downside, of course, is that the actual significance of what is happening when that iris is opened wide or closed down is often lost upon modern photographers. We can talk about “stopping down” a lens or the advantage of a wide aperture prime, but until you have actually seen the difference in an aperture iris you won’t have a full sense of what that really means. Take a look at this series from the new Rokinon 50mm f/1.4.

When you actually see that aperture closing down you really get a sense of the difference between the f-stops and how much more light gathering there actually is at wide apertures. This series starts at f/1.4 and goes to f/8 – see how much difference the aperture size makes in the amount of light entering the camera?

Dustin Abbott DPS MF 8

Dustin Abbott DPS MF 9

Dustin Abbott DPS MF 10

Dustin Abbott DPS MF 11

Dustin Abbott DPS MF 12

Dustin Abbott DPS MF 13

Dustin Abbott DPS MF 14

My wife is an intelligent woman. She even has a pretty decent eye as a photographer, and has taken some great photos. But despite having been married to a gear guy since 1997, and having a hundred or so lenses going in and out of our house, she still to this day often gets confused about aperture. It can be confusing, as the logic (due to the way that f-stops often get reported) is backwards. Bigger numbers mean smaller apertures -and that seems backwards. There is no mistaking this with a manual focus lens with a manual aperture ring – you can physically see the aperture iris shrinking as you stop the lens down (choose a smaller aperture size – larger f-stop, like f/11 etc).

More photographers would get what aperture numbers really mean in terms of light gathering, if they physically saw the aperture blades close down or open in their lenses.

Light Gathering

Most cameras have a standard focusing screen, that does not show the true depth of field. This, added with the fact that the camera typically focuses with the lens wide opened, means that you often don’t get a sense of how much less light is available when the lens is stopped down (f/4-f/16, for example) or how much more is available at large apertures (f/1.2-f/2.8). Most DSLRs have a DOF (depth of field) preview button somewhere, but it is often in an obscure location and rarely gets used by many people. For this reason many photographers have never seen the true depth of field of any of their wide aperture lenses, or any other lens for that matters. This changes when you use a manual focus lens (particularly with a focus screen that shows true depth of field). More on this in a moment.

Yes, it is a pain when the viewfinder is quite dark when you have a manual aperture lens mounted and stopped down to, say, f/8. That’s the reason that modern lenses and cameras don’t show you this in your viewfinder. But it also means that you aren’t being forced to learn what f/8 really means in terms of light gathering. You also don’t see how much more light is available, or how much more shallow the depth of field is with a large aperture. You don’t really think about your aperture setting at the time of capture, resulting in a loss of creativity because your mind isn’t forced to visualize what aperture means to the shot.

But beyond this, manually selecting your aperture really helps you to mentally dial in the relationship between aperture and depth of field. The fact that you have to think about selecting the aperture, and see a difference in the viewfinder, in both the depth of field and the amount of light, helps you to realize how shallow depth of field shots (with a large aperture) and large depth of field shots (with a small aperture) are going to turn out. I have learned how to mentally visualize how depth of field is going to affect a scene so much more because of using manual aperture lenses. Here is a series from the Zeiss Planar T* 50mm f/1.4 lens. It starts at f/1.4, f/2, f/2.8, and then finally shows f/4. Notice the huge difference this makes to the degree in which the background is blurred.

Dustin Abbott DPS MF 1

Dustin Abbott DPS MF 2

Dustin Abbott DPS MF 3

Dustin Abbott DPS MF 4

The large aperture shots are much more attractive, and give a better three dimensional effect to the image. You probably won’t always shoot with manual focus lenses, but using one will help train your brain to visualize your shots more effectively and artistically.

Depth of Field and Focus

It is quite a revelation to use a wide aperture, manual focus prime, with a focusing screen like an EG-S that shows true depth of field. At close to medium distances you can actually watch focus travel from one thing to another, and subjects pop into focus. It really helps you think about storytelling as a part of your imagery. When you think about what you want in focus, it means that you have become intentional about what you want your viewer to see.

Many cameras have AF point spreads that are not wide enough to reach the edges of the frame. Manual focus lenses remove that limitation, and I am more likely to take an image with my subject in focus in an extreme corner when I use one. The rule of thirds for composition is a great starting tool, but sometimes rules are made to be broken. Take a look at this shot of a family games night. The cards are in the extreme bottom corner. Your eye goes there first, but then considers the whole out of focus scene beyond. Your brain allows you to mentally fill in the blanks, and image possibilities, rather than just a looking at a scene.

Dustin Abbott DPS MF 7

Many macro photographers have learned to choose to use manual focus at those very fine distances. It is often challenging to place an AF focus point right where you need it (particularly when using a tripod), but manually focusing allows you to simply focus until what you need to be in focus is sharp. I’ve heard a lot of people fuss over the focus speed of some macro lenses, including the amazing EF 100mm f/2.8L IS. All I can say is that you need to use a manual focus macro lens sometime. Using the Zeiss Makro-Planar in either a 50mm or 100mm focal length helps you to realize how much the macro range adds to the focus possibilities of such a lens. There are so many extra focus points! Using a manual focus macro lens will certainly help you appreciate the AF on macro lenses, and will also help you understand why the AF focus (distance) limiter switch is there and how to properly use it.

Dustin Abbott DPS MF 6

Dustin Abbott DPS MF 5

Learning to focus with a manual focus lens will help your mind to understand how to better use autofocus lenses (particularly those with focus limiters).

In Conclusion

We live in a high-paced world. We want everything to be faster and easier. But great art is rarely created is rarely created in a rush. When I am shooting professional event work and weddings, I tend to use image stabilized, wide aperture, zoom lenses. They are big and heavy, but they are extremely flexible and deliver great results. I need speed in those situations, but some of my most creative shots in my catalogue have been taken with manual focus lenses. I slow down and become more creative. Some of my most critically acclaimed images have been taken with manual focus lenses, both inexpensive and expensive ones.

If you have been guilty of doing most of your photography in a rush, do yourself a favor a get yourself a manual focus lens (even a cheap one). If you want a cheap option, grab yourself an SMC Takumar 55mm f/1.8, and an adapter to your mount of choice. You can probably get a lens and an adapter for under $ 100. It takes some amazing pictures, and will open a world of appreciation for some of the lenses from another era. It will probably also make you a better photographer.

Even better is the SMC Takumar 50mm f/1.4, or if you want to use a value oriented modern manual focus lens, try one in your favorite focal length from Rokinon or Samyang (same thing, just rebranded lenses). You’ll find a number of reviews of different ones on my website. If you are willing to spend more and want the finest optics and image quality available, Carl Zeiss makes some of the best lenses period. They tend to be mostly manual focus, and I’ve had the privilege of using and reviewing many of them.

Once you learn how to take good pictures with a manual lens, shooting with your modern gear will seem easier than ever, and you might even use it more creatively. These are just a few reasons why every photographer should spend some time with a manual focus only lens.

googletag.cmd.push(function() {
tablet_slots.push( googletag.defineSlot( “/1005424/_dPSv4_tab-all-article-bottom_(300×250)”, [300, 250], “pb-ad-78623” ).addService( googletag.pubads() ) ); } );

googletag.cmd.push(function() {
mobile_slots.push( googletag.defineSlot( “/1005424/_dPSv4_mob-all-article-bottom_(300×250)”, [300, 250], “pb-ad-78158” ).addService( googletag.pubads() ) ); } );

The post Why Every Photographer Should Use a Manual Focus Lens by Dustin Abbott appeared first on Digital Photography School.


Digital Photography School

 
Comments Off on Why Every Photographer Should Use a Manual Focus Lens

Posted in Photography


Hoya HD3 lens filters claim to be 4x stronger than optical glass

27 Aug

Kenko Tokina USA recently announced the Hoya HD3 series UV and Circular Polarizer lens filters. According to the company, the filters are 4 times stronger than optical glass, and offer a 99.7 percent light transmission rate. Read more

Articles: Digital Photography Review (dpreview.com)

 
Comments Off on Hoya HD3 lens filters claim to be 4x stronger than optical glass

Posted in Uncategorized


Crossing the Divide: 10 Totally Atypical Bridge Designs

26 Aug

[ By Steph in Architecture & Public & Institutional. ]

bridges infinite

Bridges aren’t just a means of passing from one place to another along a linear path; they might offer a place for strangers to converge, provide a mostly decorative function or go nowhere at all. These highly unusual bridge designs aren’t packed with cities or vertical gardens, but they do turn conventional bridge typologies on their heads, whether they’re made entirely of compressed glass sheets, built by robots or held aloft by helium balloons.

3D-Printed Steel Bridge for Amsterdam

bridges 3d 1

bridges 3d 2

bridges 3d 3

Amsterdam startup MX3D aims to build a 3D-printed metal bridge for the center of the city, incorporating complex geometries and employing the help of multi-axis industrial robots equipped with 3D printing tools and developed software. Designer Joris Laarman says, “I strongly believe in the future of digital production and local production, in ‘the new craft,’ This bridge will show how 3d printing finally enters the world of large-scale, functional objects and sustainable materials while allowing unprecedented freedom of form. The symbolism of the bridge is a beautiful metaphor to connect the technology of the future with the old city, in a way that brings out the best of both worlds.”

Cirkelbroen Bridge by Olafur Eliasson

bridges circkelbroen 1

bridges cirkelbroen 2

bridges cirkelbroen 3

Stretching across a canal in Copenhagen, the new Cirkelbroen Bridge by Olafur Eliasson provides a vantage point and meeting place for pedestrians. Five posts echo the masts of ships above circular platforms, honoring the location’s nautical history. “In my art, I work with transient materials – such as wind, fog or flowing water,” says Eliasson. “It has been wonderful to have the opportunity to make a structure such as the Cirkelbroen Bridge, which embodies this transience – the changing of the weather and how this helps to create the waterfront atmosphere – but a bridge which has a long, stable life ahead of it at the same time.”

Nomanslanding Bridge

bridges mobile domed

bridges mobile domed 2

bridges mobile domed 3

A dome on a fenced platform in the middle of the Rhine, this structure looks nothing like a conventional bridge, and it doesn’t work like one, either. A collaboration between five artists for an annual festival, ‘nomanslanding’ wasn’t made for the purpose of crossing the water, but rather uniting visitors from opposite shores in a symbolic gesture. The two halves retract into separate spaces or come together to form a united, chapel-like space of contemplation. “This walk-on installation is an attempt to bridge the divide separating us from strangers and to facilitate a meeting on common ground,” say the artists. “A space is created with a unique atmosphere in which people may reflect with each other on history, memories and experiences.

The Infinite Bridge

bridges infinite

bridges infinite 2

bridges infinite 3

Created for this year’s Sculpture by the Sea festival, the ‘Infinite Bridge’ by Danish practice Gjøde & Povisgaard Arkitekter offers an entirely new way to experience the coastal landscape, jutting out over the surface of the water. Positioned just barely above the surface, the bridge has the potential to either stand several meters over the water or disappear in it altogether depending on the tide.

Helium Balloon Bridge

bridges balloon 2

bridges balloon

If crossing this bridge makes you feel nervous that the whole thing might suddenly fly away, you’re not being paranoid. Held aloft by three massive helium balloons, the only thing keeping it from drifting into the sky are a few tethers. Artist Olivier Grossetête installed the surreal featherweight attraction in Tatton’s Japanese Garden in the UK. A previous work, ‘Pont Suspendu,’ actually elevated the bridge into the air above Château Ferry Lacombe in France.

Next Page – Click Below to Read More:
Crossing The Divide 10 Totally Atypical Bridge Designs

Share on Facebook


[ By Steph in Architecture & Public & Institutional. ]

[ WebUrbanist | Archives | Galleries | Privacy | TOS ]


WebUrbanist

 
Comments Off on Crossing the Divide: 10 Totally Atypical Bridge Designs

Posted in Creativity


The Winners of Summer Landscape Photo Contest

26 Aug

In these sentimental late August days, we’re excited to announce the winners of the Summer Landscape Photography Contest. Thank you for your submissions and votes! So which photos has evoked most emotions in our jury members and readers? Who has won amazing prizes from Defrozo, Digital Photo Mentor, PhotoTraces and other respected sponsors? Let’s find it out right now! And Continue Reading

The post The Winners of Summer Landscape Photo Contest appeared first on Photodoto.


Photodoto

 
Comments Off on The Winners of Summer Landscape Photo Contest

Posted in Photography


Serious zoom: Sony Cyber-shot RX10 II shooting experience

26 Aug

We’ve been toting around the Sony RX10 II for a little while now, testing its ability to capture 4K video, high speed stills and super slow motion video clips. And while a superzoom may not be DPReview writer Dan Bracaglia’s first choice for his favored rock-and-roll and street subjects, he ultimately came around to the impressive capabilities of this camera. Read more

Articles: Digital Photography Review (dpreview.com)

 
Comments Off on Serious zoom: Sony Cyber-shot RX10 II shooting experience

Posted in Uncategorized


Ke yi ma? – Im Gespräch mit Oliver Rockwell

26 Aug

© Oliver Rockwell

Ein Beitrag von: Robert Herrmann

Es muss nun schon einige Jahre her sein, als ich das erste Mal auf Oliver Rockwells Flickrstream stieß. Seither verfolge ich mit Begeisterung seine Dokumentation des alltäglichen Lebens in China und Vietnam.
kwerfeldein – Fotografie Magazin | Fotocommunity

 
Comments Off on Ke yi ma? – Im Gespräch mit Oliver Rockwell

Posted in Equipment


Hands-on: Leica claims fastest in the world for its new CMOS S (Type 007)

26 Aug

Announced last September, Leica’s medium format S camera presents a number of key changes that bring it up to date with the latest models from its main competitors. Although the S Type 007 retains the same pixel-count as the previous Type 006, the company has switched from its traditional CCD sensor to a CMOS unit. It also claims the title of world’s fastest framerate in its class. We spent a little time getting to know the S Type 007. Read more

Articles: Digital Photography Review (dpreview.com)

 
Comments Off on Hands-on: Leica claims fastest in the world for its new CMOS S (Type 007)

Posted in Uncategorized