Das Bild des Tages von: sabek_r

Im Ausblick: Der Zauber von Polaroids, chromatische Aberrationen entfernen und Making-ofs.
kwerfeldein – Fotografie Magazin | Fotocommunity
Das Bild des Tages von: sabek_r
Im Ausblick: Der Zauber von Polaroids, chromatische Aberrationen entfernen und Making-ofs.
kwerfeldein – Fotografie Magazin | Fotocommunity
 |
|||
These hot summer days make us want to jump in a lake (or pool – or river – or ice chest) to keep cool. But let’s face it, wet cameras make for sad photographers.
We’ve been packing our gear in our favorite waterproof cases to document our summer adventures. Our pals Margo and Sara just took a few out for a test drive float down the river.
Check out their camera-filled kayak adventure and pick up some near/in/on/under water photography tips along the way …
(…)
Read the rest of Kayaking with Cameras: Keep your Gear Dry in Watery Situations (431 words)
© Erin for Photojojo, 2015. |
Permalink |
No comment |
Add to
Keep your Gear Dry in Watery Situations”>del.icio.us
Post tags:

Unser erster Award war ein voller Erfolg! Wir sind froh und auch ein bisschen stolz auf unsere großartigen Gewinnerbilder. Zur Erinnerung: Das Thema unseres Awards war „Träume“ und Ihr hattet zwei Wochen Zeit, Bilder einzureichen.
kwerfeldein – Fotografie Magazin | Fotocommunity
[ By WebUrbanist in Architecture & Cities & Urbanism. ]

Danish firm BIG Architects has a feasible strategy for converting four iconic smokestacks in the center of London into a series of gigantic pedestrian-powered Tesla coils. These would be the tallest of their kind and their visual effect would be nothing short of stunning, generating arcs of energy to bridge between the 300-foot-high towers at predetermined times.

Bjarke Ingels Group was commissioned to create a sizable public plaza space adjacent to the disused building as part of a larger redevelopment plan, but announced during a lecture that they had much larger design ambitions in mind. Going public with this plan may have come as something of a shock to their client, who had not yet be apprised of the scheme. In defense of the architects: they wished to make sure what they were proposing was actually possible before any announcement. “We’re working with experts in Tesla coils, looking into how to incorporate it into the chimneys so essentially we might celebrate the transformation from carbon footprint to human footprint.”

Currently, the world’s largest Tesla coils are in the 100-foot-high range, so depending on how much of each tower was turned toward this function, these could conceivably become the tallest coils ever constructed (in addition to being the highest-reaching).

Piezoelectric pavement would slowly generate energy from those passing through the square (estimated at 50,000 people per day), which would be collected and deployed in periodic bursts. “We imagine it like Big Ben, when the clock strikes the hour, we can have this celebration of human energy and human life.”

The two pairs of towers are extremely tall relative to their surroundings and arguably an iconic part of the neighboring urban landscape, jutting up out of a power plant complex that is nearly a century old. The Battersea Power Station will be rebuilding the chimneys regardless, so it is just a matter of whether they will adopt this enhancement in the process. Already populated with colorful enhancements and unusual architecture, bolts of electricity arcing across the sky would still certainly stand out in London’s bright nighttime cityscape (tesla coil image by Clarence Risher).

It sounds at best far-fetched and at worst frightening, at least at first, but this unique water-based energy station is already under construction and is …
Click Here to Read More »»
![]()
The iconic central cooling tower has been turned into a swing ride and climbing wall, but the re-purposed complex as a whole features over a dozen attractions …
Click Here to Read More »»

The words ‘Nazi power’ have taken on a new meaning in Hamburg, Germany as an abandoned bunker formerly equipped with anti-aircraft turrets has been …
Click Here to Read More »»
![]()


[ By WebUrbanist in Architecture & Cities & Urbanism. ]
[ WebUrbanist | Archives | Galleries | Privacy | TOS ]

Adding texture to photographs was happening long before the invention of Photoshop and other editing programs. In the days of the darkroom, we would scratch negatives with pins, sand paper them, stain the photographic paper with fixer before exposing, layer two negatives on top of each other in the enlarger, or push our film ISO to increase grain. These days, with editing programs being our digital darkroom, we simply have yet another way of adding texture to photographs.
In digital photography terms it’s simply another layer added to your photograph in an editing program, usually an image of some sort of textural surface, such as paper, wood, concrete, etc., but anything at all can be a texture. They can be photographed, scanned or even made in Photoshop.
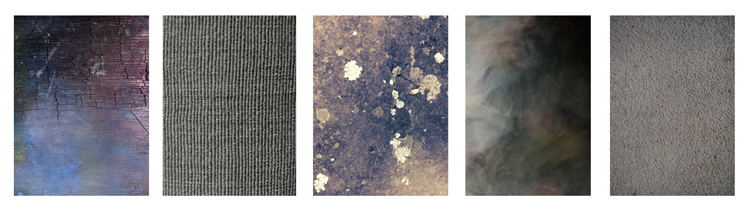
Some examples of textures. A friend’s work bench, a close-up of my lamp shade, a mossy rock, fog from a smoke machine, and some very ugly carpet.
With the right texture overlay, and application of it, you can add an extra level of depth and feeling to your photograph. You can use them for anything – from adding a vintage or grunge look to your photographs, to creating fine art pieces.
One of the best uses is to rescue a photograph that just isn’t quite working. I’ve been told no texture overlay will save a terrible photograph. While this is true for the most part, sometimes it can transform an otherwise unusable image to something more promising.
A texture can transform an otherwise unusable image into something more promising.
Textures can be added to almost any kind of image. If you’ve ever downloaded a photography app for your Smartphone, you have most likely had them add a texture with the app’s built-in filters.
If you’ve ever used a filter on a mobile phone app, you have probably already had textures added for you.
You don’t need to create your own texture to get started. There are many pre-made, free textures available on the internet. A quick Google search will bring up a bunch of free texture sites. But not all textures are created equally, or usable legally. You need to look for textures that are a decent size and resolution, a 200px/72dpi texture over a 3200 px/300dpi image probably isn’t going to work so well.
You’ll also want to make sure the texture has the right copyright permissions. Sites like deviantart.com have many stock textures offered free by their artists for personal use. These artists ask that you simply return the favor by sending them a link to the image you created using their work. Other sites like freetstocktextures.com offer their images copyright free for personal and commercial use, as long as you aren’t reselling the texture images themselves.
Creating your own textures is as simple as taking a photograph. Why do that, when you can download free ones? Because it’s fun, your work is then completely all yours, and you can tailor your textures to suit your images. For example; if you’re photographing skateboarders at a skate park, you could also gather some shots of the concrete they skate on, or graffiti around the place to create original textures that work with, and possibly add to, the story of your subject matter.

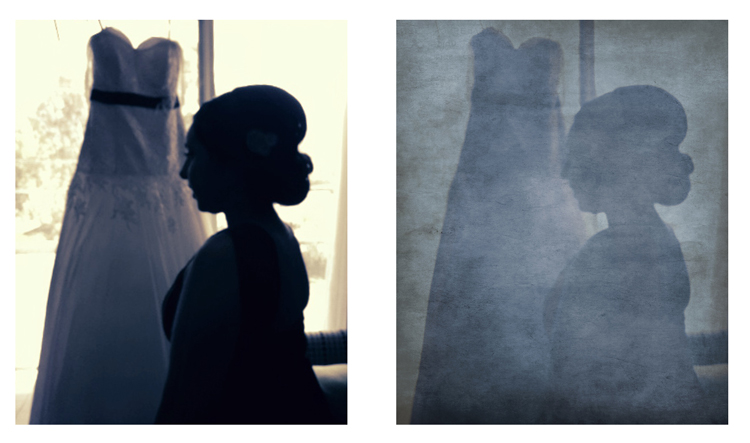
Textures can add a bit more of a story to your images.
The image above is of my daughter asleep after a day at the beach (many years ago) combined with texture of the water I took that day, to add to the story and memory of the day, and give the photo an extra dream like feel.
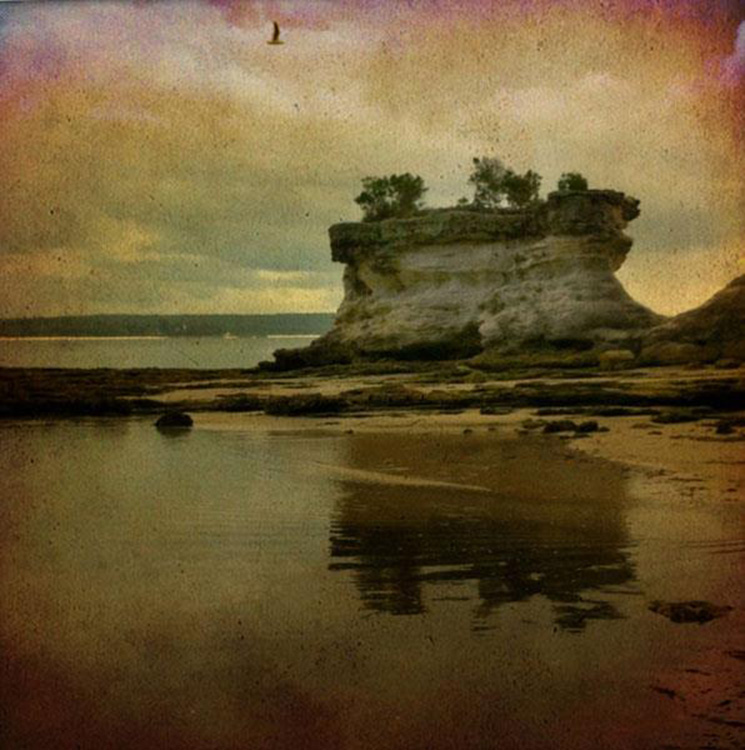
Below is the first texture I created, one that I still use years later. It was created by scanning the bottom of an old baking tray. Scanning works well for textures of papers and other small flat surfaces.

Scanned texture from an old baking tray.
The baking tray texture was used in the image of the cello player at the beginning of this article, in combination with a manuscript image of the music she played on the day. I also used it in the image below; one of a series of images created in collaboration on album artwork with Canadian singer songwriter Sora. The texture was used to tie all the photographs in the album together even though some were taken by other photographers. Yet another use for textures!

Textures can be used to tie a series of images together.
You don’t need to understand complex Photoshop processes to create a texture quickly and easily. Here are a few simple steps to create a basic texture in a few minutes:
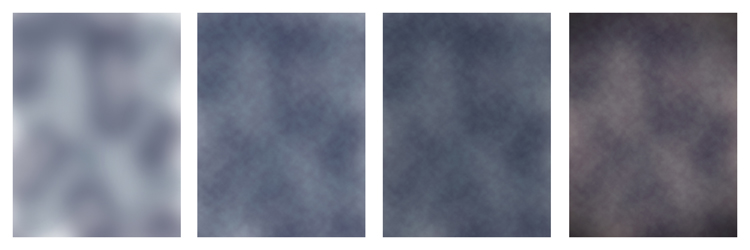
Paint in some colors, add Render Clouds Filter, some contrast, then some colour and vignette. Easy!
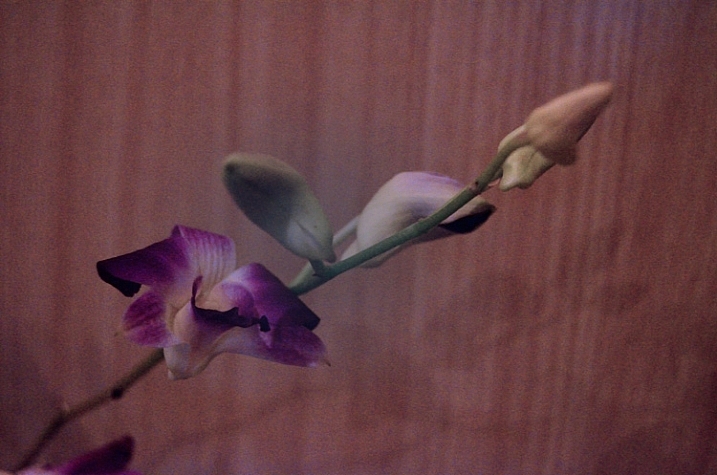
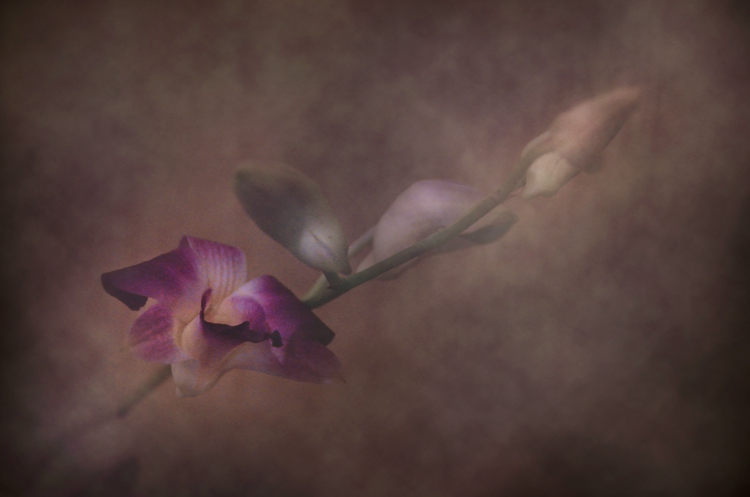
Instead of a Render Clouds you could use the Blur Tool to swirl your colors around, or try some of the other filters in Photoshop to get different effects. I tested it out on what was originally a rather terrible photograph of this orchid.
The texture, plus a few color adjustments and a warming photo filter, and it’s a whole different image.
While it does look a little like something you might see on your Facebook stream with a positive affirmation written across it in an awful font, it took me less than five minutes to do for this demonstration to show you how simple it can be to create a texture from scratch.

It is really very easy to apply your texture. There are some more technical articles on adding textures here on dPS, but here is a quick guide to get you started.
Click and drag your texture thumbnail in the Layers palette over onto your original image. Your texture becomes layer 1 in your original image’s Layer palette. Choose your level of transparency with the Opacity Slider and use Free Transform Tool to move the texture about. Turn it around, enlarge or stretch. See where it sits best.
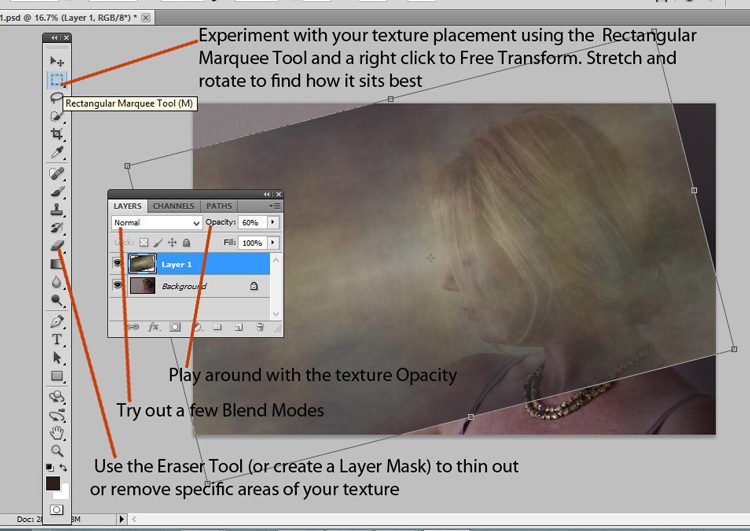
Then it’s simply fine tuning the Opacity, maybe putting Eraser Tool on a low opacity and painting out unneeded parts of the texture. Alternatively use a layer mask to paint out some areas, as well as back in, if you accidentally paint out too much.
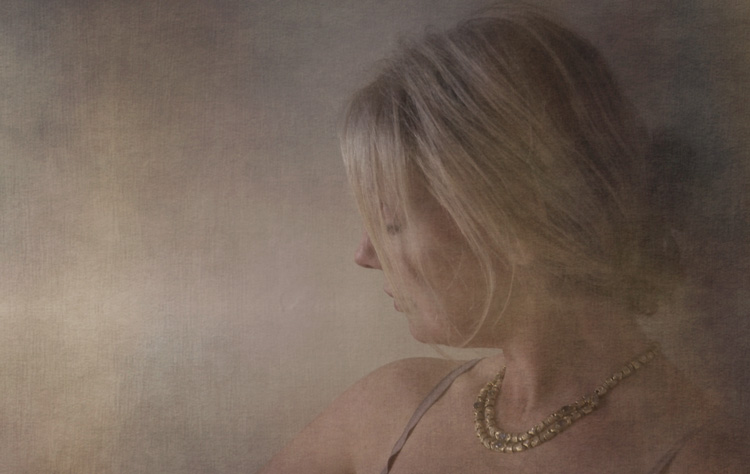
Have fun with it and experiment. Try a few different layer blend modes, add multiple textures, or add the same texture image a few times, perhaps with each layer having a slightly different hue. There are no rules.
Have you created a texture that you love? Share it and its use (your images) in the comments below.
googletag.cmd.push(function() {
tablet_slots.push( googletag.defineSlot( “/1005424/_dPSv4_tab-all-article-bottom_(300×250)”, [300, 250], “pb-ad-78623” ).addService( googletag.pubads() ) ); } );
googletag.cmd.push(function() {
mobile_slots.push( googletag.defineSlot( “/1005424/_dPSv4_mob-all-article-bottom_(300×250)”, [300, 250], “pb-ad-78158” ).addService( googletag.pubads() ) ); } );
The post Beginners Guide to Creating and Applying Texture Overlays Using Photoshop by Lea Hawkins appeared first on Digital Photography School.
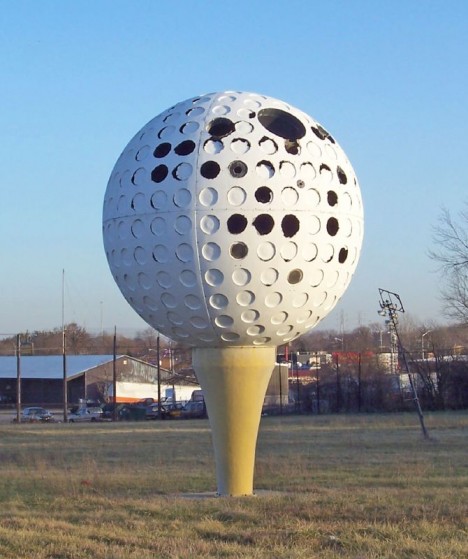
[ By Steve in Abandoned Places & Architecture. ]
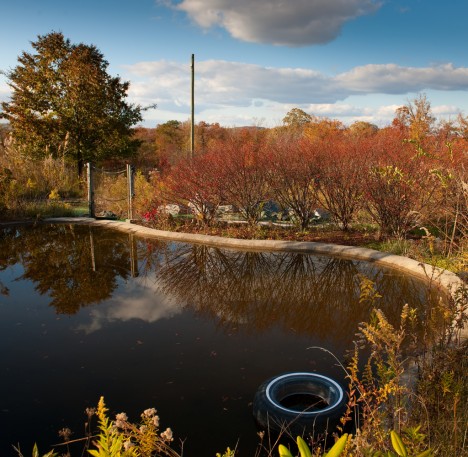
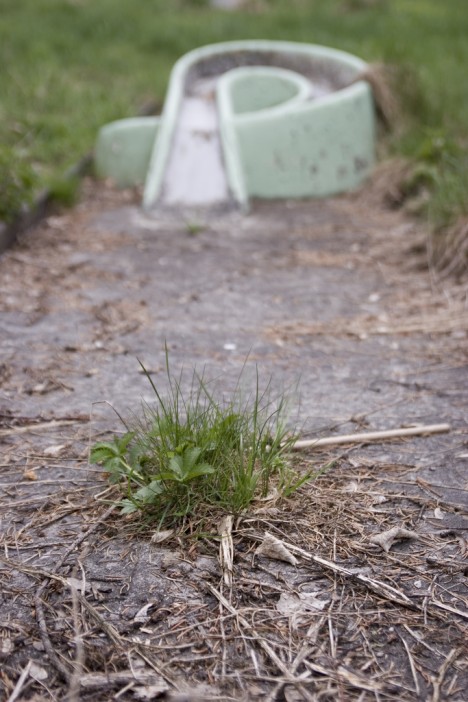
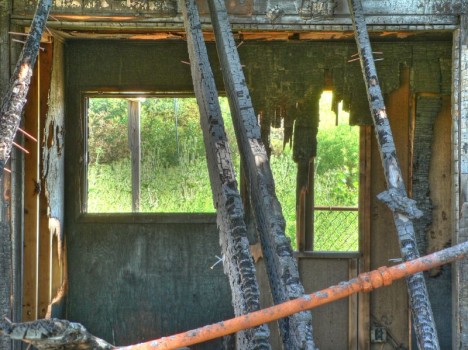
Most miniature golf courses have 9 or 18 holes per course. These dozen abandoned courses, on the other hand, have more holes than Blackburn, Lancashire.
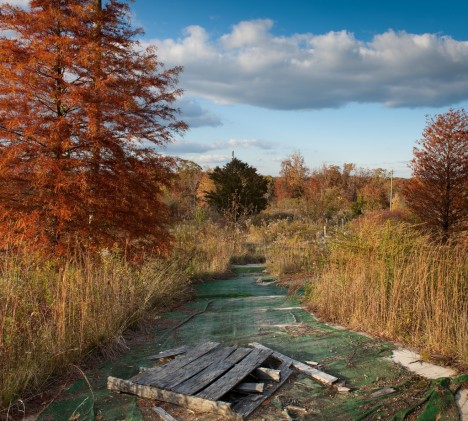
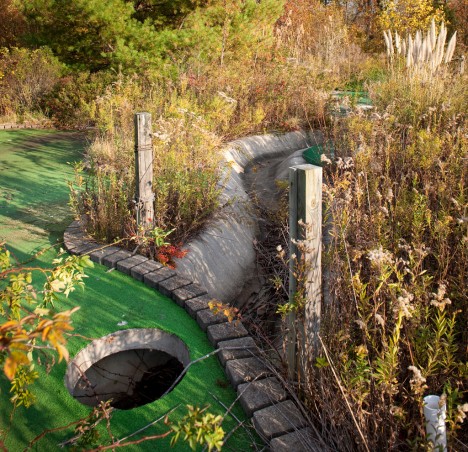

Flickr user Tom Faulkner (tom faulkner photographs) has apparently done the impossible by turning an abandoned miniature golf course into an oasis of breathtaking beauty. The course is located somewhere in Maryland and though the artificial greens and fairways still reflect hints of their former verdant glory, the true glory of Faulkner’s images comes courtesy of Mother Nature in all her autumnal glory.
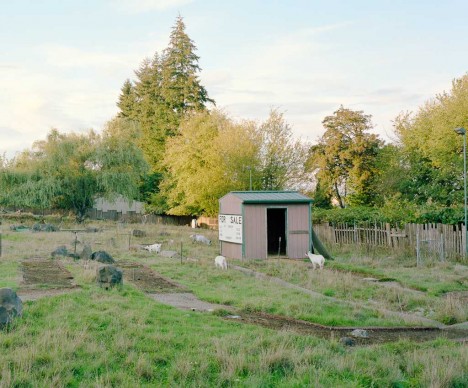
It’s so annoying when a perfectly good miniature golf course closes its doors and drifts into deterioration and decay. In fact, one might say it really… gets our goat. Kudos to Flickr user Isaac Sachs, who snapped the currently “now serving as a goat pasture” status of the former Scappoose Mini Golf in September of 2013.

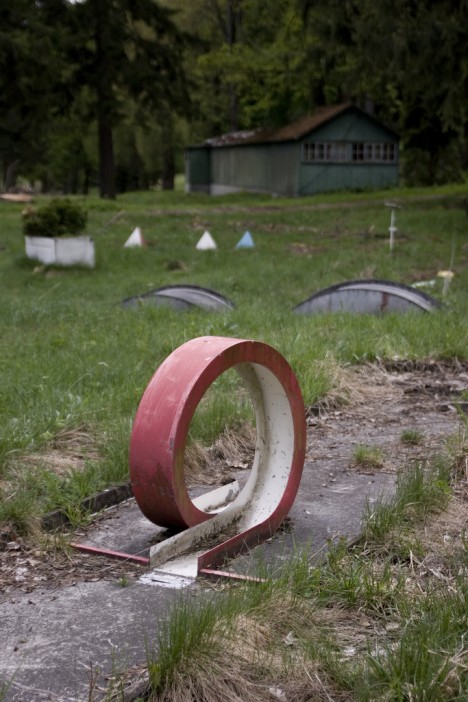
Flickr user bertolino captured this baaadly overgrown and abandoned miniature golf course on May 2nd of 2009… hey, don’t they have goats in Europe?
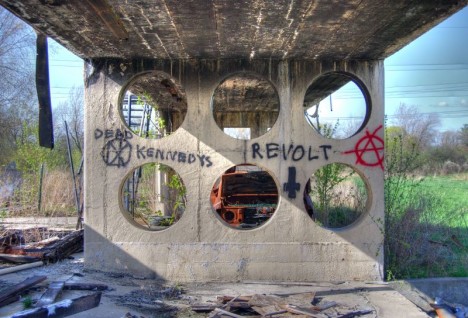
Dead Kennedys; D K; decay… coincidence? We think not! Flickr user Retinal Fetish brings us these post-apocalyptic images taken in 2006 and 2007 at Willow’s Miniature Golf in Milwaukee, Wisconsin. The graffiti’d divider wall looks a little like swiss cheese – gray and moldy swiss cheese but hey, beggers can’t be choosers. Hopefully it won’t attract giant rats.

No ifs, no ands and above all no putts. These 12 abandoned miniature golf courses are as silent as the 18th at Augusta when the green jacket’s on the line.
Click Here to Read More »»
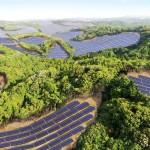
Derelict putting greens will be put to greener uses in Japan, where an abandoned golf course near Kyoto is being converted to the area’s largest solar …
Click Here to Read More »»

Easy come and easy go (just like their product), hot dog stands like these abandoned frankfurter kiosks are the fly-by-night black sheep of the fast food trade.
Click Here to Read More »»
![]()
[ By Steve in Abandoned Places & Architecture. ]
[ WebUrbanist | Archives | Galleries | Privacy | TOS ]
Das Bild des Tages von: Marta Bevacqua, Modell: Alessandra Barbieri

Im Ausblick tauchen wir heute unter.
kwerfeldein – Fotografie Magazin | Fotocommunity
If you’ve ever wanted to photograph a bottle (beer, wine, soda, ever water) and make it look like they do in the magazines or advertisements you’ll want to watch this!
In this video tutorial Lee Morris from Fstoppers shows how to light a beer bottle, step by step, one light at a time. See what each is doing as he adds them one by one. Check it out and scroll down below the video to get links to some of the gear he mentions in the video.
Things mentioned in the video:
Want to see more beverage images – have a look here.
googletag.cmd.push(function() {
tablet_slots.push( googletag.defineSlot( “/1005424/_dPSv4_tab-all-article-bottom_(300×250)”, [300, 250], “pb-ad-78623” ).addService( googletag.pubads() ) ); } );
googletag.cmd.push(function() {
mobile_slots.push( googletag.defineSlot( “/1005424/_dPSv4_mob-all-article-bottom_(300×250)”, [300, 250], “pb-ad-78158” ).addService( googletag.pubads() ) ); } );
The post How to Light a Beer Bottle – a Video Tutorial by Darlene Hildebrandt appeared first on Digital Photography School.
Fujifilm announced the XF 90mm F2 in May, adding a 137mm equiv. focal length to its X-system’s arsenal. We’ve been spending some quality time outdoors with the 90mm, take a look at how it performs against real-world subjects. Read more
Articles: Digital Photography Review (dpreview.com)

Wir wünschen Euch einen wunderschönen Sonntag. Wir wollen dieses Mal auch gar nicht lange drum herum reden: Holt Euch ein Heiß- oder Kaltgetränk Eurer Wahl, macht es Euch gemütlich und genießt unsere monatliche Videoauswahl.
kwerfeldein – Fotografie Magazin | Fotocommunity
You must be logged in to post a comment.