RSS
 

Archive for August, 2015

Nikon introduces 24-70mm F2.8 VR, 24mm F1.8 and 200-500 F5.6 FX lenses

04 Aug

Nikon has released three new full-frame lenses, including a prime and both standard zoom and super telephoto zooms. The one that will likely garner the most attention is the replacement for the venerable 24-70mm F2.8. The latest version adds Vibration Reduction, electromagnetic aperture control, a new optical construction and more. Also introduced is a 24mm F1.8 prime and a 200-500mm F5.6 super telephoto. More details

Articles: Digital Photography Review (dpreview.com)

 
Comments Off on Nikon introduces 24-70mm F2.8 VR, 24mm F1.8 and 200-500 F5.6 FX lenses

Posted in Uncategorized


Amazing Aerial Photos of LA and NYC Reveal Urban Geometry

04 Aug

[ By Steph in Art & Photography & Video. ]

Screen Shot 2015-08-03 at 4.55.33 PM

No matter how far and often you might wander around your city, there’s one way you most likely never get to experience it: from above. Approached from directly overhead, the bird’s-eye-view renders virtually any urban scene unrecognizable, reducing landscaped streets and towering skyscrapers to mere shapes within an abstract composition, as if it’s a work of art. And perhaps, for some urban planners, it is. Thanks to photographer Jeffrey Milstein, we can all appreciate New York City and Los Angeles from a new perspective.

Screen Shot 2015-08-03 at 4.56.48 PM

Screen Shot 2015-08-03 at 4.56.41 PM

Screen Shot 2015-08-03 at 4.56.28 PM

Screen Shot 2015-08-03 at 4.56.03 PM

Screen Shot 2015-08-03 at 4.54.55 PM

Captured from a helicopter both at night and during daylight, Milstein’s aerial imagery of these two iconic American cities presents entire neighborhoods as tapestries of geometric shapes. New York’s Stuyvesant Town looks like a bunch of crosses embedded in greenery, and the Statue of Liberty is strikingly jewel-like on its island. 

Screen Shot 2015-08-03 at 4.53.40 PM

Screen Shot 2015-08-03 at 4.53.00 PM


Some of LA’s most posh neighborhoods are unsurprisingly picturesque from above, laid out in their carefully-arranged grids and often centered upon parks. In comparison, the shots of downtown look downright bleak, sort of like you’re looking at a circuit board rather than a full-scale city. The photographs are on display now at New York’s Benrubi Gallery and LA’s Kopeikin Gallery.

Screen Shot 2015-08-03 at 4.53.58 PMScreen Shot 2015-08-03 at 4.54.06 PM

Screen Shot 2015-08-03 at 5.52.30 PM

If looking at the pictures gives you vertigo, good, says Milstein. That’s the effect he’s going for. “That’s exactly what I want. To get a visceral reaction from it,” he told City Lab. 

Share on Facebook


[ By Steph in Art & Photography & Video. ]

[ WebUrbanist | Archives | Galleries | Privacy | TOS ]


WebUrbanist

 
Comments Off on Amazing Aerial Photos of LA and NYC Reveal Urban Geometry

Posted in Creativity


6 Ways to Use Color for Eye Catching Compositions

04 Aug

A painter only needs to look at their palette before applying color to the canvas. Photographers have a different challenge, as they must locate their tones by studying a scene. Of course, this can be easy to bypass when you’re thinking about shadow, highlight, depth of field, shutter speed, and all of the other technical details that go into a photo. Still, as the great painter Kandinsky said, “Color is a power which directly influences the soul.” To use it in your compositions can infuse your work with a new level of sophistication.

1) Background Separation

To maximize the effect of bold colors, you’ll want to start by looking for dark, muted backgrounds. This type of stark contrast will deemphasize the surrounding areas, bringing the viewer’s attention directly to the subject. Of course, mixed lighting can trick even the most sophisticated metering systems. For the most accurate exposure, use the camera’s internal spot meter to take a reading of the brighter part of the scene. By purposely underexposing by approximately half a stop, vibrant colors will take on a deep, rich tonality.

2) Just a Dab of Color

If you want to draw people into your photograph, try including just a small amount of color. This subtle method gives your subject importance by allowing it to stand out from the rest of the frame. These thoughtful compositions are aided by a different approach to photography. Instead of working to add more visual interest, you want to eliminate any competing colors, and simplify the frame. While looking through the viewfinder, check all four corners carefully for distracting elements.

3) Cut the Glare

Each autumn, brilliant displays of fall foliage attract scores of photographers looking for that classic outdoor landscape. Yet, in many of these scenes, the glare of wet shiny leaves will actually detract from the desired color. An inexpensive solution is to add a circular polarizer to your kit. As you rotate the front element of the filter, you’ll actually see the surface reflection disappear to reveal only color. For added warmth you can even adjust the white balance using the cloudy or shade preset.

4) Make it Glow with Backlighting

Of all the directions light can come from, perhaps there’s no finer option than shooting directly into the sun. This is particularly true when working to emphasize color. When lit from behind, your subject will appear to glow. If the contrast is too great, eliminate the sun from the frame. This will make for a more even exposure, while still providing the dramatic benefit of backlighting. If you’re not comfortable with metering manually, take several shots using exposure compensation. Bracketing this way is a quick way to handle an otherwise tricky scenario.

5) Set the Mood

For added impact in your outdoor photography, consider using complementary colors. Although blue and yellow reside on opposite sides of the color wheel, they can be used together with outstanding results. On one side of the spectrum, blue is ideal for creating a quiet introspective mood. Warmer tones however, will infuse your subject with a dynamic energy. Each are effective on their own, but when used simultaneously, the contrast will bring attention to your main subject.

6) Use the Silhouette

During the magic hours around sunrise and sunset, you’ll enjoy a splendid display of color in the sky. Meanwhile, your subject will likely be in heavy shadow. If you properly exposed the subject, the sky would become pale, or even washed out. One simple option to retain the vibrant color is to create a silhouette. This is especially useful with moving subjects when HDR is less than ideal. To do this, simply expose for the sky, and let the subject’s tonality fall to black.

Conclusion

To fine tune your vision, give yourself an assignment where capturing a specific color is the only goal. For example, head out for a photo walk with no specific objective besides seeing and shooting – red. Rather than looking at subjects literally, you will be thinking in color. By studying the world around you with this in mind, you may be surprised at just how many opportunities reveal themselves. With practice, you’ll soon recognize color as an essential element of composition.

googletag.cmd.push(function() {
tablet_slots.push( googletag.defineSlot( “/1005424/_dPSv4_tab-all-article-bottom_(300×250)”, [300, 250], “pb-ad-78623” ).addService( googletag.pubads() ) ); } );

googletag.cmd.push(function() {
mobile_slots.push( googletag.defineSlot( “/1005424/_dPSv4_mob-all-article-bottom_(300×250)”, [300, 250], “pb-ad-78158” ).addService( googletag.pubads() ) ); } );

The post 6 Ways to Use Color for Eye Catching Compositions by Chris Corradino appeared first on Digital Photography School.


Digital Photography School

 
Comments Off on 6 Ways to Use Color for Eye Catching Compositions

Posted in Photography


Updated Kodak Moments app lets you share, edit and print your images

04 Aug

An update to the Kodak Moments app makes it a one-stop-shop for editing, sharing and printing, eliminating the need for a separate app to send images to Kodak’s Picture Kiosks. Read more

Articles: Digital Photography Review (dpreview.com)

 
Comments Off on Updated Kodak Moments app lets you share, edit and print your images

Posted in Uncategorized


Hot Shots: Sony Cyber-shot DSC-RX10 II real-world samples

04 Aug

Sony’s Cyber-shot RX10 II looks a lot like its predecessor, with a similar form factor and the same 24-200mm equivalent F2.8 lens. However, it adds some interesting new technology in the form of a 20MP stacked CMOS sensor, enabling 4K video, 14 fps burst shooting and slow-motion video recording. We recently got our hands on a full-production model – take a look at some initial real-world samples. See gallery

Articles: Digital Photography Review (dpreview.com)

 
Comments Off on Hot Shots: Sony Cyber-shot DSC-RX10 II real-world samples

Posted in Uncategorized


Olympus patent points at sensors with built-in polarizing filter

04 Aug

Olympus has patented a technology that records polarization information on the sensor itself, giving the effect of a polarizing filter but without the light cost. The patent is for a two-layer sensor that records color and brightness information on the top layer, just like a conventional sensor, but then has a second layer that captures information about the polarization of the light arriving at the camera. Read more

Articles: Digital Photography Review (dpreview.com)

 
Comments Off on Olympus patent points at sensors with built-in polarizing filter

Posted in Uncategorized


Tools That Rule: 13 Ways to Work Smarter, Not Harder

04 Aug

[ By Steph in Design & Products & Packaging. ]

tools vector scissors 1

Most of the tools we use have looked the same for decades, if not centuries, but that doesn’t mean they’re optimized to be as useful, convenient and durable as they can be. These clever tweaks on conventional tool designs can be incredibly simple, like adding a ledge to scissor handles for cutting straight lines, or unexpectedly innovative, like an illuminated glove that makes it easy to light whatever you’re working on while freeing up your hand.

Locking Aperture Wrench

tools aperture wrech

The aperture wrench eliminates the storage issues and guesswork associated with having an entire set of wrenches, with an aperture based on that of a camera lens. The metal blades of the aperture close around any given nut and automatically lock into place for perfect custom sizing and a secure fit.

Hoyo Drill

tools hoyo 2 tools hoyo 1

“You could almost keep your drill on the dinner table,” says the designer about the looks of the Hoyo, a sleek black-and-white power drill. In addition to ‘looking like a race car,’ the Hoyo has an optional stabilizer to ensure that you always enter a surface perfectly straight, dial presets to adjust the power depending on the material you’re drilling, and a built-in level.

Ruler Compass

tools compass 2 tools ruler compass

Conventional compasses typically have to be used in conjunction with rulers when you want to draw a circle of a very specific size. This one features a radius display that tells you the size of your circle as you move the leg of the compass

Portable Lighting Tool

tools lighting tools lighting 2

Ultra-portable and easy to recharge either with an outlet or an included mini solar panel, the H9 Portable Lighting Tool is a silicone sheath that wraps around your hand to provide up-close illumination for whatever job you’re trying to complete. You can direct the light exactly where it needs to be, but don’t have to sacrifice the utility of your hand.

Tool Pen by mininch

tool pen

Carrying a set of screwdrivers becomes as simple as carrying a pen with the Tool Pen, a lightweight, compact and ultra-sleek multitool solution with 18 bits. Six can fit inside the tool without making it heavy, and it comes in a variety of metallic finishes.

Next Page – Click Below to Read More:
Tools That Rule 13 Ways To Work Smarter Not Harder

Share on Facebook


[ By Steph in Design & Products & Packaging. ]

[ WebUrbanist | Archives | Galleries | Privacy | TOS ]


WebUrbanist

 
Comments Off on Tools That Rule: 13 Ways to Work Smarter, Not Harder

Posted in Creativity


Enter Summer Landscape Photo Contest, Win Premium Photography Resources!

04 Aug

Summer is a perfect time for travelling and improving your photography skills. Therefore, we decided to run a summer landscape photography contest on Photodoto. Use this great opportunity to challenge your creativity and grow as a photographer. You can win some exciting prizes too! Read on for details. Sponsors and Prizes There are going to be 5 winners in this Continue Reading

The post Enter Summer Landscape Photo Contest, Win Premium Photography Resources! appeared first on Photodoto.


Photodoto

 
Comments Off on Enter Summer Landscape Photo Contest, Win Premium Photography Resources!

Posted in Photography


Fujifilm announces X-T1 IR for infrared photography

03 Aug

Fujifilm has introduced the X-T1 IR, a version of its flagship mirrorless camera designed specifically for infrared photography. The camera captures light from UV, visible, and infrared portions of the spectrum, from approximately 380-1000nm. Everything else is identical to the standard X-T1. Read more

Articles: Digital Photography Review (dpreview.com)

 
Comments Off on Fujifilm announces X-T1 IR for infrared photography

Posted in Uncategorized


Canon EF-S 24mm f/2.8 Pancake Lens Review

03 Aug

In November of 2014, Canon introduced us to its newest member of their low-cost prime lens family, the EF-S 24mm f/2.8 STM pancake lens. Canon gave us the 40mm version in 2012, and hoped to up the stakes by adding a wide-angle version this past year.

Sitting at the extreme end of what can be considered wide-angle, the EF-S 24mm (full-frame equivalent of 38mm on an APS-C sensor) does so in the form of a small, light, and inexpensive prime lens that is easily accessible to all Canon enthusiasts.

24mmPancake

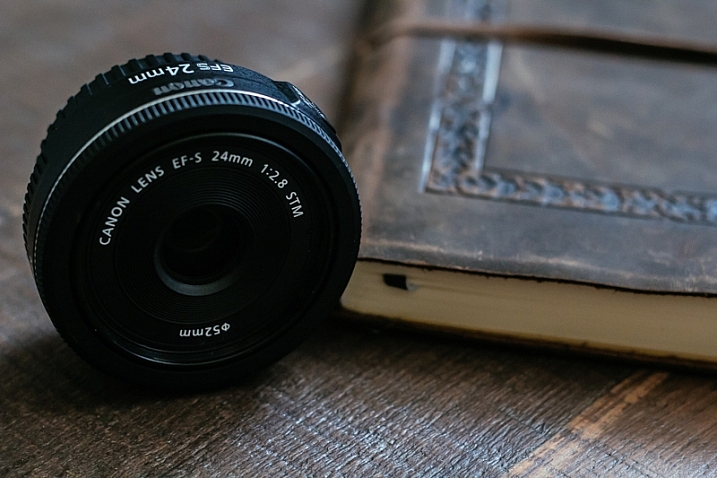
The first features that will strike you about the 24mm are its inconspicuous qualities; the lens is incredibly thin at only 2.75 inches, and weighing under five ounces. Street shooters wanting a wider angle of view will be pleased at how reserved the profile of this glass is, as it makes even a large camera body appear smaller, and less noticeable.

In addition to being visually unobtrusive, the STM (stepping motor) feature of this lens allows for faster, and much quieter autofocusing, compared to the USM (ultrasonic) motor system used on many other lenses. Manual focus is available in full, and Canon maintains this lens is capable of a minimum focusing distance of six inches.

Aperture: f/4.0  Speed: 1/800  ISO: 200

Aperture f/4.0, Shutter speed 1/800, ISO 200

For filter users, the lens uses a standard 52mm fitting, and will accept all filters of that size. Also keep in mind that as this lens is part of Canon’s EF-S line, it cannot be used on full-frame systems, such as the Canon 6D, and will only fit APS-C (crop sensor) cameras.

Aperture: f/4.5  Speed: 1/400  ISO: 250

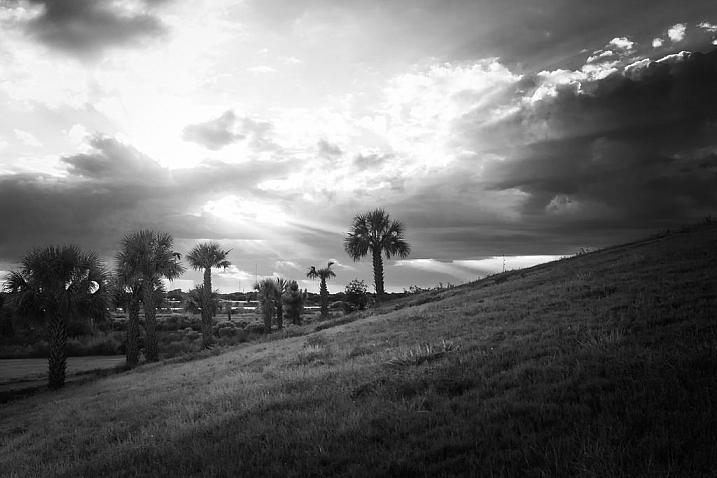
Aperture f/4.5, Shutter speed 1/400, ISO 250

As far as my personal experiences with the lens, they were generally very positive, despite my preconceived worries about image quality that were bolstered by rather mixed pre-release reviews. I was pleasantly surprised to find that the 24mm pancake performed admirably well in this area, giving me very sharp and accurate photos throughout the full range of aperture stops.

Aperture: f/8  Speed: 1/640  ISO: 250

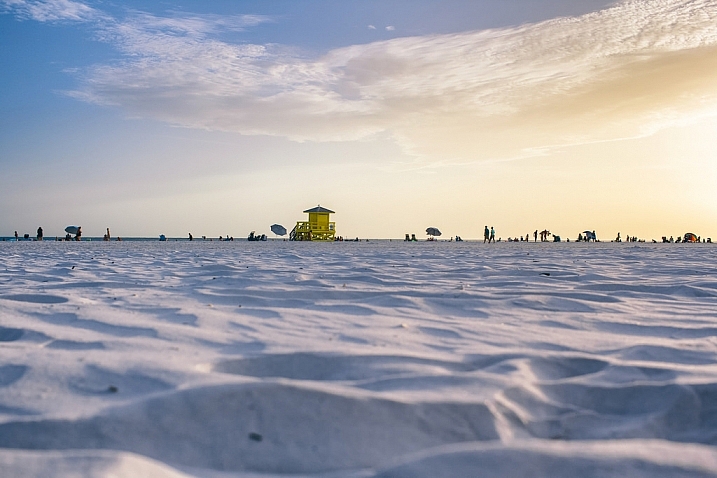
Aperture f/8, Shutter speed 1/640, ISO 250

The shot above showcases the clarity of the 24mm pancake. The beachgoers far to the back of the frame are sharp, details are well-defined, and I was still able to create a soft blur on the sand directly in front of the camera.

Aperture: f/3.2  Speed: 1/2000  ISO: 200

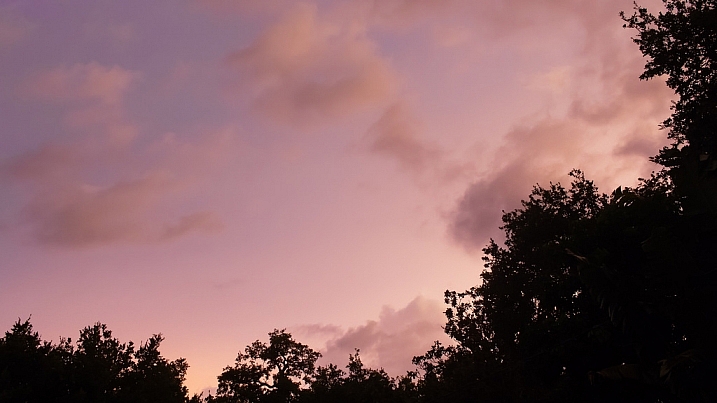
Aperture f/3.2, Shutter speed 1/2000, ISO 200

The image above highlights how well the 24mm pancake handles blurring and bokeh at wider apertures, especially for a wide-angle lens. I usually take this shot with my 50mm f/1.8, but I wanted to see what the 24mm could do. The foreground blurring, sun glare, and porch details were all handled in a pleasant manner.

Aperture: f/8  Speed: 1/200  ISO: 100

Aperture f/8, Shutter speed 1/200, ISO 100

Textures are captured very accurately with this lens, as you can see with the water in the picture above. Ripples and the smoothness of the surface translate well also, and great tonal range helps define the lake from front to back.

Aperture: f/8  Speed: 1/50  ISO: 1250

Aperture f/8, Shutter speed 1/50, ISO 1250

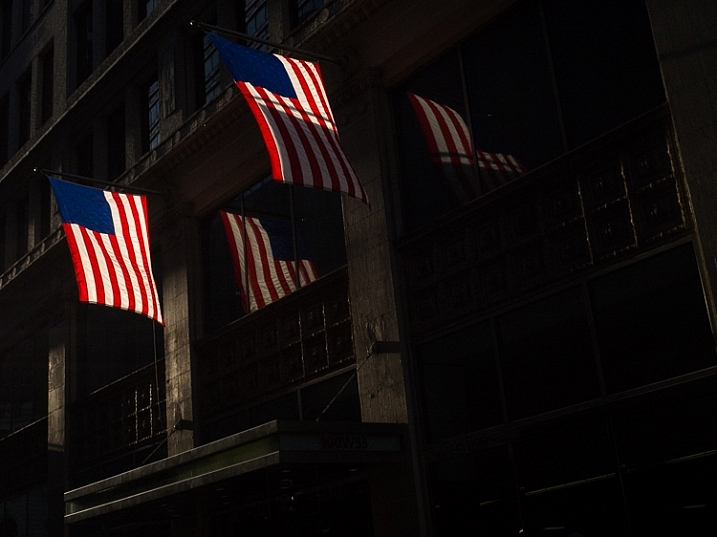
Colors are deep and accurate, as shown in the photo above. Other than sharpness, noise reduction, and a bit of contrast adjustment, this image is as it appears right from the camera. I didn’t have to go crazy with the noise reduction, and had a great looking image even with sensitivity set at ISO 1250.

Obviously, being a wide-angle affair, this lens doesn’t produce bokeh or blurring as easily or smoothly as my 50mm f/1.8. This isn’t an issue as I’m usually doing landscape shots using a smaller aperture.

This little jewel is available (at the time of this writing) for $ 149.00. I’d highly recommend giving this lens a try, especially if you’re in the need of a backup at this focal length, or even an affordable wide-angle starter lens.

Have you shot with the 24mm f/2.8 STM? What did you think? Share your experiences with us below!

googletag.cmd.push(function() {
tablet_slots.push( googletag.defineSlot( “/1005424/_dPSv4_tab-all-article-bottom_(300×250)”, [300, 250], “pb-ad-78623” ).addService( googletag.pubads() ) ); } );

googletag.cmd.push(function() {
mobile_slots.push( googletag.defineSlot( “/1005424/_dPSv4_mob-all-article-bottom_(300×250)”, [300, 250], “pb-ad-78158” ).addService( googletag.pubads() ) ); } );

The post Canon EF-S 24mm f/2.8 Pancake Lens Review by Tim Gilbreath appeared first on Digital Photography School.


Digital Photography School

 
Comments Off on Canon EF-S 24mm f/2.8 Pancake Lens Review

Posted in Photography