RSS
 

Archive for July, 2015

Floatel: Modular Floating Hotel Rooms Provide Portable Privacy

20 Jul

[ By WebUrbanist in Boutique & Art Hotels & Travel. ]

floating hotel main structure

Combining centralized shared spaces like a conventional hotel and the mobility of a catamaran, this award-winning hybrid combines elements of community and seclusion on the water.

floating hotel design

Each individual unit comes with a standard living room, kitchen, bathroom and sleeping loft as well as deck space and a driving area for taking your space around a lake or sea. Meanwhile, the lobby structure bridges the gap between land and water and provides reception, restaurant, event and cafe spaces. Design themes also create a connection between the modules and the whole, including wood slats and white surfaces.

floating hotel room interior

floating hotel living deck

The rear-facing deck provides space for sunbathing and fishing, while also framing uninterrupted views of nature. Side and front windows can be closed off for privacy, or opened when venturing out on the open water with no nosy neighbors around to sneak peaks inside.

floating hotel open water

Designed by Salt & Water, the approach won a 2015 Millennium Yacht Design Awards for innovatively integrating architectural and nautical systems to create a unique experience for guests. Like the Botel, this remains a conceptual design for now, but clearly something is in the water since firms keep coming back to this novel combination of ideas.

Share on Facebook


[ By WebUrbanist in Boutique & Art Hotels & Travel. ]

[ WebUrbanist | Archives | Galleries | Privacy | TOS ]


WebUrbanist

 
Comments Off on Floatel: Modular Floating Hotel Rooms Provide Portable Privacy

Posted in Creativity


Meet PJ:Janette Edition

20 Jul

Name: Janette Crawford

What Do You Do Here? Marketing for our all-new brand Parabo Press, coming very soon!

Favorite Camera: iPhone 6.

Learn Even More About Janette
(…)
Read the rest of Meet PJ:
Janette Edition (82 words)


© laurel for Photojojo, 2015. |
Permalink |
No comment |
Add to
Janette Edition”>del.icio.us

Post tags:


Photojojo

 
Comments Off on Meet PJ:Janette Edition

Posted in Equipment


3 Steps to Professional Looking Headshots Using One Flash

20 Jul

Ideally, every time we take photos of someone, there is a studio full of equipment at our disposal or wonderful sunlight that is perfectly diffused. This, however, is not reality. Usually, the sun is either too faint or too harsh. We don’t always have access to a studio, let alone one full of lighting gear that we can use. Sometimes, we also just don’t have the time to learn a new technique, rent more gear, or find the perfect location. Other times, the subject has very limited availability and locations. Still, we smile through the limitations and do our best to provide professional images every single time.

Do you feel prepared to compensate for these different light conditions that you may be forced to work with, though?

OneFlash-example4

Natural light is always wonderful for any type of portrait, including headshots. Bouncing that natural light around with reflectors or just finding a bright shaded spot all work well. If you have a flash at your disposal, though, you can create even, or dramatic lighting to accommodate headshot needs.

The following three tips will help you create headshots using only one flash to compensate for less-then-perfect lighting conditions:

1. Diffuse, diffuse, diffuse!

When using a flash, the last thing you usually want is for it to LOOK like you used a flash. To do this, you need to find ways to make the light disperse more, reducing any harsh look that it will otherwise produce. There are several ways to do this, and each on their own will help. Combining techniques works best, though.

  • Bounce it – If there’s a wall somewhere to your side, a ceiling within a couple of feet from you, or if you have a reflector of any kind, bounce it. Aim the flash towards the reflector so that it fills in shadows to compensate for any uneven lighting conditions.
  • Aim the flash behind you to help disperse the light –  This may sound counterintuitive, but aiming the flash BEHIND you helps to disperse the light quite a bit. It provides a front light on your subject, but much softer than would otherwise be if the flash were pointed directly at them.
  • Use a diffuser on the flash – Whether it’s a plastic cover, a fabric mini-softbox, a bendable reflector that attaches, or a homemade version of any of the above – a diffuser directly on your flash will instantly soften the light and allow you more versatile light on your subject.
  • Set zoom on flash to the widest setting possible – your flash can be set to adjust to match the angle of view of the focal length lens you are using. However, this can be manually adjusted regardless of the lens you are using. When the flash is set to 70mm, for example, the light will be more narrow and direct than when it is set to 24mm. While this alone doesn’t make a drastic difference, it is another tool to add for further light diffusion.
Left - No flash. Right - Single flash, on-camera, turned to right of subject for fill light.

Left – No flash. Right – Single flash, on-camera, turned to the right of the subject for fill light.

In the before and after photos above, the left image shows the result using only natural light from the window. It’s beautiful light, but not always what you want.

The right photo shows same location, same position, with a single flash used to fill in the shadows. The flash is on-camera and has a flash dome diffuser on it. It’s angled to left of photographer (right of subject) so that it will bounce off walls and ceiling, and manually set at 1/8th power.

2. Use remote triggers

If you have access to remote triggers, play with using the light to add drama or emotion. This alone will give you a studio look and can be done just about anywhere. Be sure that this type of look is appropriate for your subject’s needs, especially since it tends to have a very strong look. For example, the owner of a flower shop may want something that is more natural-looking and shows the outdoors or her shop, while the owner of a tech start-up may like the strong look of dramatic lighting. While each situation is different, a few options for flash placement are:

  • Directly behind client
  • At 45 degrees behind or in front of subject
  • Directly to side of subject
Left - No flash. Right - manual mode, underexposed several stops, single flash towards right of subject.

Left – No flash. Right – manual mode, natural light underexposed several stops, single flash towards right of subject.

The before and after photos above show how to use a single flash to create some dramatic headshots in any indoor situation. The left photo is properly exposing for the space, using natural light only. The photo on the right is manually controlled to greatly underexpose the natural light (so that the background disappears as much as possible), and then a single flash is placed towards right of subject to give concentrated and dramatic light.

3. Manual flash mode

While it is best to always use your flash on manual mode in order to have full control over the lighting, this is an often overlooked method. Manual mode on your flash will allow you to adjust the strength for any situation. Shooting indoors and bouncing the flash? Start your flash strength at 1/8 of full power and adjust from there. Shooting in full sun? Start at 1/2 strength and adjust down as needed. Need a soft bit of shadow to be filled while indoors? Set your flash strength to 1/16 and adjust from there. Note that you will get to know good starting points for different situations, but adjustments are always needed since every situation is unique.

OneFlash-example6

Left is using no flash, outdoors. Right photo is same position and location, using single flash on camera at 1/4th power.

The before and after photos above show you can use a single flash to compensate for shadows in daylight. The left photo shows direct daylight and no flash. The photo on the right is at the same time, same position, same sun condition, but with a single flash at 1/4 power to help fill shadows.

Regardless of what tools you have access to for each photo shoot, a big part of your job as photographers is to be able to adjust to any situation. While having lots of gear at your disposal is handy, it is not always necessary. Oftentimes, the gear you have on hand can do the job you need it to do; all it takes is some thinking outside of the box.

Do you have ways that you create beautiful headshot or portrait lighting on-the-fly? Please share in the comments below.

googletag.cmd.push(function() {
tablet_slots.push( googletag.defineSlot( “/1005424/_dPSv4_tab-all-article-bottom_(300×250)”, [300, 250], “pb-ad-78623” ).addService( googletag.pubads() ) ); } );

googletag.cmd.push(function() {
mobile_slots.push( googletag.defineSlot( “/1005424/_dPSv4_mob-all-article-bottom_(300×250)”, [300, 250], “pb-ad-78158” ).addService( googletag.pubads() ) ); } );

The post 3 Steps to Professional Looking Headshots Using One Flash by Natalia Robert appeared first on Digital Photography School.


Digital Photography School

 
Comments Off on 3 Steps to Professional Looking Headshots Using One Flash

Posted in Photography


19. Juli 2015

20 Jul

Das Bild des Tages von: Chris Zielecki

Ein Mann vor Eisbergen.

Im Ausblick stehen wir heute vor einer Menge Eis.
kwerfeldein – Fotografie Magazin | Fotocommunity

 
Comments Off on 19. Juli 2015

Posted in Equipment


Traffic Chop: 8 Dedicated Stenciled Traffic Lanes

20 Jul

[ By Steve in Architecture & Cities & Urbanism. ]

dedicated car lane
Seems everyone wants their own dedicated traffic lane these days… and it seems they’re getting them! Is white line fever taking over your neighborhood?

Scissors-Lane

White Stripes would make a great band name… oh, wait. Anyway, there’s no point demanding urban authorities cut it out. Car and truck drivers had better get used to sharing the road all official-like, no matter that traffic is certain to suffer in the short term at least. Can’t we all get along, seeing as we’re all getting along in the same direction albeit in varied types of conveyances and at different speeds?

High Textnology

Utah-texting-lane-4

Utah-texting-lane-2

Utah-texting-lane-1

Utah-texting-lane-3

If jay-walking is a crime, shouldn’t text-walking be too? The question is being dealt with, and not always in a tongue-in-cheek manner – let’s call it “raising awareness” since that imparts a resistance to mockery in a “won’t someone think of the children?” kind of way. Only the top boffins at Utah Valley University in Orem, Utah know whether their segregated Walk/Run/Text lanes are serious or not… and what if someone’s walking or running WHILE texting? DOH!

texting-lane-belgium

Then there’s the above “Text Walking Lane” somewhere in Belgium that looks official on first glance but last we heard, English isn’t one of Belgium’s official languages.

‘Boarders Security

Skateboard-Lane-Stencil

OK, so skateboarders are the red-haired children of non-vehicular traffic but don’t they deserve a little lane lovin’ too? No? Maybe you’d prefer they see you hatin’ as they rollin’ on the sidewalk, hmm? At least one ‘boarder has taken measures into his or her own hands, as seen above on a bike trail in Ottawa, Canada’s Centretown.

Next Page – Click Below to Read More:
Traffic Chop 8 Dedicated Stenciled Traffic Lanes

Share on Facebook


[ By Steve in Architecture & Cities & Urbanism. ]

[ WebUrbanist | Archives | Galleries | Privacy | TOS ]


WebUrbanist

 
Comments Off on Traffic Chop: 8 Dedicated Stenciled Traffic Lanes

Posted in Creativity


Improve Your Lighting Skills with a Trip to the Toy Store

19 Jul

You’ve heard it before: Photography is seeing and capturing light. It’s absolutely true, but what’s the best way to learn how to see something that can be infinitely shaped, altered by both environmental factors, and through intentional manipulation? As with most things, there’s a hard way and an easier way.

Learn lighting with toys batman

The hard way entails grabbing your camera and photographing everything you can, in every possible condition, and hoping everything clicks in one magic moment, thereby learning gradually through scattered experience. This works, but it can take an awful lot of time and practice before it leads to any real understanding of various lighting conditions.

The easier method, that this article covers, involves a more structured and goal oriented approach. It can get you looking at light in new ways and push you to the top of the learning curve in a very short period of time.

A trip to the toy store

Because of the studious nature of this exercise, it can seem far less exciting and adventurous than being out and about with your camera. To combat this, I propose using toys as your subjects. Aside from the quirkiness and fun this can add to the exercise, a lot of toys, particularly action figures, have insane amounts of fine details that will really show off any changes in lighting conditions.

Learn lighting with toys ff 2859

Another bonus of using toys for studying light is that if you use a character from a film or game that you know, you already have some idea of cinematic lighting schemes associated with that character, and you will quickly recognize some of them as you move through this process.

What you need to start

  • A camera set on manual mode
  • A tripod
  • A toy
  • A light source (natural or artificial with a modifier of your choice)
  • A reflector
  • A notebook (not required, but taking notes on what works and what doesn’t work never hurts)
  • A macro lens for smaller toys is useful if you have one

Note: I’m using studio strobes for this exercise out of personal preference and ease, as it’s easier to move a light source around a subject than it is to move a subject around a fixed light source such as a window. Strobes also allow you to keep the exposure constant, provided the distance from light source to subject doesn’t change.

Also, please bear in mind that the intent of these exercises isn’t to create a final polished image. You’re simply watching and gaining experience with altering light. However, you can use the images you get from these exercises to build your own reference sheet for lighting effects for various light sources and modifiers.
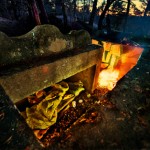
Exercise one

To start off, place your light source directly in front of your subject, pointed down at a 45 degree angle. Work out the correct exposure for your setup and dial it into your camera. These settings won’t change.

Now take your first photo.

Once that’s done, move your light source gradually around your subject, a little bit at a time, and take another photo at each angle. Repeat until you’ve come back to your starting position. Just make sure that your light source stays the same distance from the subject, while still pointed directly at it, each time you move it.

What you’re looking for is a series of images that clearly show how the light is altering as it moves around the toy. You can use these images to study how the light records in a photograph from any of the positions.
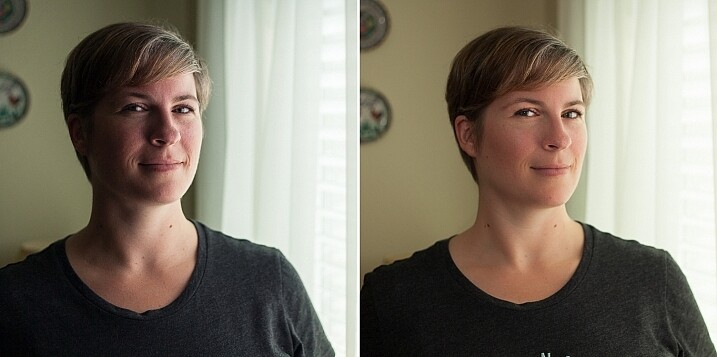
Learn lighting with toys yoshi 2795

Exercise two

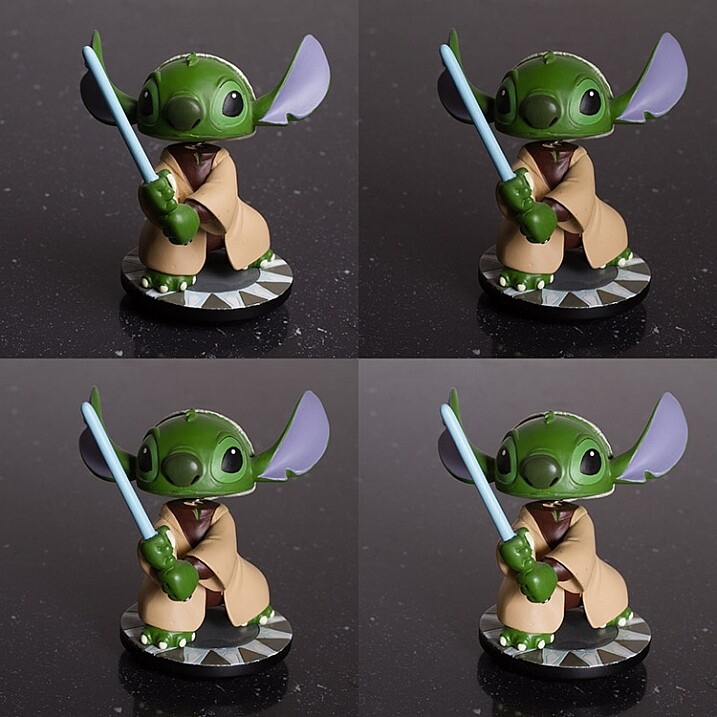
For the second part of this task, start with your light source directly in front of your chosen subject and as high possible. Work out your exposure and take the first photo. This time, move your light source down a few inches, again keeping it pointed directly at your toy. Repeat this until you can’t lower your light source any further. Now, your exposure will probably change this time as your light source gets physically closer to your subject. It’s up to you if you want to calculate a new exposure for each interval.

Learn lighting with toys dalek 2785

Top Left: Highest position of the light source. Bottom Right: Lowest position of the light source.

If you feel inclined, don’t be afraid to take the extra time and repeat this exercise once in each of the vertical positions as well. Doing so will only give you a more complete lighting reference in the end.

Exercise three


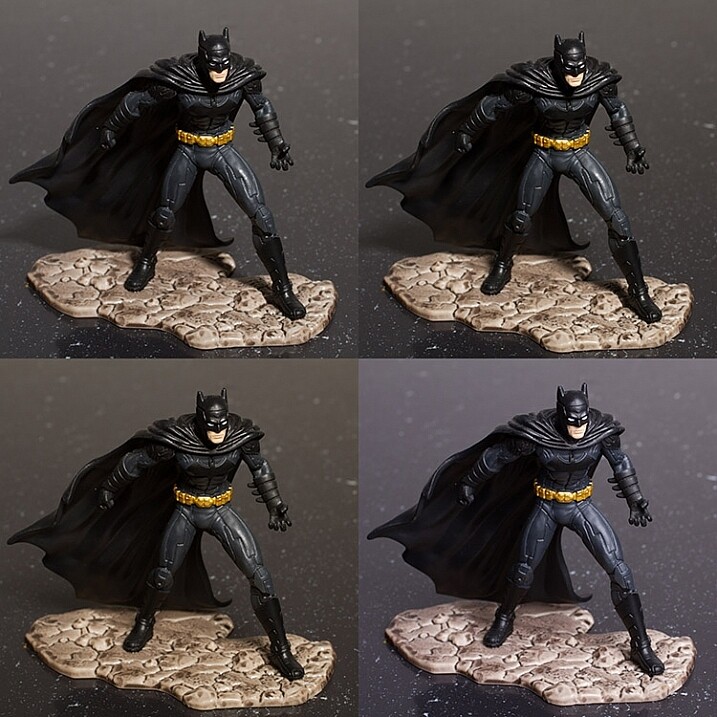
In this step, start with your light source as close to your subject as you can and place it at a 45 degree angle to camera right, pointed down at your subject. Once you have taken your first image, move it backward one foot.

Changing the distance of your light source from your subject is going to alter your exposure settings. By moving it backward, you will have less light falling on your scene. Simply recalculate your exposure and take your second shot. Repeat this until you can’t move your light source any further back.

What you should see as you do this is the light changing in quality. The closer your light source is to your subject, the softer the light. The further your light source from your subject, the harder the light. A lot people tend to have a personal preference on how they prefer their quality of light. Try to use this exercise and see if you can figure out yours.

When you change your modifiers, you may start to notice a shift in the colour temperature as shown in the bottom right image of the example. No two modifiers will be the same in this regard, so it’s always good to know exactly what you’re getting when you use your equipment.

learn-lighting-with-toys-yoda-2890

Top Left: Softbox at 2′ (61cm) away
Top Right: 4′ (1.2m) away
Bottom Left: 6′ (1.8m) away
Bottom Right: 8′ (2.4m) away
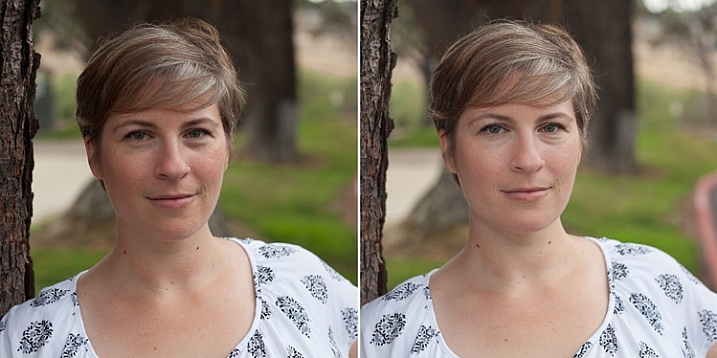
Exercise four

The next step is to start modifying your light; with a reflector in this case. Start with your light source pointed directly at your subject from camera left and above. Calculate your exposure and take a starting image with no modification.

For the next image, put your reflector at camera right, parallel to your light source.

Next, place it directly in front of your subject but as low down as you need to not block your lens and to keep it out of the frame.

Finally, if you can, curve your reflector and hold it at camera right with the centre pointed at 45 degrees from your subject.

Feel free to play around here and take photos with your reflector in as many positions as you can/want. The goal is to observe the changes it makes to the overall images. These changes can be extremely subtle so the more you can observe the better (more you will learn).

Learn lighting with toys ff 2815

Top Left: No reflector. Top Right: Reflector from the right. Bottom Left: Reflector from in front and below the subject. Bottom Right. Reflector curved around the front right corner.
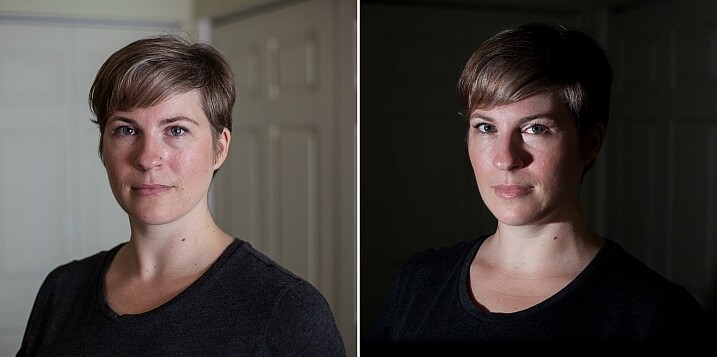
Exercise five

If you have a light source that can be modified with grids or similar (or maybe a window with blinds) it might be advantageous to study the different effects these modifiers provide. If you have a selection of modifiers available, you can use this as an opportunity to study the differences between them in a no pressure environment.

Like exercise one, your light source should be directly in front of your subject and pointed downward at a 45 degree angle. Start with no modifier at all and calculate your exposure and take your first image.

Add each of your different modifiers (softboxes, umbrellas, beauty dishes, etc.) taking a photo at each step. With that, you should have a reference for each of the modifications you can make to a particular light source.

    Top Left: No modifier ( bare bulb)     Top Right: 60 degree reflector     Bottom Left: Beauty dish     Bottom Right: Softbox

Top Left: No modifier ( bare bulb)
Top Right: 60 degree reflector
Bottom Left: Beauty dish
Bottom Right: Softbox

After-matter

By going through these exercises, you will have lit a subject from a huge variety of angles, with a good variety of modifications. From this, you should already start to see which angles are flattering and which aren’t. You may have also spotted ones that have affinity with your own personal tastes.

If you repeat the exercises with any new modifiers you get, as well as in natural lighting conditions at various times a day, then all of this should add together to quicken your understanding of light and how to apply it to your final images without a lengthy trial and error process. From here, you can start to automatically decide how to light or manipulate based on what you’ve learned.

Of course, if you don’t like the idea of using toys, feel free to use food, flowers, people or anything that’s fun and interesting to you!

googletag.cmd.push(function() {
tablet_slots.push( googletag.defineSlot( “/1005424/_dPSv4_tab-all-article-bottom_(300×250)”, [300, 250], “pb-ad-78623” ).addService( googletag.pubads() ) ); } );

googletag.cmd.push(function() {
mobile_slots.push( googletag.defineSlot( “/1005424/_dPSv4_mob-all-article-bottom_(300×250)”, [300, 250], “pb-ad-78158” ).addService( googletag.pubads() ) ); } );

The post Improve Your Lighting Skills with a Trip to the Toy Store by John McIntire appeared first on Digital Photography School.


Digital Photography School

 
Comments Off on Improve Your Lighting Skills with a Trip to the Toy Store

Posted in Photography


Readers’ Showcase: Dale Johnson

19 Jul

As a child Dale Johnson took a trip around the perimeter of the US with his family in a Volkswagen van. That experience may have helped turn him into the eager traveler and photographer he is today. Take a look at his images – you might get inspired to plan your next trip. See gallery

Articles: Digital Photography Review (dpreview.com)

 
Comments Off on Readers’ Showcase: Dale Johnson

Posted in Uncategorized


Die 5 Fotowettbewerbe des Monats

19 Jul

Seifenkistenrennen

Wir sind gerade noch mit der Auswertung unseres eigenen Awards beschäftigt und sehen nach und nach alle eingereichten Bilder an. Aber natürlich gibt es noch viele andere tolle Wettbewerbe, bei denen sich eine Teilnahme lohnt. Eine Auswahl an aktuellen Fotowettbewerben findet Ihr im Folgenden.
kwerfeldein – Fotografie Magazin | Fotocommunity

 
Comments Off on Die 5 Fotowettbewerbe des Monats

Posted in Equipment


How to Make Unique Portraits Using Light Painting

19 Jul

Using the surprisingly simple technique of light painting you can create a wide variety of portrait styles using only a small flashlight as your light source. I should warn you though, light painting of all kinds can be highly addictive. Once you start, you may not be able to stop.

Light painted portrait

Light painted portrait

One of the main things to understand with light painting is that the camera sensor only reads light, if there isn’t any light hitting the person shining the flashlight, they simply do not show up in the image. This allows you to move around in front of the camera while the shutter is open, and gives you ultimate control of what areas of your subject are lit. This is great for portraiture, especially in situations where you might have a complicated background, or one where you only want to light certain sections.

light painting a portrait

Below is a list of what you will need for any light painting, and a guide on how to use the technique specifically for portraiture. For a more detailed information on light painting have a look at this two part tutorial .

What you will need:

A hand held light source. Any cheap flashlight or LED light will do, you can even use your mobile phone.

Tools of the light painting trade

Any small LED or flashlight will do, even your mobile phone.

For light painting a portrait subject a directional beam of light is best, non-directional (or diffused) light will illuminate you as well. Different flashlights give off different types of light. Some have blue cast, which isn’t great for portraiture so you might want to experiment with your white balance, or add a warming filter in post-processing. You can also add color to your light source with cellophane (colored gels) or colored sheer fabric.

Tripod and camera settings

Light painting needs a long exposure, so you will need your camera set up on a tripod. Setting your shutter speed somewhere between 10 and 30 seconds is a good place to start, then play around from there. Your ISO should be at its lowest to avoid the grain (noise) caused by a long exposure.

The cover of darkness

You’ll need a completely dark room or studio, or you can shoot outside at night. If shooting outside, you’ll have to be careful of incidental light, such as street or car lights, overexposing your image. But these things can be used to your advantage in creating interesting backgrounds for your portrait subject.

Light painting a portrait outdoors

Light painting a portrait outdoors

Ready, set, light paint

Have your portrait subject in position and turn all lights out. Shine your light source on your portrait subject to help you get focus. You’ll want to focus on the face, so it’s possibly best to have your subject close their eyes before you shine your light directly into their face.

Note: to keep the focus locked when you press the shutter button, you will either need to switch it to Manual Focus or use back button focus.

Then click the shutter, and try not to trip over anything in the dark as you move in toward your subject. How close you get to your subject depends on your light source strength, how fast you move it, and the effect you are after. You’ll have to experiment, but for a small LED, a few inches from your subject is a good starting point. Keep the torch (flashlight) moving constantly, and pointed away from the lens.

Getting sharp images of people when you are using long exposures usually doesn’t work so well due to people’s inability to sit perfectly still. With light painting, you are only exposing a small part of them at a time, and only for a brief moment, so while it can be a bit tricky with fidgety subjects, for the most part you will be able to get sharp images. Sometimes a bit of motion blur can also be effective.

Making the most of motion blur

Making the most of motion blur

Help your subject stay still during the exposure by letting them know when you release the shutter, and when you are about to shine your light on them. They’ll be in the dark, literally, so they won’t know what you are doing.

Have them take a deep breath in and out just as, or after, you release the shutter. Don’t have them hold their breath, you don’t want them to look strained. Start your light painting with the face so they don’t have to hold their head still for your entire exposure.

Letting your portrait subject have a look at your camera preview can help them to understand what you are trying to do. If they are unfamiliar with the technique, it can seem a bit odd, all this waving a torch in their face in the dark.

You can set a flash to a slow sync so it fires off at the beginning of the exposure (or you can just set your flash to manual mode and fire it using the Test button), sharply lighting your subject, and then move in with your light source or have your model wave it around. Alternatively you can give a quick burst from a studio light.

Slow flash sync combined with light painting

While still technically a light painting portrait this method is more of portrait with some light painting added in as opposed to light painting the portrait subject themselves.

It will probably take you and your portrait subject a few attempts to get the hang of it, but once you’ve got the general idea, and have tested out how your light source plays on your subject, you can then experiment. Below are some ideas to try out.

Creating light trails

Adding light trails

Adding light trails

To get trails of light, shine the torch directly at the lens as you move it. You can move it anywhere, including in front of your subject.

Multiple sources of light

portrait-light-painting08b

In the first image above I’ve used a small LED light to paint the face, and a laser pointer for the red patterns. The laser pointer shines in very short bursts creating the broken lines. In the second image on the right, I put fairy lights in the model’s hair. The subtle movement as I light painted the rest of the model caused the fairy lights to take on the wiggly forms.

Using an iPad or tablet

portrait-light-painting09b

For this effect I downloaded an app for my tablet that lit the screen with a solid block of bright color. The colors could be changed with a slider, so with a few attempts I managed to get coordinated enough to change the colors as I moved the tablet around the subject.

Have fun with movement

portrait-light-painting11b

For both these images I shone the light over the model in one position, then had her move to the side and lit her again. As you can see, two fairly different effects using exactly the same process.

I confess I am thoroughly addicted to light painting portraits. I love that no two shots are alike, there’s plenty of room for getting creative and having happy accidents. You can use it for many styles of portraiture, and it costs basically nothing in lighting gear. So what are you waiting for? Grab a flashlight and get started! Share your results in the comments below.

googletag.cmd.push(function() {
tablet_slots.push( googletag.defineSlot( “/1005424/_dPSv4_tab-all-article-bottom_(300×250)”, [300, 250], “pb-ad-78623” ).addService( googletag.pubads() ) ); } );

googletag.cmd.push(function() {
mobile_slots.push( googletag.defineSlot( “/1005424/_dPSv4_mob-all-article-bottom_(300×250)”, [300, 250], “pb-ad-78158” ).addService( googletag.pubads() ) ); } );

The post How to Make Unique Portraits Using Light Painting by Lea Hawkins appeared first on Digital Photography School.


Digital Photography School

 
Comments Off on How to Make Unique Portraits Using Light Painting

Posted in Photography


Tree Church: Organic Arbortecture Grown from Living Branches

19 Jul

[ By WebUrbanist in Architecture & Public & Institutional. ]

tree church and grounds

‘Built’ may not be the right word for this compelling hybrid of architectural and arborsculptural design (or: arbortecture), featuring a complete chapel with landscaped fences and carefully cultivated gardens on all sides, the primary structure at its heart made from five species of tree.

tree church

Begun by Barry Cox on his New Zealand property just four years ago, the project originated as a private retreat but as word spread he decided to open it up to guest events as well starting this fall – the structure seats 100 people.

tree church interior view

Leptospernum (Copper Sheen) grows up to create the walls while Alnus Imperialis (Cut Leaf Alder) completes the roof, forming a complete canopy above. amelia Black Tie, Acer Globosum, and Thuja Pyramidalis were also employed in the construction process.

tree church entry walkway

Within the main building, a slim steel frame underlies the living components, serving as latticework around which the supporting trunks and branches were able to grow.

tree church gardens

On the grounds around the central structure are a number of other intriguing and interactive elements, including a labyrinth and extensive additional gardens for walking and exploring. The entire site is carefully sculpted and maintained, featuring traditional as well as more novel landscapes.

Share on Facebook


[ By WebUrbanist in Architecture & Public & Institutional. ]

[ WebUrbanist | Archives | Galleries | Privacy | TOS ]


WebUrbanist

 
Comments Off on Tree Church: Organic Arbortecture Grown from Living Branches

Posted in Creativity